AUFSTELLANLEITUNG
19743 Tablet-PC-Halter »Biobased«
BESTIMMUNGSGEMÄSSER GEBRAUCH
- Universeller Tablet-Halter für alle Tablets mit einer Größe von ca. 10" bis 16"
- Besonders geeignet auch für Tablets mit Schutzhülle oder Case bis zu 20 mm
- Mit Tragarm und Klammer zur seitlichen Befestigung an Stativen, Rohren, Stangen
MERKMALE & FÄHIGKEITEN
- Flexibel und solide! Ihr Tablet-PC wird wunderbar in Szene gesetzt
- Gleichermaßen geeignet für Bühne, Heim, Proberaum und Studio
- Die Klemmmechanik (inklusive seitlichem Sicherungswinkel) ermöglicht
-die einfache, effektive und sichere Montage Ihres Tablet-PC.
- Übergreifende Klemmbacken mit integrierter Moosgummiauflage sorgen
-für sicheren Halt, eliminieren Vibrationsgeräusche und schützen das Tablet-Gehäuse
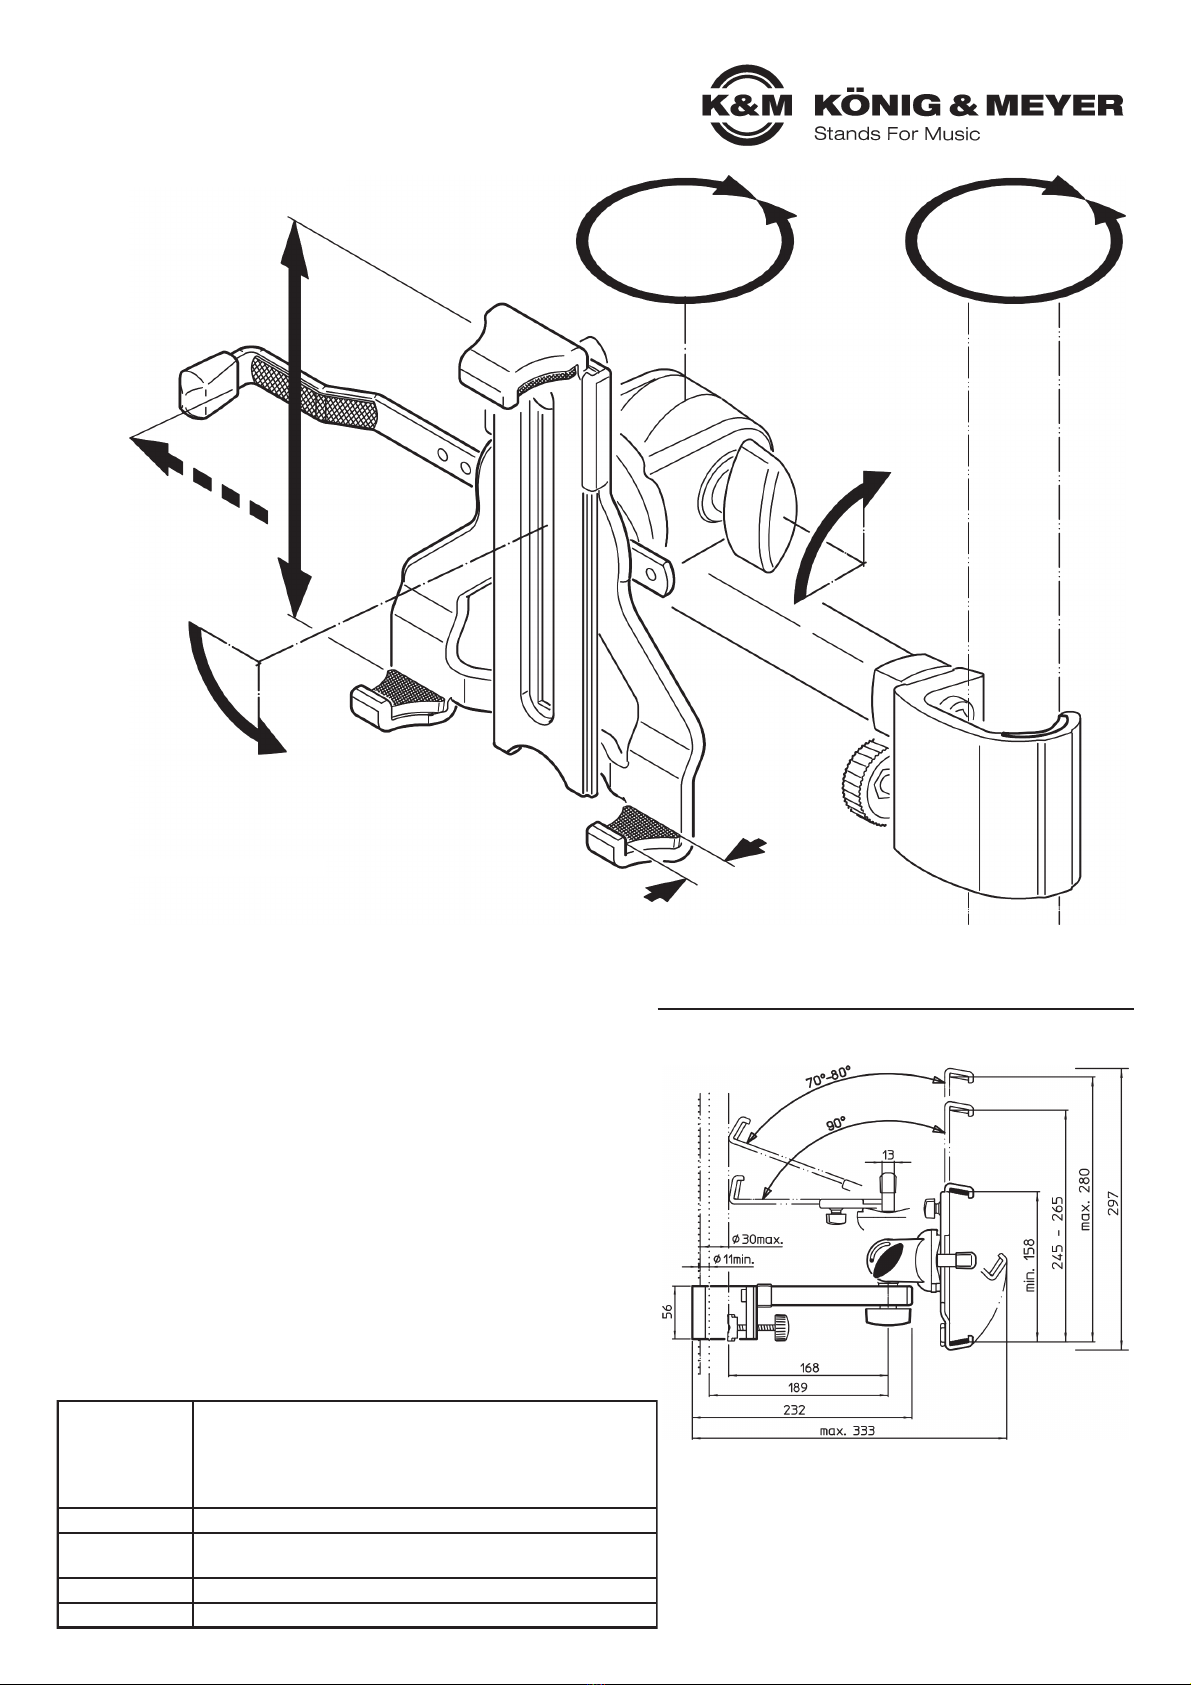
- Mit großzügig dimensionierter Klammer für sicheren Halt an Rohren von ø 11-30 mm
- Mit Verstellmöglichkeiten die keine Wünsche offenlassen:
-Tablet-Größe, Neigungswinkel, Ausrichtung, Hoch/Querformat: alles individuell einstellbar
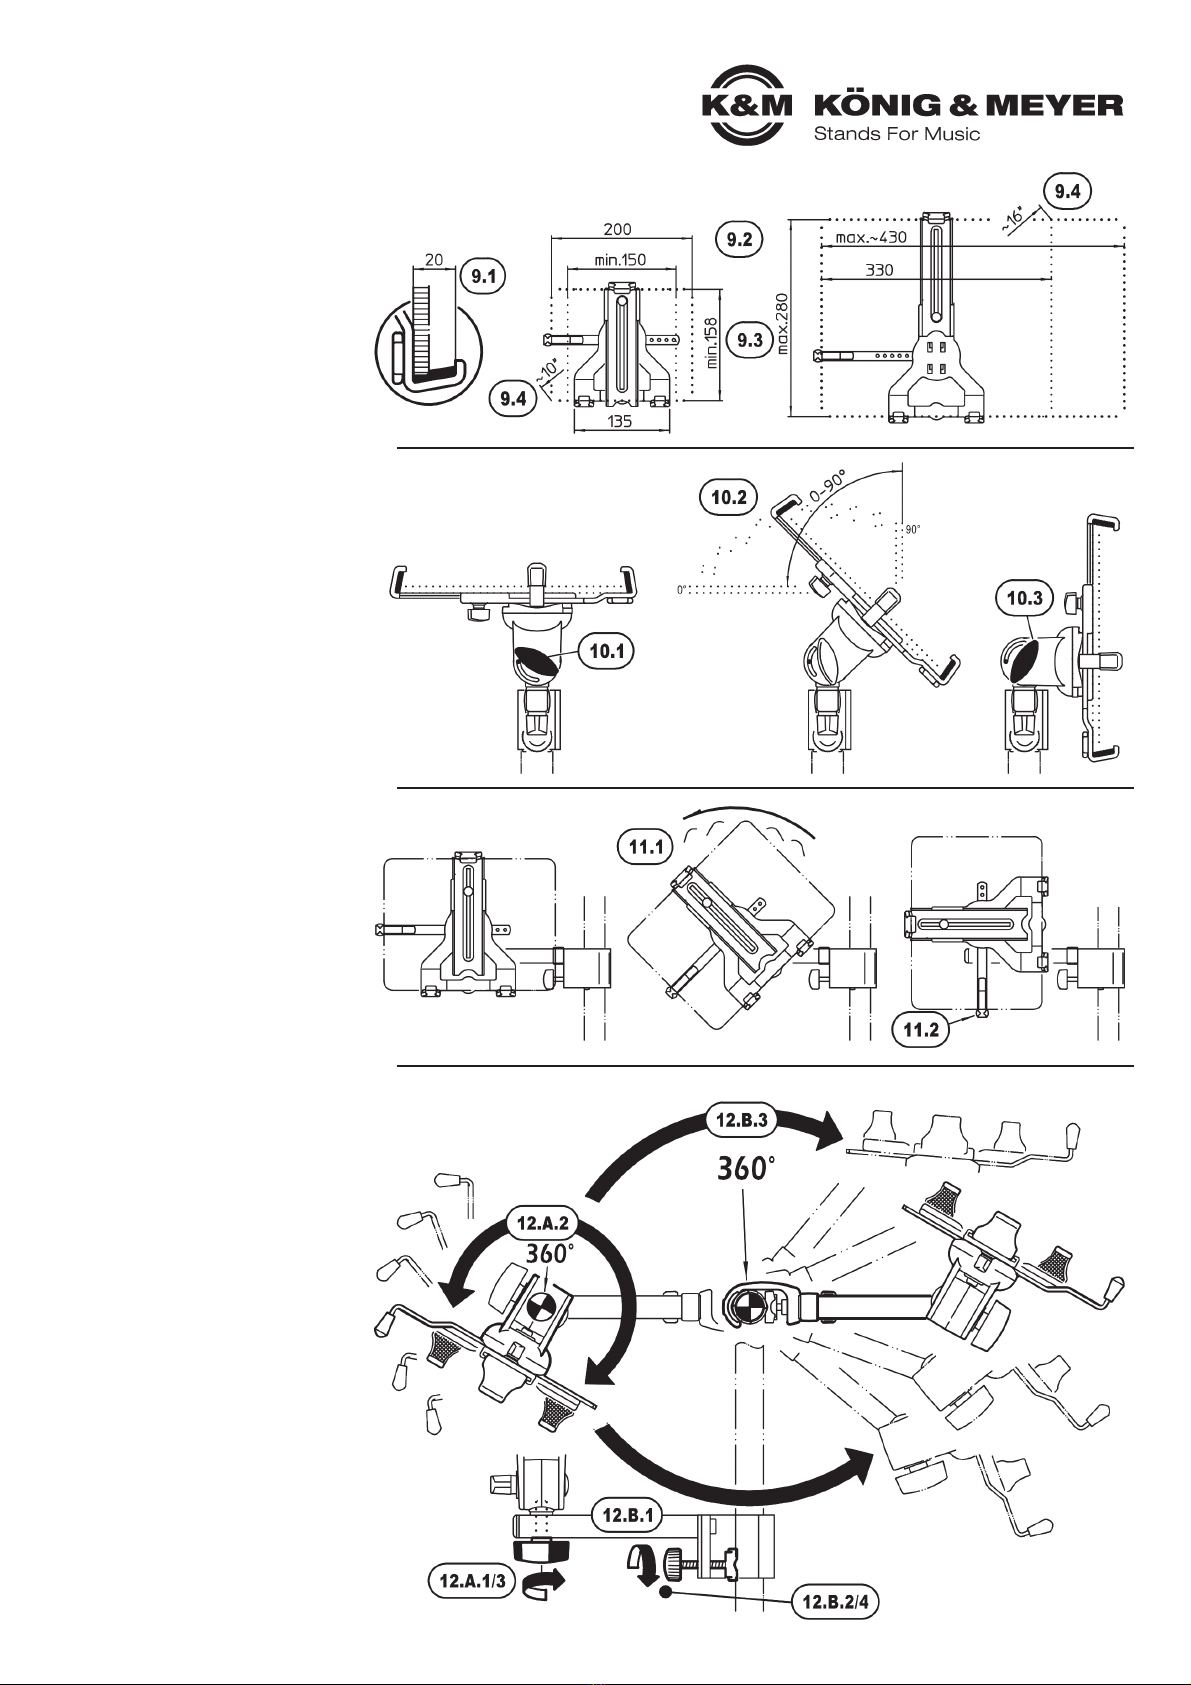
- Klemmbereich: Höhe 158-280 mm, Breite 150-330 (430) mm, Tiefe max. 20 mm
SICHERHEITSHINWEISE
- Geeignete Stative verwenden - das setzt voraus:
-Standfestigkeit, Tragkraft sowie Rohr-ø 11-30 mm
-z.B. K&M-Stative 118/1, 199, 21020, 210/8 etc.
- Das Tablet wie beschrieben sorgfältig in der
-Halterung befestigen und auf sicheren Sitz prüfen
- Halterung umsichtig handhaben; v.a. bei Ände-
-rungen der Einstellungen (Neigung, Format und
-Ausrichtung) ist auf sicheren Halt des Tablets zu
-achten
Vielen Dank, dass Sie sich für dieses Projekt entschieden haben. Bitte lesen und beachten Sie
sorgfältig diese Anleitung. Sie informiert Sie über alle wichtigen Schritte die für einen sicheren
Aufbau und Betrieb erforderlich sind. Wir empfehlen, sie auch für den späteren Gebrauch auf-
zubewahren.
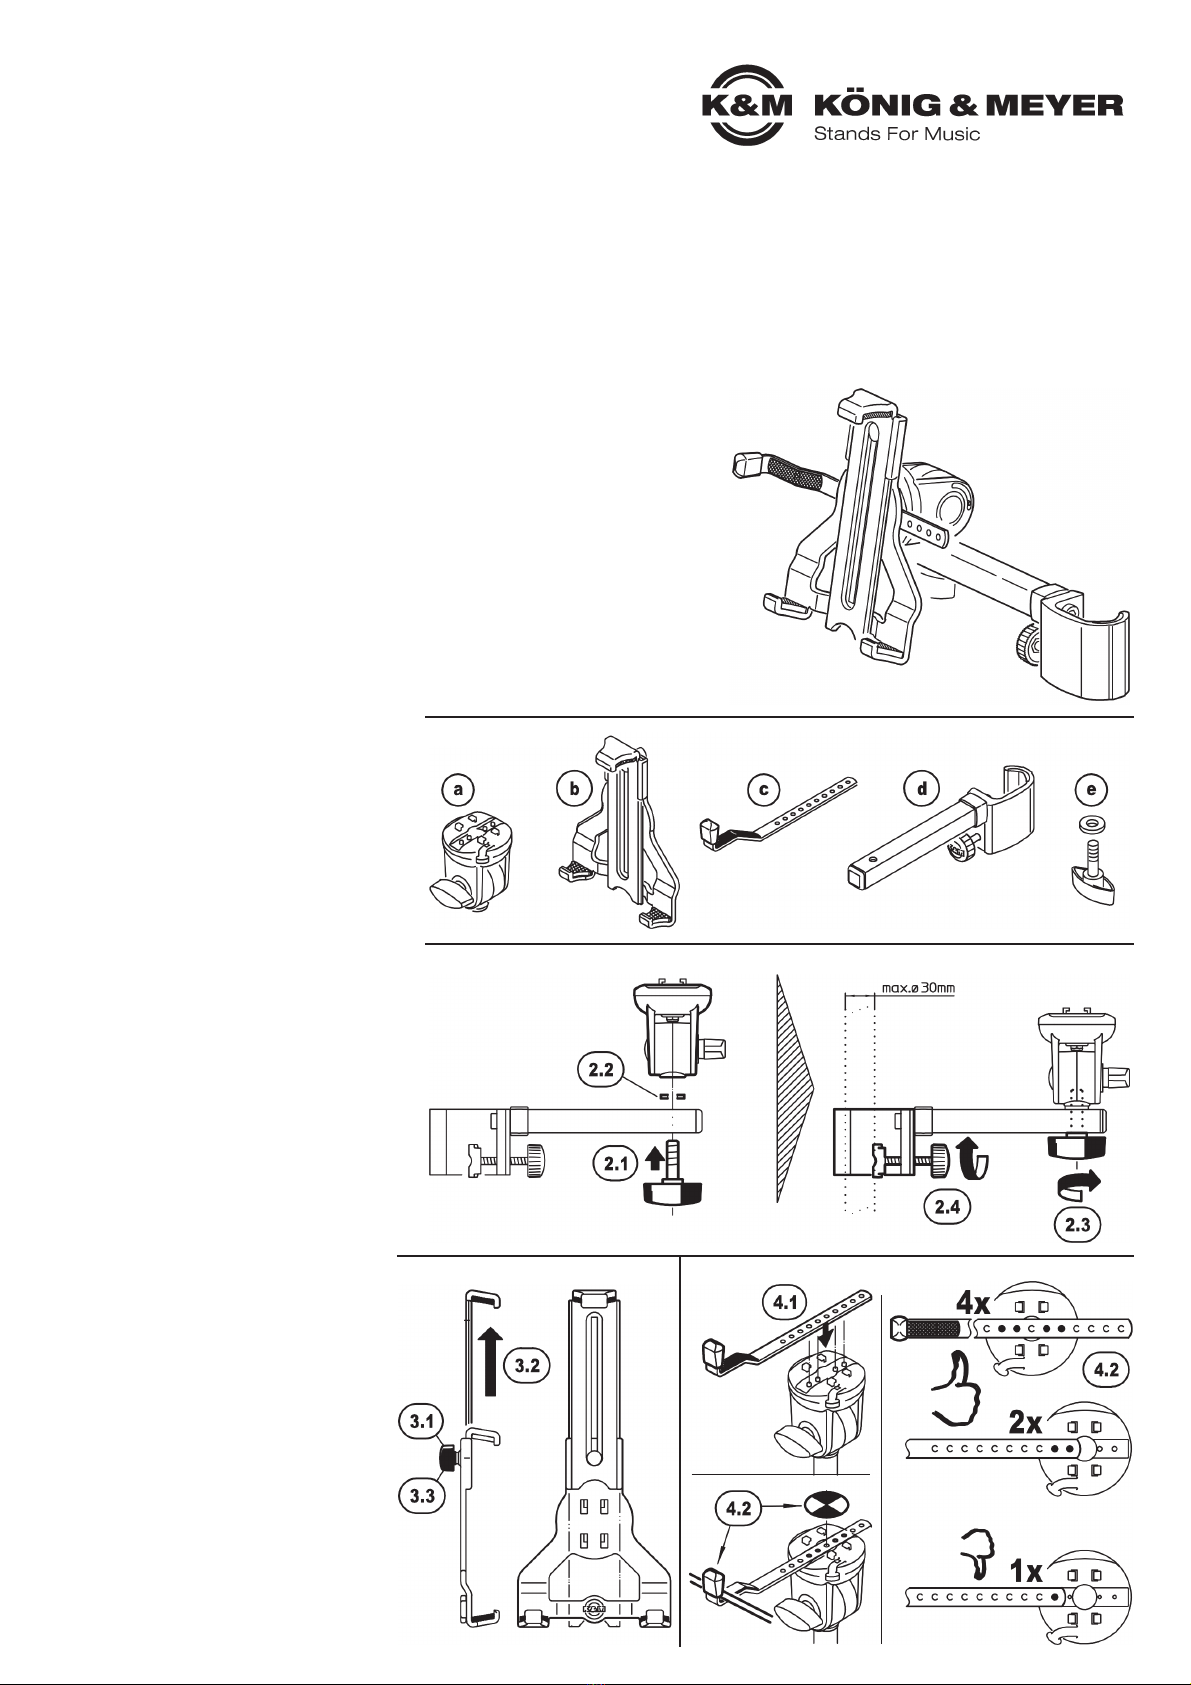
1. BESTANDTEILE
2. SCHWENKGELENK mit TRAGARM VERBINDEN
3. HALTERUNG VOREINSTELLEN 4. SICHERUNGSWINKEL EINSETZEN
STATIV VORBEREITEN (s.o.: Sicherheitshinweise)
1. BESTANDTEILE
Bitte Sichtprüfung vornehmen, ob alle Teile
vorhanden und in Ordnung sind - soweit erkennbar.
aSCHWENKGELENK
a(mit Stativ-Anschlussgewinde)
bTABLET-HALTERUNG
b(Grundkörper, Schieber, Klemmung)
cSICHERUNGSWINKEL
c(mit Filz und Gummikappe)
dTRAGARM mit Klammer
d(für max. Rohr-ø 30 mm)
eFLÜGELSCHRAUBE mit Gummischeibe
2. SCHWENKGELENK mit TRAGARM
2. VERBINDEN
2.1 FLÜGELSCHRAUBE evon unten durch die
2.1 Bohrung des Tragarmes stecken und…
2.2 …Gummischeibe ebis zum Anschlag über
2.2 das Gewinde schieben
2.3 Flügelschraube ins Schwenkgelenk eindrehen
2.4 Klammer des TRAGARMES dan das
2.4 Stativrohr halten und durch Anziehen der
2.4 Rändelschraube befestigen.
3. HALTERUNG VOREINSTELLEN
3.1 Klemmmutter etwas lösen…
3.2 …und Schieber bis zum Anschlag ausfahren
3.3 Klemmmutter wieder festziehen
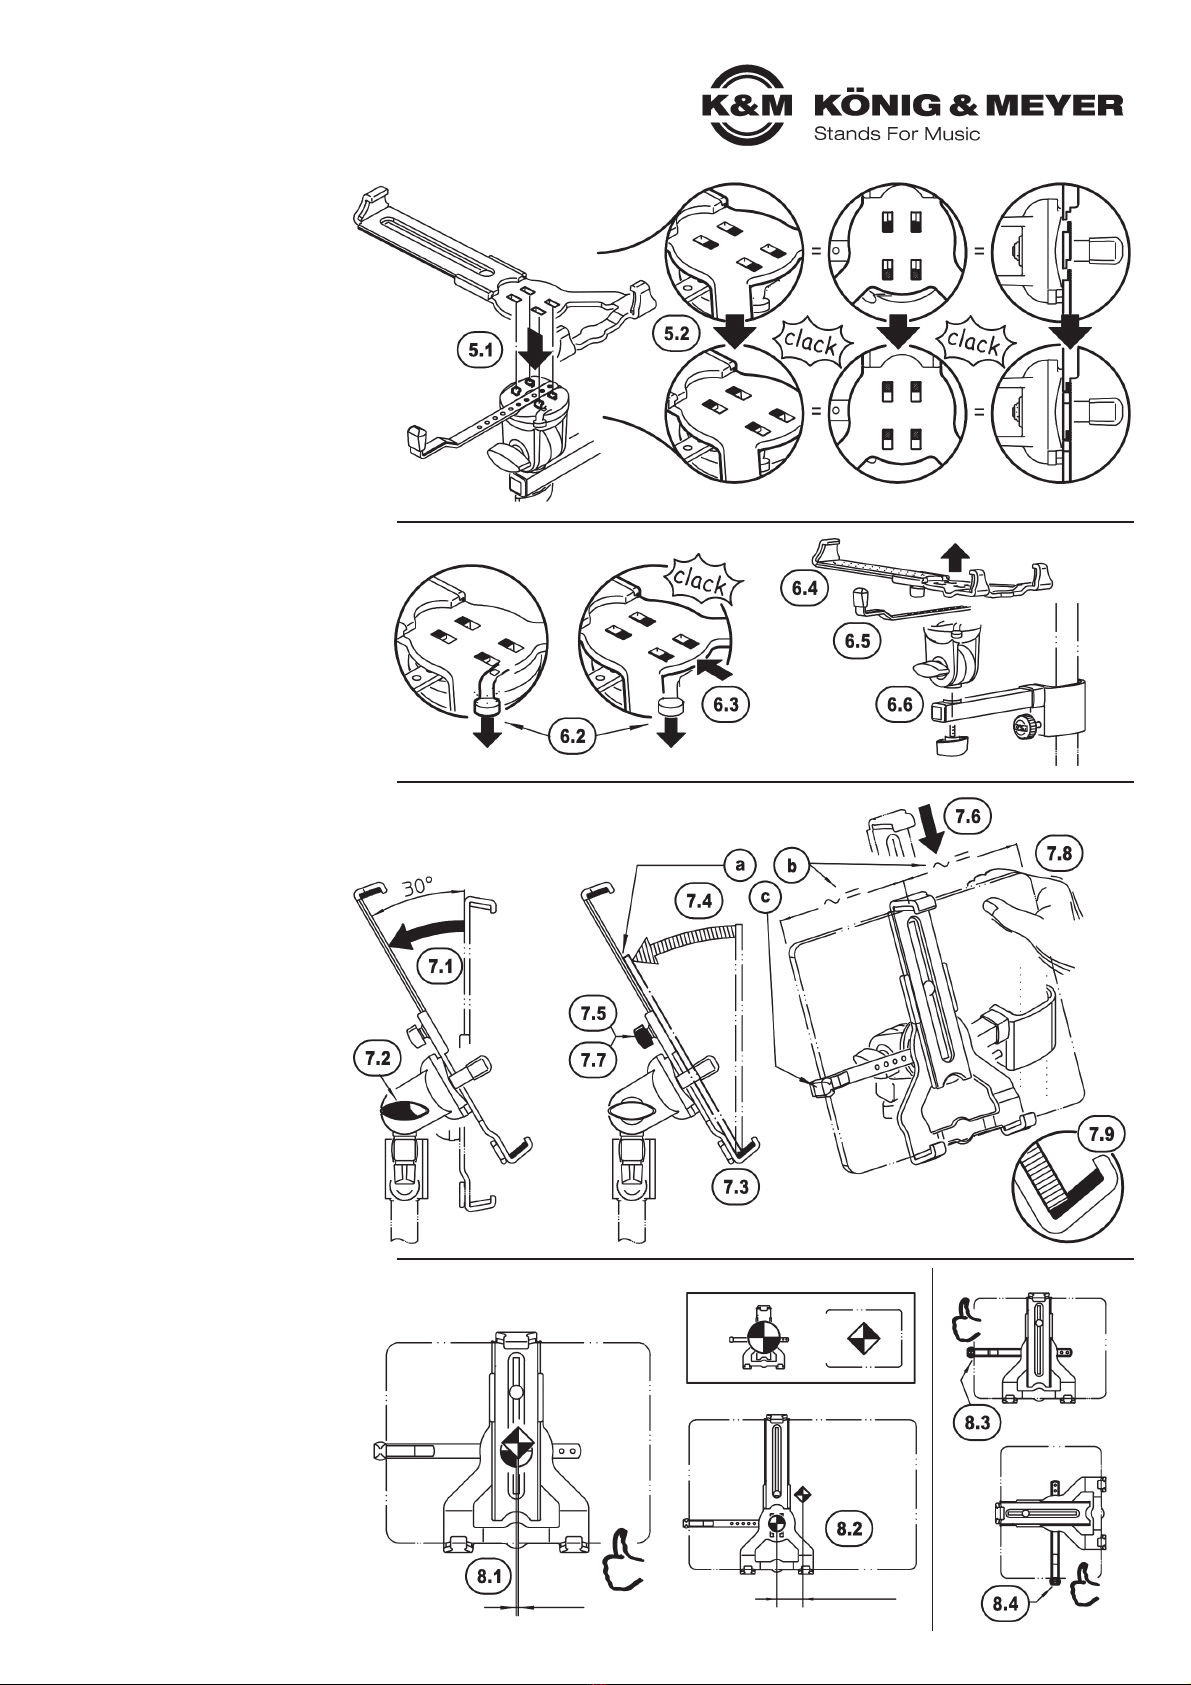
4. SICHERUNGSWINKEL EINSETZEN
4.1 SICHERUNGSWINKEL cin die
4.1 entsprechende Aussparung des
4.1 SCHWENKGELENKS aeinlegen.
HINWEISE:
4.2 Die Position des Winkels so wählen,
4.2 dass das Tablet-PC mittig auf der
4.2 Halterung sitzt und seitlich am
4.2 Gummi des Winkels anschlägt
4.2 (siehe auch Kapitel 8)
4.3 Der Sicherungswinkel sollte mit
4.3 mindestens 2 Bohrungen im
4.3 Schwenkgelenk abgesteckt sein.