Karibu 62024 Instruction Manual

62024
03.05.2013
Service-Hotline:+49 421 38693 33
Aufbauanleitung
notice de montage
Building Instructions
montagehandleiding
Instrucciones de construcción
Istruzioni per il montaggio

90660-2013
Vergleichen Sie zuerst die Materialliste mit
Ihrem Paketinhalt! Bitte haben Sie
Verständnis, daß Beranstandungen nur im
nicht aufgebauten Zustand bearbeitet
werden können!
Using the bill of materials, please first
check to be sure that all parts are
contained in the package! Please note
that claims can only be accepted for
constructions which have not been
assembled!
Veuillez d’abord comparer la liste du
matériel avec le contenu de votre
colis ! Nous vous remercions de
bien vouloir comprendre que les
réclamations ne peuvent être
traitées qu’à l’état non monté !
Pos.
Pos.
Pos. L B H Bezeichnung
Description
Désignation
Stück
Piece
Pièce
Nr.
Nr.
N°
U1 Ständer
Columns
Montants 2100 90 90 6 38800
U2 Rahmen Vorderteil
Frame – front section
Cadre – partie avant 2980 55 155 2 40628
U3 Rahmen Rückteil
Frame – back section
Cadre – partie arrière 2190 55 155 2 40626
U5 Sparren
Rafters
Chevrons 3000 34 120
Balken
Beams
Poutres
7 40638
U7 Seitenbretter
Side Boards
Planches latérales 2500 18 95
Glattkant
Smooth Edge
Angle lisse 4 38807
U8 Dachplatten
Roof Panels
Panneaux de toit 2600 1092 8 Wellenplatten
Corrugated Panels
Panneaux ondulés 6 61488
Beschlagbeutel
separat erhältlich
Fittings Pouch
sold separately
Sachet garnitures
vendu séparément
1 62047
Was wird mit was verbunden?
What is to be joined to what?
Qu’est-ce qui est fixé ensemble ?
Schraube
Screw
Vis
Anzahl
Quantity
Nombre
Vorbohrung
Predrilling
Percement
Rahmen Vorder- mit Hinterteil
Frame front and rear sections
Cadre, partie avant avec partie arrière
4 x 50 Schraube
4 x 50 Screw
Vis 4 x 50 4 3,5
Ständer mit Rahmen
Columns to frame
Montants avec cadre
M12 x 120 mit
Bulldog Dübel
M12 x 120 and
Bulldog wall anchor
M12 x 120 avec
cheville Bulldog
1 12
Winkel mit Sparren
Angle bracket to rafter
Angle avec chevrons
4 x 35 Schraube
4 x 35 Screw
Vis 4 x 35 4 3,5
Winkel mit Rahmen und Sparren
Angle bracket to frame and rafter
Angle avec cadre et chevrons
4 x 50 Schraube
4 x 50 Screw
Vis 4 x 50 4 3,5
Seitenbretter an Sparren
Side boards to rafter
Planches latérales sur chevrons
4 x 35 Schraube
4 x 35 Screw
Vis 4 x 35
pro Verbindung
per connection
par raccord
2 3,5
Dachplatten an Sparren
Roof panels to rafter
Panneaux de toit sur chevrons
Bohrschraube
Self drilling screw
Tarière

Bild
Figure
Illustration
Allgemeine Hinweise zum Aufbau General Assembly Advice Indications générales de montage
Werkzeugbedarf:
Bohrer, Bohrmaschine, Akkuschrauber,
div. Bits, Maulschlüssel oder
Steckschlüsselaufsätze, Säge,
Wasserwaage, Maßband,
Aussteifungsmaterialien wie z.B. lange
Holzlatten
Tools Required:
Drill bits, power drill, electric
screwdriver, various bits, jaw wrench
or socket wrench attachments, saw,
level, measuring tape, reinforcement
materials such as e.g. long wooden
slats.
Outillage nécessaire :
Mèches, perceuse, tournevis
électrique, diverses pointes de
tournevis, clé à fourche ou embouts
de clé à douille, scie, niveau à bulle,
mètre ruban, matériau de
renforcement (par ex. longues lattes
en bois)
Das von Ihnen erworbene Produkt gibt
es in 3 verschiedenen Tiefen und es ist
seitlich beliebig weit erweiterbar. Aus
diesem Grund erhalten Sie, wenn Sie
die kleinste Breite erworben haben nur
das Grundpaket (1 Feldbreite).
Jede breitere Variante setzt sich dann
aus diesem Grundpaket und der
entsprechenden Anzahl aus
Verlängerungspaketen (je Feld 1 Stk)
zusammen.
The product you have purchased is
available in 3 different depths and can
be extended sideways to any width.
For this reason, if you have purchased
the narrowest width, you have received
the basic package (1 panel width).
Each wider variation is composed of a
basic package plus the required
number of extension packages (1 unit
per panel).
Le produit que vous avez acheté
existe en 3 longueurs différentes et
peut être étendu latéralement selon le
besoin. Pour cette raison, si vous avez
acheté la plus petite largeur, vous ne
recevez que le paquet de base (1
largeur de panneau).
Chaque variante plus large est ensuite
composée à partie de ce paquet de
base et d’un nombre correspondant de
paquets de rallonge (1 unité par
panneau).
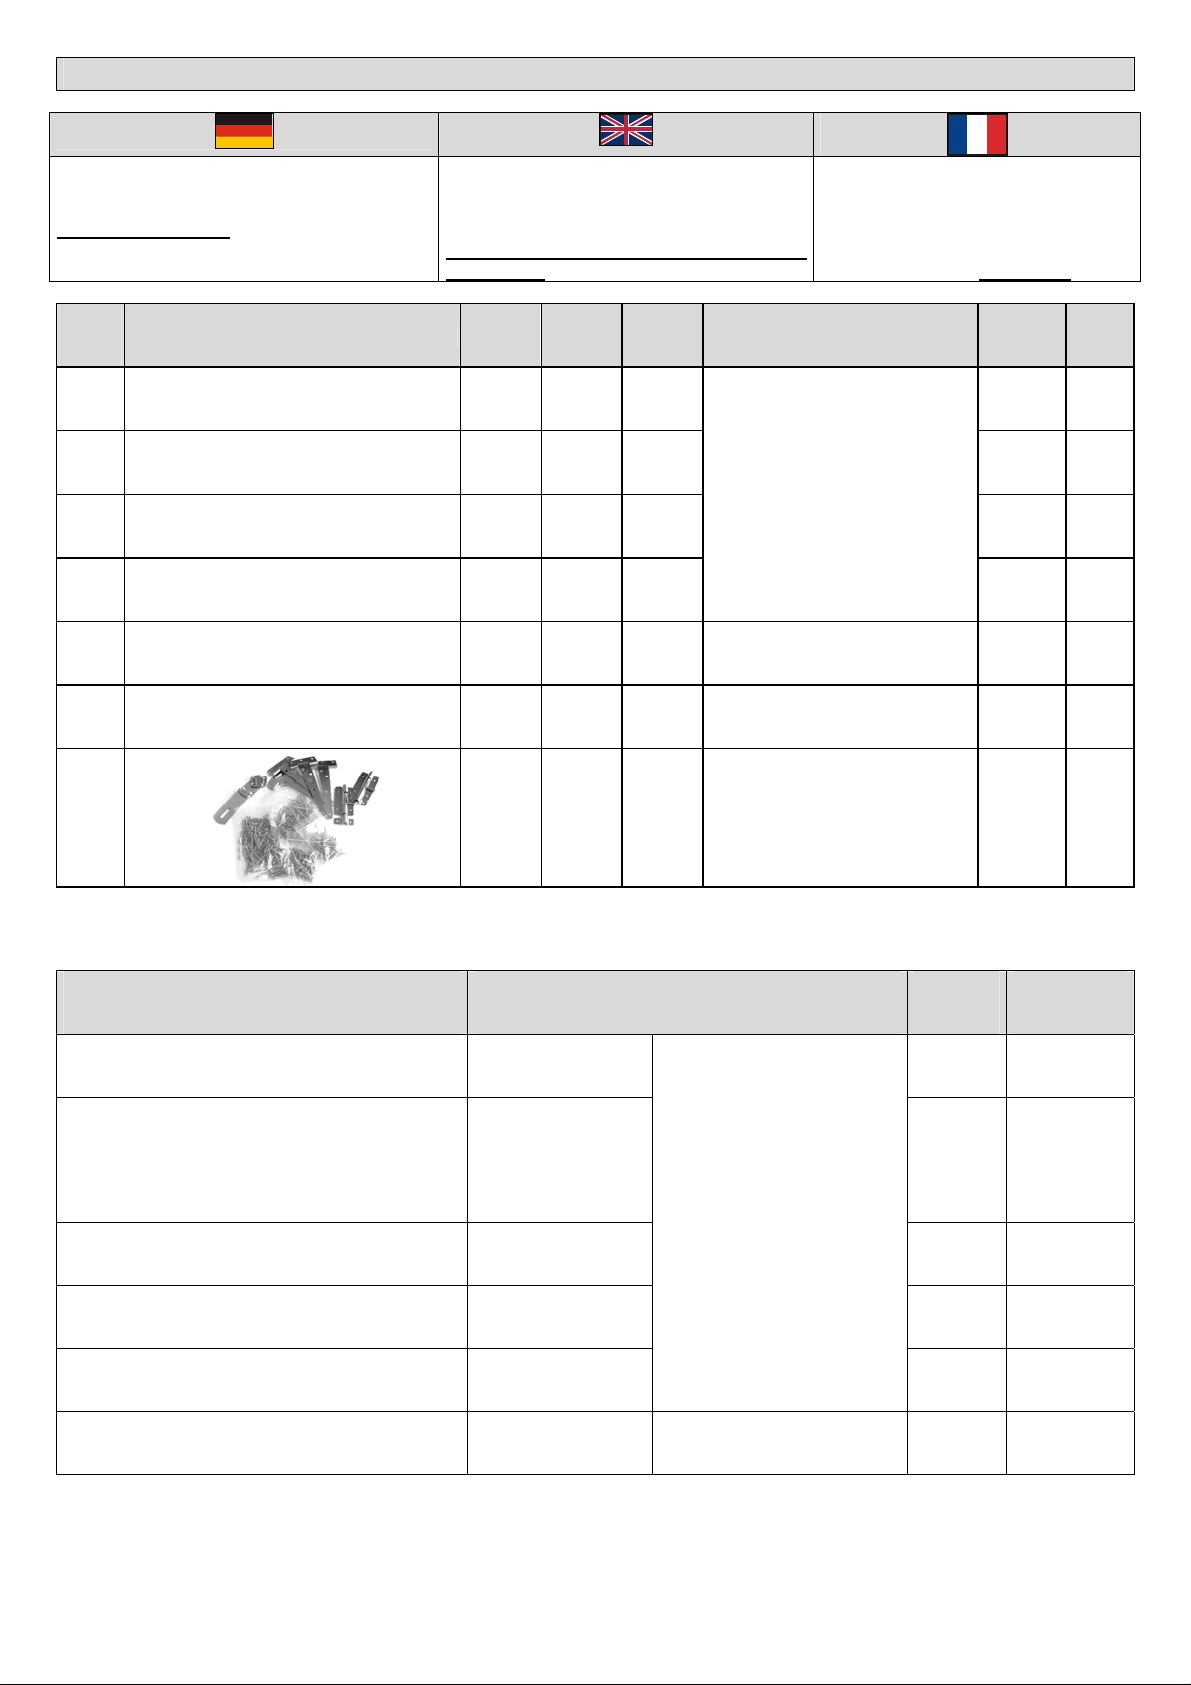
Sie sollten jedes Paket anhand der
beigelegten Stückliste auf
Vollständigkeit überprüfen. Die
Anleitung ist in jedem Paket identisch.
The parts in every package should be
checked for completeness on the basis
of the packing note. Every package
contains the same instructions manual.
Vous devez vérifier que chaque
paquet est complet à l’aide de la liste
de pièces jointe. La notice est
identique dans chaque paquet.
Wichtig!!! Alle Schraubverbindungen
sind vorzubohren. Important!!! All Screw connections
must be pre-drilled. Important !!! Tous les raccords vissés
doivent être préalablement percés.
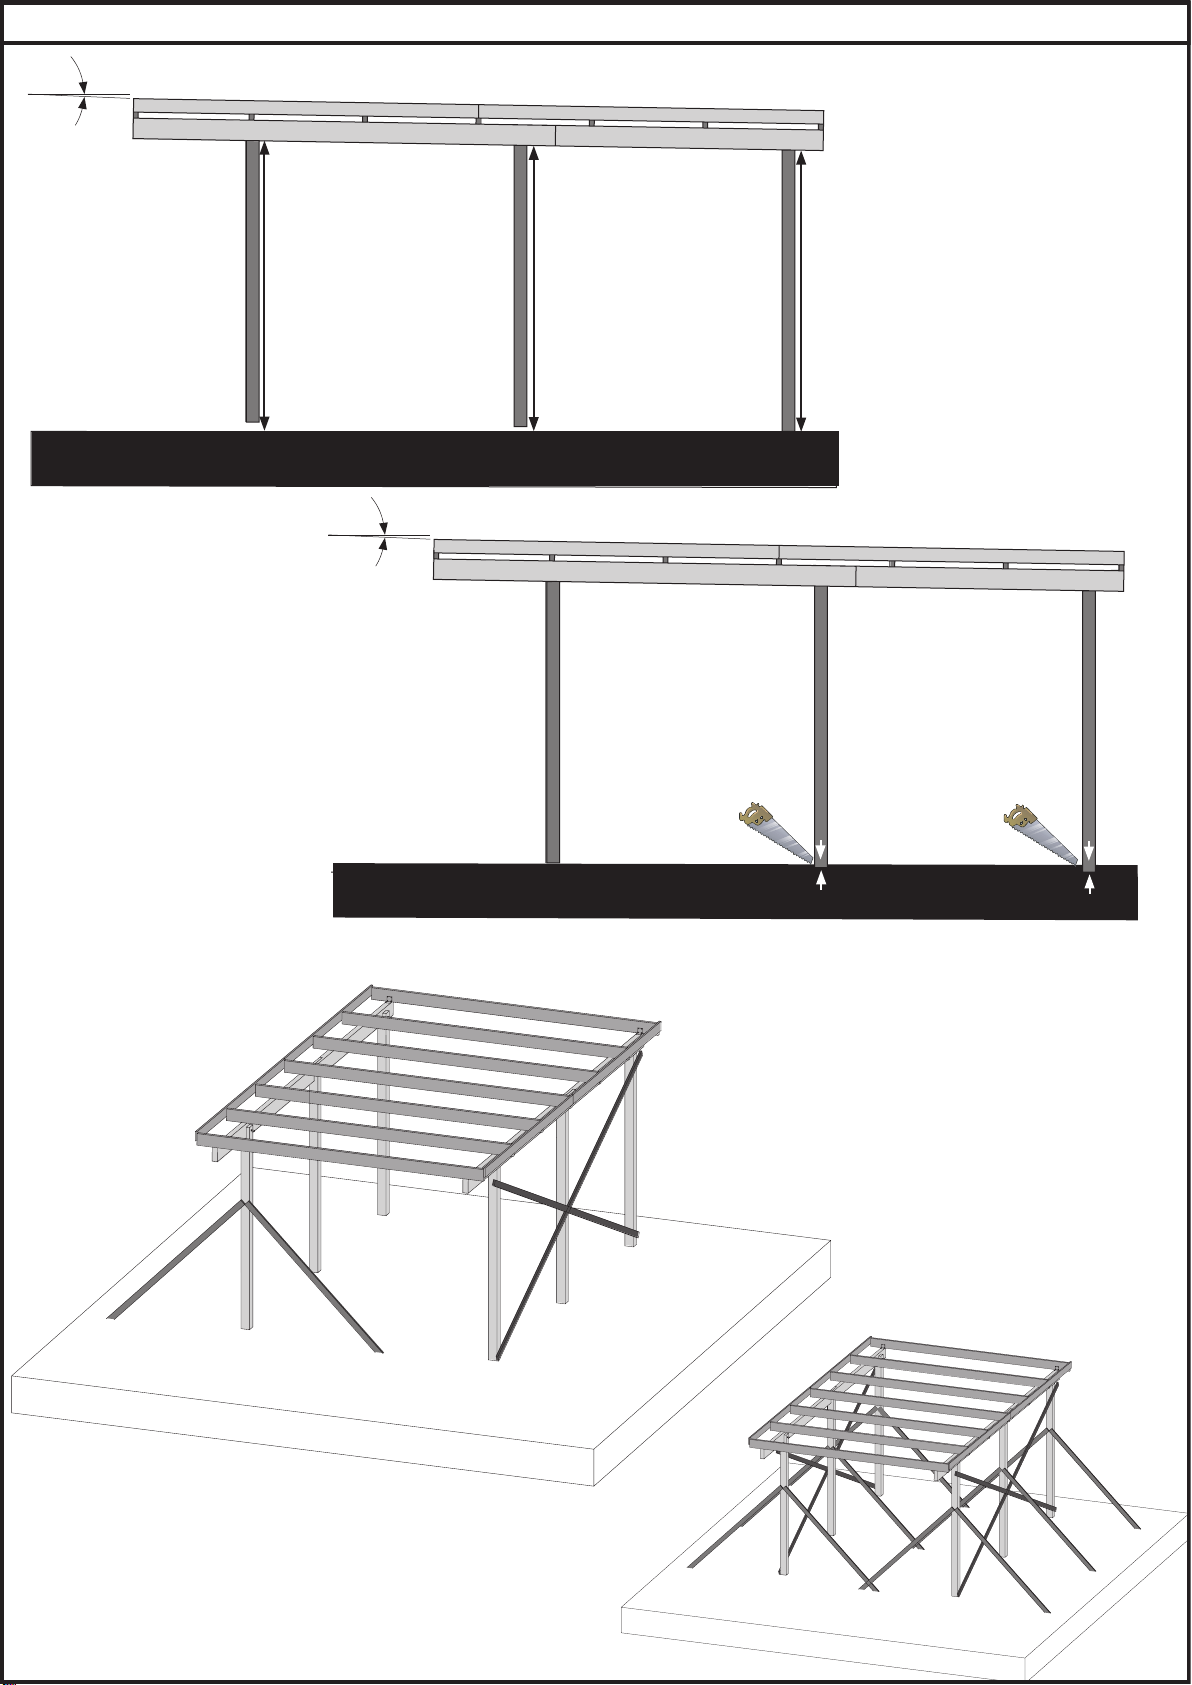
1-1 Der Carport sollte eine Dachneigung
von 1° erhalten. Um dies zu erreichen,
gibt es 2 Möglichkeiten:
A: Es werden die Ständer und damit
verbunden auch die Pfostenträger in
unterschiedlichen Höhen montiert.
B: Die Pfosten werden vor dem
Einsetzen in die Pfostenträger
eingekürzt.
The carport roof pitch should be set at
1°. There are two ways to achieve this:
A: The columns and thereby also the
column base plate can be mounted at
different heights
B: The columns can be shortened
before they are set into the column
base plate.
Le toit de l’abri de voiture doit avoir
une pente de 1°. Pour parvenir à ceci,
vous avez 2 possibilités :
A : Monter les montants et les
supports de pilier à des hauteurs
différentes.
B: Raccourcir les montants avant de
les poser dans les supports de pilier.
1-2 – 1-3 Während des Aufbaus ist es vorteilhaft
die Ständer des Carports mit Hilfe
solcher Aussteifungen zu stabilisieren.
Geeignet hierfür sind z.B. lange
Holzlatten die angeschraubt werden.
Die Ständer des Carports sollten mit
Pfostenankern, welche einbetoniert
werden, mit dem Untergrund verbunden
sein. Diese sollten, wie Sie der H-
Pfostenanker – Anleitung entnehmen
können vor dem Aufbau mit den
Pfosten verbunden werden, aber erst
nach dem Aufbau des Carports mit
Beton versehen werden.
It is advantageous to stabilize the
columns using reinforcements during
assembly of the Carport. Long wooden
slats which can be screwed to the legs
are suitable for this purpose. The
columns of the carport should be
connected to the subgrade by means
of column anchors which have been
set in concrete. As you can see in the
instructions for H-column anchor, these
should be joined to the columns before
assembling the carport but set in
concrete only after the carport has
been assembled.
Pendant le montage, il est
recommandé de stabiliser les
montants de l’abri de voiture à l’aide
de renforcements. Pour cela, prendre
par ex. de longues lattes en bois et les
visser. Les montants de l’abri de
voiture doivent être reliés au sol grâce
à des ancrages de pilier bétonnés.
Ceux-ci doivent, comme indiqué dans
la notice des ancrages de pilier en H,
être raccordés aux montants avant le
montage, mais bétonnés seulement
après la fin du montage de l’abri de
voiture.
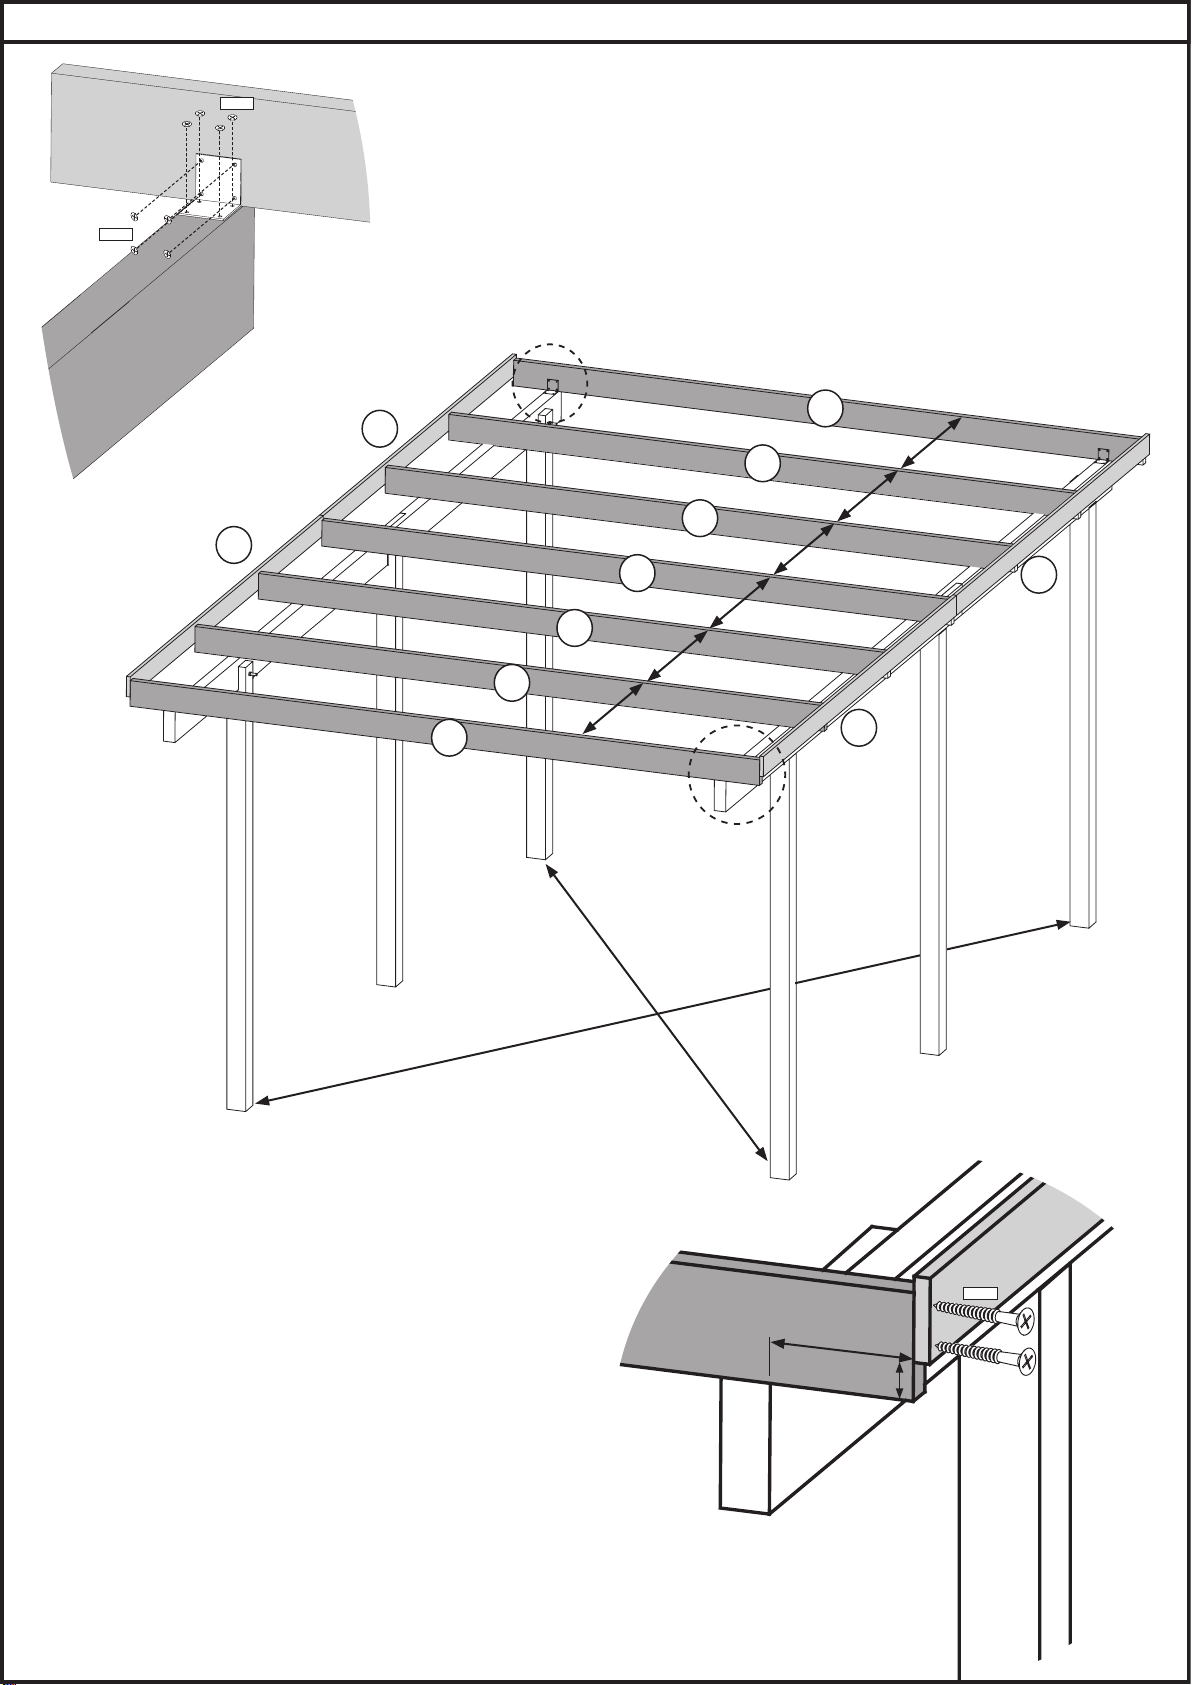
2-3 Positionierung der Elemente des
Unterteiles des Carports Position the base section units of the
carport Positionnement des éléments de la
partie inférieure de l’abri de voiture
2-1 – 2-2 Verschraubung Rahmen Vorder- mit
Hinterteil Screw the frame front and rear
sections together Vissage du cadre, partie avant avec
partie arrière
2-4 – 2-5 Verbindung Ständer mit Rahmen Join columns to frame Raccordement des montants avec le
cadre
2-6 Verschraubung Kopfband Screw connection - strut Vissage de l’adossement
3-2 Verbindung Rahmen- Sparren Connection - frame to rafters Raccordement des chevrons avec le
cadre
3-3 Positionierung und Anbringung Sparren
und Seitenbretter Position and attach rafters and side
boards Positionnement et pose des chevrons
et planches latérales
3-1 Positionierung der Elemente des
Daches des Carports Position the roof section units of the
carport Positionnement des éléments de toit
de l’abri de voiture
4-1 Carport-Verlängerung Carport extension Extension de l’abri de voiture
4-2 Verbindung der Sparren untereinander Connect rafters one after the other Raccordement des chevrons les uns
aux autres
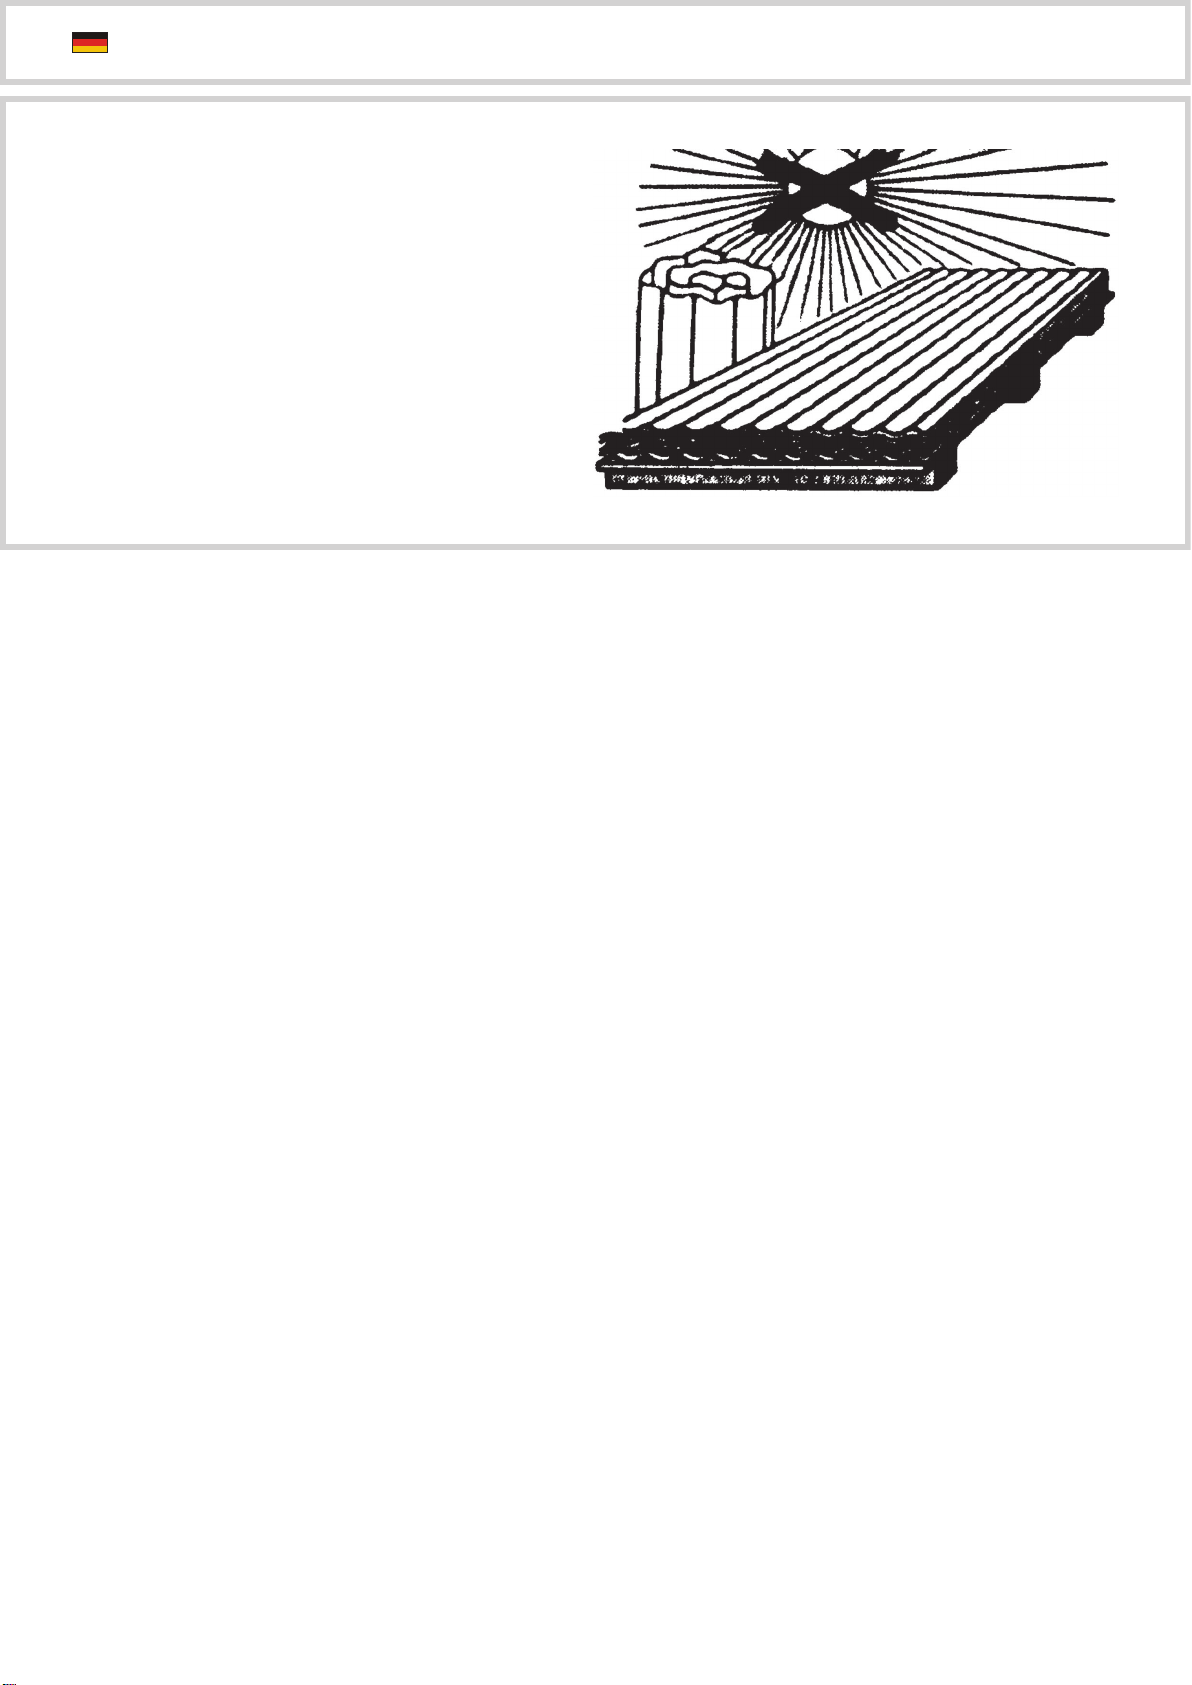
4-3 Die Dachplatten überlappend auflegen.
Die Überlappung ist mit 2 Wellen-
überdeckungen auszuführen, bei der
lezten Platte nur mit einer!
Lay the roof panels so that they
overlap. Two corrugated panels should
overlap.
Poser les panneaux de toit en les
superposant. La superposition doit
être effectuée avec 2 recouvrements
ondulés.
4-4 Vor
g
ebohrt sind die Platten in
j
edem 3. Pre-drilled the roof
p
anels should be Pré-
p
ercés les
p
anneaux doivent être

Wellenboden zu verschrauben.
In den äußeren Randfeldern jedoch
in jedem Wellenboden sowie in der
Überlappung. Schrauben Sie bis die
Gummidichtung fest an der Platte
liegt.
Die Löcher in den Dachplatten werden
in der Mitte der Welle mit einem
Holzspezialbohrer gebohrt. Bitte
beachten Sie, dass das Bohrfutter die
Dachplatte nicht beschädigt. Die
Schrauben müssen rechtwinklig in die
Latten montiert werden.
screwed in place at the base of every
three waves.
However, in the surrounding areas
and at the overlap, the base of every
wave should be screwed in place.
Turn the screw until the rubber
washer lies tightly on the roof
panels.
It is necessary to drill holes in the
middle of the roof panel corrugation
using a special drill for wood. Please
pay attention that the drill chuck does
not damage the roof panels. The
screws must be inserted at right angles
to the slats.
vissés sur les panneaux ondulés
toutes les 3 ondulations.
Dans les parties extérieures (en
bordure) cependant, visser dans
chaque ondulation et au niveau de
la superposition. Vissez jusqu’à ce
que le joint en caoutchouc soit
complètement contre le panneau.
Les trous dans les panneaux de toit
sont percés au milieu de l’ondulation
avec une mèche spéciale pour bois.
Veuillez faire attention à ne pas
abîmer le panneau de toit avec le
mandrin de perceuse. Les vis doivent
être montées en angle droit dans les
lattes.

Lagerungs- und Verarbeitungshinweise für PVC-Platten
Lagerung
Prüfen Sie genau Ihre gelieferte Ware,
spätere Reklamationen können nicht
anerkannt werden.
Bitte beachten Sie diese Lagerungsund
Verarbeitungshinweise. Bei
Nichteinhalten keine Reklamationsansprüche!
• Hitzestau und Nässe vermeiden.
• PVC-Tafeln dürfen im Stapel nicht dem Sonnenlicht und der Feuchtigkeit ausgesetzt werden. Es besteht
Gefahr der Überhitzung
(Brennglaswirkung!).
• Die maximale Lagerungstemperatur im Stapel darf 60°C nicht überschreiten. Für Brennglasschäden übernehmen
wir keine Haftung.
• Auf ebener, nicht aufgeheizter Unterlage lagern und mit licht- und wasserundurchlässigen hellen Planen
abdecken.
• Stapelhöhe max 50 cm
• Max Raumtemperatur: 40°C
• Während der Lagerung müssen PVC-Tafeln von Witterungseinüssen, Verschmutzung und mechanischen
Belastungen geschützt werden.
Montage
• Nicht bei Temperaturen unter 5°C durchführen.
• Montagebedingte manuelle Transporte einzelner Platten nicht bei Wingeschwindigkeit über 3m/s durchführen.
• Bei der Montage von Doppelstegplatten ist die Wandanschlussseite mit einer Dichtung abzuschlißen, sodass
das Eindringen von Staub und Regenwasser verhindert wird.
Aufgrund von verschiedenen Anbauoptionen ist das Dichtband nicht im Lieferumfgang enthalten.
Reinigung
• Der Reinigungszyklus ist abhängig vom Verschmutzungsgrad, sollte jedoch von außen mindestens einmal
jährlich erfolgen.
• Verschmutzungen mit Wasser oder Haushaltsreinigungsmitteln beseitigen.
• Keine scheuernden, ätzenden oder lösungsmittelhaltigen Zusätze verwenden.

Storage and processing instructions for PVC sheets
Storage
Check your delivered goods with extreme care,
as later complaints cannot be entertained.
Please observe these storage and
processing instructions. In the event of a
failure to observe these instructions, claims
relating to complaints will not be entertained!
• Avoid heat accumulation and damp.
• Stacked PVC sheets should not be exposed to sunlight and moisture. A risk of overheating exists
(risk of re through focusing of solar radiation!).
• The maximum storage temperature when stacked should not exceed 60°C. We assume no liability for
damage caused by the focusing of solar radiation in this manner.
• Store on a level, unheated surface and cover with bright tarpaulin impervious to light and water.
• Max. stack height 50 cm
• Max. room temperature: 40°C
• PVC sheets should be protected during storage against the effects of weather, dirt and mechanical loads or
stress.
Installation
• Do not install at temperatures under 5°C.
• Manual transportation of individual sheets necessary for installation should not be realised at wind speeds
exceeding 3m/s.
• When installing double-web sheets, the wall connection side should be tted with a seal to prevent the
penetration of dust and rainwater.
Sealing tape is not included in the scope of delivery, due to the different attachment options involved.
Cleaning
• The cleaning cycle depends on the level of dirt, but exterior cleaning should be realised at least once a year.
• Remove dirt with water or a household cleaning agent.
• Do not use any scouring or caustic additives or additives containing solvents.

Remarques quant au stockage et à l'utilisation des plaques PVC
Stockage
Contrôlez la marchandise reçue avec
précision, une réclamation ultérieure
ne pourra être prise en compte.
Veuillez observer ces remarques sur le
stockage et l'utilisation des plaques. Aucune
réclamation ne pourra être
acceptée en cas de non-respect !
• Éviter l'accumulation de chaleur et l'humidité.
• S'ils sont empilés, les panneaux PVC ne doivent pas être exposés à la lumière du soleil ni à l'humidité.
Risque de surchauffe
(effet de loupe) !
• La température de stockage max. à l'intérieur de la pile ne doit pas dépasser 60 °C. Nous déclinons toute
responsabilité en cas de dommages causés par un effet de loupe.
• Stocker sur une surface plane non chauffée et recouvrir de bâches claires opaques et imperméables à l'eau.
• Hauteur max. d'une pile : 50 cm
• Température ambiante max. : 40 °C
• Pendant le stockage, les panneaux PVC doivent être protégés des intempéries, de la saleté et des
contraintes mécaniques.
Montage
• Ne pas réaliser le montage si la température est inférieure à 5 °C.
• Ne pas effectuer le transport manuel de plaques individuelles nécessaire lors du montage si la vitesse du
vent est supérieure à 3m/s.
• Lors du montage de plaques alvéolaires, obturer le côté de raccordement au mur avec un joint pour empê-
cher la poussière et l'eau de pluie de pénétrer.
En raison des différentes options de montage existantes, le ruban d'étanchéité n'est pas inclus dans la livrai-
son.
Nettoyage
• La fréquence de nettoyage est fonction du degré d'encrassement. Au moins un nettoyage extérieur par an
est toutefois recommandé.
• Nettoyer les plaques avec de l'eau ou des produits ménagers.
• Ne pas ajouter d'agents abrasifs, corrosifs ou à teneur en solvants.

Abb. 1-2
Abb. 1-3
33
1°
Abb. 1-1B
66
2056 2023 1990
1°
Abb. 1-1A
(1) 90660-2013 Stand 06.02.2013

1800
1800
2500 1800
1800
Abb. 2-1
Abb. 2-3
Abb. 2-4
U1
U1
U1
Abb. 2-5
U2
U3
(2) 90660-2013 Stand 06.02.2013
4x50
797mm

(3) 90660-2013 Stand 06.02.2013
!!!A=B!!!
A
B
43
c
c=772
c
c
c
c
Abb.3-3
Abb. 3-2
Abb. 3-1
160
U5
U5
U5
U5
U5
U5
U5
U7
U7
U7
U7
4×50
4×35
4×35

(4) 90660-2013 Stand 06.02.2013
Silikon
Silicone
Silicón
Abb.4-3
U8
Abb.4-4
Ø8mm
U8
U8
U8
!
Ø8mm
Die Dachplatten müssen mit einem Ø8mm Bohrer vorgebohrt werden
The roof panels must be drilled with a drill Ø8mm
Les panneaux de toiture doivent être percés avec un foret Ø8mm
Achtung
Attention
Attention
ca 30 cm

(5) 90660-2013 Stand 06.02.2013
Service-Hotline:+49 421 38693 33
construcción
Instrucciones de
notice de montage
Aufbauanleitung
montagehandleiding
ID 84262
Building Instructions Istruzioni per il montaggio
Die Pfosten dieses Produkts müssen fest mit dem Untergrund verbunden werden. Dazu empfehlen wir
H-Pfostenanker. Diese sollten erst nach dem Aufbau dieses Produkts endgültig mit Beton versehen werden.
Die H-Pfostenanker und das zugehörige Befestigungsmaterial sind nicht im Lieferumfang dieses Produkts
enthalten.
Hinweis

H-Pfostenanker montieren
Ancres de béton installer
Install concrete anchors
Betonankers installeren
Anclas concretas instalan
Ancora di calcestruzzo installano
Eine Grube für jeden Pfosten ausheben.
Creusez un trou pour chaque montant.
Dig a hole for each column.
Een put voor elke staander graven.
Cavar un agujero por cada poste.
Creare un foro per ogni montante.
Der H-Pfostenanker kann auf dem Brett in seiner Lage noch ver-
ändert werden.
Les parties métalliques inférieures des montants peuvent encore être
ajustées en fonction de leurs position respective sur les liteaux.
The position of the column joists can be altered due to their position
on the plank.
De staanderdragers kunnen door de positie op de plank qua positie
nog veranderd worden.
La posición de los portapostes puede variarse a su posición mediante
la posición sobre la tabla.
Le parti metalliche possono essere ancora aggiustate in funzione
della loro posizione rispettiva sopra la tavola.
Das Holzprodukt aufstellen. Die Pfosten in die H-Pfostenanker
stellen. Etwas Abstand zwischen Pfostenende und Metall lassen.
Die Pfosten durchbohren um sie mit den H-Pfostenankern zu ver-
schrauben.
Positionnez le pavillon. Placez les montants dans leurs parties
métalliques inférieures. Percez les montants an de pouvoir ensu-
ite les xer et les visser aux parties inférieures métalliques.
Position the pavilion. Insert the columns into the joists in the process.
Drill holes in the columns in order to connect them to the joists by
means of screws.
Het paviljoen opstellen. De staanders daarbij in de staanderdra-
gers stellen. Om de staanders met de dragers vast te schroeven,
moeten de staanders doorgeboord worden.
Colocar el pabellón. Colocar los postes en los portapostes. Perforar
los postes para poderlos atornillar con los portapostes.
Posizionare il padiglione. Piazzare i montanti nelle loro parti me-
talliche. Per collegare i montanti con le parti metalliche è neces-
sario perforare i montanti.
Eine Maschinenschraube vorsichtig durch die Öffnung des
H-Pfostenankers einschlagen bis sie auf der anderen Seite wieder
austritt.
Introduisez doucement dans le trou de la partie métallique, à
l’aide d’un marteau, une vis d’assemblage à écrou, et cela jusqu’à
ce qu’elle apparaisse de l’autre côté.
Carefully drill a drill screw through the opening in the concrete
anchor and into the wood until the screw comes out the other
side.
Een machineschroef voorzichtig door de opening van het beton-
anker in het hout inslaan tot ze op de andere zijde naar buiten
treedt.
Introducir por percusión cuidadosamente un bulón ordinario en la
madera a través de la apertura del anclaje de hormigón hasta que
salga por el otro lado. Después aplanar el hormigón.
Introdurre, facendo attenzione, una vite d’assemblaggio nel foro
dell’ancora di calcestruzzo nel legno no a quando essa non fuo-
riesce dall’altra parte.
1. 2.
3. 4.
Ø14mm M14

H-Pfostenanker montieren
Ancres de béton installer
Install concrete anchors
Betonankers installeren
Anclas concretas instalan
Ancora di calcestruzzo installano
H-Pfostenanker montieren
Ancres de béton installer
Install concrete anchors
Betonankers installeren
Anclas concretas instalan
Ancora di calcestruzzo installano
Die Schraube mit Mutter und 2 Unterlegscheiben xieren.
Vissez et serrez les vis à l’aide de boulons.
Attach nuts to the screws.
De schroeven met moeren xeren.
Fijar los tornillos con las tuercas.
Fissare le viti con l’aiuto dei bulloni.
Fertig einbetonierter Pfosten.
Montant installé et bétonné.
The posts are completely set in concrete.
Klaar ingebetonneerde staander.
Poste hormigonado acabado.
Montante installato e gettato nel calcestruzzo.
Füllen Sie Beton in das ausgegrabene Loch. Der H-Pfostenanker
bleibt weiterhin mit der Leiste xiert. Danach den Beton glatt-
streichen.
Remplissez les trous creusés à l’aide de béton. Les parties inféri-
eures métalliques des montants doivent encore rester maintenues
en place à l’aide des liteaux. Nivelez ensuite le béton.
Fill the holes you have dug with concrete. The concrete anchor
remains attached to the slat. Then, smooth out the concrete.
Giet beton in de put. Het betonanker blijft verder met de lijst ge-
xeerd. Daarna de beton gladmaken.
Llene el agujero cavado con hormigón. El anclaje de hormigón
continúa jado con el listón.
Riempire il foro incavato con del calcestruzzo. L’ancora in cal-
cestruzzo continua a rimanere ssata con il listello. Livellare in
seguito il calcestruzzo.
5. 6.
7.
Table of contents