KBmodel Gatehouse KkStB type 18/a 1896 User manual

Translation: Marek Kovář
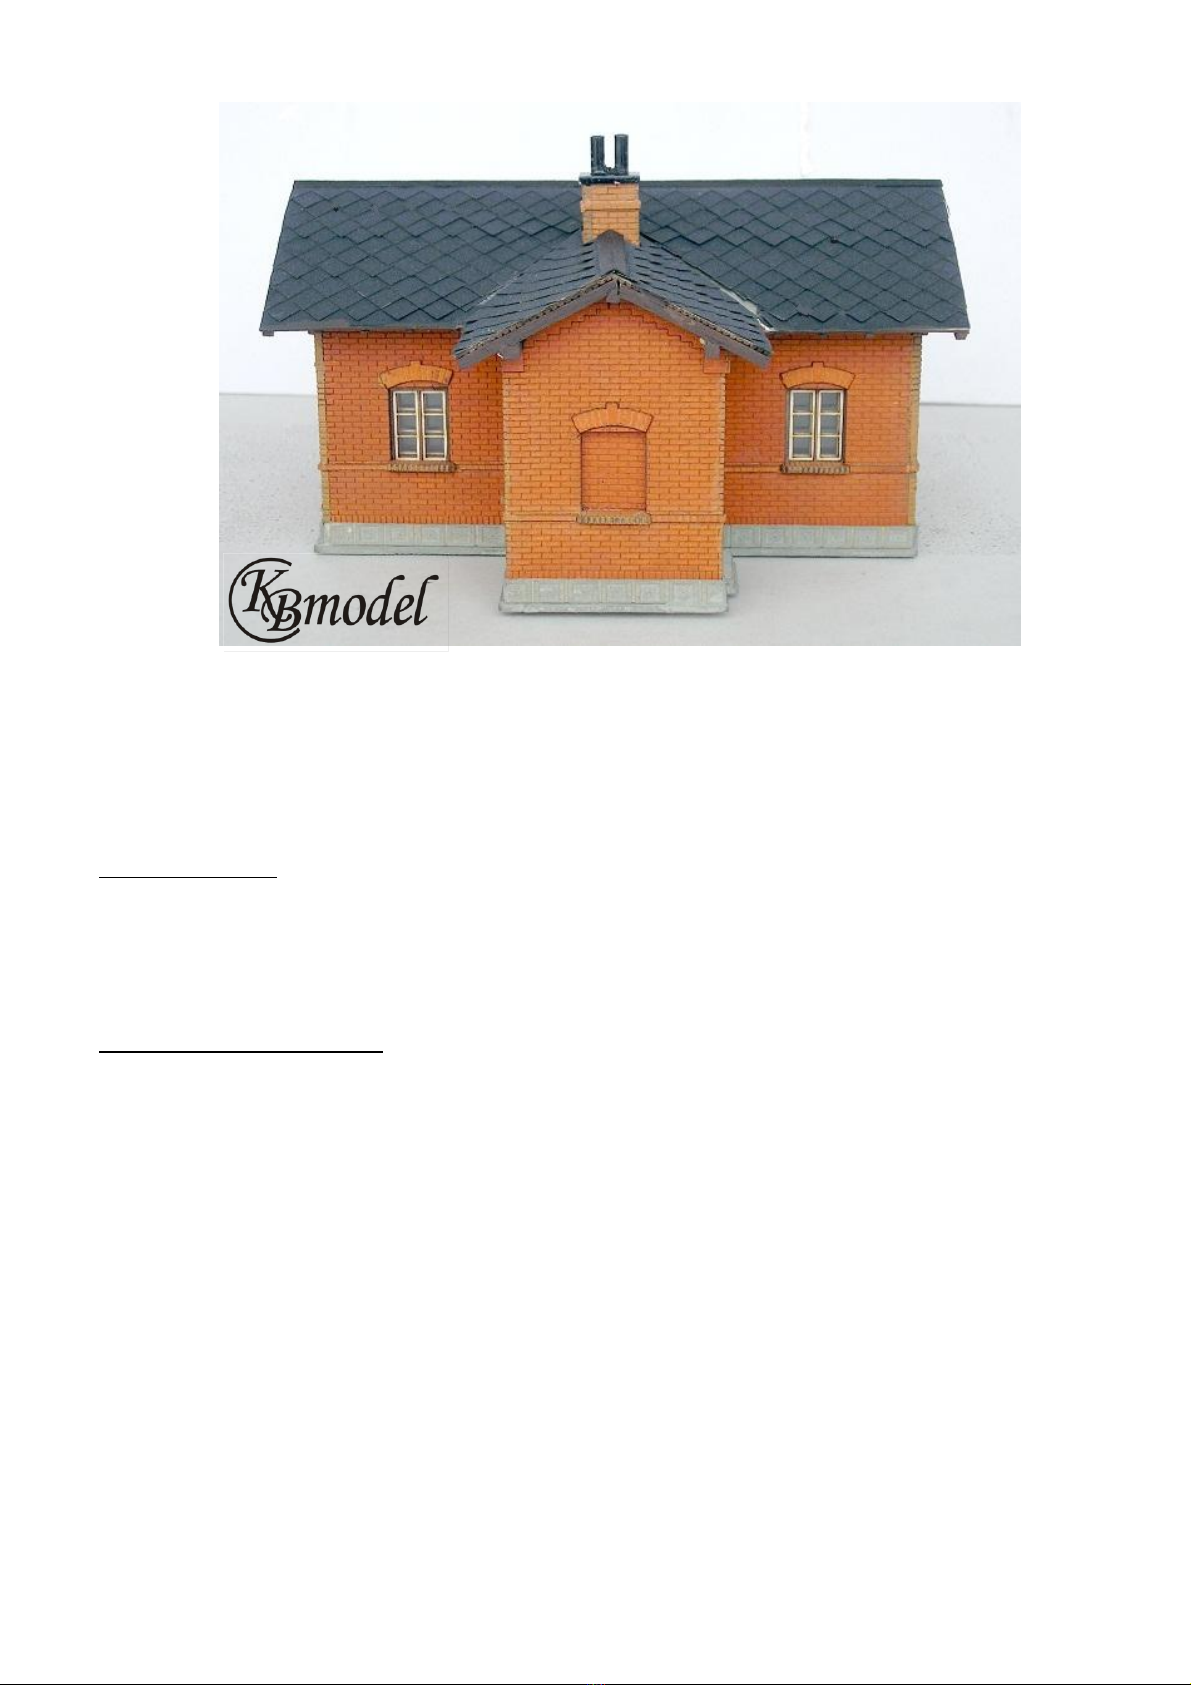
Gatehouse KkStB type 18/a 1896 –construction´s instruction
LAS 4003 TT; LAS 5003 H0
The normalizations on railway started in Austria-Hungary in 19th century. Not only in K.k. Osterrichische
Staatbahnen (KkStB), but also in many privat companies. All were standardized e.g. passenger buildings,
warehouses, heating plants, sheds, ramps, water wells, toilets and gatehouses. The gatehouse type 18/a was
approved by the head office of K.k.St.B. in Vienna in May 1896. These gatehouses were built a lots in many
different places. They were modified over time. They are not used today. Many gatehouses were destroyed or
rebuilt on recreational resorts.
Preparatory works: First read the instructions carefully and look at all parts of the construction set. Think over
each step of construction process and prepare all necessary tools and materials. Carefully remove all parts of
the construction set from the cardboard –including the small bridge and all incisions which are throughout the
cardboard. Prevent any undesirable breakage by carefully removing any parts that may not have been correctly
created during the laser-cutting.
Necessary tools and materials: wooden scantling (1,5x1,5mm for TT or 2x2mm for H0) on the inside stiffeners
of the corners, tempera´s, alcohol´s and synthetic paints, dispersed and seconds glue, neutral matt lacquer on a
furniture in a sprey, wire (diameter 1.5mm or 1mm) on the eaves, aluminium foil, knife for modellers, scalpel,
cutting backplatte, steel rule, eraser, forceps, brushes numer 4-6, sandpaper granularity 320-400.
Preliminary works: I recommend to paint before building parts 1, 31, 32 a 16 by grey colour; parts
2,3,4,5,6,7,8,9,10,11,12,13, 14, 15, 17, 18, 19, 20, 21,22, 23 and 30 bricky colour; the ends of parts 26 and 27,
edges of parts 28 and 29, parts díly 34, 36, 38, 41 and 42 in brown (or green) colour. Paint the parts 33, 35, 37
and 40 by white colour. Prepare the scantling (for scale TT 1,5mm, H0 2x2mm). The length is the same like the
length of the roof (Nr.28) –three pieces and roof (Nr.29) –three pieces. Their ends which will stick out, paint in
the same colour like parts 26 and 27 (spars).
Preparing areal parts of walls: Glue two sill ledges (Nr.13) and window stucco 10 on parts 2. Further glue one
sill ledge 15 at soil window and window arch on part 3. Also glue the arch 10 under the door. Glue window sill
ledge 13 and 15, window arches 10 and 12 on part 14. Blank off the window by part 9. Glue fourtimes sill ledges
13 and fourtimes window arches 10 on part 5. Glue the sill ledge 13 and window arch 10 on part 6. Blank off the
window by part 9. Glue the door arch 10 on part 7 and the sill ledge 14 and window arch 11 on part 8.

Translation: Marek Kovář
Set building: Put part 2 on the base Nr.1 and glue to its subsequently part 3 and 4. Close it by part 5. Complete a
lean-to from parts 6, 7 and 8. Now glue the retaining wall 16 around the building. Just as glue the decorative
bricky stipe Nr.17 in the height of window´s sill ledge. Glue a ledge under the roof - initially the side walls 18, 19
and 20 and after it gable walls (parts 22 on parts 21). Glue the stairs 32 before the both doors. Complete a
chimney from parts 30 and a head of chimney from 31. Mark gains between the bricks on the edges of gables 3,
4 and 6 by scalpel or knife. It have to continue on the gains the adjacent parts.
At this time retouch all edges and not coloured places in relevant colour. Paint the head of chimney in black
colour.
Paste into the house the ceiling (parts 24 and 25) and meanwhile don´t glue! As lately as now insert the
prepared scantlings into the holes in the gables of the building. Turn round the house and push the ceilings to
the scantlings. Glue it. Subsequently komplete construction of roof by setting of spars (26 and 27). I recommend
to stabilite by painting over by a second´s glue over the edges. Check if a chimney matchs into the holes in the
ceiling 24 and base 1.
Windows and doors: Complete the windows from the couple which go with numbers to one another –33 and
34, 35 and 36, 37 and 38. Only the soil windows are single (Nr.40). Glaze all windows by a transparent folio after
completing. The windows 33-34, 35-36 and 37-38 are double. When you complete into the couple, use the parts
(Nr.39). Glue two stripes 39 from the top on the completed window. Set in the scuncheon double window. Stick
the windows into the gatehouse. Glue the doors 41 (two parts) and 42 (two parts) at each other and glaze door
41 by a transparent folio. Stick them into the gatehouse.
Roof: Make incisions on the both end of guideline (which marked a bomb of roof 28 and 29) by stylus or pin.
Turn around the parts and drawn a abscissa between the incisions. Make a groove between the incisions by pin
(a bend is more simple). Beware of incision the roof. Glue the roof 28 on the building and also part 29. Glue the
chimney after it.
Firstly produce and glue a valley (in colour of eaves). Further cover up the roof by eternit (the first line must be
down by straight edge). A turndown strip is used like a ridge tile. Glue windward boards, sheet metal from paper
or coloured balsa from the gable side. Produce a chimney from a scantling 5x5mm for H0 (alternatively 4x4mm
for TT, 3x3 for N) and eaves (twisted aluminium folio or coloured paper bended to profile V). Produce a
windward fillet from stripe of paper or coloured balsa and glue it from gable side.
Size of model: H0 125 x 100 x 85mm (width, depth, height)
TT 91 x 73 x 62 mm
Tip for construction: Before painting, seal up the corners by the abrupt stripe of the newspaper. Alternatively
impregnace the corners with the seconds glue which prevents any soaking of water to the cardboard via
painting.
The construction´s instruction is only orientational which more so describes the individual construction steps of
the building, not a concrete modeller´s technology. Each modeller has their own methods of working. It depends
on the modeller how the final product will look like.
Have fun with this project! If you have any questions or would like further models of buildings, please contact me
(domecky.info@centrum.cz). Further models of railway buildings are offered on the website www.kb-model.eu.
You can download this construction´s instruction there, too.
Karel Barták
ver.1.0
This manual suits for next models
2
Table of contents