KDX R-091 User manual


- 1 -
CONTENTS
1 BEFORE OPERATION.......................................................................................................................................................3
1.1 PRECAUTIONS...................................................................................................................................................3
1.2 BATTERY INFORMATION OF REMOTE CONTROL...............................................................................................3
1.3 REMOTE CONTROL DESCRIPTION.....................................................................................................................4
1.4 LOCATIONS AND NAMES OF CONTROLS..........................................................................................................5
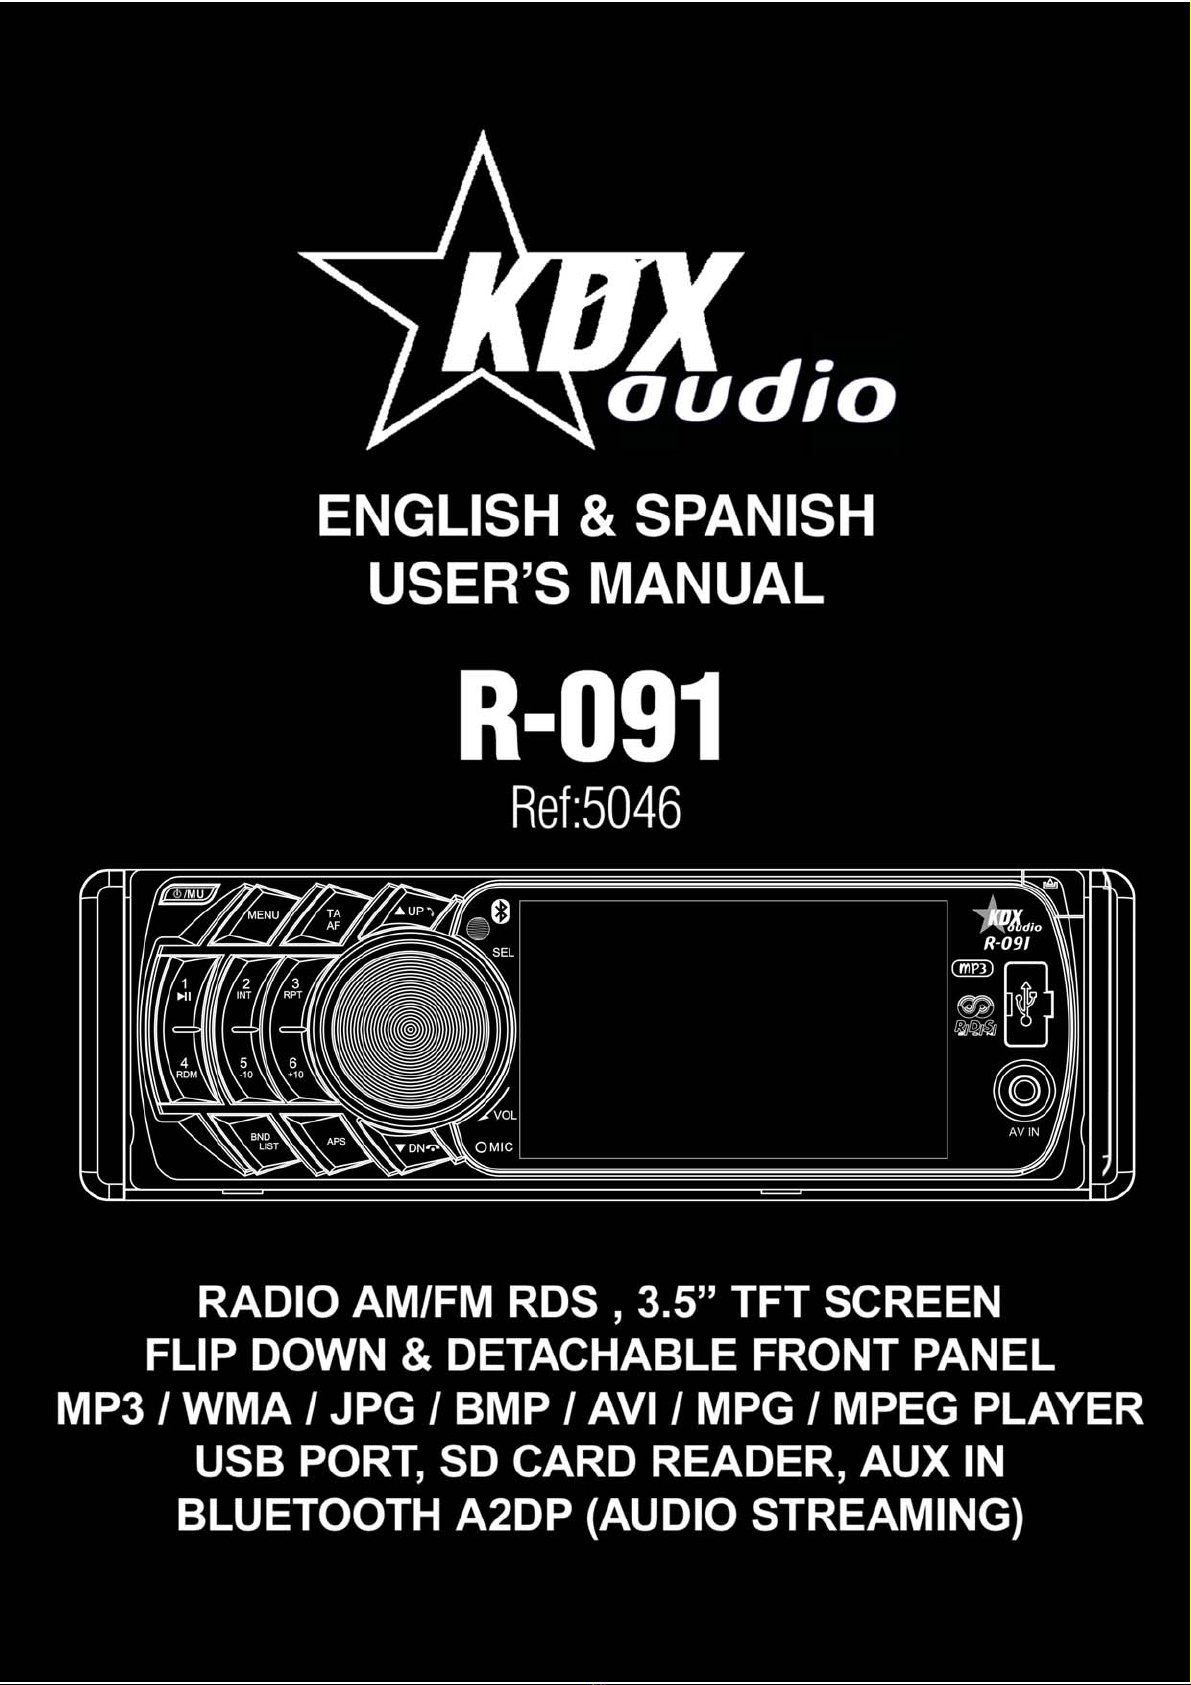
1.5 DESCRIPTION OF REAR CABINET.......................................................................................................................5
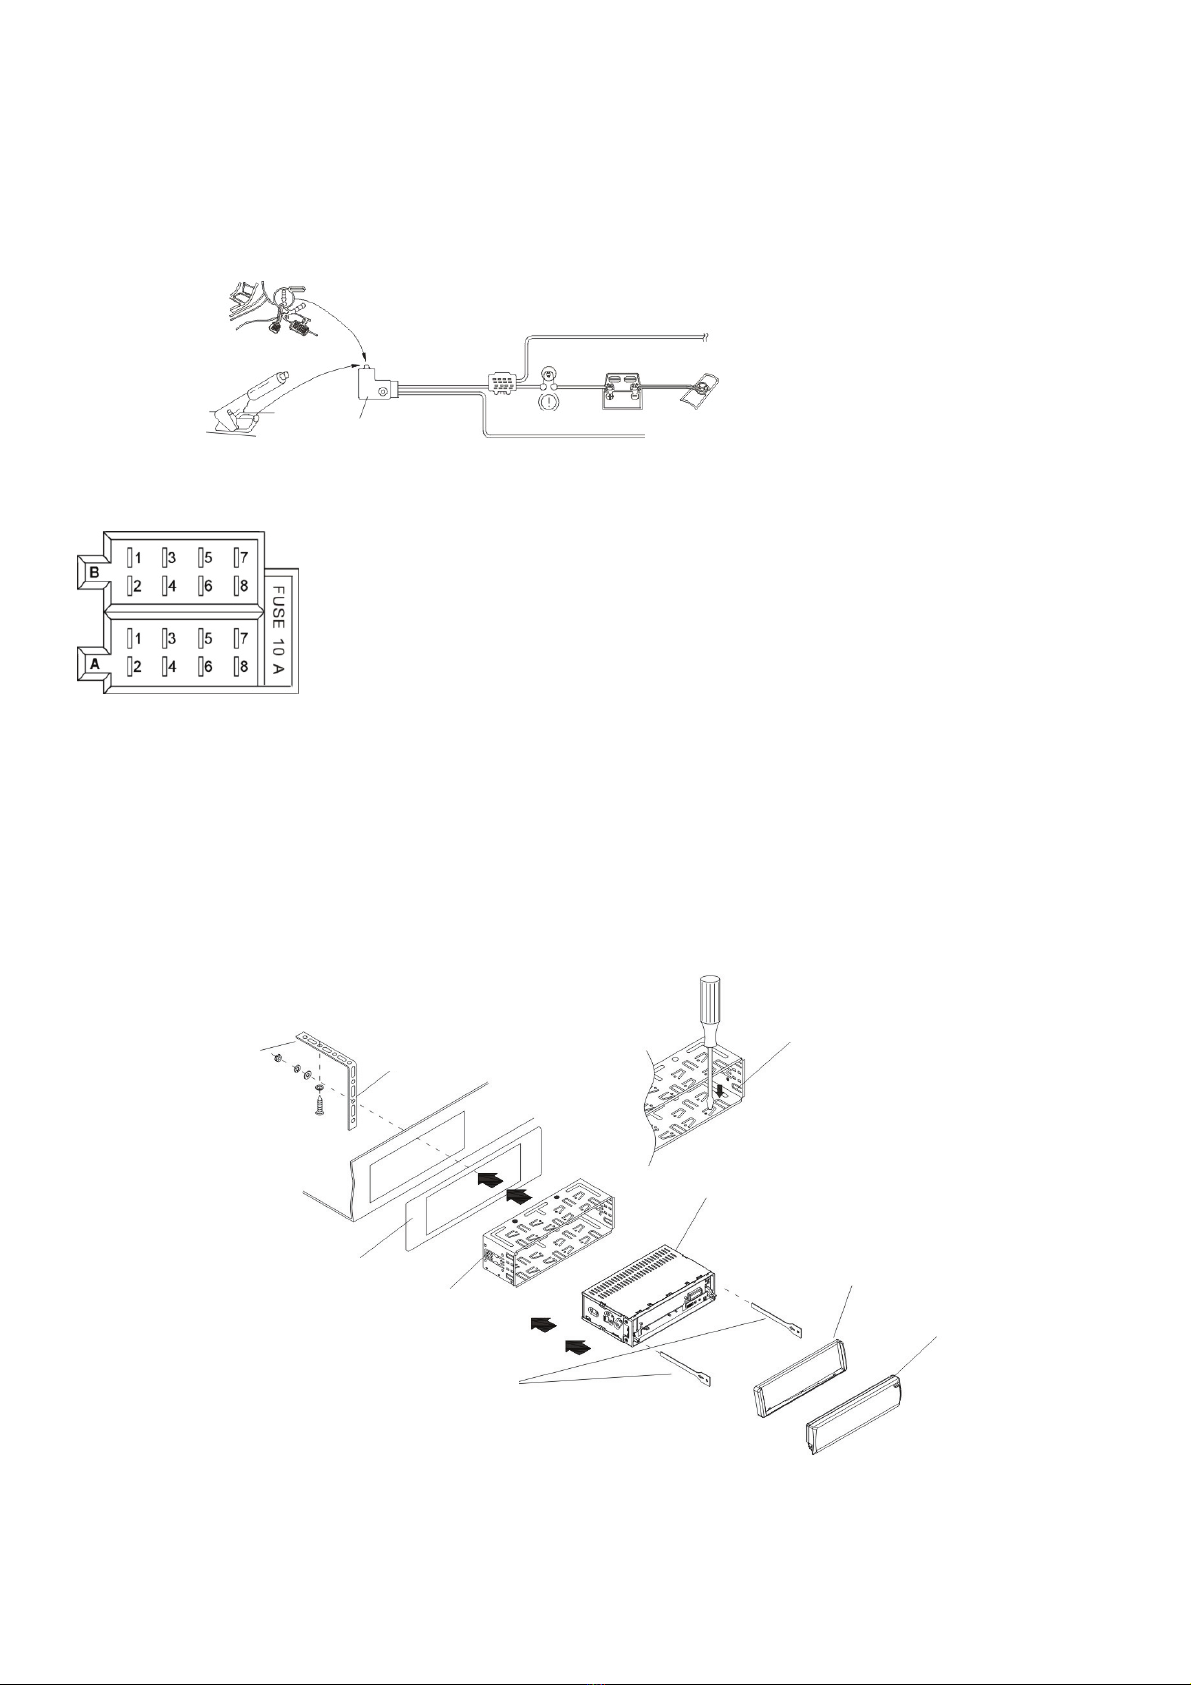
1.6 UNIT INSTALLATION..........................................................................................................................................6
2 COMMON OPERATION...................................................................................................................................................7
2.1 TURN ON/OFF THE UNIT…………………………………………………………………………………………………………….................7
2.2 TO SELECT FUNCTION MODE………………………………………………………………………………………………………………..……7
2.3 TO ADJUST SOUND LEVEL…………………………………………………………………………………………………………………………..7
2.4 TO MUTE SOUND……………………………………………………………………………………………………………………………………….7
2.5 TO DISPLAY CLOCK TIME…………………………………………………………………………………………………………………………….7
2.6 TO SELECT PRESET EQ…………………………………………………………………………………………………………………………………7
2.7 TO REMOVE FRONT PANEL…………………………………………………………………………………………………………………………7
2.8 TO TURN ON/OFF LOUDNESS MODE………………………………………………………………………………………………………....7
2.9 TO RESET THE UNIT…………………………………………………………………………………………………………………………………….8
2.10 TO ADJUST SOUND MODE………………………………………………………………………………………………………………………….8
2.11 RETURN CONTROL……………………………………………………………………………………………………………………………………..8
2.12 TO DO TURN ON/OFF TFT DISPLAY……………………………………………………………………………………………………………..8
2.13 TO DO SETUP………………………………………………………………………………………………………………………………………………8
3 RADIO OPERATION.........................................................................................................................................................9
3.1 BAND BUTTON.................................................................................................................................................9
3.2 TUNE, SEEK, UP/DOWN BUTTONS...................................................................................................................9
3.3 APS BUTTON....................................................................................................................................................9
3.4 PRESET STATION ..............................................................................................................................................9
3.4 PRESET STATION [ 1-6 ] BUTTONS....................................................................................................................9
3.5 STEREO/MONO BUTTON.................................................................................................................................9
3.6 LOC BUTTON....................................................................................................................................................9
3.7 PTY (PROGRAM TYPE) BUTTON.......................................................................................................................9
3.8 AF [ALTERNATIVE FREQUENCIES] BUTTON....................................................................................................10
3.9 TA [TRAFFIC ANNOUNCEMENT] BUTTON......................................................................................................10
4 USB OPERATION……………………………………………………....................................................................................................10
4.1 BEGIN PLAYBACK…………………………………….....................................................................................................10
4.2 PAUSE PLAYBACK…………………………………….....................................................................................................11
4.3 STOP PLAYBACK…………………………………… ......................................................................................................11
4.4 SELECT CHAPTER WITH UP/DN OR / ……………………………………………………….…………………………………..11
4.5 SELECT CHAPTER WITH NUMBER BUTTONS……………………………....................................................................11
4.6 SELECT CHAPTER WITH USB/SD MODE MENU……………………………….............................................................11
4.7 PLAYBACK WITH SPEED..................................................................................................................................12
4.8 PLAYBACK WITH LOW SPEED……………………………………...................................................................................12
4.9 PLAYBACK WITH STILL FRAME………………………………......................................................................................12
4.10 PLAYBACK REPEATEDLY……………………………….................................................................................................12
4.10.1 ONE/ALL REPEAT…………………………….......................................................................................................12
4.10.2 A-B REPEAT……………………………………….....................................................................................................12
4.11 PLAYBACK IN SCAN MODE.............................................................................................................................12
4.12 PLAYBACK FROM A SPECIFIED CHAPTER/TRACK…………………………. ..............................................................12
4.13 PLAYBACK IN RANDOM.................................................................................................................................12
4.14 PLAYBACK IN ZOOM MODE...........................................................................................................................13

- 2 -
4.15 CHANGE CAPTION LANGUAGE......................................................................................................................13
4.16 CHANGE AUDIO LANGUAGE..........................................................................................................................13
4.17 PROGRAM PLAYBACK....................................................................................................................................13
4.18 ID3FUNCTION................................................................................................................................................13
4.19 CARD READER OPERATION............................................................................................................................13
4.20 VIDEO SYSTEM MENU SETUP OPERATION........................................................................................................14
4.20.1 SYSTEM SETUP........................................................................................................................................14
4.20.2 LANGUAGE SETUP..................................................................................................................................14
4.20.3 AUDIO SETUP..........................................................................................................................................14
4.20.4 VIDEO SETUP..........................................................................................................................................15
4.20.5 SPEAKER SETUP......................................................................................................................................15
4.20.6 DIGITAL SETUP.......................................................................................................................................15
5 BLUETOOTH HANDS-FREE SYSTEM..............................................................................................................................16
5.1 ENTER BLUETOOTH MODE....................................................................................................................................16
5.2 PARING AND CONNECTION...................................................................................................................................16
5.3 USE THE MOBILEPHONE TO DO CONNECTION OR DISCONNECTION………………………………………………………………..16
5.4 CONNECTION STATUS………………………………………………………………………………………………………………………………………16
5.5 DIALING IN CONNECTION STATUS.........................................................................................................................16
5.5.1 DIAL WITH THE MOBILE PHONE DIRECTLY.............................................................................................16
5.5.2 DIAL WITH REMOTE CONTROL...............................................................................................................16
5.6 ACCEPT/EJECT /END CALL.....................................................................................................................................16
5.7 TRANSFER AUDIO TO CAR AUDIO PLAYER..............................................................................................................17
6 TROUBLE SHOOTING....................................................................................................................................................17
7 SPECIFICATION.............................................................................................................................................................18

- 3 -
1 BEFORE OPERATION
1.1 PRECAUTIONS
SAFETY
1. Power Source: The unit should be connected to power supply only of the type described in the operating
instructions or as marked on the unit.
2. The unit is designed for negative terminal of the battery which is connected to the vehicle earth. Please
confirm before installation.
3. Do not allow the speaker wires to be shorted together when the unit is switched on. Otherwise it may
overload or burn out the power amplifier.
4. Do not install the detachable panel before connecting all the wire.
ENVIRONMENT
1. Do not use this unit when water and moisture is near it.
2. If moisture forms inside the lens, it may not operate properly. To correct this problem, wait about one
hour for the moisture to evaporate.
3. If the car interior is extremely hot, do not use the player until the car has been driven for a while to cool
off the interior.
1.2 BATTERY INFORMATION OF REMOTE CONTROL
REPLACE BATTERY IN REMOTE CONTROL
1.Before using the remote control for the first time, pull the insulating sheet out of the remote control as
the direction indicated by the arrow (see fig.1)
2.Press the movable block hold as the direction indicated by the A arrow (see fig.2), then pull the battery
holder out of the remote control as the direction indicated by the B arrow (see fig.2).
3.Replace the old battery by a new battery with (+) polarity side upward (see fig.3).
4.Insert the battery holder to the original position in remote control (see fig.3).
REMOTE CONTROL INDICATIONS
1.Improper use of battery may cause overheating or explosion, so that result in injury or fire .
2.Battery leakage may cause damage to the remote control
(Battery Life: 6 months with normal use in normal room temperature).
3.Do not short the battery.
4.Do not throw the battery into the fire.
5.To avoid the risk of accident, keep the battery out of reach of children.

- 4 -
1.3 REMOTE CONTROL DESCRIPTION
1. BACK BUTTON
2. MENU BUTTON
3. POWER BUTTON
4. BUTTON
5. BUTTON
6. BUTTON
7. / CLEAR BUTTON
8. BUTTON
9. SEL BUTTON
10. PLAY/PAUSE BUTTON
11. NUMBER (0~9,+10 /- 10) BUTTONS
12. 10+/PTY BUTTON
13. SETUP BUTTON
14. MODE BUTTON
15. APS/HANG UP BUTTON
16. SEARCH BUTTON
17. RDM BUTTON
18. RPT BUTTON
19. SUBTITLE/REDIAL BUTTON
20. SLOW FORWARD BUTTON
21. ST/# BUTTON
22. ZOOM BUTTON
23. AUDIO BUTTON
24. CLK BUTTON
25. A-B BUTTON
26. INT BUTTON
27. EQ BUTTON
28. LOC/* BUTTON
29. MUTE BUTTON
30. STOP BUTTON
31. VOLUME - BUTTON
32. < BUTTON
33. OK BUTTON
34. VOLUME + BUTTON
35. BAND BUTTON
36. PROG BUTTON
37. OSD BUTTON
38. LOUD BUTTON
39. STEP/TEL BUTTON
40. TA BUTTON
41. AF BUTTON

- 5 -
1.4 LOCATIONS AND NAMES OF CONTROLS
FRONT PANEL
UNIT CHASSIS FACE AFTER REMOVINGTHE FRONT PANEL
1.5 DESCRIPTION OF REAR CABINET
1. POWER/MUTE BUTTON
2. MENU BUTTON
3. UP/ DN BUTTON
TEL/HANG UP BUTTON
4. SEL/VOL BUTTON
5. LCD
6. REL BUTTON
7. BAND/LIST BUTTON
8. APS BUTTON
9. 1/PLAY/PAUSE BUTTON
10. 2/INT BUTTON
11. 3/RPT BUTTON
12. 4/RDM BUTTON
13. 5/-10 BUTTON
14. 6/+10 BUTTON
15. AV IN JACK
16. USB JACK
17. CARD SLOT
18. RESET BUTTON
19. LED INDICATOR
20. TA/AF BUTTON
21. IR REMOTE SENSOR
REAR VIEW CAMERA(YELLOW)
SUBWOOFER(GREEN)
LEFT AUDIO IN(WHITE)
VIDEO IN(YELLOW)
RIGHT AUDIO IN (RED)
BLACK
BROWN
BROWN
BROWN
FIXED ISO FEMALE CONNECTOR
FIXING SCREW BOLT
VIDEO OUT JACK RADIO ANTENNA JACK
BLACK
PARKING LINE(GREEN)
)
BT ANTENNA)(GREY)
REVERSAL LINE (WHITE)
)
FRONT RCA OUT JACK

- 6 -
CONNECTING PARKING BRAKE LINE TO PARKING BRAKE SYSTEM BUILT IN CAR
NOTE:
1. After connecting the parking line, the video on the monitor of the front panel will be displayed only when
the hand brake is on.
2. Use the clip end of a ground line provided by manufacturer to connect the fixing screw bolt, use another
end of the Ground line to connect the negative pole of the power source. Otherwise, the video on screen
maybe flashing.
DESCRIPTION OF ISO FIXED FEMALE CONNECTOR
1.6 UNIT INSTALLATION
INSTALLATION INSTRUCTIONS
This is an anti-theft installation. The chassis wear a metal Sliding housing. Please have the wiring
connection of the Power supply, speakers and antenna as for the requirement Of the manual, then install
the metal sliding housing into the Car according to the diagram.
P
ARKING BRAKE
PARKING BRAKE SWITCH
(INSIDE THE CAR)
TO METALIC BODY
OR CHASSIS OF THE CAR
PARKING BRAKE LINE (GREEN)
CONNECTOR A
1.
2.
3.
4. MEMORY +12V
5. AUTO ANTENNA
6.
7. 12V (TO IGNITION KEY)
8. GROUND
CONNECTOR B
1. REAR RIGHT SPEAKER (+)
2. REAR RIGHT SPEAKER (-)
3. FRONT RIGHT SPEAKER (+)
4. FRONT RIGHT SPEAKER (-)
5. FRONT LEFT SPEAKER (+)
6. FRONT LEFT SPEAKER (-)
7. REAR LEFT SPEAKER (+)
8. REAR LEFT SPEAKER (-)
METAL STRAP
DASH BOARD
SLIDING METAL HOUSING
TO DRAW THE CHASSIS OUT OF THE
SLIDING METAL HOUSING, INSERT
THE LEFT AND RIGHT KEY PLATES
INTO THE TWO SIDES OF CHASSIS.
FRONT PANEL
PLASTIC TRIM OUT
UNIT CHASSIS
SELECT THE PROPER TABS
OF THE SLIDING METAL
HOUSING TO FIX THE
SLIDING METAL HOUSING.
TO REDUCE SKIPPING, PLEASE
FIX THE METAL STRAP ON THE
METAL CONNECTED TO THE
CHASSIS OF THE CAR.

- 7 -
2 COMMON OPERATION
2.1 TURN ON/OFF THE UNIT
Under power off mode, press the POWER button to turn on the unit.
Under power on mode, press and hold the POWER button on the front panel or briefly press the POWER
button on the remote control to turn off the unit.
2.2 TO SELECT FUNCTION MODE
Press the MENU button to turn to mode menu, then rotate VOL knob to select RADIO, USB (After inserting a
USB storage), Card (After inserting a SD card), AV-IN, BT or BT-MUSIC mode. After selecting, then press SEL
button to confirm your selection.
NOTE: In the mode menu, you can also use the direction button or on the remote control to select
mode and press OK button to confirm your selection.
2.3 TO ADJUST SOUND LEVEL
Rotate the VOL knob on the front panel or press the + or - button on the remote control to directly adjust
the volume level.
2.4 TO MUTE SOUND
Press the MUTE button on the remote control to turn on/off MUTE mode.
Briefly press the POWER button on the front panel also can turn on/off MUTE mode.
In MUTE mode, it can be released by pressing any button on the remote control or unit.
2.5 TO DISPLAY CLOCK TIME
Press the CLK button to display clock time on the monitor of the front panel.
2.6 TO SELECT PRESET EQ
Press the EQ button to select the preset music equalizer curves: ROCK,POP, CLASS, EQ OFF.
2.7 TO REMOVE FRONT PANEL
Press the REL button on the front panel to detach the front panel from the unit, then you can remove the
front panel.
2.8 TOTURNON/OFFLOUDNESSMODE
Press the LOUD button to turn on/off LOUDNESS mode.
When turning on LOUDNESS mode, it will enhance bass level immediately if the bass is not enough.
SD/MMC CARD

- 8 -
2.9 TO RESET THE UNIT
When the display is incorrect or the function buttons are not effective or sound is distorted, press the REL
button to detach the front panel from the unit and remove it, then use a cuspidal object to press the
RESET button, which will reset to factory default, and re-instate the correct functions
2.10 TO ADJUST SOUND MODE
To adjust the sound modes, briefly and repeatedly press the SEL button on the front panel to select one of
the sound mode such as : VOL, BAS (without preset EQ), TRE (without preset EQ), BAL, FAD.
2.11 RETURN CONTROL
Press the button on the remote control back to the previous interface.
Press the MENU button on the remote control return to the mode menu interface.
2.12 TO DO TURN ON/OFF TFT DISPLAY
Press and hold the SEL button to turn off the TFT display.
Press any button on the unit or remote control to turn on.
2.13. TO DO SETUP
In setup mode, use VOL KNOB on the front panel or direction buttons
on the remote control to select the item and press SEL button on the
front panel or OK button on the remote control to confirm your
selection.
GENERAL SETUP
Logo: this function allows to choose the starting screen.
Beep: Choose the button’s sound on/off.
CLOCK SETUP
Clock mode: Select 24 HOUR or 12 HOUR.
Clock time: Adjust the clock.
AUDIO SETUP
MBP: Choose between MBP LEFT/RIGHT/OFF.
Loud: Choose between Loudness ON/OFF.
EQ: Choose between the different types of EQ.
VIDEOSETUP
Brightness
Contrast
Saturation
Hue
Standard Video
FUNCTION
Radio region: choose the radio zone.
RDS setting: ON/OFF
GENERAL SETUP
CLOCK SETUP
AUDIO SETUP
VIDEO SETUP
FUNCTION SETUP

- 9 -
3 RADIO OPERATION
3.1 BAND BUTTON
In the radio mode, press BAND button on the front panel or remote
control to select your desired radio band of FM1, FM2, FM3, AM1 and
AM2.
Press and hold BAND button on the front panel to pop up RADIO INTERFACE 2
as right. Then use VOL knob and SEL button to select and confirm your
selection.
3.2 TUNE/SEEK UP/DOWN BUTTONS
Press and hold the UP/DN button to automatically search up/down for a
available station from current frequency.
Briefly press the UP/DN button to manually search up or down for your
desired frequency step by step.
3.3 APS BUTTON
When press and hold the APS button, the radio searches from the lowest frequency and checks the signal
strength level until 1 cycle search is finished. And the 6 strongest stations are stored to the corresponding
preset number memory bank. The AS operation is implemented in each bank of the selected band. When
the AS operation is finished, the radio executes the preset scan. After preset scanning for a cycle, it will
stop scanning and to broadcast the No.1 station of FM or AM. (It can store 3x6 stations for FM and 2x6
stations for AM in all)
When press the APS button briefly on the front panel or the remote control, the radio searches for each
preset station from the M1. When the field strength level is more than the threshold level of the stop level,
the radio holds at that preset number for few seconds with releasing mute, and then searches again. After
finishing a circle of searching, it will stop searching on the M1.
NOTE: In FM band, FM1,FM2,FM3 is checked one at a time.
In AM band, Am1, Am2 is checked one at a time.
3.4 PRESET STATION [ 1-6 ] BUTTONS
To memorize the current frequency on the current band, press and hold any one of the six Number
buttons (1-6) .
To recall the memory station on the current band, press one of the Number buttons [1-6] .
3.5 STEREO/MONO BUTTON
Press the ST button on the remote control to select the STEREO or MONO sound mode for FM band.
3.6 LOC BUTTON
When the signal of the distance radio station is very weak and the receiving effect is bad during tuning,
check whether there is the word LOC on LCD. If there is the word LOC on LCD, press this button to turn off
the LOC function, then tune again for the distance radio station.
When the signal from the local radio station is too strong, this could lead to interference. Press this button
to turn on the LOC function, and the LOC icon will be lit up on the LCD. Re-tune for the local station
required.
3.7 PTY (PROGRAM TYPE) BUTTON
Press the PTY button briefly to turn on PTY mode, then press the + or – button on the remote control or to
select one of PTY programs as follows:
RADIO INTERFACE 1
RADIO INTERFACE 1

- 10 -
NEWS – INFORM – SPORTS – TALK - ROCK – CLSROCK –
ADLT HIT – SOFT RCK – TOP40 – COUNTRY – OLDES – SOFT –
NOSTALIGA – JAZZ – CLASSICL – R&B – SOFT R&B – LANGUAGE –
RELMUSC –RETALK – PERSNLTY – PUBLIC – COLLEGE - WEATHER
When PTY group is on, pressing the 6 number buttons also can select one of PTY programs as above.
After selecting one of the PTY programs, it will display SEEK PTY and automatically search for the station of
the PTY program. If the station of the PTY program does not exist, it will display PTY NONE and then return
backtothenormalstation.
3.8. AF [ALTERNATIVE FREQUENCIES] BUTTON
Press and hold the TA/AF button, the AF switching mode is selected and the state of the AF switching
mode is displayed by AF segment in display.
•Segment off: AF switching mode off.
•Segment on: AF switching mode on, and has RDS information.
•Segment flashing: AF switching mode on, but RDS information is not received yet.
When the AF switching mode is selected, the radio checks the signal strength of the AF all the time. The
interval of checking time of each AF depends on the signal strength of the current station, from a few
minute for the strong station to a few seconds for the weak station.
Every time that a new AF is stronger than the current station, it switches over to that frequency for very
short time, and the NEW FREQUENCY is displayed for 1-2 second. Because the mute time of the AF
switching or the checking time is very short, it is almost inaudible in case of normal program. (When AF
flash on LCD, it will search for the stronger RDS station. If AF and TP flash on LCD, it can only search for
the traffic announcement station).
In FM mode, when AF is on, SEEK, (SCAN), AUTO-MEMORY function can only receive and save the RDS
program.
3.9 TA [TRAFFIC ANNOUNCEMENT] BUTTON
Press the TA/AF button shortly to turn on TA search mode. When traffic announcement is transmitted:
If the unit is in Disc Play mode, it will switch to radio mode temporarily.
Temporarily switch over to an EON linked station when EON detects a traffic announcement on that other
program, and TA, TP will be displayed on LCD.
TA interruption function:
The current traffic announcement is cancelled by pressing TA button shortly.
When TA is on, SEEK, (SCAN), AUTO MEMORY function can be received or saved only when traffic program
identification code has been received.
4. USB & CARD OPERATION
4.1 BEGIN PLAYBACK
Insert an USB or SD Card into their slots respectively, then the root menu will be displayed on the
monitor and it will play audio file automatically if the USB or SD Card include audio files.
During playback press the STOP button twice to stop playback, then pull the USB out of the USB socket; or
push the card and then pull it out of the card slot.
Press and hold BAND button on the front panel or press OSD on the remote to turn on the control List,
then rotate the VOL knob to select the function icon.
Finally press SEL button to confirm your selection.

- 11 -
Select to pause playback.
Selecttostopplayback
Select to playback next chapter/track.
Select to playback previous chapter/track.
Same as REPEAT button on remote control
To select RDM on/off
To select audio language.
To select LOUD on/off.
4.2 PAUSE PLAYBACK
During playback press the PAUSE button on the remote control to pause the
playback, press the PLAY button to resume normal playback.
4.3 STOP PLAYBACK
During playback press the STOP button once to pause the playback, then press the PLAY button to resume
the normal playback; press the STOP button twice to stop the playback, then press the PLAY button to start
playback from the beginning of the first chapter.
4.4 SELECT CHAPTER WITH UP/DN OR / BUTTONS
Press the UP/DN button on the front panel or the / button on the remote control during playback
to select the next or previous chapter to playback.
Press the UP/DN or the / button multiple times to advance multiple chapters forward or
backward.
4.5 SELECT CHAPTER WITH NUMBER BUTTONS
During playback press one of the 1~9 to directly select and play the 1st to 9th track. If you want to play
chapter with serial number bigger than 9,
For example 1, to play the 35th track/chapter, just press 3 and then press 5 on the remote.
For example 2, to play the 107 chapter, just press 1 and press 0 and then press 7 on the remote.
NOTE: Press -10 or +10 button to move up or down 10 chapters at a time. (this function only for
MP3/WMA file)
4.6 SELECT CHAPTER / TRACK WITH USB/SD MODE MENU
1.
During playback repeatedly press the back button on the remote control
return to the USB/SD mode menu. The left file sort icon is for MP3/WMA file;
the middle file sort icon is for VIDEO file; the right file sort icon is for JPG file.
If one of these 3 file sort does not exist, you can not move cursor onto the file
sort icon.
2.
Press the direction buttons to select your desired folder, file or file sort icon, then press the OK or PLAY
button to open the selected folder, or play the selected file, or display only the sort of files.
KEYBOARD INTER
F
ACE
USB INTERFACE
AUDIO INTERFACE 2AUDIO INTERFACE 1

- 12 -
During JPEG playback press one of the direction ( / / / ) buttons to change the angle of viewing picture
that is displaying as follows:
>:90degcw; <:90degccw;
^:UP<-->DOWN; v: LEFT<-->RIGHT
4.7 PLAYBACK WITH SPEED
During normal playback press and hold the UP/DN button on the front panel or the / button on
the remote control continuously to fast forward or backward at the following speeds: x2, x4, x8, x20,
normal.
During speed playback, press the PLAY button to resume normal playback.
4.8 PLAYBACK WITH LOW SPEED
During playback press the SLOW FWD button to execute the Slow Forward function.
With each consecutive pressing of the SLOW FWD button, the playback speed decreases. The speed levels
in Slow Forward as follows: x1/2, x1/3, x1/4, x1/5, x1/6, x1/7, normal.
During slow forward, press the PLAY button to resume normal playback.
NOTE: The function is only for video.
4.9 PLAYBACK WITH STILL FRAME
During video file playback press the STEP button consecutively to display the still frame forward with step
by step. Press the PLAY button to resume normal playback.
4.10 PLAYBACK REPEATEDLY
4.10.1 ONE/ALL REPEAT
During playback press the RPT button to select REP ONE, REP DIR, REP ALL or OFF.
4.10.2 A-B REPEAT
Press the A-B button if you want to repeat a specific segment on a song or a movie that you define:
1 Press the A-B button at a point (A) where you want it to be the start point of the repeat segment.
Press the A-B button again at a point (B) where you want it to be the terminal point of the repeat
segment. Then it will play the segment repeatedly.
2 To cancel the A-B repeat mode and resume normal playback, press the A-B button for the third time.
NOTE: During playback points A and B must be within the same chapter.
4.11 PLAYBACK IN SCAN MODEL
During playback press the INT button to play the previous 15 seconds part of each chapter. Press the INT
button again to resume normal playback.
4.12 PLAYBACK FROM A SPECIFIED CHAPTER/TRACK
During playback press the SEARCH button to display an interface and highlight the track item, then use the
number buttons to input the serial number of the track; finally press the OK or PLAY button to play the
selected track.
4.13 PLAYBACK IN RANDOM
During playback press the RDM button to switch between RANDOM (ON)/ RANDOM OFF. When in
RANDOM(ON) mode, it will play in random. (This function is only for MP3/WMA files)

- 13 -
4.14 PLAYBACK IN ZOOM MODE
During video playback, press the ZOOM button continuously to enlarge a certain area of the images on the
screen with these multiples: ZOOMx2, ZOOMx3, ZOOMx4, ZOOMx1/2, ZOOMx1/3, ZOOMx1/4, ZOOM OFF.
Press one of the / / / buttons to select the area you want to enlarge.
4.15 CHANGE CAPTION LANGUAGE
During video playback, press the SUBTITLE button repeatedly to select the language of the caption or turn
off the caption. (depend on the video file used.)
4.16 CHANGE AUDIO LANGUAGE
During video playback, press the AUDIO button repeatedly on the remote control to select the desired
language type(depend on the video file used).
4.17 PROGRAM PLAYBACK
It allows you to enter the order in which you want some chapters of MP3/WMA files to playback.
1 During playback press the PROG button to enter a program interface as follows:
2 Use the direction buttons to move cursor onto the desired place for inputting the sequence number.
3 Use the number button to input desired sequence number of chapter/track with desired sequence.
4 Use the direction button to move cursor onto PLAY item, then press the OK button to play the
programmed chapters in programmed order; only pressing the PLAY button also can play the programmed
chapters/tracks in programmed order.
* To exit program playback, firstly press the STOP button, then press the PLAY button to enter sequence
playback; or press the PROG button twice again.
* To remove the all programmed sequence numbers, move the cursor onto CLEAR item, then press the
OK button.
* To change the programmed sequence, move the cursor onto the item you want to change, input the
desired sequence number.
4.18 ID3 FUNCTION
In MP3/WMA mode, during playback the information of the file name, folder name, song’s title, artist and
album will be scrolling on the monitor. As long as the MP3/WMA file contains relevant Id3 tag information
in version 1.0/2.0 format, the 3 items underlined above will be scrolling on the LCD display; otherwise they
will not.
4.19 USB & CARD READER OPERATION
Power on the player, then insert the USB storage or SD Card (firstly flip down the front panel), and then the
monitor will display the root menu of the USB storage or SD Card.
All the operations are same as ones of the corresponding format. When you want to pull out the Card,
firstly push it, and then pull it out.

- 14 -
4.20 VIDEO SYSTEM MENU SETUP OPERATION
1. Press the SETUP button on the remote control to access the VIDEO System Menu on the monitor.
2. There are 6 setup pages in all for the System Menu. Press the or button to select an desired
setup page.
3. Press the or button to select an setup item in the selected setup page.
4. Press the button to enter the setup item. Then press the or button to select a desired mode
of the setup item, finally press the OK button to confirm it.
* Press the button to return to the upper level.
* Press the SETUP button again or use the direction buttons to highlight the item of the EXIT SETUP and
then press the OK button to exit the System Menu.
For the VIDEO System Menu, there are 6 setup pages in all. They display as follows:
4.20.1 SYSTEM SETUP
TV TYPE
The setup item is for matching TV screen size.
4:3 PS:
Choose the item when connecting a TV set with 4:3 screen. When
playing the pictures with 16:9 size, the left and right parts of the video
will be cut out, and display in full screen.
4:3 LB:
Choose the item when connecting a TV set with 4:3 screen. When
playing the pictures with 16:9 size, the top and bottom parts of the TV
screen will be turned into a black square respectively.
16:9: Choose the item when connecting a TV set with16:9 wide screen.
DEFAULT
This item is for making all setup items change back to original status.
4.20.2 LANGUAGE SETUP
OSD LANGUAGE
This item is for selecting the language of the SYSTEM MENU and all
operating prompt interface displayed during playback.
AUDIO LANG
This item is for selecting a audio language.
SUBTITLE LANG
This item is for selecting a subtitle language.
MENU LANG
This item is for selecting a disc menu language.
4.20.3 AUDIO SETUP
KEY
It is for selecting your desired basic music tone(from low to high).

- 15 -
4.20.4 VIDEO SETUP
BRIGHTNESS
It is for adjusting the brightness of the video output.
CONTRAST
It is for adjusting the contrast of the video output.
HUE
It is for adjusting the hue of the video output.
SATURATION
It is for adjusting the saturation of the video output.
SHARPNESS
It is for adjusting the sharpness of the video output.
4.20.5 SPEAKER SETUP
DOWNMIX
It is for selecting your desired sound effect when there is no center speaker and subwoofer. There are 3
modes: LT/RT, STEREO, VSS.
LT/RT
When playing a disc with PRO LOGIC Dolby stereo effect, choose the item, so it will output audio signal with
vivid theatre effect.
STEREO
If you choose the item, when outputting audio signal with 5.1 channels, it will output the left and right
channels of signal ; when outputting audio signal with 2 channels, it will output the common 2 channels of
stereo signal.
VSS
If you choose the item, when playing a disc recorded with 5.1 channels, the main channel speakers can
output audio signal with VSS effect.
4.20.6 DIGITAL SETUP
DYNAMIC RANGE
After selecting the compression mode of LINE OUT, set the item, so you
can adjust the linear compression ratio. If you set it to be FULL, the
Peak-to-Peak value of the audio signal is the minimum; if you set it to be
OFF, the Peak-to-Peak value is the maximum.
DUAL MONO
It is for selecting a desired audio output mode for the left and right ways
of signal. It is mainly for Karaoke of Ac3. There are 4 modes in all as follows: STEREO, MONO L, MONO R,
MIX MONO.

- 16 -
5 BLUETOOTH HANDS-FREE SYSTEM
5.1. ENTER BLUETOOTH MODE
Press MODE button on the remote control repeatedly to select BT mode, it
will display BT-Dial interface as right.
NOTE: Press MENU button to display mode menu inferface then rotate the
VOL knob to select BT mode, finally press SEL button also can enter the
mode.
5.2.PAIRING AND CONNECTION
1 Turn on the Bluetooth mode of the mobile phone;
2 Select the item of Finding the Bluetooth Device and enter it. After finishing the finding, it will show the
name of the Bluetooth Device if finding a Bluetooth Device. Select it and enter it, then it will show an
interface that ask you to input a password, input the password 0000 and then enter it. Then it will tell you
pair OK.
3 For some mobile phones, they can automatically connect with the BT device of the car audio system
after pairing is ok; for some mobile phones, they need to select the paired BT device and press the
CONNECTION button . When connection is ok, the LCD of the car audio system will show LINK OK.
5.3 USE THE MOBILEPHONE TO DO CONNECTION OR DISCONNECTION
Use the mobile phone to do connection or disconnection In the connection status, find the paired and
connected Bluetooth Device, then press the disconnection button to do disconnection.
In the disconnection status, find the paired and disconnected Bluetooth Device, then press the connection
button to do connection.
5.4 CONNECTION STATUS
In the connection status: the audio of mobile phone transfers to the car audio system whenever a dialing
takes place or receiving a call.
5.5 DIALING IN CONNECTION STATUS
5.5.1 DIAL WITH THE MOBILE PHONE DIRECTLY
You can dial a telephone number directly using your mobile phone as you use to do with BT connection to
car audio player
5.5.2 DIAL WITH REMOTE CONTROL
Dial with remote control with the following procedures:
1 Input telephone number with number buttons 0-9
* Short press CLEAR button to cancel the wrongly input number if necessary
2 Short press TEL to execute the dialing.
3 To redial the last phone number dialed, press REDIAL button on the remote control to dial the last
phone number.
5.6 ACCEPT/REJECT/END CALL
5.6.1 ACCEPT A CALL
During ringing, short press TEL button to accept the call
5.6.2 REJECT A CALL
During ringing, short press HANG UP button to reject the call
Bluetooth mode interface

- 17 -
5.6.3 END A CALL
During talking, short press HANG UP button to end the call
5.7 TRANSFER AUDIO TO CAR AUDIO PLAYER
To transfer the audio of a file played by Mobile Phone to the Car Audio
Player In the connection status between the Bluetooth devices of the Car
Audio Player and a Mobile Phone, if the mobile phone can play audio or
video files and support A2DP, when the Mobile Phone plays an audio or
video file(For some Mobile Phones, You must select Play by BT firstly),
the audio of the playing file will be transferred to the Car Audio Player.
In A2DP mode, if the Bluetooth device of the Mobile Phone support AVRCP, the functions of the MUTE, EQ,
LOUD, +, -and SEL buttons are the same as one in media mode(no fast forward/backward functions for
the / buttons).
The other buttons available in media mode are not available.
6 TROUBLE SHOOTING
Please read the user’s manual carefully before using the player. If you have any troubles in using this
player, try to solve the problems by the suggestions mentioned below. If you can not remove the trouble
after using all the suggestions, please contact the company or the technical service center authorized by
us. For the sake of your safety, please do not open the cover and repair the player by yourself, if that, it
may cause electric shock.
NO PICTURE, SOUND AND INDICATION
* Ensure that the power switch is on.
* Ensure that the wall inlet is ok.
* Ensure that the power cord is not damaged or the fuse is not blown.
* Ensure that the power plug is connected to the inlet tightly.
NO SOUND BUT PICTURE OK
* Ensure that the player s audio output has a good connection with TV s audio input.
* Check whether the audio connector is damaged.
* Check whether you have turned down the volume.
* Ensure that you have set the right AUDIO setup of the player.
* Ensure that the audio is not under mute.
NO PICTURE BUT SOUND OK
* Ensure that the player s video output has a good connection with TV’s video input.
* Ensure that you have turned your TV to the AV input channel connecting to your player.
* Check whether the video connector is damaged.
* Ensure that you have set the right VIDEO settings of the player.
BLACK AND WHITE PICTURE OR SCREEN ROLLING
* Ensure that you have set the right TV SYSTEM (e.g. PAL, NTSC) setting.
FLAWS OF PICTURE OR SOUND
* Check whether the setting of AUDIO is right.
* Check whether the AV connector and the output terminal is stained.
* Check whether there is condensation inside the Lens. If so, leave the player off for an hour or so, then
try again.

- 18 -
REMOTE CONTROL IS INSENSITIVE OR DOES NOT WORK
* Check the batteries of remote control and make sure that they are not flat.
* Direct the remote control to the IR sensor of the player.
* Check whether there are some obstacles between the remote control and IR sensor.
SOME FUNCTION BUTTONS DO NOT WORK
* Turn off the power, then turn on again.
* Reset the unit to zero, then turn on again.
* Remove the front panel from the unit, then install it again and then turn on again.
THE RADIO DOES NOT WORK
* Check whether the antenna cable is connected firmly. Or manually tune for a station.
7 SPECIFICATION
GENERAL SPECIFICATION
Power Supply Requirement....................................................................DC 12V
Maximum Power Output........................................................................4 x 25W
Dimensions(w x h x d)...........................................................................178 x 50 x 110mm
USB/CARD SPECIFICATION
Format....................................................................................................MP4/JPEG/MP3/WMA
Output Video System............................................................................NTSC
Audio System........................................................................................24 bit/96KHz
Video Specification
Video Type...........................................................................................16:9 and 4:3
Video Output level..............................................................................Composite:1.0± 0.2Vp-p
Load impedance: 75 ohms
AUDIO SPECIFICATION
Audio Output(Analog audio).............................................................2000mV +/-300
Frequency Response........................................................................20Hz ~ 20KHz(at 1KHz 0 dB)
S/N Ratio(Audio)...............................................................................90dB(at 1KHz 0 dB)
Separation.........................................................................................50dB
RADIO SPECIFICATION
FM Section
Frequency range...............................................................................87.5MHz - 108.0MHz
Usable sensitivity..............................................................................3uV
I.F Frequency....................................................................................10.7MHz
AM Section
Frequency..............................................................................................522KHz - 1620KHz
[F] La mention de ce symbole sur le produit ou son emballage signifie que ce produit ne doit pas être jeté avec le reste de vos ordures ménagères. Vous
avez pour responsabilité de jeter cet équipement usagé en l'emmenant dans un point de ramassage destiné au recyclage d'équipement électrique et
électronique usagé. Le ramassage et le recyclage séparés de votre équipement usagé au moment du rejet favorise la conservation des ressources
naturelles et garantit un recyclage respectant la santé de l'homme et l'environnement. Pour plus d'informations sur les lieux où vous pouvez déposer vos
équipements usagés pour recyclage, veuillez contacter votre bureau local, votre service de rejet des ordures ménagères ou le magasin où vous avez
acheté le produit.
[E] This symbol on the product or on its packaging indicates that this product must not be disposed of with your other household waste. Instead, it is
your responsibility to dispose of your waste equipment by handing it over to a designated collection point for the recycling of waste electrical and
electronic equipment. The separate collection and recycling of your waste equipment at the time of disposal will help to conserve natural resources
and ensure that it is recycled in a manner that protects human health and the environment. For more information about where you can drop off your
waste equipment for recycling, please contact your local city office, your household waste disposal service or the shop where you purchased the
product

19
R-091
Ref: 5046
RADIO AM /FM RDS
PANTALLA 3.5”, PANEL FRONTAL ABATIBLE Y EXTRAIBLE
REPRODUCTOR MP3 / WMA / JPG / BMP /AVI / MPG / MPEG
PUERTO USB, LECTOR TARJETAS SD, ENTRADA AUX
BLUETOOTH A2DP (AUDIO STREAMING)
Table of contents
Languages:
Popular Car Stereo System manuals by other brands

Dual
Dual DA10004D Installation and owner's manual

Sony
Sony CDXGT640UI - MP3/WMA/AAC Player CD Receiver operating instructions

Sony
Sony CDX-M730 (XT-XM1) Product guide

Ssl
Ssl SD717MB instruction manual

Discount Car Stereo
Discount Car Stereo A2D-CR12 Quick start installation guide

Sony
Sony XR-C6100 Service manual