Kelvinator KC9650BL User manual


DearCustomer:
Thankyouforchoosingourproduct.
Pleasereadthismanualcarefullybeforeusingandinstallingtheappliance.Theinstructionsinthis
manualareforthebestinstallation,useandcareoftheappliance.
Youwillfindthatthecleanlinesandmodernlookofyourovenblendsinperfectlywithyourkitchen
decor.Theoveniseasytouseandperformstoahighstandard.
Wealsomakearangeofproductsthatwillenhanceyourkitchen,suchascookerhoods,built‐inhobs,
built‐inceramichobsandbuilt‐inovens,microwaves,washingmachines,tumbledryers,dishwashers
andrefrigerators.
Wemakeeveryefforttoensurethatourproductsmeetallyourrequirements.Ourservicedepartment
isatyourdisposaltoanswerallyourquestionsandtolistentoyoursuggestions.
Pleasetakenotofthewarrantysectionatthebackofthismanualandretainalldocumentsrelatedto
thepurchaseofthisproduct.
Wearecommittedtoprovidingincreasinglyefficientproductsthatareeasytouse,environmentally
friendly,attractiveandreliable.
1

Index
pag.3-4
Instructions for installation:
Dimensions and installation features pag. 5
Electrical connection pag. 6
Ventilation and gas connection pag. 6
Adaptation to different types of gas pag. 7
Setting the minimum flame pag. 7
Burner and injector characteristic table pag. 8
Instructions for use
Description of the main parts of the appliance pag. 8
Ignition and operation of the burners pag. 9
Advice on the use of gas burners pag. 9
Oven function pag. 10
Electronic programmer pag. 11
Maintenance and cleaning pag. 14
CAUTIONS
pag. 12Instructions for cooking
2

CAUTIONS:
ThisApplianceshouldbeinstalledinaccordancewithlocalgasregulationsandonlyusedinawell
ventilatedspace.Readtheinstructionsbeforeinstallingorusingthisappliance.
Beforeusingtheovenwesuggest:
‐Heattheovenatmaximumtemperaturefor45minutestoremoveunpleasantodoursandsmoke
causedbyworkingresiduesandthermalinsulation.
‐Carefullycleantheovenwithwarm,soapywaterandrinseit.Donotuseahoseorspraywateronto
theappliance.
‐Veryimportant:Keepthisinstructionbookletsafeforusefulreferences.
‐Thisapplianceisdesignedforuseinprivatehomes.
‐Thisapplianceisnotintendedforusebyyoungchildren.
‐Donottouchtheheatingelementsinsidetheoven.
‐Whenthegrillison,alltheaccessibleelementsarehot,hence,keepchildrenawayfromthese
elements.
‐Thisapplianceshouldbeinstalledbyanauthorisedpersonandinaccordancewiththemanufacturer’s
installationinstructions,localgasfittingregulations,municipalbuildingcodes,electricalwiring
regulationsandlocalwatersupplyregulations.
‐Beforeswitchingthisapplianceon,checkthatitiscorrectlyregulatedforthetypeofgasavailable(see
relevantsection).
‐Beforemaintenanceorcleaning,disconnecttheappliancefromthemainsandwaitforittocooldown.
Donotuseharshabrasivecleanersorsharpmetalscraperstocleantheovendoorglassastheycan
scratchthesurface,whichmayresultintheglassshattering.
‐Whentheburnersarelit,makesurethattheflameisalwaysregular.Beforeremovingthe
saucepan/pot,turntheburnersoff.
‐Servicingofthisapplianceshouldonlybecarriedoutbyauthorisedpersonnel.
‐Iftheelectricitysupplycordisdamaged,itmustbereplacedbyauthorisedpersonnelorqualified
personinordertoavoidhazard.
‐Theuseofagasapplianceproducesheatandhumidityinaroom.Makesurethattheroomiswell
ventilated,keepingnaturalventilationoutletsopenorinstallingacookerhood.
‐Ifagasapplianceisusedforalongperiodoftimethenitmayrequireextraventilation(openinga
windoworincreasingthevolumeofthecookerhood).
‐Neverlinetheovenwithaluminiumsheets.
‐Becarefulnottousesaucepans/potswithunstableordeformedbottomsontheburnerstoavoid
overturningorspilling.
‐Ifthemainsofaburneristurnedoffaccidentally,turnoffthecontrolknob.Onlylighttheovenagain
afterwaitingatleastaminute.
‐Keeppackagingoutofreachofchildrenatalltimes.
‐Alwaysuseovengloveswhenremovingandreplacingfoodintheoven.
3


UnRegistered

ELECTRICAL CONNECTION
The appliance is fitted with an Australian approved 15 Amp flexible cord and plug which must be connected
to a correctly earthed socket outlet. The manufacturer is not liable for any direct or indirect damage caused by
faulty installation or connection. It is therefore necessary that all installation and connection operations are
carried out by qualified personnel complying with the local and general regulations in force.
The wire section on the cable must not be less
Than1.5mm (3×1.5cable).Use only the special
cables available at our service centers.
CONNECTION OF THE FEEDING CABLE TO THE MAINS
Connect the feeding cable to a plug suitable for the load indicated on the rating plate of the product. In case of
a direct connection to the mains (cable without plug), it is necessary to insert a suitable omnipolar switch
before the appliance, with minimum opening between contacts of 3 mm (the grounding wire should not be
interrupted by the switch).
Before connecting to the mains, make sure that:
The electrical counter, the safety valve, the feeding line and the socket are ade
quate towithstand the maximum load required(see rating plate).
The supply system is regularly grounded, according to the regulations in force.
The socket or the omnipolar switch can easily be reached after the installation
of the oven.
After carrying out the connection to the mains, check that the supplying cable
does not come into contact with parts subject to heating.
Never use reductions, shunts, adaptors which can cause overheating or burning.
The manufacturer is not liable for any direct or indirect damage caused by faulty installation or connection. It
is therefore necessary that all installation and connection operations are carried out by qualified personnel
complying with the local and general regulations in force.
Electrical features
Oven light 25W
Upper heating element 1950W
Bottom heating element 1800W
Grill heating element 2250W
Circular heating element 1800W
Ventilator motor 30W
Cooling fan 11W
This appliance shall be installed only by authorised persons and in accordance with the manufacturer's
installation instructions, local gas fitting regulations, municipal building codes, electrical wiring
regulations, local water supply regulations.
Ventilation
In general, the appliance should have adequate ventilation for complete combustion of gas, proper flueing
and to maintain temperature of immediate surroundings within safe limits.
Combustible Surfaces
Any adjoining wall surface situated within 200mm from the edge of any hob burner must be a suitable non-
combustible material for a height of 150mm for the entire length of the hob. Any combustible construction
above the hotplate must be at least 600mm above the top of the burner and no construction shall be within
450mm above the top of the burner. Zero clearance is permitted on side and rear adjoining surfaces below the
hob.
Gas connection
The appliance must be connected to the gas supply or the cylinder according to the specifications of the
standards and after checking that it is adjusted for the type of gas available.
The gas connection is male 1/2" BSP and is situated 55mm from the right and 560mm from the floor.
There are two ways to carry out
the connection to the main gas line:
A. The Cooker can be connected with the cuprum material . Loosen the tie-in down and connect one terminal
of the pipe with the gas elbow
B. The cooker can be connected with a Flexible Hose, which is 10mm ID, class B or D,
Spit motor 4W
It's
necessity of changing the flexible tube whenthe national conditions require it.
2L
N
6

7
between 1 - 1.2m long. The hose should not be subjected to abrasion, kinking or permanent deformation and
should be able to be inspected along its entire length. Unions compatible with the hose fittings must be used
and connections tested for gas leaks.
.The fixed consumer piping outlet should be at approximately the same
height as the cooker connection point, pointing downwards and approximately 150mm to the side of the
cooker. The hose should be clear of the floor when the cooker is in the installed position. Fix one end of the
chain on the screw next to the gas inlet connection and the other end should be anchored to the floor/wall so
that the chain prevents strain on the hose connections when he cooker is pulled forward.
The appliance is factory set for Natural gas. The test point pressure should be adjusted to with the
Wok burner operating at maximum.
The appliance is set up to operate with the gas specified on the gas type label placed on the back of the
appliance.
To perform these operations the qualified installer will follow the indications given in the "Adaptation to the
various types of gas" section. For safer operation make sure that the supply pressure respects the values given
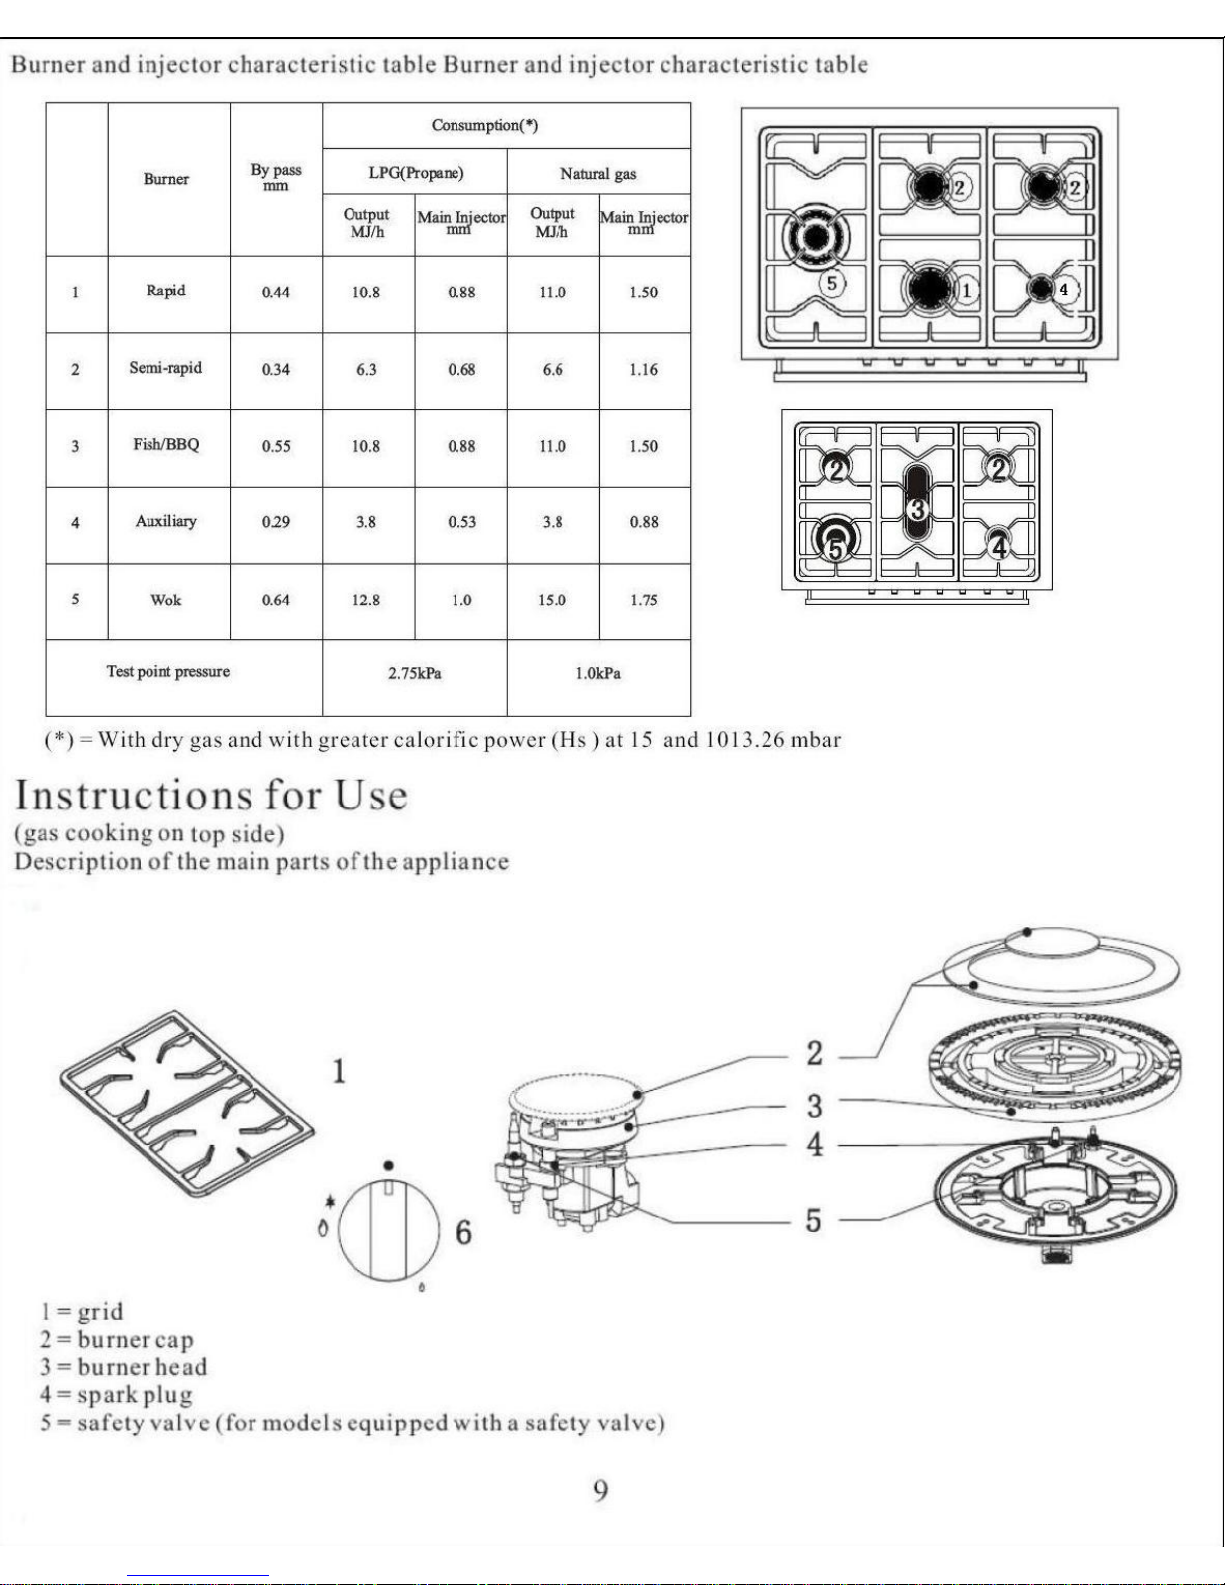
in the "Table of burner and injector characteristics".
If installing for use with gas, ensure a gas regulator suitable for a supply pressure of is part of the
gas tank supply and the test point pressure is adjusted to .
Once the appliance has been installed, make sure that the gas pipe is neither squashed or damaged by moving
parts.
Before Leaving - Check all connections for gas leaks with soap and water. DO NOT use a naked flame for
detecting leaks. Ignite all burners both individually and separately to ensure correct operation of gas valves,
burners and ignition. Turn gas taps to low flame position and observe stability of the flame for each burner
individually and separately. When satisfied with the operation of the cooker, please instruct the user on the
correct method of operation. In case the appliance fails to operate correctly after all checks have been carried
out, refer to the authorised service provider in your area.
Adaptation to different types of gas
To adapt the appliance to a gas different from that
for which it was set up (see gas type label inside
the warming compartment door) proceed as follows:
remove the grids
remove the burners caps and burner heads
with a 7 mm socket spanner unscrew and remove the injectors.
replace the injectors with those supplied corresponding to the
gas available (see burner and injector characteristics Table)
replace the various parts proceeding in reverse.
When converting from Natural Gas to ensure that theNG regulator is removed and replaced with the Test
Point Assembly. A gas regulator suitable for a supply pressure of should be part of the gas tank supply and the
test point pressure should be adjusted to
Setting the minimum flame
The flame on the small output is regulated by the factory.
When the injectors have been replaced or there are special
mains pressure conditions, it may be necessary to regulate
the minimum flame again. The operations necessary to set
the minimum flame are as following:
light the burner ;
turn the knob to the minimum position ;
take out the knob (and gasket if there is one) ;
The flexible tube shall be fitted in such a way that it cannot come into
contact with a moveable part of the housing unit (e.g. a drawer)and does not pass through any space
susceptible of becoming congested
20mbar
LPG 29mbar
29mbar
When converting from Universal LPG to Natural Gas ensure that the LPG test point is removed and replaced
with the CE Approved NG Regulator supplied in this kit. The test point pressure must be adjusted to
20mbar with the largest burner operating on maximum flame.
When converting from Natural Gas to Universal LPG ensure that the NG regulator is removed and replaced
with the Test Point Assembly supplied in this kit. An CE Approved gas regulator suitablefor a supply pressure
of 29mbar should be part of the gas tank supply and the test point pressure must be adjusted to 29mbar.
LPG
the pressure according to the data plate.
l
l
l
l
l
l
l
l

THE BURNERS REQUIRE NO REGULATION OF THE PRIMARY AIR.
ABNORMAL OPERATION
ANY OF THE FOLLOWING ARE CONSIDERED TO BE ABNORMAL OPERATION
AND MAY REQUIRE SERVICING:
l Yellow tipping of the hob burner flame.
lSooting up of cooking utensils.
lBurners not igniting properly.
lBurners failing to remain alight.
lBurners extinguished by oven door.
lGas valves, which are difficult to turn.
IN CASE THE APPLIANCE FAILS TO OPERATE CORRECTLY, CONTACT
THE AUTHORISED SERVICE PROVIDER IN YOUR AREA.
put the knob back on and turn it quickly from the maximum position to the minimum position, checking
that the flame does not go out ;
l for burners with safety valve make sure that the regulation obtained is sufficient to maintain heating of
the thermocouple. If it is not, increase the minimum
l
8
l
l
LPG TO NG:Use a thin blade screwdriver to turn the by-pass screw located above left of the gas
valve,shaft as shown right. Turn gently the by-pass screw clockwise to the end completely then turn it
anti-clockwise 1 turn for the Triple ring,7/8 turn for the Fish,3/4 turn for the Rapid,1/2 turn for the Semi-
Rapid and 3/8 turn for the Auxiliary .
NG TO LPG: Use a thin blade screwdriver to turn the by-pass screw located above left of the gas valve
shaft as shown right.Turn gently the by-pass screw clockwise to the end.


Service and Spares
In the event of your appliance requiring service, or if you wish to purchase spare
parts, contact your local Kelvinator Service Centre by telephoning:
010 207 3000 (South African Customers)
+27-10-207-3000 (International Customers)
Help us to help you
Please determine your type of enquiry before writing or telephoning. When you
contact us we need to know:
Your name
Telephone Number
Physical Address where appliance is located
Model and Serial Number of the appliance
Clear and concise details of the fault
Customer Care
For general enquiries or information regarding Kelvinator appliances contact:
Customer Care Department
Kelvinator
P.O. Box 3657
Johannesburg
2000
South African Customers: 010 207 3000
International Customers: +27-10-207-3000

Guarantee Conditions
1. The guarantee is valid for Twenty Four (24) months commencing when the appliance is
handed over to the first retail purchaser, which must be verified by purchase invoice or
similar documentation.
2. Kelvinator guarantees the equipment against defective material or faulty manufacture,
provided it is used for domestic use from the date of purchase by the original purchaser. If
not used as above-mentioned, the warranty period will limited.
3. If the appliance is used or installed more than Fifty (50) kilometres from the nearest
Kelvinator Authorised Service Agent, the additional distance covered shall be for the
account of the purchaser.
4. The risk in regard to appliances to be repaired shall at all times remain with the purchaser.
5. This guarantee is given on condition that only genuine Kelvinator parts and accessories are
used at all times in the appliance.
6. Kelvinator shall not be responsible for damage of any kind resulting from electricity
fluctuations, faults in the building wiring, faulty installations, improper use of controls or
failure to use the appliance in accordance with the operating instructions and/or general
misuse and/or abuse, which would include unforeseen accidents, wear and tear, and/or
earthquake, flood, lightning or any other natural disaster beyond the control of Kelvinator.
7. Any attempt by an unauthorised person to repair or tamper with the appliance shall render
this guarantee null and void.
8. This guarantee does not include bulbs, loose glass, glass oven doors, enamelled surfaces,
discolouring of stainless steel surfaces, filters and other parts subject to wear and tear.
9. Kelvinator shall not be responsible in terms of this guarantee for the replacement or repair
of any parts of the appliance if damaged during transit, where packaging damage is visible.
10. Repairs carried out under guarantee do not extend the guarantee period for the appliance.
Parts removed during guarantee repairs become the property of Kelvinator.
11. This guarantee shall be available only to a purchaser of Kelvinator appliances from an
authorised Electrolux Home Products/Kelvinator Dealer or Distributor in and where the
appliance has been retained for use in the Republic South Africa, Namibia, Swaziland,
Lesotho and Zimbabwe.
12. Failure to produce documentary proof of the date or original acquisition by the original
purchaser will result in normal charges being levied for the work carried out and the parts
supplied.
13. The liability of Kelvinator under this guarantee is limited to the replacement and/or repair of
the defective parts within the guarantee period and does not extend to be installation or
removal of the appliance. Furthermore, Kelvinator does not accept responsibility or liability
to compensate for any consequential loss or damage of any kind caused by or due to the
failure of operation or malfunction of any equipment to which this guarantee applies.
14. It is at the sole discretion of Kelvinator that, in terms of guarantee, consideration be given to
replace the appliance due to various parts failing of a similar nature or in the event of the
appliance being in a state of beyond repair.
Table of contents
Popular Cooker manuals by other brands

Junker
Junker JH13AA.0 instruction manual

Maxi-matic
Maxi-matic Elite CUISINE MST-500D instruction manual

Range Master
Range Master 90 Dual Fuel User's guide & installation instructions

B+K precision
B+K precision BOURGOGNE Instructions for use

New World
New World NWLS60DGB instruction manual

Scandomestic
Scandomestic IKF 160 user manual