Kelvinator KE601BL Operation manual

KE601BL- KE601SS
Built-in Ovens
User Information


Tableof contents
Installation instruction 1-4
Minute minder 7
Oven functions 8
Cooking table 9
Howto usethegrill 10
Replacing theoven light 11
Removingtheovendoor 11
Cleaning and maintenance 12
Serviceand Spares, Customer Care 13
Controlpanel5-6
Guarantee conditions 14


Thank you for choosing one of our products. It will offer you many years of
excellent performance. Please carefully read the instructions and suggestions
contained in this manual for correct use of our products.
INSTALLATION INSTRUCTION
Technical details
This appliance conforms to the standard
regarding suppression of radio reception
interference.
Voltage regulations
230 Va.c. - 50 Hz
Muffle dimensions:
Height : 340 mm
Length : 440 mm
Depth : 390 mm
Volume : 59 lt
Voltage of heating elements
Static oven (KE601BL):
- Lower heating element : 1,3 kW
- Top heating element : 1,3kW
- Maximum input of heating element : 2,6 kW
.
.
.
.
.
.
.
Multifunction oven (KE601SS):
- Lower heating element : 1,3 kW
- Top heating element : 0,9 kW
- Grill element : 1,35 kW
- Maximum input of heating element : 2,28 kW
.
.
.
.
.
.
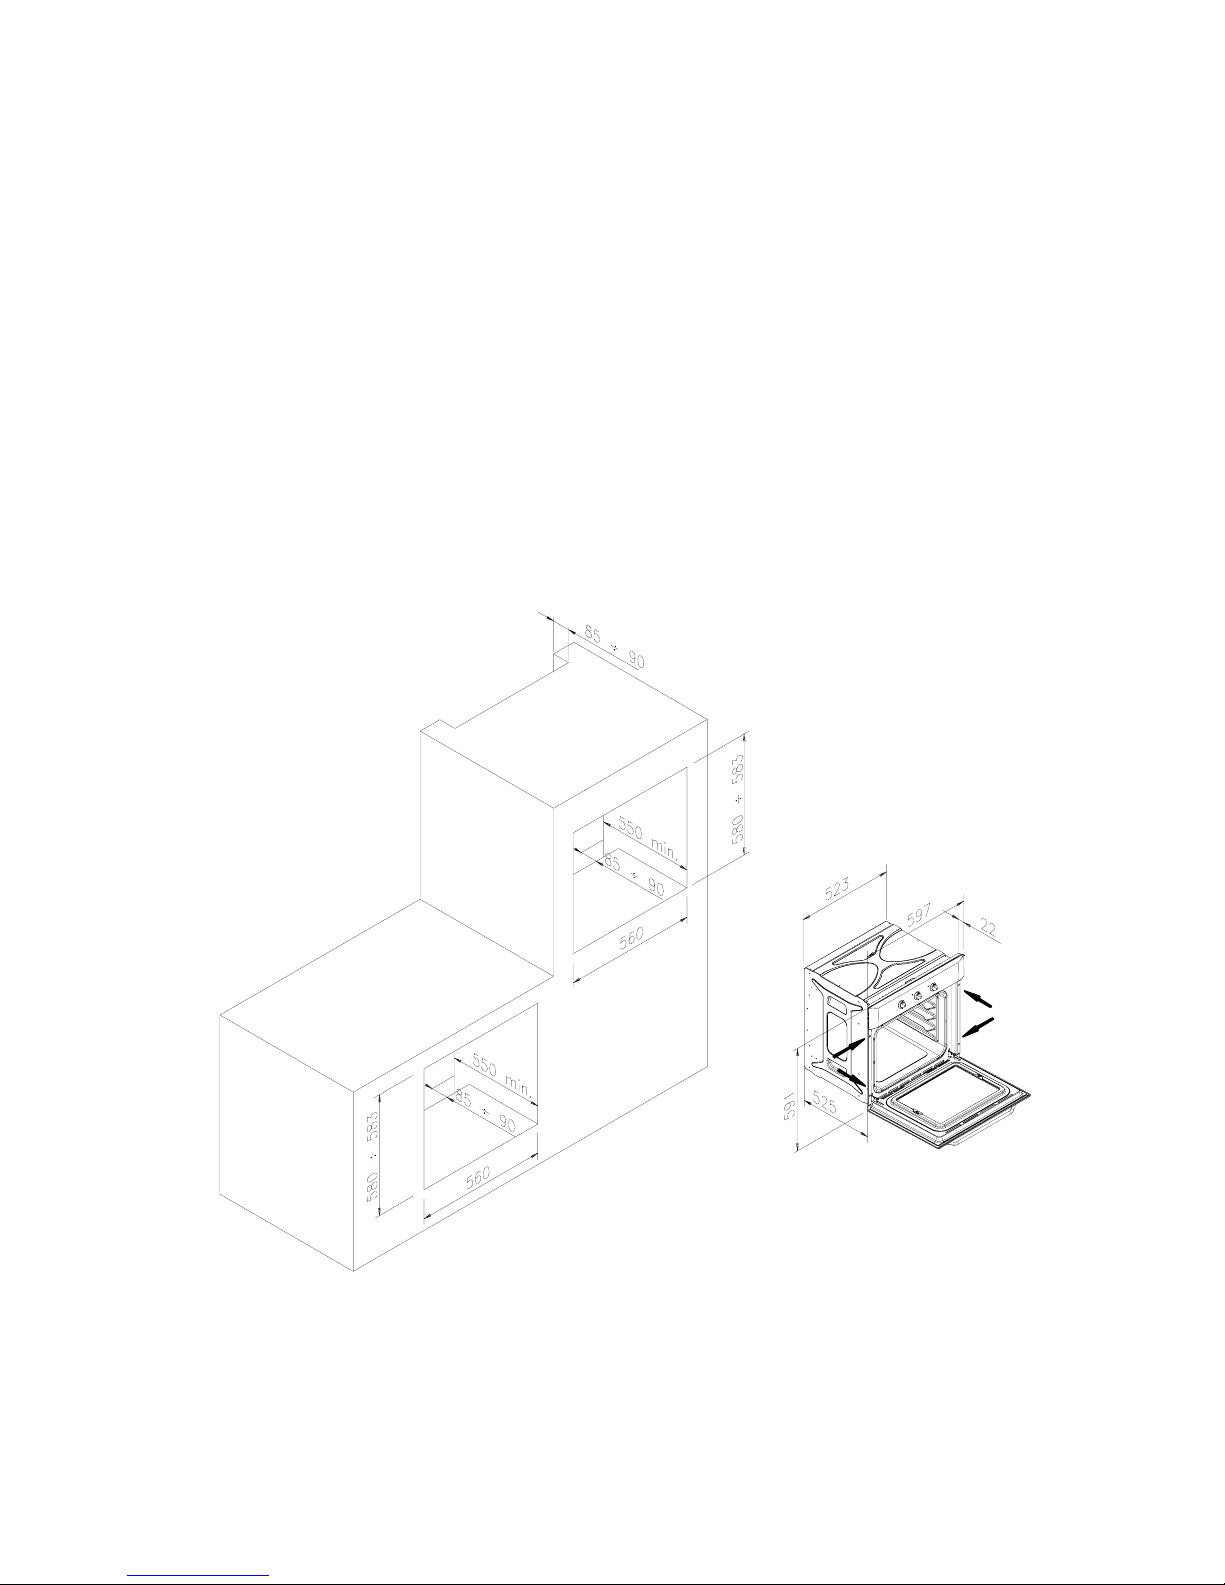
Built-in installation
IMPORTANT: The unit must be correctly
installed in accordance with Manufacturers
instructions and by qualified person.
Maintenance and service must be carried
out after the power supply has been
disconnected.
ELECTRICAL CONNECTION: Make sure
that the voltage supply is the same as what
is on the rating plate which can be found on
the lower part of the front of the oven.
The oven must be connected at the back
using a cable with minimum section of 1.5
mm, providing an omnipole switch in
compliance with current regulations with a
contact opening distance of at least 3 mm.
Warning: this appliance must be earthed.
Our company declines any liability for fai-
lures in the earth connection of for earth
connection that is not in compliance with
the regulation in force.
Oven preparation and pre-use
Before using the oven, thoroughly clean the
inside with non-abrasive soap and
lukewarm water. Fit the rack and drip pan
in their runners. Once you have completed
the operation, bring the oven to maximum
temperature for approximately 20 minutes
in order to eliminate any remains of
manufacturing grease, oil or resins that can
produce unpleasant smells during cooking;
theQYHQWLODWHWKHURRP.
1

Once you have done this operation, the oven is
ready for the first cooking.
IMPORTANT: Each time you want to clean the
oven, make sure the warning light is off and
the oven is disconnected.
CAUTION: ALWAYS KEEP CHILDREN
OFF THE OVEN WHEN HOT.
Important notices for the installation:
The oven can be built into a standard 600 mm
housing unit when built-under the work top,
or in a tall housing unit when built-in a column.
This appliance must be installed by a
competent person and with particular
attention to ventilation.
In both cases ventilation provisions must be
made.
This being a gap at the back of the housing
unit between 85 and 90 mm as indicate in
fig.1. The fixing of the oven in the cabinet is
made by 4 screws “A” that are on the corner
of the oven door-frame.
When placing the oven in the housing unit,
do not use the oven door as a lever for lifting
the oven.
Do not put excess pressure on the open door
once opened.
2

580-583
580-583
470 min.
470 min.
465
90
90
90
INSTALLATION - MOD. KE601BL
3
A
A
A
A

INSTALLATION - MOD. KE601SS
4
A
A
A
A

CONTROL PANEL - KE601BL
1
24
3
1. Function selector knob
2. Oven working light
3. Thermostat knob
4. Thermostat light
5

CONTROL PANEL - KE601SS
1
2
34
5
1. Minute minder knob
2. Minute minder light
3. Function selector knob
4. Thermostat knob
5. Thermostat light
6

Programming the oven with the 60 minutes timer (KE601SS only)
The minute minder knob must be turned completely in a clockwise
direction; then turn it in an anti-clockwise direction up to the desired
time of cooking.
The oven will not be turned off automatically.
A minute counter ringing will advise that the cooking time is over.
7

OVEN LIGHT
OVEN FUNCTIONS
LOWER ELEMENT MODE
Select the desired temperature between 50°C and 250°C.
It is suitable for very slow cooking and warming up of food.
TRADITIONAL OVEN COOKING
This function provides traditional cooking with heat from
the top and bottom elements.
GRILL MODE (KE601BLonly)
Select the required temperature between 50°C and 250°C.
See instructions on page 16.
TRADITIONAL OVEN COOKING WITH FAN (KE601SS only)
This function integrates natural convection and ventilation.
Cooking mode suited to bake bread, pizzas and lasagne.
It is recommended to pre-heat the oven.
LOWER ELEMENT MODE WITH FAN (KE601SS only)
It is recommended for very slow cooking and warming up of food.
GRILL MODE WITH FAN (KE601SS only)
The fan and the grill element allow a fast and deep cooking
for particular food.
See instructions on page 16.
8

Suggested Personal
175 2 55 - 65
175 3 60 - 70
175 3 60 - 70
200 3 8 - 10
200 3 25 - 35
200 3 25 - 35
180 3 30 - 45
200 3 25 - 35
200 3 10 - 15
200 2 35 - 45
200 3 15 - 20
225 2 40 - 50
200 2 120 - 150
200 2 60 - 90
200 2 30 - 40
200 2 120 - 180
200 2 150 - 210
200 2 60 - 90
175 2 about 240
200 2 60 - 90
200 2 90 - 150
175 2 90 - 180
220 2 30 - 40
200 2 40 - 50
200 2 40 - 50
200 2 40 - 50
240 3 10 - 20
48-12
4 10 - 12
225 - 35
50 - 60
60 - 70
Insertion*
guide
Type of food
Meat (cooking time per cm. of thickness)
Focaccia
Cake
Pie base with ricotta cheese
Cake in mould with raised mixture
Pie base
Fast cooked roast (ex. roast beef)
Ga m e
Hare
Temp.
°C
Slowly cooked roast (ex. roast veal)
Pie in mould (short pastry)
Pie base
Pie base with fruit
Biscuit pastry
Cake in mould with beaten mixture
White bread (2,2 lb of flour)
Sausages
Grilled chicken
Leg of roe
Fish
Trout
Pizza
Vegetable pudding
Greymullet
Leg of deer
Vegetable
Baked potatoes
Chicken on spit
Small pastries
Puff pastry
Choux pastry
Poultry
Duck 3,3 lb
Goose 6,6 lb
Roast chicken
Gr ill
Pork chops
Cooking table
THE GIVEN ABOV E DATA ARE INDICATIVE BECAUSE THE COOKING TYPE A ND TIME V ARIES WITH THE FOOD
QUANTITY AND QUALITY
Cooking time
in minutes
Panettone or focaccia
Roast veal on spit (1,3 lb)
* The guide number refers to the lowest level (excluding the bottom, since it is not possible to insert
the drip-pan)
Lasagne
Meatloaf
Turkey11 lb
9

How to use the grill
Lay the food in the wire shelf or in a tray in
case of small pieces.
The rack must be positioned in the highest
runner possible and the grease drip pan in
the runner below. Close the door and turn on
the element as follows:
A. Static oven: adjust selector on position
B. Fan oven: adjust selector on position
C. Multifunction-Fan oven : adjust selector
on position
D. Multifunction oven :adjust selector on
position ,
Each kind of food (fish, poultry etc.) has to
be turned over to permit the grilling on both
sides.
Under are few cooking suggestions:
Top side Under side
64
85
10 8
15 12
12 10
52
Fish (e.g. trout ,salmon)
Sausages
Toast
Cooking time in minutes
Slices of meat of medium thickness
Slices of thin meat
Slices of thin descaled fish
Dishes for grilling
10

Replacing the oven light - Fig. 1
The oven is equipped with a lamp having the
following features:
25W
screw cap E-14
T 300°C
WARNING: disconnect the appliance from the
power supply.
lf the oven light needs to be replaced, the
protective cover «A» must be removed by
turning it anticlockwise. After the light has
been replace, refit the protective cover «A».
(Fig. 1).
Removing the oven door - Fig. 2
To aid cleaning and make access to the oven
interior easier, the oven door can be simply
removed.
To facilitate cleaning of the oven, the door can
be removed via the hinges as follows:
hinges with movable bolt
The hinges A are provided with two movable
bolts B.
When bolt B is raised, the hinge is released
from its housing.
Having done this, the door must be lifted
upwards and removed, sliding it towards the
outside;
grip the sides of the door near the hinges when
performing these operations.
To refit the door, firstly slide the hinges into
their slots.
Before closing the door, remember to rotate
the two movable bolts B used to hook the two
hinges.
Fig. 2
A
B
Fig. 1
11

Important: The cleaning of the
appliance must be carried out after the
power supply has been disconnected.
How to clean the oven: The cleaning of
the oven, with no self-cleaning panels,
has to be carried out after cooking,
whilst the oven is still lukewarm (not
hot), so that the food spillages on the
oven surface can be removed easily.
Remove the lateral guides, pulling their
front side and unhooking them.
Wipe the inside of the oven by using
a damp cloth with a diluted ammonia
product; rinse and dry the oven.
In case of persistent marks, leave a
soaking ammonia cloth at the bottom
of the oven muffle for some hours with
the door closed; then wash away with
warm water and liquid detergent.
Rinse and dry carefully. For external
parts, use a soft cloth and soapy
water, rinse and dry carefully. Do not
use abrasives, bleach or coarse
cleaning material.
Cleaning and maintenance
The Manufacturerdeclines responsability for damages to persons or things
due to a bad or improper installation of the appliance.
Owing to our policy of continuous improvements, we reserve the right to
adjust and modify our product without prior notification.
12

Service and Spares
In the event of your appliance requiring service, or if you wish to purchase spare parts, contact your local
Kelvinator Service Centre by telephoning:
0860 234 481 (South African Customers)
+27-11-579-0800 (International Customers)
Help us to help you
Please determine your type of enquiry before writing or telephoning. When you contact us we need to know:
Your name
Telephone Number
Physical Address where appliance is located
Model and Serial Number of the appliance
Clear and concise details of the fault
Customer Care
For general enquiries or information regarding Kelvinator appliances contact:
Customer Care Department
Kelvinator
P.O. Box 3657
Johannesburg
2000
South African Customers: 0860 234 481
International Customers: +27-11-579-0800
E-mail: service@electrolux.co.za
13

Guarantee Conditions
1. The guarantee is valid for Twelve (12) months commencing when the appliance is handed over to the
first retail purchaser, which must be verified by purchase invoice or similar documentation.
2. Kelvinator guarantees the equipment against defective material or faulty manufacture, provided it is
used for domestic use from the date of purchase by the original purchaser. If not used as above-
mentioned, the warranty period will limited.
3. If the appliance is used or installed more than Fifty (50) kilometres from the nearest Kelvinator
Authorised Service Agent, the additional distance covered shall be for the account of the purchaser.
4. The risk in regard to appliances to be repaired shall at all times remain with the purchaser.
5. This guarantee is given on condition that only genuine Kelvinator parts and accessories are used at all
times in the appliance.
6. Kelvinator shall not be responsible for damage of any kind resulting from electricity fluctuations, faults in
the building wiring, faulty installations, improper use of controls or failure to use the appliance in
accordance with the operating instructions and/or general misuse and/or abuse, which would include
unforeseen accidents, wear and tear, and/or earthquake, flood, lightning or any other natural disaster
beyond the control of Kelvinator.
7. Any attempt by an unauthorised person to repair or tamper with the appliance shall render this
guarantee null and void.
8. This guarantee does not include bulbs, loose glass, glass oven doors, enamelled surfaces, discolouring of
stainless steel surfaces, filters and other parts subject to wear and tear.
9. Kelvinator shall not be responsible in terms of this guarantee for the replacement or repair of any parts
of the appliance if damaged during transit, where packaging damage is visible.
10. Repairs carried out under guarantee do not extend the guarantee period for the appliance. Parts
removed during guarantee repairs become the property of Kelvinator.
11. This guarantee shall be available only to a purchaser of Kelvinator appliances from an authorised
Electrolux Home Products/Kelvinator Dealer or Distributor in and where the appliance has been retained
for use in the Republic South Africa, Namibia, Swaziland, Lesotho and Zimbabwe.
12. Failure to produce documentary proof of the date or original acquisition by the original purchaser will
result in normal charges being levied for the work carried out and the parts supplied.
13. The liability of Kelvinator under this guarantee is limited to the replacement and/or repair of the
defective parts within the guarantee period and does not extend to be installation or removal of the
appliance. Furthermore, Kelvinator does not accept responsibility or liability to compensate for any
consequential loss or damage of any kind caused by or due to the failure of operation or malfunction of
any equipment to which this guarantee applies.
14. It is at the sole discretion of Kelvinator that, in terms of guarantee, consideration be given to replace the
appliance due to various parts failing of a similar nature or in the event of the appliance being in a state
of beyond repair.
14


Cod. 12300043950
This manual suits for next models
1
Table of contents
Other Kelvinator Oven manuals