Kent Euroclean SelectVac 12DC 56648092 Installation and maintenance instructions

Electronic Service
Manuals
This electronic document is provided as a service to our custom-
ers. We do not create the contents of the information contained in
this document. Should you have detailed questions pertaining to
the information contained in this document, you may contact Michco,
or the manufacturer which provided the original information in this
electronic deliverable. Michco’s only part in this electronic deliver-
able was the electronic assembly process.
You may contact Michco through the following methods:
Phone (517) 484-9312 or (800) 331-3339 MI, OH, IN only
2011 N. High St. -- Lansing, Michigan -- 48906
Fax: (517) 484-9836
Email: [email protected]
Web site: www.Michco.Com
Parts Web site: www.FloorMachineParts.Com
Order Parts on Line at:
www.FloorMachineParts.Com
Directly to Parts & Service:
By Fax: (517) 702-2041
By Voice: Use numbers above.
Serving the Cleaning Industry Since 1922
Notice: All copyrighted material remains property of original owners, all trademarks are property of respective
owners. Manuals are subject to Manufacturer’s reproduction limitations. Originals or reproductions were provided
by manufacturers through a request. We make no warranty as to the correctness of information provided in this
document and you assume all risk.

8/99 revised 11/02 Form Number 56041468
OPERATOR MANUAL AND PARTS LISTOPERATOR MANUAL AND PARTS LIST
OPERATOR MANUAL AND PARTS LIST
Kent / Euroclean MODEL 56648092
SelectVac™12DC

2 - FORM NO. 56041468 - SelectVac™12DC
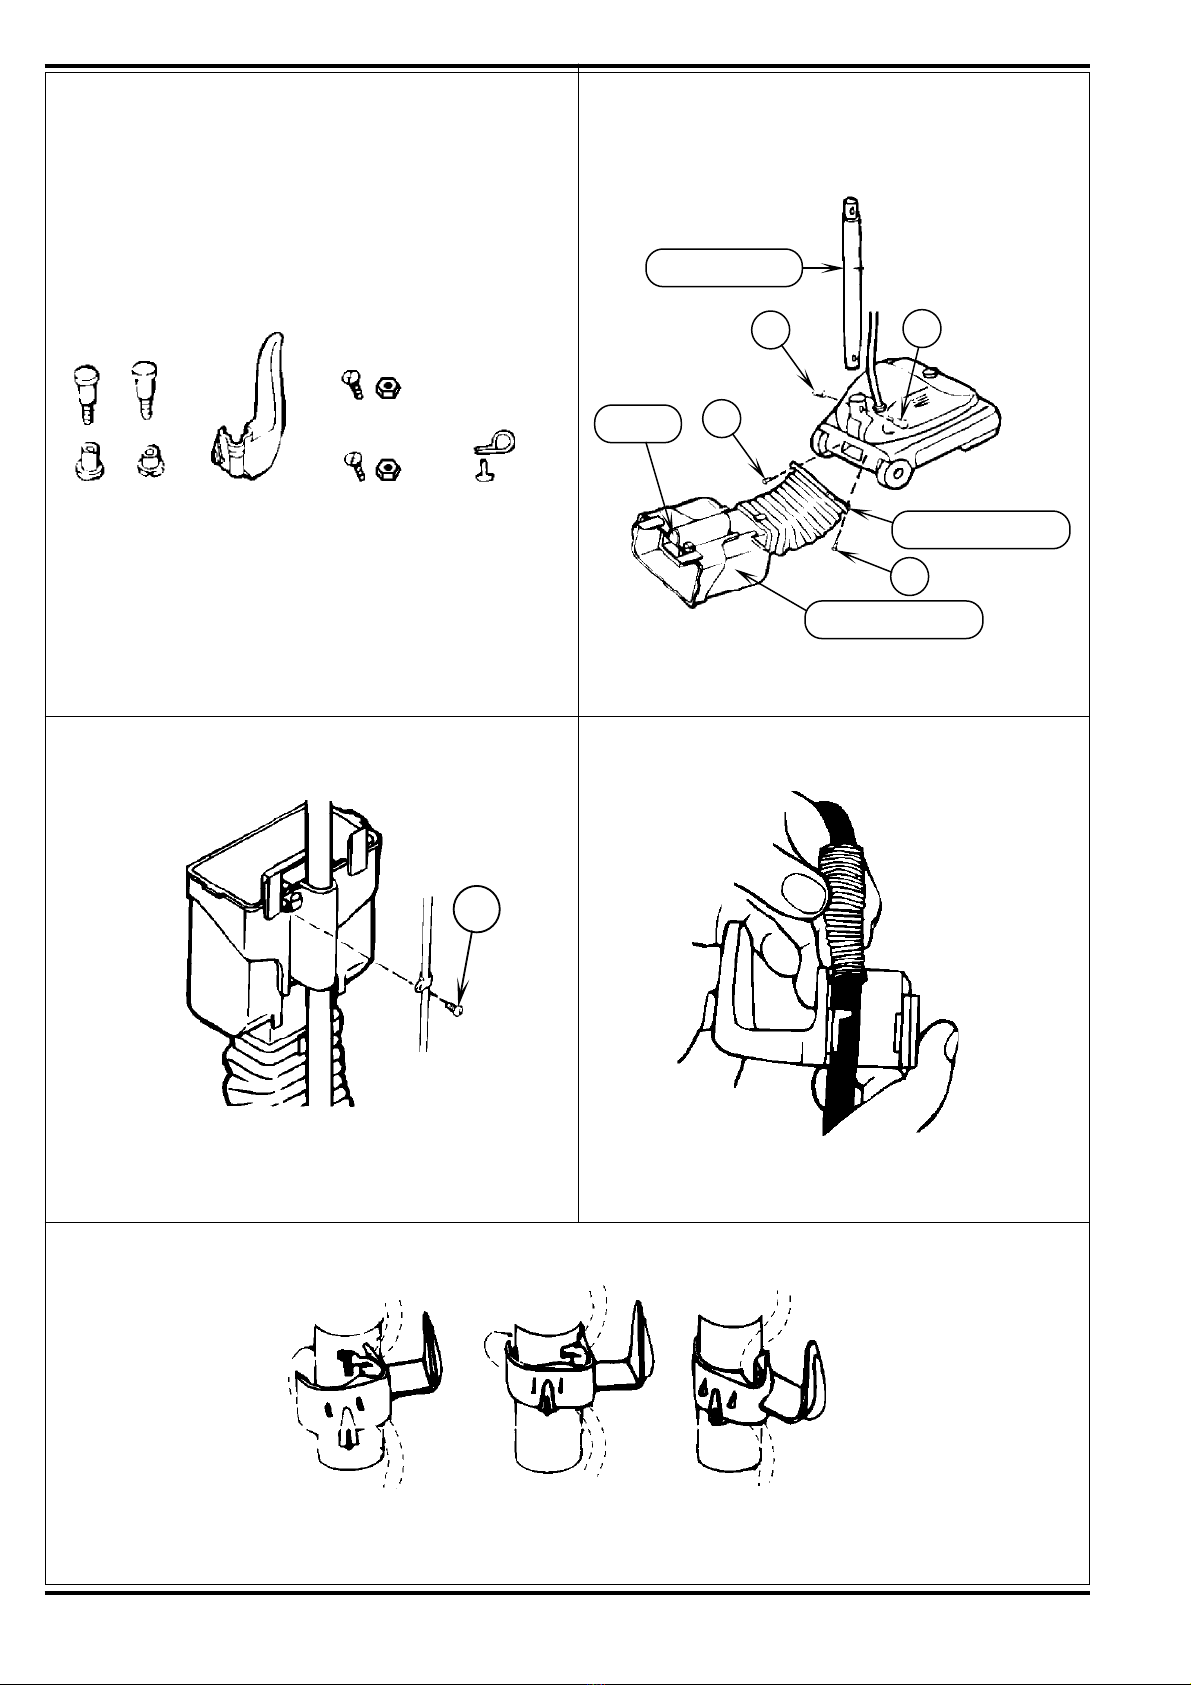
2-Part
Handle Bolts Cord Hook Bag Screws
And Nuts Cord Clamp
And Screw
Tube
Dust Cup Support
Bellows Adaptor
Lower Handle
C
C
AA
D
A B
CD
E

FORM NO. 56041468 - SelectVac™12DC - 3
Bag Hook
A
A
B
Handle Lock
Power Switch
1
2
3
1-Unhook
2-Shake Bag
3-Release
Latch
4-Lift Lid
7-Replace
Cup and
Swing Lid
Shut
6-Empty Cup
5-Remove Cup
FG
HI
JK

4 - FORM NO. 56041468 - SelectVac™12DC
IMPORTANT SAFETY INSTRUCTIONS
When using an electrical appliance, basic precautions should always be followed, including the following:
Read all instructions before using.
This machine is for commercial use, for example in hotels, schools, hospitals, factories, shops and offices other than normal
residential housekeeping purposes.
THIS APPLIANCE IS INTENDED FOR DRY USE ONLY!
DO NOT USE FOR WET FLOOR OR CARPET!
WARNING !
To reduce the risk of fire, electric shock, or injury:
Failure to follow these safety instructions could result in damage to the machine, damage to property, or bodily injury.
*Usemachineonlyasdescribedinthismanual.Donotuseinwaysitwasnotintended.Useonlymanufacturer’srecommended
attachments.
*Do not leave the machine unattended when it is plugged in. Turn off all switches and unplug the electrical cord when not in
use and before servicing.
*Do not allow to be used by untrained personnel. Close attention is necessary when used near children.
*If the machine is not working as it should, has been dropped, damaged, or left outdoors, return it to a service center before
using.
*Avoid electrical shock, do not handle the plug or machine with wet hands. To unplug the cord, grasp the plug. Do not pull on
the cord.
*Do not use extension cords or outlets with inadequate current carrying capacity. Do not use with a damaged cord or plug.
Connect the machine only to a properly grounded outlet (refer to GROUNDING INSTRUCTIONS). Avoid damaging cord
(closing doors on cord, pulling around sharp edges or corners, hot surfaces, or running machine over cord).
*This machine creates suction and contains a revolving brush roll. Keep hair, loose clothing, fingers, and all other parts of the
body away from openings and moving parts. Do not insert any object into any of the openings in the machine.
*Do not pick up anything that is burning or smoking, such as cigarettes, matches, or hot ashes.
*Do not use the machine to pick up flammable or combustible liquids such as gasoline. Do not use in areas where flammable
and/or explosive vapor or dust is present to avoid the possibility of fire or explosion. Some cleaning fluids can produce such
vapors.
*This machine is not suitable for picking up health endangering dust.
*Use extra care when cleaning on stairs.
*Unplug electrical appliances before vacuuming them.
*Do not use outdoors or on wet surfaces.
*Do not use without dust bag in place.
*Store the machine in a cool, dry area.
SAVE THESE INSTRUCTIONS

FORM NO. 56041468 - SelectVac™12DC - 5
INSTRUCTIONS DE SÉCURITÉ IMPORTANTES
Toujours suivre certaines précautions élémentaires lors de l’utilisation d’un appareil électrique.
Lire toutes les instructions avant d’utiliser la machine.
Cette machine est adaptée à l’usage commercial, par exemple dans les hôtels, les écoles, les hôpitaux, les usines, les magasins
et les bureaux.
CET APPAREIL NE DOIT ETRE UTILISE QU’A SEC!
NE PAS UTILISER SUR UNE SURFACE HUMIDE!
AVERTISSEMENT !
Pour réduire les risques d’incendie, de décharge électrique ou de blessures:
L’inobservationdesinstructionsdesécuritérisquedecauserdesdégâtsàl’appareiletauxobjetsplacésàproximitéetd’occasionner
des blessures.
*N’utilisez l’appareil que selon les indications données dans le présent manuel. Ne l’utilisez pas à des fins pour lesquelles il
n’a pas été conçu. Utilisez-le avec les seuls accessoires recommandés par le fabricant.
*Ne laissez pas l’appareil branché sans surveillance. Fermez tous les interrupteurs et débranchez le cordon d’alimentation
lorsque vous ne vous en servez pas ou avant les interventions d’entretien-réparation.
*Ne laissez pas le personnel non formé se servir de l’appareil. Soyez particulièrement vigilant lorsque vous vous en servez
en présence d’enfants.
*Si l’appareil ne fonctionne pas normalement, si vous l’avez laissé tomber ou s’il a été endommagé ou laissé à l’extérieur,
envoyez-le à un centre de réparations avant de vous en servir.
*Pour éviter les risques d’électrocution, ne touchez pas à la prise électrique ou à l’appareil avec les mains mouillées.
Débranchez le cordon en tirant sur la prise, par sur le cordon.
*N’utilisez pas de cordons de rallonge ou de prises de capacité insuffisante. N’utilisez pas de cordons ou de prises
endommagés. Branchez l’appareil uniquement à une prise correctement mise à la terre (voir les INSTRUCTIONS DE MISE
À LA TERRE). Evitez d’endommager le cordon en refermant les portes, en le tirant sur des coins de meubles, en l’exposant
à des objets chauffés ou en faisant passer l’appareil dessus.
*Cet appareil produit une succion et possède une brosse tournante. N’approchez pas les vêtements lâches, les cheveux, les
doigts ou toute autre partie du corps des orifices ou des pièces en mouvement. N’introduisez pas d’objets dans les orifices
de l’appareil.
*N’aspirez pas d’objets en train de brûler ou de fumer, tels que les cigarettes, allumettes ou cendres chaudes.
*N’utilisez pas l’appareil pour aspirer des liquides inflammables ou combustibles tels que l’essence. Ne vous servez pas de
l’appareil dans des endroits où il peut se trouver des vapeurs ou de la poussière explosives ou inflammables, pour éviter les
risques d’incendie ou d’explosion. Certains liquides de nettoyage peuvent émettre de telles vapeurs.
*Cette machine n´est pas destinée au ramassage de poussière dangereuse pour la santé.
*Soyez particulierement prudent lorsque vous passez l’aspirateur sur des escaliers.
*Debranchez les appareils electriques avant de les nettoyer.
*N’utilisez pas l’appareil a l’exterieur ni sur sol mouille.
*Ne vous servez pas de l’appareil si le sac a poussiere n’est pas en place.
*Rangez l’appareil a l’interieur, dans un endroit frais et sec.
CONSERVEZ CES INSTRUCTIONS

6 - FORM NO. 56041468 - SelectVac™12DC
120VAC GROUNDING INSTRUCTIONS
This appliance must be grounded. If it should electrically malfunction, grounding provides a path of least resistance for electric current to reduce
the risk of electric shock. This appliance is equipped with a cord having an equipment-grounding conductor and grounding plug. The plug must
be plugged into an appropriate outlet that is properly installed and grounded in accordance with all local codes and ordinances.
DANGER!
Improper connection of the equipment-grounding conductor can result in a risk of electric shock. Check with a qualified electrician
orservicepersonifyouareindoubtastowhethertheoutletisproperlygrounded.Donotmodifytheplugprovidedwiththeappliance.
If it will not fit the outlet, have a proper outlet installed by a qualified electrician.
This appliance is for use on a nominal 120-volt circuit, and has a grounding plug that looks like the plug illustrated in Figure 1 below. A temporary
adapter illustrated in Figures 2 and 3 may be used to connect this plug to a 2-pole receptacle as shown in Figure 2 if a properly grounded outlet
is not available. The temporary adapter should be used only until a properly grounded outlet (Figure 1) can be installed by a qualified electrician.
The green-colored rigid ear, tab, or the like extending from the adapter must be connected to a permanent ground such as a properly grounded
outlet box cover. Whenever the adapter is used, it must be held in place by a metal screw. Grounding adapters are not approved for use in
Canada.
Replace the plug if the grounding pin is damaged or broken.
The Green (or Green/Yellow) wire in the cord is the grounding wire. When replacing a plug, this wire must be attached to the grounding pin only.
Extension cords connected to this machine should be 12 gauge, three-wire cords with three-prong plugs and outlets. DO NOT use extension
cords more than 50 feet (15 m) long.
PLEASE NOTE: FOR NORTH AMERICA ONLY

FORM NO. 56041468 - SelectVac™12DC - 7
INSTRUCTIONS VISANT LA MISE À LA TERRE (120VAC)
Cet appareil doit être mis à la terre. En cas de défaillance ou de panne éventuelles, la mise a la terre fournit au courant un chemin de moindre
résistance qui réduit le risque de choc électrique. Cet appareil est pourvu d’un cordon muni d’un conducteur de terre et d’une fiche avec broche
de terre. La fiche doit être branchée dans une prise appropriee correctement installée et mise à la terre conformément aux règlements et
ordonnances municipaux.
AVERTISSEMENT !
Un conducteur de terre mal raccordé peut entraîner un risque de choc électrique. Consulter un électricien ou un technicien
d’entretien qualifié si vous n’êtes pas certain que la prise est correctement mise à la terre. Ne pas modifier la fiche fournie avec
l’appareil - si elle ne peut être insérée dans la prise, faire installer une prise adéquate par un électricien qualifié.
Cetappareilestdestinéàuncircuitde 120 V et est muni d’une fiche de terre semblable àcelleillustréeparlecroquis1. Unadaptateur temporaire
semblable à celui illustré par le croquis 2 et C peut être utilisé pour brancher cette fiche à une prise bipolaire comme l’illustre le croquis 2 si une
prise avec mise à la terre n’est pas disponible. L’adaptateur temporaire devrait etre utilisé seulement jusqu’à ce qu’une prise avec mise à la terre
soit installée par un électricien qualifié. L’oreille rigide ou le crochet ou autre dispositif semblable, de couleur verte, prolongeant l’adaptateur doit
Iêtre raccordé à un élément correctement mis à la terre comme le couvercle d’une boîte de sortie mise à la terre. L’adaptateur doit être fixé par
une vis métallique. Note: Au Canada, I’utilisation d’un adaptateur temporaire n’est pas autorisée par le Code canadien de l’électricité.
Remplacez la prise si la prise de terre est abîmée ou cassée.
LefilVert(ouVert/Jaune)danslaganseestlefildeterre.Lorsduremplacementd´uneprise,cefildoitêtreraccordéàlaprisedeterreuniquement.
Les ralonges connectées à cette machine doivent avoir 12 mesures, trois ganses de fil ayant trois fiches masculines féminines tree-prong plugs
and outlets. N´UTILISEZ PAS de ralonge de plus de 15 m (50 pieds) de long.
VEUILLEZ NOTER: CES INSTRUCTIONS CONCERNENT UNIQUEMENT L’AMÉRIQUE DU NORD

8 - FORM NO. 56041468 - SelectVac™12DC
INTRODUCTION
This manual will help you get the most from your Kent SelectVac™.
Read it thoroughly before operating the machine.
This product is intended for commercial use only.
PARTS AND SERVICE
Repairs, when required, should be performed by your Authorized
Kent Service Center, who employs factory trained service personnel,
and maintains an inventory of Kent original replacement parts and
accessories.
Call the KENT DEALER named below for repair parts or service.
Please specify the Model and Serial Number when discussing your
machine.
(Dealer, affix service sticker here.)
NAME PLATE
TheModelNumberand Serial Number of your machine areshownon
the Nameplate on the bottom of the machine. This information is
needed when ordering repair parts for the machine. Use the space
below to note the Model Number and Serial Number of your machine
for future reference.
MODEL NUMBER
SERIAL NUMBER
UNCRATE THE MACHINE
When the machine is delivered, carefully inspect the shipping carton
andthemachine for damage. If damage isevident, save the shipping
cartonsothatitcanbeinspected. ContacttheKentCustomerService
Department immediately to file a freight damage claim.
MACHINE ASSEMBLY
CAUTION!
Fully assemble the cleaner before using.
A - ASSEMBLY PACKET
The assembly packet contains two 2-part handle bolts, one (1) cord
hook, two (2) bag screws, two (2) bag nuts, and one (1) cord clamp
with a screw. An extra belt is included with some models.
B - SECURE BELLOWS
Check to be sure the end of the bellows is secure in the chrome
bellowsadapter. Align the screwholesinthe bellows adapterwiththe
back of the base, start the screws (C) by hand and tighten.
B - ATTACH LOWER HANDLE
Raisethedustcupsupport. Pushthelowerhandle(largestenddown)
through the tube of the dust cup support and into the handle socket
atthe back of thecleaner. Align the holes, inserta 2-part bolt (A),and
tighten.
F - ASSEMBLE UPPER HANDLE
Hold the upper handle so it curves away from the cleaner, then push
it down over the lower handle. Secure with the other 2-part handle
bolt (A).
C - SECURE CORD CLAMP
Secure the electrical cord to the dust cup support with the cord clamp
and screw (D). Place the cord clamp over the electrical cord. Screw
the clamp to the tab below the left latch; start the screw by hand, then
tighten.
D, E, F - ATTACH THE CORD HOOK
Pull the spring on the electrical cord upward toward the top of the
handle. Insertthelowerhalfofthespringintothecordhook(B). Snap
the hook into the upper handle, directions below.
Pull up on the cord to tighten but leave enough slack near the base
so the cord is not strained when the handle is lowered.
STORE ELECTRICAL CORD
Loop the cord around the cord hook and secure the plug to prevent
unwinding.
F - HOOK BAG TOP
Slip the ring at the top of the cloth bag over the bag support hook on
the back of the cord hook.
G - POWER SWITCH
The power switch is located at the rear of machine, to the left of the
handle base. Simply step on it to turn the machine on or off.
H - HANDLE ADJUSTMENT
The handle lock is located at the left rear side of the machine. Simply
steponittoreleaseandmovethehandletooneofthethreepositions.
I - HEIGHT ADJUSTMENT
This machine has a 6-position adjustment knob. To select the proper
setting, move the knob to the highest setting. Turn down one setting
at time until the machine’s sound changes to a smooth buzzing or
vibrating tone. This is the sound of the beater bars grooming the pile.
NOTE: Raise the front of the machine to ease changing the settings.

FORM NO. 56041468 - SelectVac™12DC - 9
J, K - DUST CUP AND BAG
The cloth bag and the dust cup play a very important role in the
efficiency of the vacuum cleaner. The cloth bag allows air to move
throughthe cleaner while ittraps dirt inside thecloth bag and thedust
cup. Whendirtparticles cling to theclothbagtheycanrestrict airflow.
If air cannot pass through the cloth bag, no cleaning can take place
regardless of how powerful the unit. Some fine particles can restrict
airflow very quickly and will decrease performance even before the
dust cup appears to be full. For that reason, when vacuuming
powder, flour dust, or similar fine substances, it may be necessary to
turn off the cleaner and empty the dust cup more often.
NOTE: Turn off the switch and unplug the electrical cord before
emptying the dust cup. Never operate the vacuum cleaner without
the dust cup latched in place.
1Unhook the clip from the top of the cloth bag.
2Shake the cloth bag to release dust clinging inside.
3Release each latch, one on either side of the handle (lift up
on the bottom and pull the top forward).
4Lift the lid, swing it up and outward.
5Reach in, grasp the dust cup and pull it out of the support.
6Emptycontentsinasuitable container. (If desired, the cup can
be washed in warm water using a mild soap solution. Be sure
the cup is completely dry before replacing.)
7Place the cup into the support, swing the lid shut, and fasten
each latch.
8Hook clip to top of bag (refer to item 1).
CLEAN UP AND STORAGE
Store the machine in a cool dry place. Wind the extension cord in a
circle and hang on the cord hooks provided on the machine. Be sure
not to wind the cord tighter than necessary.
Avoid prolonged exposure of machine to freezing temperatures
during storage or transporting.
MAINTENANCE
WARNING:
BEFORE ANY SERVICING TO AVOID POSSIBLE INJURY
OR ELECTRIC SHOCK, DISCONNECT THE POWER CORD
FROM THE ELECTRICAL OUTLET.
BRUSH ROLL BELT REPLACEMENT
CAUTION!
Belt and pulley become hot during normal use.
The belt should be checked regularly. Replace belt if it is
stretching, cracking or slipping.
Remove the bottom chrome plate by turning the two cam locks on
each side. Remove the worn belt from the drive motor pulley.
Removethebrush roll from thebase,andslideoffworn belt. Slip new
belt around brush roll and reinstall into machine. Install belt around
drive pulley with low side in groove. Be sure belt is installed correctly
or brush roll will turn backwards. Replace chrome cover.
NOTE: Be sure brush roll with offset belt drive is oriented correctly,
with the shorter length to the left. Arrows on brush roll end-caps
indicatesthetopofcapandshowsinstallationdirection. Cutawayany
hair or thread wound around the brush roll or the belt pulley because
the buildup could cause the belt to rotate unevenly.
BRUSH STRIP REPLACEMENT
To replace, remove the bottom chrome plate by turning the two cam
locksoneachsideandremovebrushrollfrommachine. Removenuts
and end caps. Slide out worn brush strips and replace. Reassemble
brush roll and reinstall in machine.
NOTE: Brush strips are different lengths. Arrows on brush roll end
caps indicates the top of cap and shows installation direction.
headlight replacement
Pry off the headlight lens. Press bulb into socket, turn and remove.
Install new bulb and replace lens. NOTE: Use 25 watt bulb only.
CARBON MOTOR BRUSHES
Have Kent check the carbon motor brushes once a year or after 500
operating hours.
IMPORTANT !
Motor damage from failure to service the carbon brushes is not
covered under warranty.
FAN SCROLL
If your machine has a clear fan scroll attached to the underside of the
base, this may be removed and cleaned. Remove the chrome plate
and brush roll belt from pulley. Remove the two screws on either side
of the clear scroll, press the cam locks outward and lift the scroll from
the base. Dirt should clear easily, though some scraping may be
needed.
Be sure the gasket is in place. Reinstall by placing the rear-end
between the rear wheels and seat firmly. Reinstall belt and chrome
plate.

SelectVac™12DC
10
FORM NO. 56041468
99-8
BASE ASSEMBLY
22
457
55
56
10
54
53 31
51 48
50 49
52
47
46 45
37 44
43
42 41
40 39
38
37
36
35
27
28
29
26
25
24
23
21
20
19
18
17
16
13
12
11
10
9
8
30
7
6
532
1
01-2

SelectVac™12DC 11
FORM NO. 56041468
99-8 BASE ASSEMBLY
Item Ref. No. Qty Description
156009385 1 Scr Shldr Plasform 12-10 x .172
256630517 1 Asm,Knob
356648081 1 Hood,Mtr—Light Gray
456630917 1 Nut-Switch Upright
556016459 1 Decal, SelectVac
656003322 1 Scr Tpg F Pan Hd 10-10x.625l
756630765 2 Spring,Ext .304d .930l .055wd
856630358 1 Mtr,Vac—Uprt,7 Amp,115v
956630562 2 Gasket-Motor Seal
10 56003504 7 Scr Tpg F Pan Hd 10-10x.812 L
11 56630791 2 Asm,Clamp & Screw
12 56630606 2 Cover-Wheel
13 56648060 1 Asm,Base—Uprt,120dc,12",Gray
16 56630597 1 Axle-Front (C2035g)
17 56630563 1 Belt-Disturbulator Drive
18 56630489 1 Asm,Disturbulator—Uprt,12,Vg2
19 56630819 2 Nut,Hex Lock— 10-32,Nyloc
20 56630488 2 Cap,Cover—Various Uprights
21 56630486 2 Cap,Disturbulator—1.515dia.
22 56630768 1 Bshg,Strn Rlf—Heyco Sr-6n3-4
23 56630661 2 Asm,Retainer—Bearing
24 56630866 2 Ring,Rtng—Ext,.312 Shaft,5304
25 56630479 1 Shaft-Disturbulator
26 56630478 1 Asm,Plate—Bottom
27 56630467 1 Asm,Strip—Bristle,4.5" Long
28 56630307 1 Tube,Disturbulator
29 56630469 1 Asm,Strip—Bristle,6" Long
30 56630950 1 Asm,Air Duct—Right
31 56630949 1 Asm,Air Duct—Left
35 56630592 2 Wheel—2.25dia,.322bore,1.62hb
36 56630620 1 Spring,Ext .275d 1.50l .024wd
37 56009191 5 Scr Tpg F Pan Hd 10-10x.500l
38 56630921 2 Clamp,Axle
39 56630671 1 Axle,Rear—Sc886-A
40 56009384 2 Wshr Flt .328id.562od.033t Stl
41 56630508 1 Guard,Furn—Clear Blue,31.00l
42 56630500 2 Wheel—2.62dia,.316bore,.797hb
43 56630767 2 Nut,Push-On—
44 56630790 1 Asm,Wire—18ga,Grn,7.5l,Rings
45 56630668 1 Retainer Brkt—Bag Clip
46 56630732 1 Spring,Ext .257d 1.25l .035wd
47 56630395 1 Pedal,Foot—Uprt,White
48 56630914 1 Asm,Wire—18ga,Grn,9.0l,Rings
49 56630665 1 Pulley—Motor Drive,Service
50 56630799 2 Wshr Flt .312id.625od.094t Fbr
51 56630273 1 Fan—Upright,Lexan
52 56630965 1 Label—Warning Moving Parts
53 56630837 1 Clamp,Loop—.250 Closed Id,Nyl
54 56630561 2 Brush,Mtr
55 56638120 3 Nut,Wire—Ideal 72b,Blu
56 56630621 1 Switch,Push—Spst,10a,125v
57 56009383 1 Wshr, Int Shprf .509 x .625 x .020
** 56052964 1 Magnet, Permanent
** 56630325 1 Kit, Upright Attachment
** = Not Included (optional)
Item Ref. No. Qty Description
02-1

SelectVac™12DC
12
FORM NO. 56041468
99-8
VAC MOTOR ASSEMBLY
13
14
15
17
14
16
11
12
10
10
9
8
7
6
5
4
3
2
1

SelectVac™12DC 13
FORM NO. 56041468
99-8 VAC MOTOR ASSEMBLY
Item Ref. No. Qty Description
156630787 3 Scr Tpg C Pan Hd 8-Btx.500l
256002811 2 Scr Mach Pan Hd 6-32x.250l
356630561 2 Brush,Mtr
456630525 1 Cover,Mtr
556630901 1 Kit,Armature—Replacement
656630895 1 Stator,Mtr
756630567 1 Asm,Base—Motor
856630793 2 Orlo Thd. Screw
956630870 1 Wshr Flt .318id.500od.046t Stl
10 56630799 2 Wshr Flt .312id.625od.094t Fbr
11 56630273 1 Fan—Upright,Lexan
12 56630665 1 Pulley—Motor Drive,Service
13 56630375 1 Asm,Retainer
14 56009148 4 Nut,Hex— 8-32,Zn Plt
15 56009010 2 Wshr Lk .172id.330od.020t Int
16 56630749 1 Tie-Cable—3.62'’ Long
17 56630723 1 Brg,Ball—.275id, .866od,.315w

SelectVac™12DC
14
FORM NO. 56041468
99-8
HANDLE ASSEMBLY
27
28
26
25
24
23
16
22
17
18 19
20 21
15
1
2
3
4
5
6
7
8
9
14
13
12
10
11

SelectVac™12DC 15
FORM NO. 56041468
99-8 HANDLE ASSEMBLY
Item Ref. No. Qty Description
1 56630916 1 Pin—Cover
256630352 1 Flange—Bag
356630706 1 Gasket—Dirt Cup
456630903 1 Asm,Dirt Cup Support—W/Latchs
556630502 1 Clamp—Bellows/Dirt Cup,Top
656630351 1 Bellows-Dirt Cup
756002192 2 Scr Mach Pan Hd 10-24x.750l
856630705 1 Clamp—Bellows,Dirt Cup,Bottom
956002768 2 Nut,Hex Lock— 10-24,Nyloc
10 56630959 1 Ring—Steel/Dirt Cup
11 56630958 1 Hook—Snap/Dirt Cup
12 56648085 1 Asm,Bag—Dirt Cup,Blk,Comm
13 56630969 1 Gasket,Foam—Dirt Cup,Formed
14 56630249 1 Cup—Dirt,Clear Plstc
15 56648084 1 Asm,Dirt Cup W/Bag Asm—Blk/Cm
16 56025715 1 Cord,Power—18-3,Sjt,Gray,50'
17 56003322 2 Scr Tpg F Pan Hd 10-10x.625l
18 56630623 1 Shield-Handle Socket
19 56002768 2 Nut,Hex Lock— 10-24,Nyloc
20 56630696 1 Asm,Handle Socket
21 56003543 2 Bolt,Carriage—10-24 X .625l
22 56630268 1 Handle Tube—Upright
23 56630634 1 Spring,Comp .625d 2.12l .042wd
24 56630919 2 Asm,Screw—Handle
25 56630353 1 Hook,Cord—Uprt,Black
26 56630523 1 Tube,Handle—Upper
27 56630575 1 Grip,Handle—Black
28 56630714 1 Label,Warn—Uprt,Eng/French
00-1

© 2002 Printed in USA
Kent/Euroclean
14600 21st Avenue North
Plymouth, MN, 55447-3408
www.eurocleanusa.com
Phone: 800-334-1083
Fax: 866-261-4779
This manual suits for next models
2
Table of contents
Other Kent Euroclean Vacuum Cleaner manuals

Kent Euroclean
Kent Euroclean UZ 934 User manual

Kent Euroclean
Kent Euroclean Hip Vac UZ 964 Guide

Kent Euroclean
Kent Euroclean Hip Vac UZ 964 User manual

Kent Euroclean
Kent Euroclean DuraVac 152 User manual

Kent Euroclean
Kent Euroclean GD 930S2 User manual

Kent Euroclean
Kent Euroclean Edge 12 User manual