manuals.online logo
Brands
  1. Home
  2. •
  3. Brands
  4. •
  5. Kenwood
  6. •
  7. Home Theater System
  8. •
  9. Kenwood SPECTRUM 370AV User manual

Kenwood SPECTRUM 370AV User manual

N=eNiVieie
ee
SPECTRUM
370AV
S\¥
CONGRATULATIONS!
This
guide
will
show
you
how
to
connect
ail
of
the
For
more
detailed
connection
information,
and
to
different
parts
of
your
Spectrum
370AV
System.
learn
how
to
assembie
the
rack
and
operate
ail
of
Simply
pertorm
the
following
steps
(on
both
sides)
the
system's
components.
please
read
the
manuals
to
build
your
new
system.
that
come
with
the
rack
and
the
components.
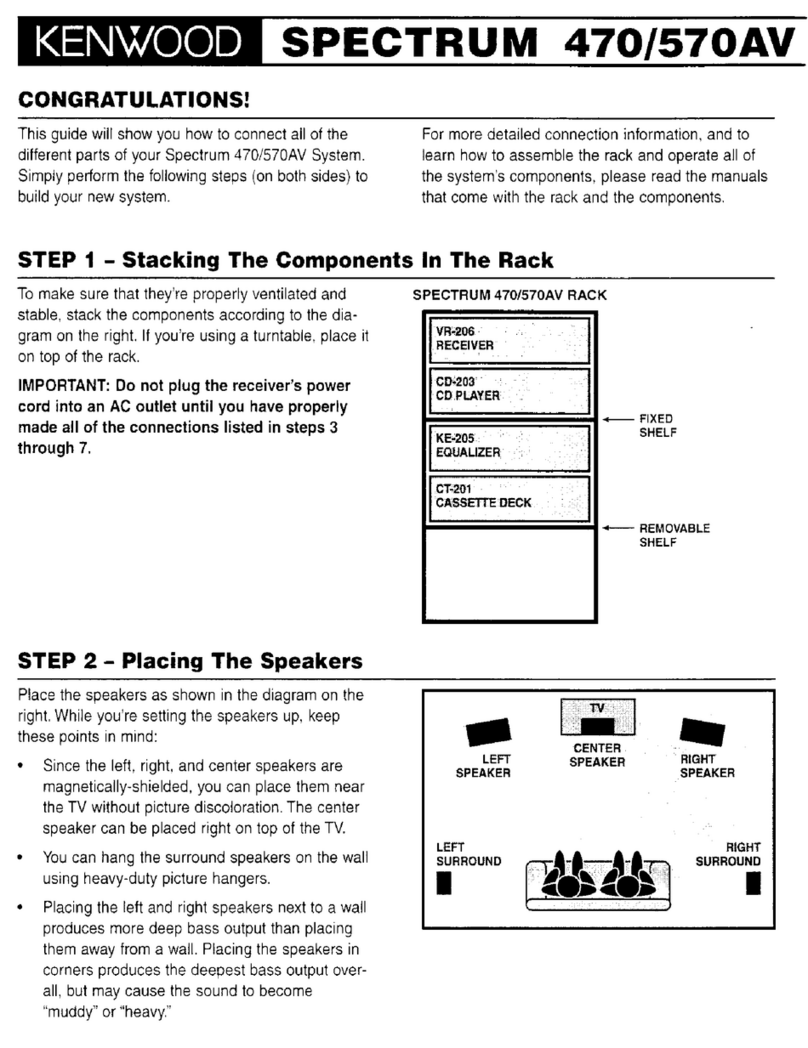
STEP
1
-
Stacking
The
Components
In
The
Rack
To
make
sure
that
they're
properly
ventilated
and
SPECTRUM
370AV
RACK
stable.
stack
the
components
according
to
the
dia-
i
'
i
VR-205
gram
on
the
right.
If
you’re
using
a
turntable,
place
RECEIVER
it
on
top
of
the
rack.
IMPORTANT:
Do
not
plug
the
receiver's
power
CD-203
: ,
CD
PLAYER
cord
into
an
AC
outlet
until
you
have
properly
.
made
all
of
the
connections
listed
in
steps
3
SHELF
through
7.
CT-201
CASSETTE
DECK
REMOVABLE
SHELF
STEP
2
-
Placing
The
Speakers
Place
the
speakers
as
shown
in
the
diagram
on
the
right.
While
you're
setting
the
speakers
up,
keep
"
z
these
points
in
mind:
CENTER
*
Since
the
left.
right,
and
center
speakers
are
SPEARER
SPEAKER
KER
magnetically-shielded,
you
can
place
them
near
the
TV
without
picture
discoloration.
The
center
speaker
can
be
placed
right
on
top
of
the
TV.
«
You
can
hang
the
surround
speakers
on
the
wall
SURROUND
4.
iw
A.
i
SURFOUND
using
heavy-duty
picture
hangers.
|
Hh
YY
4eo55
|
*
Placing
the
left
and
right
speakers
next
to
a
wail
produces
more
deep
bass
output
than
placing
them
away
from
a
wall.
Placing
the
speakers
in
corners
produces
the
deepest
bass
output
over-
all,
but
may
cause
the
sound
to
become
“muddy”
or
“heavy.”
STEM
QUICK-CONNECT
GUIDE
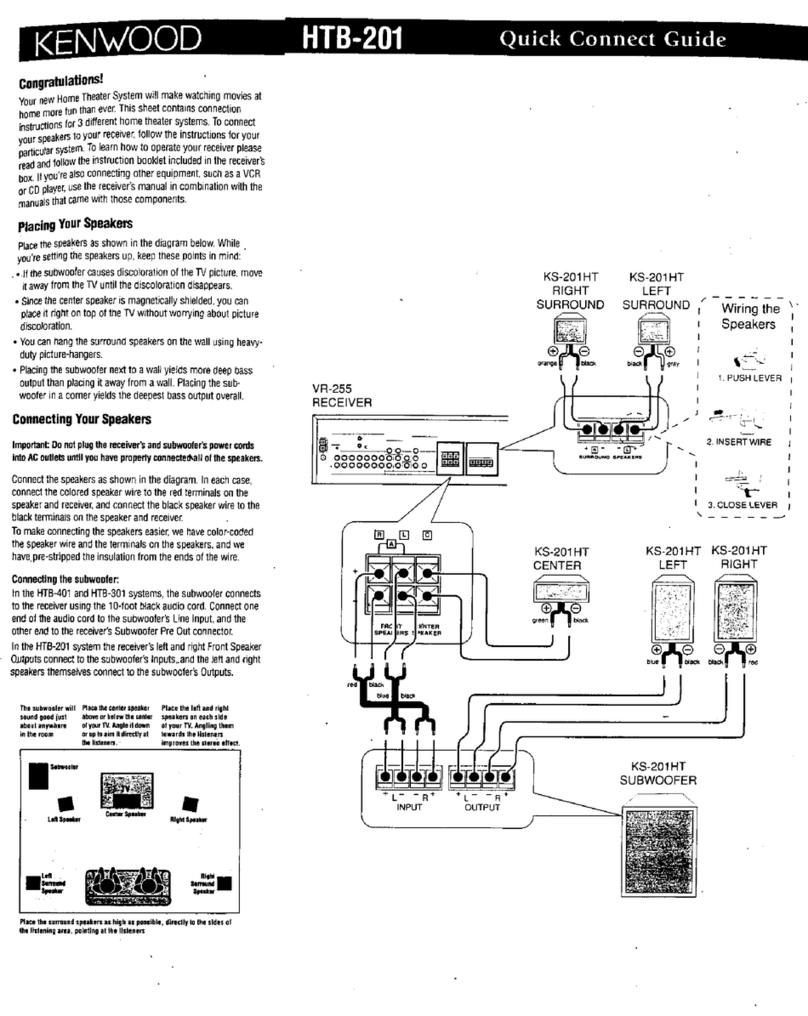
STEP
3
-
Connecting
The
Speakers
Connect
the
speakers
as
shown
in
the
diagram
on
the
right.
using
the
wires
supplied
with
the
speakers.
To
make
it
easier,
we've
removed
the
insulation
from
the
ends
of
the
wires.
*
Be
sure
to
connect
the
(+)
terminals
on
the
receiver
to
the
(+)
terminals
on
the
speakers,
and
the
(-)
terminals
on
the
receiver
to
the
(-)
terminals
on
the
speakers.
Connecting
(+)
to
(-)
can
cause
poor
sound
quality.
«
Never
allow
the
(+)
and
(-)
speaker
wires
to
touch
each
other.
Touching
wires
can
cause
a
short
circuit,
which
could
damage
the
receiver.
JL-507 JL-507
RIGHT
LEFT
7s
ee
ae
VR-205
RECEIVER
a
esegsesee
ea,
|
Ai
|
ma
})
[SUB
PRE-CUT
RCA
Moro
Carle
POWERED
CRS-158 CRS-158
SUBWOOFER
RIGHT
LEFT
(optional)
SURROUND SURROUND
STEP
4
-
Connecting
The
Audio
Components
Connect
the
components
that
came
with
the
system
as
shown
in
the
diagram
on
the
right.
Use
the
cables
supplied
with
each
component.
You
can
connect
any
turntable
that
has
a
magnetic
phono
cartridge.
TURNTABLE
(optional)
VR-205
RECEIVER
a
POWER
.
i
SORDS:
a
BEES
|
Ls
i}
CONNECTING
A
STEREO
RCA
CABLE
Er
O]o
oO)
REC
OUT
PLAY
INI
Be
OT)
ee
a
LEFT
=
we
RIGHT
=
RED
CT-201
TAPE
DECK
oma
CD-203CD
PLAYER
'—
Par,
§
B60-SPECTAUM370AV
NaNWwieesae
SPECTRUM
370AV
SY
STEP
5
-
Connecting
the
System
Control
Cable
Connect
the
System
Controj
cable
between
the
SPECTRUM
370AV
RACK
receiver
and
CD
player
as
shown
in
the
diagram
on
the
right.
Be
sure
to
push
the
plugs
ail
the
way
in.
NOTE:
Make
sure
that
the
SL16/XS8
switch
is
in
the
SL16
position.
SYSTEM
CONTROL
Oa
VR-205
RECEIVER
|
sie
Lase
CD-203
CD
PLAYER
CT-201
CASSETTE
DECK
STEP
6
-
Connecting
Video
Components
If
you
use
an
optional
VOR,
laser
disc
player,
or
VR-205
RECEIVER
DVD
piayer’s
2-channel
analog
connections
with
1
your
Spectrum
370
System,
connect
them
as
shown
ig
°
in
the
diagram
on
the
right.
ola.
es
|
@
wor0:
*
@
viec2
IREC
OUT
PLAY
IN|
PLAY
INt
CONNECTING
A
STEREO
LL
e)
i
RCA
CABLE
@
eo)
Qe
‘o-
VIDEO
2!
MONITOR
LEFT
=
WHITE,
RIGHT
=
REC
YIDEO
=
YELLOW
VCR
{record
and
play)
DVD*/LD
PLAYER
or
VCR
2
(play
only)
*2-Ch.
Analog
Audio
Only
VICES
CLT
STEM
QUICK-CONNECT
GUIDE
STEP
7
-
Connecting
a
DVD
Player
Connect
a
DVD
player
with
6-channel
analog
out-
VR-205
RECEIVER
puts
to
the
receiver
as
shown
in
the
diagram
on
the
right.
ig
=
0
|
diolo
oo
alg
If
the
DVD
player
does
not
have
a
6-channei
analog
gjolo
oo
old
output,
connect
its
2-channei
analog
output
to
the
Lo
video
2
input.
as
shown
in
the
diagram
in
STEP
6
—
Connecting
Video
Components.
@
BCH.
INPUT
CONNECTING
A
STEREO
RCA
CABLE
ae
aT,
LEFT
=
LN
RIGHT
=
RED
VIDEO
=
YELLOW
DVD
PLAYER
(6-CHANNEL
ANALOG
AUDIO
OUTPUTS)
QUESTIONS
ABOUT
YOUR
NEW
SYSTEM?
If
you
have
any
questions
about
your
new
system.
Or
visit
out
website
anytime
at:
please
contact
our
Stage
3
Customer
Service
Department
on
any
business
day
at:
*
(310)
639-5300
from
8:30
a.m.
to
5:00
P.M.,
Pacific
Time
*
—www.kenwoodusa.com

Other Kenwood Home Theater System manuals

Kenwood CD-223M Instruction Manual

Kenwood

Kenwood CD-223M Instruction Manual
Kenwood CenterStage STS-1000 Guide

Kenwood

Kenwood CenterStage STS-1000 Guide

Kenwood HTB-504 Assembly instructions

Kenwood

Kenwood HTB-504 Assembly instructions

Kenwood HTB-405 Assembly instructions

Kenwood

Kenwood HTB-405 Assembly instructions

Kenwood CD-203 Instruction Manual

Kenwood

Kenwood CD-203 Instruction Manual

Kenwood Spectrum 550 AV User manual

Kenwood

Kenwood Spectrum 550 AV User manual

Kenwood SPECTRUM 755 AV User manual

Kenwood

Kenwood SPECTRUM 755 AV User manual

Kenwood SPECTRUM 755 AV User manual

Kenwood

Kenwood SPECTRUM 755 AV User manual

Kenwood Fineline HTB-S710DV User manual

Kenwood

Kenwood Fineline HTB-S710DV User manual

Kenwood HTB-506 User manual

Kenwood

Kenwood HTB-506 User manual

Kenwood Spectrum 550 AV User manual

Kenwood

Kenwood Spectrum 550 AV User manual

Kenwood HTB-200 Instruction Manual

Kenwood

Kenwood HTB-200 Instruction Manual

Kenwood Spectrum 460 AV User manual

Kenwood

Kenwood Spectrum 460 AV User manual

Kenwood HTB-454 Assembly instructions

Kenwood

Kenwood HTB-454 Assembly instructions

Kenwood CenterStage Safety guide

Kenwood

Kenwood CenterStage Safety guide

Kenwood CD-203 Instruction Manual

Kenwood

Kenwood CD-203 Instruction Manual

Kenwood CD-203 Instruction Manual

Kenwood

Kenwood CD-203 Instruction Manual

Kenwood SPECTRUM 1050 AV User manual

Kenwood

Kenwood SPECTRUM 1050 AV User manual

Kenwood HTB-201 Assembly instructions

Kenwood

Kenwood HTB-201 Assembly instructions

Kenwood Spectrum 860AV User manual

Kenwood

Kenwood Spectrum 860AV User manual

Kenwood DVR-5070 User manual

Kenwood

Kenwood DVR-5070 User manual

Kenwood Spectrum 360 User manual

Kenwood

Kenwood Spectrum 360 User manual

Kenwood HTB-403DV Assembly instructions

Kenwood

Kenwood HTB-403DV Assembly instructions

Kenwood Spectrum 850 AV Installation and operating instructions

Kenwood

Kenwood Spectrum 850 AV Installation and operating instructions

Popular Home Theater System manuals by other brands

Toshiba SD-43HK owner's manual

Toshiba

Toshiba SD-43HK owner's manual

Samsung 2.0041112182437e16 instruction manual

Samsung

Samsung 2.0041112182437e16 instruction manual

Sharp HT-DV30H Operation manual

Sharp

Sharp HT-DV30H Operation manual

LG LHD645 Simple manual

LG

LG LHD645 Simple manual

Samsung AH68-02333R user manual

Samsung

Samsung AH68-02333R user manual

Philips MCD705/98 user manual

Philips

Philips MCD705/98 user manual

Sony HT-XT1 Startup guide

Sony

Sony HT-XT1 Startup guide

Philips MCD718 Specifications

Philips

Philips MCD718 Specifications

JVC TH-V70R instructions

JVC

JVC TH-V70R instructions

LG BH6430P Simple manual

LG

LG BH6430P Simple manual

Philips LX3900SA Specifications

Philips

Philips LX3900SA Specifications

Philips HTD5520 quick start guide

Philips

Philips HTD5520 quick start guide

LG LH-T3602SF owner's manual

LG

LG LH-T3602SF owner's manual

Samsung HT-F9750W user manual

Samsung

Samsung HT-F9750W user manual

Samsung UBD-M9700 user manual

Samsung

Samsung UBD-M9700 user manual

Panasonic sc-pt150 operating instructions

Panasonic

Panasonic sc-pt150 operating instructions

Klipsch Palladium P-39F brochure

Klipsch

Klipsch Palladium P-39F brochure

Sony BDV-N5200W Service manual

Sony

Sony BDV-N5200W Service manual

manuals.online logo
manuals.online logoBrands
  • About & Mission
  • Contact us
  • Privacy Policy
  • Terms and Conditions

Copyright 2025 Manuals.Online. All Rights Reserved.