manuals.online logo
Brands
  1. Home
  2. •
  3. Brands
  4. •
  5. Kenwood
  6. •
  7. Remote Control
  8. •
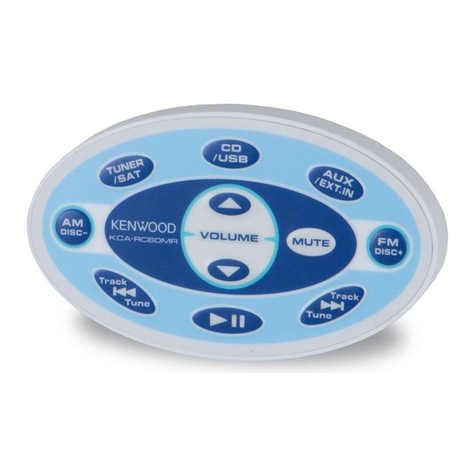
  9. Kenwood KCA-RC60MR User manual

Kenwood KCA-RC60MR User manual

KCA-RC60MR
REMOTE
CONTROL
UNIT
INSTRUCTION
MANUAL
UNITE DE
TELECOM
MAN
DE
MODE
D'EMPLOI
UNIDAD
DE
CONTROL REMOTO
MANUAL DE INSTRUCCIONES
Kenwood Corporation
US
Residence
Only
©864-4472-08/02 (W)
KCA-RC60MR
REMOTE
CONTROL
UNIT
INSTRUCTION
MANUAL
UNITE DE
TELECOM
MAN
DE
MODE
D'EMPLOI
UNIDAD
DE
CONTROL REMOTO
MANUAL DE INSTRUCCIONES
Kenwood Corporation
US
Residence
Only
©864-4472-08/02 (W)
•
English.
Function and Opration
oSwitches
between
tuner
source (HD Radio) and
Satellite Radio each
time
this
button
is
pressed.
8Switches
between
CD source and
USB
source
each
time
this
button
is
pressed.
•Switches
between
AUX source and EXT.IN
source each
time
this
button
is
pressed.
eReduces
the
volume.
When
the
button
is
pressed again, the
volume
returns
to
the
previous level.
Before Installation
AWARNING
If you connect the ignition wire (red) and the battery wire
(yellow)
to
the negative ground point, you may cause ashort
circuit, that
in
turn may start afire Always connect those
wires
to
the power source running through the fuse box.
~
This
unit
is
designed only for marine
use.
Mounting and wiring this product requires skills and
experience.
For
safety's
sake,
leave
the mounting and wiring
work to professionals.
Make
sure
to
ground the unit
to
anegative
12V
DC
power
supply.
Do
not install the unit
in
aspot exposed
to
direct sunlight
or excessive heat or humidity.
Do
not
use your own screws.
Use
only the
screws
prOVided.
If you
use
the wrong screws, you could damage the unit.
Ifyour
vessel
ignition does
not
have
an
ACC
position,
connect the ignition wire to apower source that can be
oTuner/Satellite radio: Selects
the
band.
CD/USB: Selects disc/folder.
oTuner/Satellite radio: Selects stationlchannel.
CD/USB: Selects music.
oSwitches
between
pause and play each
time
this
button
is
pressed.
oAdjusts
the
volume.
turned on and
off
with
the key or other control switch. If
the receiver
is
left on for
an
extended period
of
time the
battery may die.
Ifthe fuse blows, first make
sure
the wires aren't touching
to
cause ashort circuit, then replace the old fuse
with
one
with
the
same
rating.
Insulate unconnected wires
with
Vinyl
tape or other similar
material.
To
prevent ashort circuit,
do
not
remove the caps
on the ends
of
the unconnected wires or the terminals.
After installing the unit, check
to
make sure that electrical
equipment
such
as
the signal lamps and gauges operate
normally.
Installation
1Set
the
gascket
to
the
place where
KCA-RC60MR
is
installed, and pierce
with
adrill for
wiring
harness
and
the
installation.
2
Fix
KCA-RC60MR
as
shown in figure.
Connection
KCA-RC60MR
Remote control input Remote control output
(BluelYellow) (Light Blue/Yellow) CD Receiver
-~
~_------II
Ignition
key
switch
Ignition wire
(Red)
Fuse
box
...
_A_C_C-+-
Q
Illumination control wire
L==~~~(O~r~an~g~e:L)
======
...
-----11-0
Ground wire
(Black)
8
(To
anegative ground point
of
the
vessel)
Illumination
control switch
Fuse
box
(Main
fuse)
FCC
WARNING:
This
equipment
may generate
or
use radio frequency energy. Changes
or
modifications
to
this
equipment
may cause harmful interference unless
the
modifications are expressly approved in
the
instruction manual.The
user could lose
the
authority
to
operate this
equipment
if
an
unauthorized
change
or
modification
is
made.
NOTE:
This
equipment
has
been tested and
found
to
comply
with
the
limits for a
Class
Bdigital device, pursuant
to
Part
15
of
the
FCC
Rules.
These limits are
designed
to
provide reasonable
protection
against harmful interference in
aresidential installation.This
equipment
may cause harmful interference
to
radio communications,
if
it
is
not
installed and used in accordance
with
the instructions. However, there
is
no
guarantee
that
interference will
not
occur in aparticular installation.
If
this
equipment
does cause harmful
interference
to
radio
or
television reception,
which
can be
determined
by
turning
the
equipment
off
and on,
the
user
is
encouraged
to
try
to
correct
the
interference
by
one
or
more
of
the
following
measures:
--Reorient
or
relocate
the
receiving antenna.
--Increase
the
separation
between
the
equipment
and receiver.
--Connect
the
equipment
into
an
outlet
on
acircuit different from
that
to
which
the
receiver
is
connected.
--Consult
the
dealer
or
an experienced radiofTV technician for help.
THIS
DEVICE
COMPLIES
WITH
PART
15
OF
THE
FCC
RULES.
OPERATION
IS
SUBJECTTO
THE
FOLLOWING TWO CONDITIONS:
(1
)THIS
DEVICE
MAY
NOT
CAUSE
HARMFUL
INTERFERENCE,
AND
(2)THIS
DEVICE
MUST
ACCEPT
ANY
INTERFERENCE
RECEIVED,
INCLUDING
INTERFERENCE
THAT
MAY
CAUSE
UNDESIRED
OPERATION.
FCC
WARNING:
This
equipment
may generate
or
use radio frequency energy. Changes
or
modifications
to
this
equipment
may cause harmful interference unless
the
modifications are expressly approved in
the
instruction manual.The
user could lose
the
authority
to
operate this
equipment
if
an
unauthorized
change
or
modification
is
made.
NOTE:
This
equipment
has
been tested and
found
to
comply
with
the
limits for a
Class
Bdigital device, pursuant
to
Part
15
of
the
FCC
Rules.
These limits are
designed
to
provide reasonable
protection
against harmful interference in
aresidential installation.This
equipment
may cause harmful interference
to
radio communications,
if
it
is
not
installed and used in accordance
with
the instructions. However, there
is
no
guarantee
that
interference will
not
occur in aparticular installation.
If
this
equipment
does cause harmful
interference
to
radio
or
television reception,
which
can be
determined
by
turning
the
equipment
off
and on,
the
user
is
encouraged
to
try
to
correct
the
interference
by
one
or
more
of
the
following
measures:
--Reorient
or
relocate
the
receiving antenna.
--Increase
the
separation
between
the
equipment
and receiver.
--Connect
the
equipment
into
an
outlet
on
acircuit different from
that
to
which
the
receiver
is
connected.
--Consult
the
dealer
or
an experienced radiofTV technician for help.
THIS
DEVICE
COMPLIES
WITH
PART
15
OF
THE
FCC
RULES.
OPERATION
IS
SUBJECTTO
THE
FOLLOWING TWO CONDITIONS:
(1
)THIS
DEVICE
MAY
NOT
CAUSE
HARMFUL
INTERFERENCE,
AND
(2)THIS
DEVICE
MUST
ACCEPT
ANY
INTERFERENCE
RECEIVED,
INCLUDING
INTERFERENCE
THAT
MAY
CAUSE
UNDESIRED
OPERATION.

Other Kenwood Remote Control manuals

Kenwood KCA-RC35MR User manual

Kenwood

Kenwood KCA-RC35MR User manual

Kenwood KCA-RC547 User manual

Kenwood

Kenwood KCA-RC547 User manual

Kenwood KCA-RC55MR User manual

Kenwood

Kenwood KCA-RC55MR User manual

Kenwood RC-R0905 User manual

Kenwood

Kenwood RC-R0905 User manual

Kenwood KCA-RC50MR - Marine Wired Remote Control User manual

Kenwood

Kenwood KCA-RC50MR - Marine Wired Remote Control User manual

Kenwood KCA-RC700A User manual

Kenwood

Kenwood KCA-RC700A User manual

Kenwood RC-R0801 User manual

Kenwood

Kenwood RC-R0801 User manual

Kenwood Axcess User manual

Kenwood

Kenwood Axcess User manual

Kenwood RC-R0609 User manual

Kenwood

Kenwood RC-R0609 User manual

Kenwood RC-R0905 User manual

Kenwood

Kenwood RC-R0905 User manual

Kenwood RC-R0816 User manual

Kenwood

Kenwood RC-R0816 User manual

Kenwood KCA-RC406 User manual

Kenwood

Kenwood KCA-RC406 User manual

Kenwood KNA-RCDV331 User manual

Kenwood

Kenwood KNA-RCDV331 User manual

Kenwood KRF-V6030 User manual

Kenwood

Kenwood KRF-V6030 User manual

Kenwood KCH-20R User manual

Kenwood

Kenwood KCH-20R User manual

Kenwood Preset Remote Control User manual

Kenwood

Kenwood Preset Remote Control User manual

Kenwood GRC-151 User manual

Kenwood

Kenwood GRC-151 User manual

Kenwood KOS-A200 - Car Audio Expansion Module User manual

Kenwood

Kenwood KOS-A200 - Car Audio Expansion Module User manual

Kenwood KCA-RC406 User manual

Kenwood

Kenwood KCA-RC406 User manual

Kenwood RC-R0907 Administrator guide

Kenwood

Kenwood RC-R0907 Administrator guide

Kenwood RC-R0906 User manual

Kenwood

Kenwood RC-R0906 User manual

Kenwood Remote control User manual

Kenwood

Kenwood Remote control User manual

Kenwood KNA-RCDV330 - Wireless Remote For Multimedia... User manual

Kenwood

Kenwood KNA-RCDV330 - Wireless Remote For Multimedia... User manual

Kenwood KNA-RCDV330 - Wireless Remote For Multimedia... User manual

Kenwood

Kenwood KNA-RCDV330 - Wireless Remote For Multimedia... User manual

Popular Remote Control manuals by other brands

Sony Remote Commander RM-X170 instructions

Sony

Sony Remote Commander RM-X170 instructions

Biamp Vocia WR-1 Operation manual

Biamp

Biamp Vocia WR-1 Operation manual

FUTABA 12FG Specifications

FUTABA

FUTABA 12FG Specifications

Honeywell HS3FOB1S manual

Honeywell

Honeywell HS3FOB1S manual

Mystery Electronics EasyMix Series user guide

Mystery Electronics

Mystery Electronics EasyMix Series user guide

RCA CRCR351 owner's manual

RCA

RCA CRCR351 owner's manual

Airwell RC5 Programming and operations manual

Airwell

Airwell RC5 Programming and operations manual

Polycom HDX Desktop Systems user guide

Polycom

Polycom HDX Desktop Systems user guide

Sony NHS-1000 quick start guide

Sony

Sony NHS-1000 quick start guide

Onkyo RC-390M manual

Onkyo

Onkyo RC-390M manual

Best Modules BCR-68F2130-X01 quick start guide

Best Modules

Best Modules BCR-68F2130-X01 quick start guide

Merlin E964M instructions

Merlin

Merlin E964M instructions

BUFF HUB quick start guide

BUFF

BUFF HUB quick start guide

Siemens easyPocket user guide

Siemens

Siemens easyPocket user guide

Arlight SR-2819S manual

Arlight

Arlight SR-2819S manual

FrSky TWIN X Lite manual

FrSky

FrSky TWIN X Lite manual

Regency MODEL L Installation and operation instructions

Regency

Regency MODEL L Installation and operation instructions

McLED ML-910.545.22.0 quick start guide

McLED

McLED ML-910.545.22.0 quick start guide

manuals.online logo
manuals.online logoBrands
  • About & Mission
  • Contact us
  • Privacy Policy
  • Terms and Conditions

Copyright 2025 Manuals.Online. All Rights Reserved.