Keurig Hot K150P User manual

1
K150P
Owner’s manual
Keurig® K-Cup® K150P Brewer
manuel D’uTIlIsaTIOn
Système d’infusion Keurig® K-Cup® K150P
Série COMMERCIALE
SINGLE SERVE COFFEE MAKER
SYSTÈME D’INFUSION UNE TASSE À LA FOIS
P1 20162461 T5274_K150P_UCG_FINAL.pdf 4C(CMYK) ZB2319 2016-11-02 Size:8.5X5.5in

3
2
IMPORTANT SAFEGUARDS Safe Operation & Use
When using electrical appliances, basic
safety precautions should be followed,
including the following:
1. Read all instructions before using.
2. Do not touch hot surfaces. Use handles
and knobs when available.
3. This appliance must be properly
installed and located in accordance
with these instructions before it is used.
4. The use of accessory attachments
not recommended by the appliance
manufacturer may result in fire,
electrical shock, or injury to persons.
5. Do not place on or near a hot gas or
electric burner, or in a heated oven.
6. Do not use outdoors.
7. To protect against fire, electric shock,
and injury do not immerse cords,
plugs, or the appliance in water or
any other liquid.
8. Use only water in this appliance! Do not
use any other liquids or foods except as
instructed in the Cleaning Instructions
in this guide.
9. Turn off and unplug the brewer before
cleaning or maintenance. Allow to cool
before putting on or taking off parts
and before cleaning the appliance.
10. For best operation, plug the appliance
into its own electrical outlet on a
dedicated circuit to prevent flickering
of lights, blowing of fuses, or tripping a
circuit breaker.
11. Do not operate any appliance with
a damaged cord or plug or after
the appliance malfunctions or is
damaged in any manner. Contact your
Keurig Authorized Distributor to report
any malfunction of or damage to
the brewer.
12. Do not let the Power Cord hang over the
edge of the table or counter, or touch
hot surfaces.
13. To disconnect, press the Power Switch
on the brewer to “OFF” status and then
remove the plug from the wall outlet.
14. Close supervision is necessary
when any appliance is used by or
near children.
15. Do not lift the Handle while
brewing is in progress.
16. This appliance is equipped with a Power
Cord having a grounding wire with a
grounding plug. The appliance must
be grounded using a 3-hole properly
grounded outlet. In the event of an
electrical short circuit, grounding
reduces the risk of electrical shock.
17. If the outlet is a standard 2-prong wall
outlet, it is your personal responsibility
and obligation to have it replaced with a
properly grounded 3-prong wall outlet.
18. Do not, under any circumstances, cut or
remove the third (ground) prong from
the Power Cord or use an adapter.
19.Consult a qualified electrician if
the grounding instructions are not
completely understood, or if doubt
exists as to whether the appliance is
properly grounded.
20.Do not use the appliance for other than
its intended use.
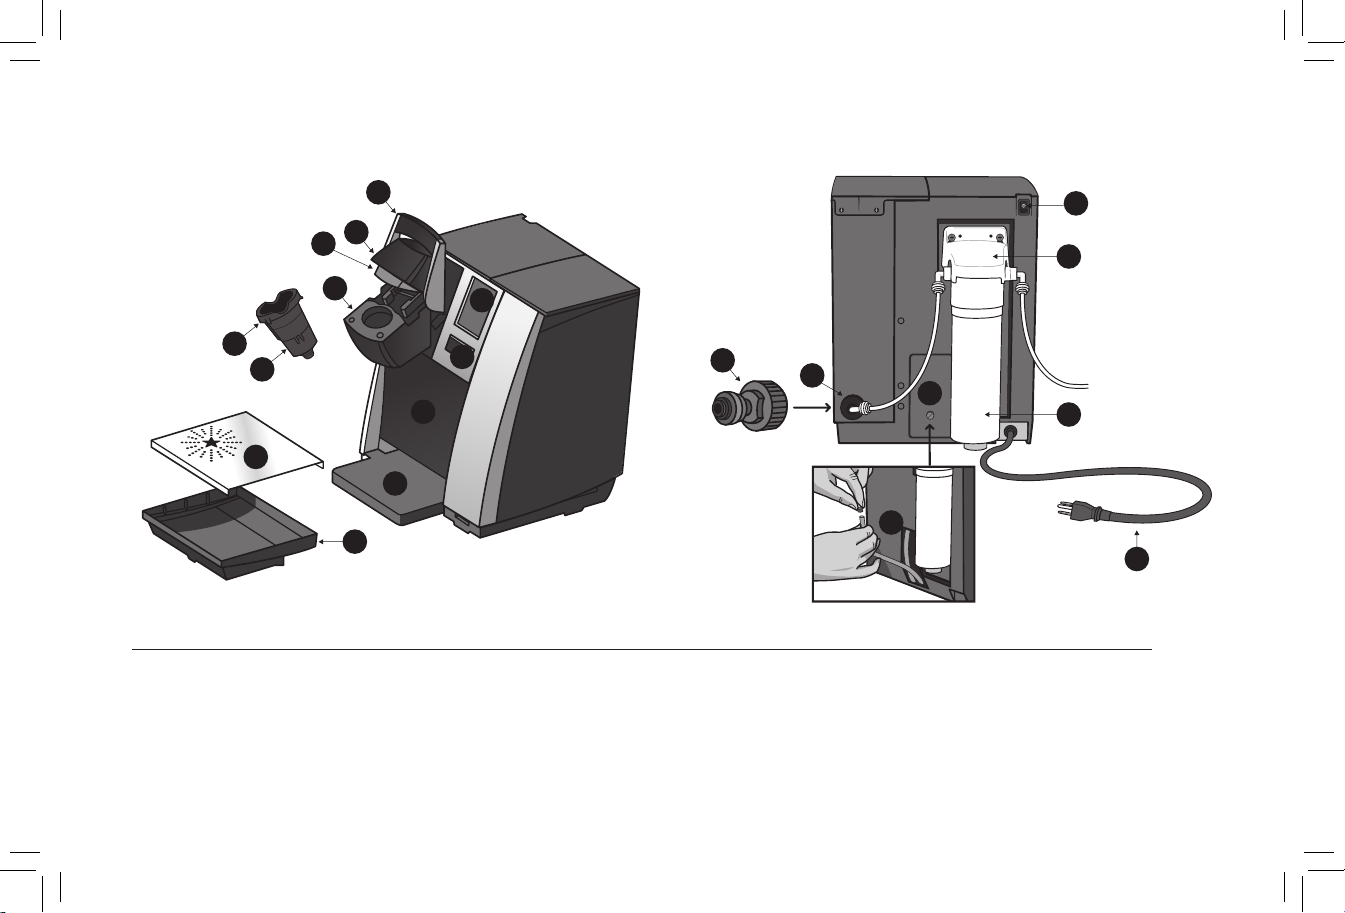
21. The Omnipure KQ8A Water Filters,
Keurig (#5572) are compatible with the
K150P brewer and are NSF certified.
22. Always brew with the Removable
Puncture Plate (item T on page 5)
installed. Failure to do so will result in
a failure to properly brew.
Save TheSe
InSTrucTIonS.
P2 20162461 T5274_K150P_UCG_FINAL.pdf 4C(CMYK) ZB2319 2016-11-02 Size:8.5X5.5in

3
2
Removing the serial number label from the brewer will void warranty.
TABLE OF CONTENTS
KEURIG®K150P - COMMERCIAL SERIES
SINGLE SERVE COFFEE MAKER
BREWER OVERVIEW
Helpful Hints........................................................................................4
Unpacking ............................................................................................4
Features ...............................................................................................5
SECTION 1—SETUP & FIRST BREW
Plumbing Instructions........................................................................6
Setting Up Your Brewer......................................................................7
Brewing Your First Cup......................................................................7
Stopping the Brew Process...............................................................8
Adding Water........................................................................................9
Brewing Iced Beverages & Hot Water.............................................9
SECTION 2—MENU CONTROLS & INDICATORS
Setting the Clock............................................................................... 11
Programming Brew Temperature ................................................. 11
Programming Brew Size .................................................................12
Programming On/Off Features ......................................................12
SECTION 3—CLEANING & MAINTENANCE
Cleaning..............................................................................................14
Descaling............................................................................................15
Draining & Storage........................................................................... 17
SECTION 4—TROUBLESHOOTING.................................................. 18
SECTION 5 —WARRANTY................................................................ 19
Pour des directives en français, veuillez vous reporter à la page 20.
Record your brewer serial number here.
See unpacking instructions on page 4 for serial number location.
WARNING TO USERS AND PARENTS
1. DO NOT permit children to use brewer unless there is adult
supervision. Brewer dispenses very hot water.
2. SPECIAL NOTICE FOR HOT COCOA USERS: IMMEDIATELY AFTER
USING A HOT COCOA K-CUP® POD, RUN a Hot Water Brew Cycle
without a K-Cup®pod to avoid the possibility of clogging the exit needle.
DO NOT assume the next user will do this.
CAUTION: There are two sharp needles that puncture the K-Cup®pod, one above the
K-Cup®Pod Holder and the other in the bottom of the K-Cup®Pod Holder. To avoid risk
of injury, do not put your fingers in the K-Cup®Pod Assembly Housing.
CAUTION: There is extremely hot water in the K-Cup®Pod Holder during the
brew process. To avoid risk of injury, do not lift the Handle or open the K-Cup®
Pod Assembly Housing during the brewing process.
CAUTION: Please always keep the brewer in its upright position to avoid potential
injury and/or damage to your brewer.
SHORT CORD INSTRUCTIONS: A short power supply cord is provided to reduce the
risk of becoming entangled in or tripping over a longer cord.
If an extension cord is used, (1) the marked electrical rating of the cord set or extension
cord should be at least as great as the electrical rating of the appliance; (2) the cord
should be arranged so that it will not drape over the countertop or tabletop where it can
be pulled on by children or tripped over unintentionally; and (3) the extension cord must
include a 3-prong grounding plug.
THIS PRODUCT IS FOR COMMERCIAL USE ONLY.
WARNING WARNING: TO REDUCE THE RISK OF FIRE OR
ELECTRIC SHOCK, DO NOT REMOVE THE
BOTTOM COVER. NO USER SERVICEABLE
PARTS ARE INSIDE. REPAIR SHOULD BE DONE
BY AUTHORIZED SERVICE PERSONNEL ONLY.
RISK OF FIRE OR
ELECTRIC SHOCK
DO NOT OPEN !
P3 20162461 T5274_K150P_UCG_FINAL.pdf 4C(CMYK) ZB2319 2016-11-02 Size:8.5X5.5in

5
Brewer Overview
Helpful Hints
1. Plug the brewer into its own grounded outlet.
If the electric circuit is overloaded with other
appliances, your brewer may not function
properly. The brewer should be operated on
its own circuit, separate from other appliances.
2. Keep your brewer turned “ON” at all times.
To brew a fresh cup of coffee, tea, hot cocoa, or
other beverage anytime you want, we suggest
you keep your brewer turned “ON” all the time.
However, the brewer is fully programmable so
you can set it to turn on and off automatically to
match your schedule. Or, if you prefer, set the
brewer to automatically turn off after a period
of time. Follow the simple instructions on pages
12–13 to make using the brewer convenient
for you.
3. For the best tasting gourmet coffee, tea, hot
cocoa, or other beverage, Keurig recommends
the use of filtered water in the brewer.
We also recommend the Omnipure Filter Kit,
Keurig (#5572).
4. Customize Your Size, Flavor & Brew.
With the choice of over 250 varieties of K-Cup®
pods and 5 brew sizes (4 oz., 6 oz., 8 oz.,
10 oz., and 12 oz.) your Keurig®brewer gives
you endless options to customize the size,
flavor, and brew that’s perfect for you. For a
strong, intense cup, select an Extra Bold K-Cup®
pod (with up to 30% more ground coffee than
regular varieties) and brew the size that’s right
for you. The smaller the brew size, the more
intense the flavor in your cup. The larger the
brew size, the less intense the flavor in
your cup.
5. Brewing into a travel mug.
To brew into a travel mug, simply remove the
Drip Tray Assembly and place the travel mug
on the Drip Tray Base.
6. Descale the brewer regularly.
Please refer to pages 15 and 16 for instructions.
Unpacking the Brewer
1. Place the brewer box on a large steady surface
(such as a table or countertop) or on the floor.
Open the box.
2. Turn the box on its side with the front of the box
face down.
3. Reach into the box and grasp the foam insert
that contains the brewer.
4. Carefully pull the foam insert toward you and
out of the box. The brewer will still be encased
in the polyfoam and be on its side.
5. Remove the top polyfoam packaging material.
6. Carefully lift brewer off of the bottom polyfoam
and place it upright on a flat, steady surface.
7. Lift plastic bag off of brewer.
8. Record the serial number for this brewer on
page 3 of this guide. The serial number can be
found on the side of the brewer box or on the
bottom of the brewer.
9. Place the brewer upright on a flat, steady
surface. Remove tape holding Water Reservoir
in place.
We recommend you save all packing materials in
case future shipping of the product is necessary.
WARNING:
Keep all plastic bags away
from children.
4
P4 20162461 T5274_K150P_UCG_FINAL.pdf 4C(CMYK) ZB2319 2016-11-02 Size:8.5X5.5in

5
A. Handle
B. Lid
C. LCD Screen
D. K-Cup®Pod
Assembly Housing
HC
4
M
L
E. Funnel
F. K-Cup®Pod Holder
(E and F are the
K-Cup®Pod Holder
Assembly)
G. Drip Tray Plate
H. Drip Tray
I. Drip Tray Base
J. Housing
K. BREW Button
L. Power Switch
M. Power Cord
N. Filter Mounting
Bracket
O. Omnipure KQ8A
Water Filter #5572
(not included)
(N and O are the
Filter Kit Assembly)
P. 3/4 Garden Hose
Connector
Part #50-201004-010
(not included)
Q. Brewer Inlet Connect
R. Drain Hatch and Knob
S. Drain Tubes and Plugs
T. Removable Puncture Plate
K
I
S
r
c
G
F
e
n
o
h
J
B
D
a
PQ
Features K150P Brewer
K150P Brewer
Back view with optional
Omnipure KQ8A Water Filter #5572 connected.
T
P5 20162461 T5274_K150P_UCG_FINAL.pdf 4C(CMYK) ZB2319 2016-11-02 Size:8.5X5.5in

7
6
SECTION 1 Setup & First Brew
2. Loosen the two mounting screws located on
the upper-rear of the brewer and hang the
Omnipure KQ8A Water Filter (#5572).
3. Tighten the two mounting screws (be careful
not to over tighten).
NOTE: The Omnipure KQ8A Water Filter (#5572)
assembly comes with 1/4 FPT ports for both
inlet and outlet and the plumbed water inlet to
the brewer is 3/4 Male Garden Hose Thread
(fig. 2) (Invensys solenoid valve). 1/4 OD LLDPE
(Linear Low Density Polyethylene) tubing is
recommended (NSF compliant between the
filter assembly and the brewer. NSF compliant
fittings are recommended such as High Density
Polypropylene Type).
4. Connect the ‘INLET’ port of the filter assembly
to the local water supply (fig. 3).
5. Connect a long length of tubing to the EXIT
Port of the filter assembly. DO NOT CONNECT
TO THE BREWER YET.
6. The filter needs an initial flush to clear any
carbon deposits. Route the long length of
tubing from the EXIT port to a container
or sink.
7. Turn on water supply and allow at least
4 gallons of water to flush through the
filter (fig. 4).
IMPORTANT: You cannot use your Keurig®brewer
until it has been set up for its first use.
NOTE: If the brewer has been exposed to temperatures
below freezing, allow the brewer at least two hours
to reach room temperature before brewing. A frozen
or extremely cold brewer will not operate.
CAUTION: This brewer is designed to handle local
water pressures from 40 psig up to 125 psig.
Consult a licensed plumber for water pressures in
your area. Use plumbing fittings and tubing specified
to withstand 125 psig.
WARNING: Keurig®requires the use of an external
water filter such as the Omnipure KQ8A Water
Filter, available from Keurig Green Mountain, Inc.
(# 5572). Failure to use a filter invalidates the
brewer Warranty.
Plumbing Fitting Connections
1. An external filter (Omnipure KQ8A Water Filter #5572) can be mounted on
the rear surface of the brewer using the mounting screws provided (fig. 1).
See back view of brewer on page 5.
fig. 1
fig. 2
P6 20162461 T5274_K150P_UCG_FINAL.pdf 4C(CMYK) ZB2319 2016-11-02 Size:8.5X5.5in

7
6
The BREW Button will now be illuminated.
Press the BREW Button to start a cleansing
brew. NOTE: A K-Cup®pod should not be used
for this sequence.
5. When the cleansing brew is complete, the
brewer will go into its idle state and will be
ready to brew your first K-Cup®pod.
Ready to Brew Your First Cup
1. The LCD Screen will be in its idle state (fig. 8).
2. Lift the Handle. The K-Cup®Pod Holder
will open toward you (fig. 9).
3. Select a K-Cup®pod.
NOTE: Do not remove the foil lid
or puncture the K-Cup®pod.
4. Place a K-Cup®pod
in the K-Cup®Pod Holder (fig. 10).
CAUTION: There are two sharp needles that
puncture the K-Cup®pod, one above the
K-Cup®Pod Holder and the other in the bottom
of the K-Cup®Pod Holder. To avoid risk of injury,
do not put your fingers in the K-Cup®Pod
Assembly Housing.
5. Lower the Handle to close the Lid over the
K-Cup®Pod Holder. (When it is closed
completely, the BREW Button will flash up
to 60 seconds.)
fig. 6
fig. 3
connect to
water supply
Welcome To The
Keurig 150P
Brewing System
Designed For The
K-Cup®Pod
Español Français
8. Turn off water supply.
9. Cut the tubing to proper length and connect to
inlet plumbing port on the brewer by using
water inlet valve 3/4 hose connector available
from Keurig Green Mountain, Inc. Part
#50-201004-010
(not included) (fig.5).
10. Turn on water supply.
Setting Up Your Brewer
1. Remove all pieces of packing tape from the
brewer and Drip Tray. Remove the clear
plastic film from the LCD Screen. Unwrap
the Power Cord and plug the brewer into a
grounded outlet. Ensure your brewer is
plumbed (refer to page 6).
2. Turn the brewer on, the Power Switch is
located at the top left hand side of the brewer
on the back. The brewer’s LCD Screen will
display the power up welcome screen (fig. 6).
3. The brewer will automatically fill the internal
water tank with water and then the water will
be heated. This will take about 3 minutes.
During the heating period, “HEATING PLEASE
WAIT” will be displayed on the LCD Screen
(fig. 7).
4. Place a 10 oz. mug on the Drip Tray Plate,
then lift and lower the Handle.
fig. 4
fig. 5
Heating...
Please Wait
fig. 7
P7 20162461 T5274_K150P_UCG_FINAL.pdf 4C(CMYK) ZB2319 2016-11-02 Size:8.5X5.5in

8
9
SECTION 1 Setup & First Brew NOTE: After brewing a hot cocoa K-Cup®pod,
we recommend running a hot water brew
cycle without a K-Cup®pod.
11. Your brewer may display “HEATING
PLEASE WAIT” as it heats water for the
next brew cycle.
Stopping the Brew Process
If you need to stop the brewing after the
process has started, press and release
the Power Switch to turn the brewer ‘OFF.’
The flow of coffee, tea, hot cocoa, or other
beverage will stop and the heating element
and the LCD Screen will shut off. NOTE: You
may get less coffee, tea, hot cocoa, or other
beverage in your cup during your next brew.
We recommend that you perform a cleansing
brew with water only after a terminated brew.
Then your next brew will be the volume you
have selected.
6. Place a mug on the Drip Tray Plate and
select your brew size (fig. 11), then press
BREW (fig. 12).
NOTE: If you do not push the BREW Button in
60 seconds, the BREW Button will be disabled
to prevent accidental activation. Re-activate the
BREW Button by lifting and lowering the
Handle completely.
7. There may be a short pause prior to coffee
being dispensed. The entire brew process
lasts for approximately 1 minute and ends
with a burst of air to remove all liquid from
the K-Cup® pod.
CAUTION: There is extremely hot water in the
K-Cup®Pod Holder during the brew process.
To avoid risk of injury, do not lift the Handle
or open the K-Cup®Pod Assembly Housing
during the brew process.
8. The end of brew is indicated by “KEURIG
BREWED ENJOY.”
9. Lift the Handle, remove and dispose
of the used K-Cup® pod.
CAUTION: K-Cup®pod will be hot.
10. Enjoy your first cup of KeurigHOT™
gourmet coffee, tea, hot cocoa, or
other beverage!
fig. 9
fig. 10
fig. 8
fig. 12
fig. 11
4 OZ.
12 OZ.
6 OZ.
10 OZ.
8 OZ.
Place Mug,
Select
Brew Size
12:30 PM
Ready
Choose Your
K-Cup®Pod
& Lift Handle
WATER
LEVEL
Español Français
P8 20162461 T5274_K150P_UCG_FINAL.pdf 4C(CMYK) ZB2319 2016-11-02 Size:8.5X5.5in

8
9
Menu Controls
To enter the Menu Mode the brewer should
be plugged in and the power must be off.
Press and hold your finger on the display for
about 10 seconds while pressing and releasing
the Power Switch (fig. 13). Once the Menu Screen
appears (fig. 14) remove your finger.
Press any line item to enter the set up for that
particular feature. Please reference the Menu
Navigation on page 10.
If you are experiencing any problems with your
brewer, please contact your Keurig Authorized
Distributor.
Adding Water
Your brewer has been configured at the factory to be direct
plumbed, however, the brewer can also be converted into a pour
over model with a Cold Water Tank Spare Part. To order, please call
your Keurig Authorized Distributor.
Brewing Iced Beverages
Your iced tea and iced coffee taste best when fresh-brewed hot over ice.
1. Fill a 16 oz. mug (do not use glass) to the top with ice and place a K-Cup®
pod into your brewer.
2. Select your brew size, we recommend selecting a 6 oz. or 8 oz. brew.
Press the BREW Button.
3. Stir and enjoy!
IMPORTANT: Do not brew into a cup made of glass. Doing so may cause the
glass to crack or break.
Brewing Hot Water
Your brewer is able to produce hot water for use
in cooking, making soups, oatmeal, etc. Simply lift
and lower the Handle on the brewer without adding
a K-Cup®pod. The BREW Button will flash. Be
sure to have a mug on the Drip Tray Plate and then
press the BREW Button.
Home
Auto OFF
Brew Temp
Language
Clock
ON/OFF Time
Brew Size(s)
Contact
SECTION 2
Menu Controls & Indicators
10 seconds
fig.14
fig.13
P9 20162461 T5274_K150P_UCG_FINAL.pdf 4C(CMYK) ZB2319 2016-11-02 Size:8.5X5.5in

10
11
Home
Auto OFF
Brew Temp
Language
Clock
ON/OFF Time
Brew Size(s)
Contact
Menu Mode Navigation
Home
Press “HOME” at any time to return your brewer to an idle state.
Clock
Setting the clock is optional. To set the clock, follow the instructions on
page 11.
Brew Temp
The brew temperature is pre-set at 193˚F. You do not have to program the
brew temperature but you can adjust it up or down by 5˚. Simply follow the
instructions on page 11.
Brew Size(s)
Five brew sizes are available: 4 oz., 6 oz., 8 oz., 10 oz., and 12 oz.
To program the brew sizes refer to page 12.
Auto OFF
Auto Off allows you to program your brewer to automatically turn off two
hours after the last brew. Refer to page 12 for programming instructions.
ON/OFF Time
You can leave your brewer on all the time and use the Power Switch to turn
it off. Or you can program the brewer to automatically turn on or off at a
specific time as shown on page 12.
Language
This brewer is shipped with English as the default language. To change the
language, follow the instructions on page 13.
Contact
The contact setting features allows you to program the contact information
you need for brewer support and help. To program, follow the instructions
on page 13.
SECTION 2 Menu Controls & Indicators
P10 20162461 T5274_K150P_UCG_FINAL.pdf 4C(CMYK) ZB2319 2016-11-02 Size:8.5X5.5in

10
11
Setting the Clock
Setting the clock is optional. When the clock is set, the time will appear
on the LCD Home Screen. NOTE: You must set the clock if you will be
programming the Auto On/Off Time feature.
1. From the Menu Mode, press “CLOCK.”
2. The set clock screen will display
“DISABLED” if the brewer is new or if
electrical power has been interrupted.
Press “DISABLED” to set a time. Press “H”
repeatedly to advance the hour in steps or
hold it down to scroll through the hours
quickly. When you have set the hour then
press the “M” to set the minutes, press
repeatedly to advance by a minute each time
or keep it pressed to scroll quickly (fig. 15).
3. Press “OK” when you are finished.
The clock is now set.
4. The correct time should now be displayed on
the LCD Home Screen.
fig.15
Programming Brew Temperature (188°–198° F)
The brewer brews at a preset temperature of 193˚F. You can adjust this
temperature up or down by 5˚. Simply follow the instructions below.
1. From the Menu Mode, press
“BREW TEMP.”
2. The LCD Screen will now display the
Brew Temperature programming
options (fig. 16). The temperature 193˚F
(initial setting) will be displayed at the
top of the LCD Screen to indicate the
current temperature setting.
3. Press the + symbol to increase the
temperature and the – symbol to lower
the temperature one degree at a time.
4. Once you have reached your desired brew
temperature, press “OK.” The brew
temperature is now programmed.
NOTE: At high altitudes (over 5,000 feet)
if boiling occurs, use the temperature
adjustment (-5°) to lower the temperature.
Clock
12:00 AM
OK
MH
193°F
+-
Temperature
OK
fig.14
fig.16
NOTE: If power is interrupted to the brewer, follow the procedure above
to reset the time as the clock will not be visible. Brew size and brew
temperature menu settings will be restored automatically. All other
settings will be restored automatically after clock is set.
NOTE: To disable the clock, press the time. However, the ‘On/Off’ time setting
will also be disabled.
P11 20162461 T5274_K150P_UCG_FINAL.pdf 4C(CMYK) ZB2319 2016-11-02 Size:8.5X5.5in

12
13
Programming On/Off Features
The brewer provides three modes so that you can enjoy gourmet coffee, tea,
hot cocoa, or other beverage on your own schedule.
1. Leave the brewer “ON” all the time. The
brewer can be left on all the time so that it is
always ready to brew a fresh cup of gourmet
coffee, tea, hot cocoa, or other beverage. To
turn the brewer off at any time, simply press
and release the Power Switch. Press and
release the Power Switch again to restore
power to the brewer. You will have to wait for
the water to heat up before the brewer is
ready to brew.
2. Program the brewer to “AUTO OFF.” The
brewer can be programed to automatically
turn off 2 hours after the last brew (fig. 18).
a. From the Menu Mode, press “AUTO OFF.”
The LCD Screen will now display the
“AUTO OFF” programming option.
b. To enable the “AUTO OFF” feature, press
“ON.” “ENABLED” will appear on the screen
and press “OK.” To disable the “AUTO OFF”
feature, press “OFF.” “DISABLED” will appear
on the screen and press “OK.”
3. Program the brewer for a specific On/Off
Time. NOTE: To use this programming feature, the clock must be set to the
correct time.
Programming Your Brew Size
All brew sizes are enabled in the default setting. If you want to disable any
brew size, just press on the appropriate icon(s). Please follow instructions
outlined below.
1. From the Menu Mode, press
“SET BREW SIZE(S).”
2. The LCD Screen will display all enabled brew
sizes. To disable a brew size press the icon.
The check mark will change to an “X”
indicating that the brew size is disabled
(fig. 17). To enable a disabled size, press
it again.
3. Once you have selected your desired brew
size(s), press “OK.” The brew size(s) are
now programmed.
NOTE: You can not delete all brew sizes.
To enable a brew size you have already
disabled, just press its icon and then press
“OK.” The 8 oz. setting is the default brew
size if all sizes have been disabled.
SECTION 2 Menu Controls & Indicators
fig.17
4 Oz.
12 Oz.
6 Oz.
10 Oz.
8 Oz.
OK
3
3
3
3
fig.18
Auto OFF
Auto Off 2 hours
After Last Brew
OK
OFFON
P12 20162461 T5274_K150P_UCG_FINAL.pdf 4C(CMYK) ZB2319 2016-11-02 Size:8.5X5.5in

12
13
fig.19
ON/OFF Time
ON 12:00 AM
OFF 12:00 PM
OK
MH
MH
Contact Screen Settings
The contact screen is pre-programmed with
the following information: Keurig Green
Mountain, Inc. and www.Keurig.com.
You can reprogram the brewer with your contact
information. The contact screen will appear in
the screen saver.
1. From the Menu Mode, press “CONTACT.”
The LCD Screen will display the Keurig
default contact information (fig. 21).
2. Press the Upper (Company Name) Box. The
Keypad will appear along with the current
information (fig. 22). NOTE: Unless changed by
the user, Keurig contact information will be
present on the display.
a. Press the Delete Key repeatedly to remove
current information. Enter new information
using the Keypad. NOTE: To select Upper Case,
Lower Case, Numerals, Upper Case Accents,
Lower Case Accents, press the Keypad Change
Key located at the bottom center of the screen.
fig.21
fig.20
WWW.KEURIG.COM
PHONE #
KEURIG GREEN
MOUNTAIN, INC.
Contact
OK
Language
Español
English
Français
OK
a. After setting the correct time (see “Setting
The Clock” page 11), return to the Menu Mode
and press “ON/OFF TIME.”
b. To set the ON time, press “DISABLED.”
The display will change to a time of day.
Press “H” to set the hours and “M” to set
the minutes. Once the desired time is set,
press “OK” to accept this time.
c. To set the OFF time, press “DISABLED.”
The display will change to a time of day.
Press “H” to set the hours and “M” to set
the minutes. Once the desired time is set,
press “OK” to accept this time (fig. 19).
Language Settings
The brewer is shipped with English as the default
language. To change the default to Français or
Español, follow the instructions outlined below.
Set Language
1. From the Menu Mode, press “LANGUAGE.”
2. The LCD Screen will now display the
Language programming options (fig. 20).
3. Press the desired Language button, then
press “OK” to confirm your selection.
fig.22
ABC DEF
GHI JKL MNO
PQRS TUV WX Y Z
Delete . , - Space
KEURIG GREEN
MOUNTAIN, INC.
OK
ABC
abc
123
P13 20162461 T5274_K150P_UCG_FINAL.pdf 4C(CMYK) ZB2319 2016-11-02 Size:8.5X5.5in

14
15
b. Press “OK” to save your changes and
return to the Main Contact Screen.
NOTE: Pressing the Back Arrow Key will
return to the Main Contact Screen without
saving changes.
3. Press the Middle (Phone Number) Box. The
Numeral Keypad Mode will appear along
with the current information (fig. 23).
a. Delete current phone number, if any, and
enter new information using the Keypad.
b. Press “OK” to save your changes and
return to the Main Contact Screen.
4. Press the Lower Box. This box can be
customized to contain any information
such as web/email address, contact
name, etc (fig. 24).
a. Delete or enter new information using
the Keypad.
b. Press “OK” to save your changes and
return to the Main Contact Screen.
c. In the Main Contact Screen (fig. 21), press
“OK” to save the updated screen as the
default and return to the Menu Screen.
SECTION 2 Menu Controls & Indicators
fig.23
SECTION 3 Cleaning & Maintenance
Cleaning External Parts
Regular cleaning of the brewer’s external components is recommended.
The following section provides instruction for standard cleaning procedures.
For in-depth NSF certified instructions, please refer to the Cleaning and
Sanitization Guide.
1. Never immerse the brewer in water or other liquids. The Housing
and other external components may be cleaned with a damp, soapy,
lint-free, non-abrasive cloth.
2. The Drip Tray can accumulate up to 12 oz. of overflow. The Drip Tray
and Drip Tray Plate should be periodically inspected and rinsed clean.
To remove the Drip Tray Assembly, simply slide it toward you, keeping it
level at all times to avoid spilling. The Drip Tray and Drip Tray Plate
should not be placed in the dishwasher. They should be cleaned with a
damp, soapy, lint-free, non-abrasive cloth and rinsed thoroughly.
Cleaning the K-Cup®Pod
Holder Assembly
1. Cleaning the Parts—The K-Cup®Pod
Holder Assembly can be placed onto the
top shelf of a dishwasher. NOTE: Use low
temperature cycles in the dishwasher.
To remove the K-Cup®Pod Holder
Assembly from the brewer, open the
cover by lifting the Handle.
fig.25
fig.24
21 3
456
789
Delete 0Space
PHONE #
OK
ABC
abc
123
ABC DEF
GHI JKL MNO
PQRS TUV WX Y Z
Delete . , - Space
WWW.KEURIG.COM
OK
ABC
abc
123
The brewer is now fully programmed. Press “HOME” on the Menu Screen
to return your brewer to its idle state.
P14 20162461 T5274_K150P_UCG_FINAL.pdf 4C(CMYK) ZB2319 2016-11-02 Size:8.5X5.5in

14
15
SECTION 3 Cleaning & Maintenance
Grasp the top of the K-Cup®Pod Holder with
one hand while pushing up on the bottom of the
K-Cup®Pod Holder from underneath with the
other until it releases (fig. 25). After cleaning,
align the K-Cup®Pod Holder with the opening
using the two front ribs as a guide, and snap
them into place from the top.
2. Cleaning the Funnel—The Funnel can be
removed from the K-Cup®Pod Holder by
pulling on it until it pops off (fig. 26). The Funnel
is dishwasher safe. To replace it, just snap it
back onto the K-Cup®Pod Holder.
3. Cleaning the Exit Needle—The exit needle is
located on the inside bottom of the K-Cup®Pod
Holder Assembly. Should a clog arise due to
coffee grounds, it can be cleaned using a paper
clip or similar tool. Remove the K-Cup®Pod
Holder Assembly and detach the Funnel. Insert
the paper clip (as shown in fig. 26) into the exit
needle to loosen the clog, then flush with fresh
water. The K-Cup®Pod Holder Assembly can
be placed onto the top shelf of a dishwasher.
NOTE: Use low temperature cycles in
the dishwasher.
4. Cleaning the Puncture Plate—The Puncture Plate can be removed by
grasping the finger grips of either side and pulling forward (fig. 27).
Once removed, spray the Puncture Plate with detergent, brush clean and
rinse if necessary. Be sure to replace the Puncture Plate after cleaning to
ensure proper brewer operation.
!
fig.26 CAUTION: There are sharp needles that puncture the K-Cup®pod above the
K-Cup®Pod Holder and in the bottom of the K-Cup®Pod Holder. To avoid risk
of injury, do not put your fingers in the K-Cup®Pod Assembly Housing.
Descaling Your Brewer
Depending on the mineral content of your water, calcium deposits or
scale may build up in your brewer. Scale is non-toxic but if left unattended
can hinder brewer performance. Regularly descaling your brewer every
3 to 6 months helps maintain the heating element, and other internal parts
that come in contact with water. Calcium deposits may build up faster,
making it necessary to descale more often.
Before you begin, you will need a large ceramic mug, fresh water,
Keurig®Descaling Solution, and access to a sink. Do not use a paper cup.
The following outlines the steps required to prepare the brewer before the
descaling procedure:
1. Unplug the brewer from the power supply.
2. Disconnect or interrupt the external water supply feeding the brewer.
3. Drain the internal hot and cold water tank (refer to page 17).
4. Remove the two screws located on the back, top, left of the brewer.
Remove the top cover to gain access to the cold water tank.
5. Pour the entire bottle of Keurig®Descaling Solution into the opening.
Then refill the empty bottle with bottled or filtered water and pour into
the opening.
6. Reconnect the power supply.
7. Proceed with the descaling procedure on page 16.
fig.27
P15 20162461 T5274_K150P_UCG_FINAL.pdf 4C(CMYK) ZB2319 2016-11-02 Size:8.5X5.5in

16
17
• IfthereisKeurig®Descaling Solution in the cold water tank, discard the
contents through the drain tubes, (follow Draining the Brewer instructions
on page 17), rinse the Water Reservoir thoroughly and refill with water.
• Plugthebrewerbackin,poweron,andrepeattheStep3FreshWater
Rinse cycle. The brewer should begin to function normally as the solution
is rinsed out and the scale is removed. If problem persists, allow the
brewer to sit unplugged for at least 30 minutes before continuing with
the rinse.
For further descale information please contact your Keurig Authorized Distributor.
Service
Beyond these recommended cleaning and maintenance procedures this
brewer is not user serviceable. For service, please refer to the Warranty
section of this guide.
SECTION 3 Cleaning & Maintenance
Descaling Procedure
STEP 1: FIRST DESCALING SOLUTION RINSE
• PressthePowerSwitchtopoweronthebrewer.
• PlacealargemugontheDripTrayPlateandrunacleansingbrewusing
the largest brew size. Do not add a K-Cup®pod. Pour the contents of the
mug into the sink.
STEP 2: SECOND DESCALING SOLUTION RINSE
• RepeatthebrewprocesswithoutaK-Cup®pod, until “ADD WATER” is
indicated. Let the brewer stand for at least 30 minutes while still on.
• After30minutes,discardanyresidualsolutionthroughthedraintubes.
STEP 3: FRESH WATER RINSE
• Ensuretheinternalcoldwatertankisfilledwithfreshwater.
• PlacealargemugontheDripTrayPlateandrunacleansingbrewusing
the largest brew size. Do not add a K-Cup®pod. Pour the contents of the
mug into the sink.
• Repeatbrewprocessuntilyouhavecompletedatleast12brewsusingthe
largest brew size. You may need to refill the cold water tank at least one
time during this process.
NOTE: The cleaning action of Keurig®Descaling Solution may result in a foam
dispensed from the brewer. This is natural, as the solution is reacting with the
scale inside. For a brewer that is heavily scaled, the brewer may not fill properly
after the descaler is added. If this occurs, you may see only a small or no output
dispensed followed by the sound of air blowing out. If this occurs:
• Turnoffandunplugthebrewer.
P16 20162461 T5274_K150P_UCG_FINAL.pdf 4C(CMYK) ZB2319 2016-11-02 Size:8.5X5.5in

16
17
Purging the Brewer
If your brewer has not been used for more
than one week, you should purge the water
from the internal water tank.
1. Follow Draining the Brewer instructions
on page 17.
2. Once drained, re-connect brewer to power
source and turn on.
3. When the brewer indicates “READY,” place
a large mug on the Drip Tray Plate and
select Large Mug (10 oz. serving) brew size
from the Select Brew Size Menu (fig. 28).
4. Discard water.
5. Repeat steps 2-4 two more times to
completely purge water from the internal
water tank.
Draining the Brewer
1. Turn off the brewer, unplug it, and allow the
brewer to cool approximately 30 minutes.
2. Turn the brewer around so the back is
facing out. Unscrew the small knob to
release the back panel, remove the panel
from the brewer, and set it aside. If the
screw is tight, you may need to use a
flathead screw driver.
fig.29
fig.28
4 OZ.
12 OZ.
6 OZ.
10 OZ.
8 OZ.
Place Mug,
Select
Brew Size
3. Pull both the tubes downwards until the ends are free. Over a large
pitcher, remove the plugs (fig. 29) and drain the water from the cold and
hot water tanks, respectively.
CAUTION: If the brewer was not allowed to cool sufficiently, the water draining
from the tube may be very hot. Recap the tube. NOTE: To avoid losing parts,
when finished, re-insert the tube and screw the panel back onto the brewer.
If you need assistance with your brewer, please contact your Keurig
Authorized Distributor.
Storage
Drain the internal water tank before storing and ensure that you store
your brewer in a safe and frost free environment. It is suggested to store
your brewer in the upright position. If you store the brewer in a cold
environment, you run the risk of water freezing inside the brewer and
causing damage. When you prepare to use it after storage, we
recommend running three cleansing brews without a K-Cup®pod. If
you plan to move your brewer to a different location, turn the brewer off,
unplug it and empty the internal water tank. If your brewer has been in
an environment below freezing, please be sure to let it warm to room
temperature for two hours before using.
Drain tube
connected to the
hot water tank.
Drain tube
connected to the
cold water tank.
P17 20162461 T5274_K150P_UCG_FINAL.pdf 4C(CMYK) ZB2319 2016-11-02 Size:8.5X5.5in

19
18
If any problems persist, contact your Keurig Authorized Distributor.
SECTION 4 Troubleshooting
SITUATION
Brewer does not
have power
Brewer will
not brew
SOLUTION
•Plug the brewer into an independent outlet.
•Check to be sure that it is plugged in securely.
•Make sure that the brewer is powered on and
LCD Screen is illuminated.
•Reset circuit breaker if necessary.
•Plug into a different outlet.
•After placing the K-Cup®pod in the K-Cup®Pod Holder,
make sure the Handle is pushed down securely and the
LCD Screen reads “READY TO BREW” with the BREW
Button flashing, then press the BREW Button.
•The exit needle may be clogged (refer to page 15).
LCD Messages
•Inplumbedmode,ifthewaterflowhasbeeninterrupted,
LCD Screen will state “WATER FLOW INTERRUPTED,
TO RESET, PLEASE PRESS BREW BUTTON.”
Press BREW Button to resolve this issue.
•Ifthemessagespersistafterfollowingthese
instructions, contact your Keurig Authorized Distributor.
SITUATION
Chlorine or mineral
taste in coffee
Brewing a partial cup
The time is not
displayed on the
LCD Screen
Brewer shuts
off or turns on
automatically
SOLUTION
•Be sure to use filtered water. If you have any
questions, contact your Keurig Authorized
Distributor.
•The exit needle may be clogged (refer to page 15).
•Clean the K-Cup®Pod Holder Assembly if necessary
and rinse under faucet (refer to pages 14-15).
•“Descale” the brewer (refer to pages 15-16).
•If you have repeated the descale procedure on
your brewer two times and it is still only
brewing a partial cup, contact your Keurig
Authorized Distributor.
•The time will not be displayed on the LCD Screen
unless you have set it. To set the clock, follow
the procedure on page 11.
•If power is interrupted to the brewer, you will
need to set the clock again using the procedure
on page 11.
•Check to make sure that the Auto Off time
and/or On/Off time features have not been set.
To do this, enter the Menu Mode (page 9) and
follow instructions to reset (page 12).
P18 20162461 T5274_K150P_UCG_FINAL.pdf 4C(CMYK) ZB2319 2016-11-02 Size:8.5X5.5in

19
18
SECTION 5 Warranty
Limited one-Year Warranty
Keurig Green Mountain, Inc. warrants to the original purchaser that its
brewer will be free of defects in materials or workmanship under normal
use for one-year from the date of purchase. Keurig, a Keurig Authorized
Distributor or Service Agent will, at their option, repair or replace a defective
brewer or brewer parts under this warranty without charge upon its receipt
of proof of the date of purchase. If a replacement brewer is necessary to
service this warranty, the replacement brewer may be new or reconditioned.
If a replacement brewer or parts are sent, a new limited one-year warranty
will be applied to the replacement brewer or parts. This warranty only
applies to brewers operated in the United States and Canada. This warranty
gives the original purchaser specific legal rights, and you may also have
other rights that vary from state to state and, in the case of Canada, from
province to province. If you obtained this brewer through sale or rental from
a Keurig Authorized Distributor, you may also want to refer to your distribu-
tor’s warranty policies. Only the use of Keurig HOT™K-Cup®brand pods and
accessories will guarantee the proper functioning and lifetime of Keurig®
K-Cup®brewer. Any damage to or malfunction of your brewer resulting from
the use of non KeurigHOT™K-Cup®brand pods and accessories may not be
covered by this warranty or may result in a service fee if the damage or
malfunction is determined to be caused by such use.
What is not covered by the Limited Warranty?
THIS WARRANTY DOES NOT COVER CONSEQUENTIAL OR INCIDENTAL
DAMAGES SUCH AS PROPERTY DAMAGE AND DOES NOT COVER
INCIDENTAL COSTS AND EXPENSES RESULTING FROM ANY BREACH OF
THIS WARRANTY, EVEN IF FORESEEABLE. Some states or provinces do
not allow the exclusion or limitations of incidental or consequential
damages, so the above limitation or exclusion may not apply to you
depending on the state or province of purchase. Nor does this warranty
cover damages caused by use of non Keurig HOT™K-Cup®brand pods or
accessories, services performed by anyone other than Keurig or its
authorized service providers, use of parts other than genuine Keurig®
parts, or external causes such as abuse, misuse, inappropriate power
supply, or acts of God.
Other Limitations
THIS WARRANTY IS EXCLUSIVE AND IS IN LIEU OF ANY OTHER EXPRESS
WARRANTY, WHETHER WRITTEN OR ORAL. IN ADDITION, KEURIG HEREBY
SPECIFICALLY DISCLAIMS ALL OTHER WARRANTIES WITH RESPECT TO
YOUR K150P BREWER, INCLUDING ANY IMPLIED WARRANTY OF
MERCHANTABILITY OR FITNESS FOR ANY PARTICULAR PURPOSE. Some
states or provinces do not allow disclaimers of such implied warranties or
limitations on how long an implied warranty lasts, so the above limitation
may not apply to you depending on the state or the province of purchase.
How do you obtain warranty service?
Keurig®brewers are high-quality appliances and, with proper care, are
intended to provide years of satisfying performance. However, should the
need arise for warranty servicing; simply call your Keurig Authorized
Distributor (KAD) who originally sold you the brewer or your Keurig
Authorized Service Provider (KASP) for full support. To be re-connected with
your KAD or KASP, please call Keurig at 1.888.CUP.BREW (287.2739).
Keurig Green Mountain, Inc.
33 Coffee Lane
Waterbury, VT 05676
P19 20162461 T5274_K150P_UCG_FINAL.pdf 4C(CMYK) ZB2319 2016-11-02 Size:8.5X5.5inP19 20162461_V01 T5274_K150P_UCG_FINAL.p19R1.pdf 4C(CMYK) ZB2319 2016-11-25 Size:8.5X5.5in

20
21
averTISSeMenT auX uTILISaTeurS eT auX ParenTS
1. ne permettezPaS aux enfants d’utiliser l’appareil sans
la supervision d’un adulte. L’appareil distribue de l’eau
très chaude.
2. avIS SPÉcIaL auX uTILISaTeurS De chocoLaT
chauD : aPrÈS L’uTILISaTIon D’une caPSuLe K-cuP®
De chocoLaT chauD, LanceZ IMMÉDIaTeMenT un
cycle d’infusion d’eau chaude sans capsule K-Cup®pour
éviter une possible obstruction de l’aiguille de sortie. ne
tenez PaS pour acquis que le prochain utilisateur le fera.
RÈGLES DE SÉCURITÉ IMPORTANTES
Fonctionnement et utilisation sans danger
Lors de l’utilisation de tout appareil électrique,
des mesures de sécurité de base devraient être
suivies, et notamment :
1. Lire toutes les instructions avant l’utilisation.
2. Ne pas toucher les surfaces chaudes.
Utiliser les poignées s’il y en a.
3. Installer correctement l’appareil et le placer
dans un endroit conforme aux présentes
instructions avant de l’utiliser.
4. L’utilisation d’accessoires non recommandés
par le fabricant de l’appareil risque de
causer un incendie, des chocs électriques
ou des blessures.
5. Éviter le contact ou la proximité de l’appareil
avec un élément électrique ou un brûleur à
gaz. Éviter également de placer l’appareil à
l’intérieur d’un four chaud.
6. Ne pas utiliser à l’extérieur.
7. Pour éviter les risques d’incendie, de chocs
électriques ou de blessures, ne pas immerger
la fiche, le cordon d’alimentation ou l’appareil
dans l’eau ni dans aucun autre liquide.
8. Utiliser seulement de l’eau dans cet appareil!
Ne verser aucun autre liquide ou aliment dans
le réservoir d’eau, à moins d’indications à cet
effet dans les instructions de nettoyage.
9. Éteindre et débrancher l’appareil avant de
le nettoyer ou d’en faire l’entretien. Laisser
l’appareil refroidir avant d’ajouter ou d’enlever
des pièces et avant de le nettoyer.
10. Pour une utilisation optimale, brancher
l’appareil dans une prise de courant séparée
sur un circuit dédié pour éviter que les
lumières vacillent, que les fusibles sautent ou
que les disjoncteurs se déclenchent.
11. Ne jamais utiliser un appareil dont la fiche
ou le cordon d’alimentation est endommagé
ou un appareil qui présente un trouble de
fonctionnement ou qui a été endommagé.
Communiquer avec votre distributeur
Keurig autorisé pour signaler tout mauvais
fonctionnement du système d’infusion ou tout
dommage à celui-ci.
12. Ne pas laisser le cordon d’alimentation pendre
d’une table ou d’un comptoir ni entrer en
contact avec une surface chaude.
13. Pour débrancher le système d’infusion,
éteindre d’abord l’appareil en appuyant sur
l’interrupteur, puis retirer le cordon de la prise.
14. Ne jamais laisser des enfants utiliser le
système d’infusion ni rester à proximité sans
surveillance.
15. Ne pas soulever la poignée durant l’infusion.
16. L’appareil est équipé d’un cordon
d’alimentation muni d’un fil et d’une prise
de mise à la terre. L’appareil doit être mis à
la terre en utilisant une prise de courant à
contact de mise à la terre à trois trous. En cas
de court-circuit, la mise à la terre réduit les
risques de chocs électriques.
17. Si la prise de courant est une prise de courant
murale standard à deux trous, le propriétaire
a l’obligation et la responsabilité de la faire
remplacer par une prise de courant à contact
de mise à la terre à trois trous.
18. Il ne faut en aucun cas couper ou enlever la
troisième broche (mise à la terre) de la fiche du
cordon d’alimentation, ni utiliser un adaptateur.
19. Consulter un électricien qualifié si les
instructions sur la mise à la terre ne sont pas
parfaitement comprises ou en cas de doutes
sur la mise à la terre de l’appareil.
20. Ne pas utiliser l’appareil à d’autres fins que
celle pour laquelle il a été conçu.
21. Le filtre Omnipure KQ8A de Keurig (no5572)
est compatible avec le système d’infusion
K150P et est homologué par la NSF.
22. Ne jamais infuser si la plaque de perforation
amovible (article T à la page 23) n’est pas en
place pour assurer le bon déroulement du
processus d’infusion.
conServer ce ManueL.
P20 20162461 T5274_K150P_UCG_FINAL.pdf 4C(CMYK) ZB2319 2016-11-02 Size:8.5X5.5in
Table of contents
Languages:
Other Keurig Hot Coffee Maker manuals