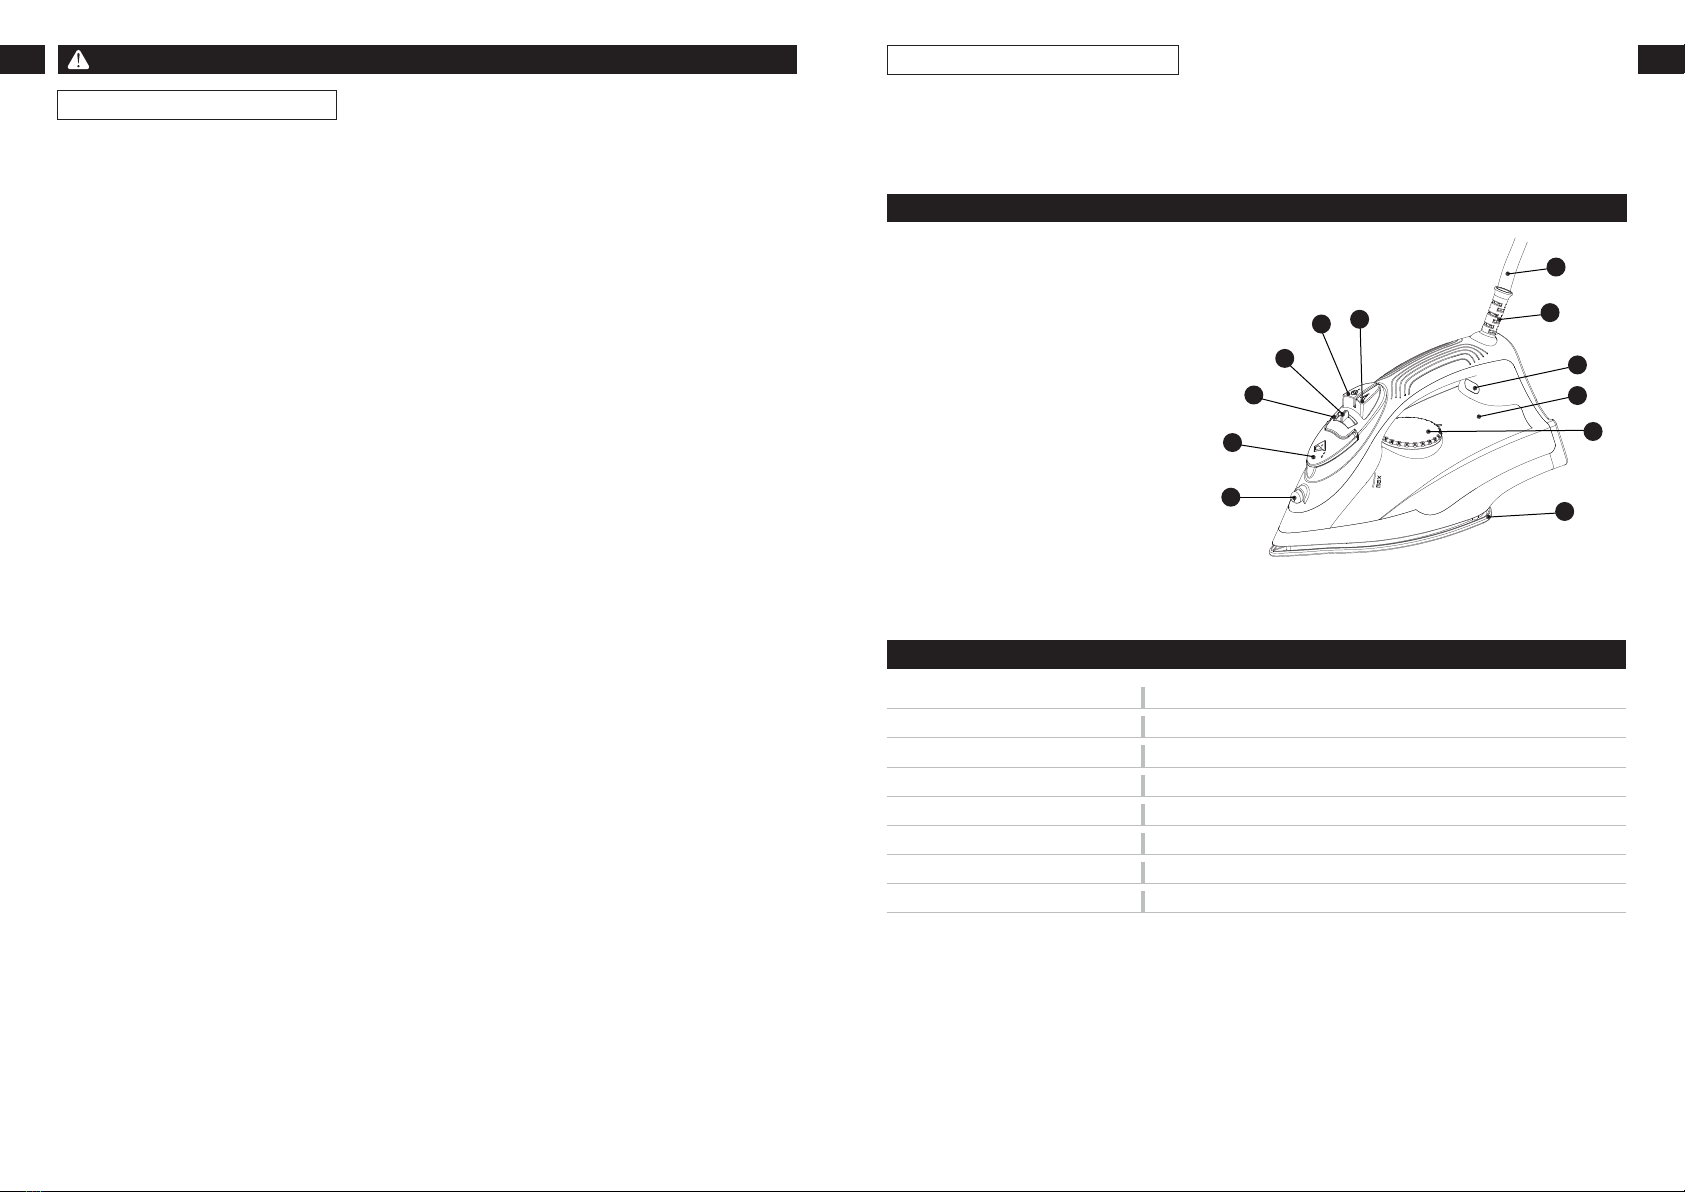
KHIND EI502 User manual

KHIND CARE Mobile App
1-800-88-0032
khind.com.my
Download to register for
E-Warranty & enjoy hassle-
free after-sales services.
ELECTRIC
STEAM
IRON
EI502
USER MANUAL
Please read this manual carefully before operating this product.
Keep this manual handy for further reference.
IMPORTANT
P/N: 40-51652-00

1. Read the instruction manual carefully and follow the instruction closely.
2. This appliance is not intended for use by persons (including children) with reduced
physical, sensory or mental capabilities, or lack of experience and knowledge, unless they
have been given supervision or instruction concerning use of the appliance by a person
responsible for their safety.
Children should be supervised to ensure that they do not play with the appliance.
3. Use this appliance with specified voltage as stated on the rating label. Before connecting
the appliance to AC mains, made sure the voltage specified corresponds to the AC supply
to your house.
4. This appliance is intended for household use only; commercial use will void warranty.
5. Do not handle the plug and the appliance with wet hands.
6. Do not pull, lift, or carry the appliance by its power cord. Do not excessively bend, stretch,
twist, haul and tramp the power cord or place heavy objects on it.
7. If the power cord is damaged, it must be replaced by the manufacturer, its service agent or
similarly qualified persons in order to avoid a hazard.
8. With any indication of damage or malfunction, please stop using the appliance
immediately to avoid hazards.Take it to the authorized service centre for repair. Do not
attempt to repair or change any parts by yourself.
9. Always take the appliance by its handle and warn against possible hazards. Eg: scalding
or burns
10. The power cord should not touch the soleplate when it is hot.
11. Do not touch the soleplate when the iron is operating or after operation.
12. Never immerse the appliance in water to protect against electrical shock hazard.
13. Keep the soleplate smooth; avoid contact with hard objects.
14. Do not leave the appliance unattended while it is connected to the main power outlet.
15. Do not iron over zippers, buttons or any form of metal ornaments found on clothes as they
may scratch the soleplate.
16. Do not bend the power cord or wind it round the appliance.
17. Never drop the appliance. If the appliance was dropped, do not use the appliance;
If there are visible signs of damages or if it is leaking, please deliver to service centre
for servicing.
18. Always disconnect the appliance from electrical outlet when not in use or before cleaning
or before filling the water tank with water.
19. The appliance must be used and rested on a flat stable surface.
20. Only fill in water but no other liquids or additives.
21. Never put the appliance down on its soleplate during use. When placing the appliance on
its stand, ensure that the surface on which the stand is placed is stable.
Safety Precaution Information
1
Safety & Warning Information
2
Cleaning & Maintenance
1. Make sure the appliance has cooled down and unplugged from power supply
before cleaning.
2. Starch and other residue may be easily removed from the soleplate with damp cloth.
3. Do not use abrasive, steel wool or metal implements to clean the soleplate.
Parts Identification
1. Spray Nozzle
2. Water Inlet
3. Self-Clean Button
4. Steam Control
5. Power Steam Button
6. Spray Button
7. Power Cord
8. Swivelling Cord Protector
9. Temperature Pilot Light
10. Water Tank
11. Temperature Control
12. Soleplate
*Pictures are for illustration purposes only.
1
2
3
11
10
9
7
8
12
4
56
Model
Voltage
Power
Power Cord Length
Steam Rate
Water Tank Capacity
Net Weight
Product Dimension (LxWxH)
EI502
220-240V ~ 50/60Hz
1300-1500W
1.8m
10g/min
220ml
0.7kg
240 x 100 x 121mm
Specifications
*Specifications are subject to change without prior notice.

3How to Use
Operation
A. Before First Use
Peel off the protective foil from the soleplate and wipe the soleplate with a soft cloth.
B. Filling the Water Tank
Warning! Make sure the appliance is not connected to the power supply before filling
the tank with water.
1. In order to avoid early furring up, we recommend to use distilled water only.
2. Make sure the Steam Control set to “ 0 “ (Steam off)
3. Open the Water Inlet
4. Fill in water (no additives) up to the maximum filling mark indicated on the water tank.
5. Close the Water Inlet.
Note: Empty the Water Tank after use.
C. Connection to the Power Supply
1. After connecting to power supply, the Temperature Pilot Light will light up while the
appliance heating up.
2. It goes off as soon as the appliance reaches pre-set temperature and you may now
start ironing.
3. During ironing, the Temperature Pilot Light automatically turn on and off as the
appliance heats up / reaches to the pre-set temperature.
D. Setting the Temperature
Set the Temperature Control according to the international textile protection symbols
(located on the Temperature control and washing label of the garment)
Rayon,Acrylic – Low Temperature
Silk, Wool – Medium Temperature
Cotton, Linen – High Temperature
E. Steam Ironing
Note: The appliance works at a constant steam volume, i.e., the steam pressure stays
same regardless of the filling level in the Water Tank.
1. Adjust the Temperature Control to the desired setting.
2. Set the steam on using the Steam Control.
3. If steam escapes from the Soleplate when the appliance is held horizontally, it is ready
for stream ironing.
4. To steam iron delicate synthetics, set the Temperature Control to a medium temperature
level. Once the Temperature Pilot Light has gone out, set the Steam Control to the
steam setting. Hold the appliance horizontally first to see whether steam is produced.
Then start ironing (check the setting at a hidden area of the garment).As the steam
produces a kind of barrier between the soleplate and cloth, most textiles are suitable
for steam ironing.
F. Power Steam
1. Press the Power Steam Button to generate a power burst of steam that can penetrate
the fabrics and smoothen the most difficult and tough creases. Wait for a few seconds
before pressing again.
2. It is also possible to use the power steam for straightening hanging clothes (vertical
shot of steam). Press the Power Steam Button in intervals then.
4
Note: If water drips from the Soleplate, its temperature might be too low. Either increase
the temperature or wait for a few seconds before pressing the button again to let the
Soleplate heat up.
G. Spray
Use the spray function to iron out stubborn creases at any temperature. Simply press the
Spray Button when required. Make sure there is enough water in the Water Tank.
H. Dry Ironing
For dry ironing, set the Steam Control to 0 (Steam off).
If you put down the iron in an upright position, steam production stops as well.
I. Self-Cleaning
Regularly clean the steam iron depending on the frequency of use and the local water
quality. In case of rather hard water self-cleaning is recommended at least every 2 weeks.
1. Set the Steam Control to “0” (steam off).
2. Set the Temperature Control to the highest level.
3. Open the Water Inlet and fill water up to the maximum filling mark into the Water Tank.
Close the Water Inlet.
4. Connect the power plug of the appliance to the wall socket.
5. Let the appliance heat up until the Temperature Pilot Light goes out.
6. Disconnect the power plug.
7. Hold the appliance horizontally across a sink.
8. Push the Steam Control to Self-Clean. Boiling hot water and steam come out of the
Soleplate washing out any limescale. Sway the iron to and fro during this.
9. Set the Steam Control to “0” (steam off).
10. Wipe the Soleplate on a (preferably) old piece of cloth. Connect the power plug to the
wall socket again and let it heat up.Any residual water now evaporates through the
Soleplate.
11. Unplug the appliance and let it cool down before stowing it away.
J. Storage
1. Unplug the appliance and let it cool down.
2. Set the Temperature Control to the lowest level.
3. Empty the Water Tank.
4. 1.Set the Steam Control to “0” (steam off).
5. If necessary, wipe the appliance with a damp cloth.
6. Store the appliance out of the reach of children and in a clean and dry place.
K. Useful Tips / Advice
1. When the appliance is used for the first time, some smoke may be generated.This is
quite normal and stops shortly after having started ironing.
2. Damp clothes are easier to iron than fully dry clothes.
3. Before the first use or when the appliance has not been used for some time, hold it
horizontally and let steam escape for approx. 1 minute by pressing the Power Steam
Button several times.
4. When using spray starch, we recommend wiping the Soleplate from time to time to
avoid the build-up of any residues.

5
1. 仔细阅读使用说明书,并严格按照说明进行操作。
2. 本设备不适合身体、感官或精神能力下降或缺乏经验和知识的人(包括儿童)使用,除非他们已由负
责他们的人员对设备的使用进行监督或指导。安全。
应监督儿童以确保他们不会玩弄本设备。
3. 使用铭牌上注明的指定电压的设备。在将设备连接到交流电源之前,请确保指定的电压对应于您家的
交流电源。
4. 本设备仅供家庭使用;商业用途将使保修失效。
5. 请勿用湿手处理插头和设备。
6. 请勿拉动、提起或搬运设备的电源线。请勿过度弯曲、拉伸、扭曲、拖拉和踩踏电源线或在其上放置
重物。
7. 如果电源线损坏,必须由制造商、其服务代理或具有类似资格的人员更换,以免发生危险。
8. 如有损坏或故障迹象,请立即停止使用,以免发生危险。将其送至授权服务中心进行维修。请勿尝试
自行修理或更换任何部件。
9. 始终握住设备的把手并警告可能存在的危险。例如:烫伤或烧伤
10. 电源线发热时不要接触底板。
11. 熨斗在工作时或工作后请勿触摸底板。
12. 切勿将设备浸入水中,以防止触电危险。
13. 保持底板平整;避免接触硬物。
14. 当设备连接到主电源插座时,请勿让设备无人看管。
15. 请勿熨烫衣服上的拉链、纽扣或任何形式的金属饰物,因为它们可能会刮伤底板。
16. 请勿弯曲电源线或将其缠绕在设备上。
17. 切勿掉落设备。如果设备跌落,请勿使用设备;如果有明显的损坏迹象或泄漏,请送至服务中心进行
维修。
18. 不使用时、清洁前或给水箱加水前,请务必断开设备与电源插座的连接。
19. 设备必须在平稳的表面上使用和休息。
20. 只加水,不加其他液体或添加剂。
21. 使用过程中切勿将产品放在底板上。将设备放置在其支架上时,请确保放置支架的表面稳定。
安全注意事项
安全和警告信息
清洁与保养
1. 清洁前确保产品已冷却并拔下电源插头。
2. 用微湿布可以轻松去除底板上的淀粉和其他残留物。
3. 请勿使用研磨剂、钢丝绒或金属工具清洁底板。
6零件名称
1. 喷嘴
2. 进水口
3. 自清洁按钮
4. 蒸汽控制
5. 强大蒸汽按钮
6. 喷雾按钮
7. 电源线
8. 旋转线保护器
9. 温度指示灯
10. 水箱
11. 温度控制
12. 底板
* 图片仅用于说明目的。
型号
电压
功率
电源线长度
蒸汽速率
水箱容量
净重
产品尺寸(长x宽x高)
EI502
220-240V ~ 50/60Hz
1300-1500W
1.8米
10克/分钟
220毫升
0.7公斤
240 x 100 x 121毫米
规格
* 规格如有更改,恕不另行通知。
1
2
3
11
10
9
7
8
12
4
56

1
2
3
11
10
9
7
8
12
4
56
9
1. Baca manual arahan dengan teliti dan ikut arahan dengan teliti.
2. Perkakas ini tidak dimaksudkan untuk digunakan oleh orang (termasuk kanak-kanak)
yang kurang keupayaan fizikal, deria atau mental, atau kurang pengalaman dan
pengetahuan, melainkan mereka telah diberi penyeliaan atau arahan mengenai
penggunaan perkakas oleh orang yang bertanggungjawab untuk keselamatan mereka.
Kanak-kanak harus diawasi untuk memastikan bahawa mereka tidak bermain
dengan perkakas.
3. Gunakan perkakas ini dengan voltan tertentu seperti yang dinyatakan pada label
penarafan. Sebelum menyambungkan perkakas ke sesalur AC, pastikan voltan yang
dinyatakan sepadan dengan bekalan AC ke rumah anda.
4. Perkakas ini bertujuan untuk kegunaan isi rumah sahaja; penggunaan komersial akan
membatalkan jaminan.
5. Jangan pegang palam dan perkakas dengan tangan yang basah.
6. Jangan tarik, angkat atau bawa perkakas dengan kord kuasanya. Jangan berlebihan
membengkok, meregangkan, memutar, mengangkut dan memijak kord kuasa atau
meletakkan objek berat di atasnya.
7. Jika kord kuasa rosak, ia mesti diganti oleh pengilang, ejen perkhidmatannya atau orang
yang berkelayakan yang serupa untuk mengelakkan bahaya.
8. Dengan sebarang tanda kerosakan atau tidak berfungsi, sila berhenti menggunakan
perkakas dengan segera untuk mengelakkan bahaya. Bawa ke pusat servis yang sah
untuk dibaiki. Jangan cuba membaiki atau menukar mana-mana bahagian sendiri.
9. Sentiasa ambil perkakas dengan pemegangnya dan beri amaran terhadap bahaya
kemungkinan. Cth: melecur atau melecur
10. Kord kuasa tidak boleh menyentuh tapak apabila ia masih panas.
11. Jangan sentuh tapak semasa seterika beroperasi atau selepas operasi.
12. Jangan sekali-kali merendam perkakas di dalam air untuk melindungi daripada bahaya
kejutan elektrik.
13. Pastikan tapak licin; elakkan sentuhan dengan objek keras.
14. Jangan biarkan perkakas tanpa pengawasan semasa ia disambungkan ke salur keluar
kuasa utama.
15. Jangan seterika pada zip, butang atau sebarang bentuk perhiasan logam yang terdapat
pada pakaian kerana ia boleh mencalarkan tapak.
16. Jangan bengkokkan kord kuasa atau lilitkannya di sekeliling perkakas.
17. Jangan sekali-kali jatuhkan perkakas. Jika perkakas terjatuh, jangan gunakan perkakas;
Jika terdapat tanda-tanda kerosakan yang boleh jelas dilihat, sila hantar ke pusat servis
untuk diservis.
18. Sentiasa putuskan sambungan perkakas daripada saluran keluar elektrik apabila tidak
digunakan atau sebelum dibersihkan.
19. Perkakas mesti digunakan dan diletakkan di atas permukaan yang stabil dan rata.
20. Isi air sahaja tetapi tiada cecair atau bahan tambahan lain.
21. Jangan sekali-kali meletakkan perkakas di atas tapak semasa digunakan.Apabila meletakkan
perkakas pada diriannya, pastikan permukaan tempat berdirinya adalah stabil.
Maklumat Langkah Keselamatan
Maklumat Keselamatan & Amaran
10
1. Pastikan perkakas telah disejukkan dan dicabut dari bekalan kuasa sebelum dibersihkan.
2. Kanji dan sisa lain boleh dikeluarkan dengan mudah dari tapak dengan kain lembap.
3. Jangan gunakan alat pelelas, bulu keluli atau logam untuk membersihkan tapak.
Pembersihan & Penyelenggaraan
Pengenalan Bahagian
1. Muncung Sembur
2. Saluran Masuk Air
3. Butang Pembersihan Diri
4. Kawalan Stim
5. Butang Stim Berkuasa
6. Butang Sembur
7. Kord Kuasa
8. Pelindung Kord Pusing
9. Lampu Pilot Suhu
10. Tangki Air
11. Kawalan Suhu
12. Plat Tapak
Spesifikasi
*Gambar adalah untuk tujuan ilustrasi sahaja.
Model
Voltan
Kuasa
Panjang Talikod Kuasa
Kadar Stim
Kapasiti Tangki Air
Berat Bersih
Dimensi produk (PxLxT)
EI502
220-240V ~ 50/60Hz
1300-1500W
1.8m
10g/min
220ml
0.7kg
240 x 100 x 121mm
*Spesifikasi tertakluk kepada perubahan tanpa notis terlebih dahulu.

7
A. 首次使用前
撕下底板上的保护膜,用软布擦拭底板。
B. 填充水箱
警告!在向水箱注水之前,确保设备未连接到电源。
1. 为避免过早起泡,我们建议只使用蒸馏水。
2. 确保蒸汽控制设置为 “0” (蒸汽关闭)
3. 打开进水口。
4. 加水 (不含添加剂) 至水箱上标注的最大加水标记。
5. 关闭进水口。
注意:使用后清空水箱。
C. 连接到电源
1. 接通电源后,温度指示灯会亮起,同时设备升温。
2. 设备达到预设温度后它会熄灭,您现在可以开始熨烫了。
3. 在熨烫过程中,温度指示灯会随着设备加热/达到预设温度而自动打开和关闭。
D. 设置温度
根据国际纺织品保护符号设置温度控制 (位于服装的温度控制和洗涤标签上)
人造丝,丙烯酸 - 低温
丝绸、羊毛 - 中温
棉、麻 - 高温
E. 蒸汽熨烫
注意:设备在恒定蒸汽量下工作,即蒸汽压力保持不变,无论水箱中的填充量如何。
1. 将温度控制调节至所需设置。
2. 使用蒸汽控制开启蒸汽。
3. 如果当设备水平放置时,蒸汽从底板逸出,则可以进行流式熨烫。
4. 若要蒸汽熨烫精致的合成材料,请将温度控制设置为中等温度。温度指示灯熄灭后,将蒸汽控
制设置为蒸汽设置。先水平握住设备,看是否产生蒸汽。然后开始熨烫 (检查衣服隐藏区域的设
置)。由于蒸汽在底板和布料之间产生了一种屏障,因此大多数纺织品都适合蒸汽熨烫。
F. 强大蒸汽
1. 按下强大蒸汽按钮,产生一股强劲的蒸汽,可以穿透织物并抚平最困难和最坚韧的折痕。等待几
秒钟,然后再次按下。
2. 也可使用强大蒸汽拉直挂衣 (蒸汽垂直喷射) 。然后每隔一段时间按一下强大蒸汽按钮。
注意:如果底板有水滴,可能是其温度过低。提高温度或等待几秒钟,然后再次按下按钮让底板加热。
G. 喷雾
使用喷雾功能熨平任何温度下的顽固折痕。只需在需要时按下喷雾按钮。确保水箱中有足够的水。
H. 干熨
对于干熨,将蒸汽控制设置为 “0” (蒸汽关闭)。
如果您将熨斗竖直放下,蒸汽的产生也会停止。
操作
如何使用 8
I. 自清洁
根据使用频率和当地水质定期清洁蒸汽熨斗。如果水质较硬,建议至少每 2 周进行一次自清洁。
1. 将蒸汽控制设置为 “0” (蒸汽关闭)。
2. 将温度控制设置为最高级别。
3. 打开进水口,将水加到水箱中的最大加水标记处。关闭进水口。
4. 将设备的电源插头连接到墙上插座。
5. 让设备加热,直到温度指示灯熄灭。
6. 拔下电源插头。
7. 将设备水平放在水槽上。
8. 将蒸汽控制推至自清洁。沸腾的热水和蒸汽从底板中流出,洗去任何水垢。在此期间来回摆动
熨斗。
9. 将蒸汽控制设置为“0” (蒸汽关闭)。
10. 在一块 (最好) 旧布上擦拭底板。再次将电源插头连接到墙上插座并使其升温。现在,任何残留
的水都会通过底板蒸发。
11. 在收起之前拔下设备并让其冷却。
J. 储存
1. 拔下电器并让它冷却。
2. 将温度控制设置为最低级别。
3. 清空水箱。
4. 将蒸汽控制设置为 “0” (蒸汽关闭)。
5. 如有必要,用湿布擦拭设备。
6. 将设备存放在儿童接触不到的地方,并放在清洁干燥的地方。
K. 提示 / 建议
1. 第一次使用时,可能会产生一些烟雾。这是很正常的,在开始熨烫后不久就会停止。
2. 潮湿的衣服比完全干燥的衣服更容易熨烫。
3. 首次使用前或一段时间未使用时,请将其水平握住,让蒸汽逸出约 10 分钟。多次按下强大蒸汽
按钮 1 分钟。
4. 使用喷雾淀粉时,我们建议不时擦拭底板,以免残留物堆积。

Cara Penggunaan
Operasi
A. Sebelum Penggunaan Kali Pertama
Tanggalkan kerajang pelindung dari Plat Tapak dan lapkan dengan kain lembut.
B. Mengisi Tangki Air
Amaran! Pastikan perkakas tidak disambungkan ke bekalan kuasa sebelum mengisi
tangki dengan air.
1. Untuk mengelakkan penyumbatan, kami mengesyorkan menggunakan air
suling sahaja.
2. Pastikan Kawalan Stim ditetapkan kepada "0" (Stim dimatikan)
3. Buka Saluran Masuk Air
4. Isikan air (tiada bahan tambahan) sehingga tanda isian maksimum yang ditunjukkan
pada tangki air.
5. Tutup Saluran Masuk Air.
Nota: Kosongkan Tangki Air selepas digunakan.
C. Sambungan ke Bekalan Kuasa
1. Selepas menyambungkan bekalan kuasa, Lampu Pilot Suhu akan menyala semasa
perkakas menjadi panas.
2. Ia padam sebaik sahaja perkakas mencapai suhu yang telah ditetapkan dan kini
anda boleh mula menyeterika.
3. Semasa menyeterika, Lampu Pilot Suhu secara automatik dihidupkan dan dimatikan
apabila perkakas menjadi panas / mencapai suhu yang telah ditetapkan.
D. Menetapkan Suhu
Tetapkan Kawalan Suhu mengikut simbol perlindungan tekstil antarabangsa (terletak
pada Kawalan Suhu dan label basuh pakaian)
Rayon,Akrilik – Suhu Rendah
Sutera, Bulu – Suhu Sederhana
Kapas, Linen – Suhu Tinggi
E. Menyeterika wap
Nota: Perkakas berfungsi pada isipadu stim yang tetap, iaitu, tekanan stim kekal sama
tanpa mengira tahap pengisian dalam Tangki Air.
1. Laraskan Kawalan Suhu kepada tetapan yang diingini.
2. Tetapkan stim menggunakan Kawalan Stim.
3. Jika wap keluar dari Plat Tapak apabila perkakas dipegang secara mendatar, ia sedia
untuk menyeterika aliran.
4. Untuk mengukus seterika sintetik halus, tetapkan Kawalan Suhu pada tahap suhu
sederhana. Setelah Lampu Pilot Suhu padam, tetapkan Tombol Stim kepada tetapan
stim. Pegang perkakas secara mendatar dahulu untuk melihat sama ada wap
dihasilkan. Kemudian mulakan menyeterika (periksa tetapan di kawasan tersembunyi
pakaian). Memandangkan stim menghasilkan sejenis penghalang antara Plat Tapak
dan kain, kebanyakan tekstil sesuai untuk menyeterika wap.
11 F. Stim Berkuasa
1. Tekan Butang Stim Berkuasa untuk menjana letupan stim berkuasa yang boleh
menembusi fabrik dan melicinkan lipatan yang paling sukar dan sukar.Tunggu
beberapa saat sebelum menekan semula.
2. Anda juga boleh menggunakan stim berkuasa untuk meluruskan pakaian yang
digantung (tembakan stim menegak).Tekan Butang Stim Berkuasa dalam selang
masa kemudian.
Nota: Jika air menitis dari Soleplate, suhunya mungkin terlalu rendah. Sama ada
meningkatkan suhu atau tunggu beberapa saat sebelum menekan butang sekali lagi
untuk membiarkan Plat Tapak panas.
G. Sembur
Gunakan fungsi semburan untuk menyeterika lipatan degil pada sebarang suhu. Hanya
tekan Butang Sembur apabila diperlukan. Pastikan air dalam Tangki Air mencukupi.
H. Menyeterika Kering
Untuk menyeterika kering, tetapkan Kawalan Stim kepada 0 (Mati wap).
Jika anda meletakkan seterika dalam kedudukan tegak, pengeluaran wap akan
berhenti juga.
I. Membersihkan Diri
Bersihkan seterika stim secara kerap bergantung pada kekerapan penggunaan dan
kualiti air tempatan. Dalam kes air yang agak keras pembersihan diri disyorkan
sekurang-kurangnya setiap 2 minggu.
1. Tetapkan Kawalan Stim kepada “0” (mati stim).
2. Tetapkan Kawalan Suhu ke tahap tertinggi.
3. Buka Saluran Masuk Air dan isi air sehingga tanda pengisian maksimum ke dalam
Tangki Air.Tutup Saluran Masuk Air.
4. Sambungkan palam kuasa perkakas ke soket dinding.
5. Biarkan perkakas panas sehingga Lampu Pilot Suhu padam.
6. Tanggalkan palam kuasa.
7. Pegang perkakas secara mendatar melintasi sinki.
8. Tekan Butang Bersihkan Diri.Air panas dan wap yang mendidih keluar dari Plat Tapak
membasuh sebarang kerak kapur. Goyangkan seterika ke sana ke mari semasa ini.
9. Tetapkan Kawalan Stim kepada “0” (mati stim).
10. Lap Plat Tapak pada sehelai (sebaik-baiknya) kain lama. Sambungkan palam kuasa
ke soket dinding sekali lagi dan biarkan ia panas. Sebarang sisa air kini menyejat
melalui Plat Tapak.
11. Cabut plag perkakas dan biarkan ia sejuk sebelum menyimpannya.
J. Penyimpanan
1. Cabut palam perkakas dan biarkan ia sejuk.
2. Tetapkan Kawalan Suhu ke tahap paling rendah.
3. Kosongkan Tangki Air.
4. Tetapkan Kawalan Stim kepada “0” (mati stim)
5. Jika perlu, lap perkakas dengan kain lembap.
6. Simpan perkakas daripada capaian kanak-kanak dan di tempat yang bersih
dan kering.
12

K. Petua / Nasihat
1. Apabila perkakas digunakan buat kali pertama, sedikit asap mungkin terhasil. Ini
adalah perkara biasa dan berhenti sejurus selepas mula menyeterika.
2. Pakaian lembap lebih mudah digosok berbanding pakaian kering sepenuhnya.
3. Sebelum penggunaan pertama atau apabila perkakas tidak digunakan untuk
beberapa lama, pegang secara mendatar dan biarkan wap keluar selama lebih
kurang. 1 minit dengan menekan Butang Kuasa Steam beberapa kali.
4. Apabila menggunakan kanji semburan, kami mengesyorkan mengelap Plat Tapak dari
semasa ke semasa untuk mengelakkan pembentukan sebarang sisa.
13

TITLE
JOB NO.
MATERIAL
PREPARED BY
EI502 Electric Steam Iron User Manual
KM-123-922
-
Pelly
CHECKED BY:
DESIGNER
CREATIVE HEAD
TSD / QA
APPROVED BY:
T. MANAGER
P. MANAGER
G. MANAGER
DATE
SCALE
COLOUR
02/11/2022, 09/11/2022
1:1
1 Colour Printing Black
Pelly
Other KHIND Iron manuals