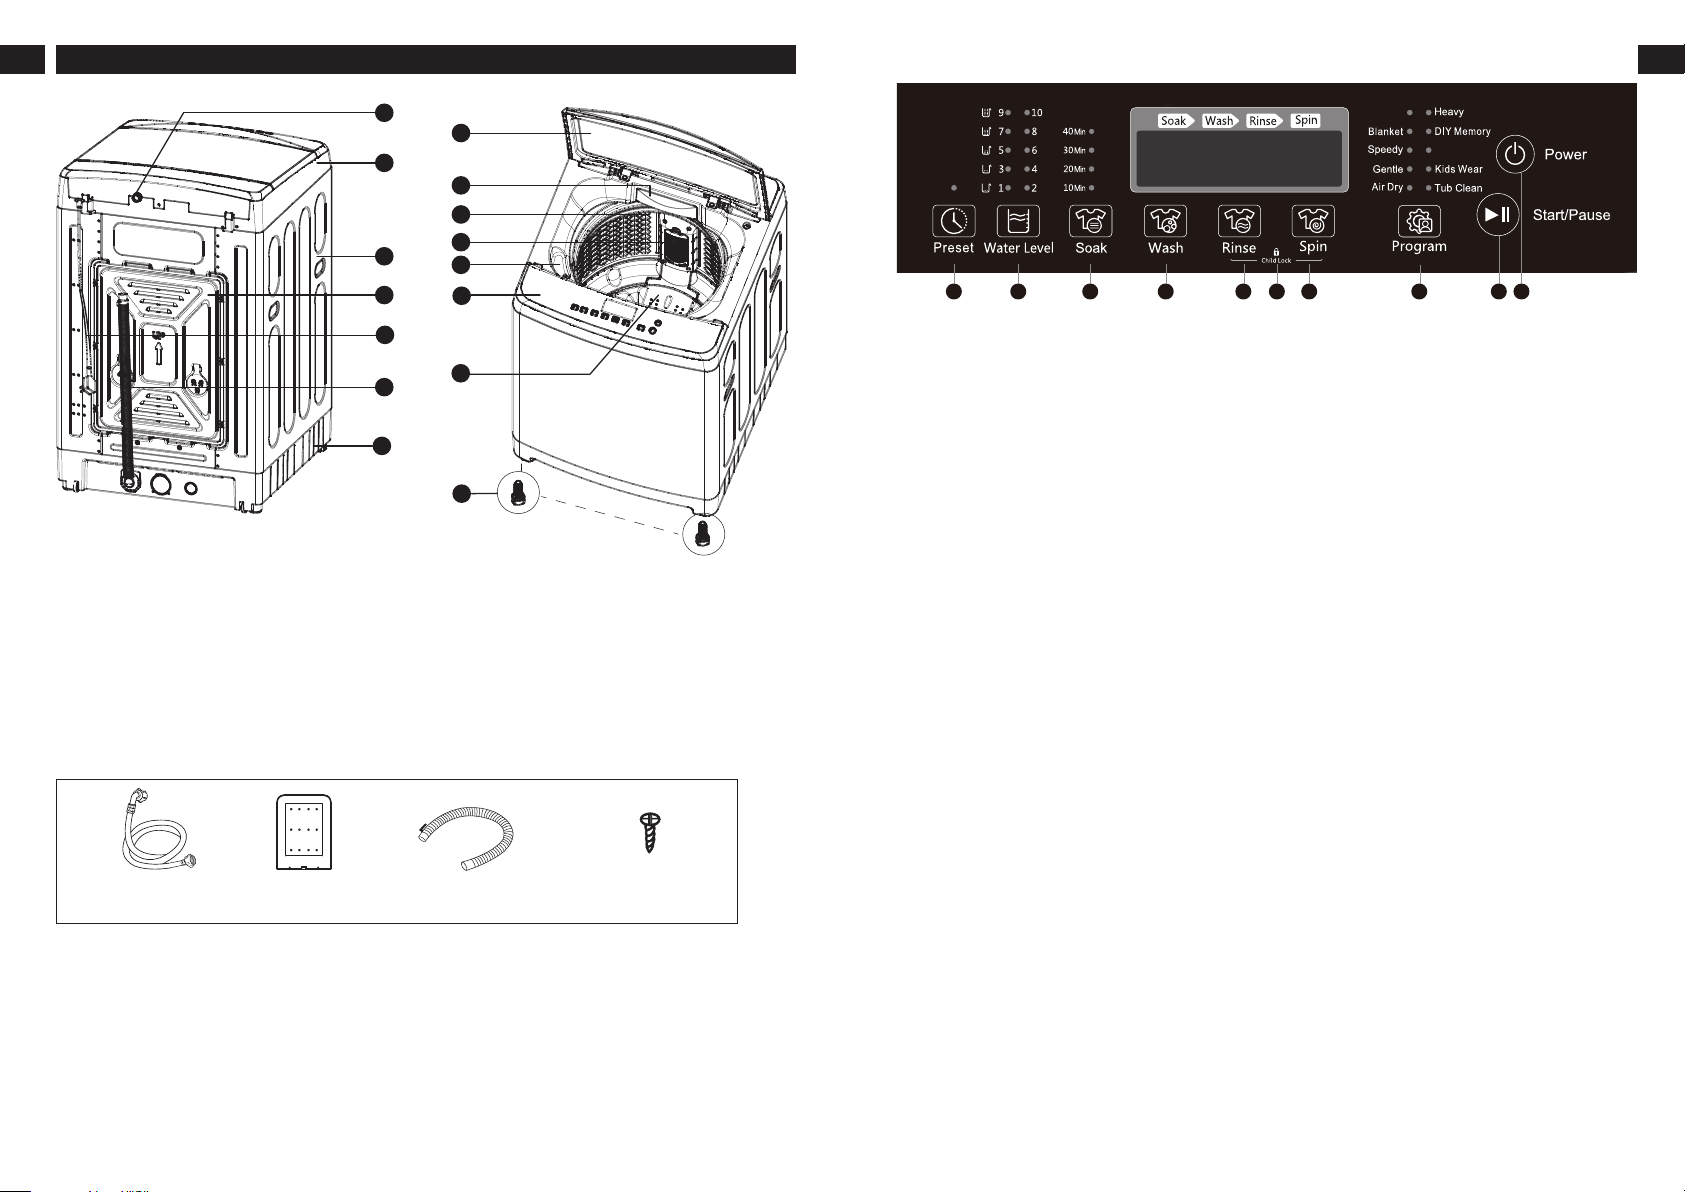
KHIND WM150A User manual

2Year
Warranty
General+
Outdoor Service
3Year
Warranty
On Control Panel
1 800 88 0032
10Year
Warranty
On Motor
(Limited To 1 Time
Replacement Within
The Warranty Period)
++
KHIND CARE Mobile App
1-800-88-0032
khind.com.my
Download to register for
E-Warranty & enjoy hassle-
free after-sales services.
FULLY AUTO
WASHING
MACHINE
WM150A
Please read this manual carefully before operating this product.
Keep this manual handy for further reference.
IMPORTANT
P/N: 40-51676-00
USER MANUAL
SERIAL NO.:

2
• This appliance is not intended for use by persons (including children) with reduced
physical, sensory or mental capabilities, or lack of experience and knowledge, unless they
have been given supervision or instruction concerning use of the appliance by a person
responsible for their safety.
Children should be supervised to ensure that they do not play with the appliance.
• If the supply cord is damaged, it must be replaced by the manufacturer, its service agent
or similarly qualified persons in order to avoid a hazard.
• This appliance is for indoor household use only, do not use at outdoor. Commercial use will
void warranty.
• Do not obstruct the ventilation openings in the base of the washing machine with carpets
etc.
• Please do not overload the appliance.
• If the tub does not stop within 15 seconds when the lid is opened during spinning process,
switch off the appliance immediately and call a service technician.
• Must let the outer drain hose down before washing clothes.
• Please do not dismantle the unit. Installation and maintenance can only be done by a
qualified technician. Refer “Installation” on page 5-7 for guideline.
• Do not climb or put heavy objects on top of the appliance.
• Do not insert your hands or feet under the main unit.
• Do not wash, rinse or spin waterproof sheets or clothes.
Please read the notice carefully in order to prevent hazard and extend the lifespan.
DENOTING IT SHOULD BE PROHIBITED DENOTING IT SHOULD BE PAID ATTENTION
Safety Precaution Information
1
Do not expose the washing
machine under direct sunlight
or rain.
Please use a separate electrical
outlet with right voltage.
The unit must be earthed properly
to prevent electric shock.When it
is not used, unplug the plug top.
Keep the washing machine away
from fire or heat source. Do not
put flammable materials or
clothes stained with such things
attached in the tub.
Do not open the cover while
washing.
Do not touch the clothes in the
tub when the tub does not
stop working.
Do not switch on when the
water pressure isn't within
0.03MPa-0.85Mpa, so as to
protect the inlet valve.
Do not wipe the washer with
volatile material, gasoline etc.
Do not pour over 50°C water
into the tub.
Please do not haul the cord
while cut off electrical power.
Please do not insert and pull
out of the plug with wet hands.
Keep children away from the
washing machine.
Do not put the washing
machine at a damp humid
place.
Do not sprinkle water directly
onto the unit around control
panel.
!
Cleaning & Maintenance
Cleaning the Filter
Cleaning the Inlet Valve Filter
The inlet valve is easy to be blocked by impurities & hinders water intake. Please clean it
regularly (usually about 2 months).
Cleaning the Machine
1. Clean the surface of the washing machine and the water in the barrel with a clean soft
cloth. Open the cover for a period of time (about 1 hour) and air dry. Close the cover
again.
2. Do not spray water directly on the washing machine, or use a thinner, detergent, kerosene,
volatile oil, alcohol, etc.
3. Special dirty places can be wiped with a soft cloth dampened with mild soapy water.
Pully upward to
remove the filter assy’s
Take the filter from
the filter cover
Clean & rinse it
thoroughly
Reinstall the filter
1 2 3 4

43
Accessories
1. Water Inlet Valve
2. Frame
3. Body
4. Back Plate
5. Power Cord
6. Drain Hose
7. Base
8. Wash Lid
9. Detergent Box
10. Inner Tub
11. Filter
12. Bleach Injection
13. Control Panel
14. Pulsator
15. Adjustable Foot
(location varies depending
on model)
Water Inlet Hose
(1 pc)
Under Cover
(1 pc)
Drainage Pipe Parts
(1 pc)
Tapping Screws
(2 pcs)
Parts Identification
1 . Power Button
Press the Power button to turn on the power.After power-on, press the Power button to turn
off the power.After the power is turned on, after 10 minutes, if the washing machine is
started without pressing the Power button, the unit will automatically power off.
2 . Start/Pause Button
After turning on the power, press the Start/Pause button to start. Press the Start/Pause
button while running to pause. Press the Start/Pause button while paused and start again.
3 . Program
Press this button to choose the desired program.
Intelligent standard washing procedure that automatically adjusts the appropriate
water level according to the amount of clothing.
Blanket washing of large fabrics such as blankets.
Speedy to wash the slight dirty clothes.
Gentle to wash wool or underwear.
Air Dry to dry the tub and clothes to some extend.
Heavy to wash the big clothes.
DIY Memory memorizing the last set of procedures.
Normal washing procedures for save water and electricity.
Kids Wear to wash the children’s clothing.
Tub Clean to clean the tub when it is idled.
4 . Preset press the【Preset】button to set the preset time.
5 . Wash the washing time can be adjusted and set.
6 . Soak select time of soak by pressing this button.
7 . Rinse the rinsing times can be set.
8 . Spin the spinning times can be set.
9 . Child Lock Combination Button
After the program starts, press the buttons of【Rinse】and【Spin】for 1.5 seconds.After
one buzzing, the washing machine enters the "Child Lock" state, repeated operation can
cancel the "Child Lock".
10. Water Level Button
According to the loading of clothing to press "Water Level" button to choose the right water
level.The washing machine determines the weight of the clothes and automatically sets
the water level according to the results of the fuzzy program. Some programs have no
water level buttons that are invalid or not adjustable.
WM150A Control Panel
Intelligent
Normal
1239 87564 10
*Pictures are for illustration purposes only.
UP
1
9
10
11
15
2
3
4
5
6
7
8
12
13
14

1. Choose to place the washing machine in a dry place without direct sunlight.
2. The washing machine should be placed on a flat, solid floor and kept at a distance of
more than 5 cm from the wall to avoid noise when coliding with the wall during
dehydration.
3. Do not place the washing machine on a sloping, uneven surface; do not place the
washing machine on an unstable stand or on the floor. When using it, remove the
bottom foam and plastic pin holder to avoid damaging washing machine.
4. The washing machine should be placed as smoothly as possible. If necessary, adjust the
supporting feet (adjustment feet) on the front of the washing machine to keep the
washing machine level.
1. The bottom cover is placed between the top of the washing machine box and the foam.
Please take it out when unpacking.
2. Place the washing machine gently on side of soft object (be careful not to touch the
case).
3. Insert bottom cover along mounting slot on base until it is seated.
4. Secure the bottom cover to the base with screws (within the accessory bag).
5. Gently lift the washing machine and stabilize it.
5 6
Model
Voltage
Rated Power
Wash/Spin Capacity
Water Pressure
Water Level Volume: High
: Low
Spin Speed
Net Weight
Gross Weight
Product Dimension
(LxWxH)
Box Dimension (LxWxH)
WM150A
220-240V ~ 50/60Hz
550W
15kg
0.03-0.85MPa
Normal: 87L
Intelligent Program: 117L
Normal/Intelligent Program: 47L
600rpm
51.5kg
58.7kg
685 x 700 x 1055mm
755 x 765 x 1115mm
• Confirming horizontal level as the picture showing.
• If you have a spirit level, set the bubble
in the spirit level.
Specifications
Installation
*Specifications are subject to change without prior notice.
Installation Notes
Install the Bottom Cover
>5 cm Screwdriver
Bottom lid
Soft substance

Power Switch
Press the power button to turn on the power.
Program Selector
Press the program button to select the appropriate full-automatic program.When the
power is turned on, the washing machine is automatically set to an intelligent
program. If you need to select other fully automatic programs, you can press the
program button to turn on the corresponding program lights.
Water Level
Press the water level button to choose the right water level.
a. After the power is turned on, the washing machine is automatically set to a fuzzy
function without water level display. If you need to choose other water level, you
can press the water level button to choose it.
b. When the power is turned on, if there is water in the laundry barrel, the washing
machine cannot enter the fuzzy function, and the default program is intelligent.
If self-programming is needed, press the buttons of washing, rinsing & spinning
separately to switch the different washing processes and adjust the time.
Start/Pause Button
a. After the system starts, if you need to change the setting program, you can first
press the "Start/Pause" button to pause the system operation, then press other
buttons to set, and finally press the "Start/Pause” button, the system will run
according to the newly set program. Close the top cover and the washing
machine is in operation.
b. Do not open the upper cover at will during the operation of the washing machine,
especially in the process of spinning, to avoid accidents.
c. When the washing is finished, it buzzes automatically and power off.
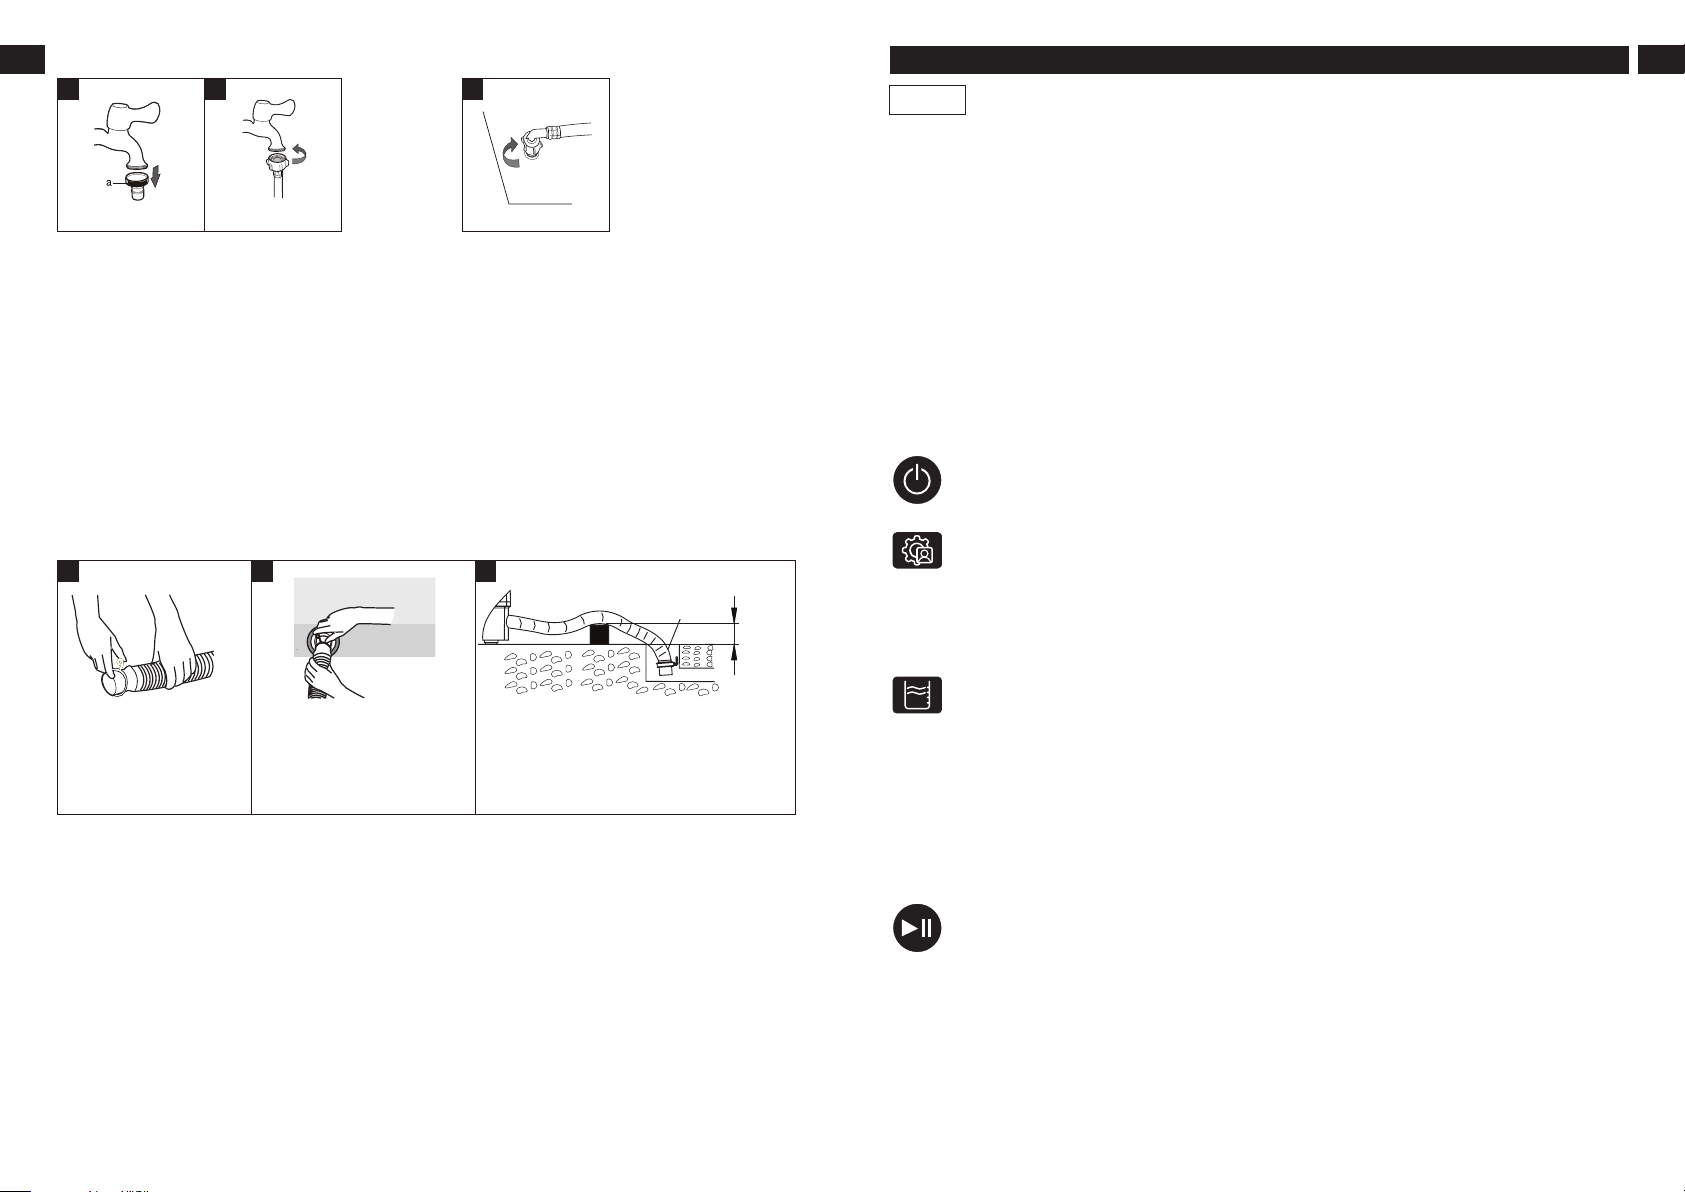
Water Inlet Pipe Installation
1 . Unscrewing the part “a” from the water faucet.
2. Respectively attach the water inlet hose to the water faucet.
Note: do not over tighten. Damage to the valve can result.
3. Run water through both faucet and inlet hose, into a bucket or laundry tub, to get rid of
particles in the water line that might clog the inlet valve screen.
4. Attach the hose connected with the water faucet to the water inlet valve.
Note: do not overtighten. Damage to the valve can result.
5. Check for leak
• Swing the water inlet hose gently to confirm if it’s suitable.
• Turn on the water faucet and check for leak.A small amount of water enter the washer.You
will drain this later.
Installation drain (some model drains have been installed before leaving the factory)
drainage type
1. Check before washing:
• Is inlet pipe connected? does faucet valve open?
• Is power cable plugged in? is power outlet grounded reliably?
• Is washing machine stable?
• Is drain hose put down? any entanglement?
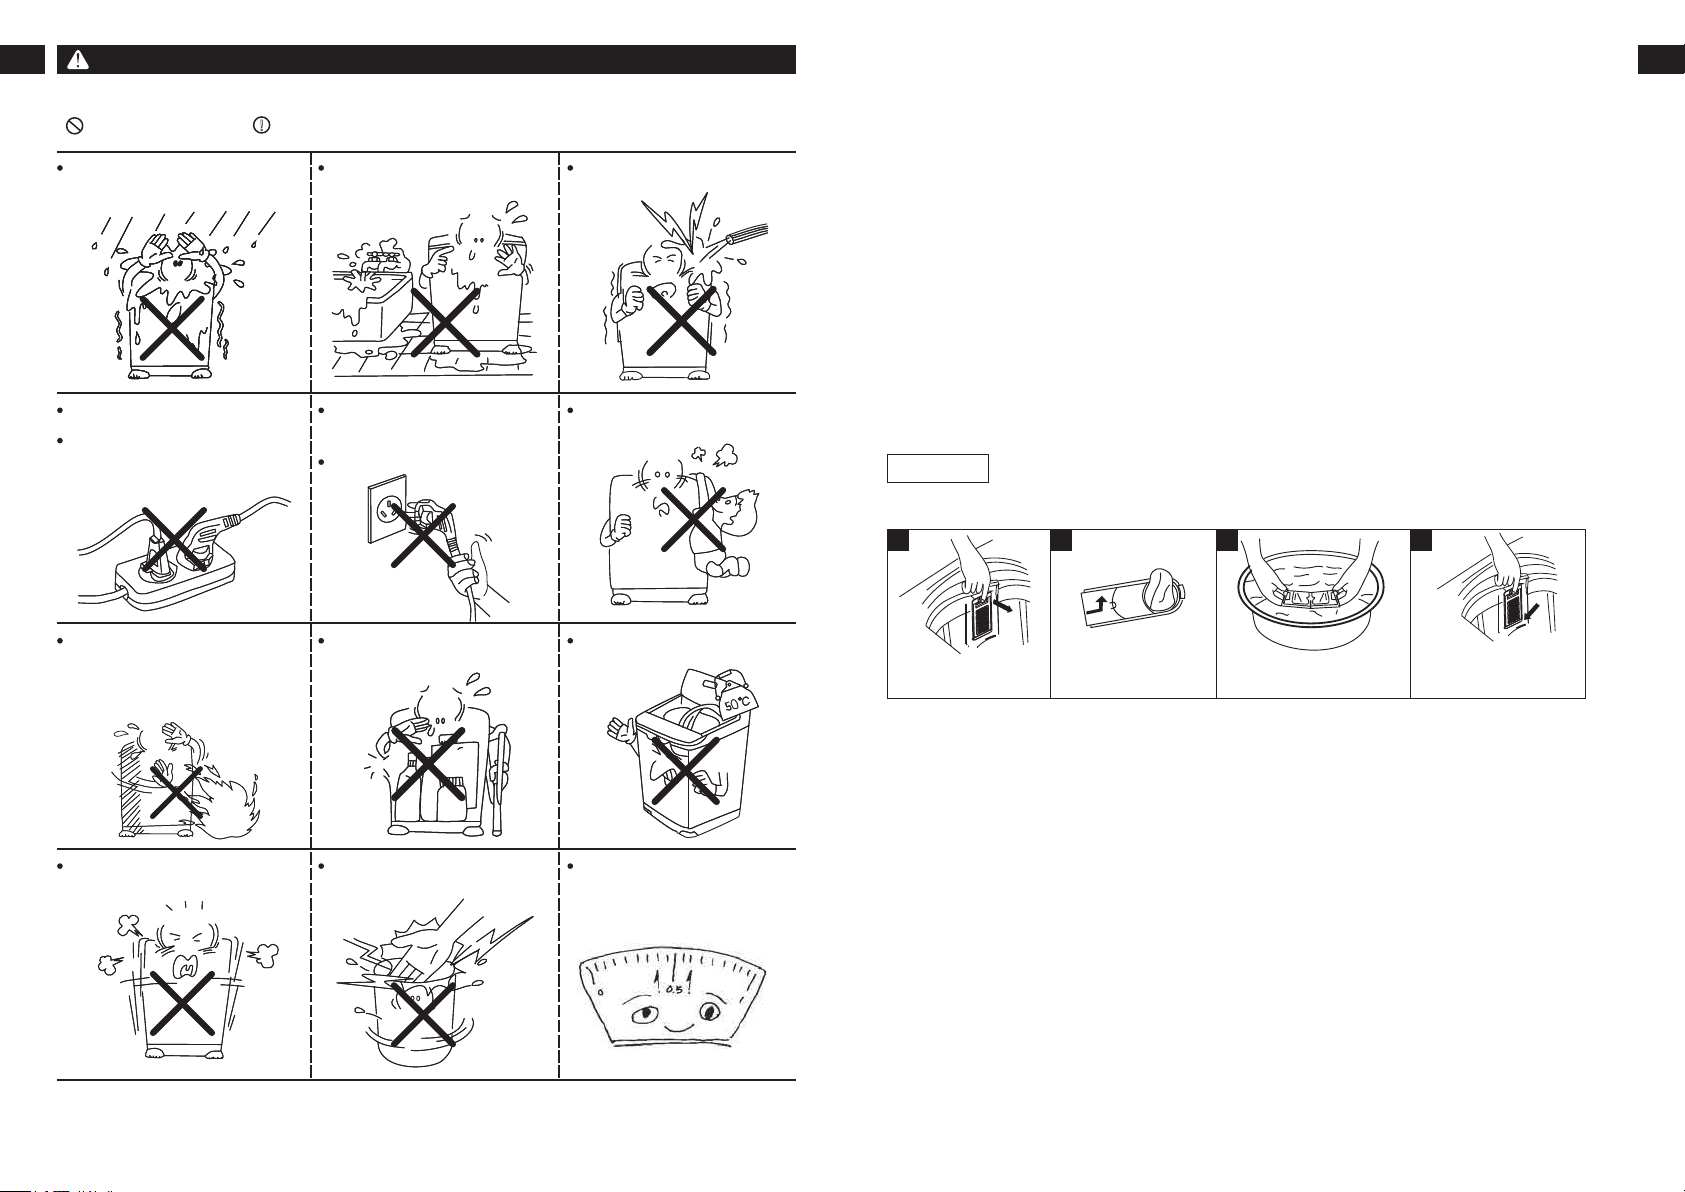
2. Pre-treatment of laundry:
• Check wether there are special requirements for washing and whether it can be hand
washed or machine washed?.
• Be sure to remove hard objects such as buttons, pins, coins, hairpins and sand.
• Greasy or faded clothes should be cleaned separately.
• If there is a zipper or a hard jewelry in clothing, please pull zipper and turn it from inside
out.
• Take long knots on the clothes and tie them tightly.The button are fastened.
• Some clothes (such as lace, nylon socks and chemical fibre hollow weaving) should be
placed in the laundry net. (laundry net not provided).
• If there is a lot of dusty clothing, please remove the dirt especially dirty parts, and spray the
detergent in advance.This will make it easier to remove stubborn stains.
7 8
How to Use
1 2
1 2 3
4
outlet less
than
6cm
Press down the
fix ring & hitch it
over the drain hose.
Press down the fix ring,
then push it to the drain
outlet. Clasping the fix ring
to make sure they are
connected well.
Draw the drain hose to the outlet. Do
not let the height of the drain hose
exceed 6cm from the bottom to
machine.
1. Low-bubble detergent is recommended during the use of this machine.
2. It is recommended to use the unit in an environment of 0˚C to 40˚C.Too low or high
ambient temperature may cause the unit to malfunction.
3. If the washing machine is stored in an environment below 0˚C, it must be left in the room
temperature environment for about 4 hours before it can be used to prevent the machine
from icing and damaging the machine.
4. The washing and dewatering capacity of the washing machine refers to the maximum
weight of the standard laundry in one washable, dehydrated and dry state, which is
different from the actual laundry.The tickness, size and type of the laundry fabric will affect
the actual washing capacity. It is advisable to wash the laundry in the washing process.
5. The amount of washing below 1kg should not be chosen high-grade water level, so as not
to splash during the washing process.
Advice

910
Troubleshooting
CauseTroubles Display
Totally no
working
No display The power plug is not plugged in
and power switch is not pressed
Solution
Plug in power plug and press power
switch
No display
No display
There is no
display
when
voltage is
too low, or
fuse
maybe
open
when
voltage is
too high
The outlet has no electricity or the
fuse is broken
The power outage cause program
to disappear and the operator must
operate it again after the call
The voltage is too low or too high
Ask an electrician to check the
socket or fuse
After starting the call, press again to
operate each press
E1Poor
drainage
The outlet of drain pipe is too high
or blocked, resulting in the water not
being discharge after 15 minutes
After checking the drain and
rectifying the fault, open the cover,
close it, and re-enter the drain
E2Not
spinning
No cover when washing (pause
and alarm) or spin (cover and
alarm)
Close the cover
E3Spinning
touch the
shell
Because the laundry unevenly
touches the shell when it is
unbalanced during spinning, the
washing machine will automatically
correct it, and if it is still invalid after
two times, it will alarm
Open the top cover, place the clothes
manually and close the cover
Unplug power plug and wait until
voltage is normal
CauseTroubles Display Solution
E4Insufficient
water
injection
The faucet is not on, the water is
stopped or the water pressure is low.
After 45 minutes, the water level is
less than the set water level
Open tap or wait until water pressure
is normal before use. Open cover,
close cover and re-enter water inlet
process
E6Water level
sensor
abnormal
Water level sensor failure, open
circuit or short circuit, then
automatically alarm
Please have professional main-
tenance personnel overhaul
E5Fail to
preset
The lid is open when preset Close the lid and try again
E9Memory
chip failure
Can’t read and write Request professional maintenance
No displayUnable to
start or not
boot
Computer board failure Request professional maintenance
F1/F2/F3Communi-
cation/
hall/
motor
failure
Poor wire contact/hall
damage/motor open circuit or
stuck
Turn off
F5/F6/F7Over-
voltage/
overload/
undervolt-
age or
controller
failure
Voltage is too high or drive module
failure; laundry overload; the
voltage is too low or the controller is
damage
Turn off
E7Water
intake or
automatic
drainage
Computer board, inlet valve, or
water level sensor is abnormal
Turn off power after the water is
finished. Please have professional
service personnel repair it
1. Common non-fault phenomenon
• When washing machine is used for the first time, there maybe a small amount of water
flowing out of the drain pipe.This is the residual water when the factory performance is
tested.
• In the process of washing or rinsing, water inflow sometimes occurs.This is due to the
automatic replenishment of the water level.
• Washing machine setup when the rinsing program is started, no water is injected.The
default rinsing program for the washing machine starts with drainage and spin.
• After spinning starts, the spin barrel stops when it is time, which is the intermittent spin set to
achieve the spin effect.
• During spinning, water rinsing phenomenon sometimes occurs because the balance of
the clothes is automatically corrected when the clothes are being spinned.
• Delayed spinning after water is finished.This is default setting of the washing machine.
• The button operation is invalid during the laundry process.This is default setting of the
washing machine. It needs to be paused before it can be operated.
2. Common Default and Solution:

12
• 本机不适合身体残障、感官或精神功能减退以及缺乏相关经验和知识的人员(包括儿童)使用,除非
有负责其安全的人员对其使用本机给予监督或指导。
应严密看管儿童,确保他们不会把此电器当玩具。
• 如果电源线损坏,必须由制造商、服务代理商或类似合格人员更换,以避免造成危险。
• 此电器仅供室内家庭使用,请勿在室外使用。商业使用将无保修。
• 请勿将本产品置放于地毯等物品上,以免洗衣机底部的通风口阻塞。
• 请勿在此电器放入过量衣物。
• 如果在脱水过程中,打开盖子后15秒内,洗衣机内桶没有停止,请立即关闭电源并致电维修人员。
• 洗衣服前必须放下外层排水管。
• 请勿拆卸此电器。安装和维护只能由合格的技术人员进行。有关指导,请参考指南第5-7页的
“安装”。
• 请勿攀爬或把重物放在此电器顶部。
• 请勿将手脚置入此电器下方。
• 请勿用此电器清洗、冲洗或脱干水防水床单或衣物。
11
!
清洁和保养
清洁过滤器
清洁进水阀过滤器
进水阀很容易被杂质堵塞,阻碍进水。请定期清洁 (通常约每2个月)。
清洁此电器
1. 用干净的软布清洗此电器的表面和桶内的水。打开盖子一段时间(大约1小时) 风干,再次关闭盖子。
2. 不要直接在此电器上喷水,也不要使用稀释剂、洗涤剂、煤油、挥发剂、酒精等。
3. 特别肮脏的地方可以用软布和中性肥皂水擦拭。
卸下线屑过滤器。 Take the filter from
the filter cover
1 2 3 4
清洗线屑过滤器。 请勿洗涤,漂洗或脱水
防水床单或衣服。
安全注意事项
请仔细阅读注意事项,以防止危险并延长使用寿命。
表示禁止使用 表示应注意
请勿将洗衣机暴露在阳光直射
或雨淋的地方。
请勿将洗衣机放在潮湿的地方。 请勿将水直接洒在电器周围
的控制面板上。
请使用电压合适的单独电源插座。
本电器必须正确接地,以防止触
电。不使用时,请拔下插头。
请勿在要切断电源的情况下拖
拉电线。
请勿用湿手插入和拔出插头。
儿童应远离洗衣机。
保持洗衣机远离火源或热源。
请勿将易燃物品或沾有此类物品
的衣服放在洗衣机中。
请勿用挥发性物质,汽油等擦
拭洗衣机。
请勿将超过50°C的水倒入洗衣
机内桶中。
请勿在洗涤时打开盖子。 当洗衣机内桶不停止工作时,
请勿触摸洗衣机桶中的衣服。
为了保护进水阀,请不要在低
于0.03MPa-0.85Mpa的水压
下使用机器。

1413
配件
1. 进水阀
2. 框架
3. 机体
4. 后挡板
5. 电源线
6. 排水软管
7. 底座
8. 机盖
9. 洗涤剂盒
10. 内桶
11. 过滤器
12. 漂白剂注入口
13. 控制面板
14. 波轮
15. 可调节底脚 (位置因型号而定)
进水软管 (1件) 底盖 (1件) 排水管零件 (1件) 螺丝 (2件)
1. 开/关电源按钮
使用此按钮打开或关闭洗衣机。打开电源10分钟后,如果没有按启动按钮,洗衣机将自动关机。
2. 开始/暂停按钮
打开电源后,按开始/暂停按钮启动洗衣机,进行清洗程序。
3. 程序选择
反复按以下按钮可以设置所需的洗涤程序。
智能 标准洗涤程序,自动根据衣物的重量调节合适的水位。
毯子 床单,和大件衣物(如毯子)的洗涤。
快速 洗涤微脏的衣服。
轻柔 洗羊毛或内衣物。
风干 在一定程度上烘干内桶和衣服。
重物 洗大型衣服。
DIY记忆 记住最后一组程序。
普通 节省用水用电的清洗程序。
童装 洗婴幼儿的衣服。
内桶清洁 闲置的时清洗内桶。
4. 预设 按[预设]键设置预设时间。
5. 洗涤 可以调节和设置清洗时间。
6. 浸泡 按此按钮选择浸泡时间。
7. 漂洗 可以设置冲洗时间。
8. 脱水 可以设置脱水时间。
9. 儿童锁组合按钮
程序启动后,按[ 冲洗 ]和[ 脱水 ]按钮1.5秒。鸣响声后,洗衣机进入“ 童锁”状态,重复操作可以取
消“ 童锁”。
10. 水位按钮
根据衣物的装载量按“水位”按钮选择合适的水位。洗衣机确定衣服的重量并自动设定水位。有些程序
没有无效或不可调节的水。
WM150A 控制面板
Intelligent
Normal
1239 87564 10
* 图片只作插图用途。
UP
1
9
10
11
15
2
3
4
5
6
7
8
12
13
14
零件名称

1. 选择把洗衣机放在没有阳光直射的干燥地方。
2. 洗衣机应放置在平坦的地板上,并与墙壁保持超过5厘米的距离,以避免脱水时与墙壁发生碰撞时产
生噪音。
3. 不要将洗衣机放置在倾斜、不平整的表面上; 不要将洗衣机放置在不稳定的支架上或地板上。在使用
洗衣机的时候,取下底部的泡沫和塑料销座,以免损坏洗衣机。
4. 洗衣机的摆放应尽量平稳。如有必要,调整洗衣机前端的6个支撑脚(调整脚) ,使洗衣机保持水平。
1. 底盖放置在洗衣机盒顶部和泡沫之间。打开包装时请取出。
2. 将洗衣机轻轻地放在软物体的一侧(小心不要碰到机壳)。
3. 沿着底座上的安装槽插入底盖直到固定。
4. 用螺丝将底盖固定在底座上(在附件袋内)。
5. 轻轻地提起洗衣机并稳定。
15 16
模型
电压
额定功率
容量
水压
水位体积 : 高
: 低
旋转速度
净重
毛重
产品尺寸(长x宽x高)
盒尺寸(长x宽x高)
WM150A
220-240V ~ 50/60Hz
550W
15公斤
0.03-0.85MPa
正常: 87L
智能程序: 117L
普通/智能程序: 47L
每分钟600转
51.5公升
58.7公升
685 x 700 x 1055毫米
755 x 765 x 1115毫米
• 如果你有水平仪,请将气泡放在水平仪中。
规格
安装
* 规格如有更改,恕不另行通知。
安装须知
安装底盖
> 5厘米
进水管安装
1. .拧下水龙头上的 a 部分。
2. 分别将进水软管连接到水龙头上。
注意: 请勿拧得过紧。可能导致阀门损坏。
3. 让水通过水龙头和进水软管,进入洗衣桶,以清除水管中可能堵塞进水阀滤网的颗粒。
1 2 4
螺丝刀
底盖
软性物质
锁紧螺母
疏松
高 低
紧
调整脚
• 确认水平如图所示。

电源开关
按下电源按钮打开电源。
程序选择器
按程序按钮选择适当的全自动程序。当电源打开时,洗衣机自动设置为智能程序。如果你需要选
择其他全自动程序,你可以按程序按钮打开相应的程序灯。
水位
按下水位按钮选择正确的水位。
a. 打开电源后,洗衣机会自动设置为模糊功能,而不会显示水位。如果你需要选择其他水位,
你可以按下水位按钮来选择。
b. 当电源打开时,如果洗衣桶里有水,洗衣机不能进入模糊功能,默认程序是智能的。
如果需要自编程序,可分别按洗涤、漂洗、脱水按钮,切换不同的洗涤程序,调整洗涤时间。
开始/暂停按钮
a. 系统启动后,如需更改设定程式,可先按「开始/暂停」按钮暂停系统操作,然后按其他按
钮设定,最后按「开始/暂停」按钮,系统便会按新设定的程式运作。关闭洗衣机上盖,洗
衣机开始工作。
b. 在洗衣机运行过程中,尤其是脱水过程中,不要随意打开上盖,以免发生意外。
c. 洗涤结束后,它会自动发出蜂鸣声并关闭电源。
4. 将与水龙头连接的软管接到进水阀上。注意: 不要过紧。可能导致阀门损坏。
5. 检查是否漏水
• 轻轻转动进水软管,确认是否合适。
• 打开水龙头,检查是否漏水。少量水进入洗衣机。您稍后水会排干。
安装排水管(一些型号的排水管在离开工厂之前已经安装好了)排水类型
1. 洗衣前检查:
• 进水管是否连接? 水龙头阀门是否打开?
• 电源线是否插入? 电源插座是否接地可靠?
• 洗衣机是否稳定?
• 排水管是否放下了? 是否被缠住?
2. 洗衣前处理:
• 检查洗涤是否有特殊要求,是否可以手洗或机洗。?.
• 一定要移除硬物,如纽扣,别针,硬币,发夹和沙子。
• 油腻或褪色的衣服应该分开清洗。
• 如果衣服上有拉链或硬质珠宝,请拉上拉链,从里向外翻。
• 在衣服上打一个长长的结,然后把它们绑紧。纽扣是固定的。
• 有些衣服(如蕾丝、尼龙袜和化纤空心编织)应放在洗衣网内。(未提供洗衣网)。
• 如果衣服上有很多灰尘,请清除污垢,尤其是脏的部分,并提前喷洒清洁剂。这样可以更容易地去除
顽固的污渍。
17 18
原因故障现象 显示
完全没有
工作
无显示 电源插头未插上电源开关未按下
解决方案
插入电源插头,按下电源开关
无显示
无显示
无显示
插座没有电,或者保险丝损坏
因电源故障而丢失当前的进程
电压太低或太高
请与授权技术人员联系
仅在消除电源故障后再重复使用
E1排水不畅 排水管的出口太高或者堵塞,导致水流
不畅15分钟后再试
检查排水管,打开盖子,然后将其关闭以
继续进行排水程序
先拔掉电源插头,等待电压恢复正常后,
再重新使用
1 2 3
插座 少于
6厘米
按下固定环.把它挂在
排水软管上。
按下固定环.然后把它推到
排水口。固定固定环以确保
它们连接良好。
把排水软管拉到排水口。不要让排水软管
的高度超过6厘米从底部到机器。
如何使用
1. 使用本电器时,建议使用低泡洗涤剂。
2. 建议在0˚c 到40˚c 的环境中使用该装置。环境温度过低或过高可能导致机器故障。
3. 如果洗衣机存放在摄氏零度以下的环境中,必须在室温环境中放置约4小时,以防止机器结冰损坏。
4. 洗衣机的洗涤脱水容量是指标准洗衣物在一次可洗、脱水、烘干状态下的最大重量,与实际衣物
不同。衣服或织物的硬度、尺寸和类型会影响实际的洗涤容量。建议在洗衣过程中清洗衣物。
5. 洗涤量低于1公斤不宜选择高水位,以免在洗涤过程中溅出水花。
使用建议
故障排除
1. 常见非故障现象
• 当洗衣机第一次使用时,可能会有少量的水流出排水管。这是工厂性能测试时的残余水。
• 在清洗或漂洗过程中,有时会出现进水现象。这是水位的自动补充造成的。
• 当洗衣机启动漂洗程序设置,不注水。洗衣机的默认清洗程序从排水和脱水开始。
• 脱水开始后,内桶到时间停止,即间歇性的脱水设置,以达到脱水效果。
• 在脱水过程中,有时会出现水漂洗现象,因为在脱水过程会自动校正衣物的平衡。
• 注水结束后继续脱水。这是洗衣机的默认设置。
• 按钮操作在洗衣过程中无效。这是洗衣机的默认设置。需要暂停才能继续运行。
2. 常见故障及解决方案:

19 20
原因故障现象 显示 解决方案
E2内桶转动 清洗时没有盖子(暂停)和警报器)或旋转
(盖子和警报)
关上盖子
E3脱水时,内
桶与机壳发
生碰撞
因为洗的衣服不均匀触摸外壳时,它是
在旋转过程中不平衡洗衣机会自动
更正它,如果它仍然是无效的后两次,
它就会报警
打开盖子,把衣服放好手动关闭盖子
E4供水不足 水龙头处于关闭状态,供水停止或水压
低。45分钟后,水位低于设定水位
打开水龙头或者等到水压升高再使用。
打开盖子,关闭盖子,重新注水过程
E6水位传感器
异常
水位传感器故障,打开电路或短路,然
后自动报警
请专业维修人员检修
E5预设失败 盖子在预设时打开 盖上盖子,再试一次
E9内存芯片
故障
不能识别 请求专业维护
F1/F2/F3通讯/大厅/
电机故障
导线接触不良/赫尔损坏/电机短路或
卡住
关机
F5/F6/F7过压/过载/
欠压或控制
器故障
电压过高或驱动模块故障;洗衣超载;
电压太低或控制器损坏
关机
E7进水或自动
排水系统
电脑板、进水阀或水位传感器异常 水结束后关闭电源。请专业维修人员维修
无显示无法启动或
重启
电脑板故障 请求专业维护
Maklumat Langkah Keselamatan
Sila baca notis dengan teliti untuk mengelakkan bahaya dan memperpanjang jangka hayat.
MENANDAKAN ITU HARUS DILARANG MENANDAKAN ITU HARUS DIBERI PERHATIAN
Jangan dedahkan mesin basuh
di tempat bawah cahaya
matahari atau hujan.
Sila gunakan soket elektrik yang
berasingan dengan voltan yang
betul.
Unit mesti dibumikan dengan betul
untuk mengelakkan kejutan elektrik.
Apabila tidak digunakan, cabut
plag bahagian atas.
Jauhkan mesin basuh dari sumber
api atau sumber panas. Jangan
letakkan bahan mudah terbakar
atau pakaian yang dicat dengan
benda seperti itu di dalam mesin
basuh.
Jangan buka penutup semasa
mencuci.
Jangan sentuh pakaian di
dalam tab mesin basuh apabila
tab mesin basuh tidak berhenti
berfungsi.
Jangan hidupkan mesin basuh
jika tahap tekanan air tidak
diantara 0.03MPa-0.85Mpa, ini
adalah untuk melindungi injap
masuk.
Jangan lap mesin basuh
dengan bahan yang mudah
meruap, petrol dan lain-lain.
Jangan tuangkan air lebih dari
50°C ke dalam mesin basuh.
Jangan tarik kabel semasa
memutuskan bekalan elektrik.
Jangan masukkan dan cabut
palam dengan tangan yang
basah.
Jauhkan anak-anak dari
mesin basuh.
Jangan letakkan mesin basuh
di tempat yang lembap.
Jangan taburkan air terus ke
unit di sekitar panel kawalan.
!

2221
Pembersihan Penapis
Membersihkan Penapis Injap Masuk
Injap masuk mudah disekat oleh kekotoran & menghalang pengambilan air. Sila bersihkannya
dengan kerap (biasanya kira-kira 2 bulan).
Membersihkan Mesin
1. Bersihkan permukaan mesin basuh dan air dalam tong dengan kain lembut yang bersih.
Buka penutup untuk tempoh masa (kira-kira 1 jam) dan keringkan dengan udara kering.
Tutup penutup sekali lagi.
2. Jangan sembur air terus pada mesin basuh, atau gunakan nipis, detergen, minyak tanah,
minyak meruap, alkohol dan sebagainya.
3. Tempat kotor khas boleh disapu dengan kain lembut yang dilembapkan dengan air
sabun yang lembut.
Keluarkan penapis
rumbai.
Ambil penapis dari
penutup penapis
Basuh penapis rumbai. Masukkan semula
penapis rumbai ke
kedudukan asalnya.
1 2 3 4
• Perkakas ini bukan untuk digunakan oleh orang ( termasuk kanak-kanak ) yang kurang
upaya fizikal, deria atau kecacatan mental, atau kurang pengalaman dan pengetahuan,
melainkan mereka diberi perhatian atau tunjuk ajar berkaitan penggunaan perkakas oleh
orang yang bertanggungjawab untuk keselamatan mereka.
Kanak-kanak haruslah diperhatikan untuk memastikan mereka tidak bermain dengan
perkakas ini.
• Sekiranya kabel bekalan rosak, ia mesti diganti oleh pengilang, ejen perkhidmatan atau
pihak yang berkelayakan bagi mengelakkan bahaya.
• Perkakas ini adalah untuk kegunaan rumah tangga dalaman sahaja, jangan gunakan di
luar rumah. Penggunaan komersial akan membatalkan jaminan.
• Jangan menghalang pengudaraan di dasar mesin basuh dengan karpet dan lain-lain.
• Jangan memuatkan perkakas secara berlebihan.
• Jika tab mesin basuh tidak berhenti dalam 15 saat ketika penutup dibuka semasa proses
putar, matikan perkakas dengan segera dan menghubungi perkhidmatan juruteknik.
• Mesti membiarkan hos saluran pembuangan diturunkan sebelum mencuci pakaian.
• Jangan membongkar perkakas. Pemasangan dan penyelenggaraan hanya dapat
dilakukan oleh juruteknik yang berkelayakan. Rujuk "Pemasangan" di halaman 5-7
untuk panduan.
• Jangan memanjat atau meletakkan benda berat di atas perkakas.
• Jangan masukkan tangan atau kaki anda di bawah perkakas.
• Jangan mencuci, bilas atau memutar cadar atau pakaian yang kalis air.
Penjagaan & Penyelenggaraan
Aksesori
1. Injap Masuk Air
2. Bingkai
3. Badan
4. Plat Belakang
5. Kabel Kuasa
6. Hos Saluran Pembuangan
7. Pangkalan
8. Penutup Basuh
9. Bekas Bahan Pencuci
10. Tab Dalaman
11. Penapis
12. Suntikan Peluntur
13. Panel Kawalan
14. Pemutar “Pulsator”
15. Kaki Pengimbang
(lokasi berbeza bergantung
pada model)
Bahagian Paip Saliran
(1 unit)
UP
1
9
10
11
15
2
3
4
5
6
7
8
12
13
14
Pengenalan Bahagian
*Gambar adalah untuk tujuan ilustrasi sahaja.
Hos Bekalan Air
(1 unit)
Penutup Bawah
(1 unit)
Skru Mengetik
(2 biji)

2423
1 . Butang Kuasa
Tekan butang kuasa untuk menghidupkan kuasa. Selepas menghidupkan, tekan butang
kuasa untuk mematikan kuasa. Selepas kuasa dihidupkan, selepas 10 minit, jika mesin
basuh dimulakan tanpa menekan butang kuasa, unit akan dimatikan secara automatik.
2 . Butang Mula/Henti
Selepas menghidupkan kuasa, tekan butang Mula/Henti untuk memulakan.Tekan butang
Mula/Henti semasa berjalan untuk berhenti sebentar.Tekan butang Mula/Henti
semasa berhenti dan mulakan semula.
3 . Program
Tekan butang ini untuk memilih program yang dikehendaki.
Pintar prosedur pencucian standard yang secara automatik menyesuai-
kan paras air yang sesuai mengikut jumlah pakaian.
Selimut mencuci kain besar seperti selimut.
“Speedy” mencuci pakaian yang mempunyai sedikit kekotoran.
Lembut untuk mencuci baju berbulu atau seluar dalam.
Udara Kering untuk mengeringkan tab dan pakaian hingga tahap tertentu.
Berat untuk mencuci pakaian yang besar.
Memori DIY menghafal set prosedur terakhir.
Biasa prosedur mencuci pakaian dengan menjimatkan air dan elektrik.
Pakaian Kanak-kanak untuk mencuci pakaian kanak-kanak.
Bersihkan Tab untuk membersihkan tab ketika ia berada dalam keadaan terbiar.
4 . Preset tekan butang【Preset】untuk menetapkan masa yang dikehendaki.
5 . Basuh masa mencuci boleh disesuaikan dan ditetapkan.
6 . Rendam pilih masa rendam dengan menekan butang ini.
7 . Bilas masa pembilasan boleh ditetapkan.
8 . Putar masa berputar boleh ditetapkan.
9 . Butang Kombinasi Kunci Kanak-kanak "Child Lock"
Selepas program dimulakan, tekan butang【Bilas】dan【Putar】selama 1.5 saat. Selepas satu
bunyi berdengung, mesin basuh memasuki keadaan "Child Lock", operasi berulang boleh
membatalkan "Child Lock".
10. Butang Paras Air
Mengikut pemuatan pakaian untuk menekan butang "Paras Air" untuk memilih paras air
yang betul.Mesin basuh menentukan berat pakaian dan secara automatik menetapkan
paras air mengikut keputusan program kabur. Sesetengah program tidak mempunyai
butang paras air yang tidak sah atau tidak boleh laras.
Panel Kawalan WM150A
Intelligent
Normal
1239 87564 10
1. Pilih untuk meletakkan mesin basuh di tempat yang kering tanpa cahaya matahari
langsung.
2. Mesin basuh hendaklah diletakkan di atas lantai yang rata dan padat dan pastikan jarak
lebih daripada 5 cm dari dinding untuk mengelakkan bunyi bising apabila berlanggar
dengan dinding semasa dehidrasi.
3. Jangan letakkan mesin basuh di atas permukaan yang lantai dan tidak rata; jangan letak
mesin basuh di atas kaki yang tidak stabil atau di atas lantai.Apabila menggunakannya,
keluarkan buih di bawah dan pemegang pin plastik untuk mengelakkan mesin basuh
daripada rosak.
Model
Voltan
Kuasa
Kapasiti Basuh/Putar
Tekanan Air
Isipadu Paras Air : Tinggi
: Rendah
Kelajuan Putaran
Berat Bersih
Berat Kasar
Dimensi Produk
(PxLxT)
Dimensi Kotak (
PxLxT
)
WM150A
220-240V ~ 50/60Hz
550W
15kg
0.03-0.85MPa
Normal: 87L
Program Pintar: 117L
Program Normal/Pintar: 47L
600rpm
51.5kg
58.7kg
685 x 700 x 1055mm
755 x 765 x 1115mm
Spesifikasi
Nota Pemasangan
>5 cm
*Spesifikasi tertakluk kepada perubahan tanpa notis terlebih dahulu.
Pemasangan

4. Mesin basuh hendaklah diletakkan selancar mungkin. Jika perlu, laraskan 6 kaki sokongan
(kaki penyimbang) di hadapan mesin basuh untuk mengekalkan ketinggian mesin basuh.
1. Penutup bawah diletakkan di antara bahagian atas kotak mesin basuh dan buih. Sila
keluarkan semasa membongkar.
2. Letakkan mesin basuh perlahan-lahan pada sisi objek lembut (berhati-hati agar tidak
menyentuh bekas).
3. Masukkan penutup bawah di sepanjang slot pelekap pada tapak sehingga ia terpasang.
4. Kencangkan penutup bawah ke pangkalan dengan skru (dalam beg aksesori).
5. Angkat mesin basuh perlahan-lahan dan stabilkannya.
25 26
• Jika anda mempunyai tahap semangat, tetapkan
gelembung dalam tahap semangat.
Pasang Penutup Bawah
Pemutar
skru
Penutup
bawah
Bahan
lembut
Mengesahkan tahap mendatar seperti gambar yang ditunjukkan.
KAKI PENGIMBANG
LOCKNUT
LONGGAR
TINGGI RENDAH
KETAT
3. Alirkan air melalui kedua-dua paip dan hos masuk, ke dalam baldi atau tab, untuk
menyingkirkan zarah-zarah dalam saluran air yang mungkin akan menyumbat skrin injap
masuk.
4. Pasangkan hos yang disambungkan dengan paip air ke injap masuk air.
Nota: Jangan terlalu ketat. Kerosakan pada injap boleh berlaku.
5. Periksa kebocoran
• Goyangkan hos masuk air perlahan-lahan untuk memastikan kesesuaian.
• Bukakan paip air dan periksa kebocoran. Sebilangan kecil air akan masuk ke dalam
mesin basuh.Anda akan keringkan ini kemudian.
Pemasangan saluran pembuangan (beberapa model saluran pembuangan telah dipas-
ang sebelum meninggalkan kilang)
1. Periksa sebelum mencuci:
• Adakah paip masuk disambungkan? adakah injap paip terbuka?
• Adakah kabel kuasa dipasang? adakah kuasa outlet dipasangkan dengan betul?
• Adakah mesin basuh stabil?
• Adakah hos saliran diletakkan? sebarang kekusutan?
2. Pra-rawatan terhadap pakaian:
• Periksa sama ada terdapat keperluan khas untuk mencuci dan sama ada boleh menggu
nakan tangan atau mesin basuh?.
• Pastikan anda mengeluarkan objek keras seperti butang, pin, syiling, penyepit rambut dan
pasir.
• Pakaian yang berminyak atau luntur hendaklah dibersihkan secara berasingan.
• Jika terdapat zip atau barang kemas yang keras dalam pakaian, sila tarik zip dan pusing
kannya dari dalam ke luar.
• Ambil simpulan panjang pada pakaian dan ikat dengan ketat. Butang diikat.
• Sesetengah pakaian (seperti renda, stokin nilon dan tenunan berongga gentian kimia)
hendaklah diletakkan di dalam jaring pakaian. (jaring pakaian tidak disediakan).
• Jika terdapat banyak pakaian yang berdebu, sila tanggalkan kotoran terutamanya
bahagian yang kotor, dan sembur detergen terlebih dahulu. Ini akan memudahkan untuk
menanggalkan kotoran degil.
1 2 3
Pemasangan Paip Air Masuk
1 . Menanggalkan bahagian “a” daripada paip air.
2. Pasangkan hos masuk air dengan tepat ke paip air.
Nota: Jangan terlalu ketat. Kerosakan pada injap boleh berlaku.
1 2 4
outlet kurang
dari
pada
6cm
Tekan gelang
pembaikan &
pasangkannya
pada hos saliran.
Tekan gelang pembaikan
ke bawah, kemudian
tolaknya ke saluran
pembuangan luar.
Menggenggamkan
gelang pembaikan untuk
memastikan ia disambung-
kan dengan baik.
Tarik hos saliran ke saluran
pembuangan luar. Jangan biarkan
ketinggian hos saliran melebihi 6cm
dari bawah ke mesin.

Suis Kuasa
Tekan butang Kuasa untuk menghidupkan kuasa.
Pemilih Program
Tekan butang Program untuk memilih program automatik penuh yang sesuai.Apabila
kuasa dihidupkan, mesin basuh ditetapkan secara automatik kepada program pintar.
Sekiranya anda perlu memilih program automatik sepenuhnya yang lain, anda boleh
menekan butang program untuk menghidupkan lampu program yang sesuai.
Paras Air
Tekan butang paras air untuk memilih paras air yang betul.
a. Selepas kuasa dihidupkan, mesin basuh ditetapkan secara automatik ke fungsi
kabur tanpa paparan paras air. Sekiranya anda perlu memilih paras air lain, anda
boleh menekan butang paras air untuk memilihnya.
b. Apabila kuasa dihidupkan, jika terdapat air dalam tab, mesin basuh tidak dapat
memasuki fungsi kabur, dan program lalai adalah pintar.
Jika pengaturcaraan sendiri diperlukan, tekan butang mencuci, membilas & berputar
secara berasingan untuk menukar proses pencucian yang berbeza dan melaraskan
masa.
Butang Mula/Henti
a. Selepas sistem bermula, jika anda perlu menukar atur cara tetapan, anda boleh
menekan butang "Mula/Henti" dahulu untuk menghentikan operasi sistem,
kemudian tekan butang lain untuk menetapkan program, dan akhirnya tekan
butang "Mula/Henti", butang sistem akan berjalan mengikut program yang baru
ditetapkan.Tutup penutup atas dan mesin basuh akan beroperasi.
b. Jangan buka penutup atas sesuka hati semasa operasi mesin basuh, terutama-
nya dalam proses berputar, untuk mengelakkan kemalangan.
c. Apabila mencuci selesai, ia akan berbunyi secara automatik dan dimatikan.
27 28
1. Bahan pencuci berbuih rendah dicadangkan semasa penggunaan mesin ini.
2. Ia dicadangkan untuk menggunakan unit dalam persekitaran 0˚C hingga 40˚C. Suhu
persekitaran yang terlalu rendah atau tinggi boleh menyebabkan unit tidak berfungsi.
3. Jika mesin basuh disimpan dalam persekitaran di bawah 0 C, ia mesti dibiarkan dalam
persekitaran suhu bilik kira-kira 4 jam sebelum ia boleh digunakan untuk mengelakkan
mesin daripada aising dan merosakkan mesin.
4. Kapasiti membasuh dan penyahairan mesin basuh merujuk kepada berat maksimum
pakaian standard dalam satu keadaan boleh basuh, dehidrasi dan kering, yang berbeza
daripada pakaian sebenar. Ketebalan, saiz dan jenis fabrik pakaian akan menjejaskan
kapasiti mencuci sebenar.Adalah dinasihatkan untuk membasuh pakaian dalam proses
mencuci.
5. Jumlah basuhan di bawah 1kg tidak boleh memilah paras air gred tinggi, supaya air tidak
terkeluar semasa proses mencuci.
Nasihat Penggunaan
Cara-cara Penggunaan
PenyebabMasalah Paparan
Tidak
dapat
berfungsi
Tiada
paparan
Palam kuasa tidak dipasang dan
suis kuasa tidak ditekan
Penyelesaian
Pasang palam kuasa dan tekan suis
kuasa
Tiada
paparan
Tiada
paparan
Tiada
paparan
apabila
voltan terlalu
rendah, atau
fius mungkin
terbuka
apabila
voltan terlalu
tinggi
Saluran tidak mempunyai elektrik
atau fiusnya rosak
Gangguan bekalan elektrik
menyebabkan program hilang dan
pengendali mesti kendalikannya
semula selepas panggilan
Voltan terlalu rendah atau terlalu
tinggi
Minta juruelektrik untuk memeriksa
soket atau fius
Selepas memulakan panggilan,
tekan sekali lagi untuk mengenda-
likan setiap akhbar
E1Saliran
buruk
Paip saluran pembuangan terlalu
tinggi atau tersumbat, menyebab-
kan air tidak dikeluarkan selepas 15
minit.
Selepas memeriksa saluran
pembuangan dan membetulkan
kesalahan, buka penutupnya dan
tutupkan, dan masukkan semula
saluran pembuangan.
E2Tidak
berputar
Tiada penutup semasa mencuci
(henti dan penggera) atau putaran
(tutup dan penggera)
Tutup penutupnya.
Cabut palam kuasa dan tunggu
sehingga voltan normal
1. Fenomena biasa bukan kesalahan
• Apabila mesin basuh digunakan buat kali pertama, mungkin terdapat sedikit air yang
mengalir keluar dari paip saluran pembuangan. Ini adalah air sisa apabila prestasi kilang
diuji.
• Dalam proses membasuh atau membilas, aliran masuk air kadangkala berlaku. Ini
disebabkan oleh penambahan paras air secara automatik.
• Persediaan mesin basuh apabila program pembilasan dimulakan, tiada air disuntik.
Program pembilasan lalai untuk mesin basuh bermula dengan saliran dan putaran.
• Selepas putaran bermula, laras putaran berhenti apabila tiba masanya, iaitu set putaran
terputus-putus untuk mencapai kesan putaran.
• Semasa berputar, fenomena bilasan air kadangkala berlaku kerana baki pakaian
diperbetulkan secara automatik apabila pakaian dipusing.
• Putaran tertunda selepas air selesai. Ini adalah tetapan lalai mesin basuh.
• Operasi butang tidak sah semasa proses cucian. Ini adalah tetapan lalai mesin basuh. Ia
perlu dihentikan sebelum ia boleh dikendalikan.
2. Lalai Biasa dan Penyelesaian :
Penyelesaian Masalah

29 30
E4Saliran air
tidak
mencukupi
Pili tidak dibuka, air dihentikan atau
tekanan air rendah. Selepas 45
minit, paras air kurang daripada
paras air yang ditetapkan
Buka pili atau tunggu sehingga
tekanan air normal sebelum
digunakan. Buka penutup, tutup
penutup dan masukkan semula air
dengan proses salur masuk
E6Sensor
paras air
tidak
normal
Kegagalan sensor paras air, litar
terbuka atau litar pintas, kemudian
penggera secara automatik
Sila dapatkan kakitangan penyeleng-
garaan profesional untuk membaik
pulihnya
E5Gagal untuk
preset
Penutup terbuka apabila dipreset Tutup penutupnya dan cuba lagi
E9Kegagalan
cip memori
Tidak dapat membaca dan
menulis
Minta penyelenggaraan profesional
Tiada
paparan
Tidak dapat
memulakan
atau
memulakan
semula
Kegagalan papan komputer Minta penyelenggaraan profesional
F1/F2/F3Komunikasi/
dewan/
kegagalan
motor
Sentuhan wayar yang lemah/
kerosakan dewan/litar terbuka
motor atau tersekat.
Matikan
F5/F6/F7Voltan
melebihi/
beban
lampau/
undervolt-
umur atau
kegagalan
pengawal
Voltan terlalu tinggi atau kegagalan
modul pemacu; cucian berlebihan;
voltan terlalu rendah atau
pengawal rosak.
Matikan
E7Pengambi-
lan air
atau
pembuan-
gan air
automatik
Papan komputer, injap masuk atau
penderia paras air adalah tidak
normal
Matikan kuasa selepas air habis. Sila
dapatkan kakitangan perkhidmatan
profesional membaikinya
E3Menyentuh
bingkai
semasa
berputar
Sebab cucian tak rata
menyentuh kerangka apabila
pakaian tidak seimbang semasa
berputar, mesin basuh akan
menyesuaikannya secara automatik
dan jika masih tidak sah selepas
dua kali, penggera akan diberi
Buka penutup atas, letak pakaian
secara manual dan tutup
penutupnya
PenyebabMasalah Paparan Penyelesaian
Table of contents
Languages:
Other KHIND Washer manuals
Popular Washer manuals by other brands

Samsung
Samsung WW9 T30 Series manual

GE
GE GTW495DMNWS Owner's Manual & Installation Instructions

Asko
Asko PROFESSIONAL WMC743VS operating instructions

LG
LG F4V9RWP2E owner's manual

GE
GE GNW128P Owner's Manual & Installation Instructions

Bosch
Bosch WAU28460ID Instruction manual and installation instructions