Kia K200SO-A User manual

BEFORE USE
INSTRUCTION MANUAL
K200SO-A
MP3/WMA CD PLAYER
WITH AM/FM RADIO

Before operating the unit, please read this
BEFORE USE
1. OPERATING INSTRUCTIONS ------------------------------------- Page 03
manual thoroughly and retain it for
future reference
2. GENERAL ---------------------------------------------------------------- Page 04
3. ANTI-THEFT SECURITY CODE ----------------------------------- Page 07
4. RADIO --------------------------------------------------------------------- Page 08
5. CD PLAYER ------------------------------------------------------------- Pa
g
e 09
g
6. AUX PLAYER ----------------------------------------------------------- Page 13
7. HANDLING COMPACT DISCS ------------------------------------- Page 14
8. LCD DISPLAY FOR CD PLAYER ERROR ---------------------- Page 15
9. PRODUCT AND WARRANTY SERVICE ------------------------ Page 16
10. MP3/WMA INFORMATION AND NOTICE -------------------- Page 17
11. WARNING AND PRECAUTIONS -------------------------------- Page 18
12 SPECIFICATIONS
Page 19
12
.
SPECIFICATIONS
---------------------------------------------------
Page
19
2

②⑰⑱ ③⑯①
OPERATING INSTRUCTIONS
⑨⑩⑪⑦⑧⑫⑬⑥⑤⑭⑮④
①POWER (ON / OFF / Volume) ⑩PRESET 1 MEMORY (DISP – Display Mode)
②AUDIO SETTING SELECT / TUNING ⑪PRESET 2 MEMORY (SCAN – Scan Mode)
③WARNING LED ⑫PRESET 3 MEMORY (RPT – Repeat Mode)
④AUDIO MUTE BUTTON (MUTE) ⑬PRESET 4 MEMORY (RDM – Random Mode)
⑤FM/AM BAND BUTTON (FM/AM) ⑭PRESET 5 MEMORY (DIRECTORY DOWN)
⑥MODE BUTTON (MODE) ⑮PRESET 6 MEMORY (DIRECTORY UP)
⑦AUTOMATICAL DOWN TUNING
TRACK DOWN & REVIEW
⑯EJECT
⑧AUTOMATICAL UP TUNING
TRACK UP & CUE ⑰EQUALIZER (EQ)
⑨AUX CONNECTOR (AUX) ⑱CD SLOT
Note: Numbers inside circles e.g. ⑱are used throughout this manual, to refer to each of the buttons
shown on this page.
3

GENERAL
②①
①POWER ON/OFF BUTTON
Press button ①momentarily to turn the set on or off. When the set is next switched on, the
previous mode and disc play position will be restored.
①VOLUME UP/DOWN CONTROL
Turn button ①right to increase the volume level. The level will be shown as “VOLUME xx” on the
display panel. Turn button ①left to decrease the volume level. After 5 seconds the display will
return to the previous mode.
①START-UP VOLUME LEVEL SET UP
Start-up volume is the volume level the set will play at when next turned on. To adjust the start-up
volume, press and hold button ①longer than 3 seconds. The current start-up volume level is
displayed as a flashing number on the display panel.
Turn button ①left or right to increase or decrease the volume, then press button ①again to set
that volume level as the start-up volume level.
②SOUND SETTING SELECTION
This button is to adjust the sound. Each time you momentary press button ②,LCDdisplayseach
mode as follows :
BASS →MIDDLE →TREBLE →BAL L=R →FADER F=R →BEEP 2ND →LOUD ON
On each setting, the level can be controlled by turning button ②. The display will automatically
return to the previous mode 5 seconds after the last adjustment is made.
Note: When the EQ mode is activated, the BASS, MIDDLE, TREBLE and LOUD modes are not
displayed.
②
BASS
CONTROL
(
1
ST
setting)
②
BASS
CONTROL
(
1
setting)
To adjust the bass tone level, first select the bass mode by pressing button ②until “BASS”
appears on the display panel. Within 5 seconds of selecting the BASS mode, turn button ②right
or left to adjust the bass level as desired. The bass level will be shown on the display panel from a
minimum of “BASS –10” to a maximum of “BASS+10”. The display will automatically return to the
normal indication in 5 seconds after the last adjustment, or when another function is activated.
4

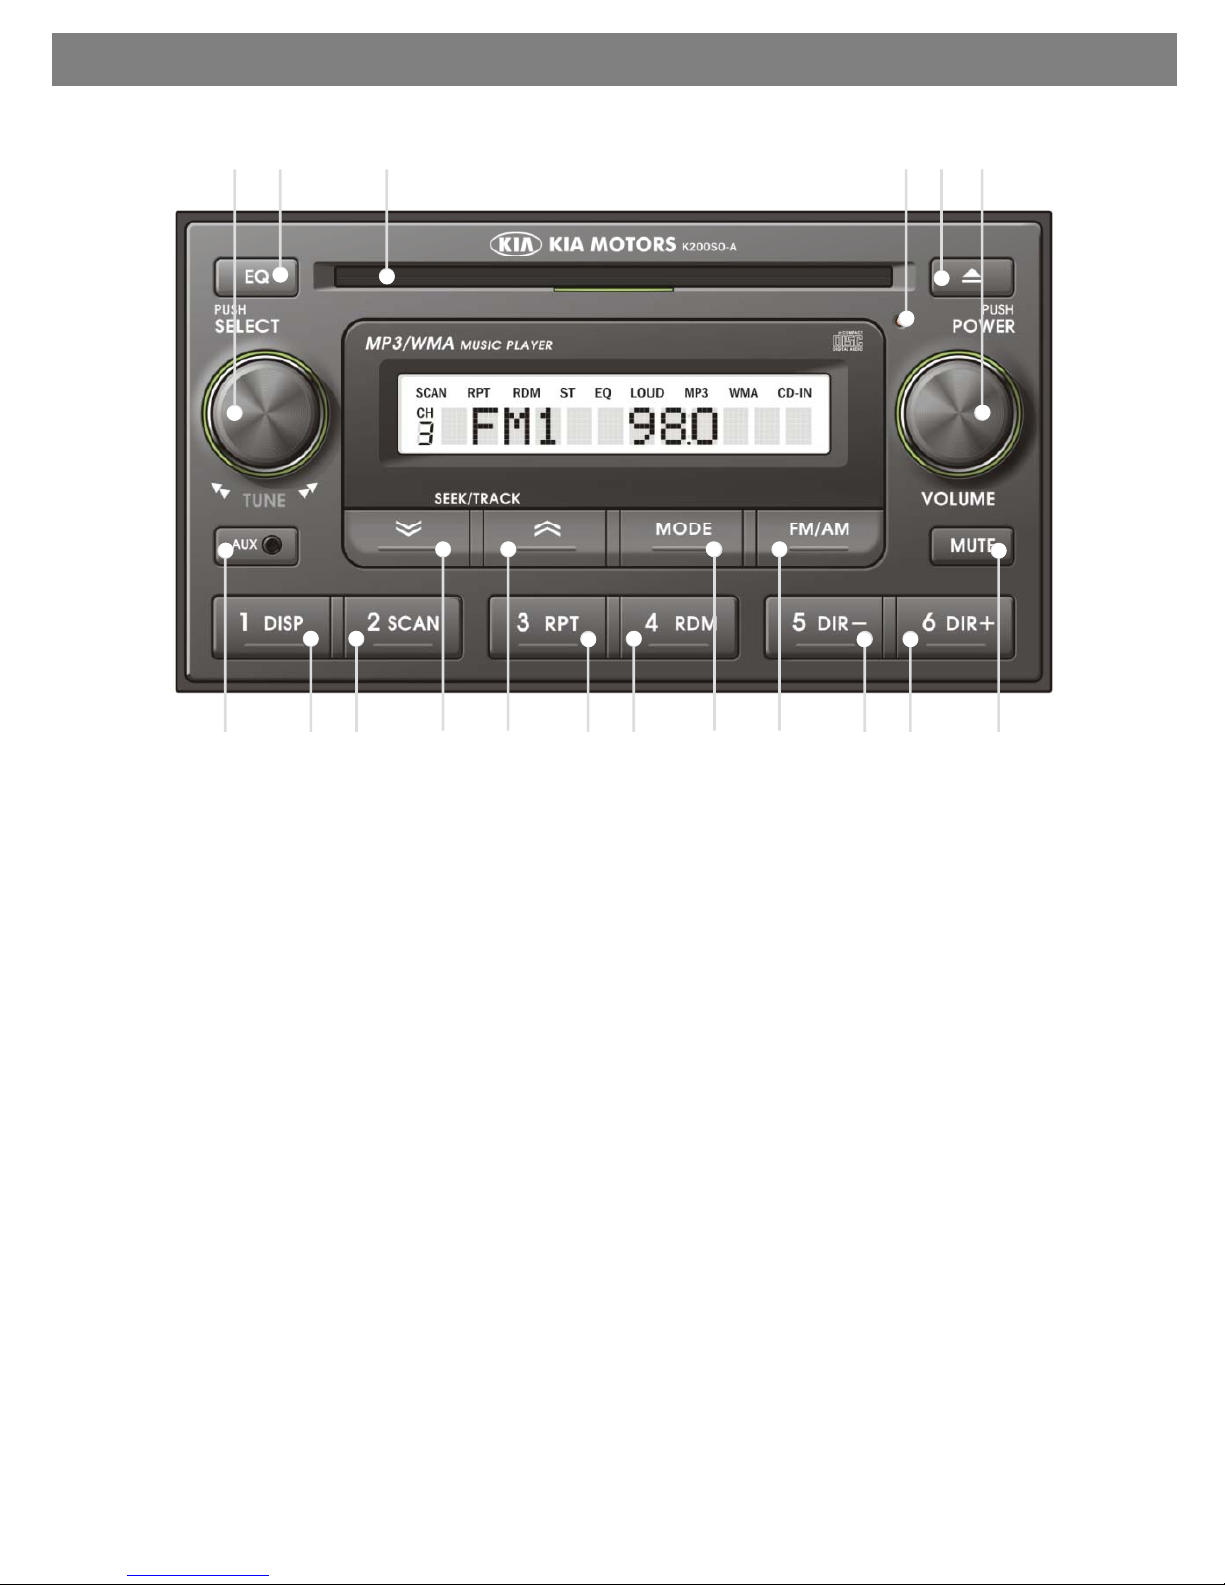
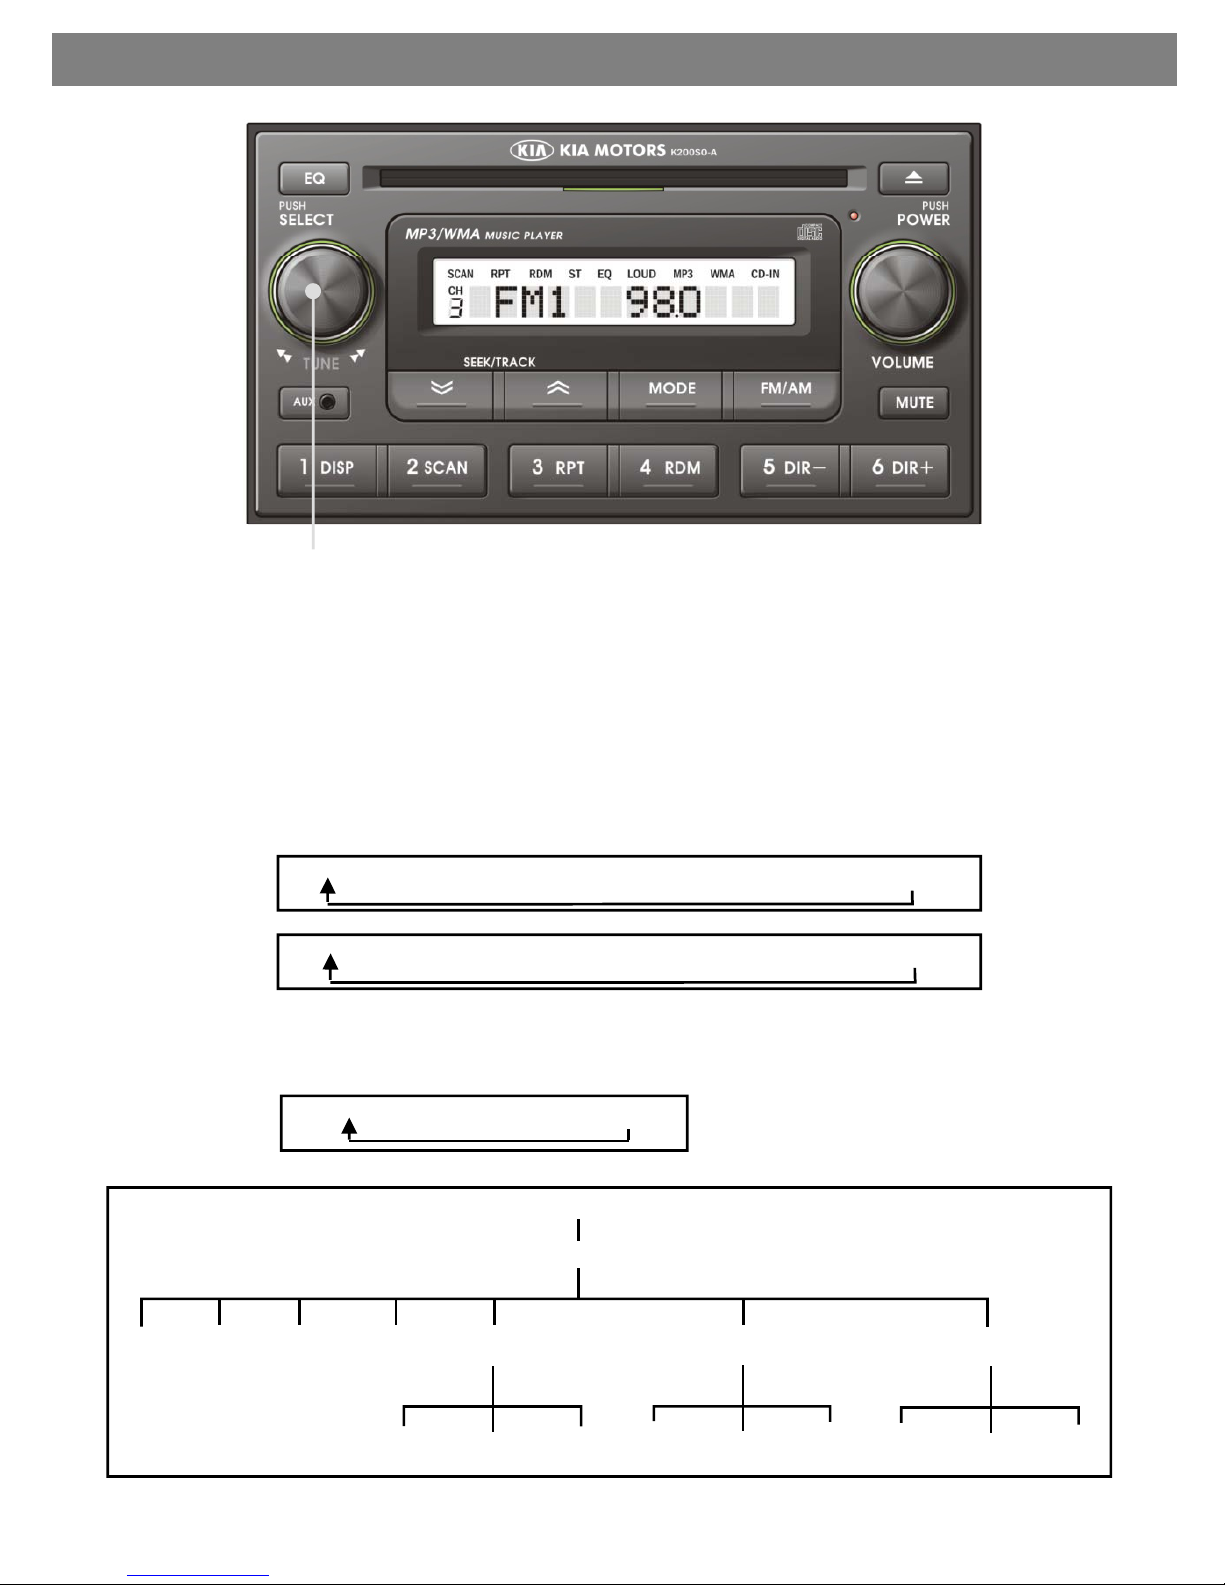
②MIDDLE CONTROL (2nd setting)
To adjust the mid tone level, first select the middle mode by pressing button ②until “MIDDLE”
appears on the display panel. Within 5 seconds of selecting the middle mode, turn button ②right
or left to adjust the mid level as desired. The mid level will be shown on the display panel from a
ii
f
“MIDDLE
10
”
t
i
f
“MIDDLE
+
10
”
Th
di l
ill
ttill
t
t
GENERAL
m
i
n
i
mum o
f
“MIDDLE
-
10
”
t
oamax
i
mum o
f
“MIDDLE
+
10
”
.
Th
e
di
sp
l
ay w
ill
au
t
oma
ti
ca
ll
yre
t
urn
t
o
the normal indication in 5 seconds after the last adjustment or, when another function is activated.
②TREBLE CONTROL (3rd setting)
To adjust the treble tone level, first select the treble mode by pressing button ②until “TREBLE”
appears on the display panel. Within 5 seconds of selecting the treble mode, turn button ②right
or left to adjust the treble level as desired. The treble level will be shown on the display panel from
a minimum of “TREBLE -10” to a maximum of “TREBLE +10”. The display will automatically return
to the normal indication in 5 seconds after the last adjustment, or when another function is
activated.
②BALANCE CONTROL (4th setting)
To adjust the left-right speaker balance, first select the Balance mode by pressing the Select
button ②until the “BAL” indication appears on the display panel. Within 5 seconds of choosing the
Balance mode, turn right/left to adjust the balance as desired. The balance position will be shown
by the bars on the display panel from “BAL 10L” (full left) to “BAL 10R”(full right). When the volume
level between the left and right speakers is equal, “BAL L=R” will be shown on the display panel.
The display will automatically return to the normal indication in 5 seconds after the last adjustment
or when another function is activated.
②FADER CONTROL (5th setting)
To adjust the front-rear speaker balance, first select the Fader mode by pressing the Select button
②
til
th
“FADER”
idi ti
th
di l
l
Withi
5
d
f
hi
th
②
un
til
th
e
“FADER”
i
n
di
ca
ti
on appears on
th
e
di
sp
l
ay pane
l
.
Withi
n
5
secon
d
so
f
c
h
oos
i
ng
th
e
Fader mode, turn right/left to adjust the front-rear speaker level as desired. The fader position will
be shown by the bars on the display panel from “FADER 10F” (full front) to “FADER 10R”(full rear).
When the volume level between the front and rear speaker is equal, “FADER F=R” will be shown
on the display panel. The display will automatically return to the normal indication in 5 seconds
after the last adjustment or when another function is activated.
②BEEP CONTROL (6th setting)
To adjust the Beep mode, first select the Beep mode by pressing the Select button ②until “BEEP”
appears on the display panel. The Beep mode will be shown on the display panel from “BEEP
2ND”, “BEEP OFF” and “BEEP ON”. The display will automatically return to the normal indication in
5
seconds
after
the
last
adjustment
or
when
another
function
is
activated
Select
“
BEEP
ON
”
when
5
seconds
after
the
last
adjustment
or
when
another
function
is
activated
.
Select
BEEP
ON
when
you wish to hear the “BEEP” sound whenever any function button is pressed. Select “BEEP 2ND”
when you wish to hear the “BEEP” sound whenever any Tuner Pre-set button and/or Track cue or
review buttons are pressed. Once the desired setting is displayed, press button ②to save your
selected setting.
②LOUDNESS CONTROL (7th setting)
When listening to music at low volume levels, this feature will boost the bass and treble response.
This action will compensate for the reduction in bass and treble performance experienced at low
volume. To select the loudness feature, press button ②until “LOUD ON” or “LOUD OFF” is
displayed, then turn button ②left or right to activate or deactivate loudness.
5
Table of contents
Other Kia Car Stereo System manuals