KIC KEO-605D Dimensions

KEO 605D PRODUCT SHEET
EN
5019 600 00976
ZAPTFR
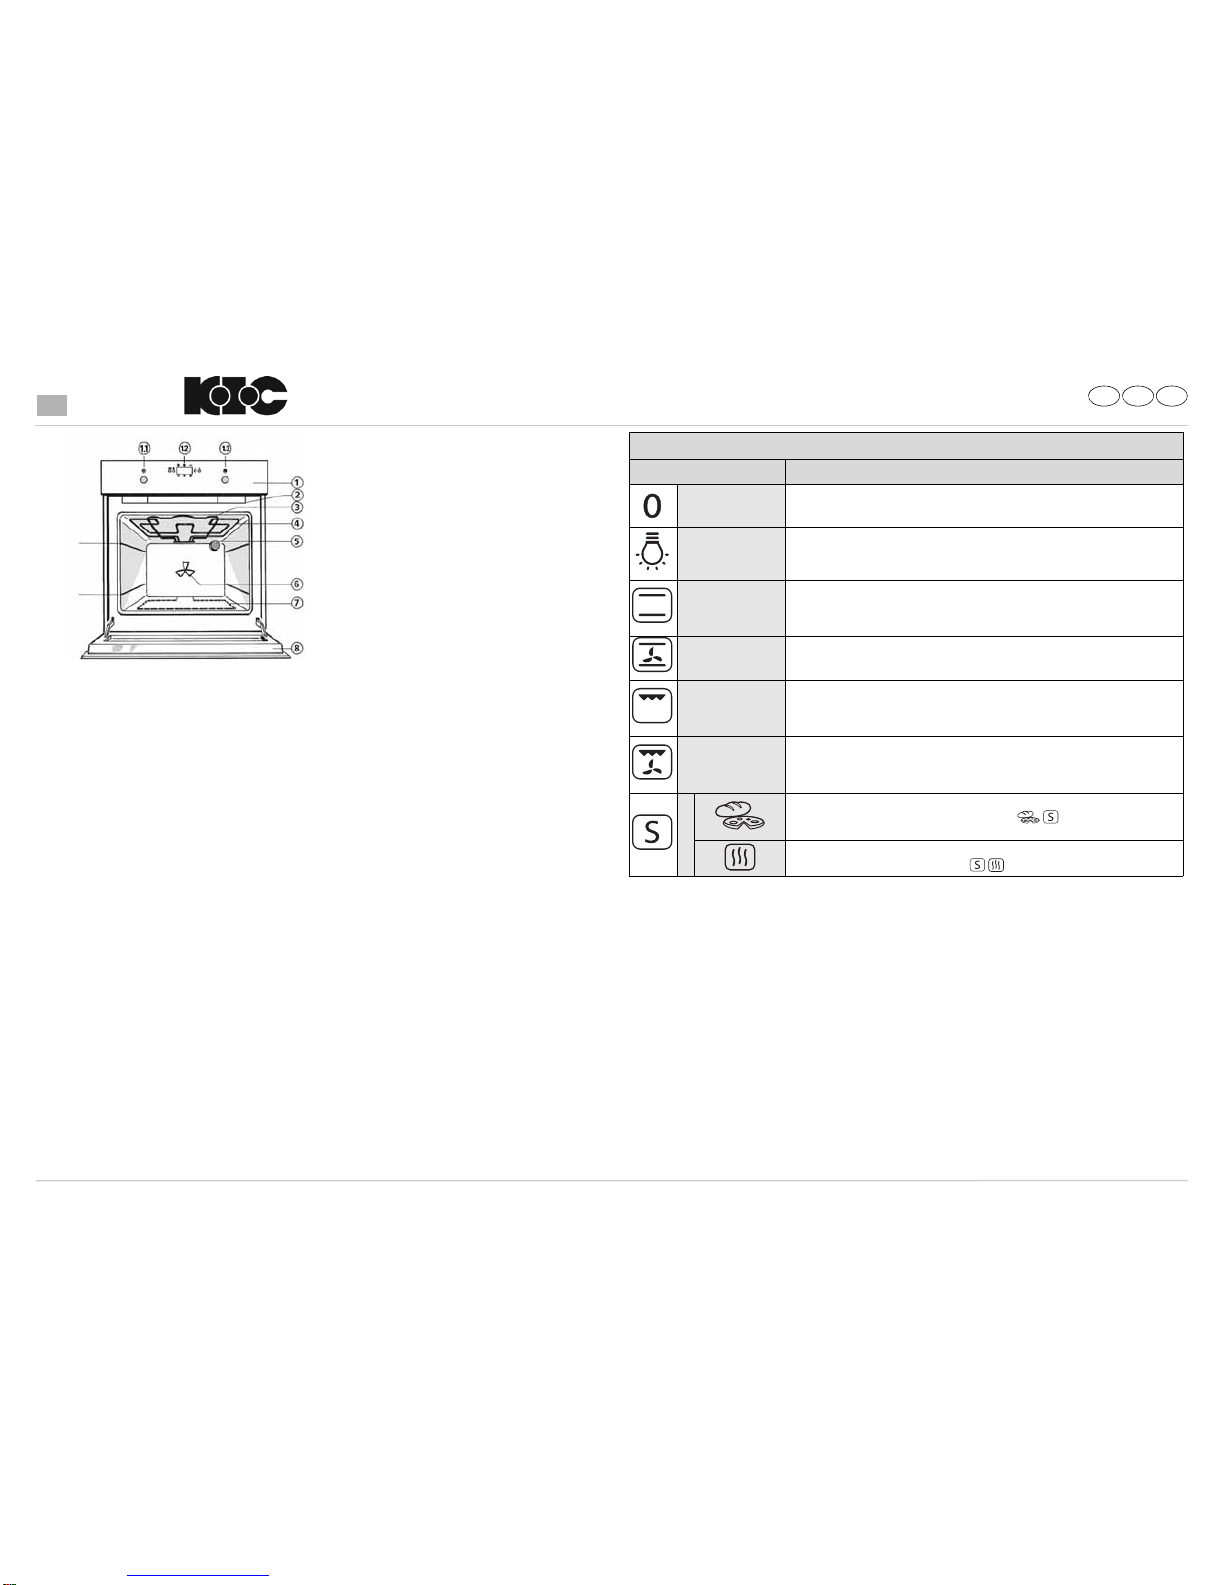
Oven Functions Table
Function Description of function
OFF To stop cooking and switch off the oven.
LAMP To switch on the oven light.
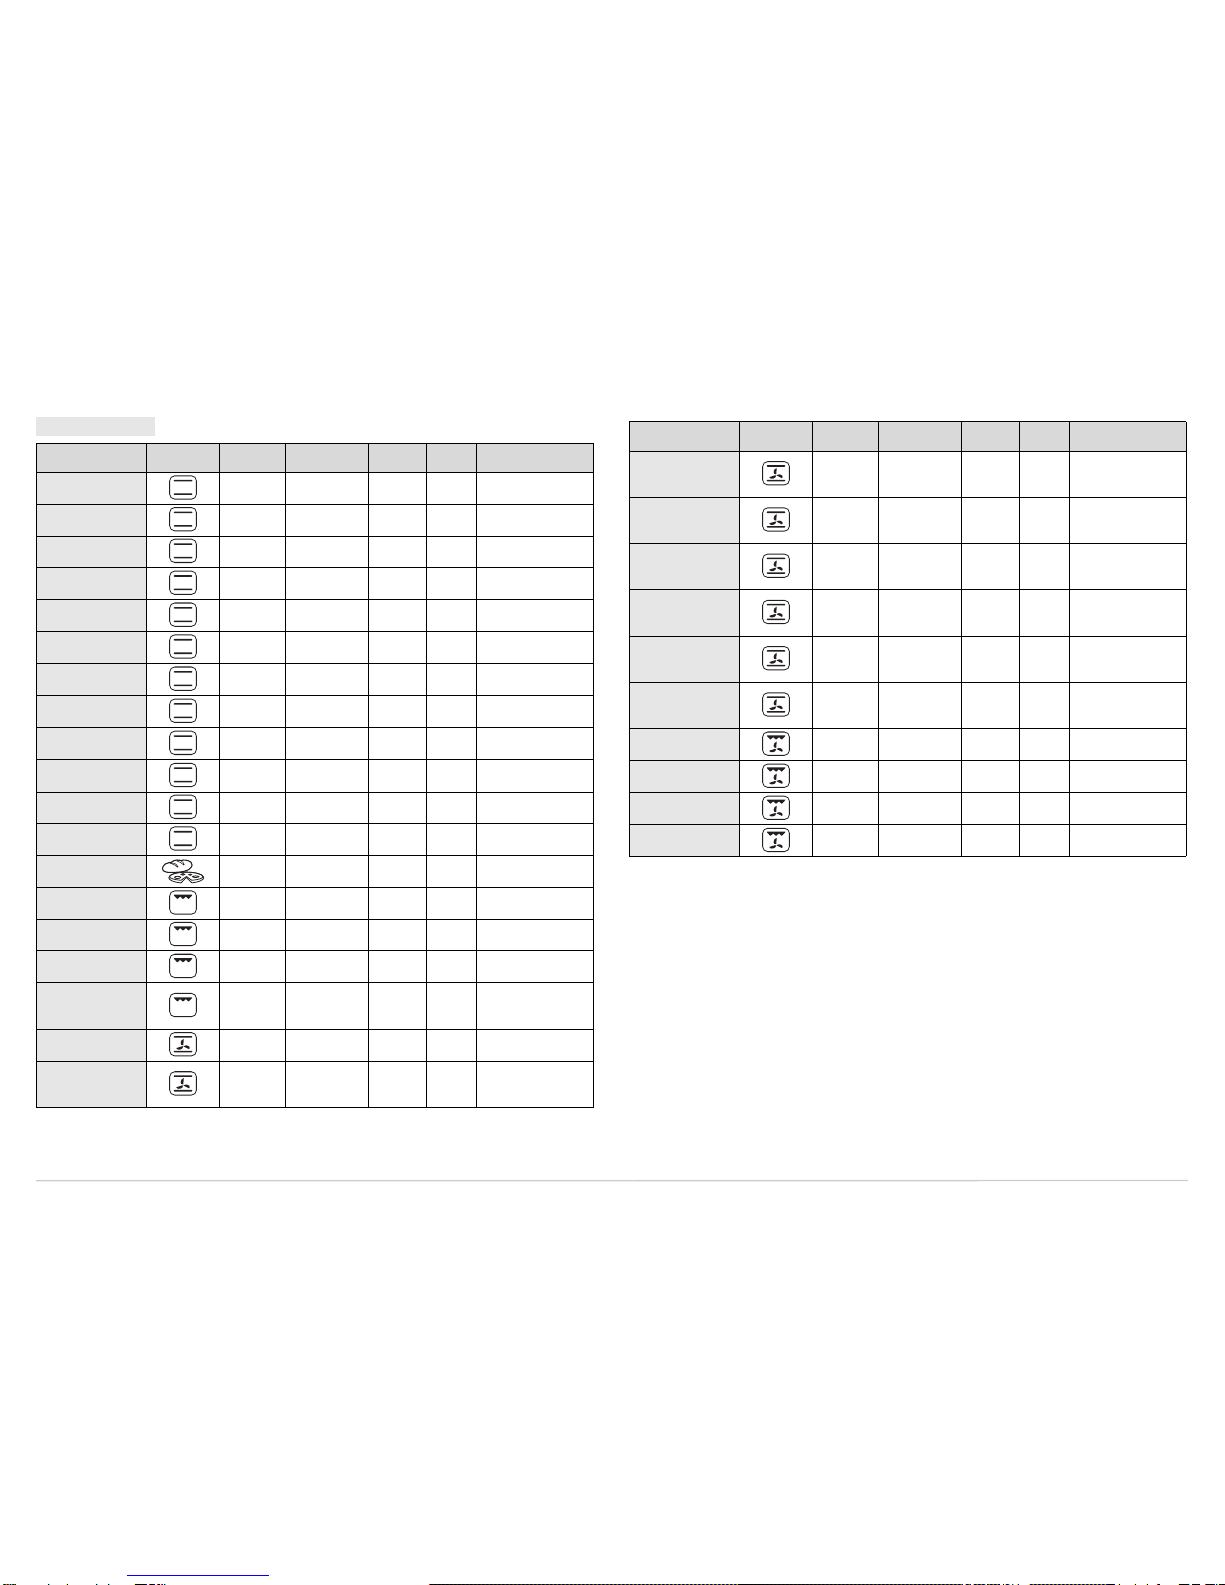
CONVENTIONAL Function suitable for cooking any type of dish on one shelf. Preheat the oven to the
required temperature and place the food in it when the set temperature is reached. It
is advisable to use the second or third shelf for cooking. This function is also suitable
for cooking frozen convenience foods; follow the instructions on the food packaging.
CONVECTION
BAKE To bake cakes with liquidfilling (sweet or savoury) on a single level. This function is
ideal also for cooking on two levels. If necessary, switch the positions of the dishes to
cook food more evenly.
GRILL To grill steak, kebabs and sausages, to cook vegetables au gratin and to toast bread.
Preheat the oven for 3 - 5 min. During cooking the oven door must remain closed.
When cooking meat, pour a little water into the drip tray (on the first level) to reduce
smoke and fat spatters. Ideally the meat should be turned during cooking.
TURBOGRILL To grill large joints of meat (roast beef and other roast meats). The oven door must be
kept closed during the cooking cycle. When cooking meat, it is advisable to pour
water in the drip-tray placed on the first level. This will reduce smoke and spattering
of fat. Turn the meat during grilling.
SPECIALS
Function for baking homemade bread and pizzas. Use the 2nd shelf. Preheat the oven,
turning the temperature knob to one of the icons ; insert the food when the
set temperature is reached.
Function ideal for keeping just-cooked food (e.g. meat, fried food, flans) hot and crisp.
Turn the temperature knob to the icon .
ACCESSORIES
Wire shelf - Baking tray
1. Control panel
1.1. Function selector knob
1.2. Electronic programmer
1.3. Thermostat knob
2. Cooling fan (not visible)
3. Upper heating element
4. Grill heating element
5. Rear oven lamp
6. Fan
7. Lower heating element (hidden)
8. Oven door
N.B:
- At the end of cooking, after theoven has been switched off, the
cooling fan may continue to run for a while.
- Your product may appear slightly different from the drawing.
WARRANTY
WARRANTY GIVEN AND UNDERTAKEN BY WHIRLPOOL SOUTH
AFRICA (PTY) LTD IN RESPECT OF THE WHIRLPOOL COOLING
PRODUCT PURCHASED BY A CLIENT
WHIRLPOOL South Africa (PTY) LTD (“WHIRLPOOL”) warrants to the
original purchaser (“the client”) of theproduct identifies by the serial number
found on the label situated on the product for a period of 24 months from the
date of purchase shall be free of defects in materials and workmanship under
normal use and service. Thewarranty is given subject to the following
provisions:
1. WHIRLPOOL shall be entitled at its sole option and discretion to either
replace or repair any defective materials and / or workmanship.
2. WHIRLPOOL shall, carry out such warranty repair or replacement work
itself or at its option through an authorised service partner free of charge
provided that if the product is situated in excess of a 50 kilometre radius
from the nearest WHIRLPOOL outlet or authorised service partner, then
the client shall be liable to pay for excess including any return journey at a
rate per kilometre as is usually or normally by WHIRLPOOL.
3. The client must provide Whirlpool or its nominated Service Partner upon
request with sufficient proof of the date and place of purchase of the
product.
Should the client be unable to provide such proof, the client will be obliged
topay normalandstandardchargestoWhirlpooland/ oritsService partner.
4. Should WHIRLPOOL or its authorised service partner determine that a
defect or malfunction in the product has been used solely or partly by the
negligentacts, omissions,abuse ormisuseof theoperatorof theproduct or
byan installationnotin accordancewiththeinstruction manual,then, unless
the client can show otherwise, the client shall be liable for the cost of the
repair and / or replacement including all travelling expenses thereby
incurred
5. The warranty does not apply in the event a product is not in normal single
family domestic use, but used for commercial, industrial or other purpose
for which it was not designed.
6. Whirlpool shall not under any circumstances whatsoever be liable for
damages sustained due to failure of operation or malfunction of products
nor for consequential damage of whatsoever nature, howsoever arising.
7. The warranty applies only to products whilst they are situated and used
within the Republic of South Africa, Swaziland, Lesotho, Botswana and
Namibia.
8. Any part replaced in terms of this warranty shall become the property of
WHIRLPOOL or its authorised service partner.
9. In the event the sale of the product was subject to special Credit
Agreements Act WHIRLPOOL warrants that the product shall be free of
latentdefects andWHIRLPOOLshallat itssoleoption repairtheproduct as
a consequence of such defects rendering the product inoperable provided
that:
9.1.the client notifies WHIRLPOOL in writing immediately on becoming
aware of such defects; and
9.2.the clientat theircost deliversthe produclto thenearest WHIRLPOOL
outlet.
10. WHIRLPOOL or its nominated independent contractor warrant that any
repairseffected orparts replacedinterms of this warranty will be free from
defectiveparts orworkmanshipfor theremainingperiod onlyofthe original
warranty period as stipulated in clause 1.
11. WHIRLPOOL reservesthe right to require aclient to furnish WHIRLPOOL
with a deposit equalto an amount determined by WHIRLPOOL or it
authorised service partner prior to servicing the product during the
warranty period which deposit shall be refunded by WHIRLPOOL to the
client should the defect, failure or malfunction of the product be covered
and / or provided for by the provisions of this warranty.
YOUR APPLIANCE PARTNER
When it comes to caring for and servicing your appliance you can rest assured
that it’s in good hands. We have a qualified committed network of sates and
service partners nationwide. So no matter where you are you’II obtain all the
service you deserve!
Bottom
Top
shelf
shelf
Service Contact: Service Partners for South Africa:
South Africa 0860 884 402 Johannesburg 011 613 6551
Botswana 318 6630/1 Bloemfontein 051 430 1809
Namibia 061 40 2144/5 Port Elizabeth 041 484 2298
Swaziland 404 5700/82 Pretoria 012 335 7408
Lesotho +27 11 663 5355/6 Rustenburg 014 597 0079
Roodepoort 011 760 1211/2
Polokwane 015 297 7992
Pietermaritzburg 033 345 7873
Klerksdorp 018 464 4294
Durban 031 301 5500
Nelspruit 013 752 6864
Randburg 011 787 3633/4
George 044 873 5323

-
COOKING TABLE
RECIPE FUNCTION PRE-
HEATING SHELF
(from bottom) TEMP
(°C) TIME
(min) ACCESSORIES
AND NOTES
Leavened cakes Yes 2 160-180 35-55 Wire shelf + cake tin
Biscuits/Tartlets Yes 3 170-180 15-40 Baking tray
Choux buns Yes 3 180 30-40 Baking tray
Vols-au-vent /
Puff pastry crackers Yes 3 180-200 20-30 Baking tray
Meringues Yes 3 90 120-130 Baking tray
Lamb / Veal / Beef /
Pork Yes 2 190-200 90-110 Drip tray or wire shelf +
pyrex dish
Chicken / Rabbit / Duck Yes 2 190-200 65-85 Drip tray or wire shelf +
pyrex dish
Turkey / Goose Yes 2 190-200 140-180 Drip tray or wire shelf +
pyrex dish
Baked fish / en papillote
(fillet, whole) Yes 2 180-200 50-60 Drip tray or wire shelf +
pyrex dish
Lasagne / Baked pasta /
Cannelloni / Flans Yes 2 190-200 45-55 Wire shelf + pyrex dish
Bread / Focaccia Yes 2 190-230 15-50 Drip tray or baking tray
Pizza Yes 2 230-250 7-20 Drip tray or baking tray
Bread / Pizza Yes 2 190-250 10-50 Drip tray / baking tray
oven tray on wire shelf
Toa st Yes 4 200 2-5 Wire shelf
Vegetable gratin Yes 3 200 15-20 Wire shelf+ pyrex dish
Grilled fish fillets and
steaks Yes 3 200 30-40 Wire shelf+ pyrex dish
Sausages / Kebabs /
Spare ribs /
Hamburgers Yes 4 200 30-50 Grill + drip tray with
water on 1st shelf, turn
halfway through cooking
Filled pies (cheesecake,
strudel, apple pie) Yes 1 180-200 50-60 Drip tray or wire shelf +
pyrex dish
Meat & potato pies
(vegetable pie, quiche
lorraine) Yes 1 180-200 35-55 Wire shelf + cake tin
The times given in the table are for cooking done with delayed start mode (if available). Cooking times maybe longer, depending on the
dish.
N.B.: the cooking function symbols can be slightly different from the drawing.
N.B.: cooking times and temperatures are approximate for 4 portions.
RECIPE FUNCTION PRE-
HEATING SHELF
(from bottom) TEMP
(°C) TIME
(min) ACCESSORIES
AND NOTES
Stuffed vegetables
(tomatoes, peppers,
courgettes, aubergines) Yes 2 180-200 40-60 Wire shelf + pyrex dish
Meat & potato pies
(vegetable pie,quiche
lorraine) Yes 1/3 180-190 45-55 Grill +pan, switch levels
halfway through cooking
Pizzas/Focaccia Yes 1/3 230-250 12-30 Baking tray+drip tray,
switch levels halfway
through cooking
Biscuits/Tartlets - 1/3 170-180 20-40 Baking tray+drip tray,
switch levels halfway
through cooking
Choux pastry - 1/3 180 35-45 Baking tray+drip tray,
switch levels halfway
through cooking
Vols-au-vent /
Puff pastry crackers -1/3 180-200 20-40 Baking tray+drip tray,
switch levels halfway
through cooking
Roast chicken -220055-65
Grill + drip tray with
water on 1st level
Roast potatoes -320045-55Driptray
Roast Beef underdone -320030-40
Grill + drip tray with
water on 1st level
Leg of lamb/Knuckle -3 200 55-70 Grill + drip tray

CONTROL PANEL DESCRIPTION
N.B.: Your product may appear slightly different from the drawing.
1. Function selector knob
2. Setting button (“set”)
3. Confirmation button (“ok”)
4. Buttons for changing time (“-” “+”)
5. Thermostat knob
USING THE ELECTRONIC PROGRAMMER
Starting the oven
When the oven is connected to the power supply for the first time, or reconnected after a power failure, the display
indicates “ ”.
Selecting and changing the clock time
1. Press “set”. The time of day flashes on the display.
2. Press button “-” or “+” to set the hour.
3. Press “set” and “-” or “+” to set the minutes.
4. Press “ok” to confirm.
To change the time:
Press and hold “ok” for 3 seconds. until the time flashes on the display. Repeat the steps described above.
Select cooking function
1. Turn knob 1to the chosen function.
2. Turn knob 5to select the temperature.
(NB: during the “Defrost” function, the temperature shown on the display is for guidance only and does not mean
the oven is heating up: the oven temperature remains comparable to room temperature, as per the description of
the function in the product description sheet).
3. Press “ok” to confirm; the oven will switch on. The indicator next to switches on.
To change the temperature:
1. Turn knob 5and select the desired temperature.
Important notes:
To cancel any selection, turn knob 1to “0”. Alternatively, press “set” to switch the oven off, maintaining the previously
selected functions.
Selecting the cooking time
Select the cooking time (available with any function, except for the special functions) to turn the oven on for a
specified period of time. At the end of the specified time the oven will switch off automatically. The maximum
programmed cooking time is 6 hours.
1. Set the function and the temperature (see chapter: “Selecting the cooking function”) up to point 2 without
confirming by pressing “ok”.
2. Press “set” (the indicator on the display lights up next to the cooking time symbol ) and, within 8 minutes,
select the desired cooking time using buttons “-” or “+”.
1 3 42 5
3. Confirm the selection by pressing “ok”; the oven switches on and the display shows the residual cooking time.
4. To change the previous temperature setting, turn knob 5. To return to the residual cooking time, wait 5 seconds.
Appearance of on the display:
Once the set time has elapsed, an acoustic signal is heard and appears on the display.
The oven will switch off automatically.
To change the cooking time, use button “-” or “-” “+”. Return to point 3 chapter “Selecting the cooking time”.
1. Turn knob to “0”
The time of day appears again on the display.
Selecting the end of cooking time
Using this function it is possible to preset the end of cooking time. The maximum programmed cooking time is 23
hours and 59 minutes.
1. Proceed as described in points 1 and 2 chapter “Selecting the cooking time”.
2. Press “set” to set the end of cooking time: the indicator next to the symbol lights up .
3. Set the end of cooking time using button “-” or “-” “+”.
4. Press “ok” to confirm the end of cooking time.
The oven will turn on automatically at the end of cooking time minus cooking time: the indicators on the display
above the symbols will light up.
Special functions
Turn knob 1to function , lights up next to the symbol .
Keep warm
This maintains a constant temperature of 80°C in the oven.
1. Turn knob 5to the symbol .
2. Press “ok” to confirm.
3. The indicator next to on the control panel switches off when a temperature of 80°C is reached, a factory-set
time of 5 minutes flashes on the display and an acoustic signal sounds.
4. Place the food in the oven.
5. To change the preset time, use button “+” or “+” “-”.
6. Press “ok” to confirm.
7. Once the set time has elapsed, the oven switches off, an acoustic signal is heard and appears on the display.
Pizza/Bread
This operates at a fixed temperatures of 200/250°C and is ideal for baking bread and pizzas.
1. Turn knob 5 to the one of the symbols –, –.
2. Press “ok” to confirm.
3. The indicator next to on the control panel switches off when a temperature of 250°C is reached, a factory-set
time of 12 minutes flashes on the display and an acoustic signal is heard.
4. Place the food in the oven.
5. To change the preset time, use button “+” or “+” “-”.
6. Press “ok” to confirm.
7. Once the set time has elapsed, the oven switches off, an acoustic signal is heard and appears on the display.
Timer
The timer can only be set when the oven is not in use and allows a maximum setting of 6 hours.
To set the timer:
1. Leave knob 1at “0”. The display shows the time of the day.
2. Press “set”. The indicator next to the symbol lights up .
Use buttons “-” or “+” to set the desired time.
3. Press “ok” to confirm the selection.
Once the set time has elapsed:
An acoustic signal sounds and flashes on the display .
Press “ok”: The acoustic signal stops. The time of day appears again on the display.
Childproof lock
1. With knobs 1and 5set to “0”, press buttons “-” and “+” at the same time for 3 sec.
N.B.: Activation of the LOCK function is signalled by an acoustic signal, whereas the symbol will appear on the
display. When set, the display will continue to show the time.
1. The oven functions will not operate while the childproof lock is activated.
2. To deactivate the lock, repeat the sequence described in point 1.
Table of contents
Popular Oven manuals by other brands

LG
LG LWS3081ST - 30in Single Electric Wall Oven installation manual

Electrolux
Electrolux EOB3434BOX user manual

Electrolux
Electrolux B3100-5 user manual

spinflo
spinflo Country Leisure PRIMA 600NG User and installation instructions

Rommelsbacher
Rommelsbacher BG 1600 instruction manual

Samsung
Samsung BT621TCDST user manual