Kicker KMC4 User manual

Owner’s Manual | English
Manual del Propietario | Español
KMC4 Receptor Multi-Media
Benutzerhandbuch | Deutsch
KMC4 Multi-Media-Receiver
Manuel d’utilisation | Française
KMC4 Multi-Media Receiver
KMC4
Media Center
KMC4

1
FCC Statement
This equipment has been tested and found to comply with the limits for a Class B digital device, pursuant to part 15 of the FCC Rules. These limits are designed to
provide reasonable protection against harmful interference in a residential installation. This equipment generates, uses, and can radiate radio frequency energy and, if not
installed and used in accordance with the instructions, may cause harmful interference to radio communications. However, there is no guarantee that interference will not
occur in a particular installation. If this equipment does cause harmful interference to radio or television reception, which can be determined by turning the equipment off
and on, the user is encouraged to try to correct the interference by one or more of the following measures:
—Reorient or relocate the receiving antenna.
—Increase the separation between the equipment and receiver.
—Connect the equipment into an outlet on a circuit different from that to which the receiver is connected.
—Consult the dealer or an experienced radio/TV technician for help.
FCC Statement
This device complies with FCC radiation exposure limits set forth for an uncontrolled environment.
This device complies with Part 15 of the FCC Rules. Operation is subject to the following two conditions: (1) this device may not cause harmful interference, and (2) this
device must accept any interference received, including interference that may cause undesired operation.
Caution! Any changes or modifications not expressly approved by the party responsible for compliance could void the user’s authority to operate the equipment.
IC Notice - CAN ICES-3 (B) - This device complies with Industry Canada’s licence-exempt RSSs. Operation is subject to the following two conditions:
(1) This device may not cause interference; and (2) This device must accept any interference, including interference that may cause undesired operation of the device.
Avis d’Industrie Canada - Le présent appareil est conforme aux CNR d’Industrie Canada applicables aux appareils radio exempts de licence. L’exploitation est au-
torisée aux deux conditions suivantes :
(1) l’appareil ne doit pas produire de brouillage; (2) l’utilisateur de l’appareil doit accepter tout brouillage radioélectrique subi, même si le brouillage est susceptible d’en
compromettre le fonctionnement. mauvais fonctionnement de I’appareil.
Cet appareil numériquie de la classe B est conforme à la norme NMB-003 du Canada. CAN NMB-3 (B)
The device meets the exemption from the routine evaluation limits in section 2.5 of RSS 102 and compliance with RSS-102 RF exposure, users can obtain Canadian
information on RF exposure and compliance.
Le dispositif rencontre l’exemption des limites courantes d’évaluation dans la section 2.5 de RSS 102 et la conformité à l’exposition de RSS-102 rf, utilisateurs peut
obtenir l’information canadienne sur l’exposition et la conformité de rf.
FCC ID: 2ADQM-KMC50 IC ID: 24966-KMC50

2
mounting hole cutout template:
3 inches, 76.2 mm
gabarit de montage trou découpé:
3 pouces, 76,2 mm
plantilla de recorte del agujero de montaje:
3 pulgadas, 76.2 mm
montageloch ausschnittschablone :
3 Zoll, 76,2 mm
3 inches, 76.2 mm
3 pouces, 76,2 mm
3 pulgadas, 76.2 mm
3 Zoll, 76,2 mm

3
mounting hole cutout template:
3 inches, 76.2 mm
gabarit de montage trou découpé:
3 pouces, 76,2 mm
plantilla de recorte del agujero de montaje:
3 pulgadas, 76.2 mm
montageloch ausschnittschablone :
3 Zoll, 76,2 mm
3 inches, 76.2 mm
3 pouces, 76,2 mm
3 pulgadas, 76.2 mm
3 Zoll, 76,2 mm

4
KMC4 OWNER’S MANUAL
Contents
Specs 5
Overview 6
Installation 7
Operation 10
Troubleshooting 11
Warranty 33
Contentido
Especificaciones 12
Descripción general 13
Instalación 14
Funcionamiento 17
Resolución de problemas 18
Garantía 33
Contentu
Spécifications 19
Généralités 20
Installation 21
Utilisation 24
Dépannage 25
Garantie 33
Inhalt
Technische Daten 26
Übersicht 27
Installation 28
Betrieb 31
Fehlersuche 32
Garantie 33

5
Model KMC4
Power Output @ 14.4V, 2Ω stereo, <10% THD+N 38W x 4
Power Output @ 14.4V, 4Ω stereo, <10% THD+N 25W x 4
Frequency Response [Hz] 20 – 20k
Signal-to-Noise Ratio [dB] 100
Pre-Amp Outputs Front, Rear, Sub, Zone2
Input Sensitivity 500mV
USB Playback MP3/WMA/FLAC/AAC/WAV
USB Charging DC 5V, 1A
USB Compatible File System FAT32
IP Rating IP66
Line-Out Level [V] 4
Outer Trim Dimensions[in, cm] 3.5 x 5.5, 8.89 x 13.97
Protrusion From Mounting Surface [in, cm] 1-1/8, 2.86
Total Mounting Depth [in, cm] 4-3/4, 12.07
Mounting Hole Diameter [in, cm] 3, 7.62
Be careful not to drill into wiring or vehicle mechanisms.
You are solely responsible for securely mounting the KMC4
Media Center. See page 2–3 for mounting hole cutout
template.
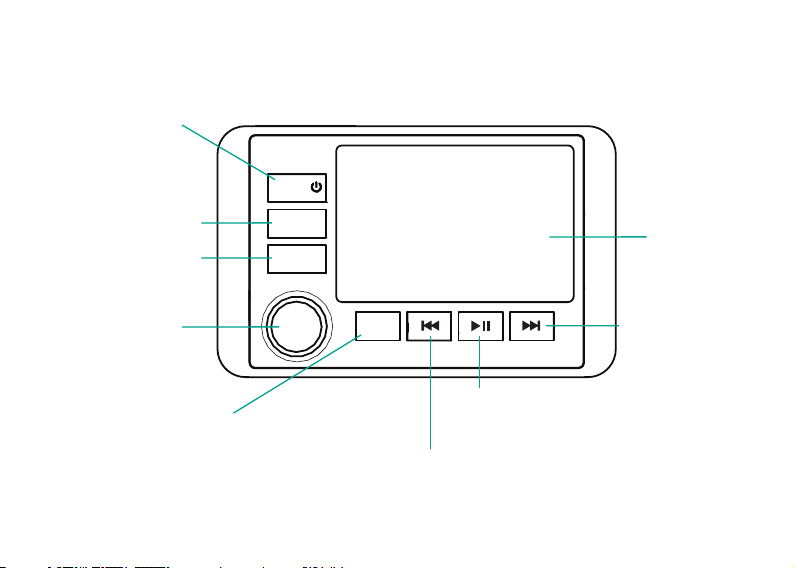
Before installation, you may wish to plan your placement
of the USB and Auxiliary inputs, and the optional KRC12
remote (sold separately), for both convenience and looks!
With a KICKER KXM amplifier, a pair of KICKER KM
speakers, and a few KICKER cables, you’re looking at a full
system upgrade that will dominate! KICKER amplifiers and
accessories make upgrading a snap. Ask your dealer about
KICKER amplifiers and speaker upgrades to complete your
system!
All specifications and performance figures are subject
to change. Please visit www.kicker.com for the most
current information.
WARNING: KICKER products are capable of producing sound levels
that can permanently damage your hearing! Turning up a system to a level
that has audible distortion is more damaging to your ears than listening to
an undistorted system at the same volume level. The threshold of pain is
always an indicator that the sound level is too loud and may permanently
damage your hearing. Please use common sense when controlling
volume.
Authorized KICKER Dealer:
Purchase Date:
Serial Number:
SPECIFICATIONS

6
SOURCE
FAVORITES
MENU
SUB/ZONE
•power on/off (long press)
•change input source (short press)
If the battery voltage is low (<+10.5V), an on-screen warning will appear.
Recharge battery and avoid becoming stuck or marooned.
•change volume/value
•confirm/select (press)
•enter audio menu (short press)
•enter main menu (long press)
•save/select favorite presets
•digital display
•previous track/rewind
•change tuner
•sub level (press)
•zone 2 level (hold)
•next track/fast forward
•change tuner
•play/pause
•mute
NOTE: Use short and long presses to operate.
Some input sources do not support all functions.
OVERVIEW

7
USB input
USB charging
front RCA out
(gray)
sub RCA out
(red)
rear RCA out
(green)
zone 2 RCA out
(purple)
AUX input
radio antenna input
wired remote
(sold separately)
fuse: 15A ATM
fuse
INSTALLATION

8
12V
+12V (switched)
≤7”
18cm
dimmer (leave disconnected
if no dimmer circuit present)
rear right
(purple)
rear left
(green)
front right
(gray)
front left
(white)
ground
fuse
battery
ground
remote turn-on output
Remember to cap unused wires
and avoid electrical shorts!
positive
negative

9
1. Remove adhesive from rear gasket and apply to the back of the KMC4.
2. Securely fasten the KMC4 to the mounting surface using the including screws.
3. Attach the snap-on trim ring to the front of the KMC4.

10
OPERATION
Playback
Use the SOURCE button to choose the input source for the KMC4: Bluetooth, USB, AUX, AM, FM, and WX. Press the SUB/ZONE
button to change Subwoofer output volume; Hold the SUB/ZONE button to change the Zone2 output volume.
The KMC4 will automatically enter Bluetooth pairing mode when there is no Bluetooth connection, with the display message “In
Pairing Mode”. Hold the FAVORITES button to manually disconnect from a paired device and re-enter pairing mode. When you begin
scanning for devices on your audio device, the KMC4 will identify as “Media Center”.
Set favorite presets for your favorite AM, FM, and WX stations by selecting the station, pressing the FAVORITES button, selecting the
favorite number (1–10) you wish to set, and pressing and holding the VOLUME KNOB for 2 seconds.
The USB input source is only available when there is a USB device connected. The KMC4 will automatically switch to USB input when
a USB device is connected and detected. KICKER recommends SANDISK drives for the best performance. Drives must be formatted
in FAT32 file system. USB hubs are not compatible. High-bit rate files (320kbps) may experience errors. In testing, the KMC4 has been
shown to work with some HDD’s and other file systems, however, this is not supported by KICKER!
Device Settings
Hold the MENU button to enter the device settings menu. Press the MENU button to enter the audio settings. The available settings
are: Loud, Area, Beep, Zone2, Z2VOL, HPF, and Dimmer. Use the VOLUME KNOB to change the available values for each setting.
LOUD - select On or Off for a low frequency boost AREA - select North America or Europe
BEEP - select whether the KMC4 responds with beeps Zone 2 - toggles Zone 2 volume control on/off
Z2VOL - change behavior of Zone 2 volume control:
Relative: Zone 2 volume is locked to main volume. Absolute: Zone 2 volume is adjusted independently of main volume
HPF - hi-pass crossover: OFF, 50Hz, 80Hz, 120Hz Dimmer - adjusts screen and button brightness: 1–10

11
TROUBLESHOOTING
If your KMC4 does not appear to be working, check the obvious things first such as blown fuses, poor or incorrect wiring connections etc. If you’re
using an amplifier, check for incorrect setting of crossover switches and gain controls etc.
No Power? Press the SOURCE/POWER button and make sure the KMC4 is turned on. Check the +12V power wire, ground wire, and fuse(s)
for power and proper connection.
No or low output? Check the balance control on the KMC4. Check the speaker output connections. Power cycle the KMC4. Check the
volume of the audio source.
Reduced volume? Reverse a speaker connection from positive to negative on the stereo channel(s); if the volume improves, the speaker was out of
phase.
Buttons/Device Unresponsive? Perform Factory reset.
Factory reset: Reset the KMC4 to factory default settings by pressing and holding the PLAY/PAUSE button for ten seconds.
Radio stations not being received? Check volume of audio source. Check the antenna for proper connection and ensure the AREA setting
in the menu is set to the correct region.
If you have more questions about the installation or operation of your new KICKER product, see the Authorized KICKER Dealer where you made your
purchase. Please E-mail support@kicker.com or call Technical Services (405) 624-8583 for unanswered or specific questions.
Audio Settings
Press the MENU button to begin cycling through the audio settings menu. Press the MENU button to enter the audio settings. The
available audio settings are: Bass, Treble, Balance, Fader, and EQ. Use the VOLUME KNOB to change the available values for each
setting.
EQ - select between EQ presets: Flat, Classical, Pop, Rock, Off, and Custom
When Custom EQ is selected, press the MENU button to enter custom frequency adjustments for 60Hz, 250Hz, 500Hz, 1kHz, 3kHz,
and 8kHz.

12
Modelo KMC4
Potencia de salida a 14.4 V, estéreo de 2Ω, <10% THD+N 38 W x 4
Potencia de salida a 14.4 V, estéreo de 4Ω, <10% THD+N 25 W x 4
Respuesta de frecuencia [Hz] 20 – 20 k
Relación señal-ruido [dB] 100
Salidas preamplificador Anterior, posterior,
subwoofer, zona 2
Sensibilidad de entrada 500 mV
Reproducción USB MP3/WMA/FLAC/AAC/WAV
Carga USB CD 5 V, 1 A
Sistema de archivos compatible con USB FAT32
Certificación IP IP66
Nivel de salida de línea [V] 4
Dimensiones del ajuste exterior [pulg., cm] 3.5 x 5.5, 8.89 x 13.97
Saliente desde la superficie de montaje [pulg., cm] 1 1/8, 2.86
Profundidad de instalación total [pulg., cm] 4 3/4, 12.07
Diámetro de orificio de instalación [pulg., cm] 3, 7.62
Asegúrese de no perforar en el cableado ni en
mecanismos del vehículo. Usted tiene la exclusiva
responsabilidad de instalar el centro multimedia KMC4 de
manera segura. Consulte la plantilla de corte de orificios de
montaje de las páginas 2 y 3.
Antes de la instalación, debería planificar la colocación
de las entradas USB y auxiliares, y el control remoto
KRC12 opcional (se vende por separado), ¡tanto para su
comodidad como para el aspecto!
Con un amplificador KXM de KICKER, un par de altavoces
KM de KICKER y algunos cables KICKER, ¡obtendrá
una actualización de todo el sistema que impresionará!
Los amplificadores y accesorios de KICKER agilizan
la actualización. Consulte a su distribuidor sobre los
amplificadores KICKER y las actualizaciones de altavoces
para completar su sistema.
Todas las especificaciones y cifras de desempeño están
sujetas a cambio. Visite www.kicker.com para obtener la
información más reciente.
ADVERTENCIA: ¡Los productos KICKER son capaces de producir
niveles de sonido que pueden dañar su oído permanentemente! Subir el
volumen de un sistema a un nivel que cause distorsión auditiva es más
dañino para sus oídos que escuchar un sistema sin distorsión al mismo
volumen. El umbral del dolor es siempre un indicador de que el nivel de
sonido está demasiado alto y que pudiera dañar permanentemente su
oído. Utilice el sentido común cuando controle el volumen.
Distribuidor autorizado KICKER:
Fecha de compra:
Número de serie:
ESPECIFICACIONES

13
SOURCE
FAVORITES
MENU
SUB/ZONE
•encendido/apagado (presionar
durante un tiempo prolongado)
•cambiar fuente de
entrada (presionar durante
un tiempo corto)
Si el voltaje de la batería es bajo (<+10.5 V), aparecerá una advertencia en
pantalla. Recargue la batería para evitar interrupciones.
•cambiar volumen/valor
•confirmar/seleccionar
(presionar)
•introducir en menú de audio
(presionar durante un tiempo corto)
•introducir en menú principal
(presionar durante un tiempo
prolongado)
•guardar/seleccionar valores
preestablecidos favoritos •pantalla digital
•pista anterior/rebobinar
•cambiar sintonizador
•subnivel (presionar)
•nivel zona 2 (mantener)
•siguiente pista/adelantar
•cambiar sintonizador
•reproducir/pausar
•modo de silencio
NOTA: Para operar, presione durante tiempos cortos y prolongados.
Algunas fuentes de entrada no admiten todas las funciones.
DESCRIPCIÓN GENERAL

14
Entrada USB
Carga por USB
Salida de RCA
frontal (gris)
Salida de RCA del
subwoofer (rojo)
Salida de RCA
trasera (verde)
Salida de RCA de
Zona 2 (púrpura)
Entrada
de auxiliar
Entrada de
antena de radio
Control remoto
cableado (se vende
por separado)
fusible: 15 A ATM
fusible
INSTALACIÓN

15
12V
+12 V (encendido)
≤7 pulg.
18 cm
atenuador (dejar
desconectado si no hay un
circuito de atenuador)
posterior
derecho
(púrpura)
posterior
izquierdo
(verde)
frontal
derecho
(gris)
frontal
izquierdo
(blanco)
conexión
a tierra
fusible
batería
conexión a tierra
salida de encendido
remoto
¡Recuerde tapar los cables que no se
usen para evitar cortocircuitos eléctricos!
positivo
negativo

16
1. Retire el adhesivo de la junta posterior y aplíquelo a la parte posterior del KMC4.
2. Sujete el KMC4 de manera segura a la superficie usando los tornillos que se incluyen.
3. Adjunte el anillo de ajuste a presión a la parte frontal del KMC4.

17
FUNCIONAMIENTO
Reproducción
Utilice el botón SOURCE (Fuente) para seleccionar la fuente de entrada para el KMC4: Bluetooth, USB, AUX, AM, FM y WX. Presione el botón SUB/
ZONE (Subwoofer/Zone) para cambiar el volumen de salida del subwoofer; mantenga presionado el botón SUB/ZONE (Subwoofer/Zone) para
cambiar el volumen de salida de la Zona 2.
El KMC4 pasará automáticamente a modo de sincronización de Bluetooth cuando no haya conexión de Bluetooth, con el mensaje en pantalla “En
modo sincronización”. Mantenga presionado el botón FAVORITES (Favoritos) para desconectar manualmente de un dispositivo sincronizado y volver
al modo de sincronización. Cuando comience a buscar dispositivos en su dispositivo de audio, el KMC4 se identificará como “Centro multimedia”.
Para configurar sus estaciones de AM, FM y WX favoritas, seleccione la estación, presione el botón FAVORITES (Favoritos), seleccione el número favorito
(1–10) que desea asignar y presione y mantenga presionada la perilla VOLUME (Volumen) durante dos segundos.
La fuente de entrada USB solo está disponible cuando hay un dispositivo USB conectado. El KMC4 automáticamente cambiará a entrada USB
cuando un dispositivo USB esté conectado y se detecte. KICKER recomienda los controladores SANDISK para obtener el mejor rendimiento. Los
controladores se deben formatear en sistemas de archivos FAT32. Los concentradores USB no son compatibles. Los archivos de alta tasa de bits
(320 kbps) pueden presentar errores. En pruebas, se demostró que el KMC4 funciona con algunos discos duros y otros sistemas de archivos; no
obstante, ¡esta función no está respaldada por KICKER!
Configuraciones de dispositivos
Mantenga presionado el botón MENU (Menú) para ingresar al menú de configuraciones del dispositivo. Presione el botón MENU (Menú) para ingresar
en las configuraciones de audio. Los opciones disponibles son: Alto, Área, Bip, Zona 2, Z2VOL, HPF y Atenuador. Use la perilla VOLUME para
cambiar los valores disponibles para cada ajuste.
ALTO: seleccione Encendido o Apagado ÁREA: seleccione Norteamérica o Europa.
para un amplificador de baja frecuencia
BIP: seleccione si el KMC4 responde con bips Zona 2: alterna entre encendido y apagado del control de volumen de la
Zona 2
Z2VOL: cambia el comportamiento del control de volumen de la Zona 2:
Relativo: el volumen de la Zona 2 se bloquea en el volumen principal. Absoluto: el volumen de la Zona 2 se ajusta de manera
independiente del volumen principal
HPF (divisor de frecuencia de paso alto): apagado, 50 Hz, 80 Hz, 120 Hz Atenuador: ajusta el brillo de la pantalla y los botones, 1 a 10

18
RESOLUCIÓN DE PROBLEMAS
Si el KMC4 no funciona, verifique elementos obvios como fusibles fundidos, conexiones de cableado incorrectas o precarias, etc. Si utiliza un
amplificador, verifique si se configuraron incorrectamente los interruptores de frecuencia y controles de ganancias, etc.
¿Sin energía? Presione el botón SOURCE/POWER (Fuente/Encendido) y asegúrese de que el KMC4 esté encendido. Verifique que el cable
de energía de +12 V, el cable a tierra y el/los fusible(s) tengan energía y estén correctamente conectados.
¿Salida baja o sin salida? Compruebe el control de balance en el KMC4. Verifique las conexiones de salida del altavoz. Reinicie el KMC4.
Verifique el volumen de la fuente de audio.
¿Volumen reducido? Revierta la conexión del altavoz de positivo a negativo en el/los canal(es) estéreo; si el volumen mejora, el altavoz estaba fuera de fase.
¿Los botones o el dispositivo no responden? Vuelva a la configuración de fábrica.
Configuración de fábrica: Restablezca el KMC4 a las configuraciones predeterminadas de fábrica manteniendo presionado el botón PLAY/
PAUSE (Reproducir/Pausar) por diez segundos.
¿No se sintonizan estaciones de radio? Verifique el volumen de la fuente de audio. Verifique que la antena esté correctamente conectada y
asegúrese de que la configuración de AREA tenga la región correcta.
Si tiene más preguntas sobre la instalación o el funcionamiento de su nuevo producto KICKER, consulte al distribuidor de KICKER autorizado donde
lo adquirió. Envíe un correo electrónico a support@kicker.com o llame al Servicio Técnico al (405) 624-8583 si tiene preguntas específicas o si no ha
recibido respuestas a sus preguntas.
Configuraciones de audio
Presione el botón MENU (Menú) para comenzar a ver las opciones del menú de configuraciones de audio. Presione el botón MENU (Menú) para
ingresar en las configuraciones de audio. Las opciones disponibles son: Bajo, Agudo, Balance, Atenuador y Ecualizador. Use la perilla VOLUME para
cambiar los valores disponibles para cada ajuste.
Ecualizador: seleccione entre configuraciones del ecualizador. Las opciones son Plano, Clásico, Pop, Rock, Apagado y Personalizado
Cuando selecciona Ecualizador Personalizado, presione el botón MENU (Menú) para introducir los ajustes de frecuencia personalizados para 60 Hz,
250 Hz, 500 Hz, 1 kHz, 3 kHz y 8 kHz.

19
Modèle KMC4
Puissance de sortie à 14,4V, stéréo 2 , < 10% THD+N 38W x 4
Puissance de sortie à 14,4V, stéréo 4 , < 10% THD+N 25W x 4
Réponse en fréquence [Hz] 20 – 20k
Rapport signal sur bruit [dB] 100
Sorties pré-amplifiées Avant, Arrière, Graves, Zone2
Sensibilité d'entrée 500mV
Lecture par liaison USB MP3/WMA/FLAC/AAC/WAV
Recharge par liaison USB CC 5V, 1A
Système de fichiers compatible USB FAT32
Classe IP IP66
Niveau de sortie [V] 4
Dimensions externes [po., cm] 3,5 x 5,5, 8,89 x 13,97
Saillie par rapport à la surface de montage [po., cm] 1-1/8, 2,86
Profondeur totale du montage [po; cm] 4-3/4, 12,07
Diamètre du trou de montage [po; cm] 3, 7,2
Faites attention à ne pas percer des trous à travers le
câblage ou les mécanismes du véhicule. Vous êtes le seul
responsable de l'installation du centre multimédia KMC4.
Consultez les pages2 et 3 pour le patron de découpe du
trou de fixation.
Avant l'installation, vous devriez planifier le placement des
entrées USB et auxiliaire, ainsi que de la télécommande
KRC12, disponible en option (vendue séparément), pour
optimiser la facilité d'emploi et l'esthétique!
Un amplificateur KICKER KXM, une paire de haut-parleurs
KICKER KM et quelques câbles KICKER, et vous disposez
d'une mise à niveau complète du système qui va dominer!
Les amplificateurs et accessoires KICKER permettent
une mise à niveau en un rien de temps. Renseignez-
vous auprès de votre revendeur sur les mises à niveau
d'amplificateurs et de haut-parleurs KICKER pour compléter
votre système!
Tous les chiffres relatifs aux spécifications et aux
performances sont susceptibles de changer. Veuillez
consulter le site www.kicker.com pour obtenir les
informations les plus récentes.
AVERTISSEMENT: Les haut-parleurs KICKER ont la capacité de
produire des niveaux sonores pouvant endommager l'ouïe de façon
irréversible! L'augmentation du volume d'un système jusqu'à un niveau
présentant une distorsion audible endommage davantage l'ouïe que
l'écoute d'un système sans distorsion au même volume. Le seuil de la
douleur est toujours le signe que le niveau sonore est trop élevé et risque
d'endommager l'ouïe de façon irréversible. Réglez le volume en faisant
preuve de bon sens.
Revendeur KICKER agréé:
Date d'achat:
Numéro de série:
CARACTÉRISTIQUES
Other manuals for KMC4
1
Table of contents
Languages:
Other Kicker Car Stereo System manuals