Kinefinity KINERAW S35 User manual

KineRAW-S35
- user manual -
KINERAW S35
DIGITAL CINEMA CAMERA
user manual
WWW.KINEFINITY.TV

INTRODUCING: KINERAW-S35
The KineRAW S35 digital cinema camera is a RAW digital cinema camera with a Super 35mm
sensor. This camera has been designed and developed by Beijing Zhuoyi Technology Co., Ltd. with
all intellectual property rights.
Key features
•Super 35mm CMOS sensor; Recording format DCI 2K or full HD;
•Dual RAW recording: uncompressed CinemaDNG or GoPro Cineform(tm) RAW; simultaneous
recording on 2.5” SSDs enabled;
•Interchangeable lens-mount system;
•Video output 1080p/720p using HDMI and 3G-SDI, compatible with all standardized broadcast
monitoring devices
•Supports 3D-LUT and LOOK files for color management.
Safety instructions
•Please read all points of the user manual carefully and pay attention to all warnings and notifications;
•Don't use the camera near water; avoid contact with any liquids;
•Use dustless dry cloth to clean the camera body;
•Don't cover the vent to avoid over-heating of the camera;
•Don't film directly into the sun;
•The recommended environmental temperature for using the KineRAW S35 is 0-40 degree Celsius;
•Don't use the camera in dusty or humid conditions or during a thunderstorm.
•Attention: the original KineMount is identical with a PL mount. However, for adaptability
reasons it is built very close to the sensor. Do not attempt to mount a lens directly onto the
KineMount. This will cause serious sensor damage. Always attach an adapter first.
•Always press the F3 button before ejecting a SSD card before removing. On the camera display the
corresponding slot will be labeled with “vacancy” when the SSD is ready for removal.
•The logo on the SSD must be on the upper side. Otherwise you will run danger to damage the pol.
•Please don't boot the camera with an USB stick inserted. The system will reset and you'll loose your
customized setting and files.
WWW.KINEFINITY.TV

CONTENT
1. BASIC FEATURES
1.1 Product images and index 1
1.2 Quick start guide 4
1.3 Factory settings 5
2. LIVE VIEW
2.1 Interface and parameters 6
3. BASIC OPERATIONS
3.1 U1: zoom-in 7
3.2 U2: exposure 8
3.3 Histogram 8
3.4 Shooting parameters 8
3.5 F1: recording resolution 9
3.6 U3: zebra 10
3.7 U4: disable status information 11
3.8 EI / ISO settings 12
3.9 Footage information 13
3.10 SSD management 14
4. RECORDING
4.1 Image recording 16
4.2 Sound recording 17
4.3 Timecode 17
4.4 Functions during recording 17
5. PLAYBACK
5.1 Footage playback 18
5.2 Footage management 19
5.3 Other buttons 19
6. AUDIO
6.1 Beeper 20
7. FOOTAGE, WORKFLOW AND POST PRODUCTION
7.1 Footage and workflow 21
7.2 Introduction to file types 22
7.3 Cineform RAW 23
6.4 Cinema DNG 28
8. CONFIGURATIONS
8.1 Categories 30
8.2 Firmware updates 31
8.3 Upload customized LUTs 31
8.4 Core temperature and system 31
WWW.KINEFINITY.TV

9. TROUBLE SHOOTING
9.1 The camera does not boot 33
9.2 The camera does not record after pressing the REC button 32
9.3 Pixel appear in LIVE VIEW MODE or during recording 32
9.4 Pixel appear on the monitoring device 32
9.5 Pixel appear on Cineroid EVF4L electronic viewfinder 33
9.6 Updating firmware has been unsuccessful 33
9.7 Clips cannot be played back from the SSD card 33
10. TECHNICAL SPECIFICATIONS
WWW.KINEFINITY.TV

KineRAW-S35
- user manual -
1. BASIC FEATURES
1.1 Product images and index
Image 1: KineRAW-S35™, left side
1. PL mount fixing ring 9. ISO button – ISO and EI settings 20. WIFI receiver
2. KineMount fixing ring 10. LOOK – Look Up Table management 21. U3 button - enables/disables ZEBRA
3. LOCK button – locks interface 11. LCD display 22. U4 button - displays pure image output
4. LOCK signal light 12. PLAYBACK button – replay clips 23. REC button – starts / stops recording
5. / 19. ¼“- 20 thread 13. SLATE - footage Information 24. U1 button – zoom in
6. SHUTTER button – shutter settings 14. /15. /16. Shortcut Buttons (F1, F2, F3) 25. U2 button – exposure assistant
7. FPS – frame rate setting 17. CONF – configurations menu 26. REC light, tally light
8. TEMP – color temperature setting 18. Selection Wheel
WWW.KINEFINITY.TV
1

KineRAW-S35
- user manual -
Image 2: KineRAW-S35™, back
27. SSD card slot A 33. U6 – exposure assistant 41. 4-Pin XLR – power input
28. SSD card slot B 34. PWR – boot / shut down camera 42. / 43. 3-Pin XLR – audio input (LINE-IN)
29. REC light, tally light 35. TC – time code synchronization port 44. Vent
30. Status signal light 36. SYNC – 3D synchronization port 45. Vent
31. REC button – starts / stops recording 37. / 38. 3G-SDI output 46. Serial number, model information
32. U5 – Zoom in 39. / 40. USB slots (A. / B.)
WWW.KINEFINITY.TV
2

KineRAW-S35
- user manual -
Image 3: KineRAW-S35™, front
47. HDMI pol – video output 49. VF pol – video output
48. MISC pol – electronic iris control 50. Sensor
WWW.KINEFINITY.TV
3

KineRAW-S35
- user manual -
1.2 Quick start guide
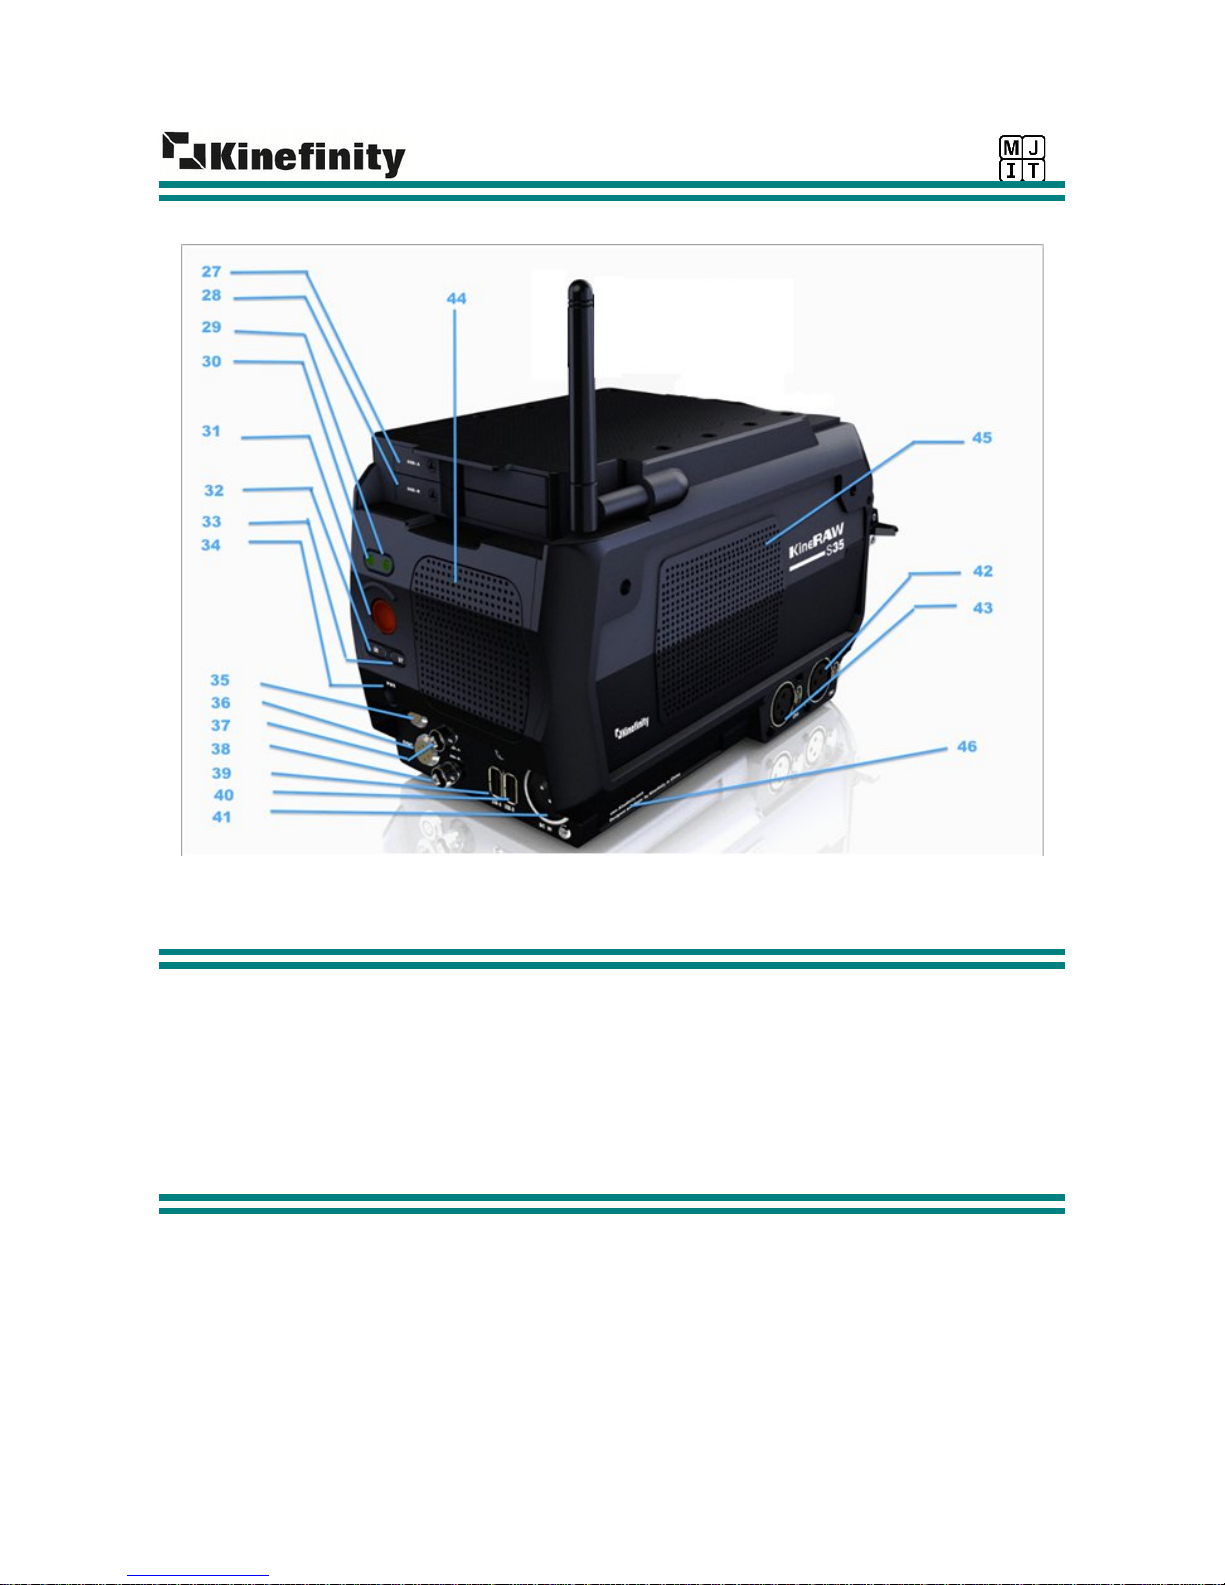
1. To supply the camera with power connect a 14V power source to the power input (image 2, 41)
a) With a 12V outlet the camera can normally not be started.
b) Pay attention on the direction when inserting or ejecting the 4 pin XLR. When the camera is
factory new, the XLR and the outlet might be tight.
2. Mount a suitable adapter on the lens mount. Afterwards mount the lens.
a) Attention: the original KineMount is identical with a PL mount. However, for adaptability
reasons it is built very close to the sensor. Do not attempt to mount a lens directly on the
KineMOUNT. This will cause serious sensor damage. Always attach an adapter first.
b) Please ensure that the slot on the lens adapter and the aligning pin are well aligned. Afterwards
fix the KineMount locking ring to avoid instability.
3. Connect a monitoring device. Devices with SDI signal input must support 3G-SDI.
4. Hold the PWR button (Image 2. 34) for two seconds to power the camera. Hold it until the signal
light blinks (Image 2. 31 LED green signal light) or the KineRAW-S35 logo appears on the display.
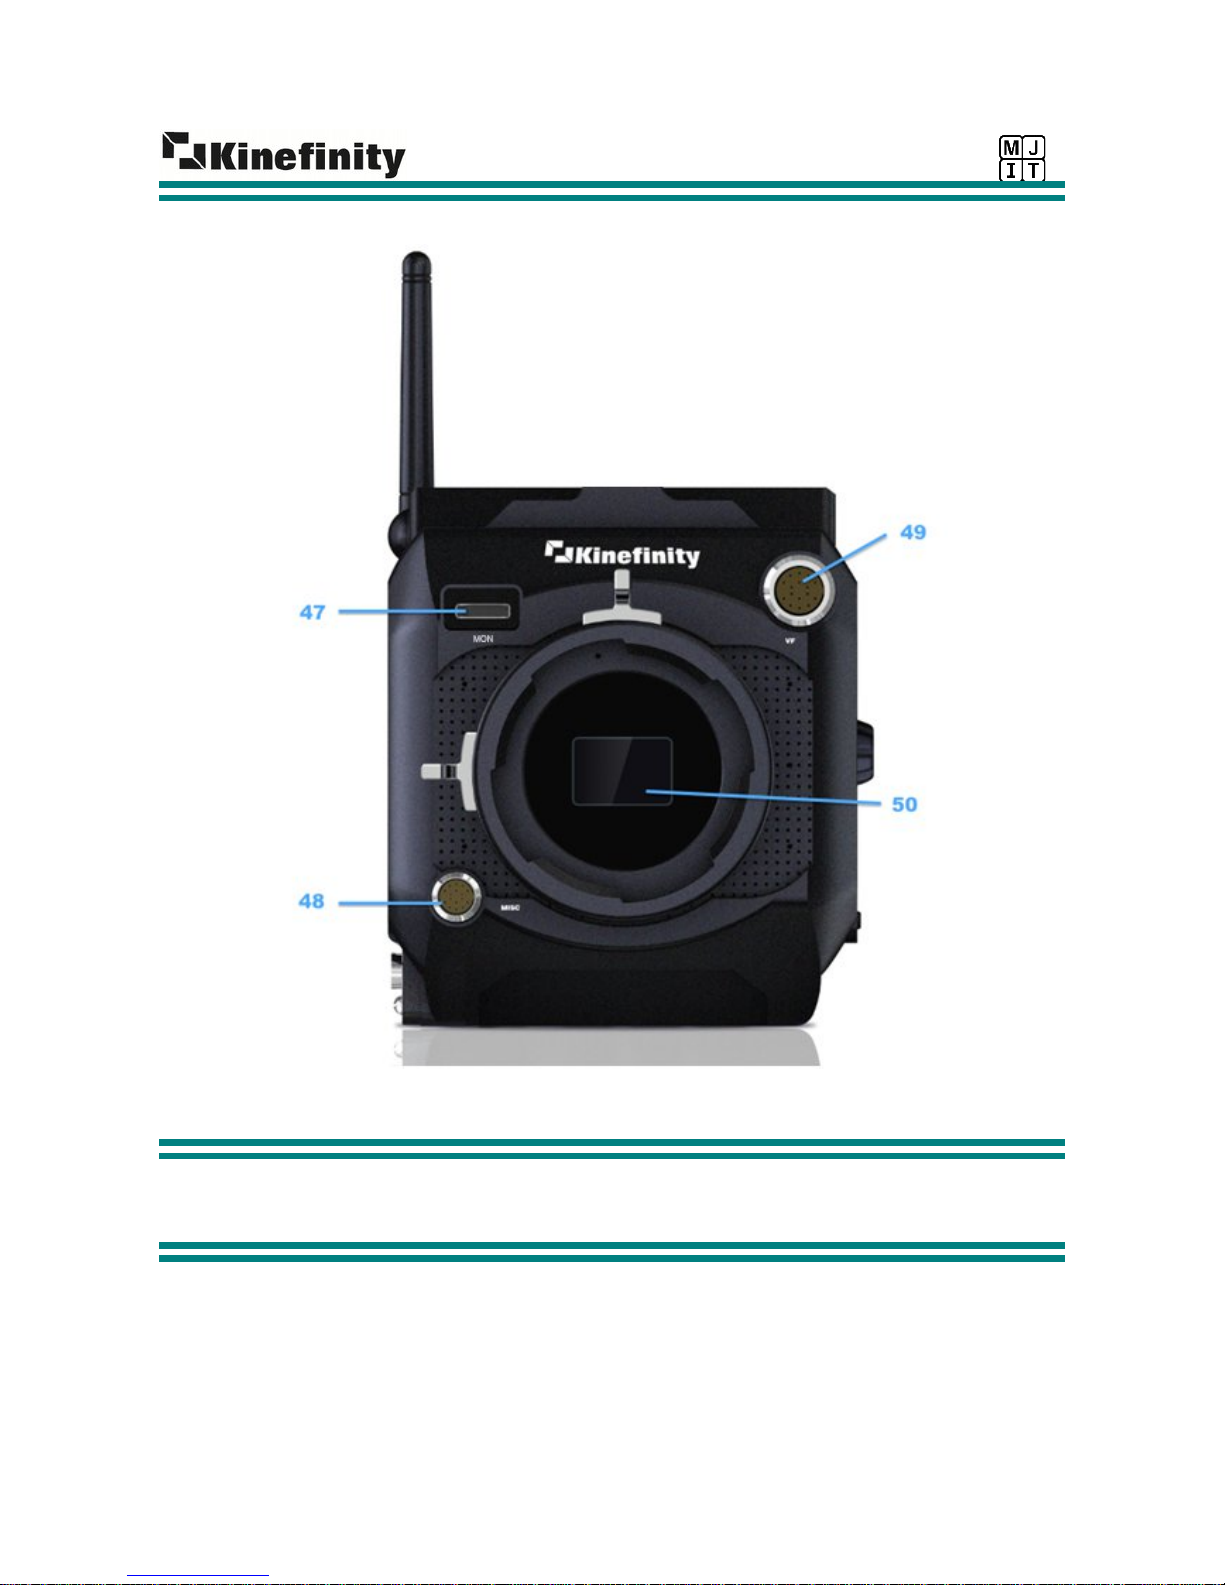
5. After about 20 seconds your monitoring device will display a live view image (Image 4). The signal
light will flash every second.
6. Insert a KineMAG SSD into one of card slots (Image 2. 27 28).
a) Move the silver pin on the SSD slot to open it.
b) The logo of the SSD should face up.
c) The pol is delicate, please be careful when inserting or removing the SSD.
7. Push and release the REC button (Image 1. 23 or Image 2. 31), to start recording. The RECORD
MENU will be displayed. Push the REC button again and the recording will stop.
8. Press the PLAYBACK button (Image 1. 12) to open the PLAYBACK MENU (Image 10). By turning
the SELECTION WHEEL (Image 1. 18) you can select clips and play them back by pressing on the
wheel.
9. Press the F3 button to deactivate a SSD card. This is a mandatory step before ejecting the card.
Using a Firewire or SATA-USB cable you can transfer data to any APPLE MACINTOSH computer.
The KineMAG SSDs are pre-formatted for macintosh. To transfer files to a WINDOWS system it is
necessary to install an emulation software such as “HFSExplorer” or “Macdrive” (available as a
freeware).
10.You'll find your footage in the “SHOTS” folder on your SSD. You can set the file names in camera
before recording. Footage metadata is included in all files.
11.For shutting down the camera press the PWR button. Please wait until the shut-down dialog window
has disappeared before removing the power supply.
a) Attention: Press the PWR button twice and, the camera will shut down immediately.
b) If the camera doesn't react: Press the PWR button for 5 seconds, the camera will shut down
automatically.
WWW.KINEFINITY.TV
4

KineRAW-S35
- user manual -
1.3 Factory setting
•EI/ISO setting: ISO Mode, ISO 800, Highlights: 4.3 stops
•Resolution: 2K mode, 2048x1080
•Frame Rate: 25fps
•Shutter: 1/50s
•Color temperature: 5600K daylight
•LOOK: Kine709
•Recording Format: Cineform RAW
•Display resolution: 720p
•Audio: Capture 15dB, Digital 0dB
WWW.KINEFINITY.TV
5

KineRAW-S35
- user manual -
2. LIVE VIEW
2.1 Interface and parameters
The LIVE VIEW interface appears immediately after booting. It offers support for compositing, framing and
exposure control.
Image 4: Live view interface parameters
1. Display mode - Live view/Playback 7. Current color temperature setting 13. Current clip name
2. Display proportion – 100% / 200% etc.
8. Exposure control mode - EI or ISO 14. Current recording format
3. Current recording resolution 9. Current EI/ISO setting 15. SSD status
4. Current frame rate 10. Highlight and headroom settings 16. Waveform monitor
5. Current shutter setting 11. VU Meter 17. Histogram
6. Current look-up-table 12. Timecode and timecode settings
WWW.KINEFINITY.TV
6

KineRAW-S35
- user manual -
3. BASIC OPERATIONS
It is highly recommended to use the SHORTCUT BUTTONS on the left side and on the back of the camera.
3.1 U1: zoom-in
(Image 1: 24, Image 2: 32)
Pressing the U1 button results in a change of the LIVE VIEW
1. 100% (Pixel to Pixel, 1:1) - The live view displays the exact same resolution as the recording
resolution.
2. 200% - The displayed image will be enlarged by the factor 2.
3. 800% - The displayed image will be enlarged by the factor 8.
PLEASE NOTE
When zoomed-in pixel and color strips will occur on the displayed image.
In ZOOM MODE a green frame will indicate the location on the displayed image. To navigate the displayed
area use the SELECTION WHEEL for horizontal and the F1/F2 buttons for vertical movement.
Image 5: The green frame
WWW.KINEFINITY.TV
7

KineRAW-S35
- user manual -
3.2 U2: exposure
(Image 1: 25, Image 2: 33)
Pressing the U2 Button swops between different tools of exposure control.
3. RAW LUMA HISTOGRAM: displays the RAW exposure (the actual brightness the sensor catches).
4. RAW RGB HISTOGRAM: displays the brightness of the red, green and blue color channel the
sensor catches.
5. POST LUMA HISTOGRAM: displays the RAW exposure considering the selected LUT.
6. POST RGB HISTOGRAM: displays the RGB exposure considering the selected LUT.
7. No exposure control will be displayed
PLEASE NOTE
The waveform always displays information according to the selected histogram mode. When POST LUMA
HISTOGRAM is selected, the waveform will also display the RAW exposure information considering the
current LUT.
3.3 Histogram
(Image 4 / LIVE VIEW: 17)
The histogram displays two lines: grey and white.
3. Grey line: under current settings the histogram peak will appear on the grey line if an 18% grey card
is filmed.
4. White line: under current settings the histogram peak will appear on the white line if an 90% white
card is filmed.
WWW.KINEFINITY.TV
8

KineRAW-S35
- user manual -
3.4 Shooting parameters
In LIVE VIEW mode you can use the buttons on the left side to set various shooting parameters.
Image 6: Shortcuts and the selection wheel
Press the SHORTCUT BUTTONS on the left side of the camera and the respective options will
appear on the display. Turn the SELECTION WHEEL to toggle through the options. Press the
selection wheel to confirm your choice.
1) SHUTTER: You can either set the shutter speed or the shutter angle in this menu. The default setting
is 1/50s and 180 degree for 25fps. Which parameter you can change depends on your settings in
LIVE VIEW > EXPOSURE.
2) FPS: Set the desired frame rate. Depending on the recording resolution different frame rates will be
available.
3) ISO: Change the ISO setting – considering your current LOOK and color temperature settings.
4) TEMP: Set the color temperature from 2000K to 7000K in 50K steps. You may also customize your
white balance.
5) LOOK: Choose a look up table. In our default setting the user can choose between: KineLOG,
Kine709 and KineCOLOR.
a) KineLOG equals a LOG C algorithm. When choosing KineLOG you'll see the widest
movement range on the display. However, the video output of the KineRAW S35 is 8bit.
Thus, it is impossible to display a 12 bit movement range.
b) KineCOLOR maintains more highlight and shadow details compared to KINE 709. It can be
used directly as a starting point for your color matching during post production.
c) Kine709 corresponds with REC 709 and, thus, coincides with ITU broadcasting standards.
The color range of REC709 fits the output range of any HDTV.
PLEASE NOTE: When recording in CineformRAW. LOG C will always be employed, regardless of your
LOOK settings.
WWW.KINEFINITY.TV
9

KineRAW-S35
- user manual -
3.5 F1: recording resolution
a) Maximum resolution is 2K (2048 x 1152)
b) There are two options for 1280x720: “1280x720” and “1280x720C”.
a. When shooting in “1280x720” only 2/3 of the sensor are used. The image quality is identical
with recordings in 2K but you'll only record 2/3 of the image area. The maximum frame rate
in this mode is 50 fps.
b. When shooting in “1280x720C” you'll record the full frame but the image quality suffers
minimal (moiré might occur). Maximum frame rate in this mode is 100 fps.
3.6 U3: zebra
Pressing the U3 BUTTON will indicate overexposed areas or areas close to overexposure. ZEBRA
lines will appear on the display. By default the zebra threshold is set to 90% - zebra appears in all
areas with brightness equal or higher than 90%. The threshold is customizable in the “LIVE VIEW”
menu. Also the color of the ZEBRA indicator can be varied here.
PLEASE NOTE:
The zebra display always refers to RAW information – regardless of your LUT settings. When Zebra appears
with the default settings of 90% the exposure is close to clipping. No information will be recorded in clipped
areas.
WWW.KINEFINITY.TV
10

KineRAW-S35
- user manual -
3.7 U4: disable status information
Use U4 to enable or disable all status information on the LIVE VIEW display.
WWW.KINEFINITY.TV
11

KineRAW-S35
- user manual -
3.8 EI / ISO settings
In LIVE VIEW the current EI/ISO settings are displayed on the top-right above the main menu.
In nature light appears in all different wavelength and intensities. No camera chip can catch all
available light information. In the EI/ISO settings you can set the sensor's light sensitivity according
to your shooting environment. There are two different modes.
•EI Mode
With the EI Mode you will solely utilize the camera's dynamic range without affecting the sensor
sensitivity. The ISO remains constant at the recommended level of 800 whereas the dynamic range
is shifted towards a lower or a higher exposure. That way the camera's light sensitivity can be
increased while keeping the noise level as low as possible. If you are familiar with other cinema
cameras you will recognize this feature and appreciate it in any controlled light situation.
•ISO Mode:
The ISO mode is probably the most common way of in-camera exposure control. The higher the ISO
setting, the higher is the sensor's light sensitivity. In ambient light situations increasing the ISO will be
inevitable.
Default settings:
a) ISO: 800
b) Highlight: 4.3 stops (level between 18% grey and ADC Clip)
c) Headroom: 2 stops (level between 90% with andADC Clip)
PLEASE NOTE:
As with every camera the noise level will raise and highlight details will vanish with higher ISO
settings.
•Headroom and highlights in ISO mode
In the “CONFIGURATIONS>SHOOTING” menu you can manually set the headroom and highlights
when shooting in ISO mode.
a) Set the Highlights from 3.3 stops to 6.3 stops
b) Set Headroom from 1 stop to 4.3 stops
c) Your choice of highlight and headroom affects your possible ISO choice. When your
highlights are set to 4.3 the lowest available ISO setting is 320 ISO. The lowest available
ISO setting is indicated with an exclamation mark next to the number in the menu.
d) When increasing the headroom / highlight value with a constant ISO setting, the sensor's
sensitivity will decrease.
e) Set the highlights at >2 to maintain highlight details
WWW.KINEFINITY.TV
12

KineRAW-S35
- user manual -
3.9 Footage information
Press the SLATE-BUTTON to display the current footage information. To edit the information press
the F1/F2 button.
Image 7: Footage information
WWW.KINEFINITY.TV
13

KineRAW-S35
- user manual -
3.10 SSD management
In LIVE VIEW you'll see the current SSD status (See image 4, point 15).
1. GREEN: Active SSD slot. Footage will be saved here.
2. YELLOW: Inactive SSD slot.A card is inserted and the slot could be activated.
3. GREY: No SSD card is inserted.
4. The number at the bottom indicates the memory space availability on the active card. “4/60GB”
stands for 4GB available space on a card with 60GB capacity. When the available space is less
than 10% of the capacity, the status is indicated in red and the card should be replaced.
PLEASE NOTE:
When no card slot is selected, no footage will be recorded when pressing the REC button. The
camera won't give any notification in this case. When less than 1% of the SSD's capacity is available
recording will terminate automatically.
WWW.KINEFINITY.TV
14

KineRAW-S35
- user manual -
Tomanage SSDs press the F3 button.
Image 8: SSD Management
It shows the current condition and the capacity of the SSD. There are 3 operations for each SSD:
1) Activate: When there is only one SSD inserted it will be actived automatically. Now the status
"in use" will be shown in the main menu.
2) Deactivate: Deactivate the active SSD. There'll be a notification in the display when the
deactivation was successful. Please do not remove an SSD before this notification has been
displayed. Otherwise you will risk data loss or damage.
3) Format: All files will be deleted and the file format will be reconstructed. You can only format a
deactivated SSD.
PLEASE NOTE
It is recommended to use Kinefinity KineMAG SSD Cards. Third-party SSD cards are not optimized
for working with the KineRAW S35. Performance and quality cannot be guaranteed.
WWW.KINEFINITY.TV
15

KineRAW-S35
- user manual -
4. RECORDING
4.1Image recording
Before starting to record, please make sure to have a KineMAG SSD card inserted and activated.
Please read section 2.4 for more information on SSD management.
Press the red REC BUTTON to start recording. A SIGNAL NOISE (1KHz) will indicate the start of the
recording. Pressing the REC button a second time will terminate the recording. Again, a signal noise
will indicate the end (2KHz). Recording in process is also indicated by two red TALLY LIGHTS (see
image 1: point 26 or image 2: point 29).
WWW.KINEFINITY.TV
16
Table of contents