King Canada POWER FORCE K-X7500 User manual

INSTRUCTION ANUAL
COPYRIGHT © 2019 ALL RIGHTS RESERVED BY KING CANADA TOOLS INC.
ODEL: K-X7500
GENE ATO HOME CONNECTION KIT

WARRANTY INFOR ATION
1-YEA
LI ITED WARRANTY
FOR THIS HO E CONNECTION KIT
KING CANADA TOOLS
OFFERS A 1-YEAR LI ITED WARANTY
FOR NON CO ERCIAL USE.
P OOF OF PU CHASE
Please keep your dated proof of purchase for warranty and servicing purposes.
LIMITED TOOL WA ANTY
King Canada makes every effort to ensure that this product meets high quality and
durability standards. King Canada warrants to the original retail consumer a 1-year
limited warranty as of the date the product was purchased at retail and that each
product is free from defects in materials. Warranty does not apply to defects due
directly or indirectly to misuse, abuse, normal wear and tear, negligence or
accidents, repairs done by an unauthorized service center, alterations and lack of
maintenance. King Canada shall in no event be liable for death, injuries to persons
or property or for incidental, special or consequential damages arising from the use
of our products.
To take advantage of this limited warranty, return the product at your expense
together with your dated proof of purchase to an authorized King Canada service
center. Contact your retailer or visit our web site at www.kingcanada.com for an
updated listing of our authorized service centers. In cooperation with our authorized
serviced center, King Canada will either repair or replace the product if any part or
parts covered under this warranty which examination proves to be defective in
workmanship or material during the warranty period.
NOTE TO USE
This instruction manual is meant to serve as a guide only. Specifications and
references are subject to change without prior notice.
KING CANADA INC. DO VAL, QUÉBEC, CANADA H9P 2Y4
www.kingcanada.com

SPECIFIC ULES FO SAFE OPE ATION
1) WARNING! RISK OF ELECTRIC SHOCK. Do not start the generator until the cord is
connected to the inlet and the generator. Any terminal may be energized when the cord
is connected. Shut down the generator prior to disconnecting the cord from this inlet and
the generator.
2) THE OUTDOOR POWER INLET BOX IS TO BE USED AS A POWER INLET ONLY,
NOT FOR USE AS AN OUTLET. NOT FOR INDOOR USE.
3) Only use for connecting a portable generator to the source terminals of the transfer
switch, so the inlet is only energized from the generator.
4) ount outdoor power inlet box 24” above grade (24” from the ground).
5) USE COPPER WIRE ONLY.
6) Use 1/2” or 3/4” conduit only.
7) Only plug one appliance per receptacle. Never use an extension cord or multi-plug
adaptors to get more appliances connected to the indoor outlet panel.
SPECIFIC
SAFETY INSTRUCTIONS
GETTING TO KNOW YOUR
GENERATOR HO E CONNECTION KIT
ITEMS INCLUDED IN THIS KIT
1) Outdoor power inlet box with 30 Amp. NE A
L14-30P 4 prong plug (underneath)
2) Indoor power outlet panel with
6 NE A 5-15R receptacles
3) 1-1/4” wide spade bit
4) 1/2” ridgid PVC conduit
5) 2 x insulating gaskets
6) Hardware for mounting
outdoor power inlet box
to outside of home
7) Hardware for mounting
indoor power outlet panel
to inside wall in home
8) 1/2” PVC sleeve
connector

INTRODUCTION &
INSTALLATION CONSIDERATIONS
INT ODUCTION
If you experience a power failure, this Generator Home Connection Kit will allow you to run
a portable generator safely OUTDOORS, to keep dangerous exhaust fumes out of your
home, and conveniently connect appliances INDOORS.
This kit transfers the 15 Amp. outlets on your portable generator indoors, to power lights,
refrigerator, freezer, microwave, sump pump and other appliances. The indoor power
outlet panel comes with LED indicators lights when the generator is connected and is
running outdoors, offering some light to see what you are doing.
NOT INCLUDED
It is important to note that a portable generator and a 30 Amp. 125/250VAC L14-30
generator cord are not included, and must be purchased.
INSTALLATION CONSIDE ATIONS- LOCATION
BEFORE INSTALLATION. We recommended that you check if a permit is required for this
type of installation.
LOCATION- INSIDE
Choose a convenient location for the indoor power panel, we recommended that the
location be 19”-20” from the floor. Installation should be between wall studs, make sure to
avoid all electrical outlet wiring or water pipes. Once you have chosen a convenient
location, measure and mark the spot. This mark will become the centre position of the
indoor power panel.
LOCATION- OUTSIDE
Try to figure out the location on your outside wall directly opposite the location of the indoor
power panel. ake sure that location doesn’t interfere with outside cabling, pipes, bushes,
etc.

INSTALLATION
INSTALLATION
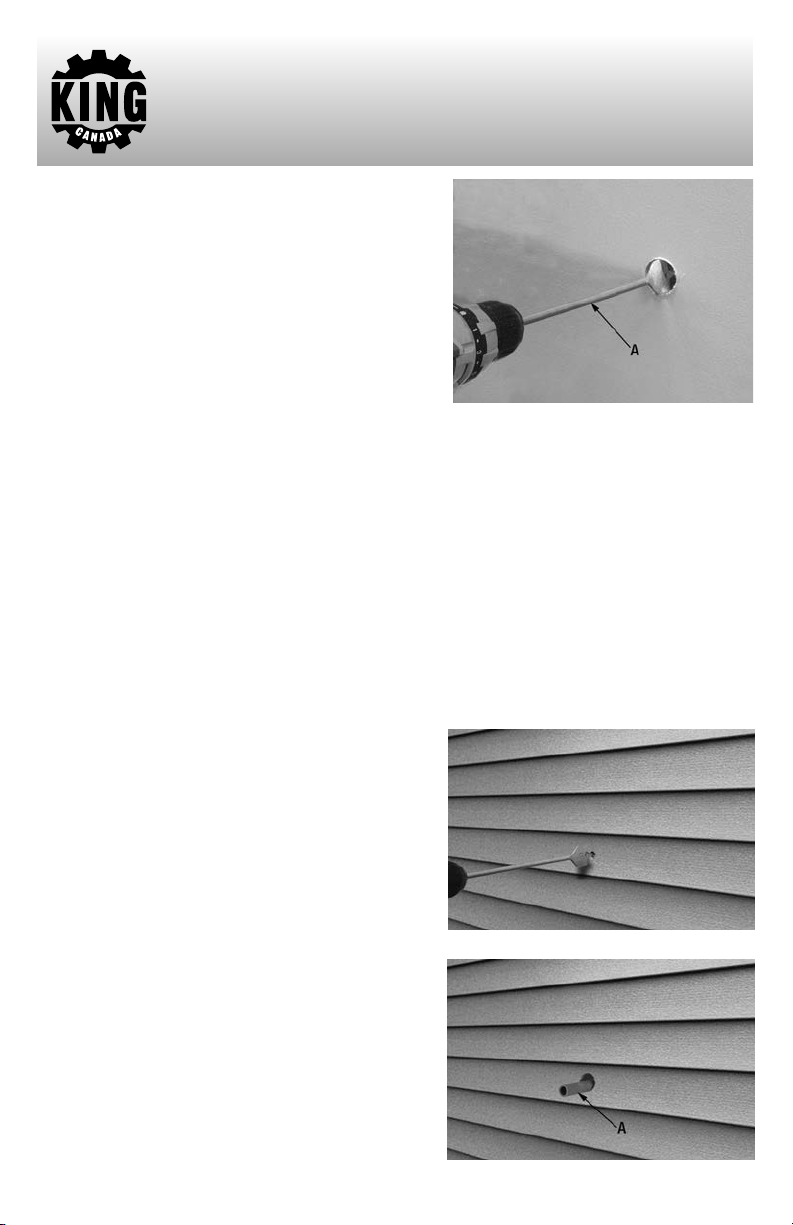
D ILLING TH OUGH THE WALL- INDOO S
NOTE: A 1-1/4” spade bit (A) Fig.1 is supplied with
this kit. It is used to drill through drywall, wood
paneling, plywood, wood studs, insulation panels,
outside wood, vinyl, aluminum, hardy plank, and all
other non-masonry materials. If drilling masonry
materials such as brick, concrete block or poured
cement is needed, it is recommend to use a 1-1/4”
masonry drill bit (not included).
1. On the inside wall, with the 1-1/4” spade bit (A) Fig.1 installed in a power drill, centre the
tip of the spade bit with your pencil mark, slowly drill through your drywall or paneling.
THEN STOP.
2. Before drilling further, remove the spade bit and inspect the interior of the wall for any
electrical wiring, water pipes, etc. If everything looks clear, continue drilling at full speed.
3. Once the spade bit reaches the wall insulation, reduce forward pressure to make sure
the spade bit cuts through the insulation without snagging.
4. Once the spade bit reaches the outside wall, apply pressure until only the tip of the
spade bit comes through the outside wall. A person outside to tell you once the spade
bit comes through the outside wall can be
helpful.
5. Stop drilling and slowly back the spade bit out of
the inside wall.
D ILLING TH OUGH THE WALL- OUTDOO S
1. From the outside wall of the house, using the
same 1-1/4” spade bit, slowly drill until you have
a clean 1-1/4” hole. See Fig.2.
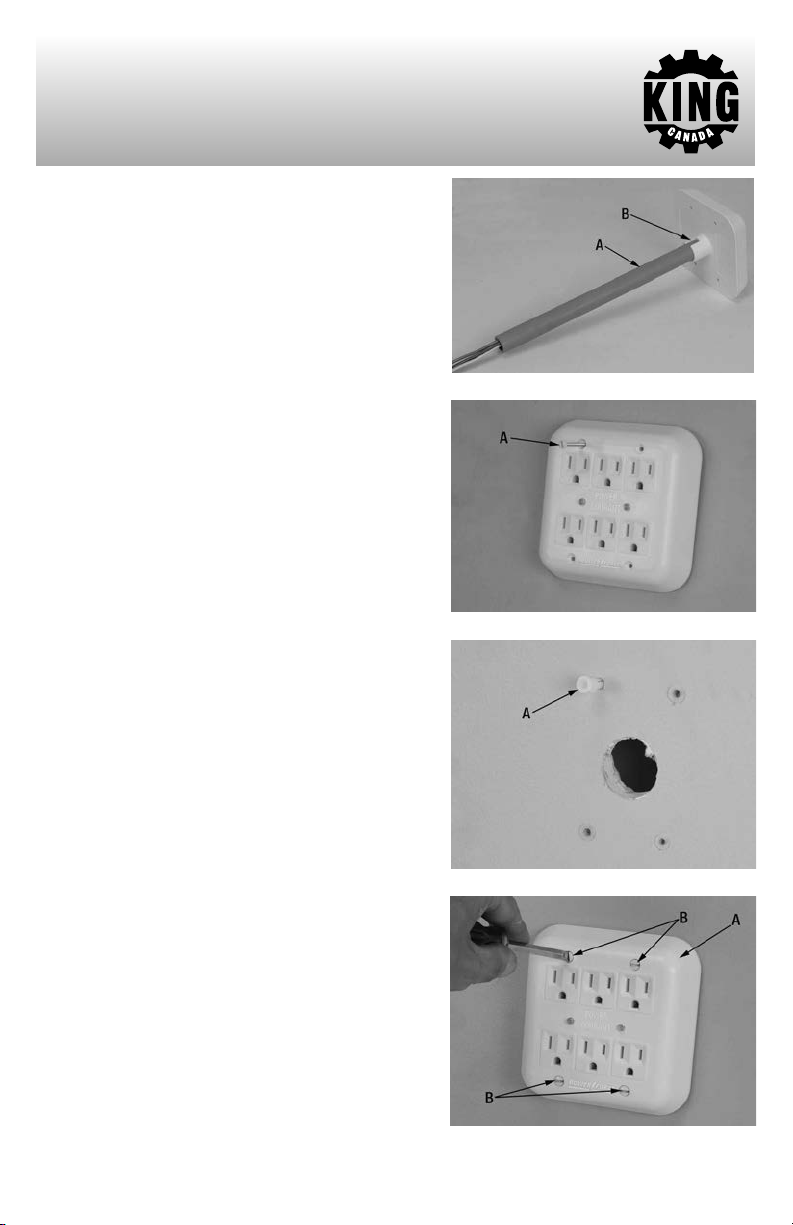
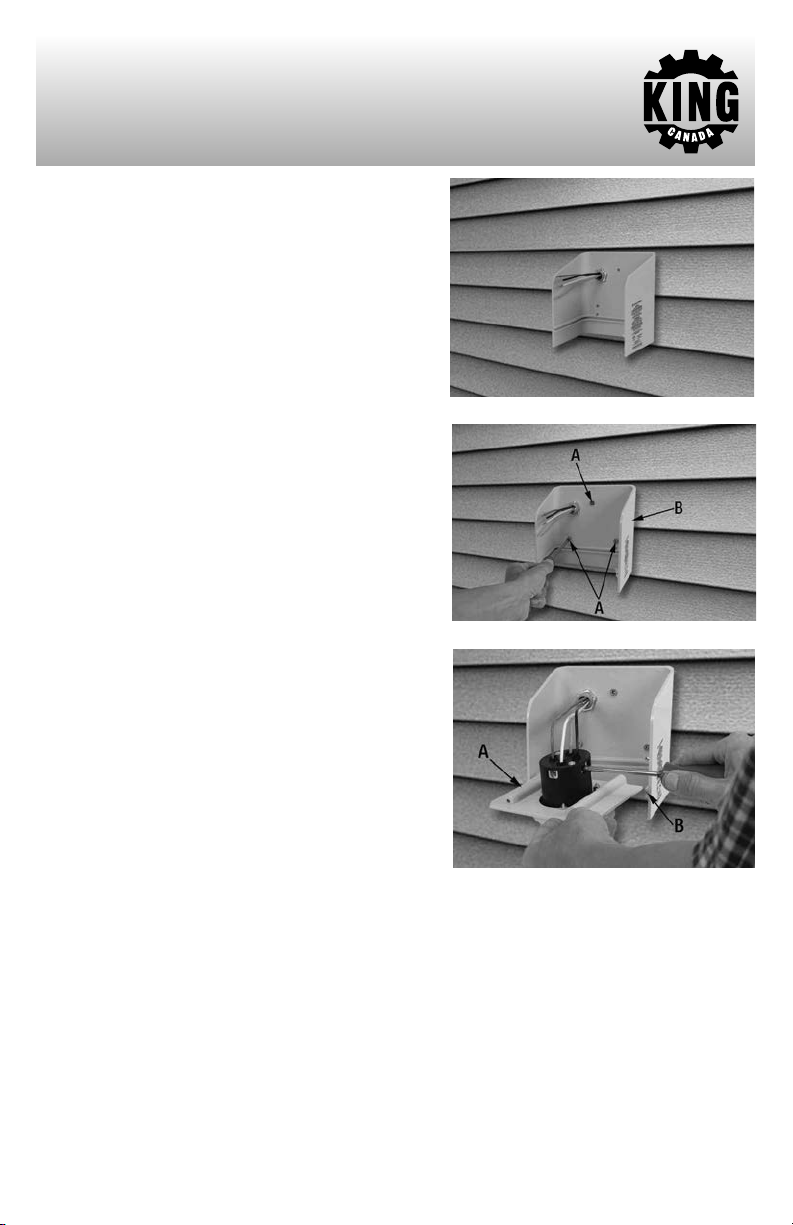
INSTALLING 1/2” PVC CONDUIT
1. Insert the 1/2” PVC conduit (A) Fig.3 into the
hole you drilled in the inside wall, until it comes
out the outside wall, as shown.
FIGU E 1
FIGU E 2
FIGU E 3

INSTALLATION
INSTALLATION
CUTTING CONDUIT AND INSTALLING WALL
ANCHO S
1. Remove PVC conduit from the hole in the wall.
2. Straighten and then insert the 4 wires at the rear
of the 6 outlet power panel through the PVC
conduit.
3. Secure the end of the PVC conduit (A) Fig.4
tightly into the cradle (B) at the rear of the 6
outlet power panel, see Fig.4.
4. Insert the PVC conduit and the outlet power
panel assembly back through the hole in the
wall.
5. With one person holding the outlet power panel
assembly indoors tightly against the wall with
the rear cradle (B) Fig.4 positioned inside the
1-1/4” hole in the wall, go outside and mark the
conduit with a pencil 1/8” from the edge of the
outside wall.
6. Remove the PVC conduit and the outlet power
panel assembly. Pull wires out of the conduit,
then cut the conduit on your pencil mark. Once
cut, reassemble the conduit to the cradle at the
rear of the outlet power panel, and reinsert
assembly into the hole in the wall.
7. With the outlet power panel assembly indoors
tightly against the wall with the rear cradle (B)
Fig.4 positioned inside the 1-1/4” hole in the
wall, insert a whitehead mounting screw (A)
Fig.5 into each of the four mounting holes in the
outlet power panel. Tap it lightly in each hole
with sufficient pressure to leave a mark on the
wall.
8. Remove the outlet power panel and PVC conduit
assembly from the wall.
9. Drill a 1/4” hole at each screw mark.
10. Insert one white wall anchor (A) Fig.6 into each
hole and tap them into the wall as shown.
11. Using a flat head screwdriver, secure the outlet
power panel (A) Fig.7 to the wall using 4
whitehead mounting screws (B).
FIGU E 4
FIGU E 5
FIGU E 6
FIGU E 7

INSTALLATION
INSTALLATION
INSTALLING PVC SLEEVE CONNECTO TO
GENE ATO POWE INLET BOX
1. Remove the power inlet box cover (A) Fig.8 by
removing the two front screws (B). Slide the
cover off by sliding it upwards.
2. Slide the NE A plug assembly (A) Fig.9 out of
the power inlet box as shown.
3. Locate the round knock-out cover (B) Fig.9 and
push it out to remove it. Install the plastic
washer (C) in its place.
4. Locate the 1/2” PVC sleeve connector (D) Fig.9,
disassemble the locking ring (E) as shown.
5. Insert the 1/2” PVC sleeve connector (A) Fig.10
through the rear hole in the power inlet box,
secure the connector with the locking ring (B)
removed previously. Use pliers to properly
secure locking ring.
INSTALLING GENE ATO power inlet box TO
PVC CONDUIT
1. Install insulating gasket (A) Fig.11 over the rear
of the sleeve connector, as shown.
Note: Outside walls can come in different styles
and configurations, if the power inlet box doesn’t fit
perfectly up against the wall, use the second
insulating gasket to increase waterproofing.
FIGU E 8
FIGU E 9
FIGU E 10
FIGU E 11

INSTALLATION
INSTALLING GENE ATO power inlet box TO
PVC CONDUIT continued...
2. Insert the 4 wires from the outlet power panel
through the PVC sleeve connector.
3. Insert the PVC conduit into the PVC sleeve
connector at the back of the power inlet box.
See Fig.12.
INSTALLING GENE ATO power inlet box
TO OUTSIDEWALL
1. Using the 3 supplied screws (A) Fig.13, secure
power inlet box (B) to the outside wall by placing
3 screws into the 3 mounting holes. Do not
overtighten so much that it distorts the box.
2. ake sure the insulation gasket(s) (A) Fig.11 is
compressed enough to ensure waterproofing.
CONNECTING WI ES TO NEMA L14-30 PLUG
1. While holding the NE A plug assembly (A)
Fig. 14, insert the 4 wires into the corresponding
screw holes.
Green wire = hole marked “G”
White wire = hole marked “W”
Red wire = hole marked “Y”
Black wire = hole marked “X”
2. ake sure the wires are pushed in completely,
then tighten the screws on the side of the Nema
plug.
3. Slide the NE A plug assembly (A) Fig. 14 back into its track (B).
4. Tuck wires and reinstall the power inlet box cover (A) Fig.8 using the two screws
removed previously.
FIGU E 12
FIGU E 13
FIGU E 14

OPERATION
USING YOU GENE ATO HOME CONNECTION KIT DU ING A POWE FAILU E
1. Connect a generator power cord (NE A L14-30/ 10 AWG, 30 Amp.- Not included) to
your generator.
2. Connect the other end of the generator power cord to the NE A L14-30 plug
underneath the power inlet box installed on the outside of your home.
3. Start the generator. Now the LED lights of the outlet power panel inside your home
should be on indicating that the panel is energized.
Operational guideline
• Never connect more than one appliance per receptacle.
• Never use multi-outlet extension cords.
• Alternate plugging in your heaviest appliance loads between the top three outlets and the
bottom three outlets.
Table of contents
Popular Cables And Connectors manuals by other brands

Staubli
Staubli CombiTac MA213-03 Assembly instructions

Signat
Signat Platinum S104105 Brochure & specs

BriskHeat
BriskHeat PTBO-GET instruction manual

Leviton
Leviton 48642 installation instructions

Philips
Philips M1500A Cleaning, disinfection & sterilization guide

JBM electronics
JBM electronics C20 through C21 user manual