King-Griller 16619 User manual

OM16619A.1 ™ & © Char-Griller / A&J Mfg.
Kamado Kooker™
Model #16619
Keep your receipt with this manual for Warranty.

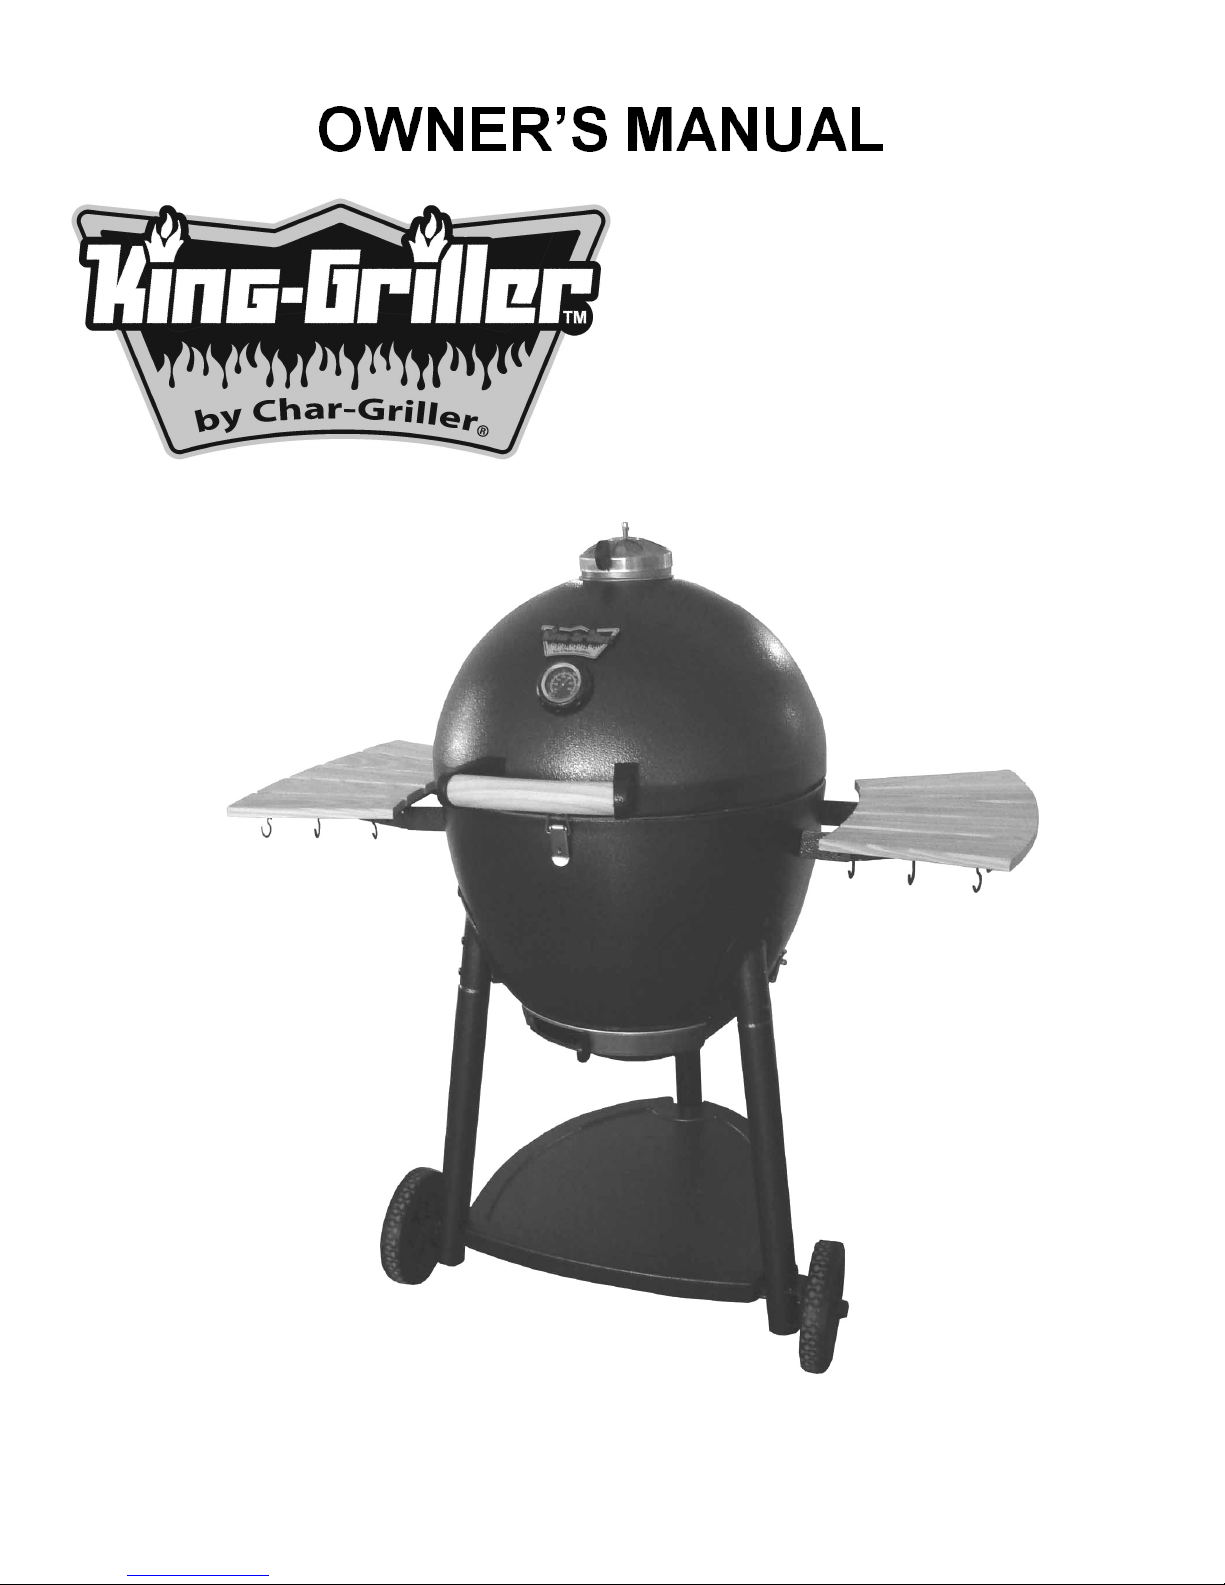
OM16619A.1 ™ & © Char-Griller / A&J Mfg. 2
IMPORTANT SAFETY WARNINGS
READ ALL SAFETY WARNINGS AND INSTRUCTIONS CAREFULLY
BEFORE ASSEMBLING AND OPERATING YOUR GRILL
Use caution when assembling and operating your grill to avoid scrapes or cuts from sharp edges.
Do not use gasoline, kerosene or alcohol for lighting charcoal. Use of any of these or similar products
could cause an explosion possibly leading to severe bodily injury.
Do not used lighter fluid on already lit coals.
Keep children & pets away from grill. Supervision is necessary and do not leave grill unattended when
in use. Use caution when moving grill to prevent strains. Keep grill at least 15 feet from any combusti-
ble material (decks, buildings, fences, trees, bushes, etc).
When adding charcoal and/or wood, use extreme caution.
Never move grill when it is in use or when it contains hot coals or ashes, keep the grill in a level posi-
tion at all times while in use. ALWAYS latch lid when lid is in closed position.
Do not place grill near flammable liquids, gases or where flammable vapors may be present.
When opening grill, first open slightly to let a small amount of air in for a few seconds. This prevents
large amounts of oxygen from getting to suffocated coals which may cause dangerous flash back.
Use caution since flames can flare-up when fresh air suddenly comes in contact with fire. When open-
ing the lid, keep hands, face and body safe from hot steam and flame flare-ups.
Removing excess fat before cooking will help prevent flare-ups.
Keep your grill clean to help prevent flare-ups.
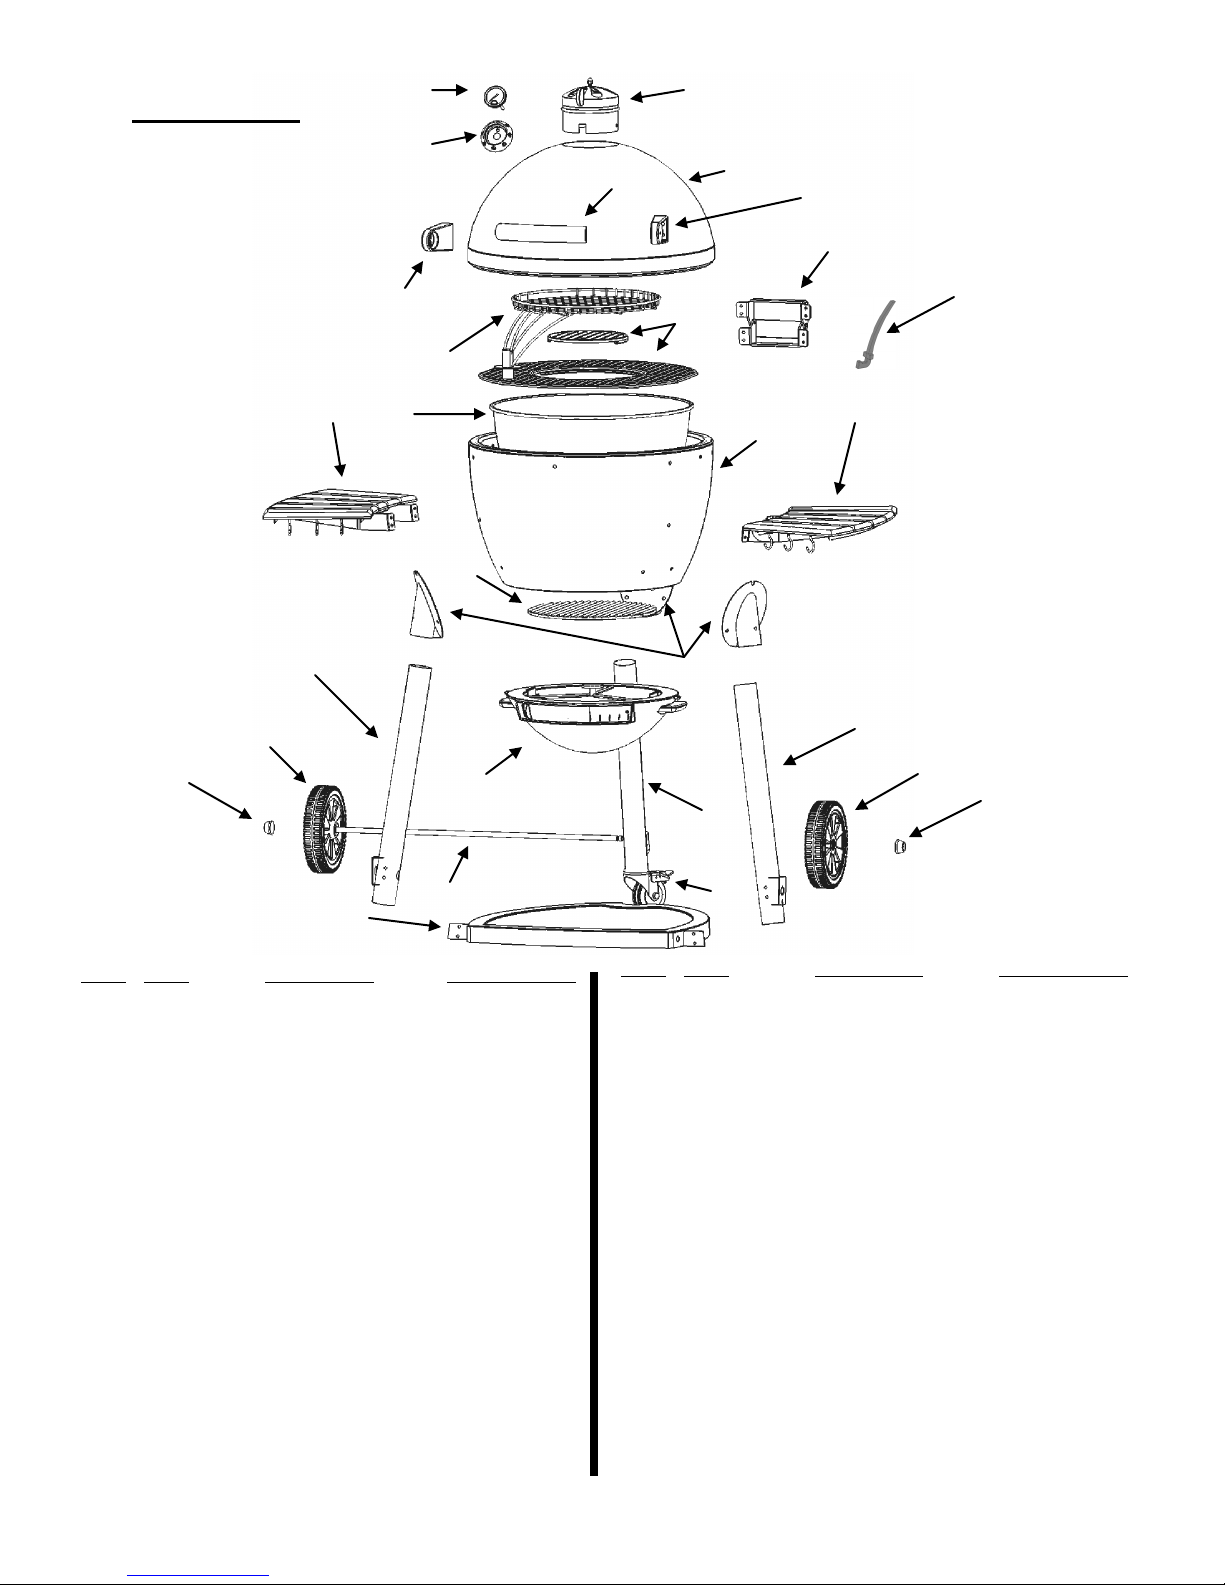
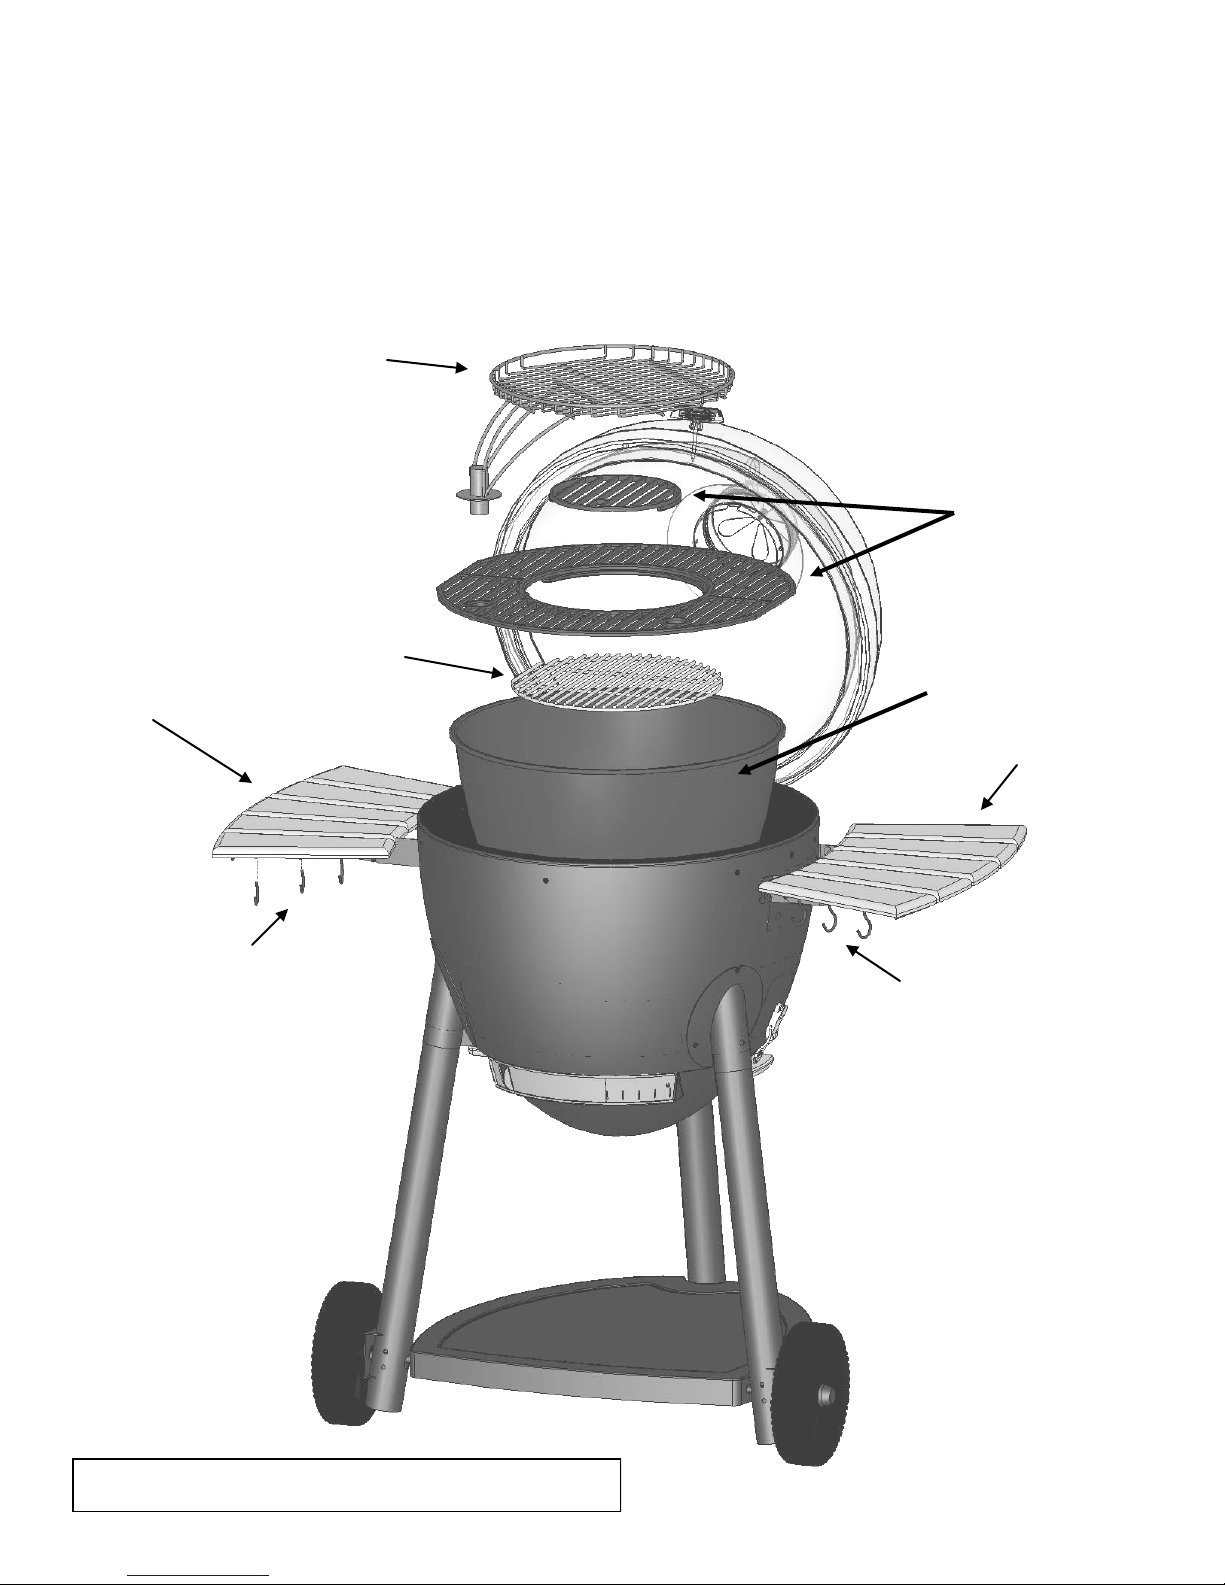
Always put charcoal on top of the fire grate and not directly into the bottom of the grill.
Do not exceed a temperature of 800˚F. Do not allow charcoal and/or wood to rest on the walls of
grill. Doing so will greatly reduce the life of the grill
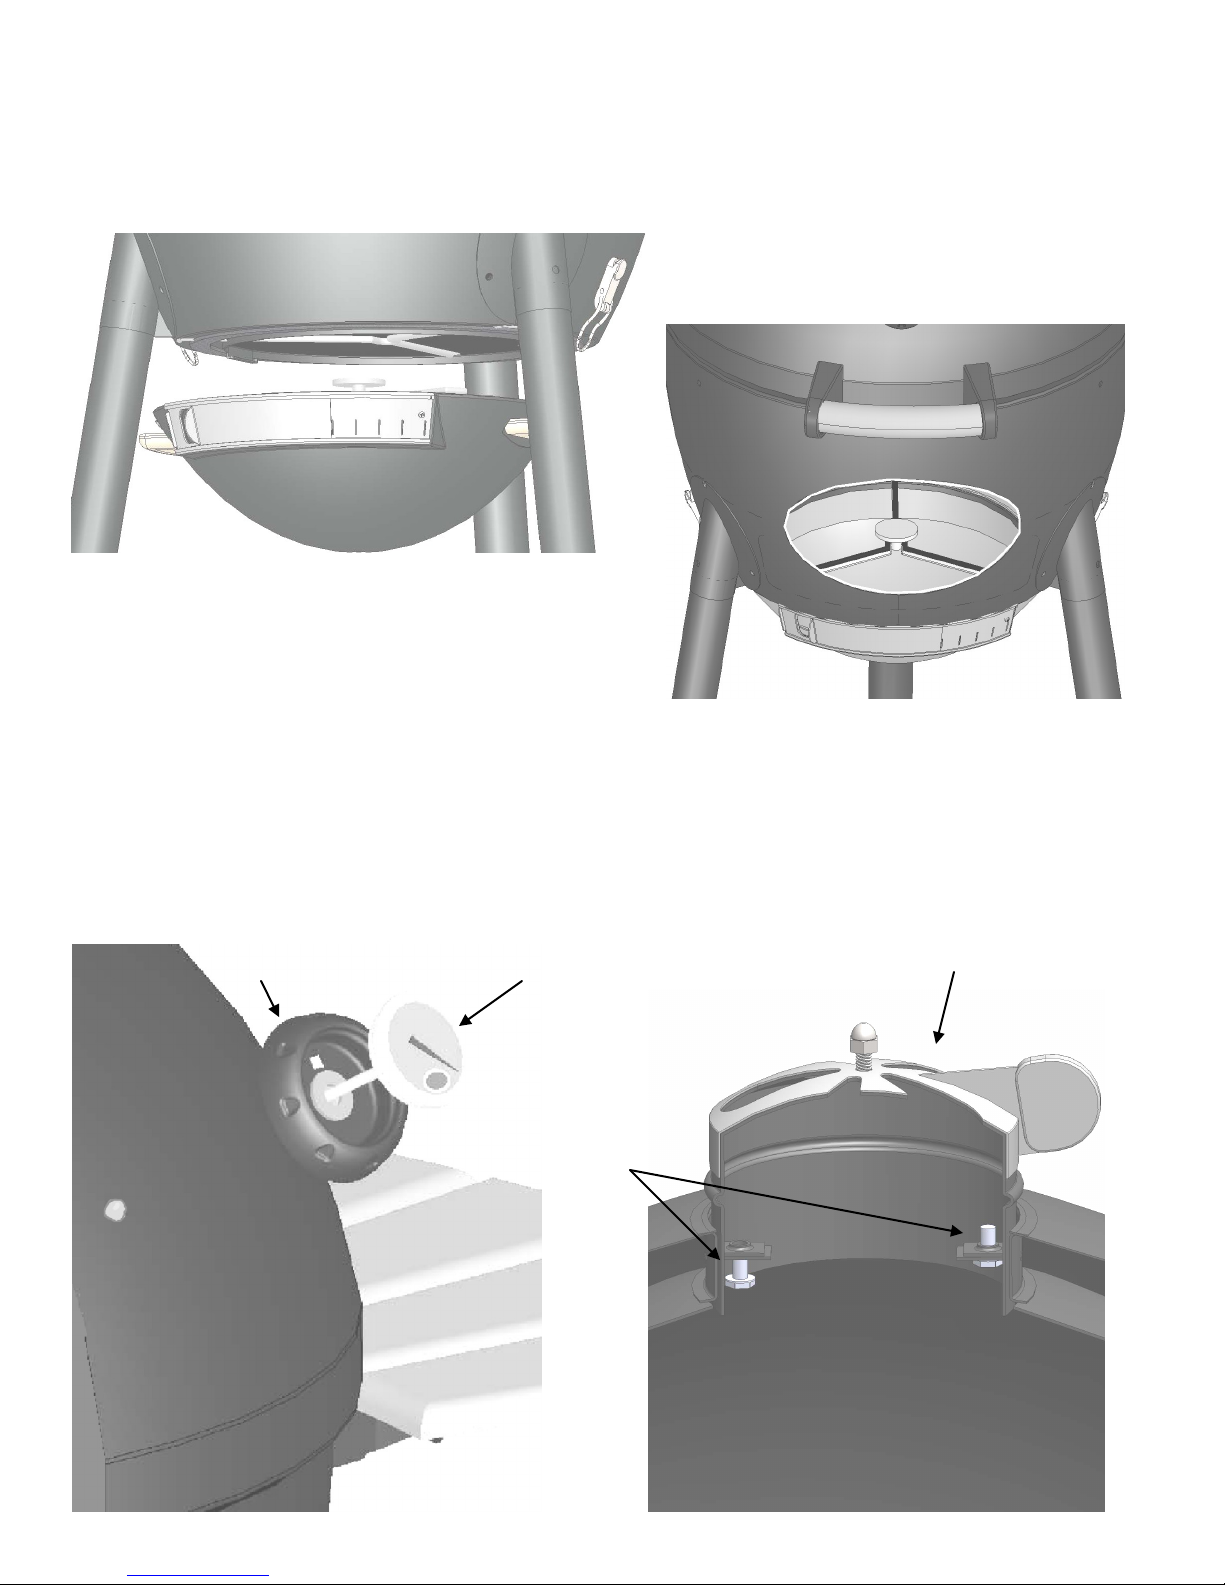
Always wear oven mitts to protect hands from burns, especially when adjusting dampers. Avoid touch-
ing hot surfaces.
When opening lid, make sure it is pushed all the way back so it rests against the lid support bracket.
Use extreme caution as hood could fall back to a closed position and cause bodily injury.
Close lid and all dampers to help suffocate flame.
Always hold an open lid from the handle to prevent it from closing unexpectedly.
Never leave coals and ashes unattended. Before grill can be left unattended, coals and ashes must
be removed. Use caution to protect yourself and property. Carefully place remaining coals and ashes
in a noncombustible metal container and saturate completely with water. Allow coals and water to re-
main in metal container 24 hours prior to disposing.
To protect against bacteria that could cause illness, keep all meats refrigerated and thaw in refrigera-
tor or microwave; keep raw meats separate from other foods; wash everything that contacts raw
meats; cook thoroughly; and refrigerate leftovers immediately. Cook meats medium to well done.

OM16619A.1 ™ & © Char-Griller / A&J Mfg. 3
Page intentionally left blank for notes

OM16619A.1 ™ & © Char-Griller / A&J Mfg. 4
Item QTY. Part Name Part Number
13 1 WARMING RACK 20-0041
14 1 GRATE LIFTER 10-0045
15 1 FIRE GRATE 20-0042
16 1 FIRE BOWL 10-0046
17 1 ASH PAN 30-0028
18 3 LEG BRACKET 20-0044
19 1 LEFT FRONT LEG 20-0045
20 1 RIGHT FRONT LEG 20-0046
21 1 REAR LEG 20-0043
22 1 AXLE 10-0048
23 2 WHEEL, 8 INCH 55-0006
24 1 WHEEL, 3 INCH CASTER 55-0011
25 1 BOTTOM SHELF 20-0051
26 2 HUB CAP 55-0007
Item QTY. Part Name Part Number
1 1 THERMOMETER 55-0012
2 1 BEZEL 10-0058
3 1 STACK DAMPER 30-0018
4 1 HOOD 30-0025
5 1 HOOD HINGE 30-0026
6 1 GRILL BODY 30-0027
7 1 LOGO PLATE 10-0042
8 1 HOOD HANDLE 10-0043
9 1 RIGHT HANDLE BRACKET 10-0082
10 1 LEFT HANDLE BRACKET 10-0059
11 2 SIDE SHELF 30-0022
12 1 COOKING GRATE SET 30-0023
1
2
3
4
5
6
8 9
1111
12
13
16
17
18
19
20
21
22
23
23
24
25
26 26
15
14
Parts List
10

OM16619A.1 ™ & © Char-Griller / A&J Mfg. 5
Hardware:
¼-20X½” HEX BOLT…….39 PCS
¼-20” SHOULDER BOLT…4 PCS
2/5” FLAT WASHER……….2 PCS
1/4” LOCK WASHER…....11 PCS
HARDWARE LIST AND TOOLS REQUIRED
(Tools Not Included)
7/16" nut driver
STOP! CALL FIRST! DO NOT RETURN PRODUCT TO STORE.
CALL (912) 638-4724. This product has been built to the highest quality standards.
Call us should you have any questions not addressed in these instructions, or for service information.
No Returns on Used Grills
CAUTION: Do not attempt to move grill unless the lid is
latched, failing to do so my lead to damage or injury.
NOTICE: Read all operating and assembly instructions
before attempting to use your grill.
NOTICE: Always have a fire extinguisher near at all times.
Maintain and check your fire extinguisher regularly.
Have your grills serial number (located on the back of the grill body or on the leg) when
calling.
¼-20 HEX NUT….4 PCS
HAIR COTTER PIN...2 PCS

OM16619A.1 ™ & © Char-Griller / A&J Mfg. 6
Step 1
Place GRILL BODY upside down and install LEG BRACKETS with three (3) ½ inch hex bolts
each. Next install LEGS (3) with two (2) ½ inch hex bolts and two 1/4 inch lock washers
each into LEG BRACKETS, DO Not Tighten Bolts Until After Step #3. Screw CASTER onto
rear leg, lock CASTER before tightening. Make Sure the leg with the caster is in the back
and wheel support braces on the front legs are facing outward.
Step 2
Attach BOTTOM SHELF to LEGS with five 1/2 inch hex bolts and lock washers.
Step 3
Insert AXLE through front LEGS and BOTTOM SHELF. Tighten all bolts.
Step 4
Install one WASHER, COTTER PIN and HUB CAP onto the AXLE then slide the AXLE through
WHEELS and legs as shown. Finish by attaching 2nd WASHER, COTTER PIN and HUB CAP.
Axle
Wheel
Washer
Cotter Pin
Hub Cap
Leg Bracket
Leg Bracket
Bottom Shelf
Axle
8” Wheel
Grill Body
Caster

OM16619A.1 ™ & © Char-Griller / A&J Mfg. 7
Side Shelf Brackets
Left Handle Bracket
Hood Handle
Right Handle Bracket
Shoulder Bolt
Hex Nut
Side Shelf
Step 5
Turn grill upright, LOCK CASTER and place HOOD on the GRILL BODY. Attach hinge on
back of HOOD to GRILL BODY using four (4) 1/2 inch hex bolts.
Step 6
Attach FRONT HANDLE to HOOD with four (4) 1/2 inch hex bolts. First attach one HANDLE
BRACKET to the Lid and then hold the HANDLE in place while attaching the other HANDLE
BRACKET to the Lid. HANDLE BRACKETS are left and right handed.
Step 7
Attach SIDE SHELVES to SIDE SHELF BRACKETS using two (2) shoulder bolts and two (2)
hex nuts for each shelf.
Hood
Grill Body Hex Bolt
NOTE: Always latch lid when lid is in the
closed position, especially while moving.

OM16619A.1 ™ & © Char-Griller / A&J Mfg. 8
Step 8
To install ASH PAN, hold ASH PAN up against the bottom of the GRILL BODY from the front
with the center pin on the inside. Slide the ASH PAN back and use clips on the sides of the
grill to snap into position as shown.
Step 9
Install DAMPER with two (2) 1/2 inch bolts from inside the HOOD. Damper coating will
scratch with use. This does not affect the function or performance of the damper. Next,
install THERMOMETER and BEZEL with wing nut, as shown below. Make sure to calibrate
the thermometer first, see page 11.
Damper
ThermometerBezel
Hex Bolt

OM16619A.1 ™ & © Char-Griller / A&J Mfg. 9
Step 10
Install: FIRE BOWL, FIRE GRATE, COOKING GRATES and WARMING RACK inside of the
lower body.
Step 11
Attach six (6) UTENSIL HOOKS to the underside of the two side shelves (3 each). Use de-
pressions in the wood as a starting point for screwing in the UTENSIL HOOKS.
Please Note: No Returns on Used Grills
Utensil Hooks
Utensil Hooks
Fire Bowl
Cooking Grates
Fire Grate
Warming Rack
Side Shelf
Side Shelf

OM16619A.1 ™ & © Char-Griller / A&J Mfg. 10
GRILL PREPARATION & OPERATING INSTRUCTIONS
PLEASE NOTE: NO RETURNS ON USED GRILLS
Read all safety warnings and instructions carefully
Before assembling and operating your grill.
IMPORTANT! BEFORE YOU USE YOUR GRILL FOR THE FIRST TIME YOU MUST SEASON THE CAST IRON
COOKING GRATE.
Seasoning Your Cast Iron Cooking Grate:
Before you use your grill it is important to season it, this will burn off coating used to protect
your grill during shipping, help protect your cast iron grates from rusting and prepare it for use.
First wash your cooking grates in warm soapy water. Rinse thoroughly and dry completely with
a towel. DO NOT AIR DRY. NEVER PUT YOUR COOKING GRATE OR ANY PART OF YOUR GRILL
IN YOUR DISHWASHER.
Once your cooking grate is dry apply a coating of vegetable oil or shortening to your cooking
grate, be sure to coat both sides thoroughly. To finish seasoning your grill start a fire in your grill, we rec-
ommend using lump charcoal, Heat your grill to 400 ˚F for an hour, this will burn off any chemical resi-
dues left from shipping and manufacturing and season your cooking grate. Seasoning should be done
periodically to lengthen the life of your cooking grate.
Lighting Your Grill:
Note: we recommend using lump charcoal because they contain no additives or fillers. This makes for
more efficient burning, less ash than charcoal briquettes and much better tasting food.
For Regular use:
Make a pyramid of lump charcoal in the center of the fire grate 1.5—2 lbs. lump charcoal (about the
weight of two 12 oz sodas.) Light using fire starters or a charcoal chimney starter. WE RECOMMEND
NOT TO USE LIGHTER FLUIDS. Leave LID open until the coals are lit and there is no black smoke com-
ing from the coals, Smoke should be clear/white and there should be no flames coming off the coals.
Starter sticks (we recommend starter sticks with no kerosene, fats, or scents) should be completely
burned before you begin cooking. Adjust dampers to control temperature. More air flow means more
heat.
More air flow means
more heat.
Fiber Insulation
Air Pocket

OM16619A.1 ™ & © Char-Griller / A&J Mfg. 11
When you are finished grilling:
After your are finished grilling you can shut down your grill by closing both dampers and allowing the fire
to suffocate.
Emptying the Ashes: ONLY EMPTY ASHES WHILE GRILL IS NOT IS USE.
After the fire is completely extinguished wait several hours before emptying the ashes to be sure they are
not still hot. Knock any ashes that did not fall into the ash pan from the fire grate. (if there are pieces
of partially burned charcoal on the fire grate you can save them for next time, they are still good). Tap
the sides of the fire bowl to knock loose any ash that is on the sides. Unclip the ash pan from the bot-
tom of the grill and slide out towards the front. Give the ash pan a few firm taps to loosen any ash that
may be stuck. Place the ashes in a metal container and cover with water to ensure there are no lit
coals then you can dispose of the ashes. Charcoal is porous and holds moisture, DO NOT leave char-
coal in your grill while you are not using it as charcoal or ashes left, especially outside, may reduce the
life of your grill.
We encourage you to search the internet for more information about
Kamado style cooking.
For lower temperature (250 ˚F and below), long duration grilling and smoking:
Use approximately 1lb. of mostly computer mouse or larger sized pieces of lump charcoal to build a fire
in the center of the fire grate. Start fire as described above. Once the fire has reached your desired
cooking temperature adjust dampers to let less air through, monitor your grill temperature and adjust
accordingly.
For High temperature grilling (650 ˚F and above):
Use mostly smaller pieces of lump charcoal, golf ball sized, and more than you would normally use for
regular grilling (2—3 lbs. lump charcoal). After you start a fire as described above leave damper open
to maintain a high temperature. Coals will burn more quickly and more can be added by using the re-
movable center fire grate.
For Smoking:
Follow instructions for lower temperature cooking (250˚F and below). Pre soak wood chips or chunks.
Soak wood chips for 35 minutes. Soak chunks for 1 hour and 30 minutes, or until wood is completely
saturated, After grill has reached desired temperature, sprinkle two handfuls of soaked wood chips or
chunks over the lit charcoals. Let the chips begin to smoke by closing the lid. You can begin cooking
after a few minutes. More soaked chips may be added to the fire later if necessary,
Thermometer:
This thermometer is accurate to +/- 10% of the actual temperature. We suggest verifying this with your
oven. If you require more precise temperature control, the use of a meat thermometer is
recommended.
Fiber Insulation
Air Pocket
Fiber Insulation
Air Pocket

OM16619A.1 ™ & © Char-Griller / A&J Mfg. 12
GRILLING RECIPES
In addition to the recipes, you might like some of the Kamado recipes that can be
found searching the internet.
DIRECT METHOD
The more you use your Kamado Kooker the more you will get a feel for cooking times
and amount and size of charcoal.
STEAK (& ALL MEATS): Cook food directly above coals/heat. Generally speaking, to grill meats, sear for
one minute on each side with the lid open to seal in flavor and juices. Then close the dampers to me-
dium position with lid closed and cook to desire doneness.
Control heat with dual dampers.
BETTER BARBECUE: Place grilled meat back in the marinade for several minutes before serving –it will
become tastier and juicier. CAUTION: Boil extra marinade first to kill bacteria remaining from the raw
meat.
Tip: Cooking with a MEAT THERMOMETER ensures food is fully cooked. Insert into thickest part not
touching bone & allow five minutes to register. Internal temperatures for BIRDS should be 170F to 180F
and meat should be 140F for rare, 160F medium and 170F for well done.
MARINATED FLANK STEAK: Mix marinade ingredients in nonmetal dish. Let steak stand in marinade for
no less than 4 hours in refrigerator. Brown each side for 5 minutes, but center should remain rare. Cut
steak diagonally across the grain into thin slices before serving.
MARINADE: 1/2 cup vegetable or olive oil, 1/3 cup soy sauce, 1/4 cup red wine vinegar, 2 tbs. Lemon
juice, 1 tsp. Dry mustard, 1 minced clove garlic, 1 small minced onion, 1/4 tsp pepper.
KABOBS: Alternating on skewers any combination of meat, onions, tomatoes, green peppers, mush-
rooms, zucchini, circular slice of corn-on-the-cob, or pineapple. Meat could consist of chunks of shrimp,
scallops, lobster, chicken, sausage, pork, beef, etc. Marinate the meat in refrigerator for several hours.
Grill each side approximately 7 minutes turning occasionally while basting with marinade. Leave a small
amount of room between pieces in order to cook faster. Grill with lid up.
KABOB MARINADE: Mix 1 cup soy sauce, 1/2 cup brown sugar, 1/2 cup vinegar, 1/2 cup pineapple
juice, 2 teaspoons salt, 1/2 teaspoon garlic powder and bring to a boil. Marinate beef in mixture a mini-
mum of 4 hours.
HOT DOGS: Grill with lid up for approximately 6 minutes, turn every few minutes.
HAMBURGERS: Mix in chopped onions, green peppers, salt, sear 3/4 inch patties on each side with lid
open a few minutes then grill with lid down to avoid flare-ups. Cook each side 3 to 7 minutes according
to desired doneness. Cook ground meat to 150 internally or until juice runs clear (free of blood) for pre-
vention of E-coli. Burgers can be basted with marinade when turning and/or other ingredients can be
mixed in with the ground beef such as chili sauce or powder; or you may marinate by allowing to stand in
marinade for 1 or 2 hours at room temperature before cooking; or let stand in covered dish in refrigerator
up to 24 hours. Bring to room temperature before cooking. See meat marinade on page 9.
SHRIMP (Peeled) & Crayfish: Place on skewers, coat with melted butter and garlic salt. Grill 4 minutes
on each side or until pink. Cocktail sauce optional.
BAKED POTATOES: Rub with butter and wrap in foil and cook on grill with lid down for 50 minutes. Turn
after 25 minutes (no need to turn if smoked). Squeeze to check for doneness.
SWEET CORN IN HUSKS: Trim excess silk from end and soak in cold salted water 1 hour before grilling.
Grill 25 minutes –turning several times.

OM16619A.1 ™ & © Char-Griller / A&J Mfg. 13
SMOKIN’ RECIPES: with a WATER PAN (also called INDIRECT METHOD).
Pan not included. Disposable bread pan is recommended. SMOKE BY COOKING SLOWLY (See chart on
page 27 for smoking times). 1) Place water/drip pan on left side of fire grate. 2) Place hot coals on right
side of fire grate. 3) Place meat above water pan. 4) Close lid & control heat with dampers. You may want
to sear certain foods before smoking by placing meat directly above coals with LID open and FIRE GRATE
in high (hot) position for several minutes. Add flavor soaked wood chips to the fire and add 1 part mari-
nade, beer or wine to 3 parts water to the drip pan. OPENING THE SMOKING CHAMBER WILL EXTEND
COOKING TIME. Cooking with meat thermometer ensures food is fully cooked. Insert thermometer into
thickest part not touching bone, and allow five minutes to register. Internal temperature for birds should
be 170F to 180F or when leg moves easily in joint. Meat should be cooked to internal temperature of
140F for rare, 160F for medium and 170F for well done. Check the water level when cooking more than 4
hours or when you can’t hear the water simmering. Add water by moving meat over and pouring water
through GRILL into WATER PAN. IF THE SMOKE IS WHITE, THE FIRE’S RIGHT. IF THE SMOKE IS BLACK,
ADD SOME DRAFT.
SMOKED TURKEY: Empty cavity rinse and pat dry with paper towel, tuck wing tips under the back and tie
legs together. Place in center of cooking grid directly above foil drip pan of water. Smoke for 12 minutes
per pound. Allow several extra minutes per pound if stuffed to allow for expansion. Use a meat thermome-
ter for best results (190F internal).
SMOKED BAKED HAM: Fully cooked canned ham or smoked and cured whole ham or shank or butt por-
tion. Place fire grate in the lowest position and a drip pan under the meat. Remove rind and score fat di-
agonally to give a diamond effect. Insert a whole clove in to the center of every diamond. Place ham with
fat side up in center of cooking grid directly above drip pan. Close lid. About 9 minutes per pound is sug-
gested for fully cooked hams. Smoked or cured ham which is not fully cooked should be cooked to an in-
ternal temperature of 160F. Baste with ham glaze 3 or 4 times during last 30 minutes of cooking time.
Garnish with pineapple rings about 15 minutes before end of cooking time.
HAM GLAZE: 1 cup of light brown sugar, firmly packed, 1/2 cup orange juice, 1/2 cup honey, combine
sugar, juice and honey. Let marinade sit for at least 4 hours.
SMOKED HOT DOGS STUFFED: Slit hot dogs lengthwise, within 1/4 inch of each end. Stuff hot dogs with
cheese and relish and wrap in bacon. Place on cooking grid over drip pan and smoke 15-20 minutes or
until bacon is crisp.
SMOKED CHICKEN PARTS AND HALVES: Rinse pieces in cold water and pat dry with paper towels. Brush
each piece with vegetable oil and season to taste with salt and pepper. Brown pieces directly above coals
with lid open and grate in high or medium position for several minutes. Then place pieces on cooking
grate directly above drip pan. With the grate in the low position, cook with lid down for 55 to 60 minutes
or until done. Do not use vegetable oil or salt and pepper if using marinade.
SMOKED VENISON: Place leg of venison in a container or "hefty bag" and marinate for 2-4 days, turning
daily. Marinate bacon overnight in its marinade. Remove roast from refrigerator at least an hour before
cooking. Season generously with seasoned salt and coarse ground black pepper. Wrap 1 lb. Bacon over
the top of the roast, and smoke 20/25 minutes per pound, or until tender. Do not overcook.
Venison Marinade: 1 cup Balsamic or wine vinegar, 1 cup olive oil, 2 oz. Worcestershire, 1/2 oz. Tabasco,
2 tbs. Season All, 1 to 2 chopped jalapenos, 3 oz. Soy sauce. Bacon Marinade: 2 oz. Wine vinegar, 2 oz.
Worcestershire, 4 dashes Tabasco.
SMOKED SHRIMP & CRAYFISH: Mix in a foil pan 1/2 cup butter, two cloves of crushed garlic, Tabasco,
sliced green pepper, 1 tbs. each of minced onions, salt and juices from one lemon. Add shrimp and/ or
crayfish and smoke 45 minutes.
SMOKED VEGETABLES: Turnips, potatoes, carrots, okra, mushrooms, peeled onions, zucchini, squash,
etc. Put in pan and cover with water and cook for several hours while cooking the meat. Or place vegeta-
bles on grill and smoke for 50 minutes, either wrapped in foil or not.

OM16619A.1 ™ & © Char-Griller / A&J Mfg. 14
SMOKED FISH: Marinate in brine (1/4 cup dissolved in 1 qt of water) or marinate fish in 1 cup white
wine, 1 cup soy sauce mixed with 1 cup lemon juice. Marinate overnight in covered dish in refrigerator.
Let air on rack 20 minutes before placing on Pam sprayed grill. Smoke 25 minutes.
SMOKED SPARE/BACK RIBS: Peel off tough layer of skin on back side. Rub all surfaces with season-
ing. Place ribs in center of grid above drip pan and smoke approximately 1 1/2 hours or until meats pulls
away from bone. Baste with barbecue sauce during last 30 minutes.
CHICKEN MARINADE: Combine 1/2 cup soy sauce, 1/4 cup vegetable oil, 1/4 cup red wine vinegar, 1
teaspoon oregano, 1/2 teaspoon sweet basil, 1/2 teaspoon garlic powder with parsley, 1/4 teaspoon
pepper. Pour over chicken pieces in nonmetal dish. Cover and refrigerate overnight, turning occasionally.
Use marinade to baste chicken while cooking.
MEAT MARINADE: For steaks, chops, and burgers: Combine 1 cup soy sauce, 2 coarsely chopped large
onions and 2 cloves garlic (halved) in an electric blender; cover, process at high speed 1 minute or until
mixture is very smooth. Stir in 1/4 cup bottle gravy coloring (Kitchen Bouquet and Gravy Master) and 2
teaspoons Beau Monde seasoning (or substitute 1 teaspoon MSG and 1 teaspoon seasoned salt). Allow
meat to stand in marinade at room temperature for 2 hours or refrigerate up to 24 hours in a covered
dish. Bring meat to room temperature before cooking.
SHISH KABOB MARINADE: Mix 1 cup soy sauce, 1/2 cup brown sugar, 1/2 cup vinegar, 1/2 cup pineap-
ple juice, 2 teaspoons salt, 1/2 teaspoon garlic powder and bring to a boil. Marinate beef in mixture a
minimum of 4 hours.
Food Weight Water Pan
Smokin’
Temperature on
Meat Thermometer
Beef Roasts, Beef Brisket 3 - 4 lbs. 1-1½ hours 140˚ rare
Lamb Roasts, Venison 5 - 7 lbs. 1¾- 2½ hours 160˚ medium
Large cuts of Game 7 - 9 lbs. 2½ - 3½ hours 170˚ well done
Pork Roasts 3 - 4 lbs.
5 - 8 lbs.
1¾ - 2½ hours
2½ - 3 hours
170˚
170˚
Pork/ Beef Ribs Full grill 1½ - 2 hours Meat pulls from bone
Pork Chops Full grill 1½ - 2 hours Meat pulls from bone
Sausage Links Full grill 2 - 2¾ hours 170˚ for fresh sausage
Ham, Fresh 10 lbs. 3 - 4 hours 170˚
Ham, Cooked All sizes 1½ - 2 hours 130˚
Chicken (Cut up or split) 1 - 4 fryers, cut up or split 1 - 1¼ hours 180˚ / leg moves easily in joint
Chicken (Whole) 1 - 4 fryers 1¼ - 1½ hour 180˚ / leg moves easily in joint
Turkey (Unstuffed) 8-12 lbs. 1¾ - 2½ hours 180˚ / leg moves easily in joint
Fish, small whole Full grill ½ - ¾ hours Flakes with fork
Fish, filets, steak Full grill ¼ - ½ hours Flakes with fork
Duck 3 - 5 lbs. 1 - 1¾ hours 180˚ / leg moves easily in joint
Small game birds Full grill ¾ - 1 hour 180˚ / leg moves easily in joint
SMOKING TIMES

OM16619A.1 ™ & © Char-Griller / A&J Mfg. 15
ACCESSORIES
ORDER FORM
TO ORDER
Visit our online store at:
www.chargriller.com
or
CALL: 912-638-4724
or
FAX: 912-638-2580
or MAIL:
P.O. Box 30864
Sea Island, GA
31561
Kamado Kooker
Model# 16619
Name_______________________________________ Telephone___________________
Street Address____________________________________________________________
City / State / Zip__________________________________________________________
Email___________________________________________________________________
Please bill my credit card:
EXPIRATION DATE
Visit our website for shipping costs
912-638-4724
Model 16619 Kamado Kooker
Check or Money Order (Sorry—No C.O.D.s)
Check orders will be held 2 weeks before shipment
Qty. Product Price
Cover For Grill $24.99
Shipping Charge
Total
Prices & policies subject to change
15% Restocking Fee on all returns
No Returns on Used Product. Please
visit our website for updated Pricing
and Product Availability.
Georgia Customers add a 7% sales tax.
Washington State Customers add a 10% sales tax
Cover
Custom Fit, Weather Resistant
Protects grill finish
King-Griller by Char-Griller Logo on Cover
Grill cover #6655 fit………………………..…………$24.99

OM16619A.1 ™ & © Char-Griller / A&J Mfg. 16
P.O. Box 30864
Sea Island, GA
31561
912-638-4724
www.CharGriller.com
Warranty Information —Charcoal Grill
Char-Griller® will repair or replace any defective part of its grillers/smokers for a period of up
to one year from the date of purchase. Char-Griller® will also repair or replace the body
(bottom half) of its grillers/smokers if the metal is rusted through or burned through for a pe-
riod up to five years. Char-Griller will repair or replace any defective part of its side fire boxes
for a period up to one year from the date of purchase.
Proof of purchase, proof of purchase date, photo and prepaid return of the item in question
may be required. Misuse, abuse, or commercial use nullifies all warranties. Paint/finish is not
warranted. Products are not warranted against rust.
The warranty is for replacement of defective parts only. Manufacture will not be responsible
for damage resulting from accident, alteration, misuse, abuse, hostile environments, improper
installation, installation not in accordance with local codes of service of unit.
This limited warranty does not cover any scratches, dents , corrosion or discoloring by heat,
abrasive and chemical cleaners nor any components used in the installation of the appliance.
Save your receipt for all warranty claims.
This manual suits for next models
1
Table of contents
Other King-Griller Grill manuals