King Kooker V User manual

ASSEMBLY INSTRUCTIONS
AND
USE AND CARE MANUAL
THE INSTRUCTION MANUAL CONTAINS IMPORTANT INFORMATION NECESSARY
FOR THE PROPER ASSEMBLY AND SAFE USE OF THE APPLIANCE.
READ AND FOLLOW ALL WARNINGS AND INSTRUCTIONS BEFORE ASSEMBLING
AND USING THE APPLIANCE. FOLLOW ALL WARNINGS AND INSTRUCTIONS WHEN
USING THE APPLIANCE.
KEEP THIS MANUAL FOR FUTURE REFERENCE.
METAL FUSION, INC.
712 St. George Avenue.
Jefferson, LA 70121
If you have any problems or questions
Call Us Toll Free at
1-800-783-3885
7:30 AM to 3:30 P.M. CST • Monday through Friday
(504) 736-0201
www.kingkooker.com
OUTDOOR COOKERS
“V” BOTTOM COOKER
MODEL/SERIAL # __________
FAILURE TO FOLLOW THESE INSTRUCTIONS
AND WARNINGS COULD RESULT IN FIRE, EXPLOSION, BURN HAZARD OR CARBON
MONOXIDE POISONING WHICH COULD CAUSE PROPERTY DAMAGE, PERSONAL
INJURY OR DEATH.
English

FOR YOUR SAFETY
If you smell gas:
1. Shut off gas to the appliance.
2. Extinguish any open flame.
3. If odor continues, keep away from the appliance and immediately
call your Fire Department.
FAILURE TO FOLLOW THESE INSTRUCTIONS COULD RESULT IN FIRE OR EXPLOSION
WHICH COULD CAUSE PROPERTY DAMAGE, PERSONAL INJURY OR DEATH.
1. Never operate this appliance unattended.
2. Never operate this appliance within 10 feet (3.05m) of any structure,
combustible material or other gas cylinder. Do not locate this
appliance under ANY overhead construction.
3. Only use propane burning units outdoors. Risks include fire and
carbon monoxide fumes. Lack of ventilation can cause injury or
death.
4. Never operate this appliance within 25 feet (7.5 m) of any flammable
liquids or vapors.
5. Do not fill cooking vessel beyond maximum fill line.
6. When cooking with oil/grease, always use the thermometer
provided and never allow the oil/grease to get hotter than 350°F
(177°C). If the temperature exceeds 350°F (177°C) or if oil begins
to smoke, immediately turn the burner or gas supply OFF.
7. Heated liquids and equipment remain at scalding temperatures
long after the cooking process. Never touch cooking appliance
until liquids have cooled to 100°F (38°C) or less.
8. If a fire should occur, keep away from the appliance and immediately
call your Fire Department. Do not attempt to extinguish an oil/
grease fire with water. When cooking, have a Type BC or ABC fire
extinguisher readily available. A Type BC or ABC fire extinguisher
may, in some circumstances, contain the fire.
2
FAILURE TO FOLLOW THESE INSTRUCTIONS AND WARNINGS COULD
RESULT IN FIRE, EXPLOSION, BURN HAZARD OR CARBON MONOXIDE
POISONING WHICH COULD CAUSE PROPERTY DAMAGE, PERSONAL
INJURY OR DEATH.
DANGER
DANGER

3
1) This is an ATTENDED appliance. The timer located on the hose/regulator
is NOT a replacement for proper monitoring. Do NOT leave this appliance
unattended while the burner is lit or while heating oil, grease, water, or
cooking food. Monitor the appliance when hot after use [oil, grease or water
above 100
°
F (38
°
C)]. Heated liquid and equipment can remain at scalding
temperatures long after cooking has ended.
2) Keep children, pets and unauthorized persons away from the appliance at
all times.
3) The use of alcohol, prescription or non-prescription drugs may impair
your ability to properly assemble or safely operate this appliance. Do NOT
assemble or operate this appliance if using alcohol, prescription or non-
prescription drugs.
4) This appliance is for OUTDOOR use only. Do NOT use in a building, garage,
tent or any other enclosed area. Do NOT use in or on a recreational vehicle
or boat. NEVER use this appliance as a heater.
5) Do not locate this appliance under ANY overhead construction. Keep a
minimum clearance of 10ft. (3.05m) from the sides, front and back of the
appliance to ANY construction. Keep the area clear of any combustible
material. Do not use on or under any apartment or condo balcony or deck.
6) When cooking, the fryer/boiler must be on a level, stable, noncombustible
surface such as brick, concrete or dirt. Not suitable are surfaces such as
wood, asphalt or plastic which may burn, blister or melt.
7) Check all cooker fittings for leaks before each use. Keep the fuel supply
hose away from any heated surfaces. Only the LP hose/regulator and
timer assembly specified by Metal Fusion, Inc. should be used with this
appliance.
8) When cooking with oil or grease, the thermometer provided MUST be
used. Follow instructions in this manual for proper installation and use of
thermometer. If the thermometer supplied with the fryer/boiler has been
lost or damaged, a replacement thermometer specified by Metal Fusion,
Inc. shall be obtained before using the appliance.
9) If the temperature of cooking oil exceeds 350
°
F (177
°
C) or if oil begins to
smoke, immediately turn the burner or gas supply OFF and wait for the
temperature to decrease to less than 350
°
F (177
°
C) before relighting burner
according to the instructions in this manual.
10) When cooking with oil/grease, have a Type BC or ABC fire extinguisher
readily available. In the event of an oil/grease fire, do not attempt to
extinguish with water. Immediately call the Fire Department. A Type BC or
ABC fire extinguisher may, in some circumstances, contain the fire.
11) NEVER overfill the cooking pot with oil, grease or water. Follow instructions
in this manual for establishing proper oil, grease or water levels.
READ AND UNDERSTAND BEFORE USING THIS PRODUCT
Throughout this manual the words appliance, cooker, fryer/boiler, burner and stove
will be used interchangeably to refer to the King Kooker® Outdoor Cooker.

4
12) Introduction of water or ice from any source into the oil/grease may cause
overflow and severe burns from hot oil and water splatter. When frying with oil/
grease, all food products MUST be completely thawed and towel dried before
being immersed in the fryer.
13) Never drop food or accessories into hot cooking liquid. Lower food and
accessories slowly into the cooking liquid in order to prevent splashing or
overflow. When removing food from the appliance, care shall be taken to avoid
burns from hot cooking liquids.
14) This appliance and pot, including handles and lids, gets dangerously hot in use.
Use well-insulated pot holders or oven mitts for protection from hot surfaces or
splatter from cooking liquids. Safety goggles are also recommended to protect
you from oil splatter. The oil remains dangerously hot hours after use.
15) Do NOT place an empty cooking vessel on the appliance while in operation. Use
caution when placing anything in the cooking vessel while the appliance is in
operation. ONLY use the cooking vessel provided with this appliance.
16) In the event of rain, snow, hail, sleet or other forms of precipitation while
cooking with oil/grease, cover the cooking vessel immediately and turn off the
appliance burners and gas supply. Do not attempt to move the appliance or
cooking vessel.
17) Do NOT move the appliance when in use. Allow the cooking vessel to cool to
100
°
F (38
°
C) before moving or storing.
18) Avoid bumping of or impact with the appliance to prevent contact with hot
appliance, spillage or splashing of hot cooking liquid.
19) See Use and Care section for LP Gas Cylinder Information. A 20 pound (9 kg)
cylinder should be used with this cooker. The LP-gas supply cylinder used must
have a protective collar and must be constructed and marked in accordance with
the specifications for LP-gas cylinders of the U. S. Department of Transportation
(DOT) or the National Standard of Canada, CAN/CSA-B339, Cylinders, Spheres
and Tubes for the Transportation of Dangerous Goods. Do not store a spare
LP-gas cylinder under or near this appliance. Never fill the cylinder beyond 80%
full. For proper vapor withdrawal, the 20 lb. (9 kg) cylinder should be used in the
proper upright position. Cylinder must be turned off while not in use. Failure to
follow these instructions and warnings could result in fire or explosion which
could cause property damage, personal injury or death.
20) This appliance is not intended for commercial use.
21) Use King Kooker
®
appliances only in accordance with state and local ordinances,
or in the absence of local codes, with the National Fuel Gas Code, ANSIZ223.1/
NFPA 54, Storage and Handling of Liquefied Petroleum Gases, ANSI/NFPA 58 or
CSA B149.1, Natural Gas and Propane Installation Code.
FAILURE TO FOLLOW THESE INSTRUCTIONS AND WARNINGS COULD RESULT IN
FIRE, EXPLOSION, BURN HAZARD OR CARBON MONOXIDE POISONING WHICH
COULD CAUSE PROPERTY DAMAGE, PERSONAL INJURY OR DEATH.

READ AND UNDERSTAND ALL INSTRUCTIONS BEFORE
USING YOUR KING KOOKER®PRODUCT
TABLE OF CONTENTS
Warnings. . . . . . . . . . . . . . . . . . . . . . . . . . . . . . . . . . . . . . . . . . . . . . . . . . . . . . . . . . . . . . . . . . . . . . . . . . . . . . . . . . . . . . . . . . . . . . . . . . . . . . . . . . . . . . . . . . . . . . . .2-4
Table of Contents .......................................................................................................................5
Warranty...............................................................................................................................6
Owner’s Registration ..................................................................................................................7-8
Introduction ............................................................................................................................9
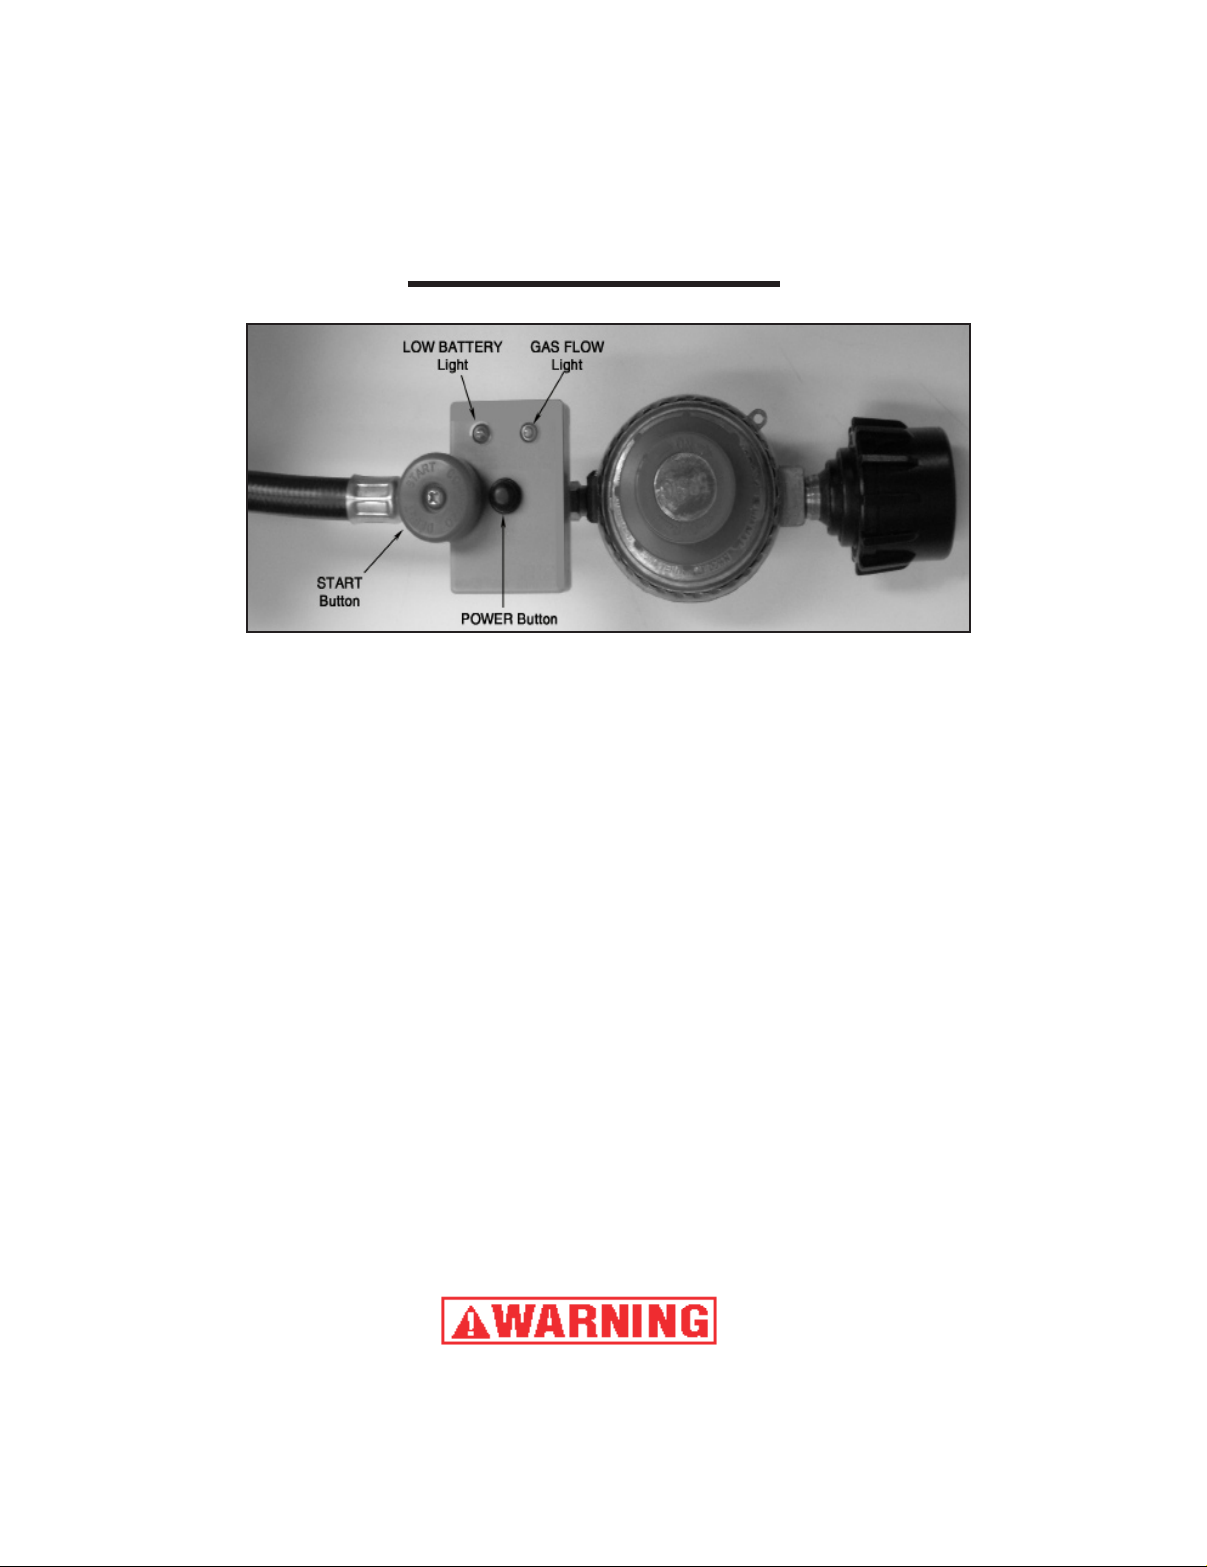
Battery Installation ................................................................................................................10
Battery Warning and Cautions ......................................................................................................1 0
Section I - King Kooker®Outdoor Cooker Assembly ........................................................................................11
Outdoor Cooker Assembly Instructions ............................................................................................11-13
Section II - Use and Care of King Kooker®Outdoor Cookers and Accessories ..................................................................14
Thermometer Instructions and Safety Precautions for Deep Frying with Outdoor Cookers ......................................................14
Determining Proper Fill Levels for Cooking Vessels .....................................................................................14
LP Gas Cylinder Information........................................................................................................15
Connection Instructions ...........................................................................................................15
Leak Test Instructions .............................................................................................................15
Placement Instructions ............................................................................................................16
Lighting and Operating Instructions ...............................................................................................16-17
Turning Off and Storing the Cooker after Use ..........................................................................................18
Maintenance Of Outdoor Cookers And Accessories..................................................................................18-19
Tips for Caring for the V-Bottom Pot .................................................................................................19
Information Regarding Cooking Oil ..................................................................................................19
Operation of Spigot...............................................................................................................20
Section III - Cooking Specialties..........................................................................................................21
Use of Baskets for Steaming .......................................................................................................21
Use of Baskets for Deep Frying ..................................................................................................21-22
Deep Fried Turkey Instructions .....................................................................................................22
Injecting Techniques..............................................................................................................23
Section IV - Recipes ....................................................................................................................24
Boiled Seafood ..................................................................................................................24
Fried Seafood ...................................................................................................................24
Deep Fried Turkey ...............................................................................................................25
Deep Fried Chickens .............................................................................................................25
Deep Fried Turkey Breast ..........................................................................................................25
Southern Fried Chicken ...........................................................................................................26
Fried Onion Rings ................................................................................................................26
Fried Mushrooms ................................................................................................................26
Deep Fried Boston Butt ...........................................................................................................27
King Kooker®Wings .............................................................................................................27
Steamed Clams and Mussels .......................................................................................................27
Steamed Crab, Shrimp, and Lobster .................................................................................................27
Section V - Frequently Asked Questions ....................................................................................28
5

6
METAL FUSION, INC.
LIMITED ONE-YEAR WARRANTY
WHAT THIS WARRANTY COVERS
This warranty covers all components of this outdoor cooker to be free from defects in materials and
workmanship, with the exceptions stated below.
HOW LONG COVERAGE LASTS
This warranty runs for one year from the date of purchase. Please keep your receipt with this manual
for future reference.
WHAT IS NOT COVERED
This warranty does not cover the following:
Incidental and Consequential Damages. This warranty does not cover incidental and
consequential damages arising in any way out of the use of this outdoor cooker. The liability of
Metal Fusion, Inc. is, in any event, limited to the amount of the original purchase price of this
outdoor cooker, and remains in force only as long as the product remains in its original, as-built
configuration. Some states do not allow the exclusion or limitation of incidental or consequential
damages, so the above limitation or exclusion may not apply to you.
Neglectful Operation. This warranty does not cover any loss or damage arising in any way
due to the negligent operation of this outdoor cooker.
Altered, Repaired or Misused Equipment. This warranty does not cover any loss or
damage arising in any way out of the use of this outdoor cooker when it has been altered, repaired
by persons other than Metal Fusion, Inc., or when it has been abused or misused, or when it has
been used other than in accordance with the manufacturer’s operating instructions, including,
without limitation, any damage to the consumer’s pots because they were placed on a lit cooker
while the pot is empty.
Other Assumed Responsibilities. Unless otherwise provided by law, this warranty does
not cover any responsibility or liability arising in any way out of the use of this product where that
responsibility or liability was purportedly assumed by any other person or agent.
Paint, Discoloration, Rust and Corrosion. This warranty does not cover the paint on the
outdoor cooker, as in a normal use of the outdoor cooker, the paint will be burned off. Nor does
this warranty cover discoloration, rust or corrosion to the cooker or LP hose/ regulator with timer
assembly as these occurrences are part of the cooker’s normal wear and tear.
WHAT METAL FUSION, INC. WILL DO
Metal Fusion, Inc. will repair or replace any outdoor cooker that proves to be defective in materials
or workmanship. In the event repair is not possible or economically feasible, Metal Fusion, Inc. will
replace your outdoor cooker with an identical or substantially equivalent outdoor cooker. Metal
Fusion, Inc. will perform this service at no charge to you, except for the actual cost of shipping and
handling the outdoor cooker or replacement parts.
HOW TO GET SERVICE
In the event you have a problem or malfunction with your outdoor cooker, simply call Metal Fusion,
Inc. at (800) 783-3885.
HOW STATE LAW APPLIES
This warranty gives you specific rights, and you may have other rights which vary from state to
state.

7
OWNER’S REGISTRATION
Dear Customer,
Thank you for purchasing a King Kooker®! Please take a moment to fill
out your registration form and return it to us. We are always happy to hear
suggestions and comments from our customers about our products. Completion
of this registration allows us to contact you if the need arises. Please keep your
receipt with your instruction manual. It will be necessary as a proof of purchase
for us to help you if there is a problem with your cooker.
Name:__________________________________________________________________
E-Mail: _________________________________________________________________
Address:________________________________________________________________
________________________________________________________________________
________________________________________________________________________
Telephone: _____________________________________________________________
Model# ________________________________________________________________
Date of Purchase ________________________________________________________
Place of Purchase _______________________________________________________
Price Paid ______________________________________________________________
Was this a gift _____ or did you _____ purchase it yourself?
________________________________________________________________________
________________________________________________________________________
Comments:
________________________________________________________________________
________________________________________________________________________
A SATISFIED CUSTOMER IS OUR MAIN GOAL. If you have any questions or
problems, please call us at 1-800-783-3885 before returning the product to the
point of purchase. Please have your receipt available when calling.
THANK YOU,
ENJOY YOUR COOKING EXPERIENCE.
CUT HERE

8
________________________
________________________
________________________
METAL FUSION, INC.
712 St. George Avenue
Jefferson, LA 70121
Place
Stamp
Here
FOLD
FOLD
TAPE HERE

READ AND UNDERSTAND ALL INSTRUCTIONS BEFORE
USING YOUR KING KOOKER®PRODUCT
INTRODUCTION
Your new King Kooker® Outdoor Cooker is equipped with a timer located on the
hose/regulator (see above picture). The timer is designed to shut-off the flow of gas
after a pre-set time period (approximately a 15 minute operational cycle) unless
manually reset by the user. This timer and the supplied thermometer are not a
substitute for attending a cooker. This timer/hose/regulator assembly should ONLY
be used on this King Kooker® Outdoor Cooker with the pot provided containing oil
or water in accordance with the instructions in this manual. Follow all instructions and
warnings contained in this manual for proper assembly and use of this product.
IMPORTANT: The timer is NOT a replacement for proper monitoring and
will not measure or control the temperature of the cooking liquid within the
pot. Your cooker must always be attended while in use and monitored after
use while still hot [100°F (38°C)]. The oil in the pot can overheat quickly if left
unattended. The thermometer supplied with this appliance must always be used
to monitor the temperature of the cooking liquid.
FAILURE TO FOLLOW THESE INSTRUCTIONS AND WARNINGS COULD
RESULT IN FIRE, EXPLOSION, BURN HAZARD OR CARBON MONOXIDE
POISONING WHICH COULD CAUSE PROPERTY DAMAGE,
PERSONAL INJURY OR DEATH.
9

BATTERY INSTALLATION
The timer requires two “AAA” alkaline batteries (not included) for operation.
Follow the below instructions for proper installation.
1. Always disconnect regulator from the propane tank before installing or removing batteries.
2. Locate battery cover on timer. Press and slide battery cover off as shown.
3. Install two “AAA” alkaline batteries. Match positive (+) and negative (-) symbols located on the case
and batteries to insure proper installation.
4. Replace the battery cover.
5. If the red “Low Battery” light becomes lit during use the batteries need to be replaced. Repeat the
above steps to remove and replace batteries.
BATTERY WARNINGS AND CAUTIONS
1. Always read and follow the battery manufacturer’s instructions.
2. Keep batteries away from small children. If battery is swallowed consult a physician immediately.
3. Do not dispose of batteries in a fire. Dispose of batteries safely, following guidelines for your area.
4. Install batteries correctly according to the “Battery Installation” directions above. Improperly
installed batteries may result in leaks and/or possible explosion.
5. Remove batteries from product after each use.
NOTE: Batteries which are not removed from this device will eventually corrode and leak and may
cause the timer to malfunction. If the batteries were not removed and/or if the unit has been
stored outdoors, test the timer for proper operation. Follow instruction number 5 in the
Lighting and Operating Instructions section on page 16 of this manual, with the cylinder
valve closed. The green light (steady for 10 minutes and blinking for a further 5 minutes)
will then go off showing that the timer is operating properly and you may proceed to use the
cooker in accordance to the warnings and instructions in this manual.
FAILURE TO FOLLOW THESE INSTRUCTIONS AND WARNINGS COULD RESULT IN
FIRE, EXPLOSION, BURN HAZARD OR CARBON MONOXIDE POISONING WHICH
COULD CAUSE PROPERTY DAMAGE, PERSONAL INJURY OR DEATH.
10

TOOLS REQUIRED:
TORQUE WRENCH or ADJUSTABLE WRENCH, LEAK TESTING SOLUTION
1. Before assembling, check that all cooker components are included in the shipping carton. Identify
these cooker parts from the assembly drawing. The following parts are considered essential and
should be included in your package regardless of model number.
Required Parts List:
(1) Cooker Body
(4) Legs
(1) Burner (with 2 screws/lockwashers/nuts to attach to cooker body)
(1) LP Hose and Regulator with Timer
(1) V-Bottom Pot with Spigot
(2) Small Baskets/Short Handles
(1) Large Basket with Two Long Handles
(16) Bolts(for handle attachments to baskets)
(1) Thermometer/Nut
If any of the above parts are missing, contact Metal Fusion, Inc. at 1-800-783-3885 between the hours
of 7:30 a.m. and 3:30 p.m. CST Monday through Friday for replacements.
2. Read assembly instructions, and understand sequence of assembly, before commencing to assemble
your cooker. Remove all plastic and paper packaging materials from the cooker and pot before
assembly and use.
11
SECTION I
OUTDOOR COOKER ASSEMBLY
THE USE AND CARE MANUAL MUST BE READ AND UNDERSTOOD
BEFORE USING THE APPLIANCE
Throughout this manual the words appliance, cooker, fryer/boiler, burner and stove will be
used interchangeably to refer to the King Kooker® Outdoor Cooker.
Leg
V-Bottom
Pot with
Spigot
Cooker Body
LP Hose and
Regulator with
Timer
* Model May
Vary From
Picture
Thermometer

12
3. Locate the cooker body and four legs. Install the four legs into the cooker body by matching the
letters on the legs to the letters on the leg receivers (for example: A to A, B to B, etc...). Snap in
leg bolts through receiving holes on frame. Make sure the leg bolts pop completely out and legs
are locked in position.
4. Make sure that the adjustable heat plate located on the front of the cooker body is raised to the
uppermost position in preparation of the installation of the burner. Locate the end of the burner
with the venturi. Insert the venturi end of the burner through the hole located on the front of the
cooker body (insert from inside cooker body to outside.) The end of the burner with the venturi
should stick out of the front of the cooker body. Attach the burner to the inside of the cooker body
by inserting the two supplied bolts through the supplied holes in the burner and cooker body
as pictured in Figure 1 below. Tighten with supplied lockwashers and nuts. Once the burner is
installed, the adjustable heat plate located on the front of the cooker frame must be lowered into
position before use. Loosen the bolt and lower the heat plate to close the hole above the venturi.
Tighten bolt when finished. See below Figure 2.
5. Place the V-Bottom Pot onto the cooker body as pictured below in Figure 3.
6. Check that the venturi tube is free of obstruction. Tighten the hose fitting into the venturi with a
torque wrench, up to a torque of 95 to 105 lb.in. Alternatively, hand tighten securely and then,
using a wrench, tighten an additional 1-1 1/2 turns. See below Figure 3.
20 lb. LP
Gas Cylinder
TOP VIEW
COOKING POT
VENTURI TUBE/
AIR SHUTTER ADJUSTABLE REGULATOR
TYPE 1
CONNECTION
1/8 MALE PIPE
THREAD WITH
ORIFICE
TIMER
Figure 1
Figure 3
Venturi
Figure 2
Heat
Plate
Bolt
Venturi/
Air Shutter
Spigot
Hole
Burner
Bolt
Attachment
Bolt
Attachment
SPIGOT

13
7. Install the provided thermometer into the front of the V-Bottom pot by inserting stem of
thermometer into the hole provided. Hand tighten brass nut to secure. See below Figure 4 for
picture of correct assembly.
8. Assembly of Baskets
Required Tools: Adjustable Wrench and Screwdriver
The baskets supplied with this appliance provides you with a wide array of cooking options.
Read and understand the following instructions for correct assembly of baskets.
A. Large Basket Assembly
1. Locate the two “long” handles and large basket. Align the four holes on each handle to
the four holes on the mounting plates located on each side of the basket. Attach using
four bolts/washers on each side. See Figure 5 and Figure 6 below for picture of correct
assembly.
2. Go to the Use and Care Section of this manual for further instructions.
B. Small Baskets Assembly
1. Locate the two “short” handles and small baskets. Repeat the below steps for each
basket/handle. Align the four holes on the “short” handle to the four holes on the
mounting plates located on the front of the basket. Attach using four bolts/washers. See
Figure 7 below for picture of correct assembly.
9. Go to the Use and Care section of this manual for further instructions.
Figure 4
Figure 5 Figure 6
Figure 7
Table of contents
Other King Kooker Grill manuals

King Kooker
King Kooker 9090 User manual

King Kooker
King Kooker LP2 User manual

King Kooker
King Kooker 1618KDS User manual

King Kooker
King Kooker CS14 User manual

King Kooker
King Kooker cast cooker With timer User manual

King Kooker
King Kooker CI1812CG User manual

King Kooker
King Kooker 1218 User manual

King Kooker
King Kooker CS29 User manual

King Kooker
King Kooker 2206 User manual

King Kooker
King Kooker CS2016 User manual