Kirsch LABO Series User manual

Refrigerator/freezer
LABO series
Operating instructions
Read instruction manual before starting work!

D1006_05.23_Operating instructions LABO version 3, en_GB
© Philipp KIRSCH GmbH 2022
Philipp KIRSCH GmbH
Im Lossenfeld 14
77731 Willstätt-Sand
GERMANY
Telephone: +49 781 9227-0
Fax: +49 781 9227-200
Email: [email protected]
Internet: www.KIRSCH-medical.de
23.05.2023Refrigerator/freezer LABO series2

This instruction manual was created for the product "Refrigerator/
freezer" (hereafter referred to as “unit”).
Persons who work with the unit must have carefully read and
understood this instruction manual before any work begins. To
ensure safe working conditions, all specified safety warnings and
instructions in this instruction manual must be observed.
In addition, special owner obligations may apply.
This instruction manual makes it possible to handle the unit safely
and efficiently. This instruction manual is part of the unit; it must be
kept in the immediate vicinity of the unit and be accessible to staff
at all times.
This instruction manual is designed to provide information to the
following target audiences:
nOwner of the unit
nUsers of the unit
A separate service manual for this unit is available for technical
customer service (hereafter referred to as “service department”).
This manual is valid for the following units:
Model Factory number from
LABO 100 PRO-ACTIVE 100 05 25000 / 100 33 35000
LABO 126 PRO-ACTIVE 125 05 25000 / 125 34 25000
LABO 288 PRO-ACTIVE 280 15 25000 / 280 34 25000
LABO 340 PRO-ACTIVE 330 12 25000 / 330 31 25000
LABO 468 PRO-ACTIVE 460 05 25000 / 460 31 35000
LABO 520 PRO-ACTIVE 500 01 25000 / 500 30 25000
LABO 720 PRO-ACTIVE 700 01 25000 / 700 30 25000
LABO 520 CR PRO-ACTIVE 500 02 25000 / 500 42 25000
LABO 720 CR PRO-ACTIVE 700 02 25000 / 700 36 25000
LABO 720 CHROMAT PRO-ACTIVE 700 20 25000 / 700 32 25000
LABO 288 ULTIMATE 280 70 25000 / 280 80 25000
LABO 340 ULTIMATE 340 70 25000 / 340 80 25000
LABO 468 ULTIMATE 460 70 25000 / 460 80 35000
LABO 520 ULTIMATE 500 70 25000 / 500 80 25000
LABO 720 ULTIMATE 700 70 25000 / 700 80 25000
About this instruction manual
Keeping the manual
Target audiences
Models
Supplemental directives
23.05.2023 Refrigerator/freezer LABO series 3

Model Factory number from
LABO 720 CHROMAT ULTIMATE 700 74 25000 / 700 87 25000
FROSTER LABO 330 PRO-ACTIVE 320 01 25000
FROSTER LABO 530 PRO-ACTIVE 500 08 25000
FROSTER LABO 730 PRO-ACTIVE 700 04 25000
FROSTER LABO 530 CR PRO-ACTIVE 500 09 25000
FROSTER LABO 730 CR PRO-ACTIVE 700 05 25000
FROSTER LABO 330 ULTIMATE 320 80 25000
FROSTER LABO 530 ULTIMATE 500 84 25000
FROSTER LABO 730 ULTIMATE 700 84 25000
Illustrations in this manual are designed as an aid to basic compre-
hension and may deviate from the version at hand.
Manufacturer Philipp Kirsch GmbH
Address Im Lossenfeld 14
77731 Willstätt-Sand
GERMANY
Telephone +49 781 9227-0
Fax +49 781 9227-200
Email [email protected]
Internet www.kirsch-medical.de
Business hours:
nMonday to Thursday: 8:00 am to 12:15 pm, 1:15 pm to 4:30 pm
nFriday: 8:00 am to 12:00 PM, 1:00 PM to 4:00 PM
Service Philipp Kirsch GmbH
Address Im Lossenfeld 14
77731 Willstätt-Sand
GERMANY
Telephone +49 781 9227-777
Fax +49 781 9227-200
Email [email protected]
Internet www.kirsch-medical.de
Illustrations
Manufacturer’s address
Service contact
Supplemental directives
23.05.2023Refrigerator/freezer LABO series4

Orders are accepted during business hours.
If you have questions or comments regarding this instruction
manual or the unit, please contact your authorised regional spe-
cialist dealer or contact KIRSCH directly.
More information
Supplemental directives
23.05.2023 Refrigerator/freezer LABO series 5

Table of contents
1 Product description............................................................ 8
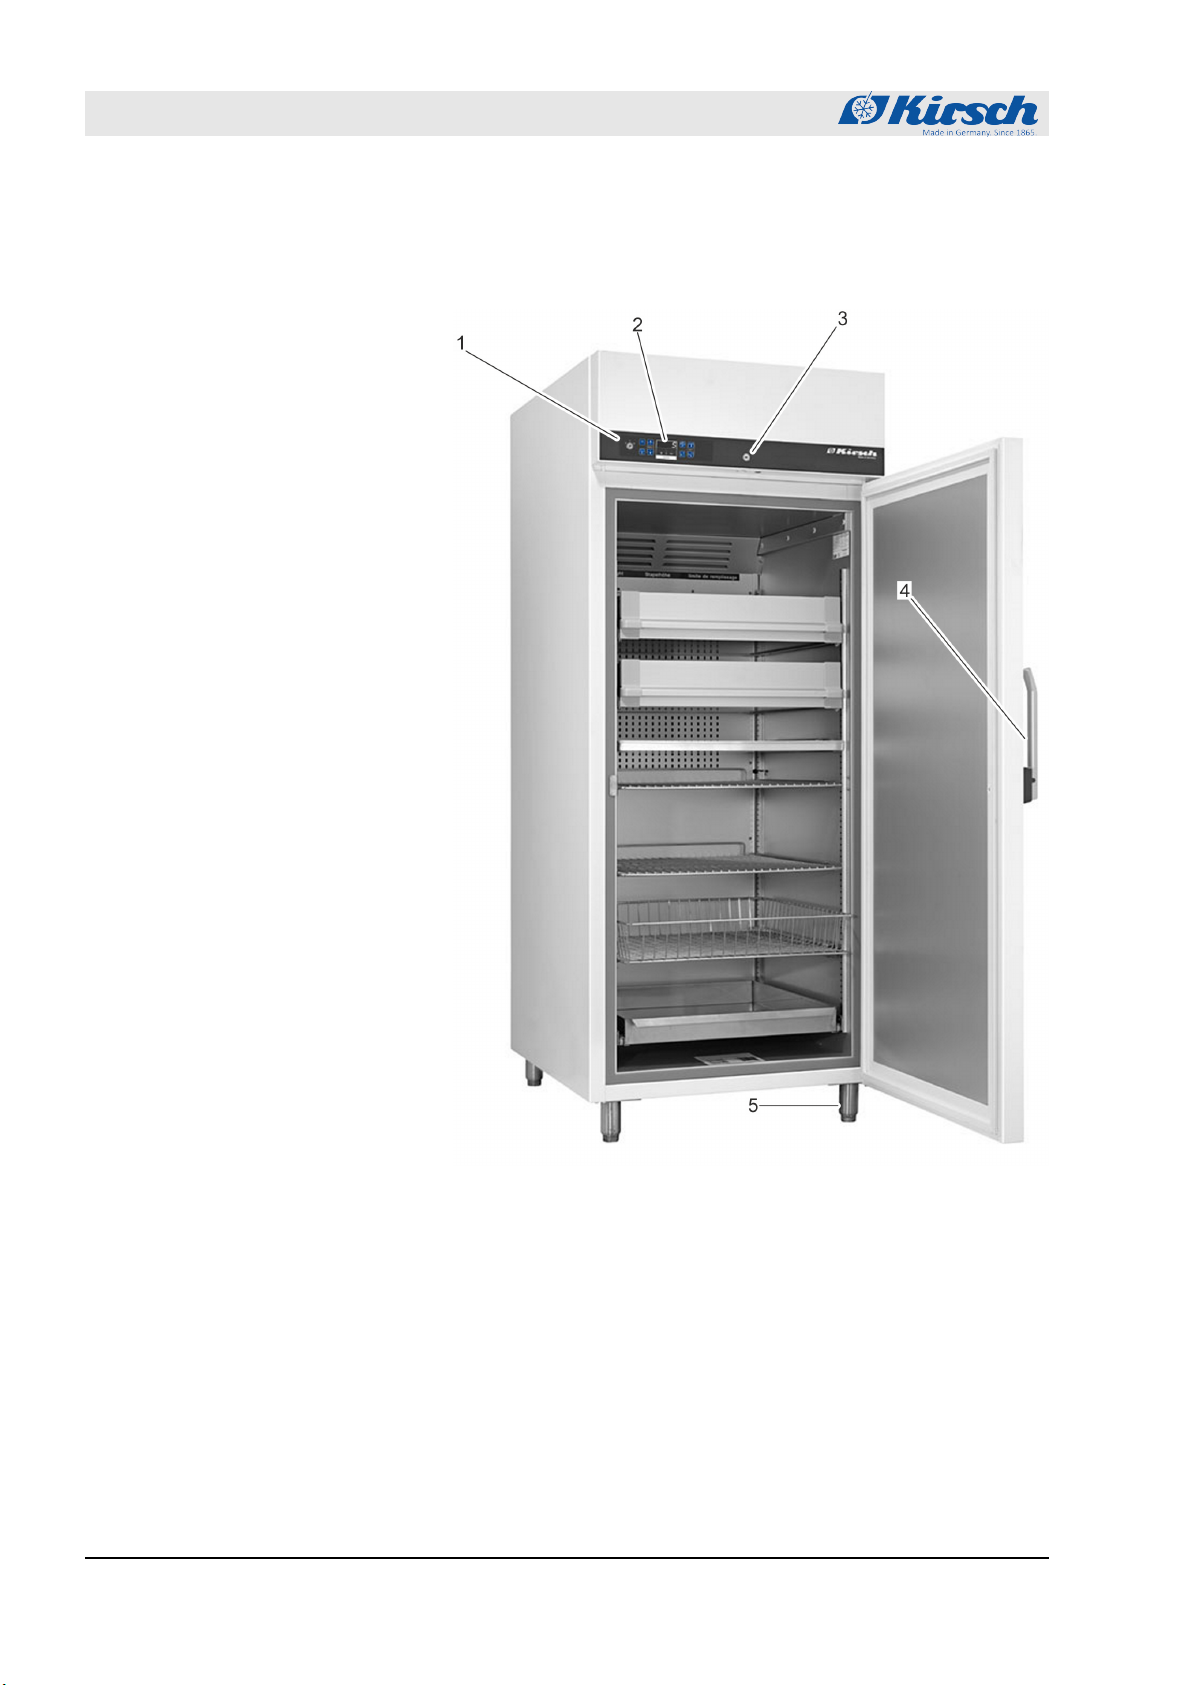
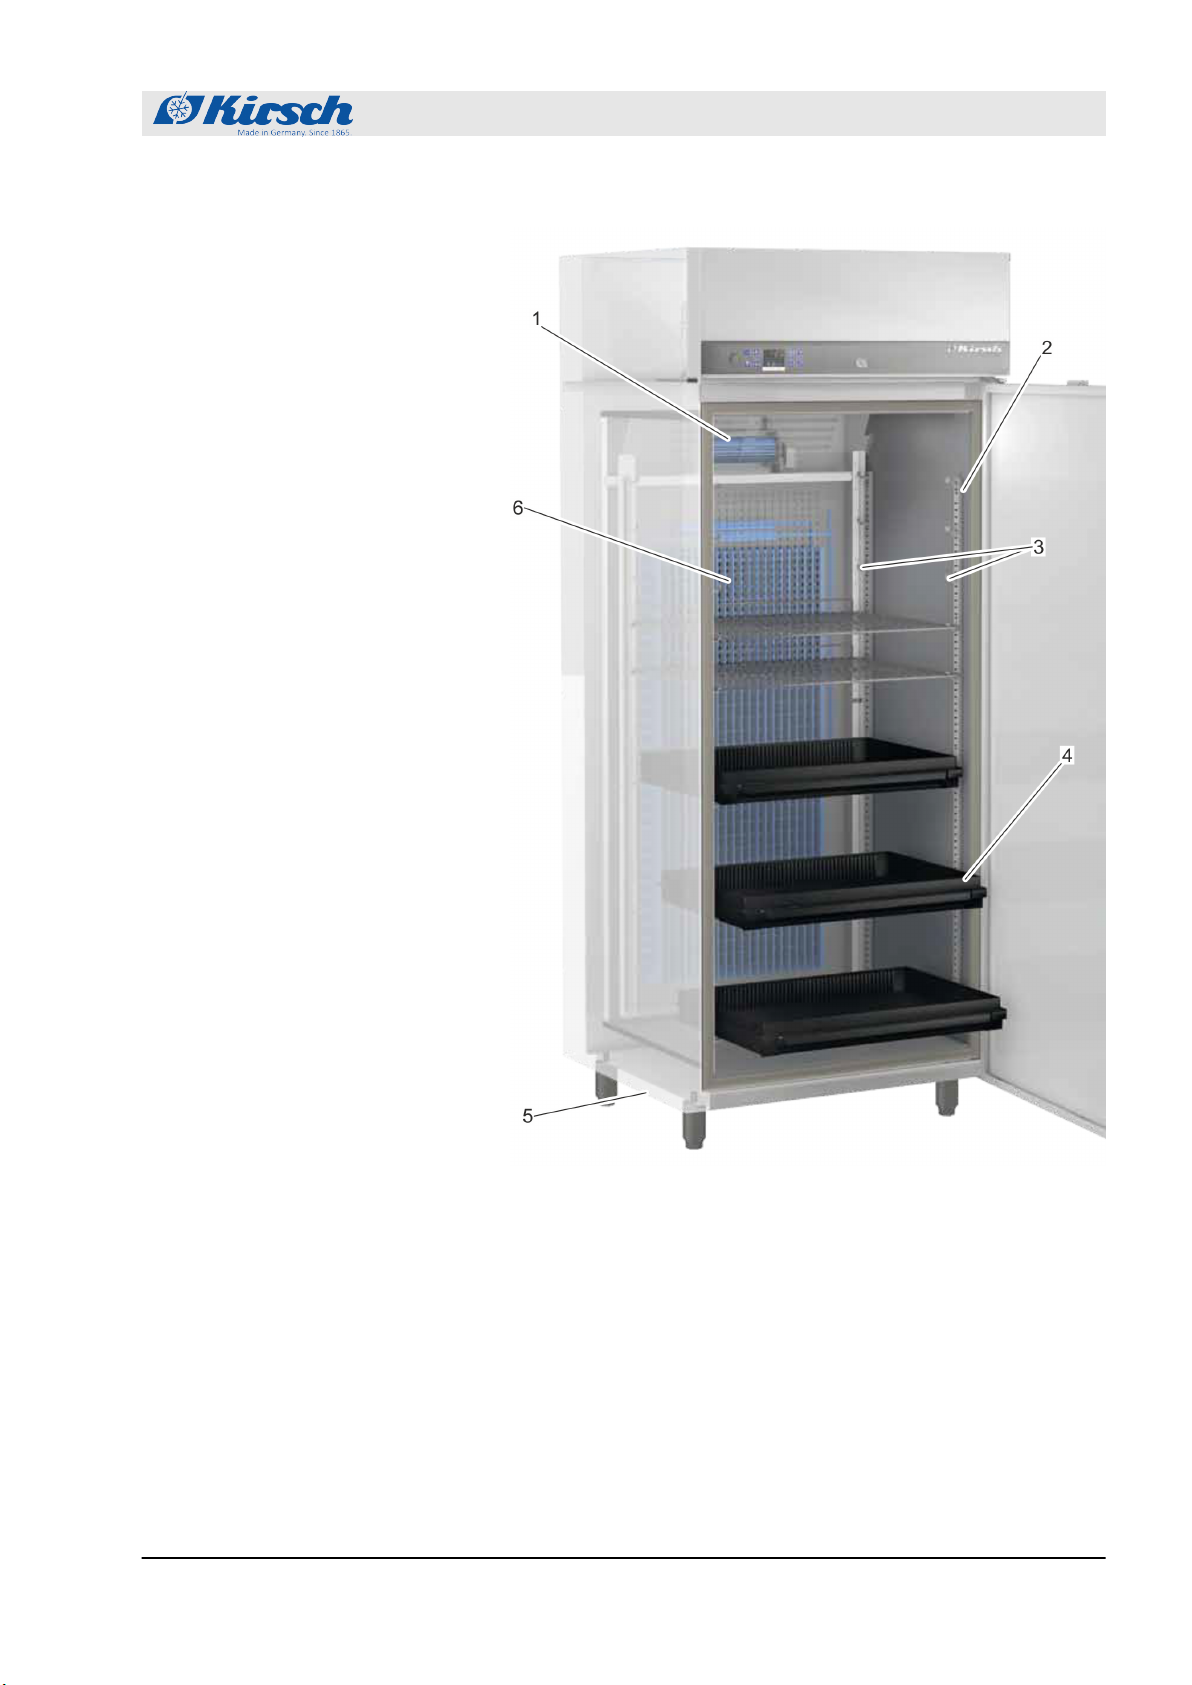
1.1 Unit overview................................................................ 8
1.2 Display and control elements...................................... 12
1.2.1 Design of the display and control unit...................... 12
1.2.2 Function of the key switch ...................................... 12
1.2.3 Function of buttons and displays............................. 12
1.3 Scope of delivery........................................................ 14
1.4 Interfaces.................................................................... 15
1.5 Unit functions.............................................................. 16
1.5.1 Cooling..................................................................... 16
1.5.2 SuperFrost function................................................. 16
1.5.3 Defrosting................................................................ 17
1.5.4 Temperature display................................................ 17
1.5.5 Temperature memory............................................... 17
1.5.6 Temperature monitoring with PC-KIT-STICK........... 18
1.5.7 Temperature sensor................................................. 18
1.6 Battery........................................................................ 18
1.7 Additional unit components......................................... 19
1.7.1 Temperature documentation.................................... 19
1.7.2 Interior lighting......................................................... 20
1.7.3 Lockable glass door................................................. 21
2 Accessories....................................................................... 22
2.1 GSM module............................................................... 22
3 Safety................................................................................. 23
3.1 Symbols in this instruction manual............................. 23
3.2 Purpose...................................................................... 24
3.3 Foreseeable misuse................................................... 24
3.4 Residual risks............................................................. 25
3.5 Measures for cyber security........................................ 27
3.6 Safety markings.......................................................... 30
3.7 Staff qualification......................................................... 31
3.8 Personal protective equipment................................... 32
4 Transport and decommissioning.................................... 33
4.1 Unit transport.............................................................. 33
4.2 Final decommissioning of the unit.............................. 35
4.3 Putting the unit back into operation............................ 35
5 Set-up, installation and connection................................ 36
5.1 Setting up the unit....................................................... 36
5.2 Installing the unit......................................................... 36
5.3 Connecting the unit..................................................... 37
6 Commissioning................................................................. 38
6.1 Activities during commissioning.................................. 38
Table of contents
23.05.2023Refrigerator/freezer LABO series6

6.2 Programming the unit................................................. 38
6.2.1 Target temperature.................................................. 39
6.2.1.1 Function of the target temperature....................... 39
6.2.1.2 Displaying and changing the target temperature.. 39
6.2.2 Temperature warning limits...................................... 41
6.2.2.1 Function of the temperature warning limits........... 41
6.2.2.2 Displaying and changing the temperature warning
limits...................................................................... 42
6.2.3 Adjusting the humidity.............................................. 43
7 Operation........................................................................... 45
7.1 Switching on the unit................................................... 45
7.2 Switching off the unit................................................... 45
7.3 Retrieving/erasing the temperature memory.............. 46
7.4 Switching on the SuperFrost function......................... 46
7.5 Data reading-out on the unit with PC-KIT-STICK....... 47
7.6 Setting up PC-KIT-NET (optional)............................... 50
7.7 Stocking the unit......................................................... 54
8 Cleaning and disinfection................................................ 56
9 Maintenance...................................................................... 59
9.1 Safety inspection........................................................ 59
10 Alarms................................................................................ 62
10.1 Alarm functions......................................................... 62
10.2 Handling alarms........................................................ 63
11 Status displays and error messages.............................. 65
11.1 Status displays.......................................................... 65
11.2 Error messages......................................................... 65
12 Decommissioning and disposal...................................... 71
12.1 Decommissioning unit............................................... 71
12.2 Disposing of the unit................................................. 71
13 Appendix............................................................................ 72
13.1 Declaration of conformity.......................................... 73
13.2 Technical data........................................................... 74
13.3 Installation drawing................................................... 78
14 Index................................................................................... 80
Table of contents
23.05.2023 Refrigerator/freezer LABO series 7

1 Product description
1.1 Unit overview
Fig. 1: Laboratory refrigerator (housing)
1 Key switch
2Display and control unit
Ä
Chapter 1.2 ‘Display and control ele-
ments’ on page 12
3 Door lock
4 Door handle
5 Adjustable feet
Model LABO (example)
Product description
Unit overview
23.05.2023Refrigerator/freezer LABO series8

Fig. 2: Laboratory refrigerator (interior)
1 Circulation cooling
2 Support rail
3 Supports
4 Drawer
5 Melt water container
6 Cooling machine
Product description
Unit overview
23.05.2023 Refrigerator/freezer LABO series 9

Fig. 4: Laboratory freezer (interior)
1 Circulation cooling
2 Support rail
3 Supports
4 Drawer
5 Melt water container
6 Cooling machine
Product description
Unit overview
23.05.2023 Refrigerator/freezer LABO series 11

1.2 Display and control elements
1.2.1 Design of the display and control unit
Fig. 5: Display and control unit
1 Key switch
2 Display and control unit (variable key assignment)
3 USB port
1.2.2 Function of the key switch
Tab. 1: Position of the key switch
Key posi-
tion
Position Function Description
“0” Switch off unit.
nSwitch off unit (for example to perform a restart).
nThe Display shows .
nTo put the unit in a currentless state, unplug the
power plug.
“1” Switch on unit.
nOperate unit.
nDisplay and reset unit values (for example actual
temperature or temperature limits).
nConfirm alarms.
“P” Program unit.
nAdjust unit (for example target values or tempera-
ture warning limits).
nDisplay parameter lists.
nConfirm alarms.
Always operate unit in key position “1” in order to pre-
vent manipulation. During normal operation, remove
key and store it safely.
1.2.3 Function of buttons and displays
For the functions of buttons and displays, see the following over-
view:
Product description
Display and control elements > Function of buttons and displays
23.05.2023Refrigerator/freezer LABO series12

Tab. 2: Buttons
Button Description Function
[Max.] Display maximum value of temperature memory.
[Min.] Display minimum value of temperature memory.
[Reset] Reset temperature memory.
Switch off buzzer.
[Temperature warning
max.] Read upper temperature warning limit.
[Temperature warning
min.] Read lower temperature warning limit.
[Target temperature] Read target temperature.
[Defrosting] Activate additional defrosting.
[Additional light / additional
defrosting]
Combination button:
Activate additional defrosting.
Switch interior lighting on/off permanently.
[SuperFrost] Activate SuperFrost function.
[Humidity] Adjust humidity.
[Light] Switch interior lighting on/off permanently.
[Start] Start data read-out via a PC-KIT-STICK.
[Cancel] Cancel data read-out via a PC-KIT-STICK.
[Unassigned button] Unassigned button without function.
Product description
Display and control elements > Function of buttons and displays
23.05.2023 Refrigerator/freezer LABO series 13

Depending on the version, certain buttons have a mul-
tiple function in combination with other buttons.
Tab. 3: Displays
Display Description Function
‘Defrosting’ Defrosting is active.
‘Humidity’ Humidity is active (temperature consistency improved, humidity
high).
‘SuperFrost’ SuperFrost is active.
‘Alarm’ An alarm was triggered.
1.3 Scope of delivery
The following interior fittings approved for operation are supplied
for each unit in line with the unit specifications:
nWire shelves
nDrawers
The unit is fitted with a lockable unit door.
Depending on the unit components, the following keys are included
in delivery:
PRO-ACTIVE
nUnit key
nDoor key (for lockable unit door)
ULTIMATE
n2 x RFID transponder (for a lockable door of the unit)
The KIRSCH-DATANET software is only available as download at
https://kirsch-medical.de/service/downloads/kirsch-datanet-
software.
Interior fittings
Lockable unit door
Keys included in delivery
Software
Product description
Scope of delivery
23.05.2023Refrigerator/freezer LABO series14

For installation/configuration, please observe the
Instruction Manual of the software. The Manual is avail-
able in the installation routine.
1.4 Interfaces
The unit is equipped with the following interface for connecting
additional units (hereafter referred to as “modules”) for monitoring
and documenting the temperature:
Tab. 4: Interfaces
Interface Module
LAN interface PRO-ACTIVE
nPC-KIT-NET (optional)
ULTIMATE
nPC-KIT-NET integrated
USB port PRO-ACTIVE
nPC-KIT-STICK
ULTIMATE
nService interface
Potential-free alarm contact Remote warning system (for
example GSM-MODUL or con-
nection to building control
system (see circuit diagram on
unit))
For information about connecting the modules to the unit, see the
relevant product documentation.
Connect only compatible USB flash drives!
Connect only modules with the following properties to
the USB port:
–Maximum memory capacity of 32 GB
–Formatted in FAT-32 format
Remove USB flash drive after use!
The USB flash drive must not remain permanently in
the unit.
–Remove USB flash drive after the data transfer is
completed
Ä
‘Error messages and status displays
of the PC-KIT-STICK’ on page 70.
Product description
Interfaces
23.05.2023 Refrigerator/freezer LABO series 15

1.5 Unit functions
1.5.1 Cooling
The unit is equipped with a cooling machine with interior evapo-
rator for cooling chilled goods.
After initial commissioning or recommissioning, the cooling
machine takes a while to cool the interior down to the set target
temperature value.
With circulation cooling, the air circulates around the interior of the
refrigerator. Circulation cooling is performed by means of ventila-
tion plates and a fan.
Circulation cooling reduces physically induced temperature differ-
ences and the target temperature is kept constant throughout the
interior.
Circulation cooling is set to continuous operation and is switched
off automatically when the door is opened.
The condenser transfers the generated thermal energy to the
ambient air.
Depending on the model, the condenser is fitted either
on the back wall or in the machine room.
1.5.2 SuperFrost function
The unit is equipped with a SuperFrost function.
With the SuperFrost function, it is possible to cool the unit down to
the lowest possible temperature in the shortest time
Ä
Chapter 7.4
‘Switching on the SuperFrost function’ on page 46.
Cooling machine
Circulation cooling
Condenser
Fig. 6: Condenser (example)
Product description
Unit functions > SuperFrost function
23.05.2023Refrigerator/freezer LABO series16

1.5.3 Defrosting
The unit defrosts automatically every 12 hours.
Automatic defrosting is time and temperature-controlled.
During automatic defrosting, the system ensures that the unit main-
tains the target temperature value.
Melt water is conducted into the exterior melt water container and
evaporates there.
When the defrosting process is active, the ‘Defrosting’ LED display
lights up on the Display.
In addition to automatic defrosting, it is possible to start the
defrosting process manually.
Press button [Additional defrosting] for four seconds.
ðThe defrosting process begins.
1.5.4 Temperature display
The temperature is shown on the Display of the unit’s display and
control unit
Ä
Chapter 1.2 ‘Display and control elements’
on page 12.
The Display indicates the temperature of the chilled goods.
The temperature display does not indicate the current
air temperature of the interior.
The alarm function and the temperature warning limits are based
on the temperature of the chilled goods as shown on the Display.
1.5.5 Temperature memory
The temperature memory records the maximum and minimum tem-
perature values reached during operation.
The temperature memory begins recording when the target tem-
perature is reached or, at the latest, after two hours of operation.
The temperature memory is reset automatically when the unit is
restarted or reset.
The temperature memory can be retrieved and erased manually
Ä
Chapter 7.3 ‘Retrieving/erasing the temperature memory’
on page 46.
Automatic defrosting
Additional defrosting
Fig. 7: Display
Product description
Unit functions > Temperature memory
23.05.2023 Refrigerator/freezer LABO series 17

1.5.6 Temperature monitoring with PC-KIT-STICK
The temperature memory of the unit documents the maximum and
minimum temperature values.
PC-KIT-STICK is the easiest method of automatic temperature
documentation.
The internal memory is a circular buffer. Before the oldest data are
overwritten, the data are kept stored for 90 days. Therefore, we
recommend to regularly read out the data, for example, weekly or
monthly, in order to avoid gaps in recording.
The data transfer is performed via a USB flash drive. Even while
the data are read out, the temperatures is constantly documented.
An unlimited number of units can be incorporated
Ä
‘Interfaces’
on page 15.
For constant temperature monitoring, the unit can be equipped with
temperature documentation via the network
Ä
Chapter 1.7.1 ‘Tem-
perature documentation’ on page 19.
1.5.7 Temperature sensor
The unit is equipped with multiple temperature sensors.
For the functions of the respective temperature sensors, see the
following table:
Colour Description Function
Evaporator sensor
(red)
Controls the defrosting
phase
Control sensor
(brown) Controls the monitoring unit
Control sensor
(violet) Controls the monitoring unit
1.6 Battery
The battery powers the temperature monitoring for up to 30 hours
in the event of a power failure.
Temperature monitoring ensures that the temperature progression
is stored and the temperature alarm is triggered if necessary.
The battery charges during normal operation and is monitored by
an automatic charging system.
Technical data for the battery:
n6 V, 4 Ah
Battery function
Product description
Battery
23.05.2023Refrigerator/freezer LABO series18

PRO-ACTIVE:
The battery does not supply the unit!
The battery only provides power to the temperature
monitoring. The battery does not provide a back-up to
the unit and therefore ensure that the interior tempera-
ture is maintained.
ULTIMATE:
The battery does not supply the ULTIMATE user infer-
face!
The battery only provides power to the temperature
monitoring. The battery ensure neither the ULTIMATE
user interface operation nor maintaining the interior
temperature.
As soon as power failure is remedied, the temperature
progression of the user interface is updated.
1.7 Additional unit components
The unit is equipped with standard equipment.
The standard equipment can be supplemented with additional unit
components.
The following additional components are available for the unit:
nTemperature documentation via the network
nInterior lighting
1.7.1 Temperature documentation
The unit can optionally be equipped with additional temperature
documentation.
The following table contains an overview of additional unit compo-
nents.
For more information on installation and use, see the documenta-
tion for the relevant product.
For information about the software for temperature documentation,
see the
“Assembly and connection manual – PC-KIT-NET”.
Product description
Additional unit components > Temperature documentation
23.05.2023 Refrigerator/freezer LABO series 19

Tab. 5: Temperature documentation options
Description Function Figure
PC-KIT-NET Automatic temperature documentation and monitoring
via the network (LAN).
Unlimited connection of units possible.
Simultaneous data access for up to 20 clients per
server. Two server accesses possible.
Disc-type pen-recording ther-
mometer
Depending on the model, it is either installed in the
machine room cover of the refrigerator or freezer or
integrated in an additional housing extension.
Pen-recording thermometer
for placing in the unit
The easiest way to retrofit temperature documentation.
Temperature measuring range from +25 °C to -40 °C.
Not suitable for FROSTER BL 180 PRO-ACTIVE and
FROSTER BL 650 PRO-ACTIVE
External temperature docu-
mentation
The sensor makes it possible to measure the tempera-
ture and transfer the data to existing interfaces on site.
The user/owner may have to check for compatibility.
1.7.2 Interior lighting
The unit is optionally equipped with interior lighting.
The interior lighting automatically switches on when the door is
opened and switches off when the door is closed.
In units with a glass door, the interior lighting can be permanently
switched on or off with the [Light] button.
Interior lighting (optional)
Product description
Additional unit components > Interior lighting
23.05.2023Refrigerator/freezer LABO series20
Other manuals for LABO Series
1
This manual suits for next models
61
Table of contents
Other Kirsch Refrigerator manuals

Kirsch
Kirsch MED Series User manual

Kirsch
Kirsch LABEX 105 PRO-ACTIVE User manual

Kirsch
Kirsch ESSENTIAL-100 User manual

Kirsch
Kirsch MED Series User manual

Kirsch
Kirsch BL Series User manual

Kirsch
Kirsch LABEX 105 PRO-ACTIVE User manual

Kirsch
Kirsch LABO Series User manual

Kirsch
Kirsch BL Series User manual

Kirsch
Kirsch MED-288 User manual

Kirsch
Kirsch BL Series User manual