KLINDEX PLANETARI NEW Product guide

M A N U A L B O O K
Please read and save these instructions
P L A N E T A R I
N
E W
&
C
L A S S I C
KLINDEX
S.
R
.
L
.
Via Vallone, 16
–
65024
–
Manoppello (PE) Italy Tel. +39 085 859 800
Fax +39 085 8599 224
http://www.klindex.it e
mail: klindex@klindex.it
Data ultimo aggiornamento: 02/09/2015
MANUALE DI MANUTENZIONI
NORME GENERALI PER LA
SICUREZZA
Leggere e conservare queste istruzioni
GENERAL SAFETY NORMS
Please read and save these instructions
NORMES GENERALES DE SÛRETÉ
Prière de lire et de conserver
ALLGEMEINE
SICHERHEITSBESTIMMUNGEN
Bitte Lesen und aufbewahren
NORMAS GENERALESE DE
SESEGURIDAD
Lea y conserve estas instrucciones por favor
MANUAL DE MANUTENÇÃO
NORMAS GERAIS PARA A SEGURANÇA
Leia e conserve essas informações
LEGGI QUESTO MANUALE DI ISTRUZIONE
READ THIS MANUAL BOOK
PRIÈRE DE LIRE
ANLEITUNSBUCH BITTE LESEN
PORFAVOR,LEERYCONSERVARESTASINSTRUCCIONES
POR FAVOR, LEIA ESTE MANUAL DE INSTRUÇÕES
Italiano: Questo manuale di istruzione contiene importanti informazioni per l'uso e la sicurezza di questa macchina. Mancare di leggere questo manuale prima di
iniziare a operare o tentare di fare qualsiasi riparazione o manutenzione alla vostra macchina potrebbe risultare dannoso a voi o ad altre persone. Potrete causare
danni alla macchina o ad altre proprietà o ad altre persone. Prima di utilizzare la macchina dovete accertarvi di utilizzarla secondo le istruzioni riportate in questo
libretto. Tutte le istruzioni date in questo manuale sono viste con l’operatore posto dietro la macchina.
English: This book has important information for the use and safe operation of this machine. Failure to read this book prior to operating or attempting any service or
maintenance procedure to your machine could result in injury and could be dangerous to your or other people. Damage to your machine or the other property could
occur. You must have training in the operation of this machine before operating it. If you or your operator(s) cannot read English have this manual explained very well
before attempting to use it. All directions given in this book are as seen from the operator's position at the rear of the machine.
Français: Ce livret d’instructions contient d’importantes informations pour l’utilisation et la sûreté de cette machine. Ne pas lire ce livret avant de commencer à travailler
ou tenter de faire n’importe quelle réparation ou manutention à votre machine pourrait se révéler pour vous ou pour d’autres personnes dangereux. Vous pourriez
causer des dommages à la machine, à vous même, ou aux autres personnes. Avant de commencer à utiliser la machine vous devez vous assurer qu’elle soit utilisée
selon les instructions reportées dans ce livret. Toutes les instructions données dans ce livret ont été vues de la position de l’opérateur derrière la machine.
Deutsch: Dieses Einleitungsbuch enthält wichtige Informationen für die Haltung dieser Maschine. Das nicht Beachten dieser Informationen, vor der Nützung oder bei
selbstständige Reparaturen an Ihrer Maschine, könnte Schaden an Ihnen oder anderen Personen zufügen. Es könnten Schaden an der Maschine und Eigentum
Anderer entstehen. Vor der Nutzung dieser Maschine vergewissern Sie sich das alle Anleitungen die dieses Lehrbuch enthält eingehalten werden. Alle Informationen
sind mit den Arbeiter hinter der Maschine angegeben.
Espanol: Este manual de instrucciones contiene importantes informaciones para el uso y la seguridad de esta màquina. No leer este manual antes de empezar a
trabajar o intentar realizar cualquier reparaciòn o manutenciòn sobre esta màquina podrìa causar daños a la màquina, a la propriedad o a otras personas. Antes de
utilizar la màquina tienen que verificar que sea utilizada segun las instrucciones descritas en este manual. Todas las directivas dadas en este manual han sido vistas
desde la posiciòn de un operador colocado detràs de la màquina.
Português: Este manual de instruções contém importantes informações para o uso e segurança desta máquina. Usar a máquina ou tentar fazer qualquer reparação
ou manutenção sem primeiro ler este manual, pode resultar danoso a si ou a outras pessoas. Poderá causar danos à máquina, à propriedade ou a outras pessoas.
Antes de utilizar a máquina deverá verificar que seja usada segundo as instruções reportadas neste livro. Todas as instruções dadas neste manual são apresentadas
com o operador por trás da máquina.


Data ultimo aggiornamento:
02/09/2015
Pag.
1
di 28
ISTRUZIONI GENERALI PER LEVIGARE
CON SISTEMA PLANETARIO
I PLANETARI BREVETTATI hanno rivoluzionato il modo di levigare e lucidare i pavimenti in marmo e
granito rendendo il lavoro di levigatura molto più facile, molto più veloce e più economico. I PLANETARI
possono essere applicati a qualsiasi “monospazzola” di qualsiasi marca o modello semplicemente
applicando la “ flangia “ della macchina che si vuole utilizzare.
AVVERTENZA GENERALE
Prima di iniziare il lavoro di levigatura è
importante considerare che la DUREZZA DEI MATERIALI LAPIDEI è sempre diversa.
Tenendo presente questa caratteristica dei pavimenti, ricordarsi che:
a)
PIÙ IL PAVIMENTO È TENERO, MAGGIORE È LA FORZA NECESSARIA
per far girare gli abrasivi.
b)
PIÙ IL PAVIMENTO È DURO, MINORE È LA FORZA NECESSARIA
per far girare gli abrasivi
c)
PIÙ ALTA È LA VELOCITÀ DI ROTAZIONE DEGLI UTENSILI DIAMANTATI
più veloce è
l’esecuzione del lavoro, ma maggiore è la forza necessaria per far girare gli utensili ad alta velocità, e
quindi più potente dovrebbe essere la macchina.
Alla luce di questi principi fondamentali sono stati realizzati tre tipi di Planetari:
PLANETARIO K 800 a 800 giri, consigliato per pavimenti teneri e parquet
PLANETARIO K 1000 a 1.000 giri, consigliato per pavimenti di media durezza come il marmo
PLANETARIO K 2000 a 2.000 giri, consigliato per pavimenti duri come il granito o il grés
porcellanato
CORRETTO VOLTAGGIO E USO DI CAVI ELETTRICI
SUPPLEMENTARI DI CONNESSIONE
Uno dei più frequenti casi di cattivo funzionamento della macchina levigatrice è dovuto al fatto che spesso
non arriva la corretta quantità di energia elettrica alla macchina. Seguire questi importanti consigli:
a) Collegarsi alla presa di corrente più vicina all’interruttore Generale. Specialmente nei vecchi impianti ci
può essere molta dispersione di energia o cattivi collegamenti lungo la rete elettrica.
b) In caso necessita prolunga elettrica, utilizzare solo cavi elettrici di sezione doppia rispetto a quello in
dotazione della macchina.
c) Mai collegare alla stessa presa di corrente due macchine come per esempio la macchina e l’aspiraliquidi.
ATTENZIONE: montaggio della staffa di bloccaggio
Si raccomanda di serrare bene la staffa di bloccaggio UT0730x alla carcassa del
PLANETARIO CLASSIC
prima
del suo utilizzo. Controllare periodicamente (ogni inizio lavoro) il suo serraggio.
MANUTENZIONE: si raccomanda di ingrassare periodicamente
GRASSO
Grado NLGI
2
Classificazione
DIN51502
KP 2 P
-
25
Test Timken carico utile ASTM2509
50 (lbs)
Temperatura di lavoro
-
25 / +170 (°C)
Olio di base / viscosità (40°C)
Minerale / 840 mm
2
/s
Addensante
Sapone comple
sso
AL
Quantità
Cuscinetti satelliti
10 g per ogni ingrassino
Ruot
e dentate
30 g per ogni ingrassino
Frequenza
─
Effettuare il I° ingrassaggio dopo
50 ore
di lavoro
─Effettuare i successivi ingrassaggi ogni 100 ore di lavoro

Data ultimo aggiornamento:
02/09/2015
Pag.
2
di 28
ISTRUZIONI PER LEVIGARE IL MARMO
LEVIGATURA DI PAVIMENTI IN MARMO
CON DISLIVELLI E/O CON DENTI
1) Iniziare con DISCHI DIAMANTATI METALLICI MS1 e levigare fino a che tutti i dislivelli non
sono stati eliminati e non ci sono più denti nel pavimento.
Consigliamo di muovere la macchina con un movimento “avanti e indietro” e nello stesso tempo
“destra e sinistra”. Fra un passaggio e l’altro rimuovere sempre il materiale asportato con un
aspiraliquidi. Non lavorare fino a bordo muro, ma tenersi a circa 10 cm.
2) Quando il pavimento è stato perfettamente livellato e non ci sono più denti proseguire con i dischi
metallici diamantati MS2 facendo attenzione a non lasciare nessuna superficie non trattata.
(suggeriamo di seguire le linee delle piastrelle). È consigliabile utilizzare AKTIVATOR 1, per
rettificare gli utensili diamantati metallici, ogni volta che inizia un nuovo lavoro, e comunque ogni
100mq circa di levigatura. Mantenersi a circa 5 cm. da bordo muro.
3) Procedere con DIAMANTI RESINOIDI M3 – M4 – M5. Prestare la necessaria attenzione nel coprire
l’intera superficie, lasciandosi guidare dalle linee delle piastrelle.
4) Dovendo levigare marmi verdi, neri, rossi e comunque marmi difficili da lucidare, procedere con M6 o
anche M7 di grana più fine.
5) Dopo la levigatura procedere alla lucidatura con i nostri POLISH. Poiché i marmi hanno diverse
composizioni, l’Azienda ha sviluppato e produce una vasta gamma di POLISH per lucidare qualsiasi
tipo di marmo:
─POLISH KP 85 utilizzabile per la maggioranza dei marmi
─POLISH KP 92 il più indicato per i marmi calcarei.
─POLISH PALLADIANA per terrazzo, palladiane, veneziane e conglomerati.
─POLISH COLOR per marmi contenenti pigmenti ferrosi come i verdi, i rossi, etc.
─POLISH KMT per marmi teneri come il Carrara
─POLISH GREY per speciali soluzioni
Per l’impiego dei P
OLISH
,spargere un po’ di polvere sul pavimento, aggiungere un po’ di acqua e
utilizzando DISCOLUX creare una crema come lo yogurt lavorare fino ad ottenere il lucido.
Quando la crema diventa troppa secca , aggiungere un altro po’ di acqua. La crema deve essere sempre
come uno yogurt.
6) Alla fine lavare accuratamente con acqua. Quando il pavimento è asciutto lucidare con DISCOLUX o
con un disco bianco.
NOTA 1 Non lasciare il
POLISH
sul pavimento per oltre 30 minuti. La polvere eccedente potrebbe
rovinare il lucido.
NOTA 2 Normalmente il P
OLISH
viene usato con disco DISCOLUX. Solo il POLISH COLOR si
lavora con lana d’acciaio.
NOTA 3 Usando il DISCO TERMICO, invece del normale disco trascinatore, il lavoro è più veloce e il
lucido migliore.
RIPRISTINO LUCIDO e MANUTENZIONE
1) Se il pavimento non ha denti ma solo graffi e desideriamo ripristinare la lucentezza iniziale, è
sufficiente iniziare con M4 e procedere come sopra. Se i graffi sono molto profondi iniziare con M3.
2) Se il pavimento presenta dislivelli e/o denti utilizzare la serie J
UMPER
e/o K
LIMBER
che, dotati di uno
speciale smusso, “salgono” sui denti del pavimento.

Data ultimo aggiornamento:
02/09/2015
Pag.
3
di 28
ISTRUZIONI PER LEVIGARE IL GRANITO
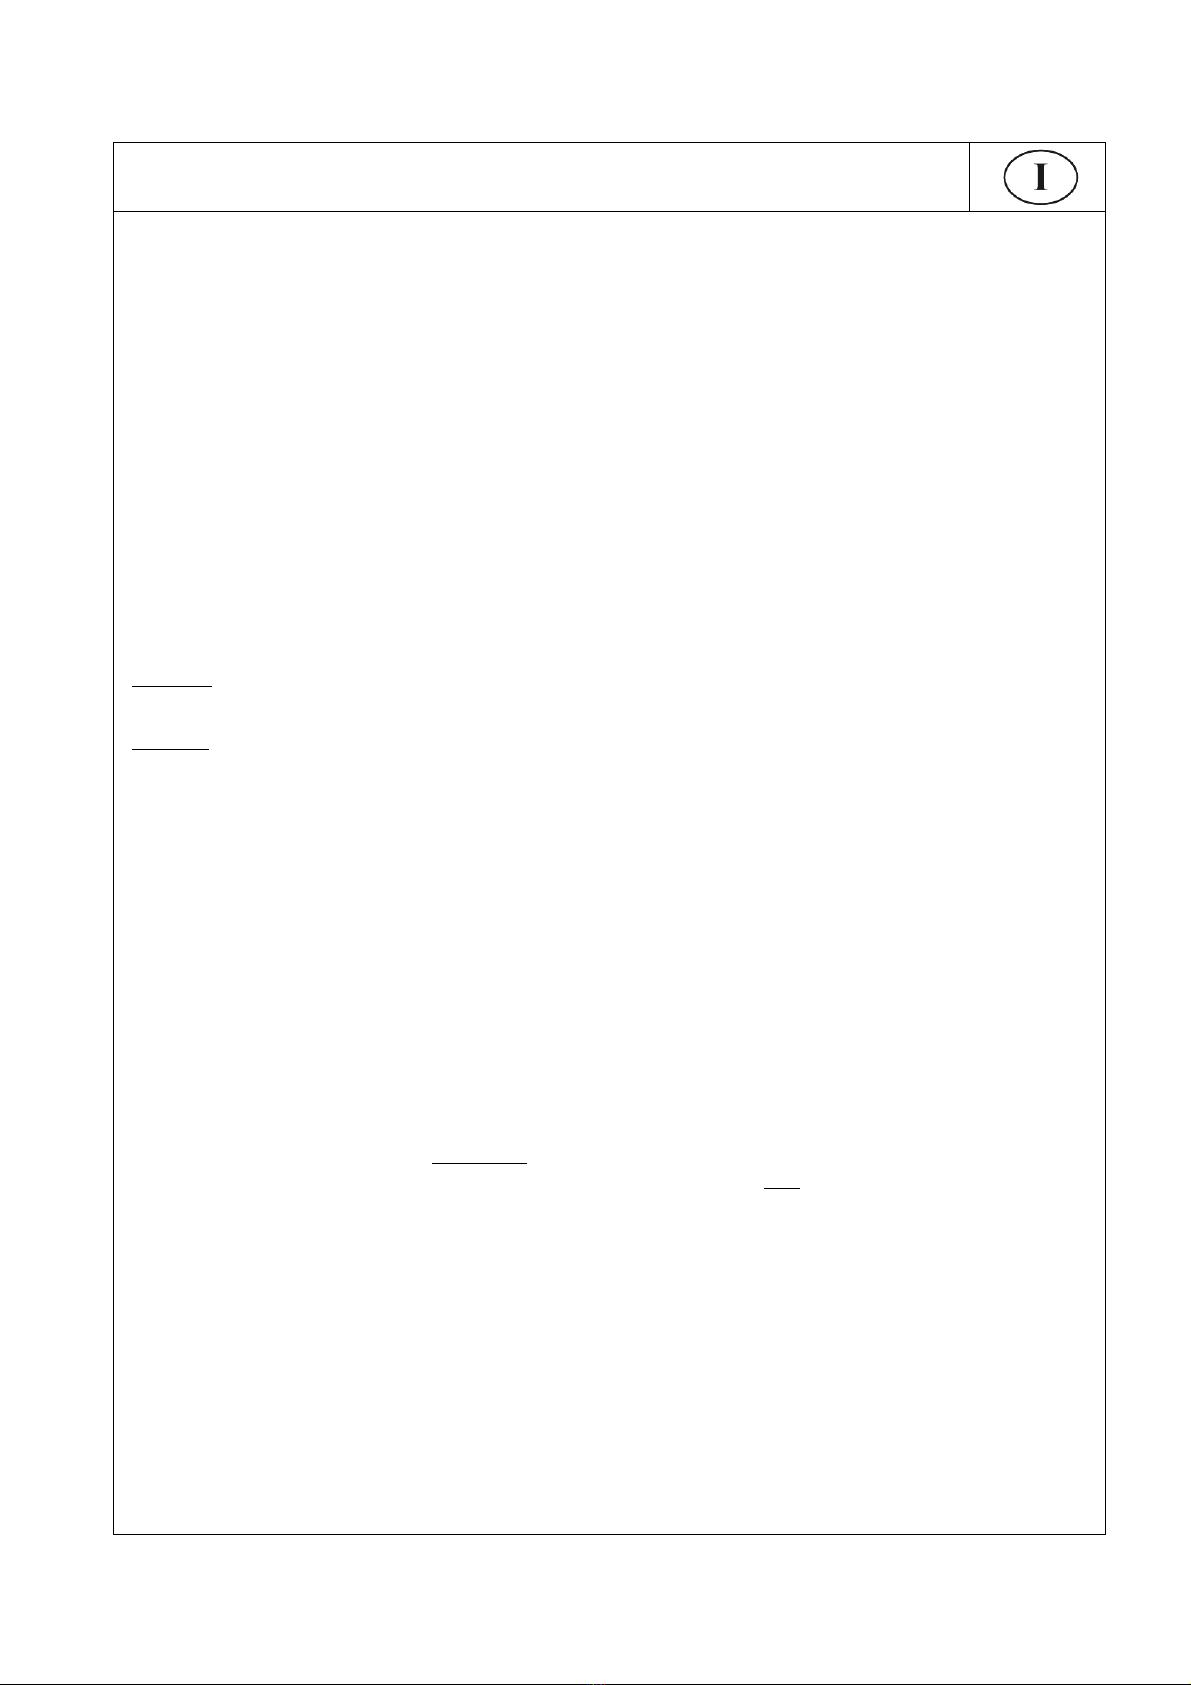
Il PLANETARIO K2000 è il planetario per levigare il granito nel modo migliore e più economico. Usando
K2000 i dischi diamantati girano a circa 2.000 giri. L’alta velocità di rotazione dei dischetti è molto
importante per levigare il granito: solo levigando ad alta velocità è possibile levigare bene senza lasciare
graffi così da ottenere un buon risultato e un buon lucido.
GS1: Iniziare la levigatura con dischi diamantati metallici GS1 e levigare fino a che tutti i denti o i
dislivelli sono stati eliminati. Questa fase è la fase più importante. È assolutamente importante eliminare
bene tutti i denti. Se non si livella perfettamente il pavimento alla fine non si ottiene un buon lucido.
Consigliamo di muovere la macchina con un movimento “avanti e indietro” e nello stesso tempo “destra e
sinistra”. Non lavorare fino a bordo muro, ma tenersi a circa 10 cm. N
OTA
:
dopo ogni passaggio, rimuovere
tutti i fanghi con un aspiraliquidi.
GS2: Dopo aver spianato perfettamente il pavimento procedere con GS 2, levigando accuratamente e
facendo attenzione a coprire l’intera area. Si consigliano 2 passaggi incrociati per essere sicuri di aver
coperto ogni area. Mantenersi a circa 5 cm. da bordo muro.
GS3: Procedere con GS3 per rimuovere i graffi di GS2, seguendo la stessa procedura.
Dopo il GS 3 non ci devono essere più graffi sul pavimento.
NOTA 1 Si consiglia di usare
PESI SUPPLEMENTARI
a seconda della durezza del pavimento e del “grip”
degli utensili
NOTA 2 Si suggerisce l’utilizzo di AKTIVATOR 1 per la taglienza degli utensili diamantati metallici.
Dopo GS3: si consiglia di proseguire secondo le indicazioni seguenti a seconda del tipo di granito:
GRANITI DURI E COMPATTI: proseguire con GK4,GK5,GK6,GK7. Per alcuni graniti,
continuare con GK8
GRANITI OPEN E POROSI:
a) dopo GS3 proseguire con
PAVELUX
G3, G4 e G5. (I
PAVELUX
serie G sono abrasivi magnesiaci
che chiudono la porosità del granito).
b) dopo
PAVELUX
G5 si può procedere a scelta o con
PAVELUX
G6, G7 eG8, oppure con dischi
diamantati GK5, GK6, GK7 e, se necessario, GK8.
Procedere alla lucidatura con il P
OLISH
più adatto. Spargere sul pavimento una piccola quantità di POLISH
e aggiungere un po’ di acqua. Usando
DISCOLUX
e/o
LANA DI ACCIAIO
creare una crema simil yogurt.
Lavorare fino ad ottenere il lucido.
NOTA Usare POLISH KG con graniti scuri, POLISH KG CLEAR con graniti chiari.
NB: Per lucidare il granito è importante usare il
DISCO TERMICO
perché il
POLISH
KG:lavora solo
quando il pavimento è caldo. È possibile ottenere un buon lucido solo quando il pavimento è caldo.
Lavorare perciò un piccolo spazio per volta (1 mq x 1 mq).
LANA D’ACCIAIO: quando il pavimento è asciutto, lucidare con lana d’acciaio.
SPAZZOLA
NYLON:
lavare il pavimento con spazzola in nylon.
BRILLUX:
quando il pavimento è perfettamente asciutto, spruzzare un po’ di
BRILLUX
e lucidare con
un
DISCO ROSSO
o
BIANCO
.
KORREKTOR:
per alcuni graniti, per migliorare la profondità del lucido, suggeriamo di usare
KORREKTOR
.
Spargere con un panno
KORREKTOR
,
aspettare che si asciughi perfettamente e lucidare con
DISCOLUX
.
K
ORREKTOR
è anche un ottimo impermeabilizzante.
KI
WATERPROOFING:
per
una migliore protezione, consigliamo
KI WATERPROOFING
.
NB : per far risaltare la lucentezza e per dare un lucido più vivo e profondo consigliamo alcune
nostre specialità come GRANITOLUX, BRILLUX, KORREKTOR, SPLENDUR.

Data ultimo aggiornamento:
02/09/2015
Pag.
4
di 28
INSTRUCTIONS FOR GRINDING
THE PATENTED PLANETARIO KLINDEX has changed the way you grind and polish marble,
granite and any other stone floors. Now grinding is easier, faster and more economic. Furthermore, the
work is clean and noiseless.
The PLANETARIO is suitable for all kinds of single-brush machines.
BASIC INFORMATION:
BEFORE YOU START it is very important to take note
of some general information. THE HARDNESS OF FLOORS is always different according to the
different materials used when the floor was made. Taking these points into account it is important to note
the following issues:
a)
THE SOFTER THE FLOOR
, more power is necessary to run the diamond discs.
b)
THE HARDER THE FLOOR
, less power is necessary to run the diamond discs.
c)
THE HIGHER THE ROTATION
of the diamond disks, faster in the grinding, however, more power is
necessary to run the diamond disks.
IN ACCORDANCE WITH THESE CONCEPTS, the Company has developed THREE types of
Planetario:
PLANETARIO K 800: for soft stone floors and wood floors.
PLANETARIO K 1000: for medium hard floors, like standard marble.
PLANETARIO K2000: for very hard floors, like granite and gres.
WARNING ABOUT CORRECT USE OF ELECTRICITY
One of the problems most frequently found during use is the problem of electric current compatibility.
Working with a single-phase
machine with over 2hp might mean that the correct current will not arrive at
the machines. FOLLOW THESE SUGGESTIONS:
1) Connect the machine to the nearest Circuit Breaker Box socket.
2) If you need to use an extension cable, use only a cable that is twice the thickness of the cable from
the machine. Lengthening the cable too much or using an inadequate cable may not provide the
correct current and the start capacitor may burn.
3) DO NOT CONNECT more than one machine with the same cable. The electricity may not be enough
for both.
ATTENTION: Assemblage of the block stirrup
It is recommended to shut well the block stirrup UT0730x to the planetary classic carcass before the use.
Periodically (every beginning job) check its blocking.
MAINTENANCE: It is recommended to grease periodically
OIL (GREASE)
NLGI Grade
2
Classification DIN51502
KP 2 P
-
25
Timken Test useful load ASTM2509
50 (lbs)
Working temperature
-
25 / +170 (°C)
Lubrificant / viscosity (40°C)
Mineral / 840 mm
2
/s
Thi
ckener
Complex soap AL
Quantity
Satellite Ball
-
bearing
10 g for each greasing
Pronged (toothed) wheels
30 g for each greasing
Frequency
─
Carry out the first greasing after
50 hours
of work
─Subsequently, carry out every 100 hours of work

Data ultimo aggiornamento:
02/09/2015
Pag.
5
di 28
INSTRUCTIONS FOR GRINDING MARBLE
GRINDING ROUGH OR UNEVEN MARBLE FLOORS
1) To start, use metallic diamond discs MS1 until the surface is even. PLEASE NOTE: If the floors are
notably uneven, start the grinding process with MS0 and proceed with MS1. For a faster and more
efficient job we advise you to work with a slow and constant movement, proceeding in a linear pattern
following the lines of the tiles. Between one stage and another always remove the mud with a vacuum
cleaner. With MS1 or MS0 don’t work up to the wall but stay 10 cm (25 inches) far.
2) When the floor has been perfectly evened and there are not any lippages proceed with the metallic
diamond disc MS2, being careful not to leave any untreated areas (we emphasize the importance of
working in linear patterns). With MS2 don’t work up to the wall but stay 5 cm (25 inches) far. Before
starting any new work do not forget to use AKTIVATOR 1 for sharpening the metallic diamond
tools.
3) Proceed with the resin diamond disc M3 – M4 – M5 using the same procedure used with MS2.
4) Working on green, black marble floor hard to polish, proceed with the diamond disc M6 and/or M7
(smaller grain)
5) After grinding, proceed to shine the floors using our POLISH POWDER:
the Company has developed and produces a complete range of Polish to shine all kinds of marble floors:
─POLISH KP 85 the most used for almost all kind of marble.
─POLISH KP 92 the best for calcareous marble.
─POLISH PALLADIANA for terrazzo, palladiane and conglomerate.
─POLISH COLOR for green, black or marble that contains iron pigments.
─POLISH KMT for soft marbles like Carrara
─POLISH GREY the special polish for non-calcareous marble.
To use the POLISH: spread the powder on the floor and add a bit of water. Using the DISCOLUX, make
the cream like a “yogourt “ consistency and work until the desired shine is achieved.
If necessary, add another little bit of Polish and water.
6) When the desired shine is achieved, wash the floor with DISCOLUX. When the floor is dry, polish
with a DRY white disc.
NOTE 1: Do not leave the P
OLISH
cream on the floor for over 30 minutes without washing. The excess
powder remaining on the floor surface may ruin the shine.
NOTE 2: Usually the POLISH is used with DISCOLUX. Only when using POLISH COLOR should steel
wool be used.
NOTE 3: THERMIC PLATE WARMER: Using the THERMIC DISC instead of the NORMAL PAD
HOLDER the work will be faster and the shine deeper.
RESTORING and MAINTENANCE
1) If the floor doesn’t have lippages but only scratches, you may start with the M4 and proceed with the
M5 diamond discs. If the scratches are very deep you may start with the M3 disc.
2) If the floor has lippages or is uneven use diamond discs series J
UMPER
and/or K
LIMBER
. They have
special bevel that allows to jump on lippages without breaking.

Data ultimo aggiornamento:
02/09/2015
Pag.
6
di 28
INSTRUCTION FOR GRINDING GRANITE
PLANETARIO K2000 is the most suitable Planetario for grinding granite floors. Using K2000, the
diamond-disks run at about 2000 rpm. The high speed is very important to polish granite: only by cutting
at high speeds is it possible to smooth granite thoroughly without leaving scratches and to obtain an
excellent shine.
GS1: Start with metallic-diamond-disc GS1 and work until the floor is perfectly evened without any
lippages. This stage is the most important stage. It is absolutely important to eliminate all the rough
edges. If floors are not perfectly evened, you will not obtain a good shine. We suggest to move the
machine with a movement “forward and backward” and at the same time “to right and left” following the
lines of the tiles. With GS1 don’t work up to the wall but stay 10 cm (25 inch) far. After any step remove
the mud by vacuum cleaner and not by hand.
GS2: After levelling, proceed with GS2. It is ideal to grind the floors in a cross-patterned direction.
GS3: Proceed with metallic-diamond-disc GS3. It is ideal to grind the floors in a cross-patterned direction.
No scratches should be visible on the floors after this step.
NOTE 1 : it is suggested to add EXTRA WEIGHT according to the hardness of the floor and the tools
grip.
NOTE 2 : it is suggested to use AKTIVATOR 1 for sharpening the metallic diamond tools
After GS3 proceed in one of the following system:
a) FOR HARD AND COMPACT GRANITE : proceed with G4, G5; G6, G7 and if it is necessary
with G8
b) FOR OPEN AND POUROS GRANITE :
1) after GS3 proceed with PAVELUX G3, G4 and G5. P
AVELUX
are magnesian abrasive useful to
close the microporosity of the granite
2) after P
AVELUX
G5 you can proceed with P
AVELUX
G6, G7 and G8 or with diamond discs GK6,
GK7 and GK8
After grinding, proceed to shine the floors using our POLISH POWDER:
POLISH KG: for dark-coloured granite
POLISH KG CLEAR: for light-coloured granite
To use the POLISH: spread the powder on the floor and add a bit of water. Using the D
ISCOLUX
or
STEEL WOOL, make the cream like a “yogourt” consistency and work until the desired shine is achieved.
If necessary, add another little bit of Polish and water. .
PLEASE NOTE: For polishing granite floors it is important to work with the THERMIC DISC because
POLISH KG works only when the floor is warmed. IT IS IMPORTANT TO APPLY THE POLISH
PROGRESSIVELY OVER SMALL AREAS 1m
2
x 1m
2
.
STEEL WOOL: when the floor is dry, polish with steel wool.
NYLON
BRUSH:
wash accurately the floor with a nylon brush.
:
BRILLUX:
when the floor is perfectly dry spray a little bit of B
RILLUX
and polish with
RED PAD
or
WHITE PAD
.
KORREKTOR:
to obtain a deep shine, spread K
ORREKTOR
on the floor by cloth , wait until becomes
perfectly dry and polish with D
ISCOLUX
. K
ORREKTOR
is also a good waterproofing..
KI
WATERPROOFING:
for a special water-proofing it is suggested to apply
KI WATERPROOFING
.
After polishing, proceed to enhance the shine with GRANITOLUX or BRILLUX:
The granite will look like it was factory-made!

Data ultimo aggiornamento:
02/09/2015
Pag.
7
di 28
ISTRUCTIONS GENERALES POUR PONCER
LES PLANETAIRES BREVETÉS ont révolutionné la façon de poncer et lustrer les sols en marbre et en
granit. Maintenant le ponçage est beaucoup plus facile, beaucoup plus rapide et plus économique.
LES PLANETAIRES peuvent être montés sur n’importe quelle monobrosse de n’importe quelle marque ou
modèle simplement en appliquant la flange de la machine qu’on veut utiliser.
AVERTISSEMENT GENERAL
Avant de commencer le ponçage il est
important considérer que la
DURETE DES
PIERRES
est toujours différente.
Tenant compte des caractéristiques de sol, vous devez vous rappeler que:
a)
PLUS LE SOL EST TENDRE, PLUS IL FAUT DE FORCE
pour faire tourner les abrasifs.
b)
PLUS LE SOL EST DUR ET MOINS EST LA FORCE NECESSAIRE
pour faire tourner les abrasifs.
c)
PLUS HAUTE EST LAVITESSE DE ROTATION DES DISQUES DIAMANTES
, plus rapide est l’exécution du
travail mais plus est la force nécessaire pour faire tourner les disques à haute vitesse.
Sur la base de ces principes fondamentaux ils ont été réalisés trois types de planétaires:
PLANETAIRE K 800 à 800 RPM conseillé pour sols tendres et pour parquet.
PLANETAIRE K 1000 à 1.000 RPM conseillé pour sols de moyenne duretés comme le marbre.
PLANETARIO K 2000 à 2.000 RPM conseillé pour les sols duretés comme le granit ou le gres.
VOLTAGE CORRECT ET UTILISATION DE CABLES
ELETRIQUES SUPPLEMENTAIRES DE BRANCHEMENT.
Un des plus fréquents cas de mauvais fonctionnement de la machine monobrosse pour travaux de ponçage ou
pour des travaux qui ont besoin de plus de force de moteur est dû au fait que, souvent la quantité de courant
nécessaire n’arrive pas à la machine. Suivre ces deux conseils importants:
a) Brancher à la prise de courant plus près de l’interrupteur général. Spécialement dans les vieilles
installations il peut y avoir beaucoup de dispersion d’énergie ou de mauvais relais le long du circuit.
b) Si vous avez besoin d’une rallonge électrique, utiliser seulement un câble électrique de diamètre double par
rapport à celui de la machine.
c) Ne brancher jamais sur la même prise de courant deux machines comme par exemple la monobrosse et
l’aspire liquides.
ATTENTION: montage de la staffe de blocage
Nous vous recommandons de bien serrer la staffe de blocage UT0730x à la carcasse du
PLANETAIRE CLASSIC
avant son utilisation. Contrôler périodiquement (à chaque début de travail) qu’il soit bien serré.
MANUTENTION: On recommande de graisser periodiquement
GRAS
Grade
NLGI
2
Classification DIN51502
KP 2 P
-
25
Test Timken charge utile
ASTM2509
50 (l
bs)
Température de travail
-
25 / +170 (°C)
Huile de base
/
viscosité
(40°C)
Mineral / 840 mm
2
/s
Addensant
Savon complexe
AL
Quantité
Coussinets satellites
10 g
pour chaque
graisseur
Roues denté
30 g
pour chaque
graisseur
Fréquence
─
Effectuer le pr
emier graissages
après
50
heures de travail
─Effectuer les graissages successifs après chaques 100 heures de travail

Data ultimo aggiornamento:
02/09/2015
Pag.
8
di 28
INSTRUCTIONS POUR PONCER LE MARBRE
PONCAGE DES SOLS EN MARBRE
AVEC DENIVELLEMENTS ET/OU AVEC DES DENTS
1) Commencer avec les DISQUES DIAMANTES METALLIQUES MS1 poncer jusqu’à ce que tous les
dénivellements soient éliminés et qu’il n’y a plus de dents sur le sol. Pour un travail rapide et efficient nous
conseillons de travailler avec un mouvement lent et constat en procédant de façon linéaire et en suivant
possiblement la ligne des dalles. Entre un passage et l’autre enlever toujours le matériau enlevé avec un
aspire-liquides.
2) Quand le sol a été parfaitement nivelé et qu’il n’y a plus de dents poursuivre avec les disques métalliques
diamantés MS2 en faisant attention à ne laisser aucune superficie non traitée. (nous vous conseillons de
suivre les lignes des dalles). Nous vous conseillons d’utiliser AKTIVATOR 1, pour rectifier les ustensiles
diamantés métalliques, à claque fois que vous commencez un nouveau travail, et surtout à chaque 100m²
environ de ponçage.
3) Procéder avec les DIAMANTS RESINOIDES M3 – M4 – M5 Prêter l’attention nécessaire à couvrir
l’entière superficie, en se laissant guider par les lignes des dalles.
4) Si vous devez poncez des marbres verts, noirs, rouge et donc des marbres difficiles à lustrer, procéder avec
M6 ou aussi M7 de grain plus fins.
5) Après le ponçage procéder à la montée en brillance avec nos POLISH. Comme les marbres ont des
compositions différentes, il a été développé et produit une vaste gamme de POLISH pour lustrer tous les
types de marbres:
─POLISH KP 85 utilisable pour la majeure partie des marbres.
─POLISH KP 92 le plus indiqué pour les marbres calcaires
─POLISH PALLADIANA pour terrazzo, palladiane, veneziane et conglomérats.
─POLISH COLOR pour marbres contenant pigments ferreux comme les verts, les rouges, etc.
─POLISH KMT pour marbres tendres comme le Carrare.
─POLISH GREY pour solutions spéciales.
Pour l’emploi des
POLISH
, étendre un peu de poudre sur le sol, ajouter un peu d’eau et utilisant
DISCOLUX créer une crème comme le yogourt et travailler. Quand la crème devient trop sèche ,
ajouter un peu d’eau. La crème doit être toujours comme un yogourt.
6) A la fin laver soigneusement avec de l’eau. Quand le sol est sec lustrer avec DISCOLUX ou avec un
disque blanc.
NOTE 1 Ne pas laisser le
POLISH
sur le sol pour plus de 30 minutes. La poudre en excédant pourrait
abîmer le lustre.
NOTE 2 Normalement le P
OLISH
est utilisé avec le disque DISCOLUX. Seul le POLISH COLOR se
travaille avec la laine d’acier.
NOTE 3 Utilisant le DISQUE THERMIQUE, à la place du plateau entraineur normal, le travail est plus
rapide et la brillance meilleure.
RESTAURATION DU LUSTRE et MANUTENTION
1) Si le sol n’a pas de dents mais seulement des rayures et vous désirez redonner le lustre initial, il suffit de
commencer avec le M4 e procéder comme ci-dessus . Si les rayures sont très profondes, commencer avec
le M3.
2) Si le sol présente des dénivellements et/ou des dents utiliser la série J
UMPER
et/ou K
LIMBER
qui ont un
bord en biais spécial, qui “montent” sur les dents du sol.

Data ultimo aggiornamento:
02/09/2015
Pag.
9
di 28
INSTRUCTIONS POUR PONCER LE GRANIT
LE PLANETAIRE K 2000 est le planétaire pour poncer le granit de façon meilleure et plus économique.
Utilisant le K2000 les disques diamantés tournent à environ 2.000 tours . La haue vitesse de rotation des
satellites est très importante pour poncer le granit: seulement en ponçant à haute vitesse il est possible
bien poncer sans laisser de rayures et obtenir un bon résultat et une bonne brillance.
GS1: Commencer le ponçage avec les disques diamantés métalliques GS1 et poncer jusqu’à
l’élimination totale des dents ou des dénivellements. Cette phase est la plus importante. Il est absolument
important bien éliminer toutes les dents. Si vous ne nivelez pas parfaitement le sol à la fin on n’obtient
pas une bonne brillance. Nous vous conseillons de donner un mouvement “en avant et en arrière” à la
machine et en même temps “droite et gauche”. Ne pas travailler jusqu’au bord du mur, mais rester à
environ 10 cm. NOTE:
après chaque passage, enlever toutes les boues avec un aspire liquides..
GS2: Après avoir aplani parfaitement le sol procéder avec le GS 2, en ponçant soigneusement et en
faisant attention de couvrir l’entière superficie et en suivant si possible les lignes des dalles pour ne laisser
aucun endroit non traité. Nous conseillons 2 passages entrecroisés pour être sûr d’avoir couvert toute la
surface. rester à environ 5 cm du bord du mur.
GS3: Procéder avec le GS3 pour enlever les rayures de GS2, et en suivant la même procédure. Après le
GS 3 il ne doit plus y avoir de rayures sur le sol.
NOTE 1 Nous vous conseillons d’utiliser des POIDS SUPPLEMENTAIRES selon la dureté du sol et du
“grip” des ustensiles
NOTE 2 Nous conseillons l’utilisation de AKTIVATOR 1 pour la coupe des ustensiles diamantés
métalliques.
Après GS3: Nous conseillons de poursuivre selon les indications suivantes selon le type de granit:
GRANITS DURS ET COMPACTES: poursuivre avec GK4,GK5,GK6,GK7. Pour certains granits,
continuer avec GK8
GRANITS “OUVERTS” ET POREUX
c) après GS3 poursuivre avec
PAVELUX
G3, G4 et G5. (. (Les
PAVELUX
série G sont des abrasifs en
magnésien qui ferment la porosité du granit).
d) après
PAVELUX
G5 on peut procéder au choix ou avec
PAVELUX
G6, G7 eG8, ou bien, avec les
disques diamantés GK5, GK6, GK7 et, si nécessaire, GK8.
Procéder à la montée en brillance avec le P
OLISH
adapte. Etendre sur le sol une petite quantité de
POLISH
KG
et ajouter un peu d’eau. Utilisant
DISCOLUX
et/ou
LAINE D
’
ACIER
créer une crème semblable au
yogourt. Travailler jusqu’à obtenir le lustre.
NB: Utiliser le POLISH KG avec le granit foncé, le POLISH KG CLEAR avec le granit claire
NB: Pour lustrer le granit il est important utiliser le DISQUE
THERMIQUE parce-que le
POLISH
KG
travaille seulement quand le sol est chaud.
NB: Il est possible obtenir un bon lustre seulement quand le sol est chaud. Travailler donc une petite
surface à la fois (1 m² x 1 m²).
LAINE D’ACIER: quand le sol est sec, lustrer avec la laine d’acier.
BROSSE
NYLON:
laver le sol avec la brosse nylon.
BRILLUX:
quand le sol est parfaitement sec, vaporiser un peu de
BRILLUX
et lustrer avec un DISQUE
ROUGE
OU
BLANC.
KORREKTOR:
pour certains granits, pour améliorer la profondeur du lustre, nous conseillons
d’utiliser
KORREKTOR
.
Etendre avec un chiffon
KORREKTOR
,
attendre qu’il sèche parfaitement et lustrer
avec
DISCOLUX
.
K
ORREKTOR
est également un excellent imperméabilisant.
KI
WATERPROOFING:
pour
une meilleure protection, nous conseillons
KI WATERPROOFING
.
NB: pour exalter la brillance et pour donner un lustre plus vif et profond nous conseillons certaines
de nos spécialités comme GRANITOLUX, BRILLUX, KORREKTOR, SPLENDUR.

Data ultimo aggiornamento:
02/09/2015
Pag.
10
di 28
POLIEREN GEBRAUCHTSANLEITUNG
DIE PATETIERTEN PLANETAREN haben die Welt der Polierung und Bohnerung von Marmor und
Granit Fußboden völlig erneuert. Jetzt ist die Arbeit der Polierung viel leichter und schneller.
DIE PLANETAREN können an jeder Monobürste von jeder Marke dank der “flangia” dieser eingebaut
werden.
ALLGEMEINE INFORMATIONEN:
bevor man mit den Polieren anfängt
muss man beachten dass die HÄRTE DER FUßBODEN je nach benutztem Material ändert.
Beachten Sie diese Merkmale der Fußboden, merken Sie sich:
a)
DESTO WEICHER DER FUßBODEN; DESTO MEHR IST DIE KRAFT DIE MAN BRAUCHT
um die
Schleifen drehen zu lassen.
b)
DESTO HÄRTER DER FUßBODEN; DESTO WENIGER DIE KRAFT DIE MAN BRAUCHT
um die Schleifen
drehen zu lassen.
c)
DESTO HÖHER DIE GESCHWINDIGKEIT DER UMDREHUNGEN DER DIAMANTIERTEN PLATTEN
;
desto schneller Arbeitet man aber desto mehr ist die Kraft die man braucht um die Platten auf hoher
Geschwindigkeit drehen zu lassen.
Die Firma hat auf Wissen dieser Merkmale drei Arten von Planetaren entwickelt:
PLANETARIO K 800 mit 800 empfohlen für weichen Fuβboden und parquet
PLANETARIO K 1000 mit 1.000 empfohlen für dürschnitlichen harten Fuβboden wie Marmor
PLANETARIO K 2000 mit 2.000 empfohlen für harten Fuβboden wie Granit oder Gres
RICHTIGE WOLLTAGE UND GEBRAUCH VON ELEKTRISCHEN KABELN
Einer der häufigsten Gründe falscher Funktion von der Monobürste bei Polierarbeiten oder bei anderer
Arbeiten wobei der Motor mehr Kraft braucht, ist es das die Maschine nicht genügend mit Strom versorgt
wird. Folgen Sie bitte diese drei Empfehlungen:
a) Vor allem bei älteren Gebäuden ist es wichtig sich an der nah liegende Steckdose vom Generalschalter zu
verbinden, dar der Strom durch schlechte Verbindungen verloren gehen kann.
b) Im Falle das Sie ein Verlängerungskabel brauchen, verwenden Sie Kabeln die doppelt so groß sind wie die
der Maschine
c) Nie zwei Maschinen an einer Steckdose verbinden, z. B. Monobürste und Saugmaschine
ACHTUNG
: montage Speer-Steigbügel
Es wird empfohlen bevor man der planetario classic benuts, der Speer-Steigbügel cod. UT0730x fest
am Basiskörper zu speeren. Periodish (vor jeder Arbeit) die Speere prüfen
WARTUNG: es empfehlen die periodische Schmierung
SCHUTZFETT
NLGI Grade
2
Classification DIN51502
KP 2 P
-
25
Timken Test useful load ASTM2509
50 (lbs)
Working temper
ature
-
25 / +170 (°C)
Lubrificant / viscosity (40°C)
Mineral / 840 mm
2
/s
Thickener
Complex soap AL
Menge
Satellite
Drehlagerung
10 g für jeden
Nabenschmierung
Zahnrader
30 g
für jeden
Nabenschmierung
Häufigkeit
─
die erste Schmierung nach
50
Stunden
Arbeit vornehmen
─die folgend Schmierungen alle 100 Stunden Arbeit vornehmen

Data ultimo aggiornamento:
02/09/2015
Pag.
11
di 28
PATENTIERTES SYSTEM
ZUM POLIEREN VON MARMOR
POLIEREN VON MARMOR FUΒBODEN
DIE UNHEBUNGEN HABEN
1) Mit DIAMANTIERTEN METALISCHEN PLATTEN MS1 anfangen, polieren so lange bis es
keine Unhebungen mehr gibt und im Fußboden keine Zähne mehr sichtbar sind. Wir
empfehlen die
Maschine mit Bewegungen wie, „vor und zurück“ und „rechts und links“, zu benutzen.
Zwischen ein Gang und den anderen dem Material mit einem Sauger für Flüssigkeit entfernen. Nich bis
zum Rand der Wand arbeiten, halten sie ca. 10 cm. Abstand.
2) Wenn der Fußboden perfekt poliert wurde und keine Zähne mehr sichtbar sind, mit
DIAMANTIERTEN METALISCHEN PLATTEN MS2 achten die dabei das die komplette
Oberfläche behandelt wird. A
KTIVATOR
1
ist zum reiniger der diamantierten metalischen platten, vor
jeder neuen Arbait, und/oder nach ca. 100 mq Polierung
empfohlen. Halten Sie sich ca. 5 cm von
der wand.
3) Mit VERHARZTEN DIAMANTEN M3- M4-M5 Achten Sie darauf die komplette Oberfläche zu
decken, lassen Sie sich dabei von der Linie der Fliesen führen.
4) Beim polieren von grünen, schwarzen, roten und anderen schweren Marmor Arten könnte es notwendig
sein die DIAMANTIERTEN PLATTEN M6 oder auch M7 zu benutzen.
5) Nach der Politur mit den Bohnern mit unseren POLISH folgen.
Die Firma hat eine große Anzahl verschiedener POLISH entwickelt und produziert um alle Arten an
Marmor zu drängen
POLISH KP 85 für fast alle Marmorarten nützpar
POLISH KP 92 der häufiger genommen wird, sehr gut für Kalkhaltiges Marmor
POLISH PALLADIANA für terrazzo, palladiane, veneziane und conglomerati.
POLISH COLOR für Marmor mit eisern Pigmenten wie grün, rot, rosa u.s.w.
POLISH KMT für weicheren Marmor wie Carrara
POLISH GREY für besondere Lösung
Um Polish zu benutzen, etwas Pulver auf den Boden verteilen und etwas Wasser dazu gießen, eine cremige
Lösung wie „Yoghurt“ entsteht. Weiter verarbeiten bis man den Drang enthält Wenn die Creme zu trocken
wird etwas Wasser dazu gießen. Die Creme muss immer wie Yoghurt sein.
6) Am Ende mit Wasser waschen. Wenn der Boden trocken ist mit
DISCOLUX
oder mit einer weißen Platte
drängen.
NOTIZ 1 Den Polish nie länger als 30 Minuten auf den Boden lassen, es könnte den Drang schädigen.
NOTIZ 2 In der Regel benutzt man die
DISCOLUX
Platte, nur bei POLISH COLOR arbeitet man mit
Stahlwolle
NOTIZ 3 Wenn man eine THERMISCH PLATTE benutzt geht die Arbeit schneller und das Drang wird
besser
GEDRÄNGTE FUßBODEN NACHPOLIEREN UND HALTUNG
1) Wenn der Fußboden Zähne hat oder nicht eben ist, mit M2 anfangen bis keine Zähnemehr zu sehen sind. (
Falls der Boden sehr geschädigt ist mit M1 anfangen ) Weiter arbeiten mit M3-M4-M5 wie oben
beschrieben.
2) Falls der Boden keine Zähne hat sondern nur Kratzer und wir den Drang wieder herstellen wollen, mit M4
anfangen dann M5. Falls die Kratzer tief sind mit M3 anfangen.

Data ultimo aggiornamento:
02/09/2015
Pag.
12
di 28
PATENTIERTES POLIERSYSTEM FÜR GRANIT
Der PLANETAR K 2000 ist der schnellste und preisgünstigste Planetar für die Politur von Granit. Bei der
Nützung der K 2000 können die diamantierten Platten auf circa 2000 Umdrehungen arbeiten. Bei der Politur
von Granit ist die hohe Anzahl der Umdrehungen sehr Wichtig: nur mit schnellen Schnitten im Granit ist es
möglich gut zu drängen ohne Kratzer zu hinterlassen.
GS 1: Die Politur mit metallischen diamantierten Platten GS1 anfangen und so lange polieren bis alle
Zähne und Unebenheiten weg sind. Diese Fase ist die wichtigste. Es ist absolut wichtig alle Zähne weg zu
polieren. Wenn man den Fußboden nicht richtig ebnet ist es nicht möglich einem guten Drang zu
bekommen. Wir empfehlen die Maschine mit Bewegungen wie, „vor und zurück“ und „rechts und links“, zu
benutzen. Nich bis zum Rand der Wand arbeiten, halten sie ca. 10 cm. Abstand. N
OTIZ
:
nach jeder Gang,
mit einen sauger für Flüssigkeit den match aufsaugen.
GS 2: Wenn man den Boden geebnet hat mit GS2 weiter arbeiten, sorgfältig polieren und die ganze
Oberfläche zu bearbeiten. Es ist empfohlen 2 gekreuzte Durchgänge zu machen um sicher zu sein das man
die komplette Oberfläche gedeckt hat. Halten Sie sich ca. 5 cm von der Wand.
GS 3: Mit GS3 weiter arbeiten um die Kratzer von GS2 zu entfernen, in den man die selbe Prozedur folgt.
Nach GS3 dürfen keine Kratzer mehr auf den Fuβboden sein und dieselbe Prozedur folgen. Es ist
empfohlen die Vorgänge zu überkreuzen.
NOTIZ 1 beim arbeiten von härteren Fuβboden ist es notwendig
EXTRA
G
EWICHT
zu benutzen.
NOTIZ 2 A
KTIVATOR
1
ist für die Schärfe der diamantierten metalischen Geräte empfohlen.
NACH GS 3 wie folgt weiter gehen je nach Granit Art:
GRANIT DICHT UND HART: mit GK4, GK5, GK6 und GK7 folgen für einige mit GK8 weiter
machen.
GRANIT OPEN UND PÖROS:
a) Nach GS3 mit
PAVELUX
G3, G4 und G5 folgen. (Die
PAVELUX
G serie sind Schleifmittel
magnesiumhaltig die porösichkeit vom Granit schlieβen)
b) Nach
PAVELUX
G5
kann man zwischen
PAVELUX
G6,
G7
und G8 oder der diamantierten Platten
GK5, GK6, GK7 und falls notwendig, GK8 auswählen.
Mit den passender
POLISH
polieren. Eine kleine Menge von
POLISH
auf der Fuβboden verteilen und
etwas Wasser dazugeben. Mit hilfe von
DISCOLUX
und/oder mit Stahlwolle eine Creme wie
„Yoghurt“ herstellen. So lange weiter Arbeiten bis der gewünschte glanz entsteht.
NOTIZ:
POLISH
KG
für dunkler Granit und
POLISH KG CLEAR
für hellen Granit verwerden.
WICHTIG: Um den Granit zu drängen ist es wichtig die
THERMISCHE
S
CHALLPLATTE
zu benutzen
das der
POLISH
KG nur auf warmen Boden arbeitet. Nur mit warmen Fußboden ist es möglich ein
guten Drang zu bekommen. Daher nur auf kleine Flächen arbeiten (1mq x 1 mq).
STAHLWOLLE: wenn der Fußboden trocken ist, mit STAHLWOLLE polieren.
NYLONBÜRSTE: Fußboden mit einer NYLONBÜRSTE washen
BRILLUX: wenn der Fußboden komplett getrocknet ist, etwas
BRILLUX
spritzen und mit einer
WEIΒEN
ODER ROTEN
P
LATTE
polieren.
KORREKTOR: um den Glanz bei einiger Granitarten zu verbessern, empfehlen wir
KORREKTOR
zu
verwerden. Mit einem Tuch
KORREKTOR
verteilen, warten das es komplett trocken ist und mit
DISCOLUX
nachpolieren.
KORREKTOR
ist auch
ein
optimales wasserdichter Stoff.
KI WATERPROFING: für ein noch sicheren Schutz, empfehlen wir KI WATERPROFING
WICHTIG: Um den Glanz zu bevorheben und um ihn lebendisch wirken zu lassen, empfehlen wir einige
unsere speziellen Produkte wie GRANITOLUX , SPLENDUR LIQUIDO und SPLENDUR SOLIDO

Data ultimo aggiornamento:
02/09/2015
Pag.
13
di 28
ISTRUCIONES GENERALES PARA LEVIGAR
LOS PLANETARIOS PATENTADOS han revolucionado el modo de levigar y abrillantar los pisos en
marmol y granito. Ahora el trabajo de levigadura es mucho màs facil, màs veloz y màs economico.
LOS PLANETARIOS pueden ser usados en cualquier pulidora de cualquier marca o modelo basta introducir
la “flangia” (disco) de la maquina que se quiere usar.
ADVERTENCIA GENERAL
: primero de empezar el trabajo de levigadura es
importante examinar que la DUREZA DEL PISO es siempre diferente a segun del material que viene
usado. El granito por ejemplo es mucho màs duro del marmol. Pero es importante saber que hai tambien
diferencia de dureza entre marmol y marmol y entre granito y granito.
Teniendo presente estas carateristicas de los pisos, recuerda que:
a)
MAS EL PISO ES TIERNO, MAJOR ES LA FUERZA NECESARIA
para hacer girar los abrasivos.
b)
MAS EL PISO ES DURO, MENOR ES LA FUERZA NECESARIA
para hacer girar los abresivos.
c)
MAS ALTA ES LA VELOCIDAD DE ROTACION DE LOS DISCOS DIAMANTADOS
màs veloz es el
trabajo pero major es la fuerza que hace falta para hacer girar los discos a alta velocidad.
Para estos principios fundamentales han sido realizados y productos tres tipos de Planetarios:
PLANETARIO K 800 a 800 giros consejado para utilizar con normales pulidoras.
PLANETARIO K 1000 a 1.000 giros es consejados para el marmol.
PLANETARIO K 2000 a 2.000 giros es consejado para el granito.
CORRECTO VOLTAJE Y USO DE CAVOS ELETRICOS
SUPLEMENTARIOS DE CONECION
Unos de los màs frecuentes casos de mal funcionamento de la maquina pulidora para trabajos de levigadura o
para trabajos que necesitan màs fuerza motriz es que muchas vecez no llega la correcta cantidad de energia
eletrica a la maquina. Seguir estos tres importantes consejos:
a) Colegarse a la toma de corriente màs cerca al interruptor general. En las viejas instalaciones se puede haber
mucha disperciòn de energia o malos colegamentos en la red eletrica
b) Si hace falta un alargador eletrico, usar solo cavos eletricos de diametro doble al que tiene en dotaciòn la
maquina.
c) Nunca conectar en la misma toma de corriente dos maquinas como por ejemplo una pulidora y una aspira
lìquidos.
ATTENTION: Assemblage of the block stirrup
It is recommended to shut well the block stirrup UT0730x to the planetary classic carcass before the use.
Periodically (every beginning job) check its blocking.
MAINTENANCE: It is recommended to grease periodically
OIL (GREASE)
NLGI Grade
2
Classificatio
n DIN51502
KP 2 P
-
25
Timken Test useful load ASTM2509
50 (lbs)
Working temperature
-
25 / +170 (°C)
Lubrificant / viscosity (40°C)
Mineral / 840 mm
2
/s
Thickener
Complex soap AL
Quantity
Satellite Ball
-
bearing
10 g for each greasing
Pronged (too
thed) wheels
30 g for each greasing
Frequency
─
Carry out the first greasing after
50 hours
of work
─Subsequently, carry out every 100 hours of work

Data ultimo aggiornamento:
02/09/2015
Pag.
14
di 28
SISTEMA DE LEVIGAR MARMO PATENTADO
LEVIGADURA DE MARMO CRUDO NUNCA LEVIGADO
1) Empezar con DISCOS DIAMANTADOS METALICOS MS1 y levigar hasta que todos los
disniveles han sido eliminados y no hay màs dientes en el piso.
Para un veloz y eficiente trabajo consejamos de trabajar con un movimiento despacio y costante
marchando en modo linear seguiendo posiblemente la linea de las baldosa. Entre un pasaje y otro
remover siempre el material removido con una aspira liquidos.
2) Cuando el piso esta perfectamente nivelado y no hai màs dientes proseguir con los discos metalicos
diamantados MS2. En esta fase es suficiente un solo pasaje sobre la superficie entera haciendo
atenciòn a no dejar ninguna superficie no tratada. (para vuestra comodidad repetimos de seguir le
linea de las baldosa).
3) Avanzar con DIAMANTES RESENOIDI M3 – M4 – M5 usando la misma tècnica usada con
MS2.
Repetimos que no es necesario insistir mucho con estos abrasivos, pero es importante cubrir toda la
Superficie dejandose diregir da las lineas de las baldosas.
4) levigando marmoles verdes, negros, rojos y otros marmoles dificiles, podria ser necesario usar los
discos
diamantados M6 o tambièn M7 de grano màs fino.
5) Despues de la levigadura avanzar a la abrillantadura con los nuestros POLISH
Han sido realizados y productos una vasta gama de POLISH para abrillantar cualquier tipo de marmo
─POLISH KP 92 el màs usado, muy bueno para marmoles calcàreo.
─POLISH PALLADIANA para terrazo, palladiane, veneziane y conglomerados
─POLISH COLOR para marmoles que tienen pigmentos de hierro como los verdes, rojos, rosa
etc.
─POLISH KMT para marmoles tiernos como el carrara
─POLISH GREY para especiales soluciònes
Para usar el Polish, desparramar un poco de polvo en el piso y agregar un poco de agua. Utilizando un
Disco blanco mezclar todo formando una crema como el yogurt. Seguir trabajando hasta optener el
lucido.
Cuando la crema se pone muy seca, agregar un poco de agua. La crema tiene que ser siempre como un
Yogurt.
6) A la fin lavar bien con agua. Cuando el piso es seco abrillantar con un disco blanco.
NOTA 1 No dejar el polish sobre el piso por
màs de 30 minutos. El polvo exedente puede arruinar el
Brillo.
NOTA 2 normalomente el Polish es usado con disco blanco. Solo el POLISH COLOR se trabaja con
lana De acero.
NOTA 3 Usando el DISCO TERMICO, en cambio del normal disco arrastrador, el trabajo es màs
veloz Y el brillo es mejor.
RILEVIGADURA PISOS YA ABRILLANTADOS
1) Si el piso tiene dientes o no es nivelado: empezar con MS 2 trabajando hasta que se eliminan los
dientes.(si el piso es muy arruinado empezar con MS 1 ). Seguir con los discos M3 – M4 – M5
como es indicado primero .
2) Si el piso no tiene dientes pero tiene solo aranazones y se quiere restablecer el resplendor inicial,
empezar con M4 y despues con M5. Si los aranazones son muy profundos empezar con M3.

Data ultimo aggiornamento:
02/09/2015
Pag.
15
di 28
SISTEMA DI LEVIGADURA GRANITO
PATENTADO
EL PLANETARIO K 2000 es el planetario para levigare el granito en modo mejor y màs economico.
Usando K2000 los discos diamantados pueden girar a casi 2.000 giros. La alta velocidad de rotaciòn de los
discos es muy importante para levigar el granito: solo cortando el granito a alta velocidad es posible levigar
bien sin dejar rallones y asi obtener un buen resultado y un buen brillo.
GS 1: empezar a levigar con discos diamantados metalicos GS 1 y levigar hasta que todos los dientes o
disniveles sean eliminados. Esta es la fase màs importante. Es absolutamente importante eliminar bien
todos los dientes. Si no se nivela bien el piso a la fin no so obtiene un buen brillo.
GS 2 : Despues de haber nivelado perfetamente el piso seg
uir con GS 2, levigar haciendo cuidado a cubrir
todo el aire siguiendo las lineas de las baldosa para no dejar superficies no tratadas.
GS 3 : Avanzar con DOS PASADAS DE GS3 seguIndo la misma procedimiento. Es consejable cruzar las
pasadas.
NB trab
ajando sobre granitos duros hace falta de los pesos suplementares. Usando la nuestra
especial Levighetor 600 puede agregar hasta 100 kg.
NB Despues el GS 3 el piso tiene que ser perfetamente liso y sìn rallones o porosidad.
DESPUES GS 3 avanzar en el siguiente modo: GK 4 – GK 5 – GK 6 – GK 7
NB : para granitos muy duros y de valor es disponible tambièn el G8 de grano màs fina
Para mejorar el brillo avanzar en el seguiente modo:
POLISH KG : desparramar sobre el piso una pequena cantidad de POLISH KG y agregar un poco de agua.
Usando lana de acero o el nuestro DISCOLUX crear una crema como el yogurt.Trabajar hasta que se
abrillanta. Despues de la abrillantadura lavar. El piso va a tener un buen brillo.
NB : Para abrillantar el granito es importante usar el DISCO TERMICO porquè el POLISH KG
trabaja solo cuando el piso es caliente.
NB : Es posible obtener un buen brillo solo cuando el piso es caliente. Por eso trabajar a pequenos
pedazos a la vez.
NB : para hacer evidenciar el resplandor y para dar un brillo màs vivo y profundo consejamos algunas
nuestras especialidades como : GRANITOLUX , SPLENDUR LIQUIDO e SPLENDUR SOLIDO

Data ultimo aggiornamento:
02/09/2015
Pag.
16
di 28
INSTRUÇÕES GERAIS PARA LIXAR COM
O SISTEMA PLANETÁRIO
Os
PATENTEADOS DO SISTEMA
PLANETÁRIO revolucionaram o modo de lixar e polir pisos em
mármore e granito, tornando o trabalho de lixar muito mais fácil, veloz e econômico. Os PLANETÁRIOS
podem ser aplicados à 'monoescovas' de qualquer marca ou modelo, simplesmente aplicando-o à flange da
máquina que deseja-se usar.
ADVERTÊNCIA GERAL
Antes de iniciar o trabalho de lixar é importante
considerar que a DUREZA DOS MATERIAIS E PEDRAS sempre difere.
Tendo em mente esta característica dos pisos, lembrar que:
a) Q
UANTO
M
AIS
'M
OLE
'
O
P
ISO
,
M
AIOR É A
F
ORÇA
N
ECESSÁRIA
para fazer girar os abrasivos.
b) Q
UANTO
M
AIS
D
URO O
P
ISO
,
M
ENOR É A
F
ORÇA
N
ECESSÁRIA
para fazer girar os abrasivos.
c) Q
UANTO
M
AIS
A
LTA É A
V
ELOCIDADE DE
R
OTAÇÃO DOS
A
CESSÓRIOS
D
IAMANTADOS
mais veloz
é a execução do trabalho, porém, maior é a força necessária para fazer girar os acessórios a alta
velocidade e portanto, mais potente deve ser a máquina.
De acordo com esses aspectos fundamentais foram criados três tipos de Planetário:
PLANETÁRIO K 800 : 800 giros, aconselhado para pisos macios e parquet.
PLANETÁRIO K 1000: 1.000 giros, aconselhado para pisos de média dureza como o mámore.
PLANETÁRIO K 2000: 2.000 giros, aconselhado para pisos duros como granito, grés e
porcellanato.
VOLTAGEM CORRETA E USO DE FIOS ELÉTRICOS
DE CONEXÃO SUPLEMENTAR
Um dos casos mais freqüentes de mal funcionamento da lixadeira é devido ao fato de que muitas vezes não
chega a correta quantidade de energia elétrica à máquina. Siga este importante conselho:
a) Conectar-se à saída de energia mais próxima ao interruptor Geral. Especialmente nas instalações antigas
pode haver muita dispersão de energia, ou má conexão ao longo da rede elétrica.
b) Em caso de necessidade de extensão, utilizar somente fios elétricos de seção dupla com relação aos
utilizados na máquina.
c) Jamais ligar na mesma tomada duas máquinas, como a lixadeira e o aspiralíquidos.
ATENÇÃO:montagem do suporte de travamento
Recomenda-se fechar bem o suporte de travamento (staffa di bloccaggio)UT0730x na base do
PLANETÁRIO
CLASSIC
antes de usá-lo; verificando periodicamente (a cada início do trabalho) seu aperto.
MANUTENÇÃO: recomenda-se engraxá-la periodicamente
GORDO
Grau NLGI
2
Classificação DIN51502
KP 2 P
-
25
Teste Timken carga útil ASTM2509
50 (lbs)
Temperatura de trabalho
-
25 / +170 (°C)
Óleo de base / viscosidade (40°C)
Mineral / 840 m
2
/s
Espessante
Sabão compleo AL
Valor
Rolamento Satelitares
10 g para cada engraxamento
Rodas dentadas
30 g para cada engraxamento
Freqüência
─
Engraxar pela 1ª vez após
50 horas
de tra
balho
─Efetuar os engraxamentos sucessivos a cada 100 horas de trabalho

Data ultimo aggiornamento:
02/09/2015
Pag.
17
di 28
INSTRUÇÕES PARA LIXAR O MÁRMORE
LIXAR PISOS DE MÁRMORE COM
DESNÍVEIS E /OU DENTES
1) Iniciar com DISCOS DIAMANTADOS METÁLICOS MS1 e lixar até que todos os desníveis
forem eliminados e não haja mais diferenças no piso.
Aconselhamos que a máquina seja movimentada “para frente e para atrás” e no mesmo tempo “à
direita e à esquerda”. Entre uma passada e outra remover todo o material retirado com o aspiralíquidos.
Não trabalhar até a beira da parede, mas manter-se a cerca de 10 cm.
2) Quando o piso estiver perfeitamente nivelado, prosseguir com os discos diamantados metálicos MS2
prestando atenção para não deixar nenhuma parte do piso sem tratamento (sugerimos seguir a linha das
lajotas). É aconselhável utilizar AKTIVATOR 1, para retificar os acessórios diamantados metálicos,
cada vez que iniciar um novo trabalho, e também a cada 100mq de trabalho realizado.
Manter-se a cerca de 5 cm da beira da parede.
3) Continuar com RESINÓIDES DIAMANTADOS M3 – M4 – M5. Prestar a necessária atenção para
cobrir toda a superfície a ser trabalhada, deixando-se guiar pela linha das lajotas.
4) Quando for necessário lixar mármore verde, vermelho, negro e também mármores difíceis de polir,
utilizar o M6 ou também o M7 de grão mais fino.
5) Após lixar, continuar com o polimento, utilizando o POLISH KLINDEX. Como os mármores
possuem diversas composições, nossa empresa tem desenvolvido e produzido uma vasta gama de pós
(POLISH) para polir qualquer tipo de mármore:
─POLISH KP 85 utilizável para a maioria dos mármores
─POLISH KP 92 os mais indicados para os mármores calcários.
─POLISH PALLADIANA para terrazzo, palladiane, veneziane e conglomerati.
─POLISH COLOR para mármores que contém pigmentos ferrosos como o verde e o vermelho
por exemplo.
─POLISH KMT para mármores macios como o Carrara.
─POLISH GREY para soluções especiais.
Para o emprego da linha P
OLISH
,espargir um pouco de pó sobre o piso, adicionar um pouco de água
e utilizando o DISCOLUX formar um creme como o iogurte, trabalhando até obter o brilho.
Quando o creme se tornar muito seco, adicionar mais um pouco de água, mantendo-o sempre como um
iogurte.
6) No final do trabalho lavar bem com água. Quando o piso estiver seco, lustrar com DISCOLUX ou
com um disco branco.
NOTA 1 Não deixar o polish sobre o piso por mais de 30 minutos. Pó em excesso poderia danificar o
brilho.
NOTA 2 Normalmente o P
OLISH
é utilizado com discos DISCOLUX. Somente o POLISH COLOR é
trabalhado com lã de aço.
NOTA 3 Usando o DISCO TÉRMICO, ao invés do normal disco arrastador, o trabalho é mais veloz e o
brilho é melhor.
RECUPERAÇÃO DO BRILHO E MANUTENÇÃO
1) Se o pavimento não tem desníveis, mas apenas riscos e desejamos recuperar a luminosidade inicial, é
suficiente iniciar com o M4 e prosseguir como acima. Se os riscos forem muito profundos, iniciar com o M3.
2) Se o pavimento apresentar desníveis e/ou dentes, utilizar a série J
UMPER
e/ou K
LIMBER
que, possuem um
sistema especial para trabalhar nesses pisos.

Data ultimo
aggiornamento:
02/09/2015
Pag.
18
di 32
INSTRUÇÕES PARA LIXAR GRANITO
O PLANETÁRIO K2000 é o planetário para lixar granito do modo melhor e mais econômico. Usando
K2000 os discos diamantados giram a cerca de 2.000 giros. A alta velocidade de rotação dos disquetes é
muito importante para lixar o granito: apenas lixando a alta velocidade é possível lixar bem sem deixar
riscos, obtendo assim o resultado e o brilho desejado.
GS1: Começar a lixar com discos diamantados metálicos GS1 e lixar até que todos os desníveis sejam
eliminados. Esta etapa é a mais importante. É de importância absoluta eliminar por completo todos os
dentes que houverem no piso. Se o piso não for nivelado completamente, no final do trabalho não se
obtém um bom brilho. Aconselhamos que a máquina seja movimentada “para frente e para atrás” e “à
direita e à esquerda”. Não trabalhar até a beira da parede, mas manter-se a cerca de 10 cm.
N
OTA
:
após cada passada, remover todos os resíduos com o aspiralíquido.
GS2: Após cuidar do piso, prosseguir com o GS2, lixando cuidadosamente e cuidando para trabalhar em
toda a área. Aconselhamos que sejam feitas duas passadas cruzadas para certificar-se de haver trabalhado
em toda a área. Manter-se a cerca de 5 cm. da borda da parede.
GS3: Prosseguir com o GS3 para remover os riscos do GS2, seguindo o mesmo procedimento.
Após o GS3 não deve haver mais riscos no piso.
NOTA 1 Aconselha-se usar pesos suplementares conforme a dureza do piso e do “grip” dos acessórios.
NOTA 2 Sugerimos o uso de AKTIVATOR 1 para o corte dos acessórios diamantados metálicos.
Após o GS3: Siga as seguintes indicações, conforme o tipo do granito:
GRANITOS DUROS E COMPACTOS: prosseguir com GK4,GK5,GK6,GK7.
Para alguns granitos, continuar com o GK8.
GRANITOS ABERTOS E POROSOS:
a) Após o GS3 prosseguir com o
PAVELUX
G3, G4 e G5. (Os pavelux série G são abrasivos
magnésicos que fecham a porosidade do granito).
b) Após
PAVELUX
G5 pode-se prosseguir conforme desejar, ou com
PAVELUX
G6, G7 eG8, ou
ainda com discos diamantados GK5, GK6, GK7 e, se necessário, GK8.
Após o polimento, usar o P
OLISH
mais adequado. Espargir um pouco de pó sobre o piso e adicionar um
pouco de água. Utilizando o DISCOLUX e/o lã de aço, formar um creme como o iogurte e trabalhar até
obter brilho.
NOTA: Usar POLISH KG com granitos escuros e POLISH KG CLEAR com granitos claros.
NB: Para polir o granito é importante usar o
DISCO TÉRMICO
porque o
POLISH
KG
funciona apenas
quando o piso está quente, somente assim obtendo um bom brilho. Trabalhar portanto, apenas pequenas
partes por vez (1 mq x 1 mq).
LÃ DE AÇO: quando o piso estiver seco, polir com lã de aço.
ESCOVA DE NYLON:
lavar o piso com escova de nylon.
BRILLUX:
quando o piso estiver perfeitamente seco, espirrar um pouco de
BRILLUX
e lustrar com um
disco vermelho, ou branco.
KORREKTOR:
para alguns granitos, para melhorar a profundidade do lustro, sugere-se o uso de
KORREKTOR
.
Espalhar
KORREKTOR
com um pano, esperar enxugar perfeitamente e polir com
DISCOLUX
.
K
ORREKTOR
é também um excelente impermeabilizante.
KI
WATERPROOFING:
ACONSELHADO
para
uma proteção melhor.
NB : para realçar a luminosidade e para um brilho mais vivo e profundo, aconselhamos algumas das
nossas especialidades: GRANITOLUX, BRILLUX, KORREKTOR, SPLENDUR.
This manual suits for next models
1
Table of contents
Languages:
Popular Adapter manuals by other brands

IOGear
IOGear GUE310 quick start guide

HEIN-WERNER AUTOMOTIVE
HEIN-WERNER AUTOMOTIVE HW93350 Operating instructions & parts manual

SRS Labs
SRS Labs iWOW-3D user manual

Keithley
Keithley 2260B-GPIB-USB Operation instructions

Weller
Weller WX HUB Operating instruction

ZyXEL Communications
ZyXEL Communications PLA-4xx user guide