KM1 64 User manual

Baureihe 64 Bedienungsanleitung
User Manual

2Modelle vom Modellbahner
Congratulation!
This model has been manufactured and
hand crafted at a limited quantity, using
finest materials such as brass, stain-
less steel and copper. Our effort was, to
provide a locomotive, that matches as
close as possible with the real engine in
design and function. Each model is care-
fully tested and the boiler got a hydraulic
pressure test at double working pressure.
Please read this manual and all safety
instructions carefully before operating
this steam model in order to avoid prob-
lems, damages and injuries. We wish
approach at any time and lots of joy, while
running your new steam engine.
Gratulation!
Sie haben ein limitiertes Modell erwor-
ben, das in sorgfältiger Handarbeit aus
Messing, Edelstahl und Kupfer gefertigt
wurde. Dabei haben wir versucht, dem
Original in Optik und Funktion so nahe
wie möglich zu kommen. Jede Lokomo-
tive wird einzeln getestet, der Kessel auf
doppelten Betriebsdruck geprüft. Bitte
machen Sie sich zuerst mit dem Modell
vertraut und lesen Sie diese Anleitung
sorgfältig, um Bedienfehler, Beschädi-
gungen oder Verletzungen zu vermeiden.
Wir wünschen Ihnen viel Freude und all-
zeit gute Fahrt.
Model Features
• Two working cylinders
• Heusinger valve gear
• Run time about 30 minutes
• Brass construction, hand crafted
• Silver soldered copper boiler
• NEM-wheels
• Stainless steel wheels and axles
• Sprung buffers
• Openable smoke box door
• Butane fired
• Adjustable safety valves
• Water gauge
• Axle pump with bypass valve
• Hand pump
• Ceramic burner
Ausstattung
• Zweizylinderantrieb
• Heusinger Steuerung mit
Umsteuerung im Führerstand
• Laufzeit ca. 30 Minuten
• Handarbeitsmodell aus Messing
• Silbergelöteter Kupferkessel
• NEM-Radsätze
• Räder und Achsen aus Edelstahl
• Federpuffer
• Bewegliche Rauchkammertüre
• Brennstoff: Butangas
• Einstellbare Sicherheitsventile
• Schauglas für Wasserstand
mit Prüfventil
• Achspumpe mit Bypassventil
• Handspeisepumpe
• Keramikgasbrenner
ACHTUNG: Im Betrieb werden We-
sentliche Teile des Modells sehr
heiß. Bitte unter größter Sorgfalt
bedienen und berühren! Die Sicher-
heitsventile können heißen Dampf
abblasen. Bitte halten Sie sich daher
vom Bereich über den Sicherheits-
ventilen fern.
CAUTION: During operation, many
parts of the engine become hot.
Please handle the model very care-
fully and with sound mind. The safe-
ty valves may blow out hot steam.
Never touch or get too close to this
area above the safety valves, when
engine is heated.

3www.km-1.de
Product Introduction
I. Main Technical Parameters
• Scale/gauge: 1:32, 45 mm
• Dim.: L 385 x W 100,8 x H 138,5 mm
• Wheel configuration: 1’C1’/2-6-2
• Net weight: 4,2 kg
• Minimum radius: 1200 mm
• Boiler work pressure aprox 60 psi
• Fuel: butan gas
• Running time about 30 minutes
The live steam models of Bowande set
new standards of detail and workman-
ship. Please take care of all instructions
for safety and operation. In case you are
not sure how to do, please contact us.
II. Safety
• Only Butan gas can be used as fuel.
• Don’t adjust the safety valves
randomly without technical experi-
ence.
• Before igniting, keep the loco away
from flammable objects.
• During ignition process and heating up
the boiler, do not move the loco.
• When you need to move the loco,
please first close the gas valve, wait
till the flame is out, then after cooling
down, you may carry the model at front
and rear buffers.
• Please take note of our general safety
instructions (p. 12).
If you wish to run your model at some
Model Engineering Clubs and at exhibi-
tions to which the public are admitted,
a test certificate may be required by the
Club or exhibition organiser. The two test
certificate documents supplied with this
locomotive will be required by the pres-
sure vessel tester as evidence of an in-
itial manufacturers’ test. Bowande Live
Steam UK Ltd recommends the test
procedure published by the Gauge One
Model Railway Association. Other proce-
dures are available.
Einführung
I. Technische Details
• Maßstab/Spurweite: 1:32, 45 mm
• Größe: L 385 x B 100,8 x H 138,5 mm
• Achsfolge: 1'C1 '/ 2-6-2
• Nettogewicht: 4,2 kg
• Mindestradius: 1200 mm
• Kesselarbeitsdruck von 4 Bar
• Brennstoff: Butangas
• Laufzeit ca. 30 Minuten
Die Livesteam Lokomotiven von Bowande
setzen neue Maßstäbe in Detail und Verar-
beitung. Beachten Sie unbedingt alle Be-
triebs- und Sicherheitshinweise. Sind Sie
sich unsicher, fragen Sie bitte zuerst nach!
II. Sicherheit
• Verwenden Sie als Brennstoff nur
Butangas.
• Stellen Sie die Sicherheitsventile nicht
wahllos ohne Fachkenntnis ein.
• Halten Sie vor dem Zünden die Lok von
leicht entflammbaren Gegenständen fern.
• Während des Zündvorgangs und der
Heizphase darf die Lok nicht bewegt
werden.
• Wenn Sie die Lok transportieren,
schließen Sie zuerst das Gasventil
und warten Sie bis die Flamme aus ist.
Nach dem Abkühlen können Sie die
Lok an der vorderen und hinteren Puf-
ferbohle anheben und transportieren.
• Beachten Sie unsere allgemeinen
Sicherheitshinweise (S. 12).
Sollten Sie das Modell in der Öffentlich-
keit betreiben wollen und nicht nur für pri-
vate Zwecke, so kann dafür ein separater
Prüfbericht vom Veranstalter oder den
zuständigen Behörden verlangt werden.
Die ab Werk beiliegenden Zertifikate wer-
den vom Prüfer gefordert, um den Nach-
weis der Prüfung von Kessel und Gastank
ab Werk zu dokumentieren. Für jede wei-
tere Vorgehensweise ist der zuständige
Prüfer verantwortlich.

4Modelle vom Modellbahner
Sichere Bedienung
I. Beschreibung der Einzelteile
Safety Using Introduction
I. Introduction of loco parts
Kohlebeladung
Coal load
Bypass Ventil (Zur Wasserspeisung)
Bypass valve (to control water feed)
Ölablassventil
Oil drainage valve
Zylinderhähne
Condensate drain cock
Zylinder
Cylinder
Führerhausdach
Cab roof
Sicherheitsventile
Safety valves
Öleinfüllstutzen
Oil inlet hole
Schornstein
Chimney

5www.km-1.de
Öleinfüllstutzen
Oil inlet hole
II. Führerhausdach und Kohleladung
abnehmen
II. Open the cab roof, take off the coal load
Wasserstandsanzeige
Water gauge
Umsteuerung (zur Richtungsänderung)
Reversing handle (to chance the direction of the loco)
Druckanzeige
Pressure gauge
Sicherheitsventile
Safety valves
Dampfregler (zur Geschwindigkeitsänderung)
Steam valve (to adjust the speed of the loco)
Gaseinlass
Gas inlet
Gasventil
Gas valve
Gas Einfüllstutzen
Gas charging mouth

6Modelle vom Modellbahner
IV. Infusing water
Open the water tank hatches, insert the
hand pump rocker. Fill proper distilled
water into the tanks, close bypass valve,
operate hand pump rocker to feed water
to the boiler. When the water level on wa-
ter gauge is high up to 1⁄3, stop pumping
water. Open the bypass valve.
IV. Wasser füllen
Öffnen Sie den Wassertankdeckel und
stecken Sie den Bedienhebel für die
Handpumpe auf. Füllen Sie geeignetes
destilliertes Wasser in die Tanks, schlie-
ßen Sie das Bypassventil und betätigen
Sie die Handpumpe mit dem beiliegen-
dem Aufsatzhebel. Wenn das Schauglas
für den Wasserstand die Hälfte erreicht
hat, stoppen Sie die Wasserzufuhr und
öffnen Sie das Bypassventil.
Bedienhebel für Handpumpe
Hand pump rocker
III. Oiling up the model
Invert the model on a sponge with cavity
to avoid unexpected movements. Using
steam oil or matching lubricating oil and
place a single drop of oil on all bearing
and sliding surfaces. Rotate the wheels to
ensure a good cover. Wipe off any surplus
with a rag.
III. Das Modell abschmieren
Legen Sie das Modell über Kopf in eine
Lokliege (Art.-Nr. 400500). Schmieren Sie
dann bitte alle beweglichen Teile, Lager
und Gleitflächen mit einem Feinmecha-
niköl oder Nassdampföl ab. Bewegen Sie
die Räder des Modells um eine gleich-
mäßige Verteilung der Schmiermittel zu
bewirken. Überflüssiges Öl können Sie
mit einem Lappen oder Wattestäbchen
abwischen.
Lokliege,
Art.-Nr. 400500

7www.km-1.de
V. Charging of Butane
Charge the gas tank by pressing the bu-
tane bottle firmly on the gas nozzle of
the tank. Use matching nozzle adaptors.
When gas flows constantly over, tank is
fully charged.
V. Butangas auffüllen
Füllen Sie den Gastank, indem Sie die
Kartusche mit Butangas und passendem
Adapter fest auf den Füllstutzen pressen.
Tritt seitlich konstant Gas aus, ist der
Tank voll.
CAUTION: Please ensure that when
filling the loco’s gas tank, that other
live steam models and naked flames
are far away. It is inevitable that some
gas will be spilt. A passing live steam
model may ignite the spilt gas and
a spectacular but highly dangerous
flare-up may occur. Fuelling your
locomotive well away from others is
a very good and safe practice and
should always be observed.
ACHTUNG: Stellen Sie sicher, dass
keine anderen Echtdampfmodellen
oder offene Flammen in der Nähe
Ihres Modells sind, wenn Sie den
Gastank befüllen. Es ist unvermeid-
lich, dass Gas seitlich zwischen
Füllstutzen und Gasflasche austritt.
Das austretende Gas kann sich an
vorbeifahrenden Echtdampfmodel-
len oder offenen Flammen entzün-
den und gesammeltes Gas zu einer
gefährlichen Verpuffung führen! Die
gängige Praxis, Gas nur abseits der
befahrenen Strecke und mit ausrei-
chend Sicherheitsabstand zu befül-
len, hat sich bewährt.
VI. Injecting steam oil
Use steam oil, to fill the lubricator with
oil leaving a little headroom in the tank to
permit the displacement principle to op-
erate. The lubricator is located in the left
hand dummy water tank under the lid.
VI. Nassdampföl füllen
Öffnen Sie den Tankdeckel des Ölbe-
hälters. Füllen Sie langsam geeignetes
Schmieröl mit einer Spritze in den Behäl-
ter. Füllen Sie nicht bis zum Rand, sonder
lassen Sie etwas freien Raum über dem
Füllstand, um dem Verdrängungsöler
Raum zum Arbeiten nach dessen Prinzip
zu ermöglichen. Bitte nutzen Sie nur spe-
zielles Nassdampföl für Dampflokomoti-
ven, kein Getriebeöl oder Motorenöl!

8Modelle vom Modellbahner
VII. Ignition
Before igniting, open the Butane gas
valve about 15 degree, and then ignite
the burner at the chimney. The gas flame
must push back into the ceramic burn-
er firebox. If flame continues to burn at
chimney, please turn slowly off the gas
valve, until it ignites back into firebox.
Then adjust the gas valve and watch the
ceramic burner glowing and heating the
boiler up to operation pressure, which is
about 60 psi. During heating up, the safe-
ty valves may release some hot steam.
VII. Zündvorgang
Öffnen Sie das Gasventil um ca. 15 Grad
und entzünden Sie danach den Brenner
über den Schornstein. Beobachten Sie
die Flamme durch die Feuertüre und re-
geln Sie den Gasfluss über das Gasventil.
Brennt die Flamme aus dem Schornstein,
regeln Sie bitte das Gasventil soweit zu-
rück, bis die Flamme in die Feuerbüch-
se zurück schlägt. Stellen Sie dann den
Gaszufluss so ein, dass der gesamte
Keramikbrenner glüht. Nun warten Sie bis
der Betriebsdruck auf ca. 60 psi (rund 4,1
Bar) steigt. Die Sicherheitsventile können
bereits vorher leicht Dampf ablassen.
CAUTION: When boiler pressure
gets too high, the safety valves will
blow off hot steam. Avoid categorical
to move around with any part of your
body right over the safety valves in
order to prevent injury.
VIII. Operation of the engine
At first, you have to adjust the reverser in
cab for forward or backward driving. Be-
cause the cylinders are cool at the begin-
ning, the steam will condensate to water
inside steam pipes and cylinders. You can
move the engine gently by hand, until the
condensed water will be ejected through
drain cocks and chimney. Then the loco
will begin to run smoothly. During running,
you can adjust the steam valve to control
the speed of the locomotive.
VIII. Betrieb der Lokomotive
Nach etwa 6 – 7 Minuten erreicht der Kes-
sel einen Betriebsdruck von 4,1 bar. Legen
Sie zuerst die Steuerung für Vorwärts oder
Rückwärtsfahrt komplett aus. Da die Zylin-
der am Anfang noch kühl sind, kondensiert
der Dampf in den Rohren und Zylindern.
Nachdem das Kondenswasser von den
Zylinderhähnen und über den Schornstein
ausgestoßen wird, fängt die Lokomotive
an reibungslos zu laufen. Zu Beginn müs-
sen Sie sie ggf. etwas anschieben. Läuft
die Lok, können Sie über den Dampfregler
die Geschwindigkeit einstellen.
ACHTUNG: Wenn heißes Öl und
Wasser aus dem Schornstein aus-
tritt, kann dies zu Verbrennungen
führen! Halten Sie Gesicht und un-
bedeckte Haut in jedem Fall fern
vom Bereich über dem Schornstein
und den Sicherheitsventilen!
ACHTUNG: Wir der Druck im Kessel
zu hoch, blasen die Sicherheitsventile
heißen Dampf ab! Vermeiden Sie des-
halb das Übergreifen des Kessels und
den Bereich über den Sicherheitsven-
tilen, um Verletzungen zu verhindern.

9www.km-1.de
CAUTION: Hot oily water and steam
will be expelled from the chimney.
Keep your face and uncovered parts
of your body away from the area
above the chimney and safety valves.
Bitte kontrollieren Sie nach ca. 5 Minu-
ten die Wasseranzeige. Es muss immer
genügend Wasser im Kessel sein, d. h.
die Feuerbüchse soll immer mit Wasser
überdeckt sein. Wenn der Wasserstand
auf weniger als ein Drittel gesunken ist,
schließen Sie das Bypassventil. Das
Wasser wird damit automatisch während
der Fahrt in den Kessel gespeist. Wenn
der Wasserstand zwei Drittel anzeigt, öff-
nen Sie den Bypass wieder.
Wir empfehlen Ihnen maximal bis zum
oberen Rand des Schauglases der Was-
serstandsanzeige zu füllen. Das kalte,
eingespeiste Wasser wird vorüberge-
hend den Kessel etwas abkühlen, daher
ist etwas Zeit nach dem Nachfüllen von
Wasser nötig, bis die Lok wieder be-
triebsbereit ist. Achtung, das Modell wird
dann beim erneuten Betrieb wieder hei-
ßes Wasser und Öl über den Schornstein
abblasen.
• Umsteuerung nach vorn bewegen:
die Lokomotive fährt nach vorn
• Umsteuerung nach hinten bewegen:
die Lok fährt rückwärts
• Umsteuerung in die Mitte bewegen:
die Lok bremst und bleibt stehen.
Die Erfahrung lehrt, dass ein konstanter
Betrieb in maßstäblicher Geschwindig-
keit am besten dann erreicht wird, wenn
der Gasbrenner und der Dampfregler
sorgfältig aufeinander abgestimmt und
eingestellt werden. Wenn ständig die Si-
Regularly check the water gauge to en-
sure there is sufficient water in the boiler
to keep the firebox covered. After running
a period of time, please observe the wa-
ter gauge, when the water level is lower
than 1⁄3, close the bypass valve, then the
loco will supply water to boiler automat-
ically, till the water level being up to 2⁄3,
open the bypass valve.
• Put the reversing handle onwards:
the loco runs forwards
• Put the reversing handle rearward:
the loco runs backwards
• Put the reversing handle at middle:
the loco brakes and stops
It has been found that steady running at
scale speeds can be achieved by careful
adjustment of gas control valve and reg-
ulator. The continuous blowing-off at the
safety valve wastes steam, so keep gas
Sollten die Räder stehen bleiben, schlie-
ßen Sie bitte den Dampfregler und schie-
ben Sie das Modell nochmals von Hand.
Eine anfangs ruckelnde Bewegung sollte
nach einer Runde in einen geschmeidi-
gen Lauf übergehen.
Nun können Sie einen Zug anhängen und
abfahren! Läuft die Lok, können Sie über
den Dampfregler die Geschwindigkeit
einstellen.
If the wheels lock, then close the regu-
lator but continue to push the loco in the
direction of travel. Jerky loco movements
will calm into steady running. After a lap of
the circuit and the model should be ready
to go. Couple the train and enjoy the run.
During running, you can adjust the steam
valve to control the speed of the locomo-
tive.

10 Modelle vom Modellbahner
VIII. End of Running
With full water and fuel, the locomotive
usually can run about 30 minutes. When
the locomotive gears down by itself, and
there is not so much steam from the
chimney, also the flame becomes feebly,
it means that the fuel is used out. If you
want to continue, you can supplement
fuel (before charging, be sure to put out
the fire/flame), repeat the above operat-
ing steps.
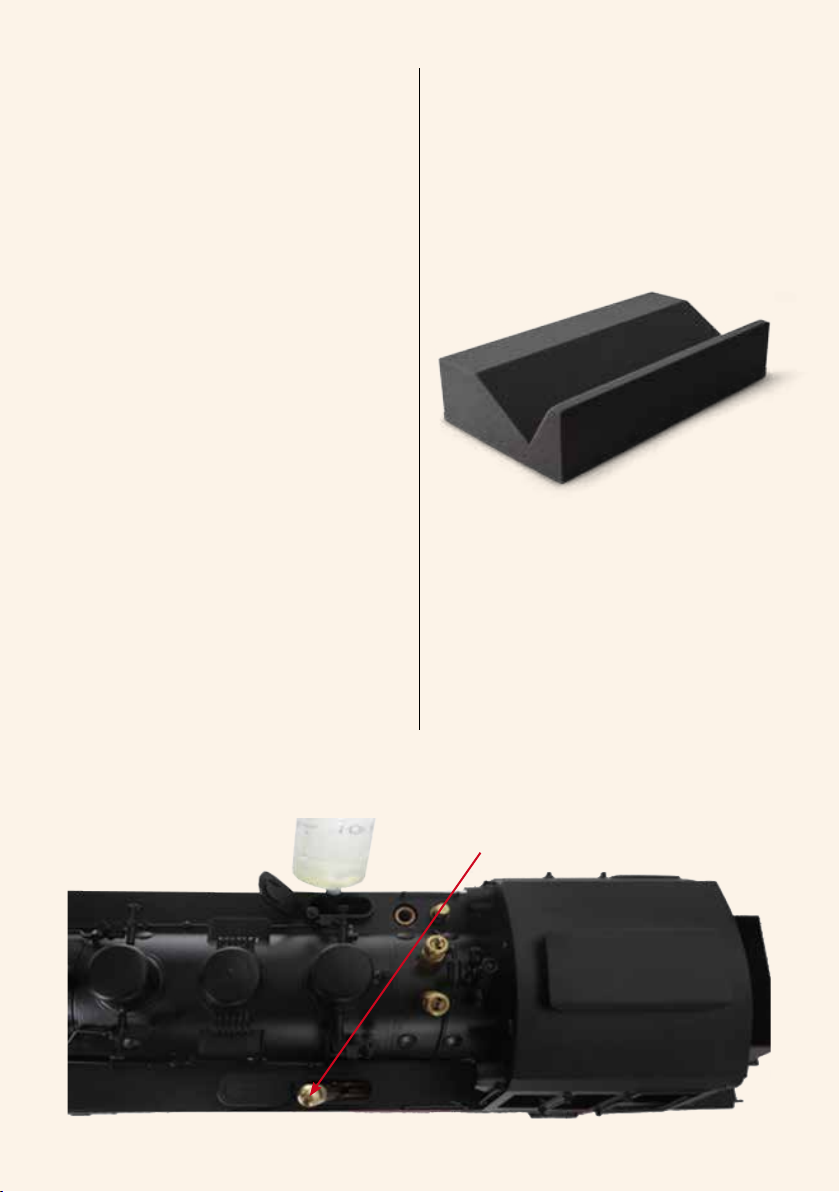
After use, please close all the valves, wait
till the loco is completely cooled down,
and take off the waste oil mouth screw
under the lubricator to drop the residual
oil and condensed water off the replace-
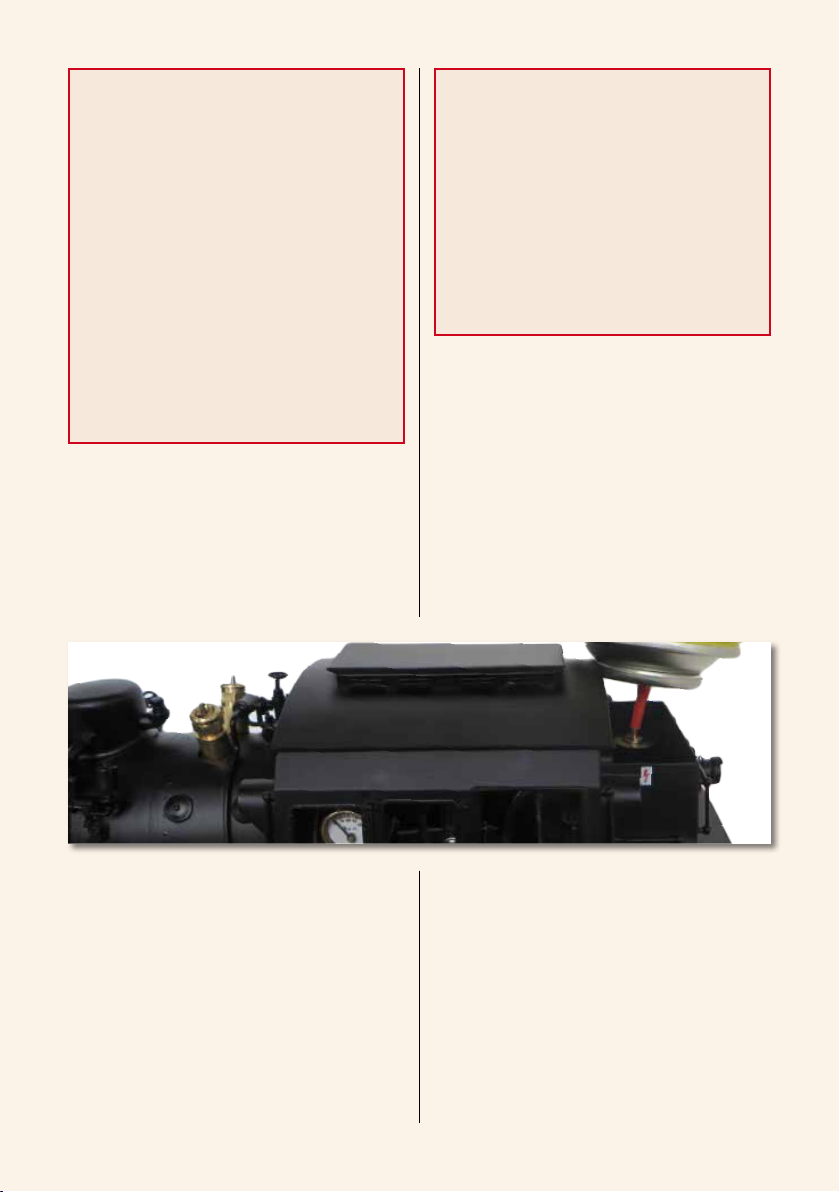
ment oiler. In order to empty the boiler
completely, remove the safety valves
and suck out the boiler water for exam-
ple by using a Syringe with extension
hose. Check the tightness of all nuts and
bolts etc. Give the model a visual check
to ensure no parts have been accidental-
ly damaged during the running session.
Clean the outside of your model with a rag
to remove oil that will have been ejected
from the chimney.
VIII. Beenden des Betriebs
Mit vollem Wasser und Treibstoff kann die
Lokomotive in der Regel ca. 30 Minuten
laufen. Wenn die Lokomotive langsamer
wird, nur wenig Dampf aus dem Schorn-
stein austritt und die Glut schwach ist, ist
der Treibstoff verbraucht. Wenn Sie fort-
fahren möchten, füllen Sie das Butangas
nach (stellen Sie sicher, dass das Feuer
vor dem Füllen des Gastanks gelöscht
ist), wiederholen Sie die oben ab IV. be-
nannten Schritte.
Nach dem Gebrauch schließen Sie alle
Ventile und warten bis die Lokomoti-
ve vollständig abgekühlt ist. Öffnen Sie
das Ölablassventil, wenn Sie das Rest-
öl und Kondenswasser vollständig aus
dem Verdrängungsöler entfernen wollen.
Wenn Sie den Kessel vollständig entlee-
ren möchten, entfernen Sie bitte die Si-
cherheitsventile und ziehen Sie (z. B über
eine Spritze mit Schlauchstück) das Was-
ser vollständig ab. Kontrollieren Sie alle
Schrauben und Muttern im Fahrwerksbe-
reich und an den Kesselarmaturen. Diese
sollten nicht locker oder gelöst sein, ist
dies der Fall, bitte nachziehen. Mit einem
Lappen können Sie nun das Modell von
Öl- und Schmutzresten reinigen und da-
nach in Ihre Vitrine stellen.
cherheitsventile abblasen, ist der in Re-
lation zum Verbrauch entwickelte Dampf
und Druck zu viel. Regeln Sie dann bitte
den Gasbrenner soweit zurück, bis Sie
eine gute Balance zwischen Verbrauch
und entwickelter Heizleistung gefunden
haben. Dies wirkt sich auch auf die Stel-
lung des Dampfreglers aus. Das Modell
muss zu Beginn erst einmal eingefah-
ren werden. Ist dies geschehen und Sie
haben etwas Erfahrung mit dem System
Echtdampf gesammelt, werden sie viel
Freude bei der Herausforderung im Be-
trieb haben, den effizientesten Weg und
Nutzen von Feuer und Dampf zu kontrol-
lieren.
flow sufficiently low to keep the loco run-
ning steadily. Use the regulator to control
the speed. When the model is run-in and
the control technique learnt, much pleas-
ure will be derived from running and con-
trolling your model in a prototypical and
economical way.

11www.km-1.de
General information and
consumables
Gas: The usual good advice for Gauge
One live steam models is to use only Buta-
ne gas. Iwe found Butane satisfactory with
the prototype model during normal wea-
ther conditions during pring and summer.
However, because there is no water jacket
surrounding the gas tank of the loco, it may
be that during the cooler winter months the
ow of Butane is inadequate to maintain
a good re. In this circumstance only, it is
permissible to use Butane/Propane mixes.
If you opt to use Butane/Propane mixes
then be sure to monitor gas tank tempe-
rature with an un-gloved nger every now
and again. If heat is detected in the tank
then stop operations immediately. Be-
cause there is no heat source immediately
adjacent to the gas tank, the chances of
any tank heating are remote but safety rst
is the mantra of all live steam enthusiasts.
Water: Distilled Water is the best water to
use. Rainwater is perfectly good too and
a couple of buckets left out when rain is
forecast will ensure a free supply. Pass
the rainwater through a filter paper if you
suspect dust or debris contamination.
Store in a container out of sunlight or the
growth of algae may occur. Never use tap
water because it will contain dissolved
Calcium and Magnesium salts which over
time will deposit in your boiler as limes-
cale.
Oil: Lubrication is very important for Live-
steam engines. Since this model is op-
erated with high temperatures, you need
a special steam oil, that provides best
performance without loosing the lubrica-
tion film at cylinders and all other parts in
move. best choice is to use KM1 steam
oil, with which we experienced best re-
sults, or you may use any other steam oil
meeting the norm ISO 460.
Allgemeine Informationen
und Verbrauchsmaterial
Gas: Unter normalen Bedingungen im
Frühjahr und Sommer, haben wir mit dem
Prototypen gute Erfahrungen mit reinem
Butangas gemacht. Bei dieser Lok wird
jedoch der Gastank nicht von Wasser um-
spült. Daher kann es zur kalten Jahreszeit
besser sein, einen Butan/Propan Gasmix
zu verwenden, um eine gute Heizwirkung
zu erzielen. Hier zählen Erfahrungswerte,
sollten Sie sich dafür entscheiden, einen
Gasmix zu verwenden, muss die Tempe-
ratur des Gastanks sorgfältig überwacht
werden. Am einfachsten tun Sie dies, in-
dem Sie von Zeit zu Zeit die Temperatur
mit dem blanken Finger erfühlen. Sollte
der Tank warm werden, stellen Sie den
Betrieb bitte sofort ein. Da am Gastank
keine direkten Wärmequellen anliegen,
sind jede Temeraturänderungen zu be-
rücksichtigen. Sicherheit geht vor!
Wasser: Für den Betrieb verwenden Sie
am besten destilliertes Wasser. Regen-
wasser kann ebenfalls verwendet werden,
Sie können dieses in Auffangbehältern
(z. B. Kübeln) sammeln. Regenwasser
muss zuvor in einem Filter von fei-
nen Schmutzpartikeln gefiltert werden
(z. B. Kaffeefilter). Bewahren Sie vor allem
Regenwasser bitte kühl und im Dunkeln
auf, damit keine Algen wachsen können.
Empfehlenswert ist von unserer Seite
immer die Verwendung von destilliertem
Wasser. Leitungswasser sollte niemals
genutzt werden, da dieses Salze und Mi-
neralien enthält. Diese können den Kessel
schädigen und Kalkablagerungen bilden.
Öl: Die Schmierung der Zylinder und der
beweglichen Teile ist bei Echtdampfmo-
dellen extrem wichtig. Der Schmierfilm darf
auch bei hohen Temperaturen nicht abrei-
ßen. Wir empfehlen Ihnen deshalb unser
Nassdampföl (auch Sattdampföl) oder an-
dere nach ISO 460 zertifizierte Dampföle.

12 Modelle vom Modellbahner
ACHTUNG: Dieses Modell ist nicht
geeignet für Kinder unter 16 Jahren.
• Bitte achten Sie darauf nur Nass-
dampföl als Schmiermittel zu
verwenden. Die Nutzung anderer
Schmiermittel kann zu Schäden
und zum Verlust der Gewährleis-
tung führen.
• Bitte lagern Sie das Verpackungs-
material an einem sicheren Ort
weg von Kindern.
CAUTION: This model is not suitable
for persons under 16 years of age.
• Please be sure to only use high
temperatures steam engine oil as
lubricant. Using other lubricants
may cause damage to the model
and loss of warranty.
• Please store the packing material
in a safe place away from children.
General safety
instructions
Please keep in mind before firing this lo-
comotive that should the locomotive stop
for any unexplained reason, then it must
be assumed that the boiler is out of water.
Immediately turn off the gas at the control
valve.
Operation of this locomotive model by
persons under the age of 16 years, even
with adult supervision, should be dis-
couraged. Sudden emissions of hot, oily
water and steam from the chimney may
scald small hands. All users should keep
their faces away from the chimney when
steaming up or when starting the run.
This model locomotive is for operation
outdoors only. Do not operate indoors
particularly in enclosed or confined spac-
es. Unpleasant fumes, the product of in-
complete combustion may be generated
during the initial firing sequence.
This model locomotive comes with a boil-
er test certificate and a gas tank test cer-
tificate. Keeps these documents in a safe
place. Boilers and gas tanks are made to
the highest standards and comply with
EU regulations.
Allgemeine
Sicherheitshinweise
Beachten Sie bitte, dass ein unerwarte-
tes Anhalten des Modells häufig daran
liegt, dass kein Wasser mehr im Kessel
ist. In diesem Fall drehen Sie bitte sofort
das Gasventil zu. Stellen Sie sicher, dass
immer genügend Wasserstand in Ihrem
Echtdampfmodell vorhanden ist.
Personen unter 16 Jahren dürfen das Mo-
dell nicht betreiben, auch nicht in Beglei-
tung oder unter Anleitung Erwachsener.
Es kann immer zum Ausstoß von heißem
Öl, Wasser oder Dampf kommen. Daher
müssen Sie sich immer von den gefährde-
ten Bereichen fern halten, insbesondere
mit dem Gesicht oder unbedeckter Haut.
Dieses Modell ist für den Betrieb im Frei-
en gebaut. Nutzen Sie es nicht im In-
nenbereich! Abdampf, Ölrückstände und
Gerüche von Gas und verbranntem Öl
können auftreten.
Das vorliegenden Modell hat ein Kessel-
prüfprotokoll und einen Gastankzertifikat,
die den Richtlinien der EU entsprechen.
Bewahren Sie diese Dokumente bitte si-
cher auf. Sowohl Kessel als auch Gastank
sind gemäß den höchsten Qualitätsstan-
dards gefertigt.

13www.km-1.de
Gewährleistung
Sie erhalten auf das Modell 2 Jahre Ge-
währleistung. Diese richtet sich nach den
gesetzlichen Vorschriften. Verschleiß-
teile sind nicht im Umfang der Gewähr-
leistung enthalten. Die Gewährleistung
erlischt umgehend bei unsachgemäßem
Gebrauch, Umbauten oder Öffnen der
Lokomotive und ist nicht an Dritte über-
tragbar. Wir haben mit Sorgfalt darauf
geachtet, dass ihr Modell ohne Mängel
ausgeliefert wird. Nur mit einem nach-
weisbaren Kaufbeleg Ihres Fachhändlers
hat die Gewährleistung ihre Gültigkeit.
Sollte an Ihrem Modell ein Fehler auftre-
ten, bitten wir Sie um folgendes Vorge-
hen:
Direktkunden
Sie haben ihr Modell direkt bei uns ge-
kauft? Bitte nehmen Sie mit uns Kontakt
auf. Sie können uns per Telefon, Fax oder
E-Mail erreichen. Wir besprechen dann
die weitere Vorgehensweise mit Ihnen.
Kauf über Fachhändler
Wenn Sie ihr Modell über den Handel
bezogen haben, ist der erste Ansprech-
partner ihr Händler. In den meisten Fällen
kann ihnen sicher vor Ort geholfen wer-
den. Ihr Händler kümmert sich dann im
Gewährleistungsfall um die Abwicklung.
Hinweis: Sollten Sie das Modell zum Ser-
vice senden, ist es unbedingt erforderlich ,
den Serviceschein ausgefüllt beizulegen.
Bitte beachten Sie unbedingt unsere Ver-
packungsrichtlinien. Beides finden Sie
als Download auf unserer Website. Bei
Versand mit unzureichender Verpackung
erlischt der Gewährleistungsanspruch.
Warranty
This warranty is valid for all KM1 products
that have been purchased from an au-
thorised dealer or directly from our store.
No claims will be accepted without proof
of purchase. The filled in service form to-
gether with your receipt serves as proof
of purchase. We recommend keeping
the receipt together with the documents
of your model. In case of claim please
fill in the service form as detailed and
preciseley as possible and send it along
with your original packed product. This
warranty covers free of charge repair or
replacement of the faulty part, provided
the failure is demonstrably due to faulty
design, manufacturing, material or trans-
port. Please use the appropriate postage
stamps when shipping the product to
KM1. Any further claims are excluded.
The warranty expires:
In case of wear and tear due to normal
use. In case modifications of KM1 prod-
ucts or removing or adding parts without
approval of KM1. In case of inappropri-
ate use (different to the intended use as
specified by the manufacturer). If the in-
structions as laid down in the user man-
ual by KM1 were not adhere to. If packag-
ing and stuffing is unsufficient and or too
weak mailer box.
Due to liability reasons any inspections or
repairs can only be carried out on prod-
ucts that are not installed in a locomotive
or carriage. Any locomotive sent to KM1
for inspection will be returned without
even touching it. There is no extension
of the warranty period due to any repairs
or replacements carried out by KM1. You
may submit your warranty claims either at
your retailer or by shipping the product in
question with the service form and the re-
ceipt of purchase directly to KM1.

14 Modelle vom Modellbahner
Class A4 Class 7 Britannia
Decapod
Empfohlenes Zubehör
• KM1 Nassdampföl, Art.-Nr. 550001
• Spritze 60 ml, Art.-Nr. 550010
• Spritze 20 ml, Art.-Nr. 550011
• Stabfeuerzeug
• Fusselfreies Tuch
• Schraubendreher und Schlüssel für
metrisches System
Recommended
accessories
• KM1 steam oil, Item No. 550001
• Injection 60 ml, Item No. 550010
• Injection 20 ml, Item No. 550011
• Barbecue lighter
• Lint-free cloth
• Screwdrivers and spanner for metric
system
Weitere Echtdampfmodelle, Zubehör
und Detailinformationen finden Sie unter
www.km-1.de.
www.km-1.de
Steam Edition
More live steam engines, accessories
and detailed information are available on
our website www.km-1.de.
Baureihe 64
Class 8F

15www.km-1.de
Baureihe 01.10 (Spur 1) Jetzt
vorbestellen!
Art.-Nr. 150101, BR 01 1087, DB Ep. IIIa,
ED Kassel, Bw Bebra
Altbaukessel Kohle, RAL 5011 Stahlblau,
silberne Kesselringe
Art.-Nr. 150102, BR 01 1087, DB Ep. IIIa,
ED Kassel, Bw Bebra
Altbaukessel Kohle, RAL 9005 Schwarz,
silberne Kesselringe
Art.-Nr. 150103, BR 01 1059, DB Ep. IIIa, ED
Karlsruhe, Bw Offenburg
Neubaukessel Kohle, RAL 9005 Schwarz,
silberne Kesselringe
Art.-Nr. 150104, BR 01 1099, DB Ep. IIIb, BD
Münster, Bw Osnabrück
Neubaukessel Kohle, RAL 9005 Schwarz
Art. Nr. 150105, BR 01 1085, DB Ep. IIIb,
BD Kassel, Bw Kassel
Neubaukessel Ölfeuerung, RAL 9005
Schwarz
Listenpreis: 5.550,- €
Modell: Echtdampfmodell aus Messing
und Edelstahl, Brennstoff: Butangas, Achs-
folge: 2’C1’, Dreizylinderantrieb, Keramik-
gasbrenner mit Schauglas in Feuerbüch-
se, Wasserstandanzeige mit Prüfventil,
Dampfpfeife, nachgebildete Zylinderhähne,
Heusinger Steuerung mit Umsteuerung
im Führerstand, Kupfer und Edelstahl, sil-
ber gelöteter Kupferkessel, Manometer für
Kesseldruck, gefederte Achsen und Puffer,
Überhitzer, Achsfahrpumpe mit Bypassven-
til, Handspeisepumpe, Verdrängungsöler,
Vorbildgerechte Lackierung und Beschrif-
tung, Modelle mit individueller Seriennum-
mer, komplett lackierte und betriebsbereite
Modelle, einstellbare Sicherheitsventile,
vorbildgerechte Kupplungen, bewegliche
Wasserkastendeckel, zu öffnende Rauch-
kammertüre, CE zertifizierte und getestete
Kessel, streng limitierte Auflage von max.
20 Exemplare pro Version, optionale R/C
Steuerung, Mindestradius 2000 mm, LüP
ca. 770 mm, NEM-Radsätze.
bis 30.04.2018
10%
Vorbestellrabatt
auf den Listenpreis
Abbildung zeigt die elektrische Version aus dem Jahr 2007. Serie kann vom Bild abweichen.

KM1 Modellbau e. K.
Ludwigstraße 14
89415 Lauingen
Tel.: 09072 – 922 67 0
Fax: 09072 – 922 67 22
Mail: info@km-1.de
Web: www.km-1.de
Kontakt
Europavertrieb von
Irrtümer und Änderungen vorbehalten. Es gelten unsere allgemeinen Geschäftsbedingungen.
Nicht für Kinder unter 15 Jahren geeignet.
© by KM1 Modellbau 2017
Kontakt
Table of contents
Popular Toy manuals by other brands

Mattel
Mattel Barbie CHT59 instructions

Radica Games
Radica Games Password Journal 75015 Specification sheet

Skywalker
Skywalker X-8 Assembly manual

Barbie
Barbie LIL' TRAIL RIDER K0451 Owner's manual with assembly instructions

The Learning Journey
The Learning Journey Techno Gears Marble Mania SIDEWINDER 3.0 instruction manual

Eduard
Eduard EF 2000 Single Seater interior S.A. quick start guide

Fisher-Price
Fisher-Price Octonauts Gup-A Megapack quick start guide

Hasbro
Hasbro NERF Marvel Avengers MechStrike instructions

Rail King
Rail King 2-8-8-2 Steam Engine instruction manual

Harlock-RC
Harlock-RC VIPER 140 user manual

rc3Dprint
rc3Dprint PILATUS PC-6 PORTER Assembly

Force1
Force1 STORMRIDER instruction manual