Knapik PR 20 User manual

Hand-Pulled Sprayer
Operating Instructions
Phone: +55 42 3522-2789 | +55 42 3522-1819 | +55 42 3523-7926
Rua Prefeito Alfredo Metzler 480 - CEP 89400-000 - Porto União – SC – Brasil
Website: www.knapik.com.br | E-mail: knapik@knapik.com.br
vendas@knapik.com.br | vendas2@knapik.com.br
Modelo - Model: PR 20
Carriola Pulverizador Manual
Instruções de Operação
Pulverizador Manual de Arrastro Humano
Manual de Instrucciones

2
INDIC - SUMMARY
AVISO AO OPERADOR
OPERATOR WARNING
ADVERTENCIA DEL OPERADOR
03
1. P ÇAS QU STÃO D NTRO DA MBALAG M:
PIEZAS QUE ESTÁN DENTRO DEL EMBALAJE:
PARTS THAT ARE INSIDE THE PACKAGE
04
05
3. MONTAG M DO TANQU NO QUADRO
MONTAGE DEL TANQUE EN EL CHASIS
TANK ASSEMBLY ON THE FRAME
06
4. MONTAG M DA BARRA
MONTAJE DE LAS BARRAS DE PULVERIZACIÓN
SPRAY BOOM ASSEMBLY
10
5. R GULAG NS DA BARRA
REGULACIÓN BARRA DE PULVERIZACIÓN
SPRAY BOOM ADJUSTMENT
12
6. R GULAG M DA PR SSÃO
REGULACIÓN DE LA PRESIÓN DE PULVERIZACIÓN
SPRAY PRESSURE REGULATING
14
7. MBR AG M DO PULV RIZADOR
EMBRAGUE DEL PULVERIZADOR
SPRAYER CLUTCH
15
8. CONS RVAÇÃO MANUT NÇÃO
CONSERVACIÓN Y MANTENIMIENTO
CONSERVATION & MAINTENANC
16
9. LIMP ZA DO PULV RIZADOR
LIMPIEZA DEL PULVERIZADOR
CLEANING THE SPRAYER
18
10. R COM NDAÇÕ S D S GURANÇA
RECOMENDACIONES DE SEGURIDAD
SAFETY PRECAUTIONS
19
11. CONSID RAÇÕ S FINAIS
CONSIDERACIONES FINALES
FINAL CONSIDERATIONS
22
2. MONTAG M DOS CABOS
MONTEGE DEL MANILLAR
SPRAYER HANDLEBARS ASSEMBLY

3
PERSONAL PROTECTIVE EQUIPMENT (PPE) AT WORK IS VERY
IMPORTANT TO PROTECT YOUR HEALTH.
AVISO AO OPERADOR
OPERATOR WARNING
ADVERTENCIA DEL OPERADOR
Por favor, evite a eliminação
de resíduos no ambiente,
o planeta agradece a você.
Please, avoid the improper
disposal of waste in the environment,
the planet thank to you.
Por favor, evite lo inapropiado
eliminación de residuos en el medio ambiente,
el planeta gracias a ti.
SEGURANÇA NO TRABALHO
SAFETY AT WORK
SEGURIDAD EN EL TRABAJO
Lembre-se de que SEGURANÇA requer OBSERVAÇÃO DE ADVERTÊNCIA CONTÍNUA e CUIDADO
durante o armazenamento e manuseio transporte e manutenção do equipamento.
Keep in mind that SAFETY requires CONTINUING WARNING OBSERVATION and CAUTION durin
stora e and handlin , transport and maintenance of the equipment.
Ten a en cuenta que la SEGURIDAD requiere CONTINUAR LA OBSERVACIÓN DE ADVERTENCIA y
PRECAUCIÓN durante el almacenamiento y manejo, transporte y mantenimiento de la equipo.
POR FAVOR LEIA O MANUAL DE INSTRUÇÕES
PLEASE, READ THE INSTRUCTIONS MANUAL
POR FAVOR, LEA EL MANUAL DE INSTRUCCIONES
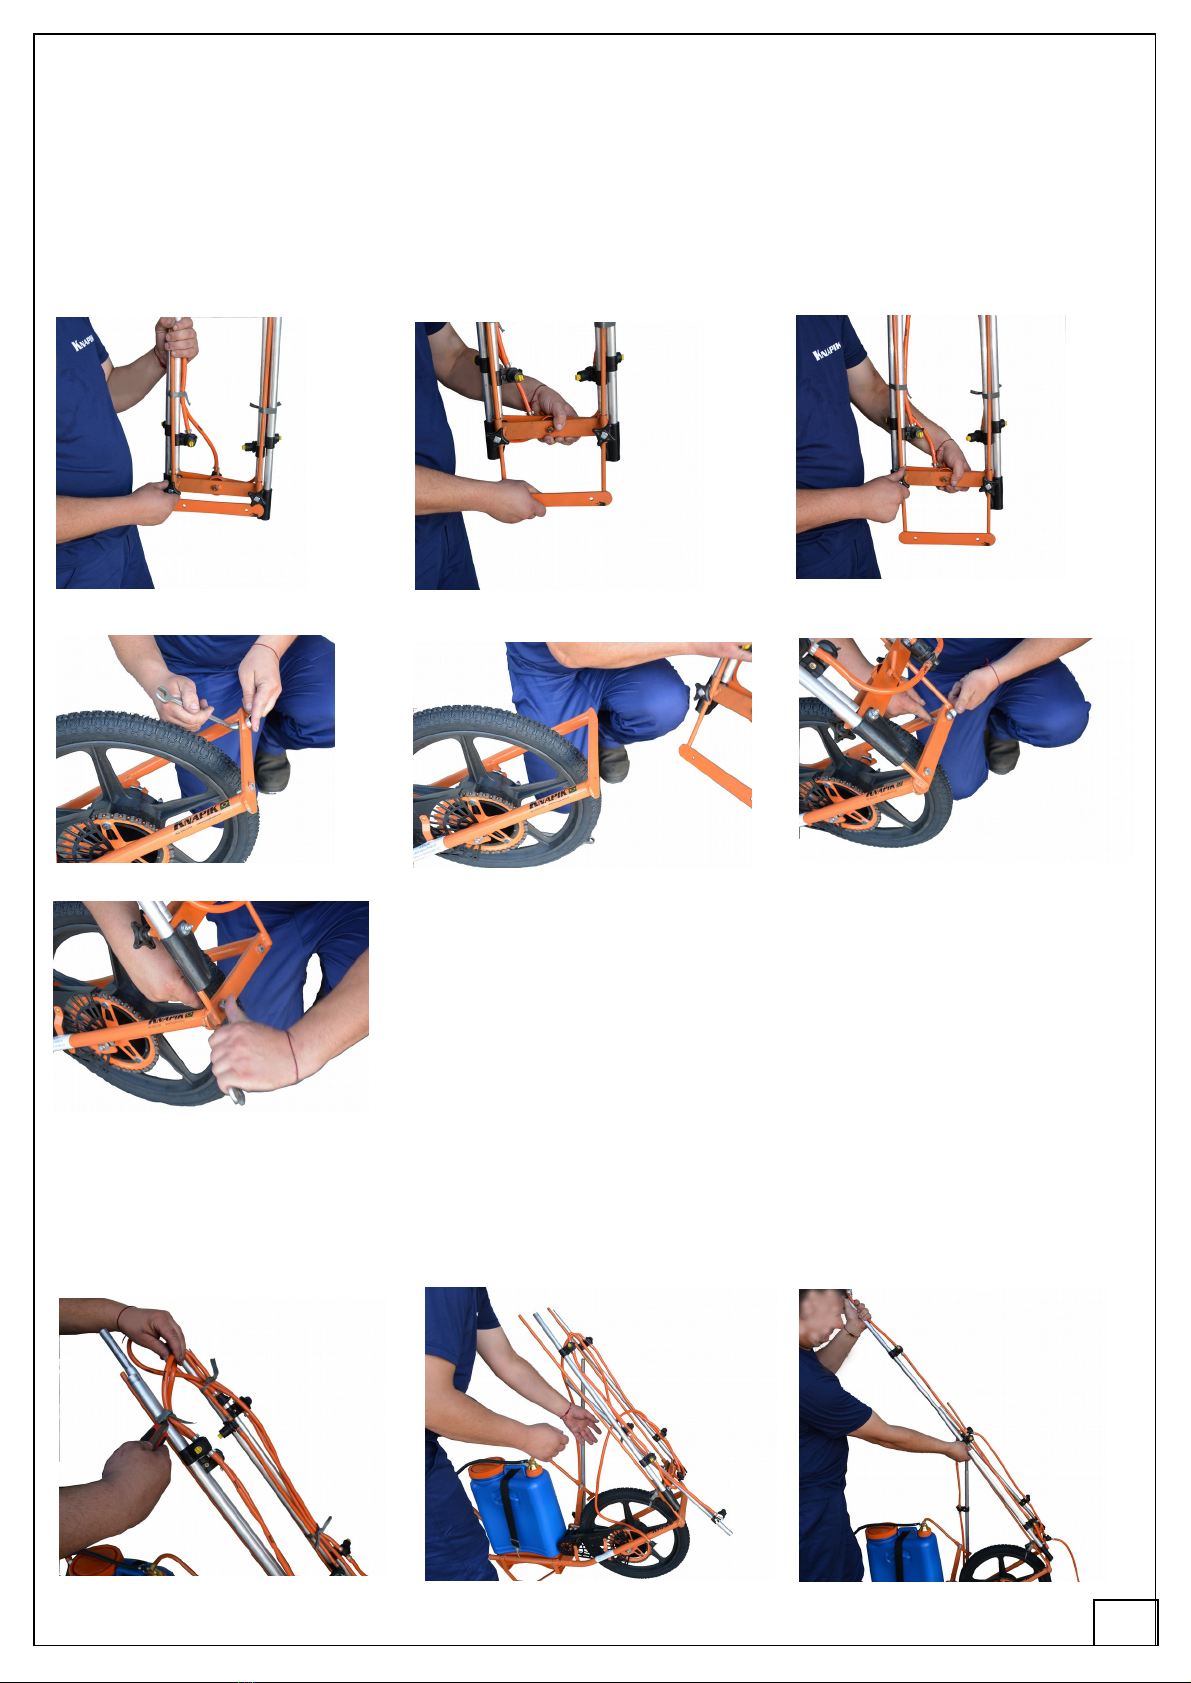
Antes da montagem, ajustes ou procedimentos de manutenção,
por favor, consulte o manual de instruções.
Before mounting, adjusting or maintenance procedures,
please, consult the instructions manual.
Antes de los procedimientos de montaje, ajuste o
mantenimiento, consulte el manual de instrucciones
USAR OS EQU PAMENTOS DE PROTEÇÃO ND V DUAL
É MU TO MPORTANTE PARA SUA SAÚDE
USAR LOS EQU POS DE PROTECC ÓN ND V DUAL
ES MUY MPORTANTE PARA SU SALUD

4
1. P ÇAS QU STÃO D NTRO DA MBALAG M:
PI ZAS QU STÁN D NTRO D L MBALAJ :
PARTS THAT AR INSID TH PACKAG :
1
2
3
1) Chassis com os cabos;
Chasis con los cables; Chassis with cables
2) Barra de alumínio com 8 bicos;
Barra de aluminio con 8 boquillas;
Aluminum bar with 8 nozzles;
3) Tanque Costal Jacto JH 20 litros – ATENÇÃO O TANQUE É ITEM
O CIONAL.
Tanque Costal Jacto JH 20 litros - ATENCIÓN EL TANQUE ES ITEM
O CIONAL.
JH Costal Jet 20 L Tank - ATTENTION THE TANK IS O TIONAL ITEM
F RRAM NTAS N C SSÁRIAS PARA MONTAG M:
HERRAMIENTAS NECESARIAS PARA MONTAJE:
TOOLS REQUIRED FOR ASSEMBLY:
01 unit - Estilete – Stylus
01 unit - Alicate – Pliers
01 unit – Chave Philips – Clave Philips – Philips Key
02 unit – Chave de boca ½ – Clave de boca ½ – rench ½
02 unit – Chave de boca 7/16 – Clave de boca 7/16 – rench 7/16

5
2. MONTAG M DOS CABOS
MONTEGE DEL MANILLAR
SPRAYER HANDLEBARS ASSEMBLY
2.1 - Os cabos do pulverizador devem ser montados paralelos.
El manillar del pulverizador se debe ser montado en paralelo.
The Sprayer handlebars must be assembled in parallel.
2.2 - Parafusar a travessa dos cabos.
Atornille la varilla de conexión las dos partes del manillar
Screw the rod connecting the handlebars
2.3 - Conferir se os dois cabos estão na mesma medida com relação ao solo.
Comprobar que ambos las partes del manillar esté en la misma altura desde el suelo.
Check to that both handlebars are the same distance or height from the ground.
2.1.1 2.1.2
2.1.3 2.1.4
2.2.1 2.2.2

6
2.4 – Agora parafusar os cabos sem forçar muito.
A continuación, atornille las partes del manillar en el chasis - No utilice una fuerza excesiva para atornillar.
Then, screw the handlebars in the frame – Do not use excessive force to screw.
3. MONTAG M DO TANQU NO QUADRO
MONTAG D L TANQU N L CHASIS
TANK ASS MBLY ON TH FRAM
2.4.1 2.4.2
ATENÇÃO:
- Ao montar o jacto PJH de 20 litros usado
verificar com atenção os seguintes itens:
*Câmara *Cilindro
*Reparos *Válvula
Para haver um bom funcionamento
estes devem estar em bom estado.
AVISO:
Al montar el tanque en el chasis por favor revise
cuidadosamente los siguientes ítems:
* Cámara * Válvula de la Cámara
* Cilindro * Juntas
Es importante el buen estado de los elementos
de la lista para tener el rendimiento adecuado del equipo.
Warning:
When assemble the tank on the frame
please check carefully mainly the following items:
* Cha ber * Cha ber valve
* Cylinder * Gaskets
It is important the good condition of the listed items
to have the proper performance of the equipment.
3.0.1 3.0.2
3.0.3
AT NÇÃO: o tanque deverá ficar encaixado junto a caixa virabrequim.
Aviso: Se debe poner en el lado de la caja de cigüeñal de pulverizador.
Warning: Must be placed at the side of sprayer crankshaft box.

7
3.1 – Passar a cinta pela alça do tanque e apertar os parafusos da cinta para firmar o tanque no quadro.
Pase la cinta a través de la empuñadura del tanque y apriete el tornillo hebilla para sujetar el tanque en el chasis.
Pass the strap through the tank handle and tighten the screw buckle to fasten the tank.
Como passar a cinta na fivela:
Cómo pasar la cinta por el tornillo hebilla:
How to pass the strap through the screw buckle:
Obs.: Não apertar em excesso a cinta.
Aviso: No aprieteexcesivamente el tornillo hebilla.
Warning: Do not tighten excessively the screw buckle.
3.2 - Encaixar a biela no pistão do tanque e colocar as arruelas e a trava R
Coloque la varilla de bombeo en la cámara y poner las arandelas y trabar con la clavija "R"
Fit the pumping rod of the chamber and put the washers and lock with “R” clip..
3.1.1 3.1.2 3.1.3 3.1.4
3.1.5 3.1.6 3.1.7
3.2.1 3.2.2

8
Montagem do manete
Montaje del gatillo
Mounting the trigger
3.2.3 3.2.4
3.2.5 3.2.6
3.2.7 3.2.8
AB C

9
3.3 – Montagem do gatilho na caneta.
Montaje del gatillo en el manillar.
Mounting the trigger on the handlebar.
Atenção: para a montagem é utilizada a mangueira do próprio tanque.
Nota: Hacer la montaje con el tubo original del tanque.
Note: Make mounting with the original hose of the tank.
Não aperte excessivamente a
abraçadeira do gatilho.
Aviso: No apriete
excesivamente la
abrazadera del gatillo.
Warning: Do not tighten
excessively the trigger
clamp.
Deixar o gatilho do registro
para baixo em cima do
extensor do cabo.
Aviso: Hacer el montaje
del registro colocando el
gatillo a la parte inferior.
Warning: Make mounting
the trigger valve placing
the trigger to underside.
3.3.1 3.3.2 3.3.3
3.3.4
3.3.5 3.3.6

10
4.1 - Encaixar as hastes da barra no quadro e parafusar
Poner las varillas (tallos) de las barras en el chasis y atornillar.
Fit the boom rods in the frame and screw it.
4. MONTAG M DA BARRA
MONTAJ D LAS BARRAS D PULV RIZACIÓN
SPRAY BOOM ASS MBLY
4.1.1 4.1.2 4.1.3
4.1.4 4.1.5 4.1.6
4.1.7
4.2 - Sequencia de montagem das mangueiras da barra.
Secuencia de montaje de la barra.
Sequence of bar mounting.
4.2.2
4.2.1 4.2.3

11
4.2.4 4.2.5 4.2.6
4.2.7 4.2.8 4.2.9
4.2.10 4.2.11 4.2.12
Passar a mangueira no meio das Hastes.
Pase la manguera por entre las varillas.
Pass the hose through between the rods.
Passar a mangueira atrás da cinta.
Pase la manguera detrás de la cinta.
Pass the hose behind the strap.
Rosquear na ponta da lança.
Atornille la manguera em el extremo de
la lanza.
Screw the hose at the end of the spray
lance.

12
5. R GULAG NS DA BARRA
REGULACIÓN BARRA DE PULVERIZACIÓN
SPRAY BOOM ADJUSTMENT
5.1 - A barra trabalha tanto na horizontal como na vertical.
La barra de pulverización funciona tanto en horizontal como en vertical.
The spray boom works both horizontally and vertically.
5.1.1 5.1.2
A barra com 8 bicos mede 3m 35cm atinge uma pulverização de 3m 85cm.
Barra de pulverización 3,35 m con 8 boquillas - 3,85 m de ancho de banda de aplicación.
3.35m Spray boom with 8 nozzles - 3.85 m spray application band width.
5.2 - Regulagem de altura da barra:
El ajuste de la altura de la barra de pulverización:
Adjustment of the spray boom height:
É possível regular a altura de 30 cm até 1m 30 cm do solo.
La altura de la barra de pulverización se puede ajustar de 0,30 m a 1,30 m del suelo.
The height of spray boom can be adjusted of 0.30 m to 1.30 m from the ground.
A altura correta de pulverizador é de aproximado 70 cm do solo.
La altura correcta de pulverizador es de aproximadamente 70 cm del suelo.
The correct spray height is approximately 70 cm from the ground.
1°) Afrouxar os dois parafusos borboleta que prendem a barra na haste.
Afloje los dos tornillos de mano que sujetan la barra de pulverización en las varillas.
Loosen both thumbscrews that holding the spray boom in the rod.
2°) Posicionar a barra na altura desejada.
Coloque la barra de pulverización a la altura deseada.
Place the spray boom at the required height.
3°) Apertar os parafusos borboleta.
Vuelva a apretar los tornillos.
Re-tighten the thumbscrews.

13
OBS: A altura deverá ser o suficiente para que os leques dos bicos se encontrem.
NOTA: La altura de la barra de pulverización debe ser suficiente para que el ancho de banda de
pulverización tenga superposición mínima.
NOTE: The spray boom height should be enough that the spray bandwidth has minimum overlap.
A altura correta da barra para pulverização é de aproximado 70 cm do solo.
La altura correcta de la barra para pulverización es de aproximadamente 70 cm del suelo.
The correct height of the spray bar is approximately 70 cm from the ground.
5.3 – REGULAGEM DE GRAU.
AJUSTE DEL ÁNGULO.
ANGLE ADJUSTMENT
Regulagem de ângulo - Direita e Esquerda - utilizado em terrenos com declive.
Generalmente se utiliza para terrenos en pendiente.
Mostly used to sloping land.
1°) Afrouxar o parafuso borboleta no centro.
Afloje el tornillo central.
Loosen the central thumbscrew.
2°) Posicionar a barra com o grau desejado.
Coloque la barra de pulverización en el ángulo deseado.
Place the spray boom to the required angle.
3°) Apertar o parafuso borboleta.
Vuelva a apretar el tornillo.
Re-tighten the thumbscrew.
5.3.2
5.3.1

14
6. R GULAG M DA PR SSÃO
R GULACIÓN D LA PR SIÓN D PULV RIZACIÓN
SPRAY PR SSUR R GULATING
Soltar parafuso borboleta e firmar na
pressão desejada.
Afloje tornillo y ajuste a la presión
requerida.
Loosen thumbscrew and adjust at the
required pressure.
Regulagem de pressão:
para um (01) bico - 0 5 à 0 8 cm
de curso do pistão.
Para la regulación de la presión de una
boquilla considerar 0,5 a 0,8 cm
de la carrera del pistón.
For the pressure regulating to one
nozzle consider from 0.5 to 0.8 cm of
the piston stroke.
Para 8 bicos - barra original aproximado 4
cm de curso do pistão.
En la barra con 8 boquillas alrededor de 4
cm de la carrera del pistón.
For the 8 nozzles spray boom about 4 cm of
the piston stroke.
4 cm
Curso máximo - é necessário a troca de bicos ou colocar mais bicos para não travar a roda.
Se Travar a Roda é sinal que há excesso de pressão pois o líquido deverá sair de forma uniforme e sem
prender a roda.
Para trabajar con los máximos recorridos de pistón se requiere cambio de las boquillas o añadir más boquillas en la
barra de pulverización para no bloquear la rueda.
El líquido debe ser pulverizado uniformemente y la rueda se debe girar normalmente. Si la rueda está bloqueada,
indica que hay sobrepresión.
To work with the maximum piston strokes is required exchange the nozzles or add more nozzles at the spray boom to
not block the wheel.
The liquid should be sprayed uniformly and the wheel turns normally. If the wheel is blocked, it indicates that there is
overpressure.
6.0.1 6.0.2 6.0.3
6.0.4

15
7. MBR AG M DO PULV RIZADOR
EMBRAGUE DEL PULVERIZADOR
SPRAYER CLUTCH
6.1 PARA UMA PULV RIZAÇÃO UNIFORM
PARA LA APLICACIÓN UNIFORM D SD L INÍCIO
FOR T H UNIFORM APPLICTION
6.1.26.1.1 6.1.3 Embrear e bombear com a mão para cima e para
baixo até encher as mangueiras com o líquido.
No mínimo 5 bombadas para gerar a pressão inicial.
En primer lugar desconectar la varilla de bombeo (un
tipo de embrague) del mecanismo de bombeo (como
se muestra en las fotos),y bombear manualmente para
producir la presión de arranque - bombeo de cinco
veces, por lo menos.
Firstly disconnect the pumping rod (a kind of clutch of
thepumping mechanism) of the pumping mechanism
(as shown at the pictures), and pump manually to
produce the starting pressure - pumping five times, at
least.
Quando for transportar a máquina acione a embreagem do pulverizador.
Empurre o meio da biela (joelho) para frente e o pistão para baixo.
Para el transporte del equipo utilizar el mecanismo de embrague del pulverizador como se muestra
a continuación.
El mismo tiempo empujar el centro de la varilla de bombeo hacia adelante y el pistón hacia abajo.
Así, la función de bombeo se vuelve inactiva.
For transporting of the equipment use the sprayer clutch mechanism as shown below.
The same time push the middle of the pumping rod forward and the piston down. Thus the
pumping function becomes inactive.
7.0.1 7.0.2 7.0.3 7.0.4
Nota: no ano de 2019 temos alteração no joelho da biela para o sistema de esfera.
Not : en el año 2019, tenemos alteración en la rodilla de la biela, para el sistema de esfera.
Note: in the year 2019, we have change in the knee of the connecting rod, to the ball system.

16
8. CONS RVAÇÃO MANUT NÇÃO
CONSERVACIÓN Y MANTENIMIENTO
CONSERVATION & MAINTENANC
Dicas:
Utilizar água limpa para pulverização para não entupir os bicos.
Lavar o pulverizador após o uso.
Atención:
Utilizar agua limpia para pulverizar para no obstruir las boquillas.
Lavar el equipo después del uso.
Attention:
Use clean water for spraying to avoid clogging the nozzles.
Wash the equipment after use.
Pontos para engraxar e lubrificar a máquina.
Na caixa virabrequim:
* Pingar óleo nas laterais;
* Também é possível retirar os 4 parafusos
para desmontar a caixa e engraxar o eixo.
Puntos de Lubric ción
En el cigüeñal
- Gotear aceite en los lados de la caja
- También puede remover los 4 tornillos para
desmontar la caja del cigüeñal y engrasar el eje.
Greasing and oiling points
At the crankshaft:
- Oiling on the box sides
- Also can remove the 4 screws to
disassemble the crankshaft box and grease the shaft.
Para engraxar o cubo da roda:
* Pingar óleo nas laterais;
* Também é possível retirar a roda do quadro
No cubo tem bucha com um pequeno furo por onde é possível injetar a
graxa com o auxílio de seringa com agulha.
Para lubricar el cubo de la rueda:
- Gotear aceite en las laterales cubo de la rueda.
- También puede remover la rueda del chasis.
En el cubo hay un casquillo con un pequeño agujero donde es posible
inyectar grasa.
To lubricate the wheel hub:
- Dropping oil in the sides wheel hub
- Also can remove the wheel from the frame.
At the hub there is a bush with a little hole where is possible to inject
grease
Lubrificar a corrente a cada 12 horas de trabalho.
Lubricar la cadena cada 12 horas de trabajo.
Lubricate the chain every 12 working hours.

17
É possível cortar a gaxeta para o pistão ficar mais leve.
ATENÇÃO nunca corte a gaxeta se for usar o tanque como costal.
Es posible cortar la junta, para que el pistón sea más ligero.
ATENCIÓN nunca corte la junta si va a usar el tanque como costal
It is possible to cut the gasket, so that the piston becomes lighter.
CAUTION Never cut the gasket if you will use the tank as a sack.
É interessante manter o pistão limpo
para não formar uma pasta que pesa no bombeamento
Lubrificar o pistão com óleo fino nunca utilizar graxa.
El pistón debe mantenerse limpio. El residuo remanente
puede dejar difícil el bombeo reduciendo el rendimiento de
la pulverización.
Lubrique el pistón con aceite fino nunca use grasa.
The piston must be kept clean. The remaining waste can be
pumping hard reducing the spraying performance.
Lubricate the piston with fine oil never use grease.
Dica importante
Consejo Importante
Important Tip
Lubrificar a cada 5 horas de trabalho.
Retire o pistão e lubrifique até o reparo na parte inferior.
Lubricar cada 5 horas de trabajo.
Retire el pistón y lubricar hasta que la junta en la parte inferior.
Lubricate every 5 hours of work.
Remove the piston and lubricate until the gasket at the bottom.

18
9. Limpeza do pulverizador
Limpieza del pulverizador
Cleaning the Sprayer
Depois de finalizada a aplicação lave todo o equipamento em um local onde não há risco de contaminação.
Opere a máquina com água limpa para limpeza interna da câmera.
Después de terminada la aplicación, limpie y lave todo el equipo en local donde no exista ningún riesgo de
contaminación.
Accione la palanca para la limpieza interna de la cámara.
After finishing the spray application, clean and wash all equipment in an approved decontamination area.
Pump until the discharge runs clear.
Não guarde o equipamento com líquido dentro do tanque. Produtos
químicos podem causar diferentes reações causando danos aos
componentes do equipamento e à saúde do operador.
No Almacene equipos con líquido dentro del tanque. Los productos
químicospueden provocar diferentes reacciones pudiendo causar
daños a los componentes del equipo y la salud del operador.
Remove all chemicals before storing the sprayer. Chemical products
have different reactions and can damage the sprayer components as
well as cause personal injury.
Periódicamente limpe a câmara e lubrifique os
componentes conforme mostra o desenho ao lado.
Retire a câmara e lubrifique os embolos
Periódicamente limpie la cámara y lubrique los
componentes conforme muestra el dibujo al lado. Retire
la cámara y lubrique los émbolos.
Periodically clean the chamber and lubricate the
components as shown.
Remove the chamber and lubricate the piston cups.

19
10. R COM NDAÇÕ S D S GURANÇA
RECOMENDACIONES DE SEGURIDAD
SAFETY PRECAUTIONS
ATENÇÃO!
LEIA O RÓTULO DOS PRODUTOS QUÍMICOS.
¡ATENCIÓN!
LEA EL RÓTULO DE LOS PRODUCTOS QUÍMICOS
ATTENTION!
READ CAREFULLY THE CHEMICALS
MANUFACTURER'S LABELS.
Coloque 5 litros de água em um recipiente e
adicione o produto.
Coloque 5 litros de agua en un recipiente
y adicione el producto químico.
Put 5 liters of water in a bucket and add
the chemical product.
Agite para misturar. Coloque a mistura no
tanque durante o abastecimento.
Agite hasta mezclarlo. Coloque la mezcla
en el tanque durante el abastecimiento.
Stir until it becomes an homogeneous
Mixture. Pour the solution into the tank
while filling with water.
¡ATENCIÓN!
Lávese las manos y las partes del cuerpo que tuvieron contacto con los productos químicos.
Realice la pulverización luego en seguida.
ATENÇÃO!
Lave as mãos e as partes do corpo que tiveram contato com os produtos químicos.
Realiza a pulverização logo em seguida.
ATTENTION!
Wa h hand and other part of the body that have touched chemical before
tarting to pray.

20
Leia com atenção o rótulo do produto.
Lea con atención el rótulo del producto.
Read carefully the chemicals
manufacturer's label.
Uso obrigatório de equipamentos de segurança
adequado.
Es obligatorio el uso de vestimentas y equipos de
seguridad adecuados.
Use of individual protective clothing and
safety equipment is obligatory.
Não comer beber ou fumar durante a aplicação.
No coma, ni beba, ni fume durante la aplicación.
Do not eat, drink or smoke while spraying.
Não contamine o meio ambiente.
No contamine el medio ambiente.
Do not pollute the environment.
Guarde os produtos químicos em local seguro.
Guarde los productos químicos en lugar seguro.
Lock up the chemical products to prevent untrained
persons to handle them.
Depois do trabalho tome banho com água fria e
bastante sabão. Troque de roupas.
Después del trabajo, tome baño com agua fría y
bastante jabón. Cambie sus vesti-mentas.
After finishing the spray application, take a shower
with plenty of water and soap. Put on clean clothes.
Table of contents