KnitKing KK93 User manual

knitkinq
HOW
TO
USE
YOUR KNITTING MACHINE

CONTENTS
ORIGINAL PATTERNS ................................. 1
PART
NAMES
............................................... 10
SETTING UP YOUR KNITTING MACHINE.... 14
REPLACING YOUR MACHINE INTO
THE CARRYING CASE ................................. 16
BEFORE STARTING TO KNIT ...................... 18
Holding Cam Lever• Cam Button Release Lever
•Cam Buttons • Weaving Pattern Levers
•Change Knob •Tension
Dial•
Cast-on
Comb
• Needle Positions •Carriage Direction Indicator
• Row Counter• L-Carriage • Claw Weights • End
Needle Selection Mechanism
of
the K-Carriage
• Non Selection Mechanism
of
the
L-Carriage
HOW
TO OPERATE YOUR KNITTING
MACHINE
STOCKING STITCH (Plain Knitting)
1.
Threading the yarn ..............................
..
...........
24
2.
How
to
cast on
with
afinished edge ................ 25
3.
Stocking stitch ..................................................
27
4.
How
to
remove
your
knitting
from
the machine ...................................................... 28
PATTERN KNITTING
PUNCH CARD AND THE PATIERN ...................... 29
RELATIONSHIP BETWEEN THE PUNCH CARD
AND THE NEEDLES ............................................... 30
HOWTO SET THE PUNCH CARD .........................
31
BASIC STEPS TO PATIERN
KNITIING
............... 32
SKIP STITCH PATIERN .........................................
34
MULTI-COLOUR SKIP STITCH PATIERN ............. 35
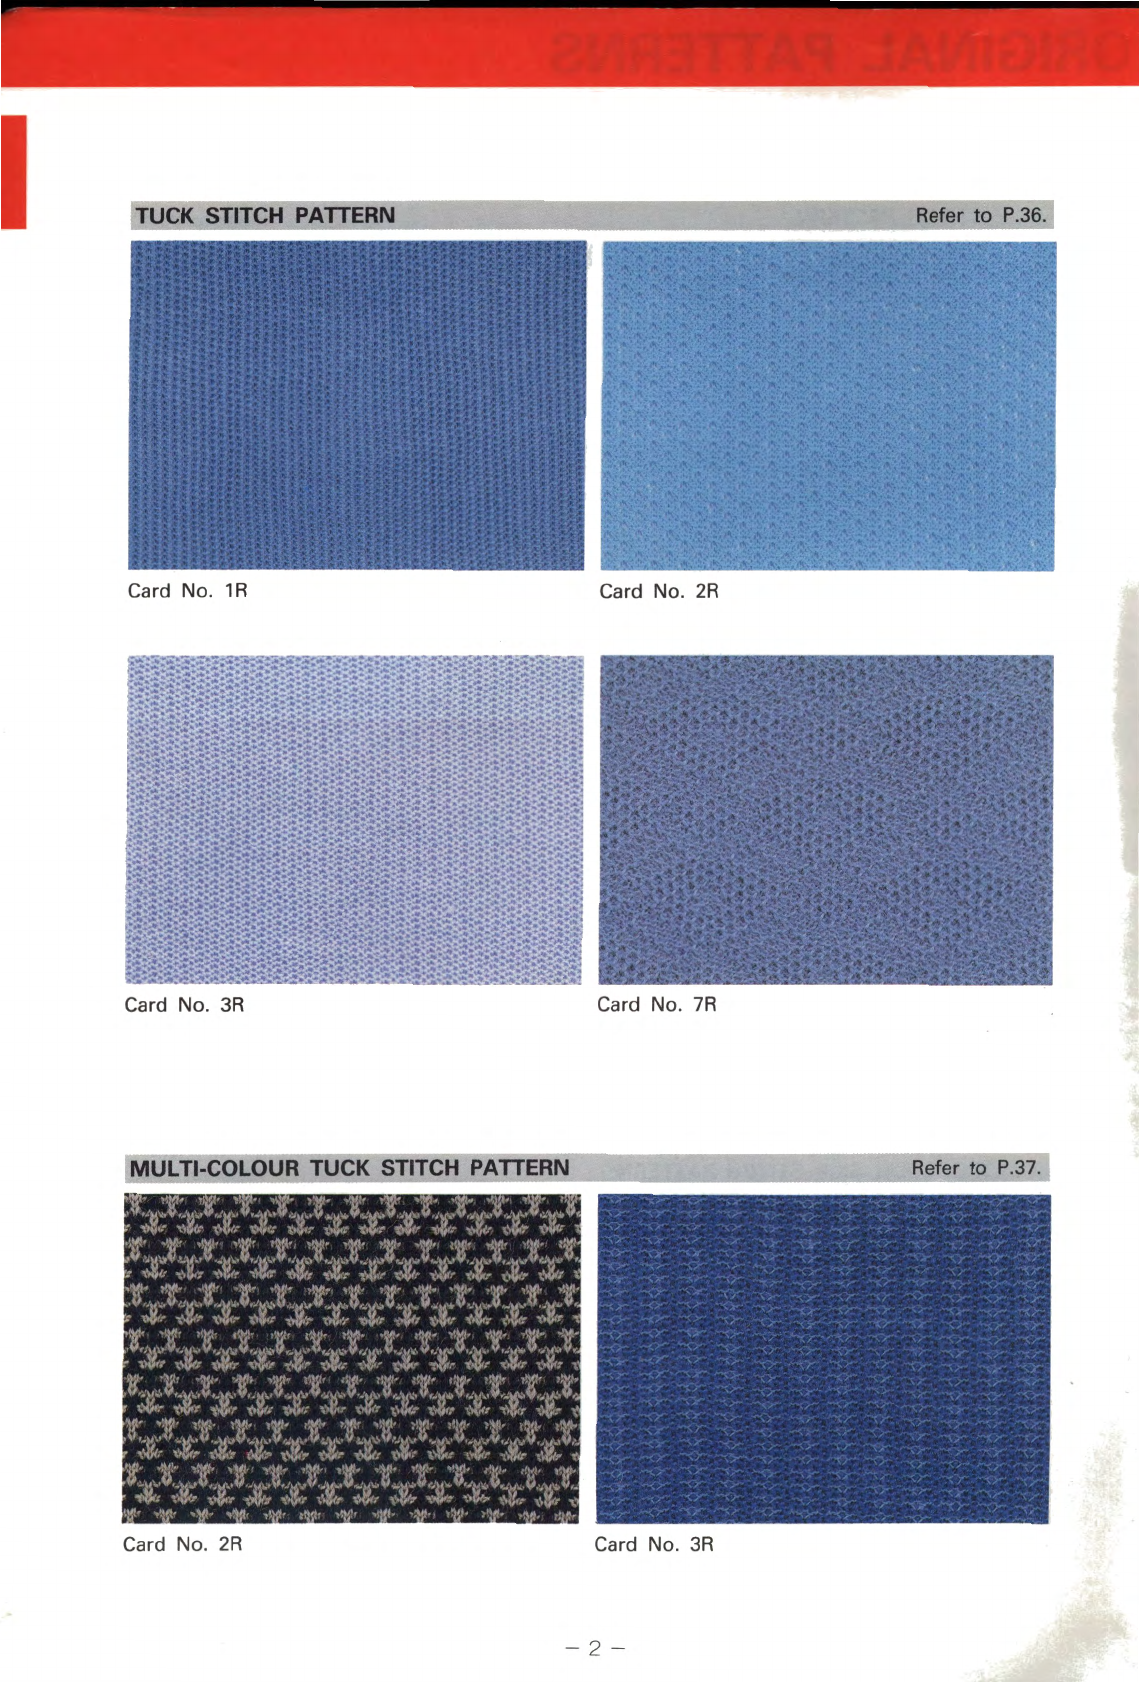
TUCK STITCH PATIERN ........................
..
............. 36
MULTI-COLOUR TUCK STITCH PATIERN .......... 37
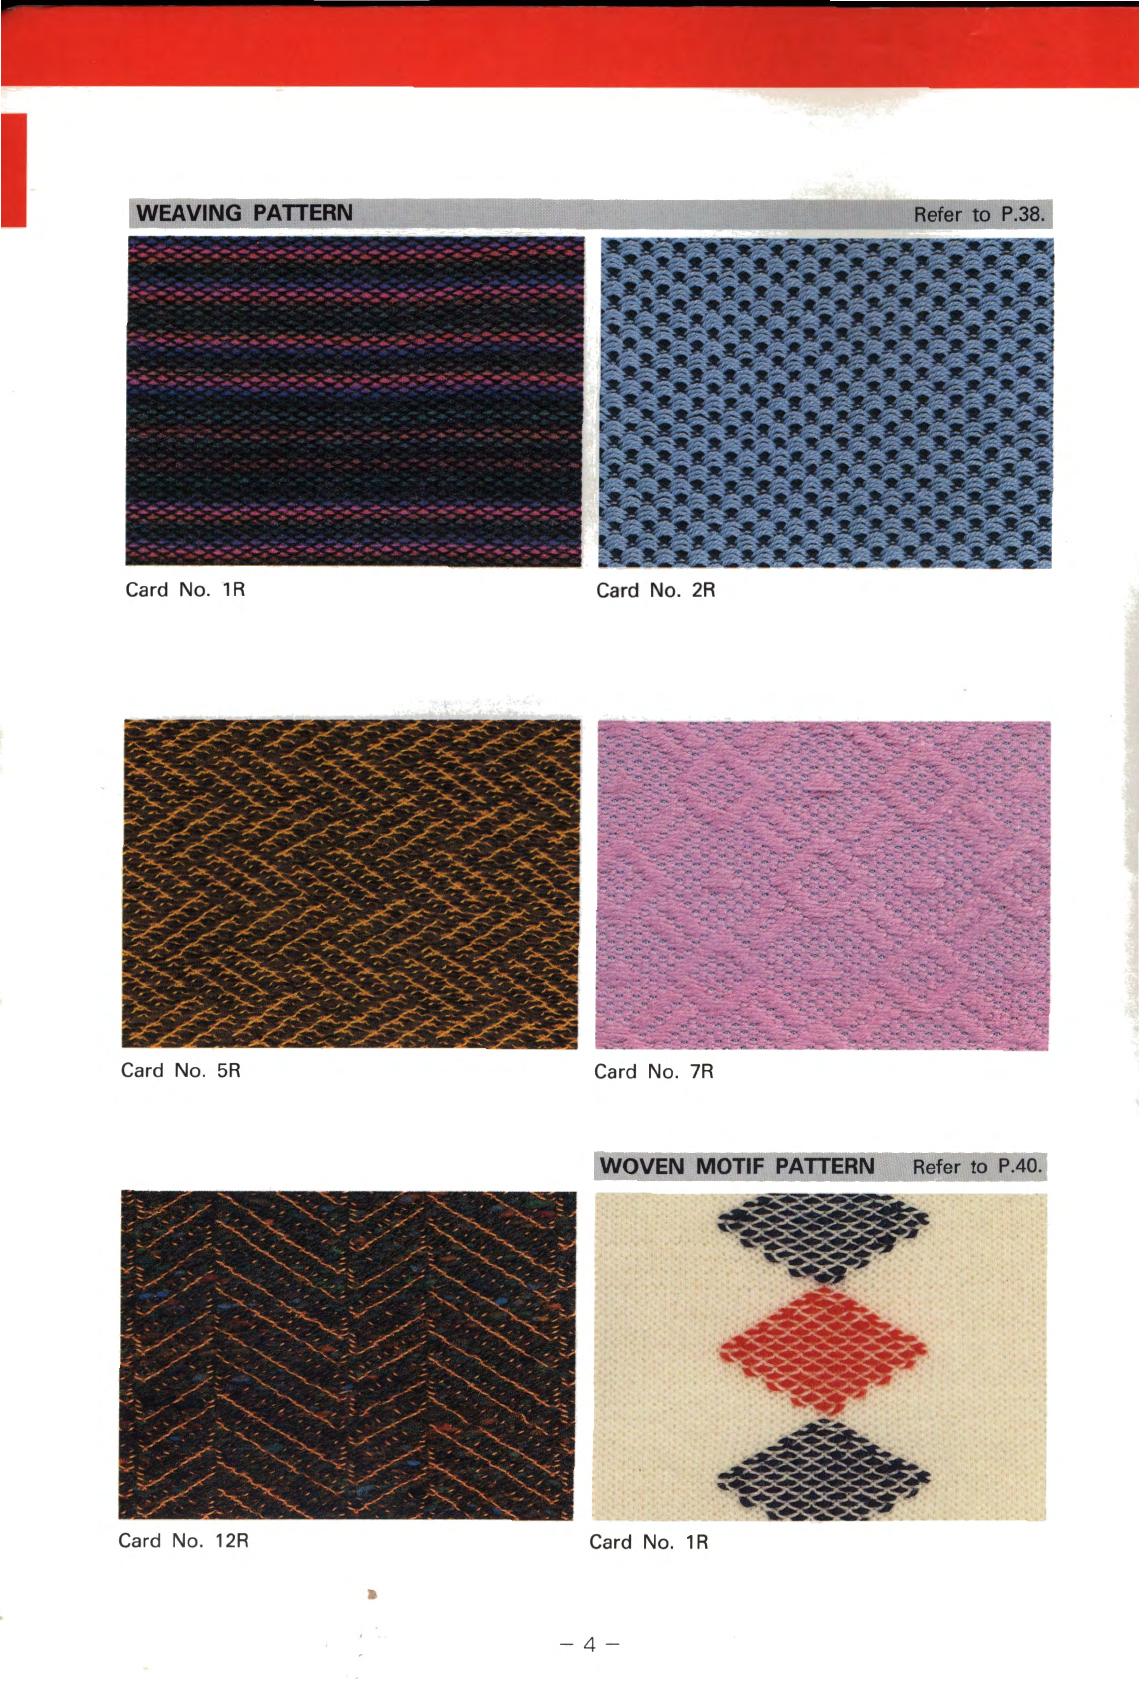
WEAVING PATIERN ............................................. 38
WOVEN MOTIF PATIERN
..
.................................. 40
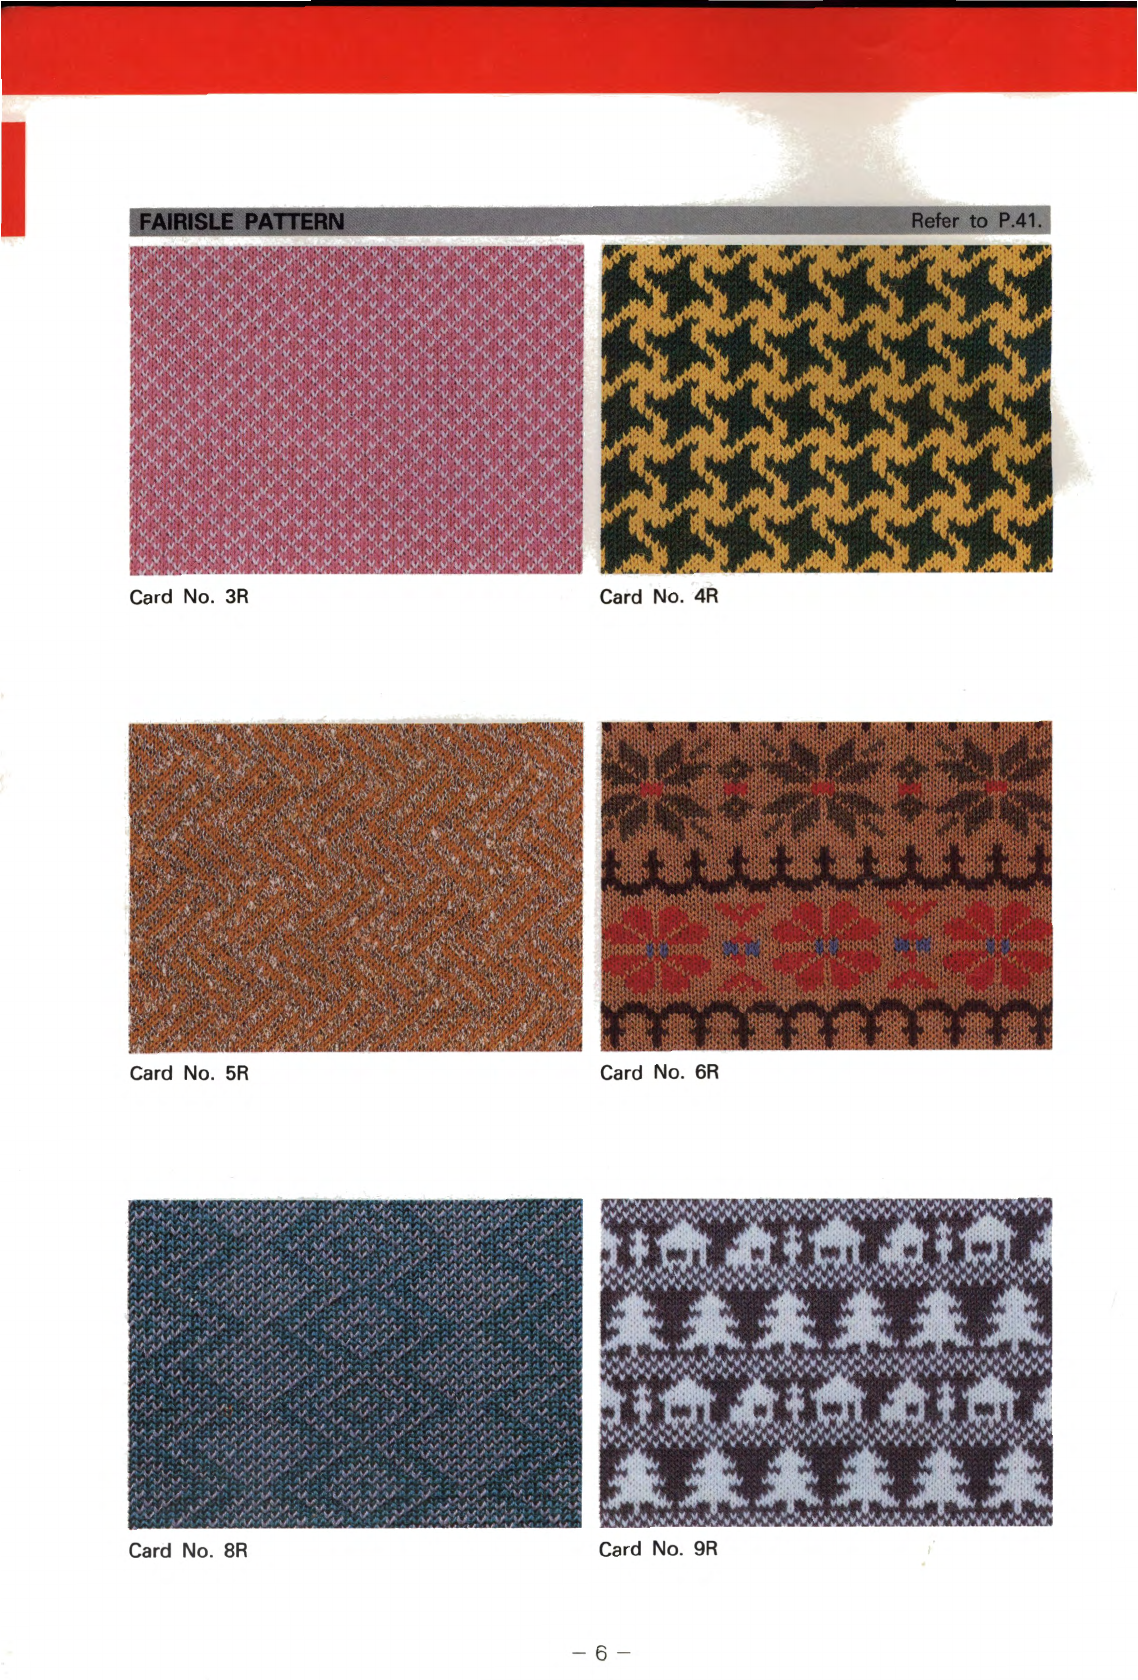
FAIRISLE PATIERN ...............................................
41
FAIRISLE MOTIF PATIERN ................................... 43
DOUBLE LENGTH PATIERN ................................ 47
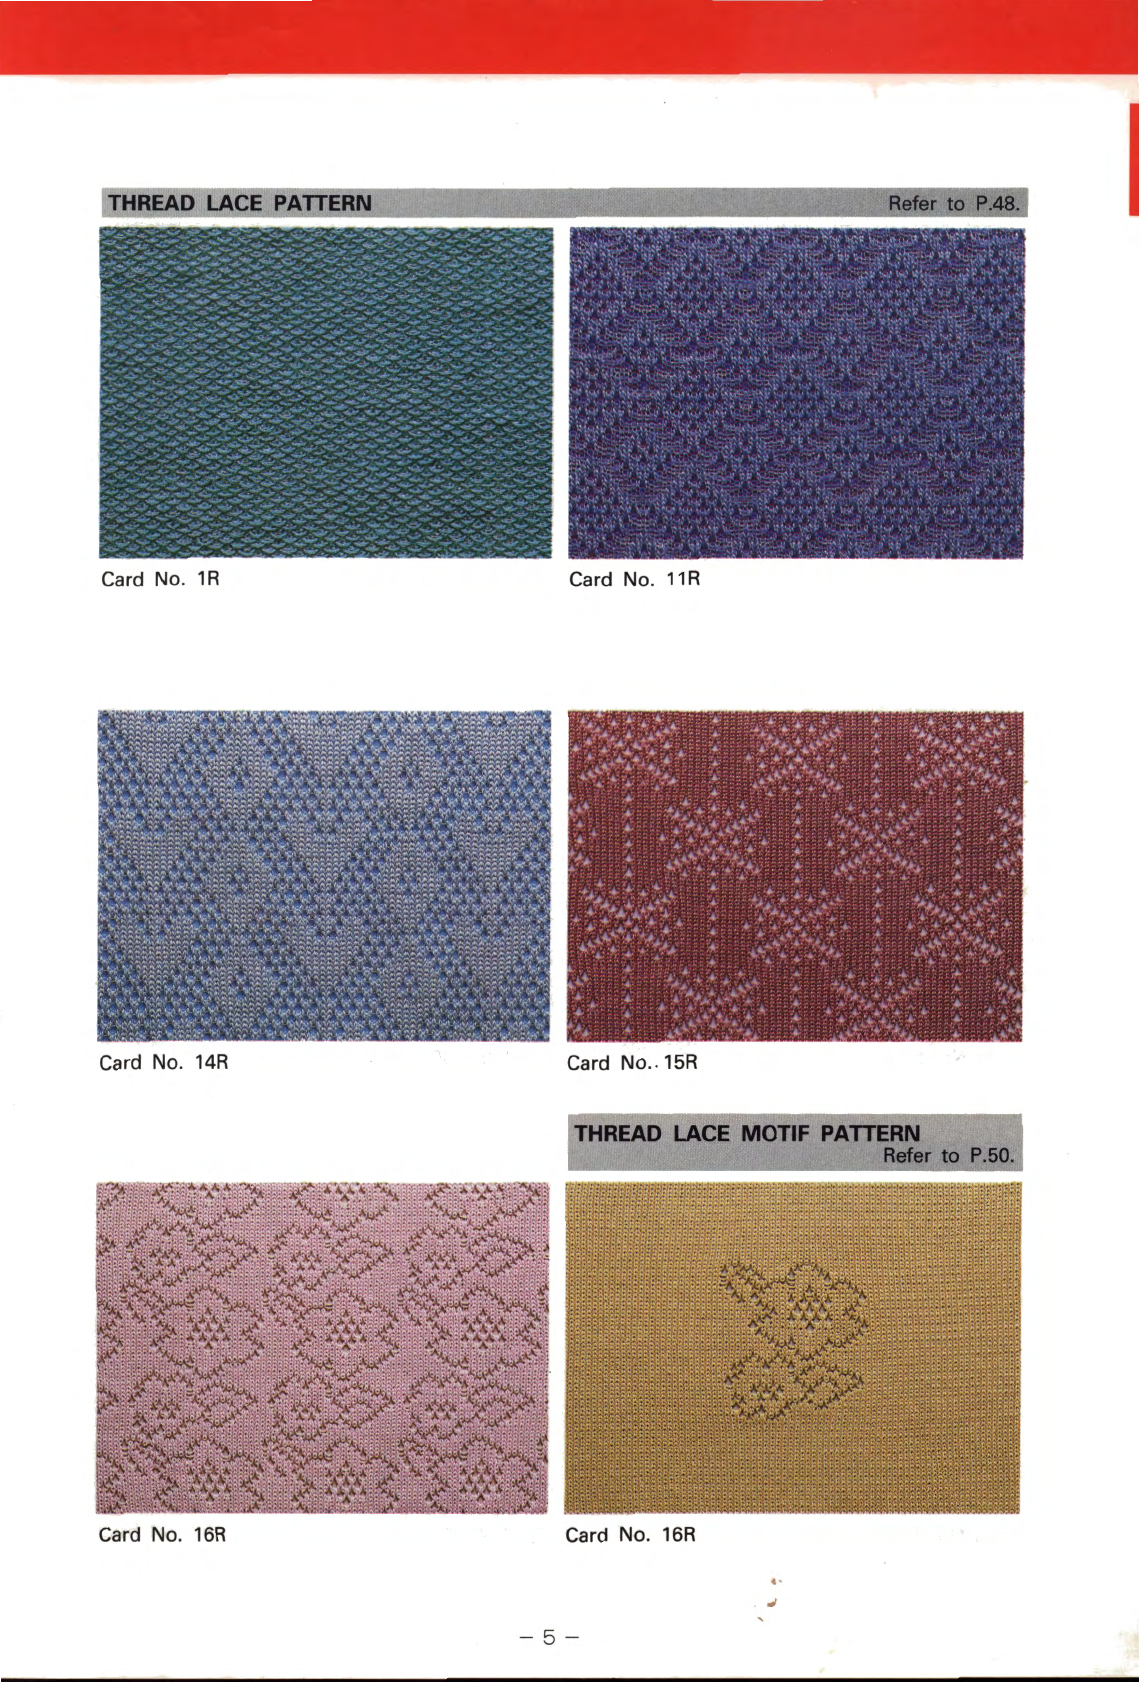
THREAD LACE PATIERN ..................................... 48
THREAD LACE MOTIF PATIERN ......................... 50
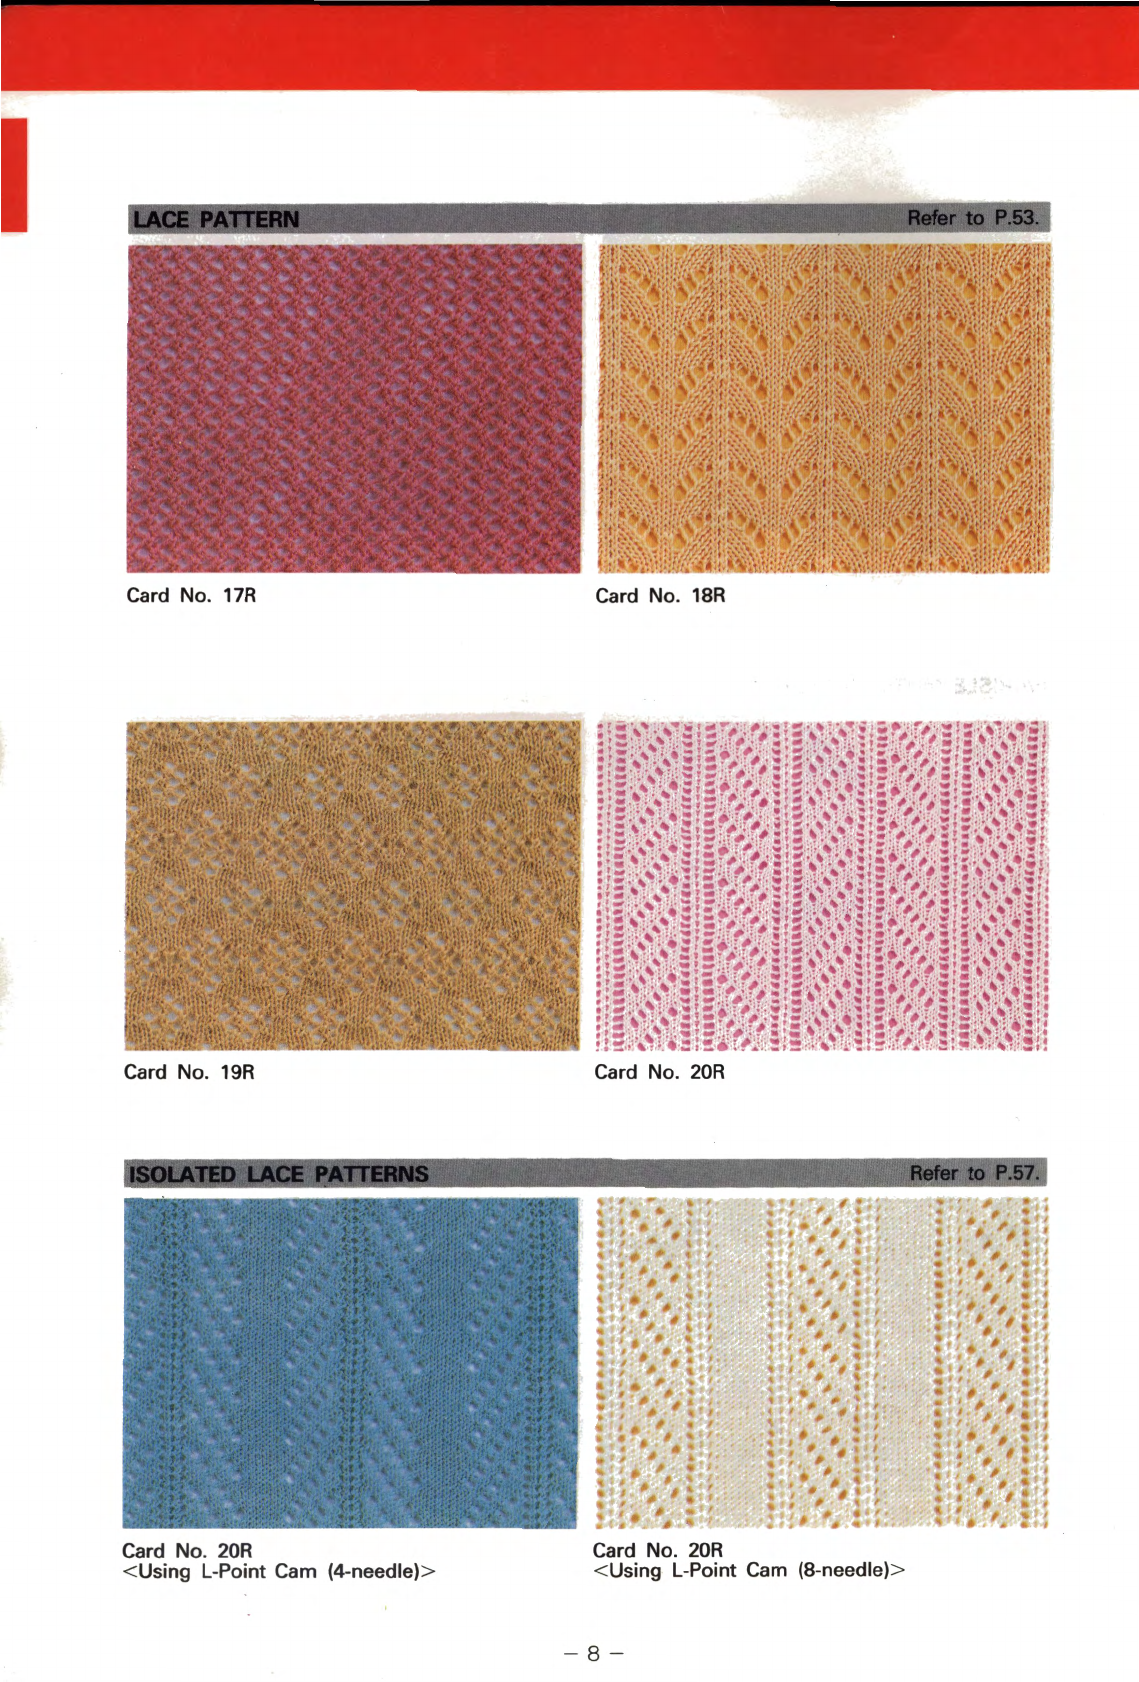
LACE PATIERN AND
FINE
LACE
PATIERN
........ 53
LACE AND
FINE
LACE MIXED .............................. 56
ISOLATED LACE PATIERN .................................. 57
PLATING ................................................
..
..
............ 59
CHAGING THE MAIN YARN
AND
THE PLATING
WHAT
TO
DO
IF
YOU MAKE MISTAKES
AS YOU KNIT
STOCKING STITCH AND PLATING .................
67
PATIERN KNITIING ........................................
71
INTARSIA ..........................................................
74
LACE
OR
FINE
LACE PATIERN .......................
75
HOW TO MOVE THE K-CARRIAGE ACROSS
THE NEEDLE
BED
WITHOUT
KNITIING
....
........
..
77
HOWTO CHECK
IF
THE NEEDLES ARE
SELECTED CORRECTLY .......................................
77
CHECK FOLLOWING POINTS
IF
THE NEEDLES
ARE
NOTSELECTED CORRECTLY .......................
77
MAKING GARMENTS
HOWTO
USE
THE TRANSFER TOOL ..................
78
HOWTO
USE
THE LATCHET TOOL .....................
78
Making Rib
by
Hand ..........................................
78
HOWTO INCREASE STITCHES ............................ 80
HOWTO DECREASE STITCHES ..........................
82
PARTIAL KNITIING
1.
Plain Stocking Stitch and Pattern Knitting ....... 84
2.
Lace
or
Fine Lace Pattern Knitting ...................
86
3.
lntarsia Knitting ................................................
88
HOWTO SHAPE A ROUND NECKLINE
Stocking Stitch and Plating ..............................
90
Pattern Knitting .................................................
91
Lace
or
Fine Lace Pattern .................................
93
lntarsia .........................................................
.....
95
HOWTO CAST ON WITH A FINISHED
EDGE
(CLOSED
EDGE
CAST ON)
"E"
wrap
method
..............................................
96
Using the LatchetTool .....................................
97
Waste Knitting (Casting-on) .............................
99
BACK STITCH CASTING
OFF
(BINDING
OFF)
...... 100
CHAIN STITCH CAST
OFF
(BINDING
OFF)
...........
101
WASTE KNITIING (CAST
OFF)
............................ 103
CORD KNITIING .................................................... 103
CABLE STITCH PATIERN ............
..
....................... 104
HOWTO MAKE A HEM
Plain Hem .......................................................... 105
Picot Hem
..
....
..
........
....
..
................................
...
1
06
1x 1 Elastic Hem
..
....................
....
..............
....
..
108
HOWTO MAKE A BUTIONHOLE ........................
109
USING A SEWING MACHINE
FOR
MAKE-UP ...... 110
SEAMING ...............................................................
112
PREPARING YOUR YARN ..................................... 113
YARN ......................................................................
PLATED TUCK STITCH PATIERN ......................
..
INTARSIA
KNITIING
.............................................
USEFUL HINTS
(PROBLEMS DURING KNITTING)
WHAT
TO DO WHEN YOU CANNOT KNIT
SMOOTHLY
61
62 1REPLACING A NEEDLE ............................... 114
63 CLEANING
AND
MAINTENANCE ............... 115
ADJUSTMENTS TO
RIBBER
CONNECTINGARMASSEMBLY
................
116
LIST
OF
PATTERN VARIATION ..................
117
1.
When the needles
don't
catch the yarn
properly
.......
...
.
..
......
..
.
...
.
......
.
...
..
..
...
....
...
..
...
..
...
65
2.
When the K-Carriage is hard
to
push back
and
forth
........................................................... 65
3.
When stitches are
not
formed
correctly
..
......
..
65
4.
How
to
pick
up
a
dropped
stitch ...................... 66

I
Card No.
2R
Card No.
3R
Card No.
5R
Card No.
11R
Card No.
5R
Card No.
7R
- 1 -

Card
No
.
1R
Card No.
2R
Card No.
3R
Card No.
7R
Card No.
2R
Card
No
.
3R
-2-

FRONT
BACK
PLATED TUCK STITCH PATTERN
Card No.
1R
BACK
Card No.
8R
BACK
FRONT
Card No.
3R
BACK
-3
-
BACK

I
Card
No
.
1R
Card No.
2R
Card
No
.
5R
Card No.
7R
WOVEN
MOTIF
PATTERN
Card No. 12R Card No.
1R
•
-4-

I
Card No.
1R
Card No.
11R
THREAD
LACE
MOTIF
PATTERN
Refer
to
P
.50.
Card No.
16R
Card No.
16R
..
-5
-

Card No.
3R
Card No.
4R
Card No.
5R
Card No.
6R
Card No.
8R
Card No.
9R
- 6 -

(')
<
..
.,
-
""
-.
Ql
~
<
..,
< <
c..
""
-, .
<
<%
<
~
·-
z
~
~
~~
.......
~
""
~
-.
-
~
~
. <
co
' ' .·, ~
::0 < .' .
..
'-.)
I
C..
f\
(')
ti.
II
IW
0
'""0
Ql
C:Ql..,
Q:~c..
<1>
z
-Q.o
<1>
•
:::~-co
<s
~
::0
i~j:t
~~
-
"ti
¥
~
t:
P
?~l
@f:t
~~
~
~
~
~
~
·-c
V
Dl
~
<1>
..,
:::::1
c;;·
7'
:::::1
a·
<1>
c..
li-
i
=C
i
-
@}f;
t-~
ff.
~
-
I
c
(')
IIJiiiJiilfiJIII'i
Ql
0
..,
c..
c:
m z
r-
~
m
~
I""' w
::0
(')
!llilllliill
Ql
..,
c..
z
~
I w
l.·.w
'
<:
ifb?•
m:F
:;
K1
I
::0
~~$~
;
~
fl
'
':
~l!\~r
,e
-s':'
~
fi
~
2
1
I
.....
~
•..
•.t
:·:·.•:0:!-:·1.
-:
:~~
··~
·
·:)i
:;
:~;:::...
-
"TT
(')
Ql
~
..,
c..
:a
c;;
z
~
r-
m 0
~
::0
(')
Ql
..,
c..
z
~
I
"->
::0
:::0
<1>
CD'
.,
-
0
---~~.,.-:~~~-;.-..,;,.
'
~";..;:_
~<---~.,
-~
,
~~~
~~
.C...s&,
<,
-z;-~~
~;~
-
~-
~
~
~,~~
~
.
~r
-
-
-~~
-
$~
'"'"..::;4-
--~
.e,
~
...,.;~
<__ '";
r-
~ ~~
'«
-~
-~
-
;,~
-
.:,5;
-
.,.,
ZJ<.
-
";
-;
n.
~
...
~...
-----:
"'
~
~
....
~
-
~
.r.?
~
::_~
-
../ '
*'~F
"'~
...
~V'_j~-.
#~J<~~·
-:!~-~,l-:1~-:.:.~
~-l::~}?_,y~~
;
~'
-
....
~
...;;;,..<
~~
:
~-:
<,_....-
·
~
~
-
~....:
~~~~~~:~:~~~~:iz
~
~--'-
c
.,
-
~
;
.('<>.&
...
-
~
-
~
-~~~~~C'~{~~~:;~~~;;%~~
:-sr
~
:
"'
.£
c~-
~r
:,.
~"'
c~<
.
-?'
'.:
\.
-:
~
...
-:.:
~::
......
.t:":.>.,..
-:_
'"""'
L
~-
-::.
~~
~
-·
-
~
C:.: -..;._
~
~'
«
~
·
~
__
-;
-"
_;~
-'!1~
:i_{-
~~,
~~
~~~~
~
k -
-
~~-
~:
_
·
cff
:~~~t~;;~:~~;~~;~~
.
...
__,_
....._
,.
ry.
....~
.,
__
:;:t,
---
~
-,;;)--_,.
~-::-
~
..
- -,
_____
-..
_;r-_
--:
-
~~
<:!:
~

Card No.
17R
Card No.
18R
Card No.
19R
Card No.
20R
. ' .
~'
i
".ot~
,.,.,.
~
.r
'
~·
~
..
·'
Card No. 20R Card
No
.
20R
<Using L-Point Cam (4-needle)> <Using L-Point Cam (8-needle)>
- 8 -

I
Card No.
17R
Card No.
19R
Card No.·
20R
Card No.
19R
Card No.
19R
- N (Normal Lace) - F (Fine Lace)
- F (Fine Lace) - N (Normal Lace)
-
9-

•
MACHINE
Accessory Box
Stud
for
the
Row Counter
Yarn Tension Unit
Hot
rf_
If~
-
~
J
~
I
II
~
B
•e•OO,OC'
n o o n o
oooc-oonaooftC!i
onetC"'
" 0 n "
.,
" (
i ·
111/~JgftJ!JJJ!JJJJ!!!!J!JJ!!!!IIIIIII!IIIIIJJIJJIIIIIIIIIIilillililil111J11lll1l!l
lllll!ml~
mm~~~
~
0
1
11111111111111111111111111111111111111111111111111111111111111111111111111111111111111111111111111111111111
• K-CARRIAGE
Tripper
for
Row- -
-H
Counter and
Knit Leader
Cam Button
Release Lever
Change Knob
Yarn Feeders
Feeder A - Thread
with
main yarn
Feeder B - Thread
with
contrast yarn
when knitting Fairisle
or
Thread Lace Pattern.
-10-

Push Button Card Lock Lever I
Accessory Stand Card Opening Feeding Knob
,..
r-.
I
II
M
i!}
o
LJ
,-
-,J
'm
. ,
:-_
_:7
1 1\
\\
Ca
rriage Direction Indicator
~
n o o n
.,
o n n n " o o o n o o n " o « n,.;o·
!ll'iitlrf._i<¥'fi~'!ll
Rear Rail
I
IIII\\\
tl\1\\\
\
\[
\
\\\\
\\\
\\\\
\\
\\\\\
1\tt~\\\
\\\\\
\
\\\\\\\\\\
\\\\\\\~
~\\~
\\\~
: \
1\
·\
o~Y
Needle Bed
......u
Gate
Peg
Needle
Needle Position Indicator
•
NEEDLE
•CASE
F f h E . R 'I
or
1xing t e xten
s1
on
a1s
For fixing the Sinker Plate Assembly
and Cast-
on
Comb For fixing the
L-Carriage
I I
~
-
~
-Ql
~
~--
f::!t
=
!==
-
(
b(
~tt
oo
~~
1-
"
~
~
~
'1
~
B-.
L___
r;;;;;;l
~
J
.I
1
!:::::=
~
l
II
I
- 1
1-

• ACCESSORIES
Cast-on
Comb
·lll~/llii/U/llllllllllllllllllllllllllllllllllllllllllllllllllllfllllllliillilllllllllllllllllllllllllllll,lllllllll\llll\l\\lll\\\\\\\\\l\\\\\\\l\\l\llll\\\\\\lll\"
Extension Rails
Punch Cards (20 pes.)
Plastic Punch Card Snaps (4 pes.)
Punch Card
Holder
Pin
Row Counter
=:
L-Carriage
L-point Cam
for
4-needles
(6
pes.)
One-
point
Cam
(1
pee.)
for
8-needles
(6
pes.)
Motif
Knitting Cam M
(2
pes.)
Motif
Knitting Cam L & R
(1
each)
-12
-

Crochet Hook Table Clamps
(2
pes.) I
Latchet Tool
( J Claw Weights
(2
pes.)
Transfer Tools
(1 X 2, 1 X 3, 2 X 3)
J l J (
n1
1---t\
1,
rtl--Jn
@ @ @ @
Hand Brush
Needle Pusher
Plating Yarn Feeder
Cast-on Thread
Latch Opening Plate
Tapestry Needle
Spare Needles
(3
pes.) Oil Yarn Wax
Carriage Lock
-
13
-

lA'\
Place
the
machine
on
a firm table, with
\..!J the Carrying Case Handle away from @ Open
the
Accessory Box.
you and unlock
the
catches.
Lift up the case
top
and pull it
towards you
to
release the lid.
Ui\
Fasten the machine
to
the
~
table
with
the
Table
Clamps.
A\
Set the Row Counter onto
\U
the
two
studs on the ma-
chine.
® Push to back
<D
Place onto
of
machine. studs.
~
~
~
-::=--:
g~~
~
~
~
12\
Loosen the knob and re-
~
move the Carriage Lock.
Carriage Lock
@ Release Spring and
re-
move the Sinker Plate As-
sembly from the lid
of
the
Carrying
Case.
Spring
Sinker Plate Assembly
-14-
@Take
the
two
Table
Clamps
out
of
the Acces-
sory Box.
Table Clamp
I'B\
Remove the Row Counter
'91
from the lid
of
the Carrying
Case
.
Row Counter
16\
Screw the Sinker Plate As-
\&/
sembly onto the K-
Car
-
riage.

aM
Raise the Carriage Handle
~
by pulling it towards you.
~
Lift the Front Guide Arm
in
\!..!31
the direction
of
the arrow
as
far
as
it will go.
Front Guide Arm
~
Insert the end
of
the Rod
\!..91
into the hole at the back
of
the machine.
r.r.t\ Take the Yarn Tension Unit
out
of
the
\.!..Y
Carrying Case lid
in
the order
<D.~.~.
as
shown.
a-A\
Turn back the Take-up
~
Springs until you hear a
"Click".
Take-up Springs
The machine is
now
set up.
-
15-
"""
Unwind
the
Take-up
\!..5I
Springs from the
Rod
.
Rod
Take-up Spring
@ Raise the Rear Yarn Guide.
I

This
is
how your machine should look when it
is
packed away.
®Join the
two
sections of the
Cast-on Comb.
Connecting Plate
IE\
Put the Extension Rails
in
the
~
Carrying Case.
@
Ne~t
fold
down
the Take-up
Spnngs.
@ Lift the Spring and replace the Cast-
on Comb back into the Lid.
l'i!!S\
Remove Yarn Tension Unit and
'91
fold
down
the Front Guide
Arm.
Front Guide Arm
16\
Fix
the Take-up Springs
as
'&J shown
in
the illustration.
-16-
lA\
Fold
down
the
handle
on
the
L-
\.!J Carriage. Push the Release But-
ton and replace the L-Carriage
in
the Carrying Case.
Release Button
@
To
remove the Extension
Rails, lift up and pull.
r.J)
Wind the Take-up Springs.
i
II
at\\
Put the Sub Take-up
~Spring
on
the
Rod.

,.::f,1\
Fol
.d down Rear
Yarn
\LV
Gu1de
.
aA\ Put the Sinker Plate Assembly
~
in
the
Case
where indicated
and secure it with the Spring.
/
@ Replace the Yarn Tension Unit
into the Case
in
the order
eD
.®.®
as
shown.
~
Set
the Row Counter onto
\.!.SV
the
two
studs
in
the Carry-
ing Case and push it away
from you.
---Pu
sh away.
®
~
Loosen knobs and remove
\!..!31
the
Sinker Plate Assembly
from the K-Carriage.
~Pu
sh
a
ll
Needl
es
back
to
A
\!.91
Positi
on
and
fo
ld down Han-
dle on
K-
Carriage.
Insert the Carriage Lock into
the hole
in
the left side
of
the
machine and secure the
K-
Ca
rriage
as
il
lustrated.
/.f-7\
Unscrew the Table Clamps and
put
them
in
\!.!/ the Accessory Box
wi
th the other parts. @ Then
cl
ose the lid
of
the Accessory Bo
x.
3§ttjl~
~IIIII
II
II/II/IIIII/II
/Ill
/Ill/
II
1111111111\\
I\\\\\\\\\\\\\\\\\
f.li""m
H
ol
d the lid and replace it
as
\!.91
shown. When it is
in
place, lock
the
two
catches
on
either side
of
the
Hand
le.
Do not store your machine
in
the
following conditions.
1.
In
direct or strong sunlight.
2.
Close to a hot object such as a
heater.
3.
In
humid or dusty places.
6
-1
7-

HOLDING CAM
LEVER
CAM BUTTON
RELEASE
LEVER
(
OJ
For lntarsia
Release the
Cam
Buttons by sliding the
Cam
Button Release Lever
to
the
right.
I
( 0 JFor Partial Knitting (except lntarsia
. Knitting)
H
~---0
______
) Others
N
CAM BUTTONS
Use the
Cam
Buttons according
to
the pattern you want.
TUCK STITCH PATTERN
Push
in
the
2 l
eft
buttons
at the same time.
~
SKIP STITCH PATTERN
INTARSIA KNITTING
Push in
the
2 right buttons
at the same
time
.
~
INTAR
=:Jt::£dWBBL
\ R (
FAIRISLE PATTERN
Push
the
Upper middle
button only.
~
THREAD LACE PATTERN
Push
in
both middle but-
tons (Upper & Lower) at
the same
time
.
~
* Do not operate
the
K
-Ca
rriage if you have depressed both
middle Buttons (Upper & Lower) plus either the Tuck Buttons.
or
the Part Buttons.
-18-
WEAVING
PATTERN
LEVERS
WEAVING PATTERN
Set Levers
to
W.T Weav-
ing Brushes
in
use.
Other occasions
Set Levers
to
N Weaving
Brushes not
in
use.
Table of contents
Popular Sewing Machine manuals by other brands

Singer
Singer LS2125 instruction manual

Singer
Singer Centurion 121D200A Service manual

Viking
Viking Huskystar C10 user guide

Zhejiang Sansilou Industrial
Zhejiang Sansilou Industrial BECS-129S manual

Atlanta Attachment Company
Atlanta Attachment Company 1347MA Technical Manual & Parts Lists

Brother
Brother LH4-B814-2 instruction manual