Knowhow CIL60W12 Parts list manual

INTEGRATED BUILT UNDER LARDER
INSTRUCTION / INSTALLATION MANUAL
CIL60W12
CIL60W12_IB_Final_130313.indd 1 15/03/2013 15:12

Contents
Safety Warnings........................................................................................................................... 3
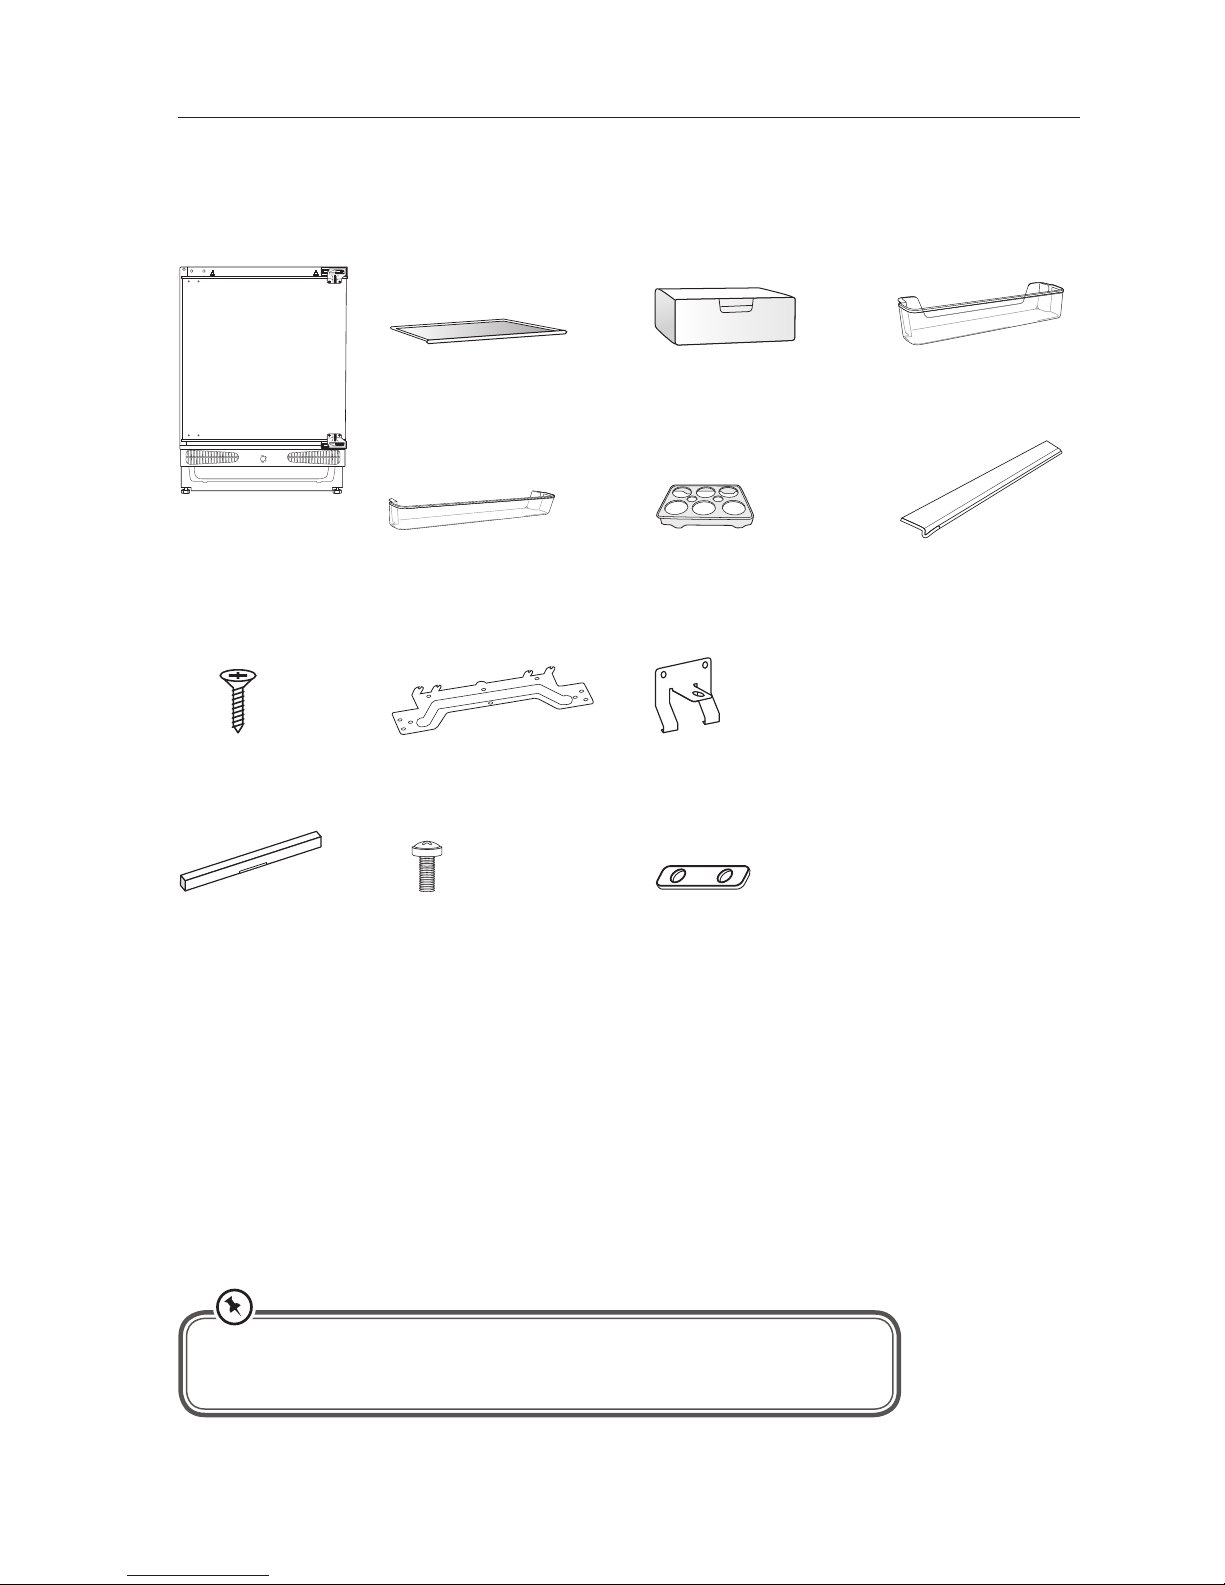
Unpacking.................................................................................................................................... 4
Location ..................................................................................................................................................................... 5
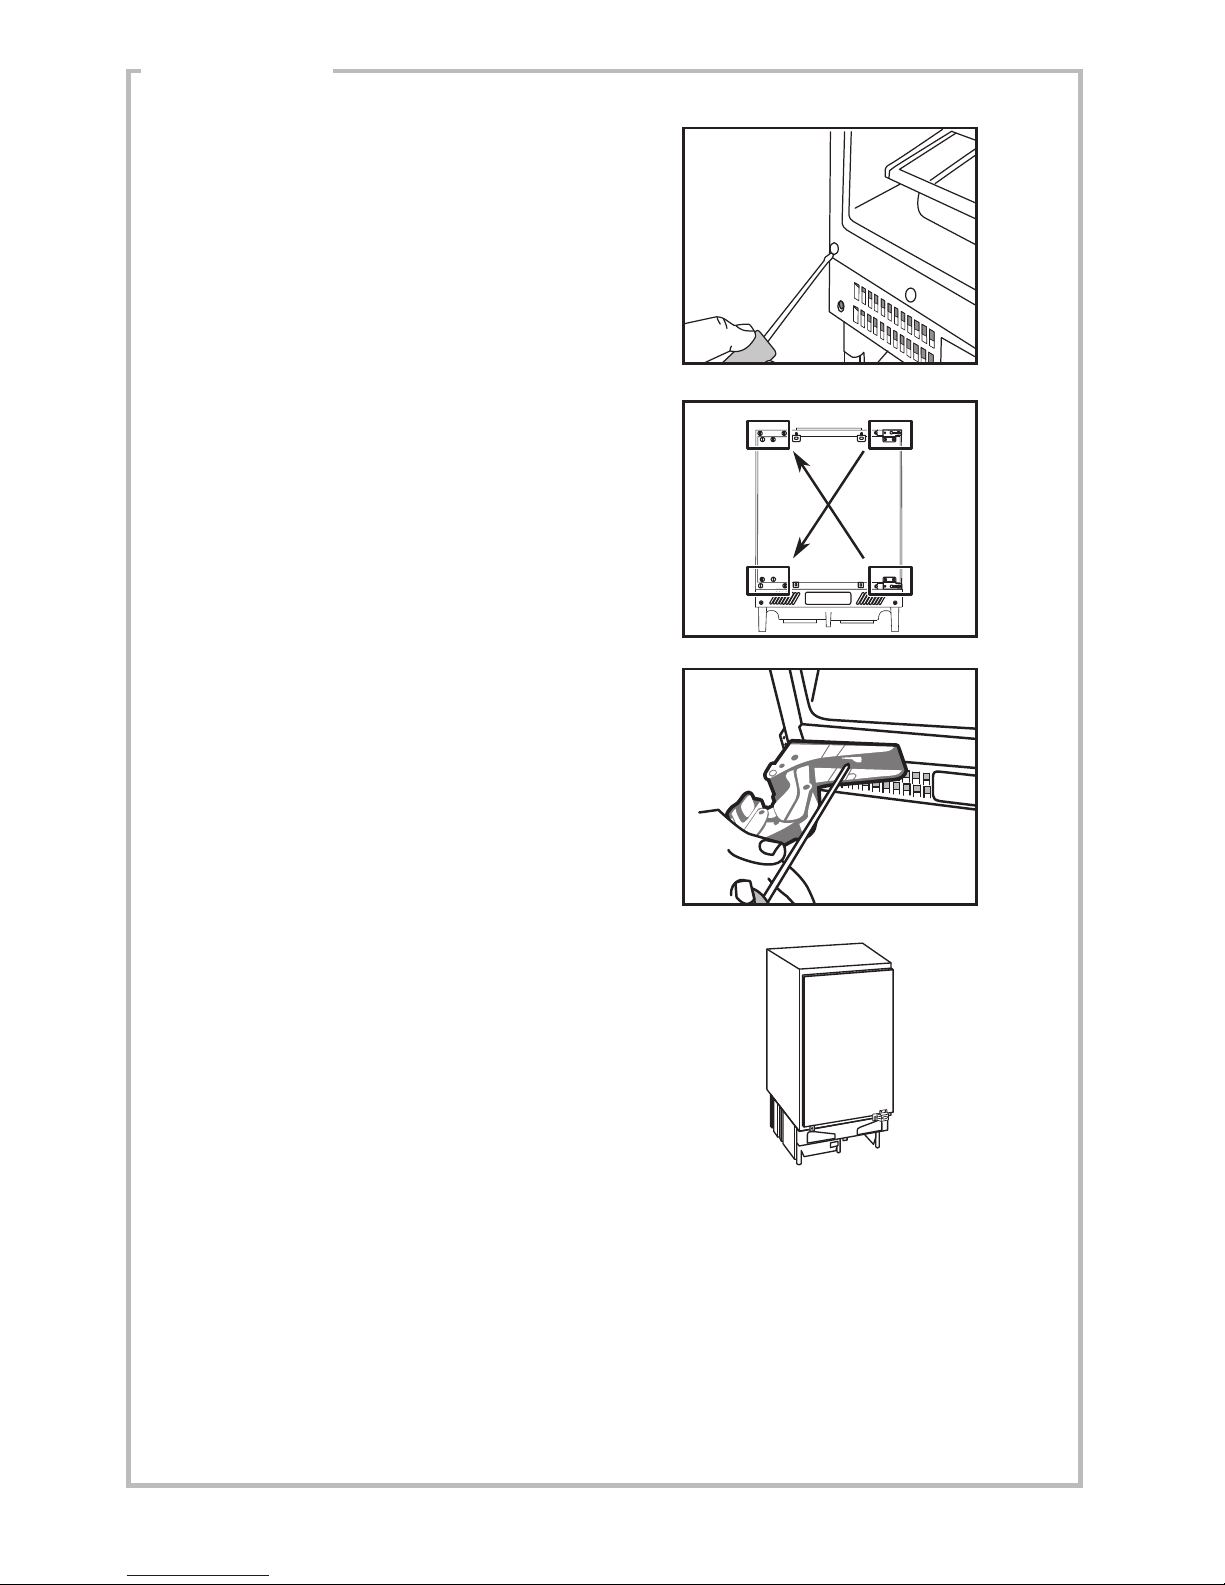
Reversing the Door Swing................................................................................................................................... 5
Dimensions............................................................................................................................................................... 8
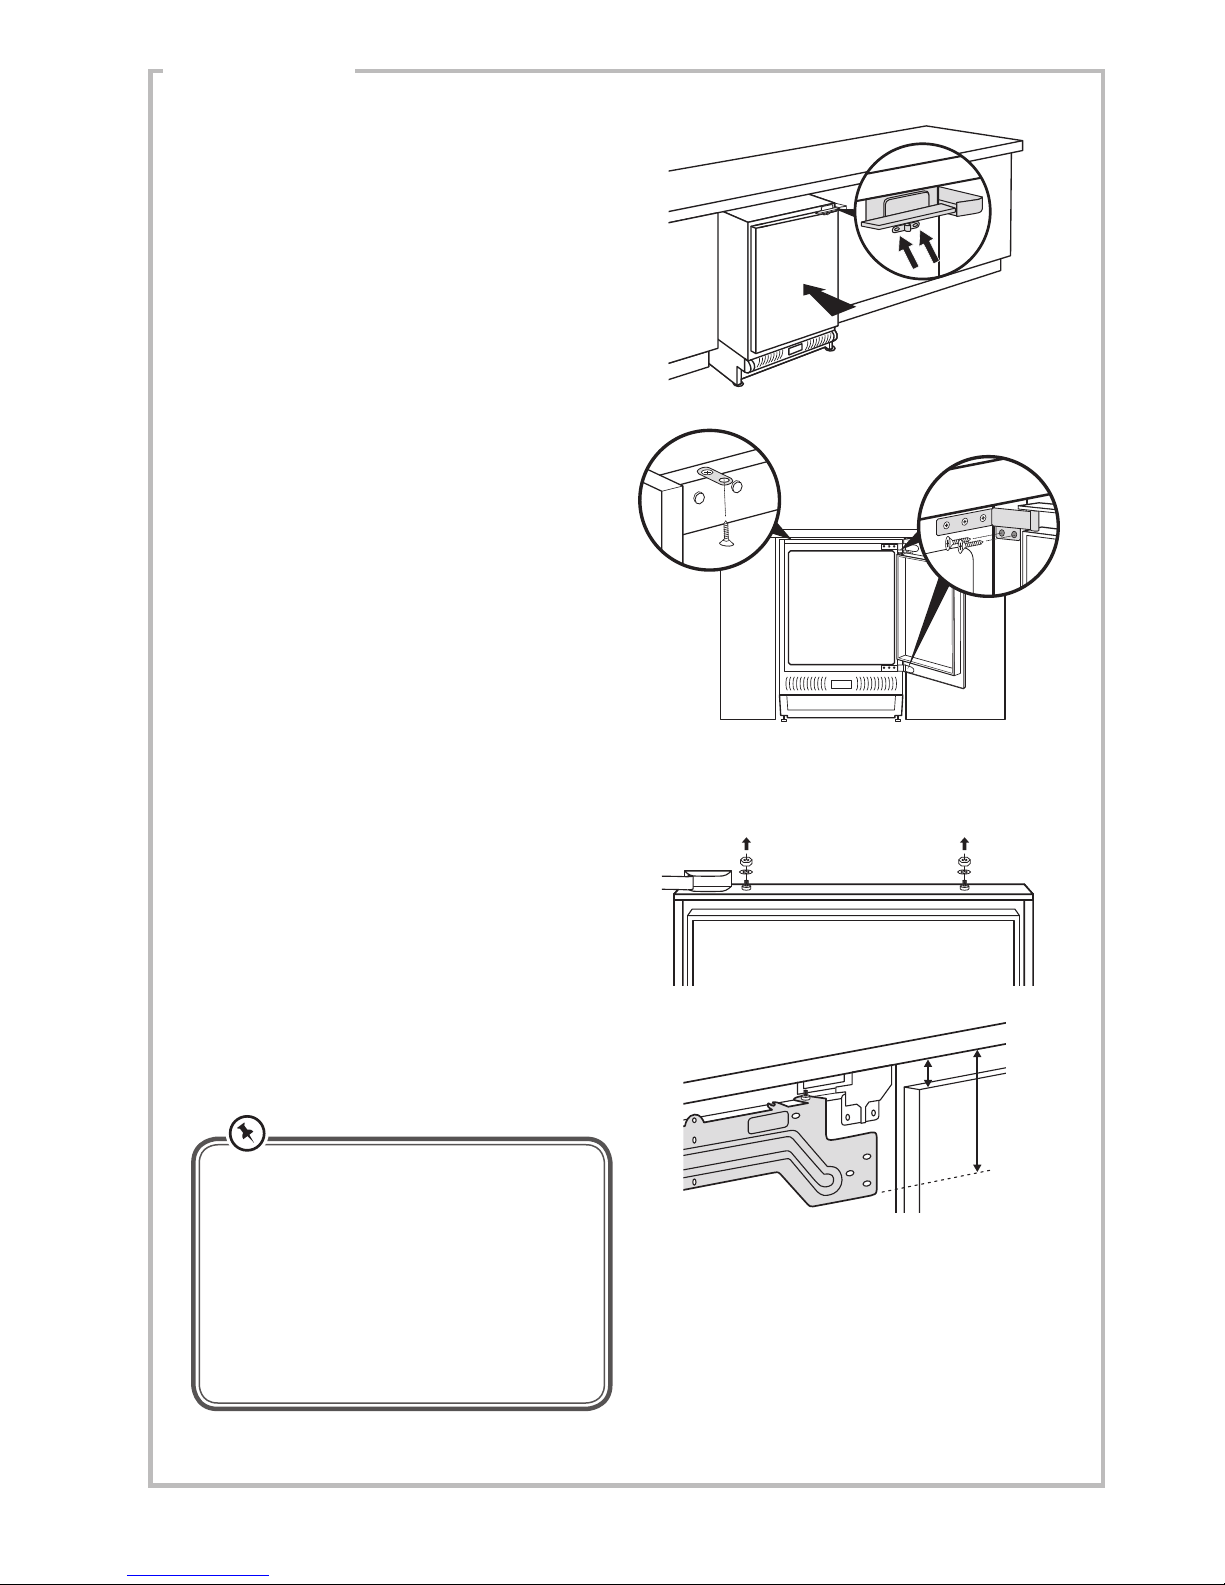
Installation of the Unit Under the Worktop .................................................................................................. 8
Fastening the Unit.................................................................................................................................................. 9
Mounting the Kitchen Cabinet Door.............................................................................................................10
Cleaning Before Use ............................................................................................................................................13
Interior Accessories..............................................................................................................................................13
Product Overview...................................................................................................................... 14
Operation ................................................................................................................................... 15
Switching On Your Unit......................................................................................................................................15
Noises Inside the Unit!........................................................................................................................................15
Tips for Keeping Food in the Unit and Saving Energy.............................................................................16
Shopping for Chilled Foods ..............................................................................................................................16
Cleaning ..................................................................................................................................... 17
Defrosting ...............................................................................................................................................................17
Condensation in the back or your fridge.....................................................................................................17
Cleaning the drain hole......................................................................................................................................17
Cleaning the Interior and the Exterior of the Unit....................................................................................17
Cleaning Tips..........................................................................................................................................................18
Maintenance .............................................................................................................................. 18
Changing the Internal Light .............................................................................................................................18
Care When Handling / Moving Your Unit.....................................................................................................18
Servicing..................................................................................................................................................................18
Switching O for Long Periods of Time........................................................................................................18
Disposal..........................................................................................................................................
Specications............................................................................................................................. 19
CIL60W12_IB_Final_130313.indd 2 15/03/2013 15:12

3
Safety Warnings
IMPORTANT SAFETY INSTRUCTIONS
READ CAREFULLY AND KEEP FOR FUTURE REFERENCE.
• If you pass the unit onto a third party, make sure to include this manual.
• This fridge is for household (domestic) use only.
• Check that the voltage marked on the rating label matches your supply
voltage.
• Keep ventilation openings in the unit enclosure clear of obstructions.
• Do not use electrical appliances inside the food storage compartments
of the unit, unless they are of the type recommended by the
manufacturer.
• If the mains cable is damaged, it must be replaced by the manufacturer,
its service agent or a qualified technician in order to avoid a hazard.
• Young children should be supervised to ensure that they do not play
with the unit.
• Do not damage the refrigerant circuit/piping located inside and
outside the appliance.
• This appliance is not intended for use by persons (including children)
with reduced sensory or mental capabilities, or lack of experience and
knowledge unless they have been given supervision or instructions
concerning the use of the unit by a person responsible for their safety.
• Do not store volatile or flammable substances in the unit.
• The mains plug must remain accessible to allow disconnection or an
all pole switch must be incorporated in the fixed wiring in accordance
with the wiring rules.
WARNING
IT IS HAZARDOUS FOR ANYONE OTHER THAN AUTHORISED
SERVICE PERSONNEL TO CARRY OUT SERVICING OF REPAIRS
WHICH INVOLVE THE REMOVAL OF COVERS.
TO AVOID THE RISK OF AN ELECTRICAL SHOCK DO NOT ATTEMPT
REPAIRS YOURSELF.
CIL60W12_IB_Final_130313.indd 3 15/03/2013 15:12

Salad Bin x 1
The Main Unit
0
12
3
4
5
Unpacking
Remove all packaging from the unit. Retain the packaging. If you dispose of it please do so
according to local regulations.
The following items are included:
Wood Screw x 17
Upper Fridge Door
Shelf
Door Hang x 1
Hang Cover x 1 Screw x 1
Door Bottom
Fixing x 2
Top Bracket x 1
If items are missing or damaged please contact Partmaster (UK only).
Tel: 0844 800 3456 for assistance.
Adjustable Glass Shelf x 2
Egg Tray x 1 Rubber Strip x 1
Lower Fridge Door Shelf
* All images are for indication only; please refer to your individual unit for actual item.
CIL60W12_IB_Final_130313.indd 4 15/03/2013 15:12

INSTALLATION
5
Location
When selecting a position for your unit you should make sure the floor is flat and firm, and
the room is well ventilated with an average room temperature of between 10°C and 32°C.
Avoid locating your unit near a heat source, e.g. cooker, boiler or radiator. Also avoid direct
sunlight as it may increase the electrical consumption. Extreme cold ambient temperatures
may also cause the unit not to perform properly. This unit is not designed for use in a garage
or outdoor installation.
Ensure that a mains supply socket is within reach of the unit where it is to be installed and is
easily accessible, or has an easily accessible double pole switch in the fixed wiring allowing
full disconnection. If no socket or switch is available contact a qualified electrician to install
one.
Reversing the Door Swing
Tools required: Phillips style screwdriver / Flat bladed screwdriver / Hexagonal spanner
• If you want to have the door swing reversed, we recommend that you contact a
qualified technician. You should only try to reverse the door yourself if you believe
that you are qualified to do so.
• All parts removed must be saved to do the reinstallation of the door. You should
rest the unit on something solid so that it will not slip during the door change
process. Do not lay the unit flat as this may damage the coolant system. Ensure the
unit is unplugged and empty.
• This must be done before fitting the cabinet outer door.
• Ensure the unit is unplugged and empty.
• To take the door off it is necessary to tilt the unit backwards. You should rest the
unit on something solid so that it will not slip during the door reversing process.
• All parts removed must be saved to do the reinstallation of the door.
• Do not lay the unit flat as this may damage the coolant system.
• We recommend that 2 people handle the unit during assembly.
* All images are for indication only; please refer to your individual unit for actual item.
1. Remove the 4 blanking plates from the
outside of the fridge door. Ensure you do
not damage the blanking plates as they
will be required to cover the other holes
when the hinges are removed.
CIL60W12_IB_Final_130313.indd 5 15/03/2013 15:12

INSTALLATION
6
2. With the door closed remove the screws
on the outside of the hinges. Start with
the top hinge.
3. Open the hinges away from the door.
4. Remove the door, while supporting the
bottom of the door. Be careful with the
hinges.
5. With the hinges open undo the screws
holding them to the cabinet. Be careful
with the hinges, use a long shafted
screwdriver if you have one.
* All images are for indication only; please refer to your individual unit for actual item.
CIL60W12_IB_Final_130313.indd 6 15/03/2013 15:12

INSTALLATION
7
6. Remove the 4 blanking plates from the
fridge cabinet.
7. Turn the hinges over and place them
on the diagonally opposite corner of
the cabinet. Screw them back in place.
Replace all the blanking plates on the
opposite side of both the cabinet and the
fridge door.
8. With the door closed, check that the
door is aligned horizontally and vertically
and that the seals are closed on all sides
before finally tightening the bottom
hinge. Re-adjust the levelling feet as
needed.
* All images are for indication only; please refer to your individual unit for actual item.
CIL60W12_IB_Final_130313.indd 7 15/03/2013 15:12

INSTALLATION
8
Dimensions
Installation of the Unit Under the Worktop
100 - 170
min 25
819-889
820 - 890
min 550
600
Take care that the legs are not dragged when sliding the unit under the counter as
this could lead to breakages.
* All images are for indication only; please refer to your individual unit for actual item.
800mm
1160mm
CIL60W12_IB_Final_130313.indd 8 15/03/2013 15:12

INSTALLATION
9
Fastening the Unit
1. Remove the screw at the top of the unit.
Place the top bracket and fix the bracket
with the screw.
0
12
3
4
5
2. Remove the rubber strip located on the
side panel. Remove the backing paper
from the rubber strip.
3. Stick the rubber strip to the opposite
side of the door hinges of the unit. The
rubber strip must be fitted to the side of
the unit.
Ensure the surface is clean prior
to sticking the rubber strip to the
side of the unit.
4. Adjust the levelling feet to fit the kitchen
unit height, also ensuring the unit
remains level.
* All images are for indication only; please refer to your individual unit for actual item.
CIL60W12_IB_Final_130313.indd 9 15/03/2013 15:12

INSTALLATION
10
5. Slide the unit carefully, by lifting slightly
to avoid damaging the feet, into the
kitchen unit and align the hinge surface
with front surface of the kitchen unit.
6. Screw the hinges and metal bracket to
the kitchen unit.
Mounting the Kitchen Cabinet Door
2. Place the door hang on the fridge
door by inserting the holes onto the
adjustment bolts.
Dimension A:
Measure from the underside surface
of kitchen unit to the top of next unit
door.
Dimension B:
Measure from the underside surface
of kitchen unit to the bottom of door
hang.
B
A
* All images are for indication only; please refer to your individual unit for actual item.
1. Unscrew and remove the nuts and
washers from the fridge door.
CIL60W12_IB_Final_130313.indd 10 15/03/2013 15:12

INSTALLATION
11
3. To obtain the measurement for
positioning the door hang, subtract
A from B . Centre the door hang
horizontally and screw in the door hang
as shown.
B - A
4. Place the kitchen cabinet (aesthetic) door
onto the fridge door by inserting the
adjustment bolts into the slots on the
door hang. Place the washers and screw
the nuts onto the adjustment bolts, do
not tighten.
5. Align the kitchen cabinet (aesthetic)
door by adjusting the double threaded
bolts by using a flat bladed screwdriver
(not included) of sufficient size. When
supplied the adjustment will only allow
unscrewing, do not try to tighten. Once
alignment is achieved, tighten the nuts
to fix the bracket, use the screwdriver to
prevent the adjustment from moving if
necessary. 1
2
* All images are for indication only; please refer to your individual unit for actual item.
CIL60W12_IB_Final_130313.indd 11 15/03/2013 15:12

INSTALLATION
12
6. Remove the screws at the bottom of the
fridge door.
7. Place the door bottom fixings and screw
the fixings to the fridge door and the
cabinet door.
8. Slide the hang cover onto the door hang.
* All images are for indication only; please refer to your individual unit for actual item.
CIL60W12_IB_Final_130313.indd 12 15/03/2013 15:12

INSTALLATION
13
• Before Plugging in YOU MUST
Check that you have a socket which is compatible with the plug supplied with the
unit.
• Before Turning On!
Do not turn on until two hours after moving the unit. The coolant fluid needs time
to settle.
Cleaning Before Use
Wipe the inside of the unit with a weak solution of bicarbonate soda. Then rinse with warm
water using a ‘wrung-out’ sponge or cloth. Wash the shelves and salad bin in warm soapy
water and dry completely before replacing in the unit. Clean the exterior of the unit with a
damp cloth.
If you require more information refer to the Cleaning section.
9. Slot in the plinth and ensure there is a
minimum of 25 mm gap between the
cabinet door and the plinth. The plinth
may need to be notched depending
upon the unit’s height from the floor.
Min. 25mm
* All images are for indication only; please refer to your individual unit for actual item.
Before Using Your Unit
Before placing any food in your unit, turn it on and wait for 24 hours, to make sure it is
working properly and to allow it time to fall to the correct temperature. Your unit should not
be overfilled.
Interior Accessories
Various glass or plastic storage shelves are included with your appliance – different models
have different combinations.
In order to make the most of the volume of the fresh food storage compartment, the
user can remove one or more shelves, drawers, according to daily use.
CIL60W12_IB_Final_130313.indd 13 15/03/2013 15:12

14
Product Overview
0
12
3
4
5
Internal Light
Upper Fridge
Door Shelf
Lower Fridge
Door Shelf
Adjustable Glass Shelf
Salad Bin Cover
Salad Bin
Egg Tray
* All images are for indication only; please refer to your individual unit for actual item.
CIL60W12_IB_Final_130313.indd 14 15/03/2013 15:12

15
Operation
Switching On Your Unit
1. The internal temperature of your unit is controlled
by a thermostat. There are six settings, of which
position 5is the coldest, position is the warmest.
2. Adjust the thermostat control dial to the desired
position, bear in mind that the higher the number,
the lower the temperature. Position 4is the
recommended setting for the unit when operating
at normal room temperature (between 10°C
and 32°C).
3. The unit may not operate at the correct
temperature if it is in a particularly hot or a
particularly cold room, or if you open the door
often.
4. To ensure that the unit is cool enough to sufficiently
chill your food, wait 24 hours before filling it with
food.
5. If you are concerned that your unit is not being kept
cold enough and wish to check the temperature,
you will need a special fridge / freezer thermometer.
These are available from most supermarkets and
hardware shops.
Place the thermometer in the centre of the unit,
where it can be read easily. Leave overnight, the
temperature in the fridge compartment should be
4°C or lower.
Noises Inside the Unit!
You may notice that your unit makes some unusual noises. Most of these are perfectly normal,
but you should be aware of them!
These noises are caused by the circulation of the refrigerant liquid in the cooling system. It has
become more pronounced since the introduction of CFC free gases. This is not a fault and will
not affect the performance of your unit. This is the compressor motor working, as it pumps the
refrigerant around the system.
12
3
4
5
* All images are for indication only; please refer to your individual unit for actual item.
CIL60W12_IB_Final_130313.indd 15 15/03/2013 15:12

16
Tips for Keeping Food in the Unit and Saving Energy
• Cooked meats/fishes should always be stored on a shelf above raw meats/fishes to avoid
bacterial transfer. Keep raw meats/fishes in a container which is large enough to collect
juices and cover it properly. Place the container on the lowest shelf at the bottom of the
fridge compartment.
• Leave space around your food, to allow air to circulate inside the compartments. Ensure all
parts of the unit are kept cool, this will help to keep energy usage down.
• To prevent transfer of flavours and drying out, pack or cover the food separately. Fruit and
vegetables do not need to be wrapped.
• Always let pre-cooked food cool down before you put in the unit. This will help to maintain
the internal temperature of the unit and keep energy usage down.
• To prevent cold air escaping from the unit, try to limit the number of times you open the
doors, this will help to keep energy usage down. We recommend that you only open the
doors when you need to put food in or take food out.
Shopping for Chilled Foods
• Take a quick look at the chilled food package and make sure it is in perfect condition.
• Try to keep chilled food together whilst shopping and on the journey home as this will help
to keep the food cold.
• Don’t buy chilled food unless you can chill it straight away. Specially insulated bags can be
bought from most supermarkets and hardware shops. These bags can keep chilled food cold
for longer while transporting.
• Food that has been left in a car or at room temperature for a prolonged period of time could
raise the food temperature to a dangerous level, which allows harmful bacteria to grow.
• Always unpack and place chilled food in the unit before storing dry food.
CIL60W12_IB_Final_130313.indd 16 15/03/2013 15:12

Cleaning
Defrosting
Frost may accumulate on the inner rear surface of the
appliance which will automatically defrost during the
off cycle of the compressor.
Water is channelled via the drain hole to the collection
tray above the compressor where it will evaporate.
0
12
3
4
5
Condensation in the back or your fridge
Condensation may build up on the back wall of your fridge, and will freeze. This is normal. The
frozen condensation will melt and drain away through a drain hole in the back of the fridge,
during its normal cycle.
Make sure you do not allow food to touch the back wall of your fridge, it may freeze and stick to
the wall. This will then melt, drop into and may block the drain hole at the back of your fridge
preventing liquid from draining away. If you find pools of water in your fridge or the drainage
channel clean your fridge and check the drain hole for blockages.
Cleaning the drain hole
• Clean the drainage channel leading to the drain hole, be careful not to push crumbs towards
the drain hole.
• Use the cleaning tool (if provided) or a pipe cleaner to clean the drain hole and remove any
blockage. You can leave the cleaning tool (if provided) in the drain hole.
Cleaning the Interior and the Exterior of the Unit
• Remove all the shelves and the salad bin. To remove the salad bin first remove the lower
door shelf.
• Wipe the inside of the unit with a weak solution of bicarbonate soda and then rinse with
warm water using a ‘wrung-out’ sponge or cloth. Wipe completely dry before replacing the
shelves and salad bin.
• Use a damp cloth to clean the exterior, and then wipe with a standard furniture polish. Make
sure that the door is closed to avoid the polish getting on the magnetic door seal or inside
the unit.
• The grille of the condenser at the back of the unit and the adjacent components can be
vacuumed using a soft brush attachment.
Cleaning Tips
Condensation may appear on the outside of the unit. This may be due to a change in room
temperature. Wipe off any moisture residue. If the problem continues, please contact a qualified
technician for assistance.
* All images are for indication only; please refer to your individual unit for actual item.
CIL60W12_IB_Final_130313.indd 17 15/03/2013 15:12

Maintenance
Changing the Internal Light
1. Before carrying out the bulb replacement always press
and turn the thermostat control dial to Position 0, then
disconnect the mains supply.
2. Press the hook in front of the light bulb cover.
3. Remove the plastic light bulb cover.
4. Remove the old bulb by unscrewing in an anticlockwise
direction.
5. Replace with a new bulb (15W SES). Please make sure that
it is secure in the bulb cover.
6. Refit the translucent light cover and reconnect your unit to
the mains supply and switch on and reset the thermostat.
Care When Handling / Moving Your Unit
Hold the unit around its sides or base when moving it. Under no circumstances should it be
lifted by holding the edges of the top surface or the door.
Servicing
The unit should be serviced by an authorised engineer and only genuine spare parts should be
used. Under no circumstances should you attempt to repair the unit yourself. Repairs carried
out by inexperienced persons may cause injury or serious malfunction. Contact a qualified
technician.
Switching O for Long Periods of Time
When the unit is not in use for a long period of time, disconnect it from the mains supply, empty
all food and clean the appliance, leaving the door ajar to prevent unpleasant smells.
Disposal
Old units still have some residual value. An environmentally friendly method of disposal will
ensure that valuable raw materials can be recovered and used again. The refrigerant used in
your unit and insulation materials require special disposal procedures. Ensure that none of the
pipes on the back of the unit are damaged prior to disposal.
Up to date information concerning options of disposing of your old unit and packaging from
the new one can be obtained from your local council office.
When disposing of an old unit break off any old locks or latches and remove the door as a
safeguard.
* All images are for indication only; please refer to your individual unit for actual item.
CIL60W12_IB_Final_130313.indd 18 15/03/2013 15:12

Specications
Model CIL60W12
Fresh Food Storage Compartment
Volume 133L
Storage Temperature Fridge: 0°C - 8°C, average ≤ 4°C
Energy Consumption 0.332kWh / 24h
Energy consumption 121 kwh per year, based on standard test results for 24 hours.
Actual energy consumption will depend on how the appliance is used and where it is located.
Household Appliances Category Category 1
(Refrigerator)
Energy Grading A+
EU Ecolabel N/A
Defrosting Type Auto Defrost
Climate Class SN
This appliance is intended to be used at an ambient temperature between 10°C and 32°C.
Airborne Acoustical Noise 44 dB(A)
Rated Voltage 220 - 240V~
Rated Current 0.58A
Product Dimension (W x D x H) 595 x 548 x 818 mm
Features and specifications are subject to change without prior notice.
CIL60W12_IB_Final_130313.indd 19 15/03/2013 15:12

(IB-CIL60W12-130313V2)
DSG Retail Limited (Registered in England No. 504877) Maylands Avenue,
Hemel Hempstead, Hertfordshire HP2 7TG. UK
This symbol on the product or in the instructions means that your electrical and electronic equipment
should be disposed at the end of its life separately from your household waste. There are separate
collection systems for recycling in the EU.
For more information, please contact the local authority or your retailer where you purchased the product.
Visit Partmaster.co.uk today for the easiest way to buy electrical spares and accessories. With over
1 million spares and accessories available we can deliver direct to your door the very next day.
Visit www.partmaster.co.uk or call 0844 800 3456 (UK customers only)
Calls charged at National Rate.
For general information about this appliance
and handy hints and tips, please visit
www.knowhow.com/knowledgebank or call 0844 5611234.
CIL60W12_IB_Final_130313.indd 20 15/03/2013 15:12
Table of contents