1368349-T01-A -1-
ڣ
1. ڐঔՃ؍...................................................................................... 1
1.1 ڐঔեࠒ߲........................................................................... 1
1.2 嘜䏟▲ѽߑ؍ ..................................................................2
2. ؍Ҷސவࡨ۞зாչڏઑ ....................................................3
3. ֘څޛהࣲ...................................................................4
4. фսৈߣ۞֣...................................................................5
5. 嘜䏟▲ѽߑݏӲவߡ֣߶પޢ..........................................5
6. фս҅ ..........................................................................7
6.1 ޞ୕ગؔ .....................................................................7
6.2 ࡊѹܶ .....................................................................7
7. ࠥڔԥ..............................................................................8
7.1 嘜䏟▲ѽߑׂߎࠥڔ ...................................................8
7.1.1 嘜䏟▲ѽߑׂߎࠥڔ 4...............................8
7.2 嘜䏟▲ѽߑ٫嘜ࡖࠥڔׂߎࠥڔ..............................9
7.2.1 嘜䏟▲ѽߑ٫嘜ࡖࠥڔׂߎࠥڔ 4.............9
7.3 Շ懡ࠥڔ .....................................................................9
7.4 ٴ䓓ࠥڔ .....................................................................9
7.5 ஔࠥڔ ...................................................................10
7.6 ݐ崭 ...................................................................10
8. ޞગؔ............................................................................12
8.1 ગ昭ୟޞ 0-23 شޞ 59 ӣ୕........................12
8.2 ગ䏔䏟ޞޞ 00:00-10:00 شޞ .................13
8.3 ݷ䏔䏟ޞ............................................................13
8.4 ԅગৈߘޞԈپ
00:00-23:59.......................................................13
8.5 Ոࢃ ...................................................................14
9. ୧ԅ............................................................................14
10. ઓڸԅ............................................................................14
10.1 ࠥڔҥ ...................................................................14
10.2 ઓڸલՈ ...................................................................15
11. چ߲ԅ ....................................................................15
12. 嘜䏟▲ѽߑғЊґ⡭ ......................................................15
13. ݻஞї............................................................................16
14. ֘ઁࠀ ...........................................................................17
15. ݻஞஔ............................................................................18
16. фսИ߄؞࣒ૅխપޢ...............................................19
17. 嘜ࡖௐսݎઇனୂўࢎԥ...............................................21
1. ڐঔՃ؍
1.1 ڏդࣩ߳ߓ
1. ߑѽיד߄ޗ֜ݬӠ୍۪Թ৲ଭۨՊڥଜ澞
2. 嘜䏟▲ѽߑЊݏӲவߡثݎީիٵޅڐީիிࢲࡴ澞
TABLE OF CONTENTS
1. UNPACK AND INSTALL.....................................................1
1.1 Inspection after Unpacking.........................................1
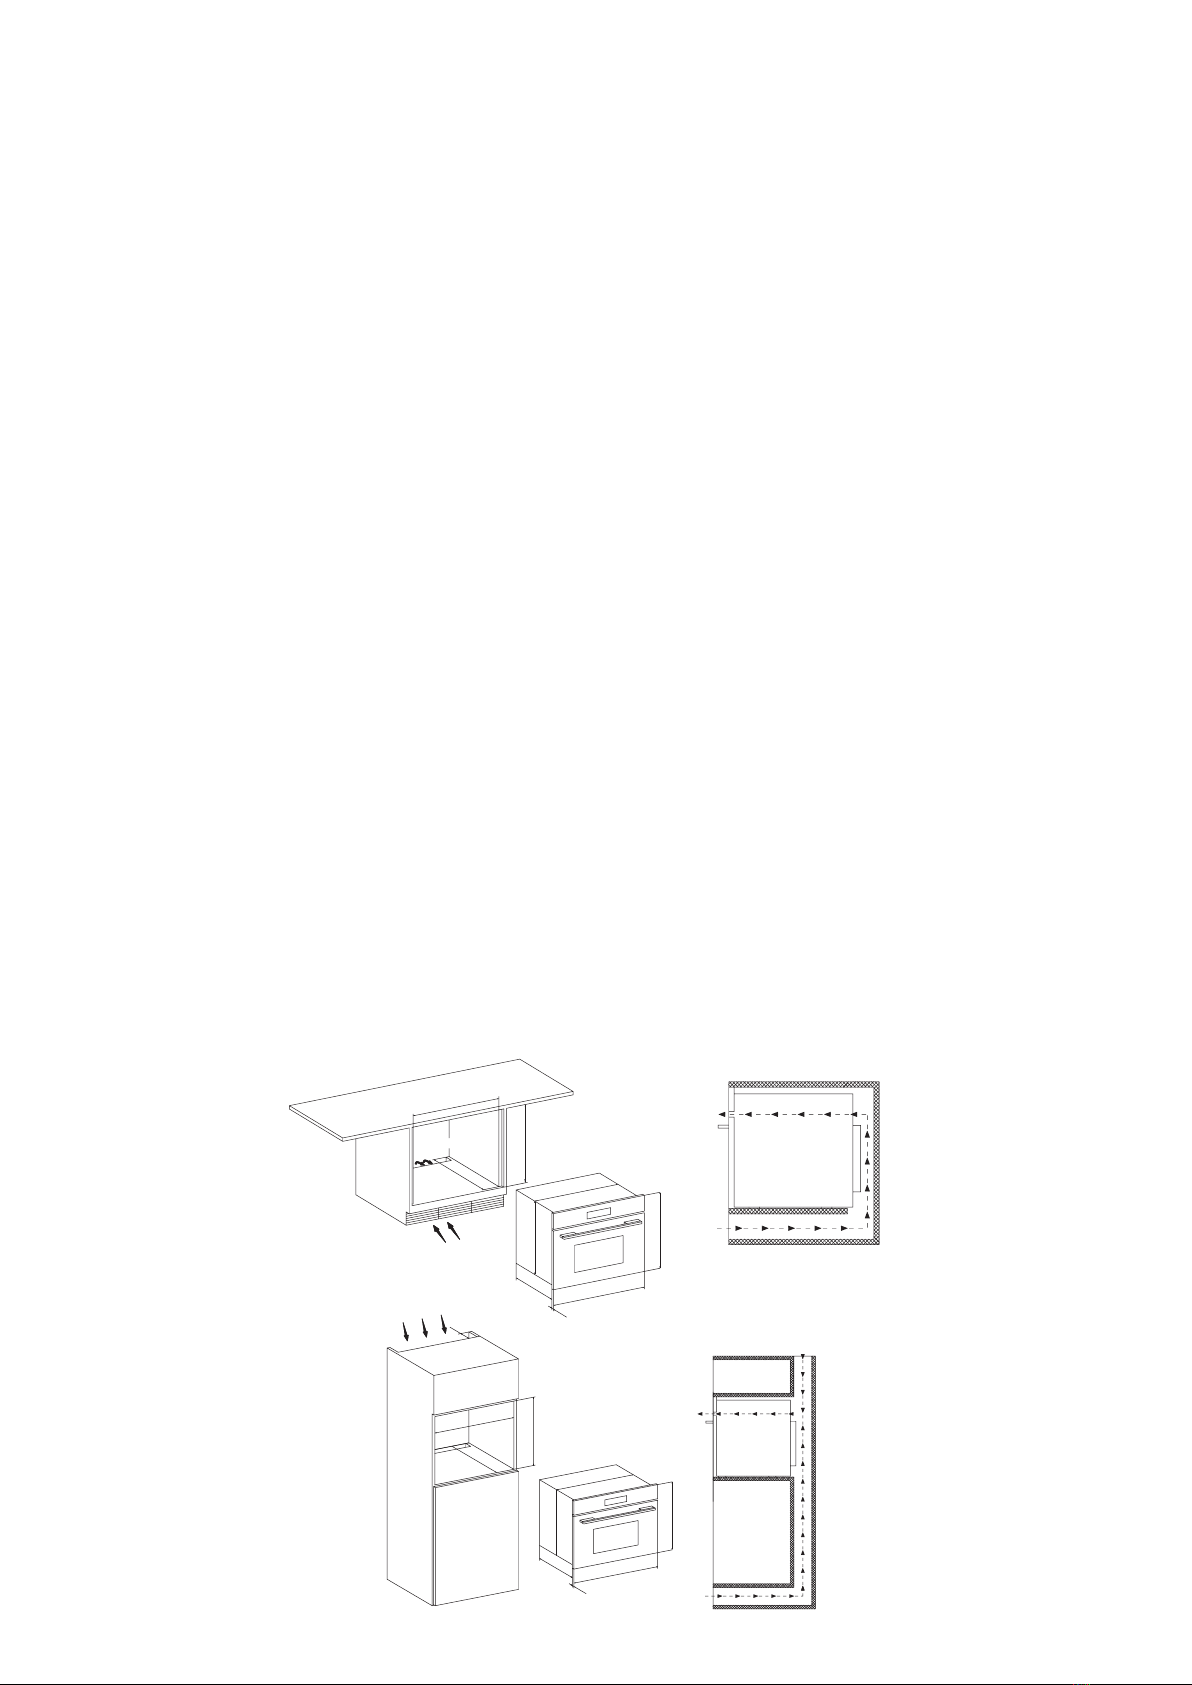
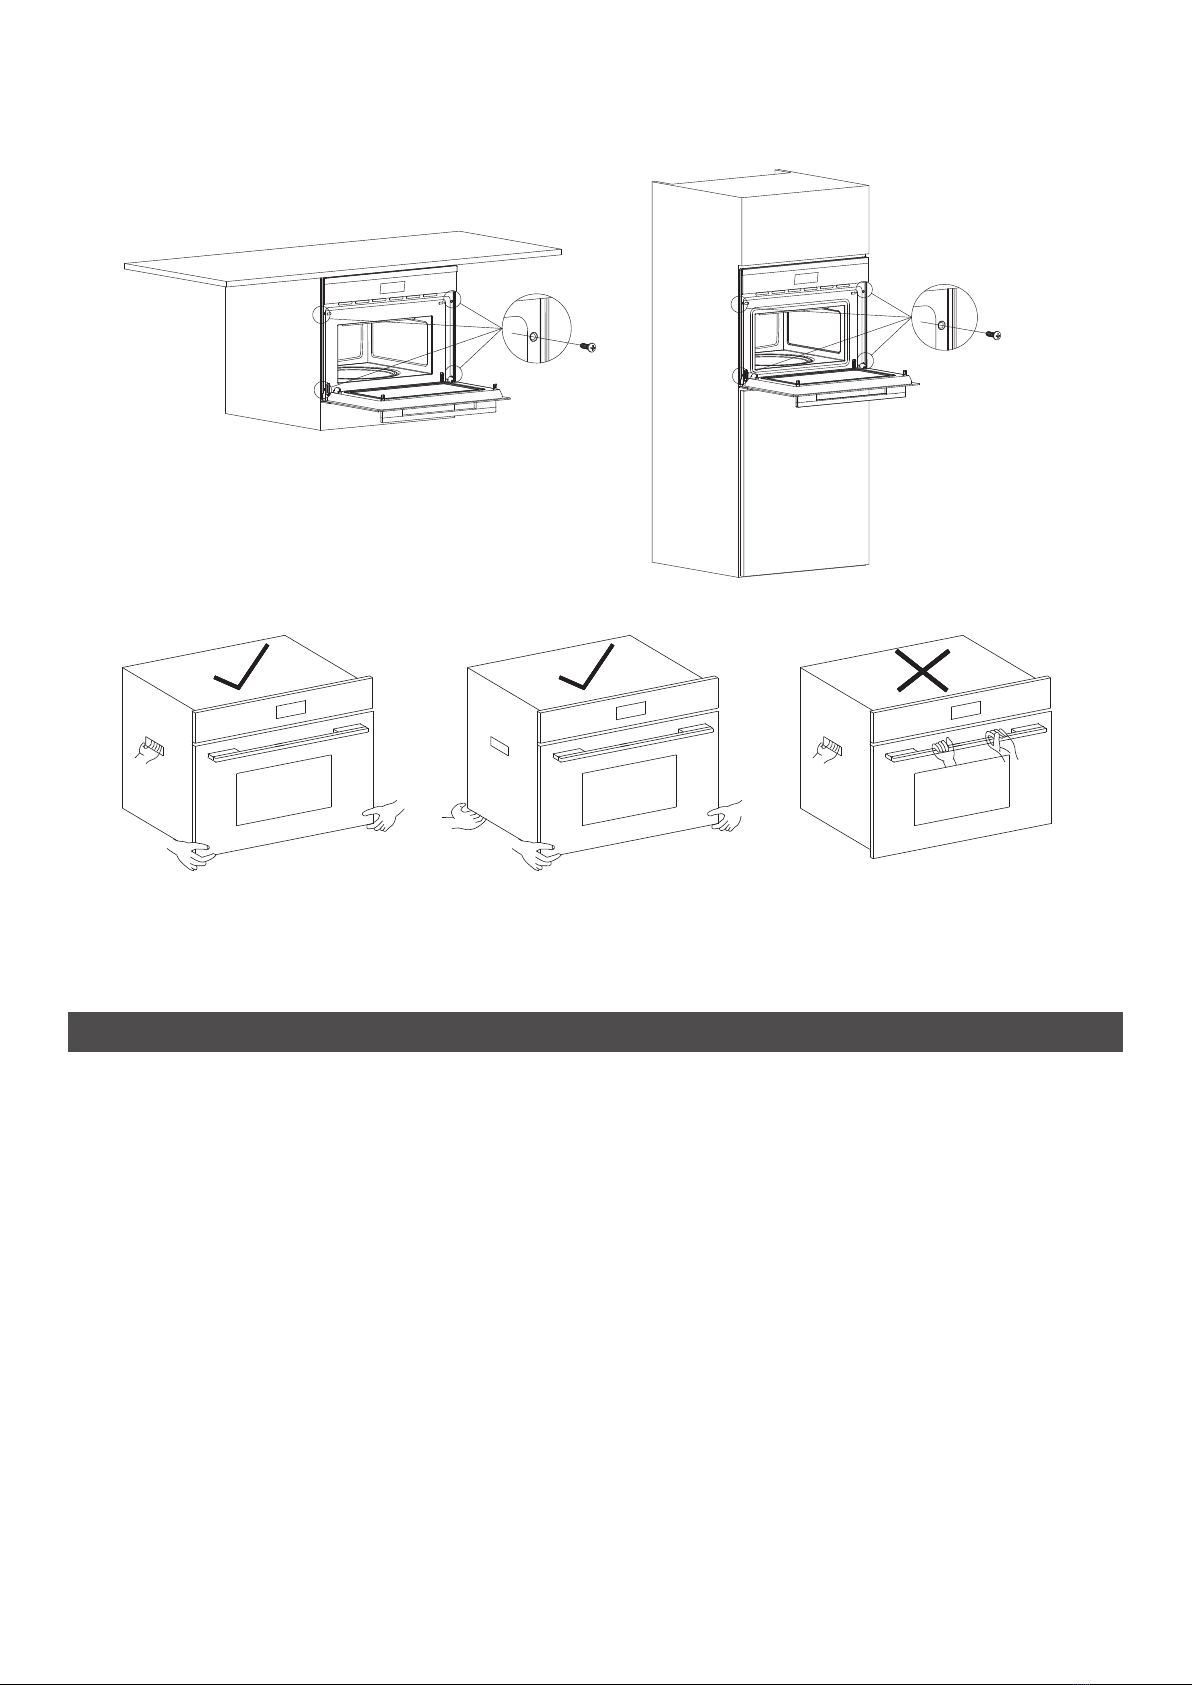
1.2 Installation of Steaming and
Baking Integrated Machine.........................................2
2. SAFETY NOTICE AND ADVICE ........................................3
3. WASTE APPLIANCE DISPOSAL .......................................4
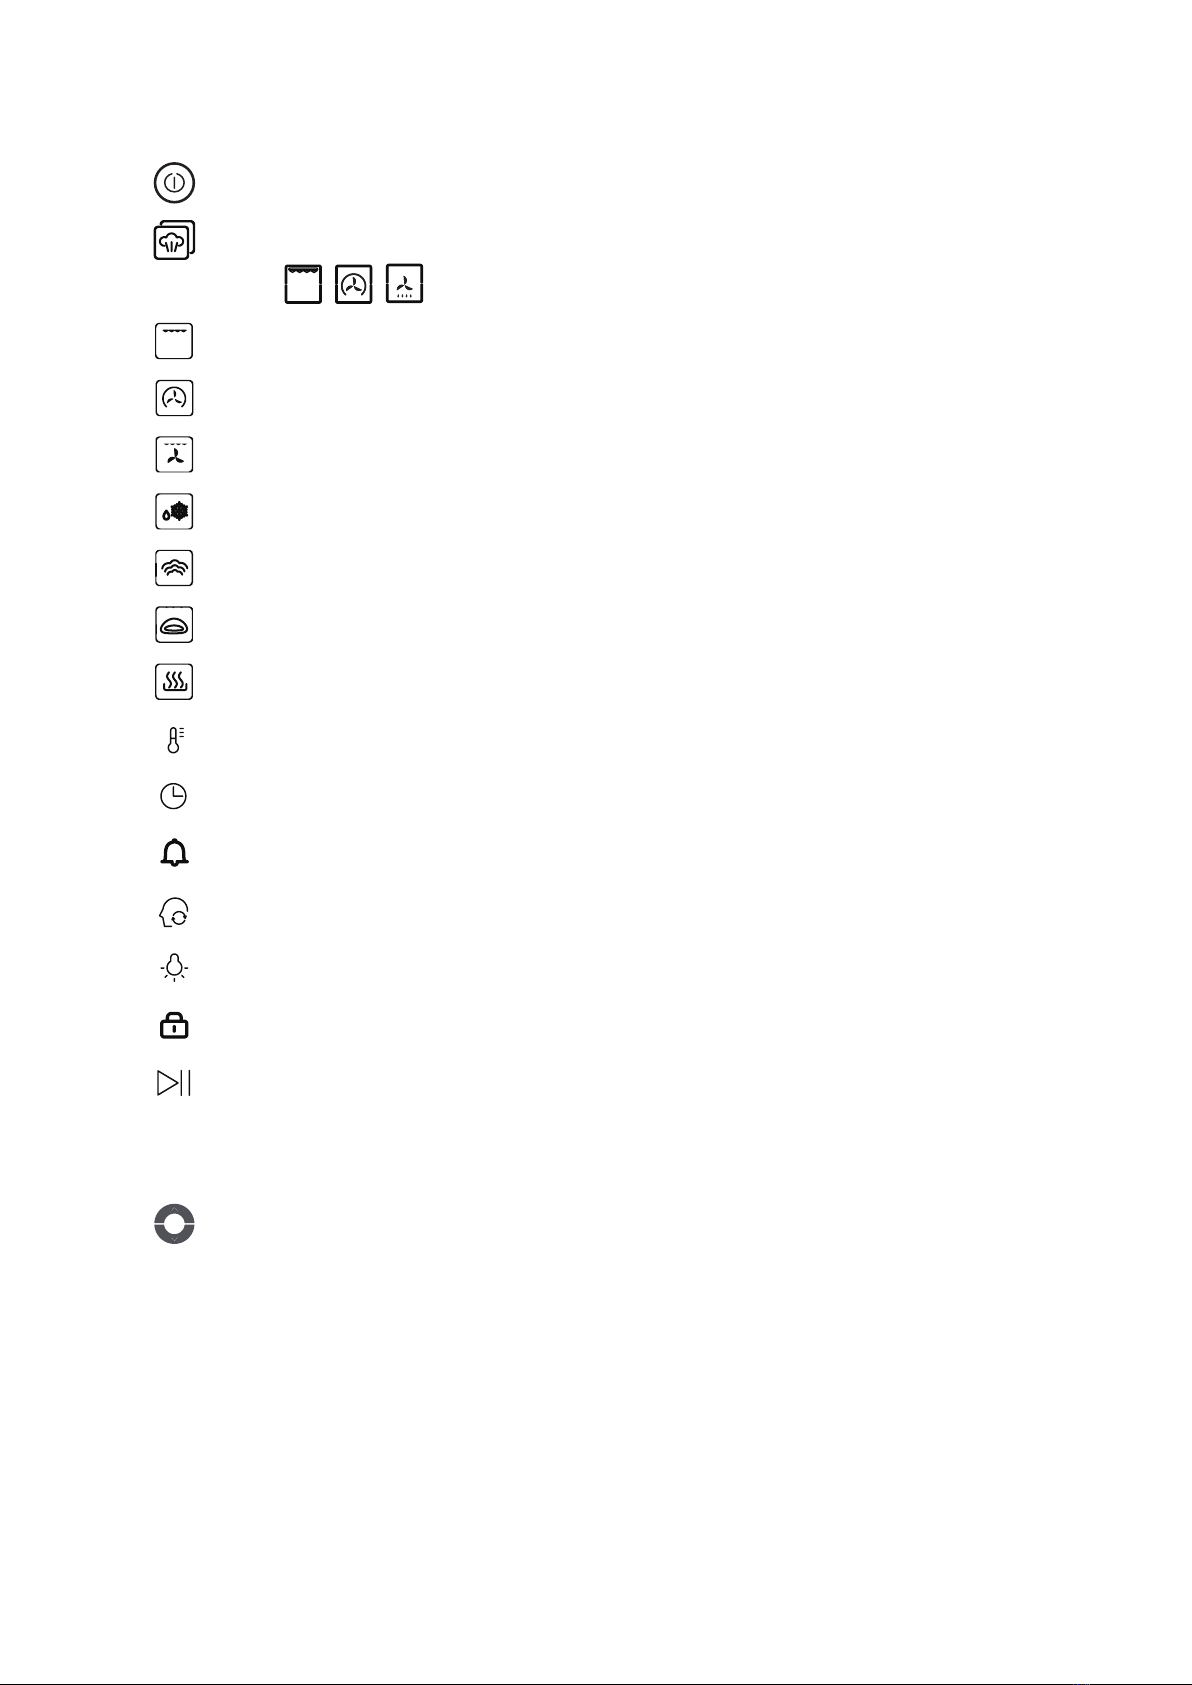
4. PRODUCT STRUCTURE DIAGRAM .................................5
5.
CONTROL PANEL INSTRUCTION ....................................5
6. PRODUCT ..........................................................................7
6.1 Clock Setting.................................................................7
6.2 Water Level Indicator ....................................................7
7. MODE MENU......................................................................8
7.1 Basic Modes of Oven .................................................8
7.1.1 The oven has four basic modes ........................8
7.2 Basic Modes of Oven with Steam Mode.....................9
7.2.1
The oven with steam mode has
four basic modes.....................................................9
7.3 Fermentation Mode ....................................................9
7.4 Drying Mode ...............................................................9
7.5 Descaling Mode........................................................10
7.6 Recommended Recipes ...........................................10
8. TIME SETTING.................................................................12
8.1
Set Alarm (time 0-23 hours and 59 minutes)................12
8.2 Set Baking Time (00:00-10:00 hour) ........................13
8.3 Modify Baking Time..................................................13
8.4 Reserve Function (automatic function for
setting the end time) (00: 00-23: 59) ........................13
8.5 Cancellation of Reservation......................................14
9. CHILD LOCK ....................................................................14
10. MEMORY FUNCTION ......................................................14
10.1 Mode Storage...........................................................14
10.2 Memory Recall..........................................................15
11. TEMPERATURE VIEW FUNCTION .................................15
12. REPAIR AND MAINTENANCE.........................................15
13. MALFUNCTION CODE.....................................................16
14. SPECIFICATIONS ............................................................17
15. TROUBLE - SHOOTING...................................................18
16. DESCRIPTION OF CONTENT OF
HAZARDOUS SUBSTANCES IN PRODUCT...................19
17. LIST OF FOOD CONTACTING PARTS AND
COMPONENTS IN THE PRODUCT.................................21
1. UNPACK AND INSTALL
1.1 Inspection after Unpacking
1. Check whether the body shell has any marks of
deformation due to impact or heavy pressure.
2. Check whether the connection between the oven door and
VJGEQPVTQNRCPGNKUƀCVCPFYJGVJGTVJGFQQTQRGPKPIKU