Kohler K-23708T-NA User manual

1368274-T01-A
© Copyright Kohler China Investment Co., Ltd. 2019
© 晜勉⚹猰⹗⚥㕂䫏餴剣ꣳⰖ䨾剣 2019
KOHLER CHINA INVESTMENT CO., LTD NO.158, JIANG CHANG SAN ROAD,
JING' AN DISTRICT, SHANGHAI, PRC POST CODE: 200436
猰⹗⚥㕂䫏餴剣ꣳⰖ ♳嵳䋑㸝⼓寐㖞♲騟 158 〿齱綘200436
STEAM GRILL OVEN
棇⾾禹䅺Ⰶ䒭㢴⸆腊襒盲 K-23708T-NA
ぜ⾾禹䅺Ⰶ䒭㢴⸆腊襒盲 K-22682T-NA
USER MANUAL
欽䨪䩛ⱃ

1368274-T01-A -1-
湡䔶
1 䪮助錞呔..............................................................................1
2 䒓盲⿺㸝鄳 ..........................................................................2
2.1 䒓盲た涸唬叅 ................................................................2
2.2 㢴⸆腊襒盲涸㸝鄳 .........................................................2
3 㸝Ⰼ倰岤䠑✲고ㄤ䒊雳 ....................................................4
4 歏㐼涸䏑傊㢅椚...................................................................5
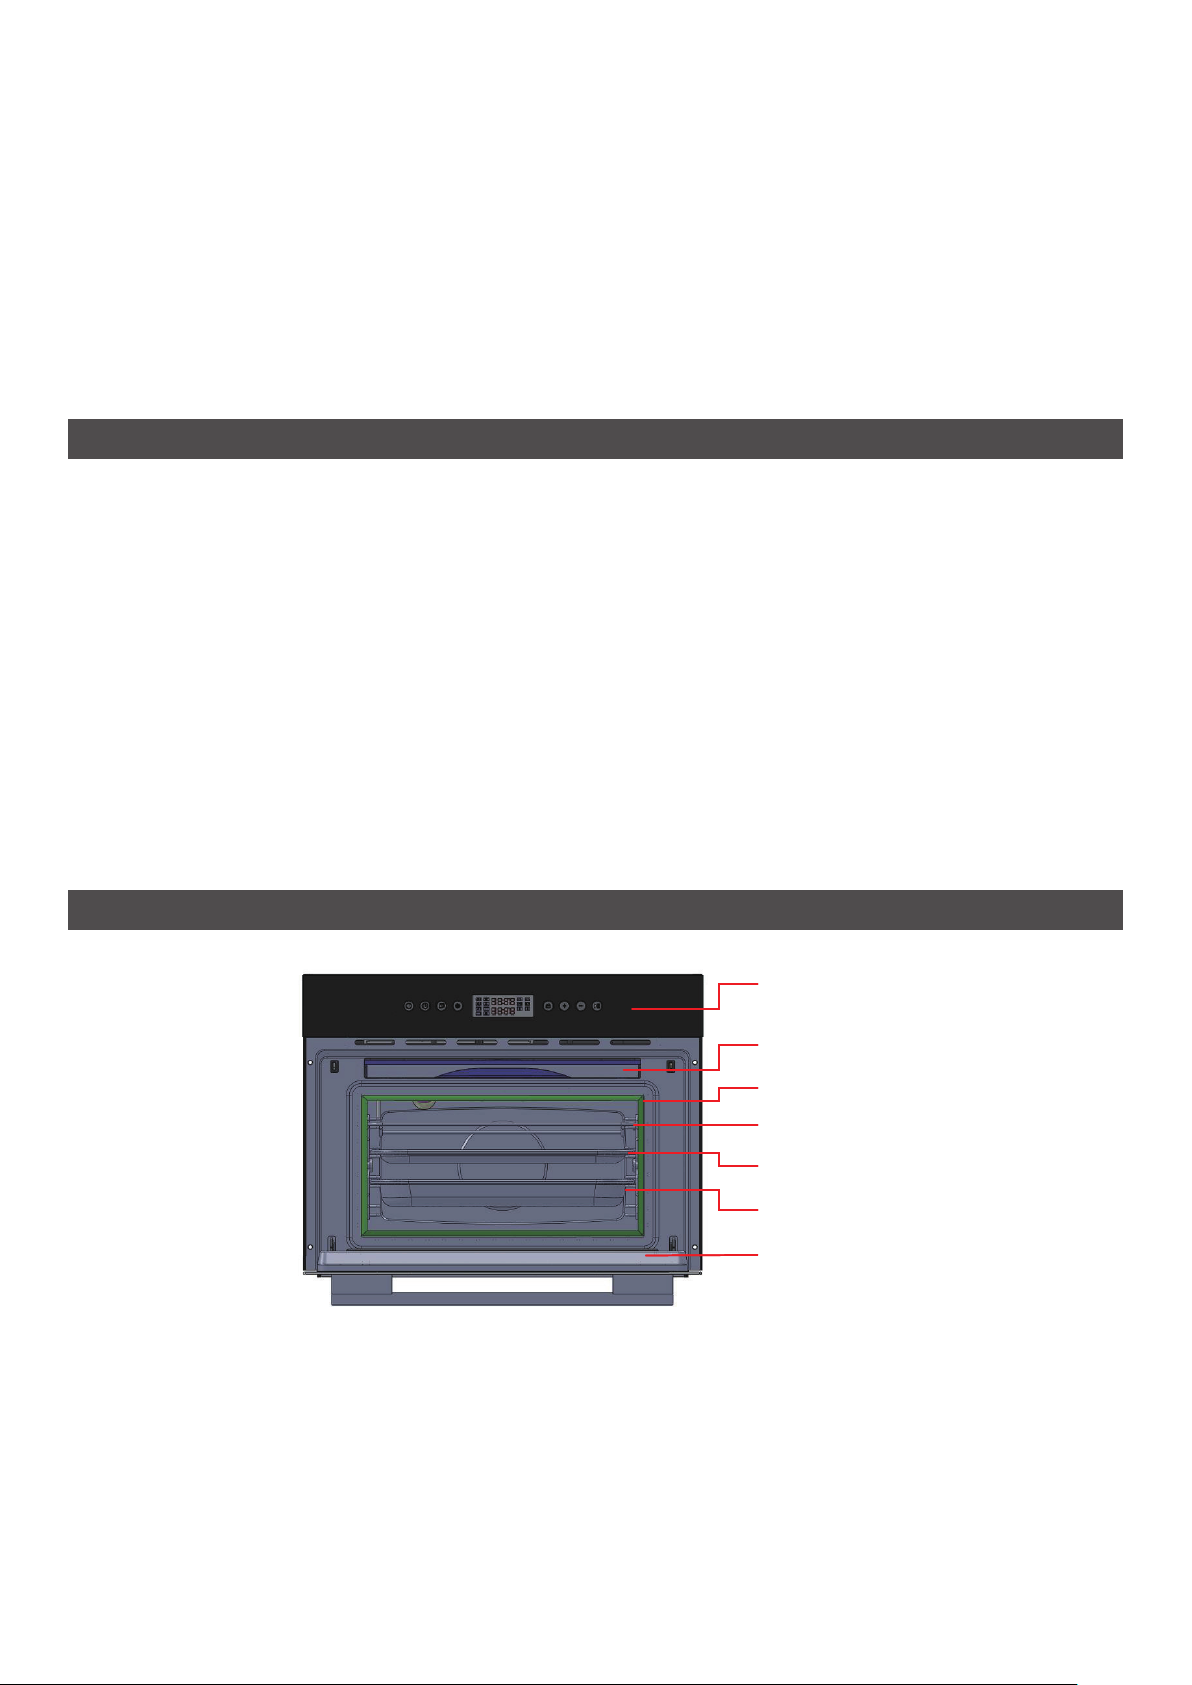
5 ❡ㅷ絕匬爙䠑㕃...................................................................5
6 㢴⸆腊襒盲涸䱽ⵖ匣㕃叻霹僈..........................................6
7 ❡ㅷ⢪欽..............................................................................7
7.1 霃縨...............................................................................8
7.2 宐盲涸⢪欽 ..................................................................10
8 ⸆腊蝲⽀............................................................................11
8.1 ⸆腊鷥䭊......................................................................11
8.2 Ⰼ襒导⸆腊 ..................................................................11
8.3 掔掐掱껋⸆腊 ..............................................................11
8.4 掔掐䌄襒导掱껋⸆腊....................................................11
8.5 鍒ⲏ⸆腊......................................................................11
8.6 〄ꃋ⸆腊 .....................................................................11
8.7 ⱄ掚勄蝒垷䒭⸆腊 .......................................................11
8.8 ꤑ㘻⸆腊......................................................................12
8.9 蝲靶⸆腊......................................................................13
9 䲀虛蝲靶............................................................................14
10 ⚥鸀⨢姺掱껋 ....................................................................15
10.1 ⨢姺䧴罏》嶊掱껋 .....................................................15
10.2 靈侮侨....................................................................15
11 留ꝉ⸆腊............................................................................16
12 雵䗴⸆腊............................................................................16
12.1 垷䒭㶸⪰....................................................................16
12.2 雵䗴靈》....................................................................16
13 庛䏞叅溏⸆腊 ....................................................................16
14 㢴⸆腊襒盲絶⥝♸⥂Ⱞ ......................................................17
15 刿䰃㢴⸆腊襒盲撑僈抧 ......................................................17
16 儑爙⥌䜂............................................................................18
17 佦ꥻ䱗ꤑ............................................................................18
1 䪮助錞呔
TABLE OF CONTENTS
1 TECHNICAL SPECIFICATIONS.........................................1
2 UNPACK AND INSTALL.....................................................2
2.1 Inspection after Unpacking ...........................................2
2.2 Installation of Steam Oven ...........................................2
3 SAFETY NOTICE AND ADVICE ........................................4
4 WASTE APPLIANCE DISPOSAL .......................................5
5 PRODUCT STRUCTURE DIAGRAM .................................5
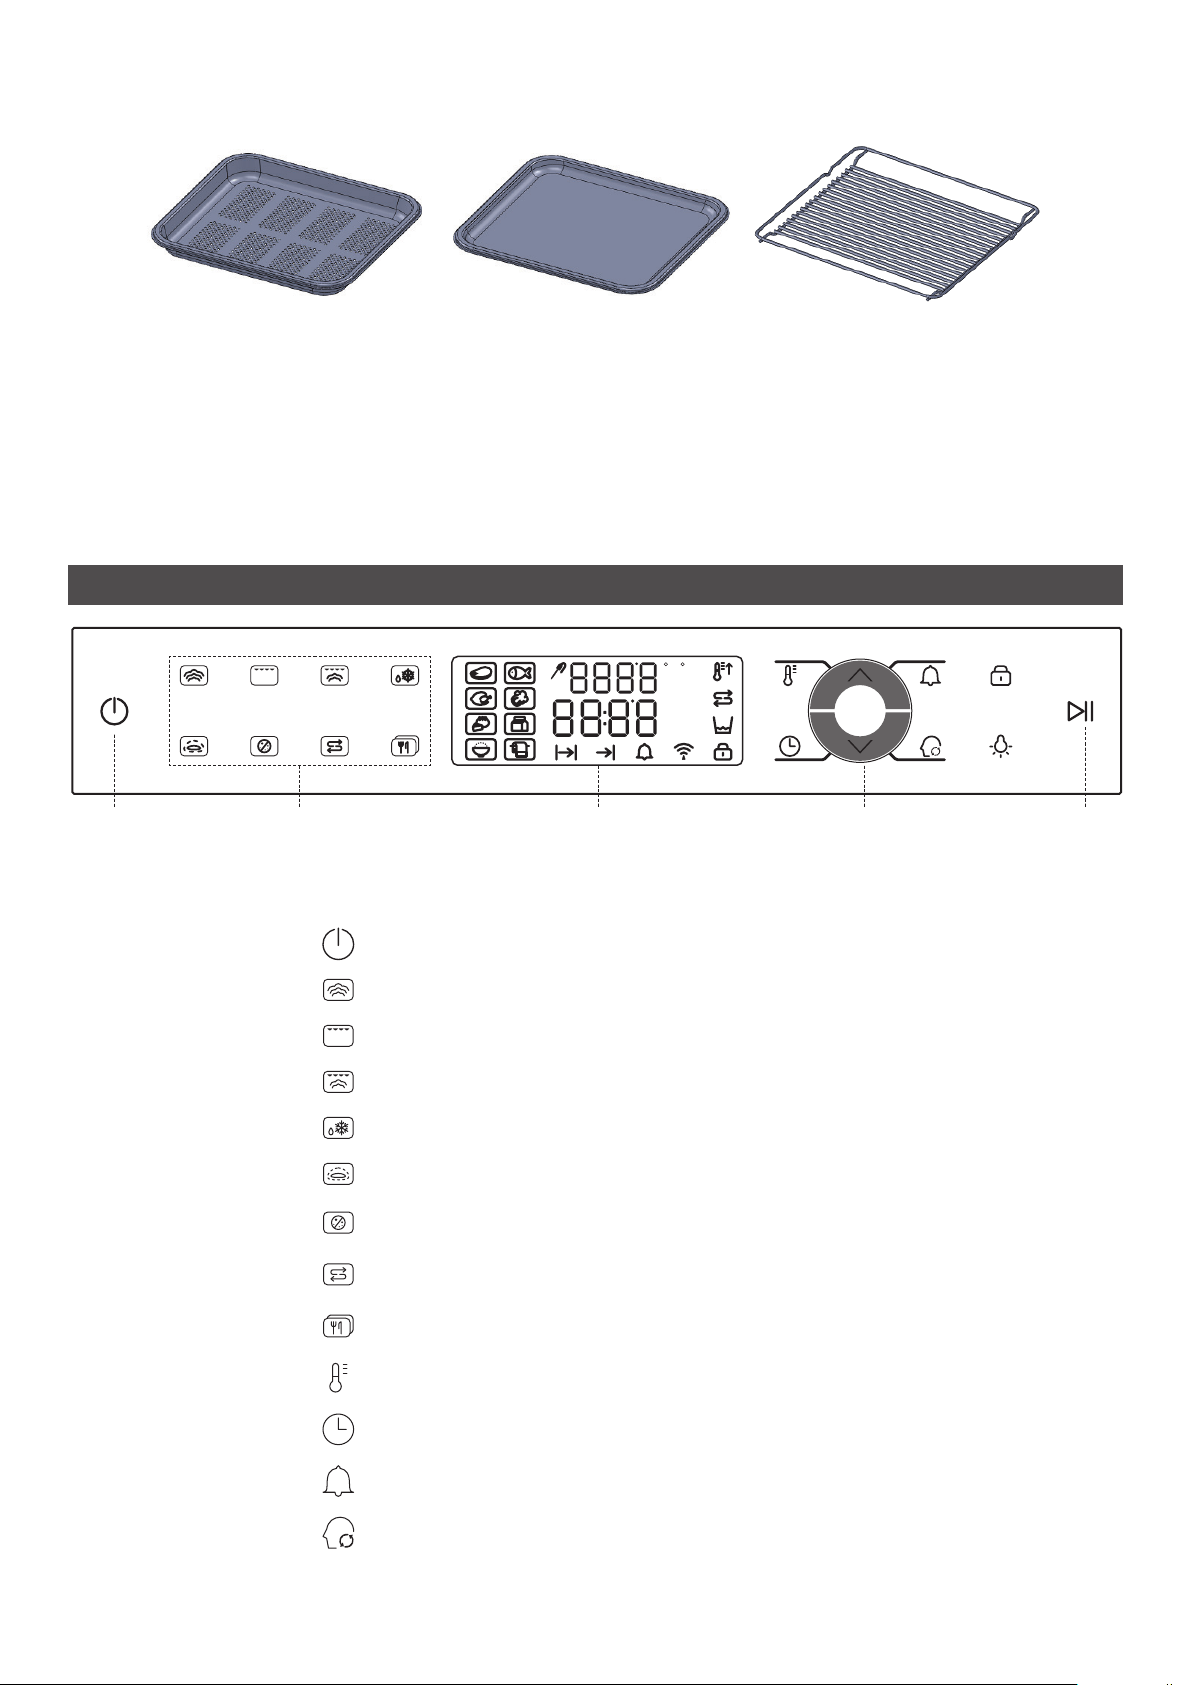
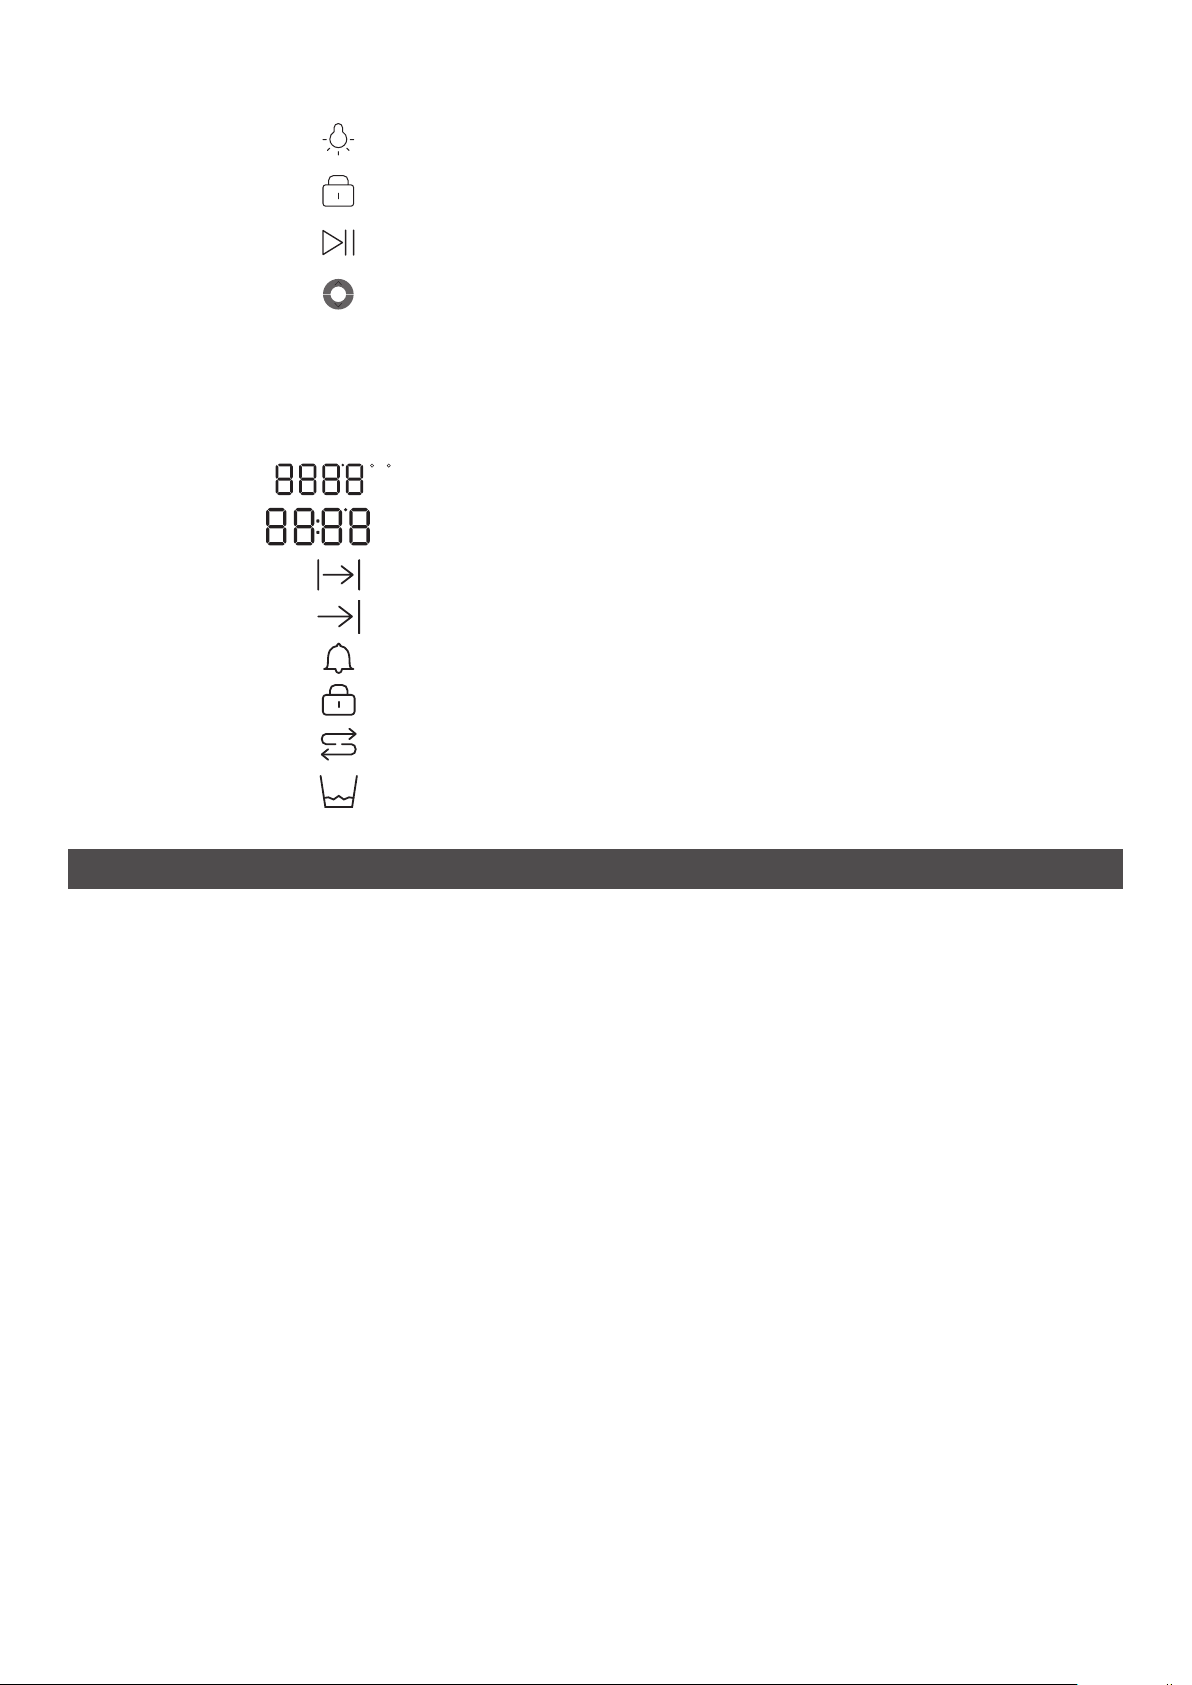
6 INSTRUCTION OF THE CONTROL PANEL......................6
7 USE OF PRODUCT............................................................7
7.1 Setting...........................................................................8
7.2 The Use of the Water Tank.........................................10
8 FUNCTION MENU............................................................11
8.1 Function Selection ......................................................11
8.2 All Steam.....................................................................11
8.3 Barbecue Cook ...........................................................11
8.4 Barbecue with Steam Cook ........................................11
8.5 Defrost ........................................................................11
8.6 Ferment ......................................................................11
8.7 Reheat Sterilization Mode...........................................11
8.8 Descale .......................................................................12
8.9 Recipe.........................................................................13
9 RECOMMENDED RECIPES ............................................14
10 INTERRUPT FUNCTION..................................................15
10.1 Stop or Cancel Cooking ............................................15
10.2 Adjust Parameters ....................................................15
11 CHILD LOCK FUNCTION.................................................15
12 MEMORY FUNCTION ......................................................16
12.1 Mode Storage ..........................................................16
12.2 Memory Recall .........................................................16
13 TEMPERATURE VIEW FUNCTION .................................16
14 REPAIR AND MAINTENANCE.........................................17
15 CHANGE THE LIGHT.......................................................17
16 MALFUNCTION CODE.....................................................18
17 TROUBLE SHOOTING.....................................................18
1 TECHNICAL SPECIFICATIONS
Model
㘗〿 K-23708T-NA/K-22682T-NA Maximum Power
剒㣐⸆桧W1550W-1650W
Volume
㺂 獤 L35L Product Outline Dimensions
❡ㅷ㢪䕎㽯㼄mm594530455 mm
Rated Voltage
괄㹁歏⾓V220-240V Package Dimensions
⺫鄳㽯㼄mm688637537mm
Frequency
곸 桧 Hz50Hz
Product Gross Weight / Net Weight
❡ㅷ嬁ꅾ /ⲙ ꅾ Kg36.0/30kg
Fuse / Circuit Breaker
⥂ꤗ⚏A/倗騟㐼A16A
1550W

1368274-T01-A
-2-
2 UNPACK AND INSTALL
2.1 Inspection after Unpacking
1. Check whether the body shell has any marks of
deformation due to impact or heavy pressure.
2. Check whether the connection between the oven door and
VJGEQPVTQNRCPGNKUƀCVCPFYJGVJGTVJGFQQTQRGPKPIKU
UOQQVJCPFƀGZKDNG
3. Check whether the door glass is broken.
4. Check whether the power cord is damaged or loose.
5. Check whether the data marked on the steam oven
nameplate is consistent with the local power grid.
6. Do not throw the packages at home after unpacking.
Classify the waste packages and send them to the nearest
garbage sorting center.
x When the steam oven is damaged or operates abnormally,
please immediately stop using and unplug the power supply.
x Please contact your local distributor and our special
maintenance service department for repair.
2.2 Installation of Steam Oven
The installation of this steam oven must be carried out strictly
in accordance with the regulations and shall be installed and
commissioned by professionals. The manufacturer shall not
be liable for any injury to persons, animals or properties due to
wrong installation.
Caution:
x Remember to cut off the power supply before any
commissioning or repair work.
x Ventilation ducts must be used for ventilation.
x AC power supply must be 220-240V, 50Hz, with minimum
16A distribution line fuse, or at least 16A distribution line.
x The power cord for machine is 1M. If the power cord needs
to be lengthened, please purchase new one from Kohler.
* This embedded steam oven is placed in a cupboard, which is made of insulating
materials, and should comply with dimensions shown below; If installed in a
cupboard, 500 mm2circulation space should be reserved between the cupboard
and the steam oven.
min 600
458
558-565
465
444
594
21
455
542
min500cm
2
min500cm
2
2 䒓盲⿺㸝鄳
2.1 䒓盲た涸唬叅
1. 劼⡤㢪㡲剣偽㔔中ⴁ䧴ꅾ⾓罜鸣䧭」䕎涸汚鶺կ
2. 掐盲꡶♸䱽ⵖ匣㼆䱹僽や䎂侮䒓꡶僽や곡歧抳崞կ
3. ꡶梯槴僽や灶鄬կ
4. 歏彂絁剣偽灶䰀匠膴涸梡韌կ
5. 霼唬叅㢴⸆腊襒盲ꜵ晥♳䨾叻霋涸侨䰘僽や♸䔲㖑歏緸湱痗կ
6. 䒓盲た涸⺫鄳♶銳ꥥ⤑⚗㖈㹻ꅽ銳㼜鵯❈䏑傊涸⺫鄳ⴔ㥩
碫た鷐ⵌ剒鵛涸㘏㖤ⴔ䭄⚥䗱կ
x 䔲㢴⸆腊襒盲剣䰀㗁䧴乼⡲♶姻䌢傞霼用⽰⨢姺⢪欽䬬䱈
歏彂䳃㣢կ
x 霼翫禹䔲㖑絑Ꝉ㉁ㄤ劥Ⱆ暵紨絶⥝剪⸉鿈鵳遤絶⥝կ
2.2 㢴⸆腊襒盲涸㸝鄳
㸝鄳劥㢴⸆腊襒盲䗳곢⚚呔䭽撑錞㹁鵳遤䎇곢歋⚁⚌➃プ㸝鄳
ㄤ靈霚կ歋✵ꝡ霴涸㸝鄳䨾鸣䧭涸㼆➃ծ⸓暟ㄤ餒❡涸⠟㹲ⵖ
鸣㉁㼜♶䪬䬐⟣⡦餓⟣կ
岤䠑✲고
x ⴗ雵㖈鵳遤⟣⡦靈霚䧴絶⥝䊨⡲銳껷⯓ⴗ倗歏彂կ
x 䗳곢欽鸑굥盗麤鵳遤鸑굥կ
x ❜崨歏彂⣘䎾㐼䗳곢僽 220-240V50Hz剒⡛ 16A ꂁ歏絁騟
擧倗㐼䧴荛㼱 16A 涸ꂁ歏絁騟䒓Ⱒկ
x ❡ㅷ叻ꂁ歏彂絁䏞⚹ 1碛㥵卓銳⸈歏彂絁霼➢猰⹗
㈒た剪⸉鿈餝✈⸈絁կ
* 霪䅺Ⰶ䒭襒盲佞㖈塆厷ꅽ塆厷勞俱僽ꥬ掚涸銳♸♴㕃⚥涸㽯㼄湱痗 㥵卓鄳
㖈塆厷ꅽ銳塆厷♸襒盲⛓ꢂ銳殆ⴀ 500 䎂倰嬗碛涸崨鸑瑟ꢂկ

1368274-T01-A -3-
542
455
21
594
444
465
100
448-452
min 600
500cm
2
100
558-565
There are four screws on the inside of the oven door. 炉门内侧上了四个螺丝。

1368274-T01-A
-4-
NOTE: When installing and handling, please do not use the
door handle as the force point.
3 SAFETY NOTICE AND ADVICE
Warning: Electrical appliances shall not be installed,
disassembled or repaired by non-professionals, and shall
be kept away from children!
x 9JGPVJGUVGCOQXGPJGCVKPIVWDGKUWUGFHQTVJGſTUVVKOG
idle running should be carried out once after heating to the
JKIJGUVVGORGTCVWTG6JGJGCVKPIVKOGUJQWNFDGUWHſEKGPVVQ
remove the grease residue generated during the production
process.
x To prevent the formation of excessive condensate on the
glass in the steam oven, baked food should not be left in the
steam oven for a long time.
x Do not pull out or plug in the power plug with wet hands.
x When the steam oven is working normally, never block the
outlet of heat dissipation.
x Before cleaning and maintenance, pull out the plug and wait
for the steam oven to cool down in order to avoid electric
shock, burning and scalding accidents.
x During the cooking process or after the cooking is
completed, when the oven door is opened, there will be a lot
of water vapor, so be sure to keep a certain distance.
x After cooking, the food or vegetable juice remaining in the
steam oven should be cleaned up in time and the condensed
water on the cavity should be wiped clean.
x After cooking, please pump back the excessive water from
the steam generator.
x The use of steam oven as heating equipment is prohibited.
x If the steam oven does not work properly, it must be repaired
by a professional servicing personnel.
x When cleaning, it is prohibited to use such tools as metal
shims or sharp knives. Please use ordinary, non-corrosive
cleaning agents; preferably use wood or plastic utensils.
After cleaning, wash thoroughly and dry with a dishcloth and
soft leather.
x To ensure that the food is delicious, it is recommended to
pour fresh water in before cooking.
x This steam oven is designed for adults. Children under the
age of eight should stay away from the steam oven if there
is no continuous supervision.
岤䠑 :㸝鄳⿺䵥鵘傞霼⺡⟄꡶䪾䩛⚹「⸂挿կ
3 㸝Ⰼ倰岤䠑✲고ㄤ䒊雳
险デ ꬋ⚁⚌➃プ霼⺡㸝鄳ծ䬒⽸ㄤ⥝椚歏㐼 ⯄留霼⺡鍘⿺
x 㖈痦♧妃欽㢴⸆腊襒盲⸈掚盗涸傞⦫銳⸈掚ⵌ剒넞庛䏞瑟掔
1妃⸈掚傞ꢂ銳⥂霆駈⟄ꤑ欰❡鵂玐⚥涸屘腒婎殆暟կ
x ⚹✫姺㢴⸆腊襒盲ⰻ梯槴♳欰䧭鵂㢴涸ⳕ翸暟捷掐㥩涸굹
暟♶銳傞ꢂ佞㖈㢴⸆腊襒盲ꅽկ
x 犜姺弪䩛䬬䳃歏彂կ
x 㢴⸆腊襒盲㖈姻䌢䊨⡲傞⼪♰♶銳㜧⡞侔掚ⴀ굥〡կ
x 幡峇⥂Ⱞ⯓䬬䱈䳃㣢䖉㢴⸆腊襒盲ⲇ⽲た鵳遤կ鼙⯝鍘歏ծ
掔⠟ծ掘⠟✲佦涸〄欰կ
x 㖈掱껋鵂玐䧴掱껋絕勲た䩧䒓拝꡶傞剣㣐ꆀ涸宐襒孞烁
⥂♧㹁銳⥂䭯♧㹁騄猌կ
x 掱靈た婎殆㖈㢴⸆腊襒盲涸굹暟䧴蝲实銳⿺傞幡椚䎇㼜ⳕ絕
㖈臼⡤♳涸ⲇⳕ宐亭ⲙկ
x 掱靈た霼㼜襒导〄欰㐼涸㢴⡮宐絛㔐䬄ⴀ勻կ
x 犜姺㼜㢴⸆腊襒盲欽⡲》军霃㢊կ
x 㥵卓㢴⸆腊襒盲♶腊姻䌢⢪欽䗳곢霼⚁⚌絶⥝➃プ勻鵳遤絶
⥝կ
x 幡峇傞犜姺⢪欽ꆄ㾩㙈晙䧴㼺ⴉ瘝䊨Ⱘ霼⢪欽兜鸑ծ偽臱
赤䚍涸幡峇 剒㥩⢪欽加餘䧴㝕俱㐼Ⱘ幡峇た霼䕸䏀幡峤
䎇欽䬀䋒ㄤ鲱淼㼜Ⱖ亭䎁կ
x 烁⥂굹暟涸繠䒊雳掱靈岤Ⰶ倝됮涸宐կ
x 劥㢴⸆腊襒盲僽⚹䧭➃霃雦涸Ⱃ㿨⟄♴涸⯄留㖈尵剣䭯絯港
漛涸䞔ⲃ♴䎾鵴猌㢴⸆腊襒盲կ

1368274-T01-A -5-
x 㢴⸆腊襒盲➑鷓ざ㹻䏭⢪欽〳欽勻掱靈ㄤ⸈掚굹暟姼❡ㅷ
♶僽⚹㉁⚌⢪欽罜霃雦䧴欰❡涸劥❡ㅷ痗ざ EEC 叻ⲥկⵖ鸣
㉁ㄤ絑Ꝉ㉁㼆㔔ꝡ霴⢪欽䨾鸣䧭涸餒❡䰀㣟ㄤ➃魧⠟㹲♶餏⟣
⡦岁䖒餓⟣կ
x 絑Ꝉ㉁ㄤ欽䨪㼆劢黽㸛♳鶣霹僈刿䰃㢴⸆腊襒盲ꨪ鿈⟝⿺劢
⢪欽⾲⾊ꂁ⟝鸣䧭➃魧⠟㹲ㄤ餒❡䰀㣟劥Ⱆ♶餏餓⟣⡦岁
䖒餓⟣կ
4 歏㐼涸䏑傊㢅椚
䧮⟌涸❡ㅷ⺫鄳㖲ꅷ欽梠⥂勞俱ⵖ䧭㔔姼䝠㖈㢅椚鵯❈⺫鄳勞
俱傞銳岤䠑⺫鄳勞俱涸ⱄ㔐佐ⵄ欽⥂䫡䧮⟌饆⟄欰㶸涸梠㞯կ
♶銳ꥥ䠑⚗䒙㝕俱⺫鄳⟄姺⯄留㖈梖罞鸣䧭璜䜂⽭ꤗկ
䏑傊歏㐼ず呋銳ざ椚涸䏑䒙㢅椚䒊雳䝠㼜䏑䒙涸歏㐼鷐荛梠
㞯⥂䫡絆絉䧴佟䏎劼匬䱇勉涸梠⥂歏㐼㔐佐畀鵯呋⨞⠔⢪♧❈
剣欽涸勞俱䖤ⵌⱄ妃ⵄ欽Ⲹ㼱㼆梠㞯涸⽭㹲կ
5 ❡ㅷ絕匬爙䠑㕃
x Steam oven is suitable for domestic use only. It can be used
to cook and heat food. This product is not designed or man-
ufactured for commercial use. This product complies with
EEC standards. Manufacturers and distributors shall not be
liable for any loss of property or personal injury caused by
improper use.
x We shall not be held legally liable for any loss of property or
personal injury if the distributor and the user fail to observe
the above instructions, replace the steam oven parts and fail
to use the original parts.
4 WASTE APPLIANCE DISPOSAL
All packages of our products are made of environmentally
friendly materials, so you should pay attention to the recycling
of packaging materials when disposing of these packaging
materials in order to protect our survival environment. Do not
discard plastic packages at random to prevent children from
suffocating by playing with them.
Waste electrical appliances also need to be disposed of
in a reasonable way. It is recommended that you send the
waste electrical appliances to an environmental protection
organization or government authorized environment-friendly
electrical appliances recycling depot, so that some materials
will be fully used again to reduce hazards to the environment.
5 PRODUCT STRUCTURE DIAGRAM
1. Control Panel
1. 䱽ⵖ匣
2. Water Tank Assembly
2. 宐盲絆⟝
3. Sealing Ring
3. 㺙㼓㕕
4. Grill Rack
4. 掐卹
5. Griddle Plate
5. 掐渹
6. Perforated Griddle Plate
6. 䌄㶰掐渹
7. Oven Door Assembly
7. 拝꡶絆⟝
1
2
3
4
5
6
7

1368274-T01-A
-6-
〳欽ꂁ⟝
䊩䌄㶰掐渹鷓ざ掱껋倝됮䧴ⲇⲏ涸詪蝲ծ聘碫ㄤ猐碫կ
⚥偽㶰掐渹鷓ざ掱껋撞굹굹暟㥵 蹓껐ծ껛㶩կ
〸掐卹鷓ざ掱껋䌄㼭㐼渓涸굹暟㥵 껳㣢ծ欫ㅷկ
6 㢴⸆腊襒盲涸䱽ⵖ匣㕃叻霹僈
Available Fittings:
Left (Perforated griddle plate): suitable for cooking fresh or frozen
vegetables, meat and poultry.
Middle (Non-perforated griddle plate): suitable for boiling food,
such as: candied fruits, dumplings.
Right (Grill): suitable for cooking food with small utensils, such as
steamed buns, desserts.
6 INSTRUCTION OF THE CONTROL PANEL
h
min
FC
g
W
Power ON/
OFF button
䒓Ⱒ劼ꝶ
mode
垷䒭
LED Display Area
LED 儑爙⼓
Auxiliary Function Area
鳇⸔⸆腊⼓
Start / Pause
button
⸓兽⨢ꝶ
Button Symbol
䭽ꝶ痗〿
Button Description
䭽ꝶ䲽鶣
Power ON/OFF button
䒓Ⱒ劼ꝶ
Steam mode
襒导垷䒭
Barbecue mode
掔掐垷䒭
Steam with barbecue mode
襒导䌄掔掐垷䒭
Defrosting mode
鍒ⲏ垷䒭
Fermentation mode
〄ꃋ垷䒭
Sterilization mode
勄蝒垷䒭
Descaling mode
ꤑ㘻垷䒭
Recipe
蝲靶
Temperature setting button
庛䏞霃㹁ꝶ
Clock, working time, end time setting button
傞ꛦծ䊨⡲傞ꢂծ絕勲傞ꢂ霃㹁ꝶ
Alarm setting button
ꢇ꜊霃縨ꝶ
Memory function button: memory recall and storage
雵䗴⸆腊ꝶ雵䗴靈》♸㶸⪰

1368274-T01-A -7-
Lighting button
撑僈抧䭽ꝶ
Long press: child lock button, lock control panel
䭽留ꝉ䭽ꝶꝉ⡞䱽ⵖ匣
Start / Pause button
⸓兽⨢ꝶ
Adjustment buttons for temperature, time and other values
庛䏞⟄⿺傞ꢂ瘝侨⧩靈侮䭽ꝶ
Display Icon Description:
Icon symbol
㕃叻痗〿
Icon description
㕃叻霹僈
FC
g
W
Temperature value display icon
庛䏞侨⧩儑爙㕃叻
h
min
Time value display icon
傞ꢂ侨⧩儑爙㕃叻
Working time icon
䊨⡲傞ꢂ㕃叻
Working end time icon
䊨⡲絕勲傞ꢂ㕃叻
Alarm icon
ꢇ꜊㕃叻
Child lock icon
留ꝉ㕃叻
Descaling icon
ꤑ㘻㕃叻
Water shortage icon
緃宐㕃叻
7 USE OF PRODUCT
Power-on state: Power off the machine and turn on the
power again. At this point, all buttons and icons light up. One
second later, the clock time is shown on the LED display
(50% brightness), and other buttons and icons keep off. This
is the standby state. At this point, you can directly touch the
corresponding function button to enter its mode. To exit the
current mode, touch the power ON/OFF button.
When the system is idle (including no alarm, no child lock, no
lighting, no mode on, and that time or temperature of a mode
is set but not in running state), if there is no actions taken
within 30 seconds, the system will require the program to
return to the standby state, with only 50% brightness for clock
time on the LED screen.
儑爙㾓㕃叻霹僈 :
7 ❡ㅷ⢪欽
♳歏朐䙖 侮劼倗䒓歏彂たⱄ妃䱹鸑歏彂姼傞䨾剣䭽ꝶ⟄⿺
㕃叻挿❭朐䙖絶䭯 1猲 た ꤑ LED 儑爙㾓涸傞ꛦ傞ꢂ挿❭50%
❭䏞㢪Ⱖ➭䭽ꝶ⟄⿺㕃叻㖲♶❭姼傞⽰⚹䖉劼朐䙖կ姼傞
〳湬䱹鍘䷫湱䎾涸⸆腊䭽ꝶ鵳Ⰶ垷䒭》嶊䔲垷䒭鍘䷫䒓Ⱒ
劼ꝶ㹊梡կ
䔲禹絡㢅✵ꬋ鵘遤朐䙖⺫䭍偽ꢇ꜊ծ偽留ꝉծ偽撑僈抧ծ偽垷
䒭䒓⚂⺫ゎ霃縨✫傞ꢂ䧴罏垷䒭涸庛䏞⡎僽尵剣䒓鵘遤
涸霃縨朐䙖〫銳 30 猲ⰻ偽⟣⡦乼⡲ⴭ銳宠玐䎸㔐鷍ⵌ䖉劼
朐䙖⽰〫剣 LED 㾓涸傞ꛦ 50% ❭䏞կ

1368274-T01-A
-8-
7.1 Setting
7.1.1 Clock Setting
The clock can be set only when the oven is standby.
When the product is connected to the power supply and enters
the standby state, the time digital tube displays 12: 00. At this
point, when the clock button is touched , the corresponding
button lamp lights up, and the digital tube lights up brightly
CPFUVCTVUƀKEMGTKPIKHPQUGVVKPIKUOCFGYKVJKPUGEQPFU
bright lighting automatically changes to dark lighting, without
ƀKEMGTKPI
At this point, touch the adjustment button. The incremental
method is as follows:
When short pressing, the minute digit increment is 1, when
reaching 60 minutes, the hour digit increment is 1;
When long pressing for 2 seconds, the minute digit increment
is 5; When long pressing for over 5 seconds, the hour digit
increment is 1.
Finally, touch the clock button CICKPVQEQPſTO#VVJKU
point, the clock time setting is over and the clock button
lamp turns off.
7.1.2 Set Alarm (time 0-23 hour and 59 minute)
The alarm can be set in the standby state or the setting state of
the oven. This function does not affect the operation of the oven,
but is only used to set the time to remind the user.
After touching the alarm button , the corresponding button lamp lights
up, the alarm icon flickers on the display screen, the time digital tube
is highlighted 00: 00, and starts to flicker. Set as follows: (if no setting
is made within 3 seconds, it will no longer flicker.)
Touch the adjustment button to set the alarm time. Only the
minute digit needs adjustment. When the increment reaches 60
minutes, the hour digit advances 1, with display status being
9: 59 h. It is countdown mode. Finally, the alarm button is
touched again to confirm. At this point, the alarm time setting is
over and the alarm time starts to count down.
Incremental method: When short pressing, the minute digit
increment is 1; When long pressing for 2 seconds, the minute
digit increment is 5; When long pressing for over 5 seconds, the
hour digit increment is 1.
Notes:
1. During the countdown of the alarm, if the system is in the mode
operation state, the user can touch the alarm button to check
the remaining time of the alarm (the display lasts 3 seconds,
and then returns to the operation time after 3 seconds). When
the alarm time is displayed, touch the alarm button again to
cancel the alarm setting. If the currently displayed content is
not the alarm time, but the operation time, touching the alarm
button cannot cancel the current alarm setting.
If the system is in the standby state, the display screen has
7.1 霃縨
7.1.1 傞ꛦ霃縨
㖈掐盲䖉劼朐䙖♴䩞〳⟄霃縨傞ꛦ
䔲❡ㅷ鄄鵶䱹ⵌ歏彂⚂鵳Ⰶ䖉劼朐䙖た傞ꢂ侨瀦盗儑爙
12:00姼傞鍘䷫傞ꛦ䭽ꝶ 㼆䎾涸䭽ꝶ抧挿❭侨瀦盗」
넞❭⚂䒓㨤捌㥵 3猲ꛦⰻ♶鵳遤霃㹁ⴭ荈⸓歋넞❭」⚹冝
❭⚂♶ⱄ捌կ
姼傞鍘䷫靈侮䭽ꝶ姿鵳倰䒭
瀊䭽ⴔꛦ⡙姿鵳⚹ 1, ⴔꛦ忘 60 ⴔꛦ㼭傞⡙鵳 1
䭽 2猲ⴔꛦ⡙姿鵳⚹ 5 䭽 5猲⟄♳ⴭ㼭傞⡙姿鵳⚹ 1կ
剒たⱄ妃鍘䷫傞ꛦ䭽ꝶ 邍爙烁雩姼傞傞ꛦ傞ꢂ霃㹁絕勲
傞ꛦ䭽ꝶ 抧擆抣կ
7.1.2 霃縨ꢇ꜊傞ꢂ 0-23 㼭傞 59 ⴔꛦ
㖈掐盲䖉劼朐䙖♴䧴罏僽霃縨朐䙖♴〳⟄霃縨ꢇ꜊姼⸆腊♶䕧
ㆇ掐盲䊨⡲〫僽欽勻霃㹁傞ꢂ䲿ꄀ欽䨪կ
鍘䷫ꢇ꜊䭽ꝶた㼆䎾涸䭽ꝶ抧挿❭儑爙㾓ꢇ꜊㕃叻捌傞
ꢂ侨瀦盗」⚹넞❭ 00:00䎇䒓㨤捌䭽撑⟄♴鵳遤霃縨 㥵
3猲ꛦⰻ♶鵳遤霃㹁ⴭ♶ⱄ捌կ
鍘䷫靈侮䭽ꝶ 勻霃㹁ꢇ꜊傞ꢂ〫靈蒜ⴔꛦ⡙姿鵳忘 60
ⴔꛦ㼭傞⡙鵳 1儑爙朐䙖⚹ 9:59h⚹⦝雦傞垷䒭剒たⱄ
妃鍘䷫ꢇ꜊䭽ꝶ邍爙烁雩姼傞ꢇ꜊傞ꢂ霃㹁絕勲ꢇ꜊傞ꢂ䒓
㨤⦝雦傞կ
姿鵳倰䒭 瀊䭽ⴔꛦ⡙姿鵳⚹ 1 䭽 2猲ⴔꛦ⡙姿鵳⚹ 5
䭽 5猲⟄♳ⴭ㼭傞⡙姿鵳⚹ 1կ
霹僈
1. ꢇ꜊⦝雦傞鵂玐⚥㥵卓僽㖈垷䒭鵘遤朐䙖♴欽䨪〳⟄鍘
䷫ꢇ꜊䭽ꝶ叅溏ꢇ꜊ⶥ⡮傞ꢂ䭯絯 3猲儑爙3猲た鷍㔐
䊨⡲傞ꢂ䔲儑爙ꢇ꜊傞ꢂ傞ⱄ妃鍘䷫ꢇ꜊ꝶ》嶊ꢇ꜊霃
縨㥵卓䔲♶僽儑爙ꢇ꜊傞ꢂ罜僽䊨⡲傞ꢂⴭ鍘䷫ꢇ
꜊䭽ꝶ♶腊》嶊䔲涸ꢇ꜊霃縨կ
㥵卓僽㖈䖉劼朐䙖♴儑爙歲䊺絑儑爙ꢇ꜊傞ꢂ✫姼傞

1368274-T01-A -9-
already shown the alarm time. At this point, touching the alarm
button again will directly cancel the current alarm setting.
2. After setting the alarm time, the oven enters the baking
process. The time digital tube only displays the baking
time but not the alarm time. When the alarm countdown
is over, the buzzer rings with 2 beeps in 1 second every
other 1 second, and the buzzer stops automatically after
10 seconds. The alarm icon disappears from the display
screen, and the alarm button icon light does not turn on. If
the buzzer is cancelled during the buzzing process, it can be
cancelled by touching the alarm button .
3. After setting the alarm time, the oven is in the standby mode.
The time digital tube displays the alarm time and counts
down. When the alarm countdown is over, the buzzer rings
with 2 beeps in 1 second every other 1 second, and the
buzzer stops automatically after 10 seconds. The alarm icon
disappears from the display screen, the alarm button icon
light does not turn on, and the time digital tube goes back to
the clock display.
7.1.3 Set Baking Time (00:00-10:00 h)
The baking mode should be selected before setting the baking time.
The default baking time for each mode is 02:00 hour. After touching
the time button , the corresponding button lamp lights up, the
baking time icon flickers on the display screen, the time digital
tube is highlighted 02:00, and starts to flicker. Set as follows: (if no
setting is made within 3 seconds, it will no longer flicker.)
1. Touch the adjustment button to set the baking time.
Only the minute digit needs adjustment. When the increment
reaches 60 minutes, the hour digit advances 1, with display
status being 9: 59 h. It is countdown mode.
2. Touch to start operation. If additional parameters need
to be set at this point, this setting takes effect by default.
3. Incremental method:
When short pressing, the minute digit increment is 1; when
long pressing for 2 seconds, the minute digit increment is
5; when long pressing for over 5 seconds, the hour digit
increment is 1.
Note: if the default time is used, the icon does not turn on.
Only after the user touched the time button to adjust the time,
this time icon will appear on the display screen.
7.1.4 Reserve Function (automatic function
for setting the end time) (00: 00-23: 59)
After setting the baking time, touch again. The end time icon
flickers on the display screen, the time digital tube displays
by default (the current clock time + the baking time), and starts
to flicker. Set as follows: (if no setting is made within 3 seconds,
it will no longer flicker.)
ⱄ鍘䷫ꢇ꜊䭽ꝶⴭ湬䱹》嶊䔲涸ꢇ꜊霃縨կ
2. 霃縨✫ꢇ꜊傞ꢂた掐盲鵳Ⰶ捷掐鵂玐傞ꢂ侨瀦盗〫儑爙
捷掐傞ꢂ罜♶儑爙ꢇ꜊傞ꢂꢇ꜊⦝雦傞絕勲傞踡뚅㐼ㆇ
饰1猲ⰻ忹忹 2㡮ꢂꥬ 1猲ⱄ踡뚅䭯絯 10 猲た荈⸓⨢姺
踡뚅儑爙㾓ꢇ꜊㕃叻嶊㣟⚂ꢇ꜊䭽ꝶ㕃叻抧♶❭㥵卓
㖈踡뚅鵂玐⚥》嶊踡뚅㡮ⴭ鍘䷫ꢇ꜊䭽ꝶ〳鵳遤》嶊կ
3. 霃縨✫ꢇ꜊傞ꢂた掐盲㢅✵䖉劼垷䒭ⴭ傞ꢂ侨瀦盗儑爙
ꢇ꜊傞ꢂ䎇⦝雦傞ꢇ꜊⦝雦傞絕勲傞踡뚅㐼ㆇ饰1猲ⰻ
忹忹 2㡮ꢂꥬ 1猲ⱄ踡뚅䭯絯 10 猲た荈⸓⨢姺踡뚅儑
爙㾓ꢇ꜊㕃叻嶊㣟⚂ꢇ꜊䭽ꝶ㕃叻抧♶❭傞ꢂ侨瀦盗騥
㔐傞ꛦ儑爙կ
7.1.3 霃縨捷掐傞ꢂ傞ꢂ 00:00-10:00 㼭傞
霃縨捷掐傞ꢂ⛓銳⯓鷥䭊捷掐垷䒭嫦⚡垷䒭랾雩捷掐傞ꢂ㖲
⚹02:00 㼭傞 ,鍘䷫傞ꢂ䭽ꝶ 㼆䎾涸䭽ꝶ抧挿❭儑爙㾓
捷掐傞ꢂ㕃叻 捌傞ꢂ侨瀦盗」넞❭ 02:00⚂䒓㨤捌
䭽撑⟄♴姿낢〳鵳遤霃縨㥵 3猲ꛦⰻ♶鵳遤霃㹁ⴭ♶ⱄ捌կ
1. 鍘䷫靈侮䭽ꝶ 勻霃㹁捷掐傞ꢂ〫靈蒜ⴔꛦ⡙姿鵳
忘60 ⴔꛦ㼭傞⡙鵳 1儑爙朐䙖⚹ 9:59h⚹⦝雦傞垷䒭կ
2. 鍘䷫ ⸓鵘遤㥵卓姼傞銳霃縨Ⱖ➭侨ⴭ랾雩姼
霃㹁⧩欰佪կ
3. 姿鵳倰䒭
瀊䭽ⴔꛦ⡙姿鵳⚹ 1 䭽 2猲ⴔꛦ⡙姿鵳⚹ 5 䭽 5
猲⟄♳ⴭ㼭傞⡙姿鵳⚹ 1կ
霹僈 㥵卓⢪欽랾雩傞ꢂⴭ 㕃叻♶❭欽䨪〫剣㖈鍘䷫
✫傞ꢂ䭽ꝶた鵳遤傞ꢂ靈侮儑爙㾓䩞⠔ⴀ梡姼傞ꢂ㕃叻կ
7.1.4 곫紨⸆腊霃縨絕勲傞ꢂ涸荈⸓玐䎸
00:00-23:59
霃㹁㥩捷掐捷掐傞ꢂたⱄ妃鍘䷫ 儑爙㾓絕勲傞ꢂ㕃叻
捌傞ꢂ侨瀦盗랾雩儑爙䔲傞ꛦ傞ꢂ +捷掐傞ꢂ
⚂䒓㨤捌䭽撑⟄♴姿낢〳鵳遤霃縨 㥵 3猲ꛦⰻ♶鵳遤霃
㹁ⴭ♶ⱄ捌կ

1368274-T01-A
-10-
1. Touch adjustment button to set the end time, When short
pressing, the minute digit increment is 1; when long pressing
for 2 seconds, the minute digit increment is 5; when long
pressing for over 5 seconds, the hour digit increment is 1.
2. Finally touch to start operation and enter the reservation
state. If additional parameters need to be set at this point,
this setting value takes effect by default.
x After setting is complete, you can press the start button to
start and enter the reservation waiting state.
x In the reservation waiting state, the display screen shows
the operation time and the reserved end time alternately
ƀKEMGTKPICPFVJGQRGTCVKQPVKOGKEQP and the
reservation icon CNUQƀKEMGTU[PEJTQPQWUN[
x When the reserved start time is reached, the display screen
time digital tube requests to display the operation time and
the operation time icon , and the reservation icon
turns off.
7.1.5 Cancel Reservation
1. When the reservation is valid and the reservation waiting
state is not entered with the button not pressed, you can
touch the button to adjust the time to the current clock
time + the baking time; when you press the start button
, the reservation end time icon disappears;
2. In the reservation waiting state, you need to press for
1.5 seconds to cancel the reservation function.
7.2 The Use of the Water Tank
(with steam function)
In the initial state, the transparent water tank is placed in
position, a "beep" sound is heard, and the water level indicator
turns off to show . If the water level in the water tank is
insufficient and the pump cannot pump water to the oven, it
will show . At this point, the system will not be able to
work properly. Please add water to the
“
MAX
”
position on the
water tank (The water tank can store water up to 1.2L, which is
generally for cooking once, about 60-70 minutes).
Note:
1. When adding water, please remove the water tank and fill
it with water through the small flap hole at the top of the
water tank. Please be careful not to overflow the water. It is
dangerous when the water overflows.
2. If you want to add water while the oven is working, open the
oven door. Do not directly pull the water tank out. Be careful
not to be scalded by the steam. It is recommended to leave
the oven door open for a while (5-10 seconds) before taking
the water tank out and adding water.
1. 鍘䷫靈侮䭽ꝶ 勻霃㹁絕勲傞ꢂ〫靈蒜ⴔꛦ⡙
瀊䭽ⴔꛦ⡙姿鵳⚹ 1, ⴔꛦ忘 60 ⴔꛦ㼭傞⡙鵳 1
䭽 2猲ⴔꛦ⡙姿鵳⚹ 5 䭽 5猲⟄♳ⴭ㼭傞⡙姿鵳⚹ 1կ
2. 剒た鍘䷫ ⸓鵘遤鵳Ⰶ곫紨朐䙖㥵卓姼傞銳霃縨Ⱖ
➭侨ⴭ랾雩姼霃㹁⧩欰佪կ
x 㖈霃縨㸤䧭た〳䭽⸓ꝶ⸓鵳Ⰶ곫紨瘝䖉朐䙖կ
x 㖈瘝䖉곫紨朐䙖儑爙㾓儑爙䊨⡲傞ꢂ♸곫紨絕勲傞ꢂ❜剏捌
䊨⡲傞ꢂ㕃叻 ♸곫紨㕃叻 ⛲ず姿捌կ
x 곫紨䒓㨤傞ꢂ鴪ⵌ傞儑爙㾓傞ꢂ侨瀦盗銳宠儑爙䊨⡲傞ꢂ♸䊨
⡲傞ꢂ㕃叻 곫紨㕃叻 擆抣կ
7.1.5 곫紨》嶊
1. 㖈곫紨剣佪罜劢䭽⸓ 䭽ꝶ劢鵳Ⰶ곫紨瘝䖉朐䙖傞〳
鍘䷫ 䭽ꝶ靈侮傞ꢂ⚹䔲傞ꛦ傞ꢂ +捷掐傞ꢂ 䭽♴
⸓䭽ꝶ 곫紨絕勲傞ꢂ㕃叻 嶊㣟
2. 곫紨瘝䖉朐䙖䭽 1.5 猲䩞腊》嶊곫紨⸆腊կ
7.2 宐盲涸⢪欽䌄襒导⸆腊垷䒭
宐ⴲ㨤朐䙖♴鷳僈宐盲佞㖈坵⡙♳ゑⵌ涸♧㡮宐⡙䭷
爙抧抣䭷爙 㥵卓宐盲ⰻ宐⡙♶駈宐岹䬄♶ⵌ宐ⵌꝍ拝
ⴭ⠔儑爙緃宐䭷爙 禹絡偽岁姻䌢䊨⡲姼傞霼⸈宐⸈
宐荛宐盲♳涸MAX⡙縨宐盲剒㣐⪰宐 1.2L♧菚〫㢿♧妃
掱껋㣐紨 60-70 ⴔ ꛦ կ
岤䠑
1. ⸈宐傞霼㼜宐盲》ⴀ鷳鵂宐盲곝鿈涸㼭缺渷㶰岤宐霼岤
䠑宐♶銳形ⴀ形宐⽭ꤗկ
2. 㖈䊨⡲鵂玐⚥⸈宐傞䩧䒓拝꡶霼⺡湬䱹》ⴀ宐盲㼭䗱
襒导掘⠟䒊雳䝠䩧䒓拝꡶♧⠔⯄5-10 猲ⱄ㼜宐盲》ⴀ
⸈宐կ

1368274-T01-A -11-
8 FUNCTION MENU
8.1 Function Selection
When the steam oven is standby, press the power ON/OFF
button to activate the display, and select the corresponding
working mode.
8.2 All Steam
Touch function button , the button is highlighted, the time
digital tube of the display shows 02: 00. The default mode
temperature of this mode is 100 oC, which is not shown on
the temperature digital tube and cannot be adjusted. Touch
the time button , then touch the adjustment button for
time adjustment. You can also press the button without
adjustment to start operation.
8.3 Barbecue Cook
Touch function button , and the button is highlighted,
showing the default temperature 180 oC of this mode and time
of 02: 00 h. Temperature and time of this mode can be adjusted
by touching the temperature button or time button .
Finally, press button to start cooking, or you can press the
button directly without adjustment to start cooking.
8.4 Barbecue with Steam Cook
Touch function button , and the button is highlighted,
showing the default temperature 180 oC of this mode and time
of 02: 00 h. Temperature and time of this mode can be adjusted
by touching the temperature button or time button .
Finally, press button to start cooking, or you can press the
button directly without adjustment to start cooking.
8.5 Defrost
Touch function button , the button is highlighted, no default
temperature, showing the time of this mode 01: 00 h. Time of
this mode can be adjusted by touching the time button . Finally,
press button to start operation, or you can press the
button directly without adjustment to start operation.
8.6 Ferment
Touch function button , the button is highlighted, no icon is
shown on the display screen, only the default time 01:00 flickers.
At this point, time can be adjusted through the adjustment button
. You can also press the button without adjustment to
start operation.
8.7 Reheat Sterilization Mode
Touch function button , the button is highlighted, no icon is
shown on the display screen, only the default time 01:00 flickers.
At this point, time can be adjusted through the adjustment button
8 ⸆腊蝲⽀
8.1 ⸆腊鷥䭊
㖈䖉劼朐䙖♴䭽♴ 䒓Ⱒ劼ꝶ慨崞儑爙㾓鷥䭊湱䎾涸䊨
⡲垷䒭
8.2 Ⰼ襒导⸆腊
鍘䷫⸆腊䭽ꝶ 䭽ꝶ넞❭儑爙㾓傞ꢂ侨瀦盗儑爙 02:00
霪垷䒭랾雩庛䏞⚹ 100 䏞⡎僽庛䏞侨瀦盗♶儑爙庛䏞⧩⚂庛
䏞♶腊靈侮鍘䷫傞ꢂ䭽ꝶ 搬た鍘䷫靈侮䭽ꝶ 鵳遤傞
ꢂ靈侮⛲〳⟄♶鵳遤靈侮湬䱹䭽♴ ꝶ䒓㨤䊨⡲կ
8.3 掔掐掱껋⸆腊
鍘䷫⸆腊䭽ꝶ 䭽ꝶ넞❭랾雩ⴀ梡霪垷䒭涸庛䏞 180 䏞
傞ꢂ 02:00h鍘䷫庛䏞䭽ꝶ 䧴罏傞ꢂ䭽ꝶ 〳⟄㼆垷䒭
涸庛䏞⟄⿺傞ꢂ鵳遤靈侮剒た䭽♴ ꝶ䒓㨤䊨⡲⛲〳⟄♶
鵳遤靈侮湬䱹䭽♴ ꝶ䒓㨤䊨⡲կ
8.4 掔掐䌄襒导掱껋⸆腊
鍘䷫⸆腊䭽ꝶ 䭽ꝶ넞❭랾雩ⴀ梡霪垷䒭涸庛䏞 180 䏞
傞ꢂ 02:00h鍘䷫庛䏞䭽ꝶ 䧴罏傞ꢂ䭽ꝶ 〳⟄㼆垷䒭
涸庛䏞⟄⿺傞ꢂ鵳遤靈侮剒た䭽♴ ꝶ䒓㨤䊨⡲⛲〳⟄♶
鵳遤靈侮湬䱹䭽♴ ꝶ䒓㨤䊨⡲կ
8.5 鍒ⲏ⸆腊
鍘䷫⸆腊䭽ꝶ 䭽ꝶ넞❭偽랾雩庛䏞랾雩ⴀ梡霪垷䒭傞
ꢂ01:00h鍘䷫傞ꢂ䭽ꝶ〳⟄㼆垷䒭涸傞ꢂ鵳遤靈侮剒た䭽♴
ꝶ䒓㨤䊨⡲⛲〳⟄♶鵳遤靈侮湬䱹䭽♴ ꝶ䒓㨤䊨⡲կ
8.6 〄ꃋ⸆腊
鍘䷫⸆腊䭽ꝶ 䭽ꝶ넞❭儑爙㾓偽㕃叻儑爙〫儑爙랾雩
傞ꢂ⚹ 01:00 捌姼傞〳⟄鸑鵂靈侮䭽ꝶ 鵳遤傞ꢂ靈侮
⛲〳⟄♶鵳遤靈侮湬䱹䭽♴ ꝶ䒓㨤䊨⡲կ
8.7 ⱄ掚勄蝒垷䒭⸆腊
鍘䷫⸆腊䭽ꝶ 䭽ꝶ넞❭儑爙㾓偽㕃叻儑爙〫儑爙랾雩
傞ꢂ⚹ 01:00 捌姼傞〳⟄鸑鵂靈侮䭽ꝶ 鵳遤傞ꢂ靈侮
杀菌模式功能
Sterilization Mode

1368274-T01-A
-12-
. You can also press the button without adjustment to
start operation.
8.8 Descale
As steam is generated, certain scale will be formed in the steam
generator over time. The system will automatically remind you
of descaling based on the water hardness and use frequency.
In the standby state, the descaling alert icon flickers on
the machine screen, and at the same time the start button
starts to flicker, indicating that only the start button is valid while
all other buttons are invalid with a sound indicating invalidation
when touched.
Manual descaling: long press the steam mode button for 1.5
seconds to enter the descaling mode.
Note:
1. When the descaling button is pressed, the descaling mode
can be quited any time before pressing the start button (press
the descaling mode button again or press the power ON/
OFF button to quit).
2. The descaling alert icon disappears after descaling.
1) Water hardness level setting:
In the standby state, press and hold the upper and lower parts
of the adjustment button for 1.5 seconds to enter the water
hardness level setting, and the LED time digital tube H1 starts to
highlight and flicker. At this point, you can touch the adjustment
button to adjust the water hardness level. If no operation is
performed after 3 seconds, the system will return to the standby
state. Or when the setting is done, you can press the start button
to confirm and return to the standby state.
Water hardness level
宐炽䏞瘝紩
Continuous use time
鵶絯⢪欽傞ꢂ
H0 (hard water)
H0炽宐
2 months
2⚡剢
H1 (default) (moderately hard water)
H1랾雩⚥宐
4 months
4 ⚡剢
H2 (soft water)
H2鲱宐
6 months
6⚡剢
2) Descaling working principle:
Stage 1: Soak once with descaling solution
The descaling icon blinks, prompting the user to descale.
After pressing for confirmation, the icon keeps on,
and the icon and time digital tube show 0.5L while blinking,
prompting the user add 0.5L descaling solution into the water
tank. After the water tank is reset, the icon turns off, 0.5L
disappears, and the time digital tube of the display shows
00:30h. The pump starts to draw water into the oven until the
high water level switch detects the signal. The pump stops
drawing water, and the oven will be soaked for 30 minutes.
⛲〳⟄♶鵳遤靈侮湬䱹䭽♴ ꝶ䒓㨤䊨⡲կ
8.8 ꤑ㘻⸆腊
歋✵剣襒导❡欰襒导〄欰㐼ꅽ歋✵傞ꢂ涸䲀獴⠔䕎䧭♧㹁涸宐
㘻呏䰘宐炽䏞⟄⿺欽䨪⢪欽곸桧禹絡鵳遤荈⸓䲿ꄀ㖈䖉劼
朐䙖♴劼㐼儑爙㾓♳ꤑ㘻䲿ꄀ㕃叻 捌ず傞⸓ꝶ
䒓㨤捌➿邍鵯猫朐䙖♴〫剣⸓ꝶ剣佪Ⱖ➭䭽ꝶ㖲偽佪
鍘䷫Ⱖ➭䭽ꝶ〄ⴀ偽佪갉կ
䩛⸓ꤑ㘻 䭽襒导垷䒭䭽ꝶ 1.5 猲鵳Ⰶꤑ㘻垷䒭կ
岤
1. 䭽♴ꤑ㘻ꝶ㖈劢䭽⸓ꝶ鿪〳⟄鷍ⴀꤑ㘻垷䒭ⱄ妃䭽
ꤑ㘻垷䒭䭽ꝶ鷍ⴀ䧴僽䭽䒓Ⱒ劼ꝶ鷍ⴀկ
2. 䲿爙ꤑ㘻㕃叻 㖈ꤑ㘻絕勲た嶊㣟կ
1宐炽䏞瘝紩霃縨
䖉劼朐䙖♴ず傞䭽靈侮䭽ꝶ涸♳ծ♴ꝶ⥂䭯 1.5 猲鵳Ⰶ宐炽䏞
瘝紩霃縨LED 傞ꢂ侨瀦盗 H1 䒓㨤넞❭捌姼傞〳鍘䷫靈侮
䭽ꝶ 靈侮宐炽䏞瘝紩3猲た偽乼⡲㔐ⵌ䖉劼朐䙖䧴罏僽
霃縨㸤䧭た䭽⸓ꝶ烁雩䎇㔐ⵌ䖉劼朐䙖կ
2ꤑ㘻䊨⡲⾲椚
痦♧媯 ⢪欽ꤑ㘻巊嵵岙 1妃
ꤑ㘻㕃叻 捌䲿爙欽䨪ꤑ㘻䭽♴ 烁雩た㕃叻
䌢❭㕃叻ㄤ傞ꢂ侨瀦盗儑爙 0.5L ず傞捌䲿ꄀ欽䨪岤
Ⰶ0.5L 涸ꤑ㘻很巊荛宐盲宐盲㢕⡙た 㕃叻♶❭0.5L
嶊㣟儑爙㾓傞ꢂ侨瀦盗儑爙 00:30h宐岹䒓㨤䬄宐ⵌꝍ拝ⰻ
湬荛넞⡙宐䒓Ⱒ唬崵ⵌ⥌〿⨢姺䬄宐嵵岙 30 ⴔꛦ

1368274-T01-A -13-
Stage 2: Rinse twice with clear water
When the 30-minute countdown is over, the draining pump starts to
draw water back to the water tank. The drainage stops 50 seconds
after the low water level switch detects the signal. The buzzer gives
a long beep for prompting, lasting 2 seconds. The temperature
digital tube shows “CH H20”(prompting the user to replace water)
with the icon blinking. After the water tank is reset, “CH H20”
disappears. The icon turns off while only the icon keeps
on on the screen. The pump automatically starts to draw water.
The drainage starts 5 seconds after the pump stops drawing
water. The drainage stops 50 seconds after the low water level
switch detects the signal. After the drainage, the buzzer gives
a long beep for prompting, lasting 2 seconds. The temperature
digital tube shows
“
CH H20
”
(prompting the user to replace
water). Then the rinse repeats once.
Stage 3:
After rinsing twice, the time digital tube of the display shows
“
End
”
and the buzzer gives 2 beeps in 1 minute every other 1 second.
10 seconds later, the buzzer stops automatically.
Notes:
1. When the pump starts to draw water in the descaling function,
it must be ensured that the last drainage has been completed,
otherwise perform drainage before drawing water.
2. The descaling and the rinsing can be performed whether the
oven door is open or closed.
3. When pumping water, the upper digital tube shows
“
H20
”
and the lower digital tube shows
“
In
”
.
When draining water, the upper digital tube shows
“
H20
”
and the lower digital tube shows
“
out
”
.
When prompting to replace water, upper digital display
“
CH
”
,
lower digital display
“
H20
”
.
8.9 Recipe
Touch function button , and the button is highlighted, the
recipe icon shown on the display screen. At this point, you can
adjust the recipe through the adjustment button . The default
time button flickers. Touch the time button , and the time
can be adjusted through the adjustment button . You can
also press the button without adjustment to start cooking.
No. Function Icon
⸆腊㕃叻
Function Description
⸆腊䲽鶣
Default Weight (g)
랾雩ꅾꆀg
Default Temperature (oC)
랾雩庛䏞˫
Default Time
랾雩傞ꢂ
Time range (hour)
傞ꢂ薴㔵㼭傞
1Meat
聘碫 500g 100 (not displayed)
100♶儑爙
1 hour
1㼭傞 00:00-10:00
2Fish
됎碫 500g 100 (not displayed)
100♶儑爙
30 minutes
30 ⴔꛦ 00:00-10:00
3Poultry
猐碫 500g 100 (not displayed)
100♶儑爙
1 hour
1㼭傞 00:00-10:00
4Vegetable
詪蝲碫 500g 100 (not displayed)
100♶儑爙
10 minutes
10 ⴔꛦ 00:00-10:00
5Snack
挿䗱 500g 100 (not displayed)
100♶儑爙
30 minutes
30 ⴔꛦ 00:00-10:00
痦✳媯 ⢪欽幡宐怓峤 2妃
30 ⴔꛦ⦝雦傞絕勲た䱗宐宐岹䒓㨤䊨⡲䪾宐䬄㔐宐盲䱗宐
唬崵ⵌ⡛宐⡙䒓Ⱒた䒁傞 50 猲た⨢姺䱗宐踡뚅㐼䲿爙갉ㆇ饰
忹------- 갉䭯絯 2猲庛䏞侨瀦盗儑爙 CH H20䲿ꄀ欽䨪
刿䰃幡宐 㕃叻捌宐盲㢕⡙たCH H20 嶊㣟
㕃叻♶❭㾓䍋〫剣㕃叻 䌢❭宐岹荈⸓䒓㨤䬄宐
䬄宐絕勲 5猲た荈⸓䒓㨤䱗宐䱗宐唬崵ⵌ⡛宐⡙䒓Ⱒた䒁傞 50
猲た⨢姺䱗宐䱗宐絕勲た踡뚅㐼䲿爙갉ㆇ饰忹 ------- 갉䭯
絯2猲庛䏞侨瀦盗儑爙 CH H20䲿ꄀ欽䨪刿䰃幡宐ꅾ㢕怓
峤1妃
痦♲媯
怓峤 2妃た儑爙㾓傞ꢂ侨瀦盗儑爙 End, 踡뚅㐼ㆇ饰 ,1 ⴔꛦ忹
忹2㡮ꢂꥬ 1猲踡뚅♧妃䭯絯 10 猲た荈⸓⨢姺踡뚅կ
霹僈
1. ꤑ㘻䒓㨤鵳遤䬄宐傞䗳곢烁⥂♳♧妃䱗宐䊺絕勲やⴭ⯓
鵳遤䱗宐ⱄ䬄宐կ
2. 㖈䩧䒓꡶ㄤⰢ꡶朐䙖ꤑ㘻ծ怓峤鿪〳⟄䊨⡲
3. 䬄宐傞♳侨瀦盗儑爙 H20♴侨瀦盗儑爙 In
䱗宐傞♳侨瀦盗儑爙 H20♴侨瀦盗儑爙 out
䰃宐䲿ꄀ♳侨瀦盗儑爙 CH♴侨瀦盗儑爙 H20
8.9 蝲靶⸆腊
鍘䷫⸆腊䭽ꝶ 䭽ꝶ넞❭儑爙㾓蝲靶㕃叻❭饰姼傞〳⟄
鸑鵂靈侮䭽ꝶ 鵳遤蝲靶靈侮랾雩傞ꢂ䭽ꝶ捌鍘䷫傞ꢂ
䭽ꝶ 搬た〳⟄鸑鵂靈侮䭽ꝶ 鵳遤傞ꢂ靈侮⛲〳⟄♶
鵳遤靈侮湬䱹䭽♴
ꝶ䒓㨤䊨⡲կ

1368274-T01-A
-14-
6Yogurt
ꃑ㥗 --------- 40 (not displayed)
40♶儑爙
5 hours
5㼭傞 00:00-10:00
7Rice
碛껎 250g 100 (not displayed)
100♶儑爙
30 minutes
30 ⴔꛦ 00:00-10:00
8Hot towel
掚嬁䋌 --------- 70 (not displayed)
70♶儑爙
10 minutes
10 ⴔꛦ 00:00-10:00
9 RECOMMENDED RECIPES
Mode
垷䒭
No.
䎸〿
Food
굹暟
Weight
ꅾ ꆀ g
Vessel used/position
⢪欽㺂㐼 /⡙縨
Set temperature (˫)
霃㹁庛䏞˫
Preheating
or not
곫掚♸や
Cooking time (minute)
掱껋傞ꢂⴔꛦ
Steam mode
襒导垷䒭
1Steamed sausage
襒臢肃 500 Perforated griddle plate/2
䌄㶰掐渹 /2 yes 30-40
2Steamed bacon
襒臢聘 500 Perforated griddle plate/2
䌄㶰掐渹 /2 yes 20-30
3Chicken leg
뚃艙 1000 Perforated griddle plate/2
䌄㶰掐渹 /2 yes 31-36
4Chicken
뚃聘 1000 Perforated griddle plate/2
䌄㶰掐渹 /2 yes 35-40
5Crucian carp
됽됎 500 Shallow plate/2
崯渹 /2 yes 18-25
6Grass carp
虊됎 1000 Shallow plate/2
崯渹 /2 yes 35-40
7Clam
蔄跷 500 Perforated griddle plate/2
䌄㶰掐渹 /2 yes 25-30
8Shrimp
赢500 Perforated griddle plate/3
䌄㶰掐渹 /3 yes 15-20
9Steamed broccoli
幡襒銯Ⱎ蔄 500 Griddle plate/2
掐渹 /2 yes 8-20
10 Steamed carrot
幡襒脋蠄⽋ 500 Perforated griddle plate/2
䌄㶰掐渹 /2 yes 20-30
11
Steamed potato shreds
幡襒㕼鞝⚏ 300 焇㶩 /2 yes 25-30
12 Steamed Dutch bean
幡襒蚚Ⱎ鞝 500 Griddle plate/2
掐渹 /2 yes 10--15
13 Steamed asparagus
幡襒蓧疡 250 Glass bowl/2
梯槴烽 /2 yes 20-25
14 Steamed egg
襒跗
1
piece
Glass bowl/2
梯槴烽 /2 yes 15-25
15 Rice
碛껎 200 Shallow plate/2
崯渹 /2 yes 40-45
16 Boiled dumpling
宐껛 300 Perforated griddle plate/2
䌄㶰掐渹 /2 yes 20-30
17
Quick-frozen
steamed bread
鸟ⲏ껳㣢
500 Perforated griddle plate/2
䌄㶰掐渹 /2 yes 15-25
18
Quick-frozen
steamed stuffed buns
鸟ⲏ⺫㶩
500 Perforated griddle plate/2
䌄㶰掐渹 /2 yes 15-25
19
Steamed bread with
TCYƀQWT
欰껳㣢
500 Perforated griddle plate/2
䌄㶰掐渹 /2 yes 30-35
20
Steamed stuffed
DWPUYKVJTCYƀQWT
欰⺫㶩
500 Perforated griddle plate/2
䌄㶰掐渹 /2 yes 30-35
Barbecue
mode
掔掐垷䒭
21 Sliced bread
⺫晙
12
slices
Grill/2
掐卹 /2 230 yes 3-11
9 䲀虛蝲靶
100
100
100
100
100
100
100
100
100
100
100
100
100
100
100
100
100
100
100
100
200

1368274-T01-A -15-
Barbecue
mode with
steam
掔掐垷䒭䌄
襒导
22 Fish block
됎㗌 500 Perforated griddle plate/2
䌄㶰掐渹 /2 200-230 yes 20-35
23 Pork slices
枽聘晙 200 Perforated griddle plate/2
䌄㶰掐渹 /2 180-230 yes 15-35
24 Sliced bread
⺫晙
12
slices
Grill/2
掐卹 /2 230 yes 3-8
25 Half chicken
⼱〫뚃 500 Grill/2
掐卹 /2 180-220 yes 35-60
10INTERRUPT FUNCTION
10.1 Stop or Cancel Cooking
Press the start/pause button to stop the function that is
currently working.
Open the door and suspend the function currently in operation
(this is not recommended as it will result in a large amount of
steam pouring out of the oven tank). The oven will resume to
working after the door is closed.
Press and hold the standby function button to cancel the
program.
Note: As the oven has a certain air pressure, if you need to
open the oven door, a certain distance needs to be kept
from the steam oven to ensure that you will not get injured
by the steam.
10.2 Adjust Parameters
10.2.1 Modify Baking Time
After the function starts to work, if the baking time needs to
be modified, you need to short press the button to pause
the current operation mode. Then touch the time button ,
and the corresponding button lamp lights up. The baking time
icon flickers on the display screen. The time digital tube
is highlighted and starts to flicker. Touch the adjustment button
to adjust the baking time. Then, press the start/pause button
to make the oven resume to working.
10.2.2 Modify Baking Temperature
After the function starts to work, if the baking temperature
needs to be modified, you need to short press the button to
pause the current operation mode. Then touch the temperature
button , and the corresponding button lamp lights up. The
temperature digital tube is highlighted and starts to flicker. Touch
the adjustment button to adjust the baking temperature.
Then, press the start/pause button to make the oven resume
to working.
10⚥鸀⨢姺掱껋
10.1 ⨢姺䧴罏》嶊掱껋
䭽♴ 䒓㨤 /兽⨢ꝶ〳⟄⚥鸀⨢姺䔲㖈鵘遤涸⸆腊կ
䬘䒓꡶兽⨢䔲㖈鵘遤涸⸆腊鵯⚡♶䒊雳⢪欽拝胐ⰻ剣㣐
ꆀ襒导ぢ㢪䩣ⴀⰢ♳꡶⠔絩絯䊨⡲կ
䭽 䖉劼⸆腊ꝶ㽠〳⟄》嶊霪玐䎸կ
岤䠑 掐盲Ⱘ剣♧㹁涸导⾓㥵䩧䒓拝꡶銳騈㢴⸆腊襒盲⥂
䭯♧㹁騄猌烁⥂♶⠔鄄襒导䨾霴⠟կ
10.2 靈侮侨
10.2.1 刿佖捷掐傞ꢂ
⸆腊鵘遤䒓㨤た欽䨪銳⥝佖捷掐傞ꢂⴭ銳瀊䭽 ꝶ兽
⨢䔲涸鵘遤垷䒭ⱄ鍘䷫傞ꢂ䭽ꝶ 㼆䎾涸䭽ꝶ抧挿❭
儑爙㾓捷掐傞ꢂ㕃叻 捌傞ꢂ侨瀦盗」넞❭⚂䒓㨤捌
鍘䷫靈侮䭽ꝶ 勻靈蒜捷掐傞ꢂ傞ꢂ霃㹁た䭽♴ 䒓㨤 /
兽⨢ꝶ⸓絩絯䊨⡲կ
10.2.2 刿佖捷掐庛䏞
⸆腊鵘遤䒓㨤た欽䨪銳⥝佖捷掐庛䏞ⴭ銳瀊䭽 ꝶ兽
⨢䔲涸鵘遤垷䒭ⱄ鍘䷫庛䏞䭽ꝶ 㼆䎾涸䭽ꝶ抧挿❭庛
䏞侨瀦盗」넞❭⚂䒓㨤捌鍘䷫靈侮䭽ꝶ 勻靈蒜捷掐庛
䏞庛䏞霃㹁た䭽♴ 䒓㨤 /兽⨢ꝶ⸓絩絯䊨⡲կ
200
180~200
180~200
200

1368274-T01-A
-16-
11CHILD LOCK FUNCTION
The child lock button is used to lock the screen.
Lock: press the child lock button for 1.5 seconds to lock the
screen. In the locked state, the child lock icon lights up
on the display screen, and the child lock button is highlighted;
At this point, if you touch other buttons, the button flickers,
prompting the locked state.
Unlock: In the locked state, press the child lock button for 1.5
seconds to unlock. After unlocking, the child lock button turns off
(30% brightness), and the child lock icon does not light up
either on the display screen.
12MEMORY FUNCTION
12.1 Mode Storage
After the function stops work, the time digital tube 88:88 displays
End. Without touching other buttons, touch the memory button
to store the parameters such as the current baking mode,
the operating time and the temperature. At this point the
temperature digital tube shows C1.C2.C3.C4 (rear alignment),
and tentatively up to 4 programs can be stored. It automatically
displays the serial numbers, and replacing the earliest one
when exceeded. Assuming that no content is currently stored in
C1.C2.C3.C4, a invalid sound is given when the start button is
touched.
During the storage process, long pressing the memory button
will flicker. After the flickering is completed, the storage has
been completed, requiring the display screen to exit the display
and return to the standby state.
12.2 Memory Recall
In the standby interface, after a short pressing , the
memorized menu (default display C1) can be recalled, and the
number can be changed by the adjustment button ; when
the start is pressed, the button lamp turns off (30%
brightness), and the screen works according to the contents
of the memory based on the stored time and temperature until
work is done.
13TEMPERATURE VIEW FUNCTION
After all the modes start operation, during the process of heating
up, the temperature can be viewed by pressing the temperature
button for a short time. The upper digital tube displays the current
probe temperature value in real time, and returns to the display
of set temperature value after 3 seconds. After the temperature
holding process begins, you cannot view the real-time temperature,
i.e. pressing the temperature button is invalid, or pressing the
temperature button shows only the set temperature value.
11留ꝉ⸆腊
留ꝉ䭽ꝶ欽✵ꝉ⡞㾓䍋կ
♳ꝉ 䭽留ꝉ䭽ꝶ 1.5 猲ꝉ⡞㾓䍋㖈ꝉ㹁朐䙖♴儑爙㾓留
ꝉ㕃叻 挿❭⚂留ꝉ䭽ꝶ넞❭ 姼傞㥵卓鍘䷫Ⱖ➭䭽ꝶ傞
䭽ꝶ捌䲿爙ⴀ✵ꝉ⡞朐䙖կ
鍒ꝉ 㖈ꝉ㹁朐䙖♴䭽留ꝉ䭽ꝶ 1.5 猲鍒ꝉ鍒ꝉ絕勲た
留ꝉ䭽ꝶ抧Ⱒ (30% ❭)儑爙㾓留ꝉ㕃叻 ♶❭կ
12雵䗴⸆腊
12.1 垷䒭㶸⪰
㖈⸆腊鵘遤絕勲た傞ꢂ侨瀦盗 88:88 儑爙 End㖈劢䭽⸓Ⱖ
➭䭽ꝶ涸䞔ⲃ♴鍘䷫雵䗴ꝶ 㶸⪰䔲捷掐垷䒭ծ鵘遤傞
ꢂծ庛䏞瘝侨姼傞儑爙㾓庛䏞侨瀦盗儑爙 C1.C2.C3.C4た
㼆룅兽㹁剒㢴〳㶸 4⚡玐䎸 荈⸓儑爙㶸侨곡䎸〿馄ⴀた
䪾剒傍涸♧⚡剏䰃䱈կ⧺霃 C1.C2.C3.C4 䔲尵剣㶸⪰ⰻ㺂ⴭ
鍘䷫⸓䭽ꝶ䫣偽佪갉կ
㶸⪰鵂玐⚥䭽雵䗴ꝶ捌捌㸤䧭た➿邍㶸⪰䊺㸤䧭銳宠儑
爙㾓鷍ⴀ儑爙鵥㔐ⵌ䖉劼朐䙖
12.2 雵䗴靈》
㖈䖉劼歲瀊䭽 た〳靈》䊺雵䗴涸蝲靶랾雩儑爙
C1,〳鸑鵂靈侮䭽ꝶ 佖」侨㶶 㖈䭽⸓ ꝶ擆抣
(30% ❭䏞 )䎇䭽撑㶸⪰涸傞ꢂծ庛䏞䊨⡲㾓䍋⠔䭽雵䗴涸ⰻ
㺂鵳遤䊨⡲湬ⵌ䊨⡲絕勲կ
13庛䏞叅溏⸆腊
㖈䨾剣垷䒭⸓鵘遤た㖈⼮庛鵂玐⚥〳⟄鸑鵂瀊䭽庛䏞鵳遤
庛䏞叅溏♳侨瀦盗㹊傞儑爙䔲涸䱲㣢庛䏞⧩儑爙 3猲た鷍
㔐儑爙霃㹁庛䏞⧩鵳Ⰶ⥂庛鵂玐たⴭ偽岁鵳遤叅溏㹊傞庛䏞
⽰䭽庛䏞ꝶ偽佪䧴罏僽䭽庛䏞ꝶ〫儑爙霃㹁庛䏞⧩կ
存储过程中长按记忆键闪烁,闪烁完成后代表存储已完成,显示屏
退出显示返回到待机状态。

1368274-T01-A -17-
14REPAIR AND MAINTENANCE
Cut off the power supply before cleaning or maintenance of
the steam oven.
In order to extend the service life of the steam oven, please
note the following:
1. The oven tank surface and attached stainless steel parts should
be cleaned with warm water. Do not clean with strong detergent
or strong corrosive agents. Otherwise the stainless steel will
be spotted. For spots that are difficult to remove, clean with a
special cleaning agent available on the market. The cleaned
parts must be rinsed and dried before they can be used.
2. Pour the cleaning agent onto a wet cloth or wipe the inner surface of
the steam oven, then thoroughly scrub it with clean water, and finally
dry it with a soft cloth or an oil tanned leather. Do not use abrasives,
cleaning agent containing chloric acid (e.g., washing powder),
grinding gauze or acid substance (e.g., alkaline detergent) to clean
dishes. Deposits will appear in the steam oven after using for a long
time. Please use soft gauze to remove. A rubber sealing ring is
arranged around the opening of the steam oven. Please check the
usage of the sealing ring regularly. Clean if necessary, but do not
use abrasive products. If the seal ring is damaged, please contact
the nearest after-sales service center. We recommend that you do
not use the steam oven until the sealing ring is repaired.
3. Cleaning agents for descaling are suitable, such as Durgol
or liquid coffee machine cleaning agents. Foam-containing
cleaning agents are not suitable.
4. Do not use vinegar or products containing vinegar, or it will
damage the internal circuits.
5. Avoid the use of abrasive cleaners, such as washing pads,
steel balls, etc., which may damage the surface.
Important: please do not put the water tank into the dishwasher
for cleaning.
15CHANGE THE LIGHT
1. Cut off all power to the steam oven or unplug the power socket.
2. Rotate and remove the bulb cover.
3. Remove the old bulb, and then replace it with a new one.
Voltage: 220 to 240 V
Wattage: 25 W
Model: G9
4. Re-rotate and fix the bulb cover in the original groove to
connect the power supply.
14㢴⸆腊襒盲絶⥝♸⥂Ⱞ
㖈幡峇䧴⥂Ⱞ㢴⸆腊襒盲 銳ⴗ倗歏彂կ
⚹✫䒁㢴⸆腊襒盲涸⢪欽㼑ㄐ 霼岤䠑⟄♴Ⳝ挿
1. 拝胐邍ㄤ꣡⟝♶Ꝑꛩ鿈⟝欽庛宐幡峤ⴗ⺡⢪欽䔂⸂峤
嶷䧴䔂臱赤幡峤կやⴭ♶Ꝑꛩ⠔剣俤挿կ㼆✵䖎ꦼꤑ
涸俤挿㖈䋑㖞♳餝✈⚁欽幡峤幡峤կ幡峤た涸鿈⟝䗳곢
Ȿ峤䎁ⲙ亭䎁た倰腊⢪欽կ
2. 㼜幡峤⦝ⵌ♧㗌弪䋒♳䧴亭䭎㢴⸆腊襒盲ⰻ鿈搬た䕸
䏀欽幡宐亭峤剒た欽鲱䋒䧴屘ꭶꬠ亭䎁կⴗ⺡⢪欽熋瀨碫
ゎ守ꃑ䧭ⴔ幡峇⢾㥵 峤邆磋瘝ծ灇熋紳䋒䧴ꃑ䚍暟餘
⢾㥵 焦䚍寓幡峤渹㶩կ㢴⸆腊襒盲⢪欽䖎傞ꢂ
⠔ⴀ梡㛜獤暟霼欽鲱紳䋒幡ꤑկ㖈㢴⸆腊襒盲䒓〡㔋ワ剣
♧堩脸㺙㼓㕕կ霼㹁劍唬叅㺙㼓㕕涸⢪欽䞔ⲃկ㥵剣䗳銳〳
⟄幡峤⡎ⴗ⺡⢪欽灇熋ⵖㅷ幡峤կ㥵卓㺙㼓㕕䰀㗁霼♸
剒鵛涸㈒た剪⸉⚥䗱翫絞կ䧮⟌䒊雳䝠湬荛㺙㼓㕕⥝㥩た倰
〳⢪欽㢴⸆腊襒盲կ
3. 鷓ざꤑ㘻涸幡峤㥵 Durgol 䧴巊⡤ㄳ㉰劼ꤑ㘻幡峤կ♶
鷓ざ欽ゎ岙屁涸幡峤կ
4. ♶銳⢪欽ꃲ䧴ゎꃲ涸❡ㅷ⠔䰀㹲ⰻ鿈歏騟կ
5. 鼙⯝⢪欽熋瀨㘗幡峇㥵峤巄㙈ꛩ⚏椕瘝〳腊⠔䰀㗁
Ⱖ邍կ
ꅾ銳 霼♶銳㼜宐盲佞Ⰶ峤烽劼幡峤կ
15刿䰃㢴⸆腊襒盲撑僈抧
1. ⴗ倗㢴⸆腊襒盲䨾剣歏彂䧴僽䬬歏彂䳃䏠կ
2. 偒鲮䎇⽸♴抧岙⥂䫡縟կ
3. 䬬♴傊抧岙搬た䰃♳涸倝抧岙կ
歏⾓ 220-240 ⠃
檲侨 25 檲
㘗〿 G9
4. 㼜抧岙⥂䫡縟ꅾ倝偒鲮㔿㹁㖈⾲剣涸⳾坵⚥鵶䱹歏彂կ

1368274-T01-A
-18-
16MALFUNCTION CODE
Malfunction code is displayed on the time digital tube
Error code
ꝡ霴➿瀦
Error description
ꝡ霴䲽鶣
HE1 Open circuit or short circuit of oven core temperature sensor
拝䗱庛䏞⠛䠭㐼䒓騟䧴瀊騟
HE2 Open circuit or short circuit of oven temperature sensor
ꝍ拝庛䏞⠛䠭㐼䒓騟䧴瀊騟
HE3 Communication Failure
鸑⥌ꝡ霴
HE4 Door switch disconnection reminder after pressing the start button
䭽♴⸓ꝶた꡶䒓Ⱒ倗䒓䲿ꄀ
17TROUBLE SHOOTING
Warning: So long as repair is involved, the repair must be
carried out by specialized technical personnel.
The following malfunctions do not require contacting
technical support personnel.
x No display whatsoever!
Check to see if the power is off.
x No response after pressing the button!
Check to see if the child lock is activated.
x The steam oven does not work!
Check whether the plug is inserted properly.
Check whether the steam oven power supply is connected.
Ensure the oven door closes properly and tightly .
Ensure that there is no foreign body stuck between the steam
oven's door and the cavity's front panel.
x Strange noises can be heard when the steam oven is working!
Noise is produced during cooking, such as the water pump of
a steam generator. (These are normal phenomena)
x Food cannot be heated or heated very slowly.
Check whether cooking time and temperature settings are
correctly selected.
The food chunks in the steam oven are too large or too cold.
16佦ꥻ➿瀦
佦ꥻ➿瀦絡♧儑爙㖈傞ꢂ侨瀦盗♳
17佦ꥻ䱗ꤑ
险デ 〫銳嶍⿺ⵌ絶⥝ ♧㹁銳歋⚁⚌䪮助➃プ勻鵳遤絶⥝կ
♴佦ꥻ僽♶銳翫禹䪮助佅䭯➃プ涸կ
x 尵剣⟣⡦儑爙
唬叅歏彂僽や䊺絑Ⱒկ
x 䭽ꝶ⛓た尵剣⟣⡦僥
唬叅留ꝉ僽や䊺絑䒓կ
x 襒盲♶䊨⡲
唬叅䳃㣢僽や䳃㥩կ
襒盲歏彂僽や䱹歏կ
烁⥂꡶姻烁稒㺙Ⱒկ
⥂霆襒盲꡶ㄤ臼⡤匣⛓ꢂ偽䒗暟⽓⡞կ
x 襒盲鵘鲮涸傞⦫腊ゑⵌ㣼䚓涸㐾갉
掱껋鵂玐⚥❡欰涸䊨⡲㐾갉㥵 襒导〄欰㐼涸宐岹臼⡤ⰻ臼
涸襒导⾓⸂❡欰կ鵯❈鿪僽姻䌢梡韌
x 굹暟偽岁⸈掚䧴⸈掚鸟䏞ꬋ䌢䢨կ
鷥掱껋傞ꢂㄤ庛䏞霃縨僽や姻烁կ
佞㖈襒盲ꅽ涸굹暟㗌㣖㣐✫䧴罏僽㣖ⲫ✫կ

1368274-T01-A -19-
x 鸑歏たⰻ鿈撑僈抧♶❭
㥵卓Ⱖ㸐⸆腊姻䌢鵘鲮〳腊僽抧岙抣✫ ♶䕧ㆇ襒盲⢪欽կ
㥵⚗䒙劥❡ㅷ䎾㧆㊤㢅椚䧴❜✵⚁⚌➃プ㢅椚♶䎾ꥥ⤑⚗
䒙⟄⯝㼆梠㞯鸣䧭⽭㹲䧴罏䒸〄Ⱖ㸐⽭ꤗկ
❡ㅷ⚥剣㹲暟餘ゎꆀ涸霹僈
x The internal illuminating lamp does not light up after the
power is switched on!
If other functions are working properly, the bulb may be out; it
does not affect the use of the steam oven.
If it is necessary to discard this product, it should be properly
disposed of or handed over to a professional for disposal. It
should not be discarded casually so as not to cause harm to the
environment.
DESCRIPTION OF CONTENT OF
HAZARDOUS SUBSTANCES IN PRODUCT
Reclaim Indication
When the product exceeds service life or is unable to use after repair, do not throw the product away in the normal trash. Please
FKURQUGVJGYCUVGGNGEVTQPKERCTVUVJTQWIJCSWCNKſGFTGENCOCVKQPGPVGTRTKUG/CMGUWTGVJGRTQFWEVKUJCPFNGFRTQRGTN[
Disposing of product must be done in accordance with the local or national government law.
㔐佐䲿爙
劥❡ㅷ馄鵂⢪欽劍ꣳ䧴罏絑鵂絶⥝偽岁姻䌢䊨⡲た♶䎾ꥥ䠑⚗䒙霼❜歋剣䏑歏㐼歏㶩❡ㅷ㢅椚餴呔涸⟱⚌㢅椚姻烁涸㢅椚倰岁霼
叅ꢓ㕂㹻䧴䔲㖑剣Ⱒ傊歏㐼歏㶩❡ㅷ㢅椚涸錞㹁կ
Statistics of Contents of Toxic or Hazardous Substances or Elements
剣㹲暟餘絡雦邍
Part name
鿈⟝ぜ獦
Toxic or Hazardous Substance or Elements
剣㹲暟餘ぜ獦
Lead (Pb)
꜍(Pb)
Mercury (Hg)
寏(Hg)
Cadmium (Cd)
ꞑ(Cd)
Hexavalent
Chromium
(Cr(VI))
Ⱉ⟟Ꜵ (Cr(VI))
Polybrominated
biphenyls (PBB)
㢴徃翫薅 (PBB)
Polybrominated
Diphenyl Ethers
(PBDE)
㢴徃✳薅ꄍ(PBDE)
Plug
䳃㣢 մմմմմմ
Power cable
歏彂絁 մմմմմմ
Internal connecting
wires
ⰻ鿈鵶䱹絁
մմմմմմ
Heating pipe
⸈掚盗 մմմմմմ
Cooling motor
侔掚歏劼 Ҡմմմմմ
Heat insulation
ſDGT
⥂庛紦絶
մմմմմմ
Glass
梯槴 մմմմմմ
Grill (Tongs)
掐卹䫋䩛 մմմմմմ
This manual suits for next models
1
Table of contents
Other Kohler Oven manuals