Kona Pools ROUND User manual

ROUNDASSEMBLY
Positioning
Toensuremaximumenjoymentandefficiency,considerthefollowingstepswhenselectingthe
desiredlocationofyoupool.
·Selectalocationthatreceivesmaximumsunlightforincreasedheatandextendeduse.
·Selectalocationwithaslittlewindexposureaspossibletominimizeheatloss.
·Beawareoftheamountoftreesandshrubberyaroundyourpooltolimittheamountofdebris.
·Selectalocationwithaccessibilitytowaterandelectricsources.
·Considerprivacywhenselectingalocation.
GroundPreparation
NOTE:PLEASEREVIEWATTACHMENT(#1)FORPOTENTIAL “SOFTGROUND”
INSTALLATIONS.
·Thesurfacethepoolistobeassembledon,mustbefirmandlevel.Thepoolmustbe
installed aslevelaspossible,within2”3”of level(fromthehighestpointtothelowestpoint
ofthe pool).Ifyouaregoingtobe2”–3”offlevel,besuretoinstalltheskimmeronthe
lowerside toensureyouskimmerwillnotsuckairintothepump.
·Ifthegroundisnotlevel,taketheearthfromthehighsideofthesurface;donotaddearthto
thelowerareaofthesurface.
·Oncethesurfaceislevel,clearanydebrisorsharpobjectsthatmaybeuncomfortabletowalk
on,orcouldpotentiallypuncturetheliner.Afoamflooringmaybeaddedunderthelinerfor
additionalcomfort. Seeyourdealerfordetails.
·Thesupportinglegsburdenmuchoftheweightofthepoolandmayneedadditionalsupport
in“softground”installations,orinareasthatmayexperienceexcessgroundwater.A2”x8”
x 22”pieceoflumberinstalledundereachsupportlegandleveledwiththegroundisvery
effective.Makesuretheentirebaseofeachlegisonthe2”x8”lumber;anyoverhangmay
resultinbendingoftheleg.Aconcreteslab(notapaver)ofthesimilardimensionsmaybe
usedaswell.Pleasenotethatanysupport(s)addedunderthepoolstructuremustbesunkso
thatthetopofthesupportislevelwiththegroundsurface.Liftingthelegsorframeinany
mannermaycauseexcessivestressonthelinerandframe,andmayvoidthepoolwarranty.

PartsForAssembly
Yourpooliscomprisedofvariouspartsaccordingtothesizeandmodelselected.Therefore,
beforeproceedingwithinstallation,ensurethatallnecessarypartsarepresent,andgrouplike
parts.
·OneBlueliner(LetterA)w/correspondingnumberofhooks,asstrapsalongbottom
·120cmtubes(LetterB)
·115cmlegs(LetterC)w/onewhitetopcapandtwowhitebottomcapsperleg
·Partsbagcontaininginstructions,gloves,patchkit,andquickdisconnectsprings.
·EachpoolwillcontainthefollowingnumberofpartBandpartCcomponents:13’round
contains10,15’roundcontains12,20’roundcontains16,andthe24’roundcontains19.
PoolAssembly
·Unfoldandspreadoutliner(A)onpreparedarea.
·Align(C)legswithcutoutsattopofliner.Eachlegwillneed(2)bottomcapstoenclosethe
bottomoftheleg&(1)topcap,inwhichthetubes(B)areplaced.
·Slide(B)tubesthroughsleevesattopofliner.
·Connect(B)tubesand(C)legs.Ensurethatthetipsofthe(C)legsarepointingaway
fromtheliner.
·Hook(C)legstostrapsatbottomofliner.Usingtheprovidedhooks,loopthroughthestrap
andthenlineupthetipsofthehookwiththeholesonthefrontofthelegs.
·Whilepoolisfillingmakesurethelegsandtoprailsstayinproperpositionuntilpoolisat
least¼full.
SkimmerAssembly(seeAttachment#2)
·Alignandplacetheskimmerfaceplateonthefrontofskimmerandaffixbyusing
providedscrews.
·AttachtheenclosedSkimmerRailHookbyliningupthehookwithpredrilledholesand
attachingwiththeenclosedNutsandBolts(#13).
·SnapinWeirdoor,addbasketandpushthelidintoplace.Onlyusetheincludedskimmer
plateifusingaVacuumorSuctionCleaningsystem(i.e.Starfish,AquaBug,etc…)
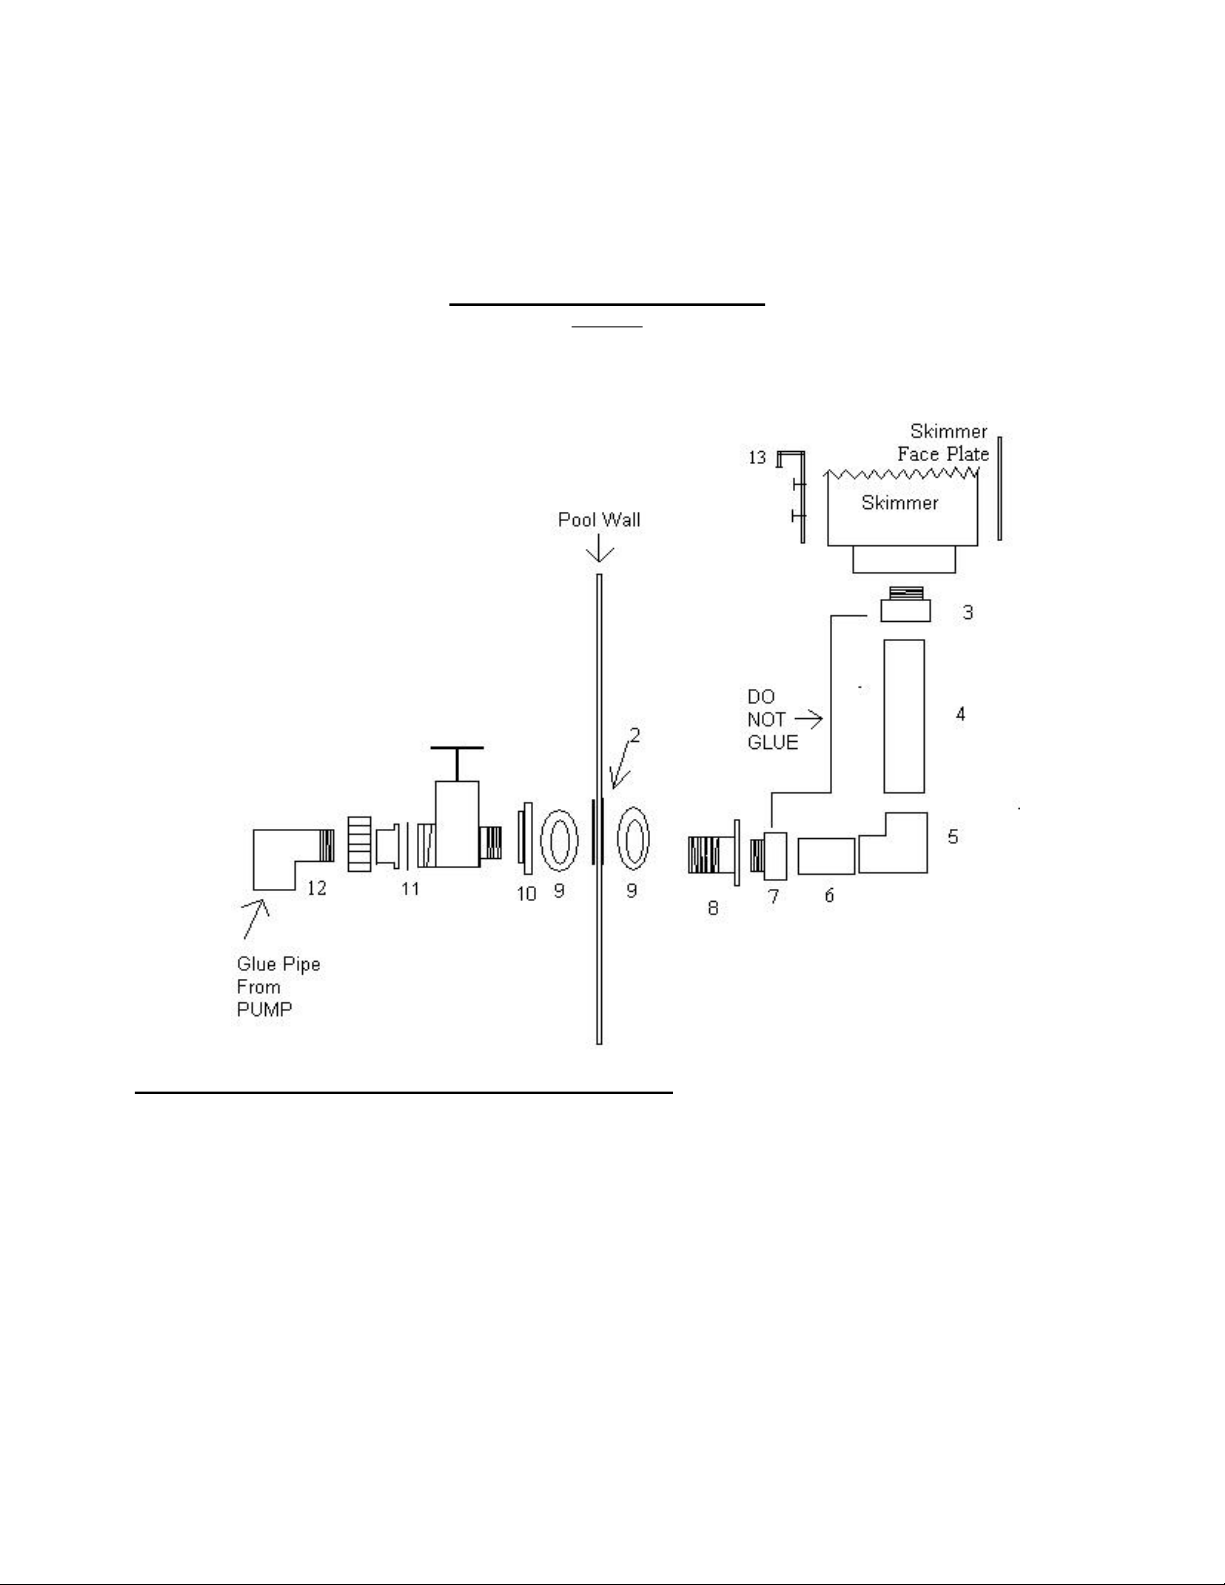
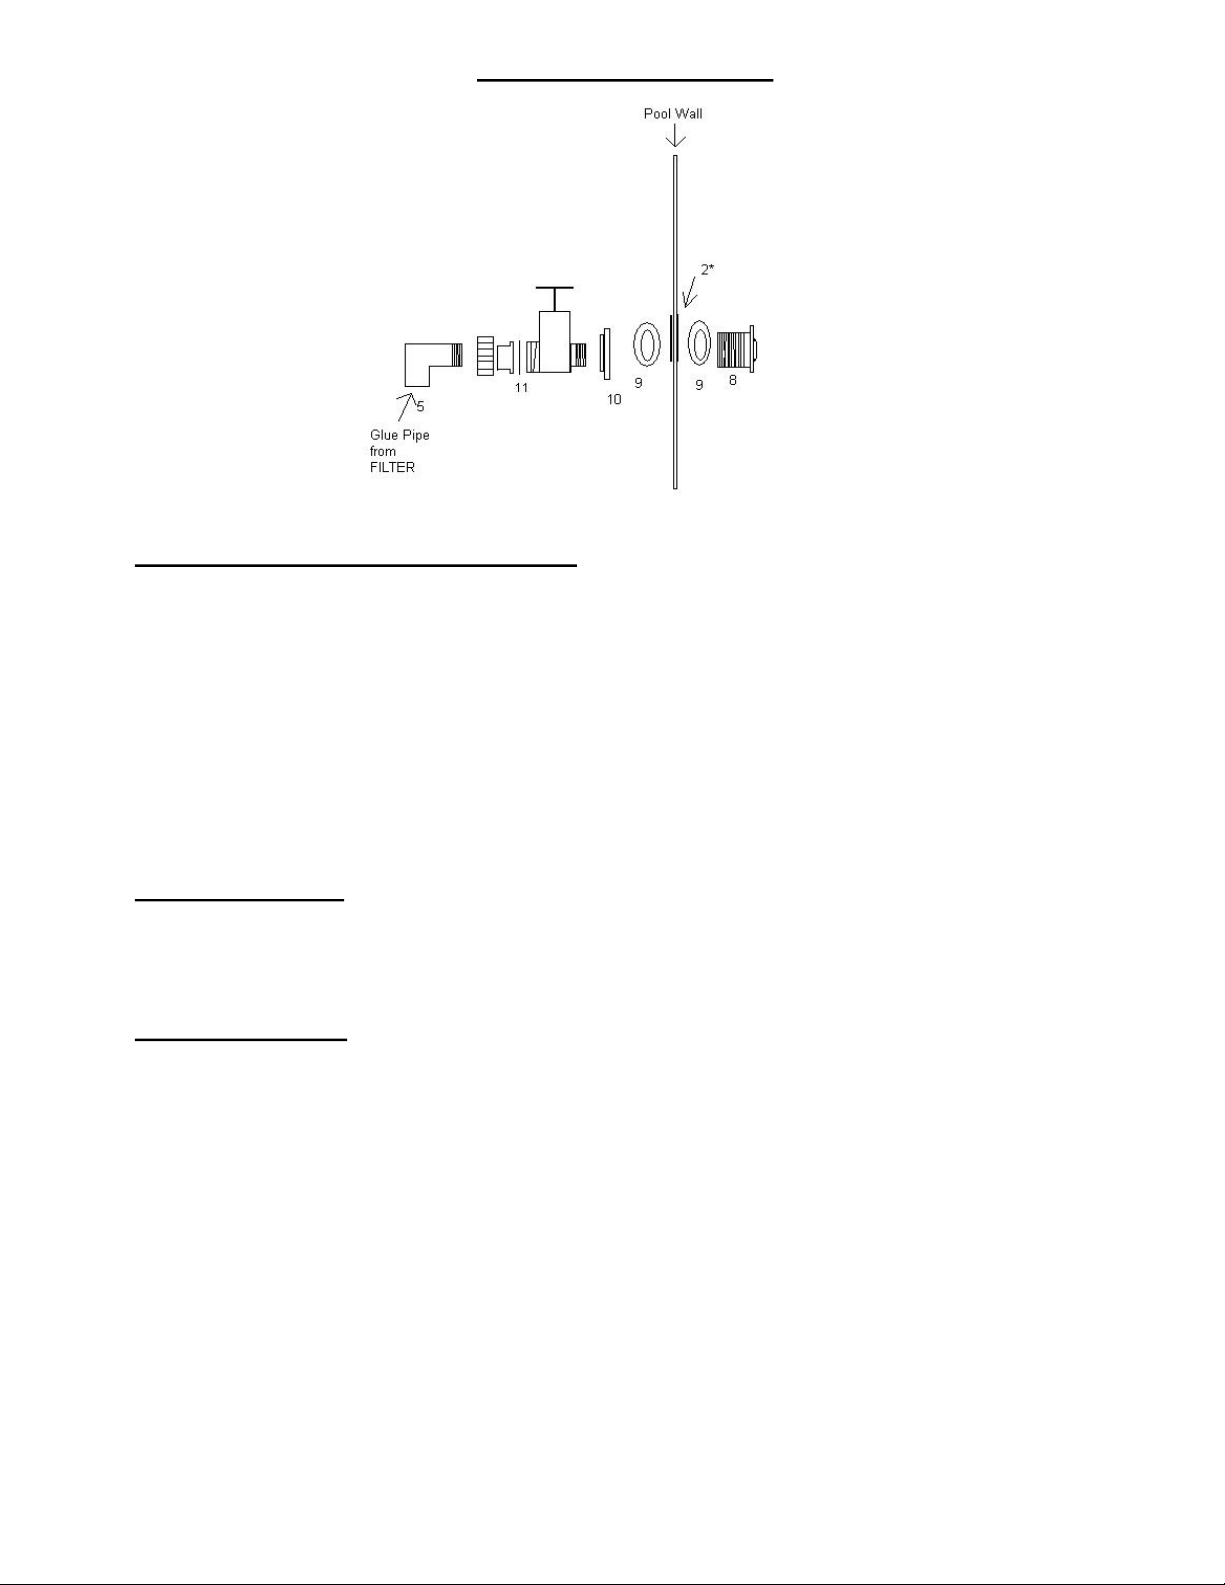
ConnectingSkimmerWallFitting(seeAttachment#2)
·USETHELOWESTPRECUTLINERPORTFORTHESKIMMMER(#2)
·Pushfitting(#8)thruthewallofthepool(#2)fromtheinside.MAKESURETOUSEA
GASKET(#9)onbothsidesofthewallofthepool.Securethewallfittingnut(#10)to
(#8)nowstickingoutofthewallofthepool.Again,makesuretohaveagasket(#9)on
bothsides.Tightenwithalargepairofchannellocks.Makesurethenutisverysnugbut
donotovertighten,asthismaycrackyourfitting.
·ThreadthemaleportionontheMaleAdaptor(#3)intothebottomoftheskimmer.Thread
themaleportionofMaleAdaptor(#7)intothewallfitting(#8).
·Pressthelongerconnectionpipe(#4)intotheskimmerfitting(#3)thenpresstheotherend
ofthepipe(#4)intotheelbowfitting(#5).Presstheshorterconnectionpipe(#6)intothe
elbowfitting(#5)thenpresstheotherendofthepipeintotheMaleAdaptorfitting(#7),

·alreadyinthewallofthepool. Note:Youmayhavetoliftslightlyonskimmertomake
thisconnection.
·Threadtheprovidedslidevalve(#11)intothewallfitting(#10)then;makesurethegasket
isinplaceandtheUnionNutissecurelyfastenedtothebodyofthevalvethen;threadthe
maleportionthethreaded90(#5)intotheTailpieceoftheslidevalve(#11).(Use
providedTeflonTapeonthreadsinthisstep)(seebelow)
Attachment#2
RoundPoolSkimmerDiagram
PartList
● (2)ThreadedMaleAdaptor(#3,7)●8½”ConnectionPipe(#4) ●6½”ConnectionPipe(#6)
● 90˚Elbow(#5) ● WallFitting(#8) ● WallFittingNut(#10)
● (2)WallFittingGaskets(#9) ● Thrd.90˚Elbow (#12)
● SkimmerRailHookw/twoboltandnuts(#13)●SlideValvew/UnionNut,GasketandTailpiece(#11)
ConnectingReturnWallFitting(seeAttachment#3)
·USETHEHIGHESTPRECUTLINERPORTFORTHERETURN(#2)
·Pushfitting(#8)thruthewallofthepool(#2)fromtheinside.MAKESURETOUSEA
GASKET(#9)onbothsidesofthewallofthepool.Securethewallfittingnut(#10)to
threadedportionnowstickingoutofthewallofthepool.Again,makesuretohavea
gasket(#9)onbothsides.Tightenwithalargepairofchannellock.Makesurethenutis
verysnugbutdonotovertighten,asthismaycrackyourfitting.
·Threadtheprovidedslidevalve(#11)intothewallfitting(#10)then;makesurethegasket
isinplaceandtheUnionNutissecurelyfastenedtothebodyofthevalve(#11)then;
threadthemaleportionthethreaded90(#5)intotheTailpieceoftheslidevalve(#11)
(UseprovidedTeflonTapeonthreads)

(Attachment#3)
RoundWallFittingDiagram
PlumbingfromWallFittingstoEquipment
·Threadthetwomaleadaptors(providedwiththeplumbingkit)intoyourequipment
package.Oneintothepumppotandtheotherintothereturnportofthefilter.Thisstep
variesdependingontypeof equipment. Note:Someequipmentmaycomereadytoglue
intoorprovideslipfittingsforyou,thereforetheprovidedadaptorsmaynotbeneeded.
·Cuttheprovided25’offlexiblePVCtolengthmeasuringfromtheskimmerfitting(#12)
tothepumpsideoftheequipmentandthenfromthereturnfitting(#5)tothefiltersideof
theequipment.Usetheprovidedgluetosecuretothefittings.Note:Besuretocutenough
pipesothatthepipelaysontheground.Donotpullthepipetightfrompoolto
equipment.Pressandholdgluedconnectionsforatleast20seconds.
Placartingyourpool
·Placetheincluded(8)nodivingintopool/keepchildrensuperviseatalltimesstickerson
allfoursidesyourpoolontheinsideandoutsidetoprailareaofyourliner.
CaringforyourPool
·Predissolvealldrychemicalsbeforeputtingthemintothepool.Failuretodosomay
resultinbleachingordamagingyourliner.Alwayshaveyourpoolrunningwhenadding
chemicals,liquidordry.
·Keepwaterbalancedwithin
NSPIstandardsforvinyllinerpools(seeyourlocalpooland sparetailerfordetails).
CareofaKonaPoolisthesameasanyAboveGroundVinyl LinedPool.
·Donotleavepoolsetupwhileempty.
·Donotleavepoolfilledwithwaterwithoutproperchemicaltreatmentandpool
maintenance.

·Takethepooldownifinanareawhereharshwinterweatheroccurs.Ifyouonlyclosethe
poolknowthat“Winterizing”isspecifictotheclimatethepoolislocatedin.KonaPools
requirenospecialpreparation fortheoffseason.KonaPoolsaretreatedthesameasany
otherAboveGroundPool.“Winterizing”generallyreferstothetreatmentofthewaterin
thepool,drainingbelowtheportsanddrainingyourequipment,againthepoolitself
requiresnospecial attention.Visityourlocalpoolstoreandtellthemyouwouldliketo
“Winterize”or“Close”yourAboveGroundPoolfortheseason.Theywillabletoget
you whatyouneedandinstructyoubasedonyourlocationsclimate,again seeyourlocal
pool retailerfordetails.
·IfyouDOchoosetowinterize,youmustdrainthepoolbelowallwallfittingsandview
ports(ifapplicable).
·Whenstoringyourpool,thoroughlycleananddrylinerandcarefullyrollup.Storeyour
poolinadrysafeplace.Alwaysstorethehardpartsandthelinerinseparateboxes.
NODIVINGintopool!
KeepchildrensupervisedatALLtimes!
Table of contents
Popular Swimming Pool manuals by other brands

Outside Living Industries
Outside Living Industries ubbink UrbanPool 250x450 - H140 cm Note of assembly

Wilbar
Wilbar Optimum OVAL instructions

Oval
Oval SP493613B instruction manual

edel immersys
edel immersys Birth Pool in a Box Eco instructions

Bestway
Bestway POWER STEEL 56629 manual

GRE
GRE 790098 instruction manual