Konig DL-DANCER250 User manual

DL-DANCER250
MANUAL (p. 2)
Light xture Dancer 250W
MODE D’EMPLOI (p. 13)
Jeu de lumières Dancer 250W
MANUALE (p. 24)
Luminaria Dancer 250W
BRUKSANVISNING (s. 46)
Belysningsarmatur Dancer 250W
MANUAL DE UTILIZARE (p. 57)
Corp de iluminat Dancer 250W
HASZNÁLATI ÚTMUTATÓ (o. 35.)
250 W-os Dancer fényeffektus-vetítő
KÄYTTÖOHJE (s. 41)
Dancer 250W valolaite
GEBRUIKSAANWIJZING (p. 18)
Verlichtingsarmatuur Dancer 250W
ANLEITUNG (s. 7)
Lichteffekt Dancer 250W
MANUAL DE USO (p. 30)
Dispositivo luminoso Dancer 250W
NÁVOD K POUŽITÍ (s. 51)
Světelná konstrukce Dancer 250W
ΕΓΧΕΙΡΙΔΙΟ XPHΣHΣ (σελ. 62)
Συσκευή φωτισμού Χορευτής 250W

2
ENGLISH
INTRODUCTION:
This advanced, DMX controllable multi-color light effect has 14 different rotating gobo patterns. The
250W halogen lamp ensures a room lling effect. This light effect is ideal for permanent installation or
mobile use.
IMPORTANT INFORMATION BEFORE USE:
The DANCER250 is not for household use. It is not a toy: it presents risks of serious injury due to
electric shock, high heat, and intense light. For safe operation, read this manual before using the
xture and observe all warnings and precautions printed here and on the xture. If you have questions
about how to operate the xture safely, please contact your König distributor or dealer.
Precautions:
• For protection against dangerous electric shock, the xture must be grounded (earthed). The AC
mains supply shall be tted with a fuse or circuit breaker and ground-fault protection.
• The xture operating voltage is printed on the rating label. Verify that the operating voltage closely
matches the AC supply voltage before connecting the xture. Do not connect the xture if the
voltage on the label differs from the AC mains voltage by more than ve percent.
• Verify that all used power cables are undamaged and rated for the current requirements of all
connected devices before use.
• There are no user serviceable parts inside except the lamp. Refer for all service to a qualied
technician.
• Replace the lamp if it becomes defective or worn out. Allow the xture to cool for 15 minutes before
installing a new lamp and make sure the xture is disconnected from the AC mains supply.
• Keep all combustible materials (for example fabric, wood, paper) at least 50cm (20 inches) away
from the xture. Keep ammable materials well away from the xture.
• Provide a minimum clearance of 10cm (4 inches) around the fan and air vents.
• When suspending the xture above ground level, verify that the structure can hold at least
10 times the weight of all installed devices and secure the xture with an approved safety cable.
Block access below the work area whenever installing or removing the xture.
• When carrying the xture, lock the mounting bracket securely and do not touch the lens or mirrors.
• Do not expose the xture to rain or moisture.
• Do not illuminate surfaces within 1 meter (39 inches) of the xture.
• Do not operate the xture if the ambient temperature exceeds 40°C (104°F).
• Never place lters or other objects over the lens or mirrors.
Important! Electric dimmers may damage the electronic components.
Although the DANCER250 cannot be dimmed, it may be switched on and off remotely using switch
packs or the full-on and full-off levels on dimmer packs.
INSTALLATION:
The best way to hang the DANCER250 is to use a rigging clamp. Bolt the clamp securely to the
mounting bracket. Verify that the structure can hold at least 10 times the weight of all installed devices
and secure the xture with an approved safety cable. Change to the desired angle by adjusting the
mounting bracket and tighten both swivel locks.
Install the xture at least 50cm (20 inches) away from combustible materials. Keep ammable
materials well away from the xture. Make sure the xture does not illuminate surfaces within 1 meter
(39 inches).
To ensure maximum lamp life, provide a minimum clearance of 10cm (4 inches) around the fan and air
vents. Make sure the ambient temperature will not exceed 40°C (104°F) and do not place the xture
on or nearby a loudspeaker.
3
OPERATION:
Read “IMPORTANT INFORMATION BEFORE USE” rst and verify all precautions are fullled before
operating.
Make sure the correct lamp is installed, read “SERVICE” on how to (re)place the lamp.
Although the DANCER250 cannot be dimmed, it may be switched on and off remotely using switch
packs or the full-on and full-off levels on dimmer packs. Disconnect the xture from AC power when
not in use.
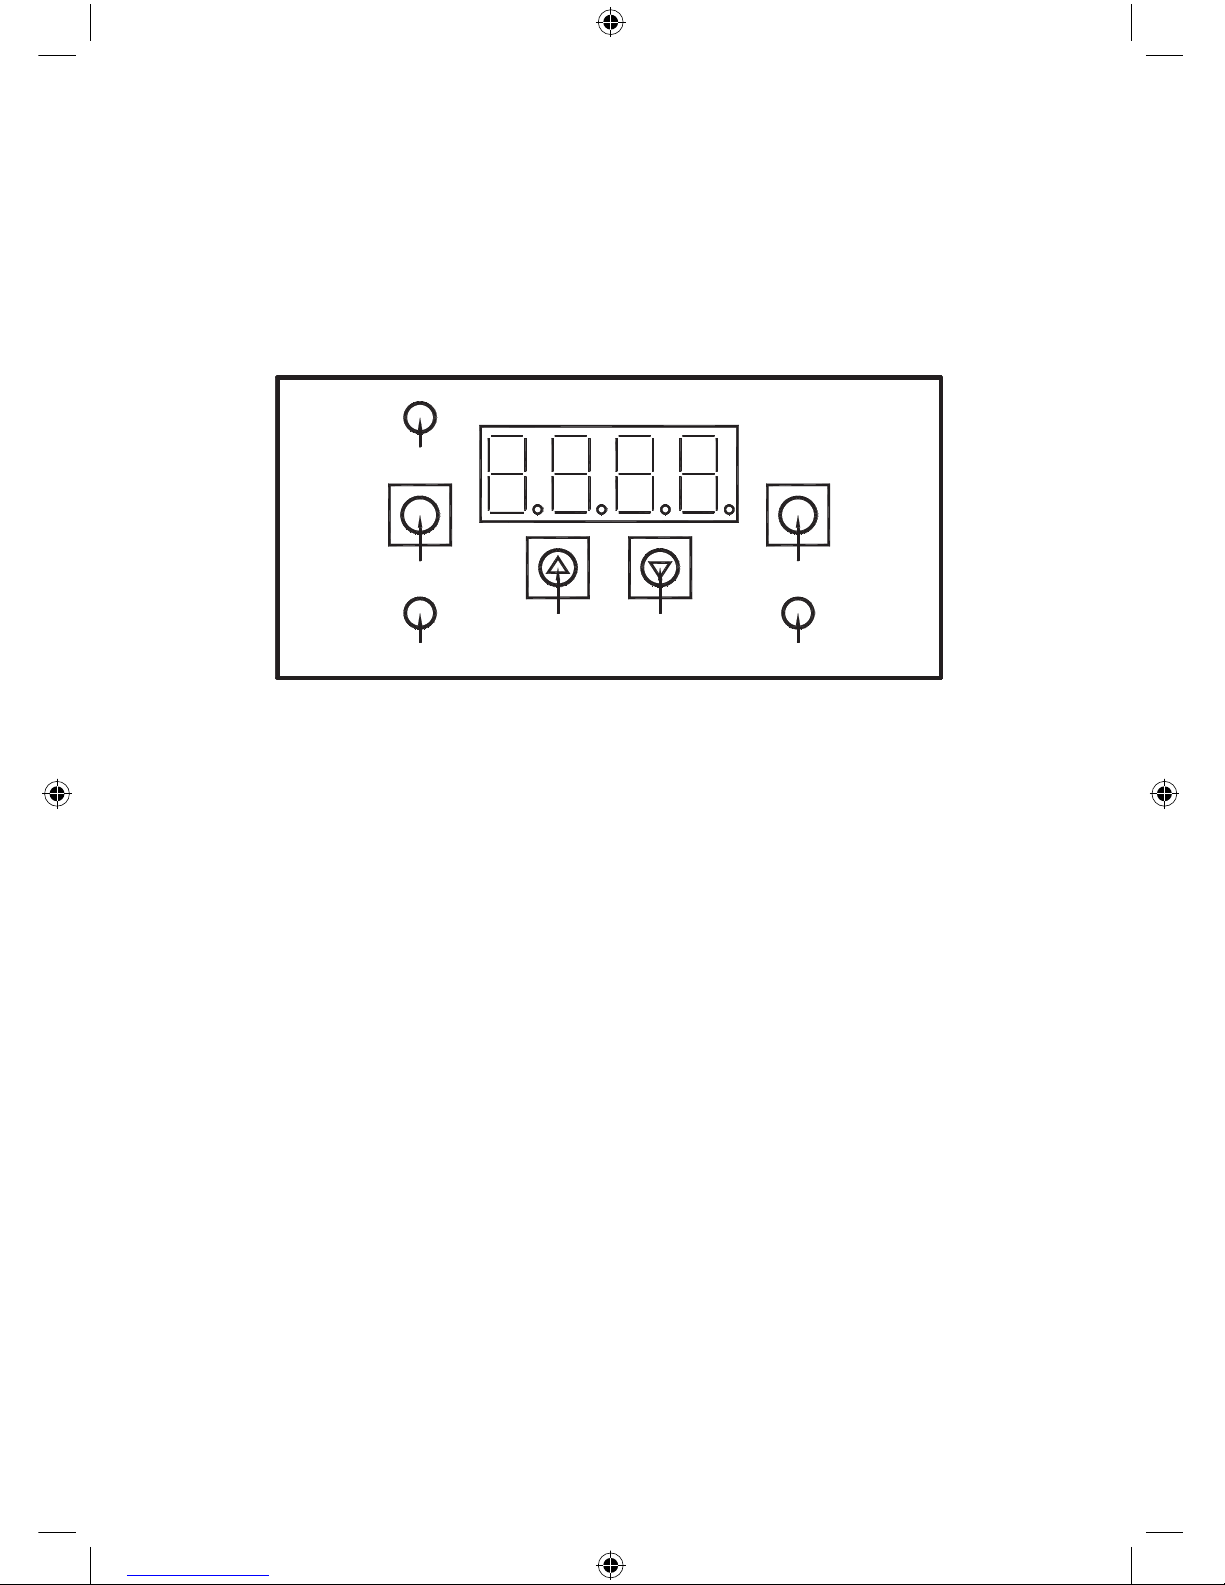
The DANCER250 has an advanced control panel. To set the desired function please read the following
instructions carefully.
Power
Menu
DMX
Up Down
Enter
Sound
Control panel
DMX address setting:
1. Press Menu to access address code setting menu Axxxx
2. Press UP or DOWN to set the DMX address code.
3. Press ENTER to save the update DMX address code.
Address code setting range A001-A512
Motor Speed and Sound Sensitivity setting:
1. Press Menu to access the menu StuP
2. Press ENTER to save the setting.
3. LCD display Mot1, press ENTER to access.
4. Press UP or DOWN to select motor speed, the range is 0-99.
5. Press ENTER to save the setting. Press Menu to exit.
6. In Mot1 interface, press UP or DOWN to select Mot2 and SEnS, the same setting as SenS is
sound sensitivity; 0 is closed, 99 max sound sensitivity.
StuP → Mot1 0-99 Gobo motor speed
→ Mot2 0-99 Gobo rotate motor speed
→ SenS 0-99 Sound sensitivity
Test program:
Press Menu to access the test program, select TESt and press ENTER to save the setting, the LCD
display ashes.
Press Menu to exit this scene.
Mode setting:
Press Menu to access the menu ModE and press ENTER button to save the setting.
Press UP or DOWN to select the mode of Auto or Sond or dMH.
Press ENTER to save the setting.
Press Menu to upgrade the menu.

4
Auto Automatic mode
Sond Sound activity mode (w/o sound triggering will be black out)
dMH DMX mode
Display function setting:
Press Menu to access the menu diSP, press ENTER button to save the setting.
Press UP or DOWN to select the mode rdiS CLdi .
Press ENTER to save the setting.
Press UP or DOWN to select the mode.
Press ENTER to save the setting.
Press Menu to upgrade the menu.
diSP → rdiS →rEV Reverse display
→ Stnd Standard display
→ Cldi → on 6 seconds to clear up window
→ OFF Close the clear up window
Menu list:
A001----(001-512) DMX address setting
StuP →Mot1 0-99 GOBO motor speed
→ Mot2 0-99 GOBO rotate motor speed
→ SenS 0-99 Sound sensitivity setting
TESt Test program
ModE →Auto Automatic mode
→ Sond Sound activity mode
→ DMH DMX mode
rESt Reset function
DMX control:
CH 1 Mode
Value# Function
0 Black out
1-127 DMX mode
128-191 Automatic mode
192-255 Sound activity mode
CH 2 Gobo
Value# Function
0STOP
1-99 CW
100-155 STOP
156-255 CCW
5
CH 3 Gobo Rotation
Value# Function
0STOP
1-99 CW
100-155 STOP
156-255 CCW
In DMX mode and SLAVE mode, the lamp will be blacked out automatically if there is no DMX signal
input.
SERVICE:
There are no user serviceable parts inside except the lamp. Refer all service to a qualied technician.
Lamp replacement:
1. Disconnect the xture from AC power and allow it to cool for 15 minutes.
2. Loosen the access screws and lift the cover.
3. Remove the base of the old lamp from the socket.
4. Install the new lamp: ELC 24 V/250 W GX5.3 halogen.
Push the lamp base pins fully, but gently, into the socket.
To ensure maximum lamp life, avoid touching the lamp with bare hands.
Replace the main fuse:
1. Unplug the mains cable from the output socket.
2. Open the fuse holder and replace the fuse with one of the same type. The fuse rating is listed on
the rating label.
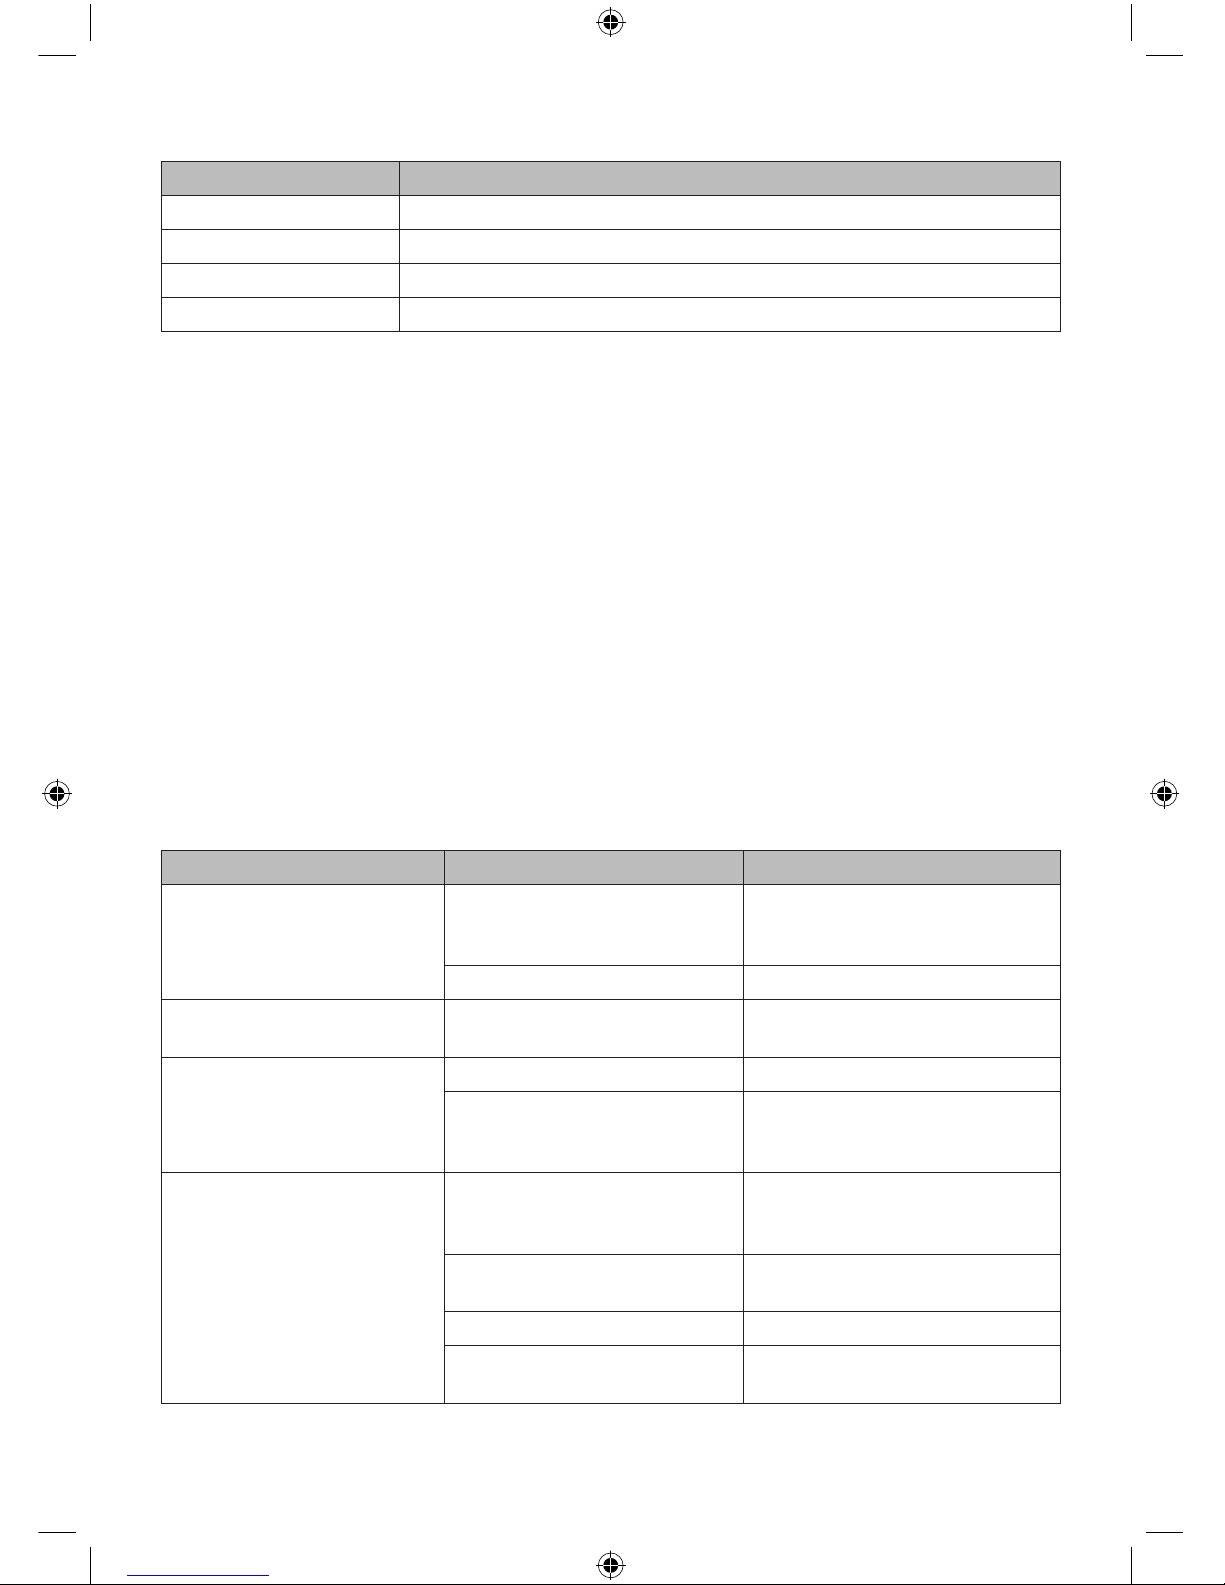
TROUBLESHOOTING:
Problem Probable cause Solution
One or more xtures are
completely dead.
No power to the xture.
Make sure that cables are
plugged in and power is switched
on.
Main fuse blown. Replace fuse.
Fixture is working correctly but
no light output. Broken or worn out lamp. Install new lamp.
Fixtures reset correctly but
all respond erratically or not
at all to controller.
Controller not connected. Connect controller.
XLR pin-out of controller does
not match pin-out of rst xture
on link (polarity is reversed).
Install a phase-reversing cable
between controller and rst
xture on link.
Fixtures reset correctly but
some respond erratically or
not at all to controller.
Bad data link connection.
Inspect connections and cables.
Correct poor connections. Repair
or replace damaged cables.
Data link not terminated with
120 Ohm termination plug.
Insert termination plug in output
of last xture on link.
Incorrect xture addressing. Check DMX addresses.
One of the xtures is
transmitting as a master. Check all xture settings.
Table of contents
Languages:
Other Konig Dj Equipment manuals


