Konka KDG49JT542A User manual

!"#$%#&'%()(* ("+
" %(%##%"$+
$(!("#!'" "#!'(%+
'$("'$,$(-".#( "%(! ("(&(#
/"&(#.# - $+
KDG49JT542A


1
In
case
of
smoke,
strange
noise
or
strange smell
from the
unit:
Turn
off the
power
switch
immediately;
Disconnect
the
power
plug
from
the
power
outlet;
Contact your
dealer
or
service
centre. Never
attempt to
make
repairs
yourself because this
could
be
dangerous.
G
G
G
High
Voltage
Do
not open
Risk
of electronic
shock, do not
open.
Do
not
attempt to
service this
product
yourself
as
opening
or
removing
covers
may
expose
you to
dangerous
voltage
or
other
hazards.
Refer
all
servicing
to
qualified
service
personnel.
CAUTION
Important Safety Instructions
Never
push
objects
of
any
kind
into
the set
through
the
cabinet
slots
as they
may
touch
dangerous
voltage
points
or
short-circuit parts that
could
result
in
a fire
or
electric
shock.
Never
spill
liquid
of any
kind
on the
set.
Use
special caution
in
households
where
children
are
present. The
apparatus
is
not
suitable for
children
under
3-year
to
operate.
Power
supply
cords
should
be
routed
safety
to
prevent
life
and
property from
dangerous
with
damaged
cord.
Mains
plug
is
used
as the
disconnect device. It
shall
remain
readily
operable
and
should
not
be
obstructed
during
intended
use. To
be
completely
disconnected the
apparatus from
supply
mains, the
mains
plug
of
the
apparatus
shall
be
disconnected.
To
reduce
the
risk
of
fire
or
electric
shock, do
not
expose this
product to
rain
or
moisture.
The
apparatus
shall
not
be
exposed
to
dripping
or
splashing
and
no
objects
filled
with
liquids,
such
as
vases,
shall
be
placed
on the
apparatus.
To
avoid
the fire,
no
naked
flame
source,
such as lighted candles, should be
placed on the apparatus.
naecnanetniaMdnasnoitcurtsnIytefaStnatropmI

Always turn
the
set off
when
it
is
not
being
used.
Unplug the
apparatus from the
AC
outlet when
it will
not
be
used
for
a
long
period
of time.
And
when
there
is
a
lightning,
unplug
the
unit from the
AC
outlet
immediately.
Never
touch the
antenna
wire
during
lightning.
An
Important Safety Instructions
outside
antenna
system
should
not
be
located
in
the
vicinity
of overhead
power
lines
or
other
electric
light or
power
circuits,
or
where
it
can fall
into
such
power
lines
or
circuits. When
installing
an
outside
antenna
system,
extreme
care
should
be taken
to
keep
from touching
such
power
lines
or
circuits
as
contact
with
them
might
be fatal.
Installation
The
ventilation
should
not be
impeded
by
covering the
ventilation
opening
with
items, such
as
newspapers,
tablecloths,
curtains, etc.
At
least
10
cm
space
should
be
left
around
the
apparatus
for
sufficient ventilation.
The
product should
be
situated
away
from
heat
sources
such
as
radiators,heat registers,
stoves,
or
other
products
(including
amplifiers)
that
produce
heat.
Place
the
apparatus
in
such
a
position that the
screen
is
not
exposed
to
direct sunlight. It
is
best to
have
soft
indirect
lighting
while
watching
and
avoid
complete
dark
environment
and
reflection
from
the
screen
as
these
may
cause
eye
fatigue.
Keep the
product away
from
high
magnetic
field
(i.e.
power-amplified
power
speaker) to
avoid
affecting
the
tint.
Do
not
pull the
plug
out by the
wire;
Never
touch the
plug
with
wet
hands.
Excessive sound
pressure
from
earphones
and
headphones can
cause
hearing
loss.
naecnanetniaMdnasnoitcurtsnIytefaStnatropmI
2

Installation
Do
not
place
this
apparatus
near
water,
for
example,
near
a
bath tub,
wash
bowl, kitchen
sink,
or
laundry
tub; in
a
wet
basement; or
a
swimming
pool; and
the
like;
Cleaning
When
the TV being
moved
in from
cold
place, it needs
some
right time
for
dew
inside
unit evaporating fully
before turn on the
unit;
Unplug this
apparatus
from
the
AC
outlet
before
cleaning.
Do
not use
liquid
cleaners
or
aerosol
cleaners.
Use
a
damp
cloth
for
cleaning;
Do not place the set on an unstable cart, stand, table
or shelf. The set may fall, causing serious personal
injury
as
well
as
damage
to
the
product.
Use
only
with
the
cart,
stand, tripod,
bracket,
or
table
specified
by
the
manufacturer,
or
sold
with the
apparatus.
An
appliance
and
cart
combination
should
be
moved
with
care. Quick
stops, excessive force,
and
uneven
surfaces
may
cause the
appliance
and
cart
combination to
overturn.
To
prevent injury,
this
apparatus
must be
securely
attached to the floor/wall
in
accordance
with
the
installation instructions.
Move
For
your
protection, please
read this
instruction
completely,
and
keep
this
manual for
future
reference.
WARNING
naecnanetniaMdnasnoitcurtsnIytefaStnatropmI
3

General description
Specifications and Accessories
Overview
Remote control
External connection
Trouble shooting
Picture defects and countermeasures
5
6
7
8
10
11
19
18
17
Basic Operation
Contents
4

AV out
u
Zero X radiation complies to green environment protection
requirement
Auto tuning and fine tuning
One YPbPr input socket
HDMI inp t sockets (HDMI 1.4)
One socket
audio input sockets
Support USB
Multi-language OSD
Wide range voltage input
Feature:
Note:
1. In case of any design change, a notice will not be released.
Three
One
One PC VGA input socket
General Description
5

Specifications and Accessories
User’s manual
Note: Due to TV may be used with different display screen, weight marked in this
user’s manual or in packaging box are subject to change without notice.
Remote control
Specifications:
110W
49
~110-240V
50/60Hz
Dimensions
(LXWXH)
TV
with
stand
Power consumption
Sound output
Video in
Frequency range
TV receive system
Power supply
The maximum resolution
Display size
Display Screen Type
Description
Color active matrix LED display
Antenna input impedance
Power supply for
remote controller
TV
without
stand
TV
with
stand
TV
without
stand
Accessories
Operation environment
temperature
Weight
(Net weight)
" Diagonal(max.)
10.1Kg
10.4Kg
1109×246×693mm
1920X1080
PAL:BG DK I; SECAM: BG DK
42.75~869.25MHz
75
2x10W
DC 3V(Two AAA size batteries)
PAL/NTSC/SECAM
1109×82×647mm
0 C-40 C
6
KDG49JT542A

Overview
1
2
3
4
5
1
2
2
3
4
5
6
6
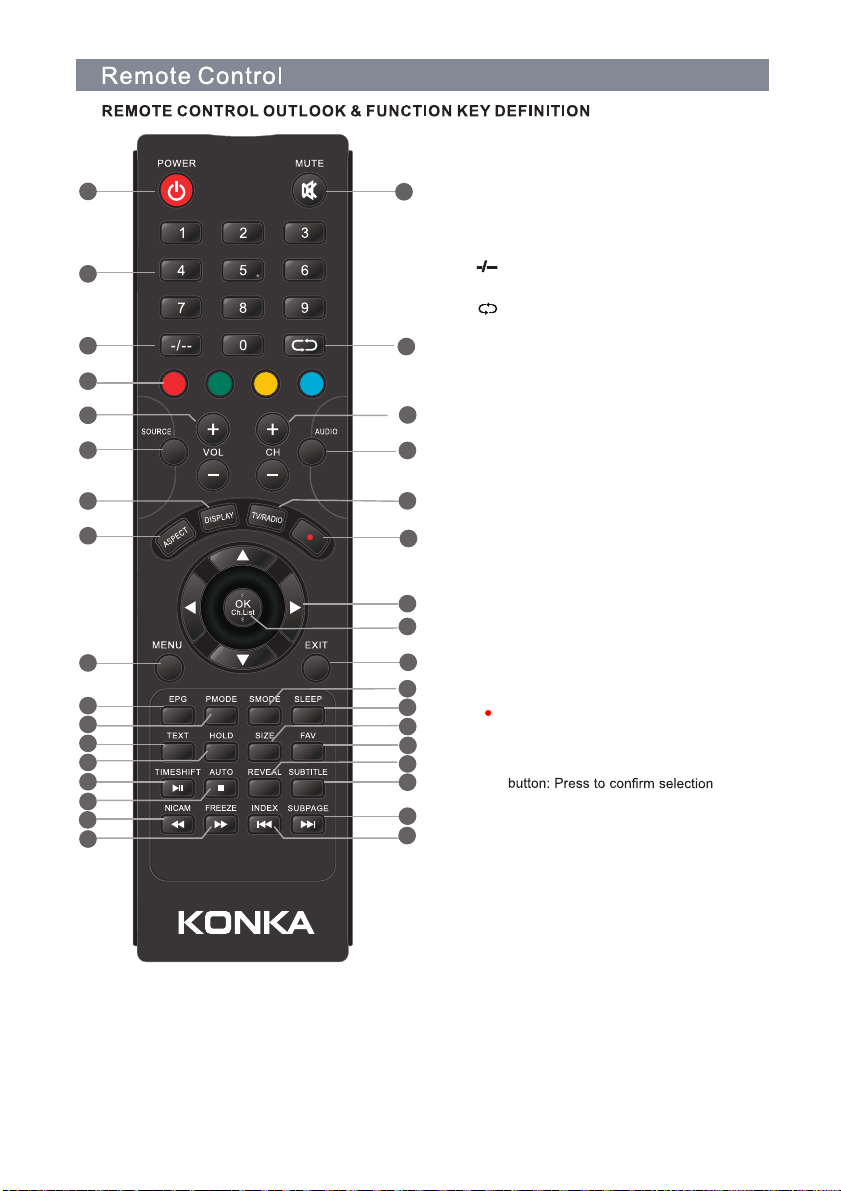
The buttons on the lower-right panel control your Tv’s basic features, including the
on-screen menu. To use the more advanced features,you must use the remote control.
1
Green: Normal playing status. Red: Standby
status.
2. IR remote sensor
Point remote control at this sensor to conduct
remote control.
4
Switch on LED TV when at standby mode.
5
. CH+/-
Press to scan through or to select a channel.
6
. VOL+/-
Press to increase / decrease the sound level.
7
.MENU
Brings up the LED main menu to the screen
in TV mode.
. SOURCE
Press to select the input source.
8. Power
789
6
7
SPDIF:
VIDEO OUT: Connect the audio equipment.
Connect the audio equipment.
USB: Connect to USB flash driver to play
supported multimedia content.
RF IN: Connect to an antenna and cable
TV system.
EARPHONE OUT: Audio output for external
devices.
HDMI: Connect to the HDMI jack of a device
with an HDMI output.
PC IN: Connect to the video output jack on
your PC.
Connect to the audio output jack on your PC.
V/YPbPr: Connect component video.
8
9Video/Audio L/R : Connect the audio,
POWER SWITCH
1. Power indicator
3. POWER SWITCH
( )
video signal.
7

1.
POW ER button: Press
to
enter
or
exit
the
standby mode.
2. MUTE
button: Press
to
turn
on
or
off
the
audio
sound.
3.
Number
buttons (0~9):
Press
to
change
the
a programme number greater than 09.
about the current mode on the screen.
11.DISPLAY button: Press to display information
10 AUDIO button: Press to selec t the different
12. TV/RADlObutton: Switch between TV and
RADIO mode.
channel of the
TV.
4. ton: Press this button before enteringtub
13
. ASPECT button: Press repeatedly to cycle
audio.
15.Direction buttons: Press the direction buttons
to select menu options or settings.
setup menu.
16.
OK in the
Ch.List button: Display program list.
17.
MENU
button:
Press
to
enter
or
exit
the setup
menu.
14. programme.
18.
EXIT button: Press to exit all the OSD on the
screen.
button: Press it to enter record
through the available aspect modes.
7. VOL+/-
button:
Press
to
increase
or
decrease
the volume.
8. CH+/- button: Press to skip the next/previous
channel.
viewed.
5. button: Press to return to the channel last
6. Color : Access the Teletext items
or program edit when using Digital/Freeview TV
channels.
buttons
9.SOURC E button: Press to select enter the
source selecting menu.
.
3
1
4
11
13
17
7
19
23
25
27
29
31
33
6
2
5
10
12
15
16
18
8
20
22
28
24
30
32
34
26
14
9
21
PVR
8

21. PMODE button: Press to select the picture
mode.
20. SMODE button: Pressto change the audio
mode.
22. SLEEP
button:
This
feature
allows
you
to
set
up sleep time.
23.
TEXT
button :
Switch
on
or
off
the
tele text
mode.
25.
HOLD
button: Freeze
a
multi-page
passage
In
Teletext.
27.
:
Press
to
start
playback
or
pause
(ln
MEDIA mode).
32.
INDEX
button:
Request
the
index
page
Teletext mode).
24.
SIZE
button: Change
display
size
in
teletext
mode.
29. : Press to stop playing (ln MEDI
A mode).
28. REVEAL button: Reveal hidden information.
: Playing forward fast (ln MEDIA mode).
34. : Skip forward button (ln MEDIA
31. : Playing backward fast (ln MEDIA mode).
30. SUBTITLE
button: press to select altermate
subtitle languages during view/playback of a DTV
program.
TIME
SHIFT
button:
Press
it
to
enter
timeshift
function.
AUTO button: Auto adjust (only use in the
VGA source).
: Skip backward button (ln MEDIA mode).
SUBPAGE button: Display the subpage on the
teletext screen.
26.
FAVbutton :
Displays the
selected favorite
programmers.
19. EPG bu tton: Press to display the Channel
Guide menu in DTV mode.
33.
mode).
3
1
4
11
13
17
7
19
23
25
27
29
31
33
6
2
5
10
12
15
16
18
8
20
22
28
24
30
32
34
26
14
9
21
button:The button is used to set NICAM
sound system.
NICAM
FREEZE button:Freeze picture for TV
PVR
PVR button: Press this button to record
the document selected.
9

10

the Signal Information by button.
Select Signal Information with button, and then press OK button. Next,you can adjust
By button ,you are able to select channel number
Press button to select Programme Edit, and then press OK button to
Through button ,you are able to select channel number. You can
Press button to select Manual Tuning and press OK button to show manual tunnning list.
Press button to select Auto Tuning. After
Press button to switch menu. Press
Press Menu button to show Channel,Picture
Sound, Time, Option, Lock
button to select Menu item.
Channel Menu
of auto tuning .
DTV Manual Tuning
Auto Tuning
also directly press number
keys to select channel number, and then press OK button to start searching channel.
Programme Edit
go into interface of edit.
and start editing according to the relevant
button.
Signal Information
Through button ,you are able to select channel number.you can
Press button to select Manual Tuning and press OK button to show manual tunnning list.
ATV Manual Tuning
also directly press number
keys to select channel number, and then press OK button to start searching channel.
DTV Manual Tuning
pressing OK button, you can see a interface
11

Then press button to adjust their value.
select the above menu
The rest of menu item can be altered by the same way.Press button to
Press to select Surround Sound and then press OK button to go into sub menu.With button.
Press button to select menu item of AVL and then give a tip to ENTER button by button,
through button.
switched to standard/music/movie/sports/personal
list of sound mode. The sound mode can be
Mode .Then through OK button,you can go into the
Press button to select menu item of Sound
you are able to change value by button.
In the picture menu, the rest can be altered by the same way. First you should press button
next interface.Next, press button to select off/low/middle/high.
Press button to select menu item of Noise Reduction , and then OK button lead you to
interface which you can switch Colour Temp. The system provide modes of normal,warm,
Press button to select menu item of Colour Temp, and then OK button lead you to next
can change picture mode to standard/mild/dynamic
and go into next interface by OK button.Then you
Picture Menu
Press button to select menu item of Picture,
/personal throngh button.
Colour Temp
cold,personal. You can freely alter colour temperature by button.
Noise Reduction
Other menu item
to select menu item. After pressing OK button,
Sound Menu
Sound Mode
Auto Volume
AVL can be open or closed.
Surround Sound
surround sound can be switched to SRS TEXT/surround/ off .
Other Menu Item
items and go into next interface with OK button.
12

Press button to select Clock and go into next
Select Sleep Timer with button and press OK button. Then with
Select Auto sleep with button and press OK button .Then with button, then function of auto
Select On Time with button and press OK button to go into sub_menu.
Select Off Time with button and press OK button to go into sub_menu.
Time Menu
Clock
clock list and four menu item.The customer can set
date, month, year, hour, minute at freedom.
Off Time
Customer can firstly
set the date of off time.then select the hour and minute.
On Time
Customer can firstly
set the date of on time. Then the hour, minute, channel, volume can be altered to set specific on time.
Auto sleep
sleep can come true.
Sleep Timer
button, the sleep timer can
be open and set to specific sleep time.
interface with OK button. Then there appear
13

you can choose
Select OSD Timer with button and then press OK button.By button,
changed to factorySelect Reset with button and then press OK button. The system can be
button and
language with or
Press to select OSD Language and select
Option Menu
OSD Language
Reset
default.
OSD Timer
specific time.
button and
language with or
Press to select Audio Languages and select
Audio Languages
button and
language with or
Press to select Subtitle Languages and select
Subtitle Language
OK button.
Select Blue Screen with button and then press OK button. The system can be changed to
Blue Screen
off or on.
then press
OK button.
then press
OK button.
then press
14

With button, the
Select Parental Guidance with button, and then press OK button.
Select Block Programme with button,and press OK button. Then you can add some channel
Block Programme
to block programme.
Parental Guidance
parental guidance can be open or closed.
Select Set Password with button. Then press
Select System Lock with button and then
Lock System
press OK button to input old password "0000".
SET Password
OK button to set new password.
Select System Lock with button and then
Lock System
press OK button to select on/off to open or close
the lock function.
Block Program
With button, the
Select Clear Lock with button, and then press OK button.
Clear Lock
Clear Lock can be change.
With button, the
Select Hotle Mode with button, and then press OK button.
Hotel Mode
option of the Hotle Mode can be changed.
Lock Menu
Hotel Mode
15

5. Press Exit button to exit.
previous one,press to play next one.
button to play, press button to play
4. Select the specific photo, and press
3. Select C:\,press OK button to go into
2. Select photo with button, and then
press with or button.
choose specific menu and the adjustable
Music, Movie, Text. Press button to
Press SOURCE button to show Photo,
USB Mode
value. In their sub_menu, choose menu
item
Photo Show
1. Insert USB Port to USB entry.
press OK button to enter sub_menu
sub_menu.
X
4. Select the specific text, and press
2. Select TEXT with button, and then
Text Show
previous one, press
X
1. Insert USB Port to USB entry.
5. Press Exit button to exit.
button to play, press button to play
3. Select C:\, press OK button to go into
press OK button to enter sub_menu
sub_menu.
to play next one.
2.Select film with button, and then
4. Select the specific film, and press
previous one,
X
4.Select the specific music, and press
2. Select music with button, and then
Music Play
1. Insert USB Port to USB entry.
5.Press Exit button to exit.
button to play, press button to play
3. Select C:\,press OK button to go into
press OK button to enter sub_menu
sub_menu.
Film Play
press to play next one.
previous one, press
X
1. Insert USB Port to USB entry.
5. Press Exit button to exit.
button to play, press button to play
3.Select C:\, press OK button to go into
press OK button to enter sub_menu
sub_menu.
to play next one.
16

Assemble the stand
Installation instructions as shown in Fig:
12
External connection
17
1.
2.
Take out the main unit and the stand from the carton, and place the main unit with display side
Fix the stand to the main unit with 4 screws(M4X20).
down on a table(flat surface).
Stand Screws (M4X20)
Main Unit

Problem Possible
Solution
Poor
picture
and
sound
quality
Try
another
channel.
Adjust
the
antenna.
Check
all
wire
connections.
No
picture
or
sound
unde r
TV
status
Try
another
channel.
Press
the
TV/AV
button.
Make
sure
the
TV
is
plugged
in.
Check
the
antenna
connections.
No
sound
or
sound
is
too
low
at
maximum
volume
First,
check
the
volume
of
uni t s
connected
to
your
TV.
Adjust
the
TV
volume
accordingly.
Check
sound
adjustment(Volume
and
Mute)
No
color,
wrong
colors
or
tints.
Make
sure
the
program
is
broadcast
in
color.
Select
the
picture
menu,
then
adjust
the
color
or
tint
submenu
to
the
proper
value.
Picture
rolls
verti cally.Check
all
wire connections.
Blurred
or
snowy
picture,
distorted
sound
Check
the
direction,
location
and
connections
of
your
antenna.
Thi s
interference
is
often
due
to
the
use
of
an
indoor
antenna.
Remote
control
malfunctions
Replace
the remote
control
batteries.
Check
the
battery
terminals.
Remote
is
out of range,
move
close
to
TV
Confirm
there is no
obstructions
between
remote
and
TV
Make
sure
power
cord
is
plugged
in
Ima ge
is
not
centered
on
the
screen.
Adjust
the
horizontal
and
verti cal
position
Clean
TV
set
When
cleaning the
LCD
screen,
please
pull
out
the
power
plug,
use
dry
and
soft and
clean
cloth
to
clean
the
dust
on
the
screen
and
shell.
In
case
of
further
cleaning
for
the
screen,
please
use
clean
wet
cloth.
Do
not
use
naphtha ,
thinner
or
similar
liquids
for
cleaning.
Colored
point
Thi s
product
adopts
a
high-resolution
LCD
TV,
and
the
colored
point
of
some
pixels
may
occur
due
to
the
special
feature
of
the
product.
For
a
few
of
colored
points,
this
shall
not
be
related
with
terrible
product
performance
or
product
reliability,
and
in
case
of
this
situation,
the
service
of
the
product
will
not
be
influenced.
For
the
criterion
of
colored
points,
our
company
has
similar
products
with
others.
The
colored
point
in
conformity
with
the
product
criterion
is
not
covered
by
the
return
scope
of
the
product
due
to
quality
problems.
We
hope
our
respected
customers
will
forgive
us.
If you
have
any
problem,
check
the
countermeasure for
each
symptom
listed
below.
The
following
symptoms
may
have
caused
by
inappropriate
adjustment rather
than
actual
malfunction
of the
unit.
If
the
trouble
persists,
contact
the
service
center.
Trouble shooting
18
Table of contents
Other Konka LED TV manuals

Konka
Konka KUD49MK794ANTS User manual

Konka
Konka KDG40XE530AN2 User manual

Konka
Konka KDG43XE559AN2 User manual

Konka
Konka KUD43WT808AN User manual

Konka
Konka KDG32MX665AN2 User manual

Konka
Konka KDG40MX665AN2 User manual

Konka
Konka KDG40MX558AN2 User manual

Konka
Konka KUD50GT775AN User manual

Konka
Konka KDG50JT628A User manual

Konka
Konka KDG32MX665AN2-B User manual