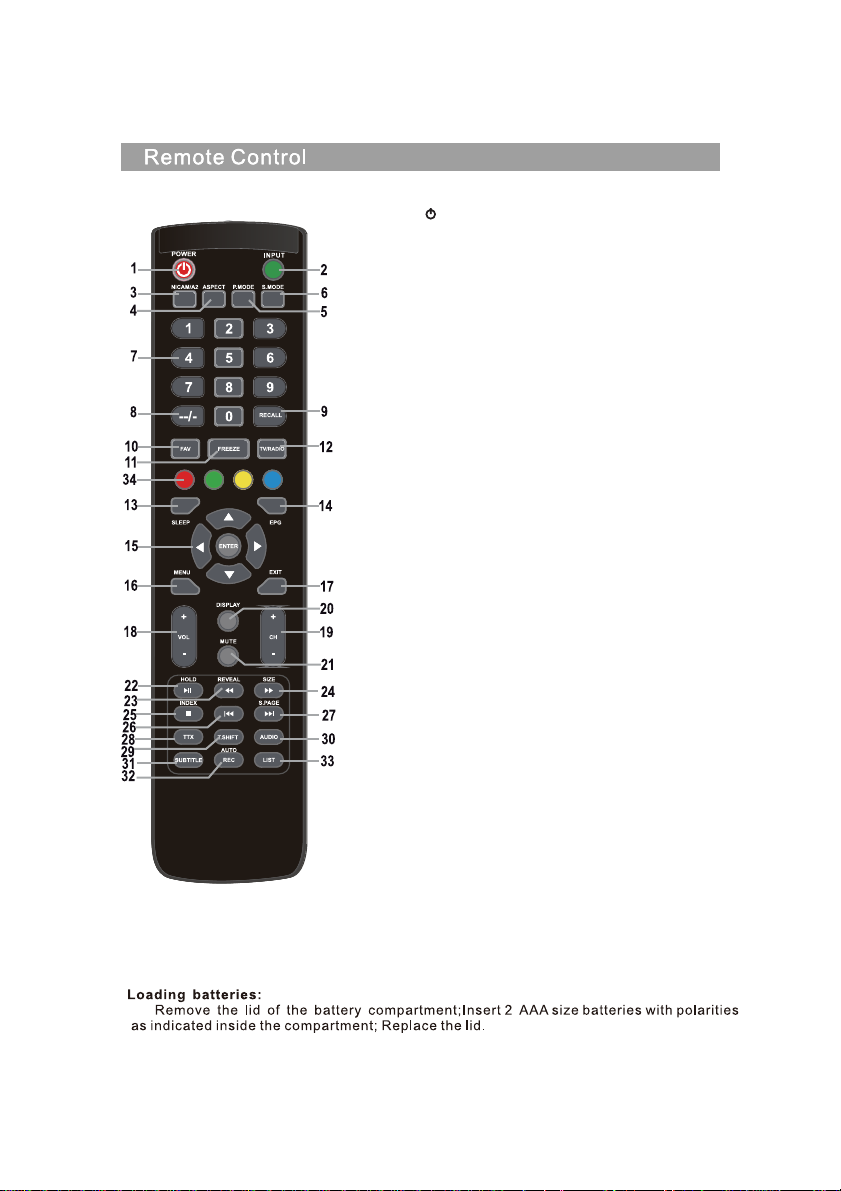
Konka KDG50JT628A User manual

KDG50JT628 A

1
In
case
of
smoke,
strange
noise
or
strange smell
from the
unit:
Turn
off the
power
switch
immediately;
Disconnect
the
power
plug
from
the
power
outlet;
Contact your
dealer
or
service
centre. Never
attempt to
make
repairs
yourself because this
could
be
dangerous.
High
Voltage
Do
not open
Risk
of electronic
shock,
do
not
open.
Do
not
attempt to
service this
product
yourself
as
opening
or
removing
covers
may
expose
you to
dangerous
voltage
or
other
hazards.
Refer
all
servicing
to
qualified
service
personnel.
CAUTION
Important
Safety
Instructions
Important Safety Instructions and Maintenance
Never
push
objects
of
any
kind
into
the set
through
the
cabinet
slots
as they
may
touch
dangerous
voltage
points
or
short-circuit parts that
could
result
in
a fire
or
electric
shock.
Never
spill
liquid
of any
kind
on the
set.
Use
special caution
in
households
where
children
are
present. The
apparatus
is
not
suitable for
children
under
3-year
to
operate.
Power
supply
cords
should
be
routed
safety
to
prevent
life
and
property from
dangerous
with
damaged
cord.
Mains
plug
is
used
as the
disconnect device. It
shall
remain
readily
operable
and
should
not
be
obstructed
during
intended
use. To
be
completely
disconnected the
apparatus from
supply
mains, the
mains
plug
of
the
apparatus
shall
be
disconnected.
To
reduce
the
risk
of
fire
or
electric
shock, do
not
expose this
product to
rain
or
moisture.
The
apparatus
shall
not
be
exposed
to
dripping
or
splashing
and
no
objects
filled
with
liquids,
such
as
vases,
shall
be
placed
on the
apparatus.
To
avoid
the fire,
no
naked
flame
source,
such
as
lighted
candles, should
be
placed
on the
apparatus.

2
Important Safety Instructions and Maintenance
Important
Safety
Instructions
Always turn
the
set off
when
it
is
not
being
used.
Unplug the
apparatus from the
AC
outlet when
it will
not
be
used
for
a
long
period
of time.
And
when
there
is
a
lightning,
unplug
the
unit from the
AC
outlet
immediately.
Never
touch the
antenna
wire
during
lightning.
An
outside
antenna
system
should
not
be
located
in
the
vicinity
of overhead
power
lines
or
other
electric
light or
power
circuits,
or
where
it
can fall
into
such
power
lines
or
circuits. When
installing
an
outside
antenna
system,
extreme
care
should
be taken
to
keep
from touching
such
power
lines
or
circuits
as
contact
with
them
might
be fatal.
Installation
The
ventilation
should
not be
impeded
by
covering the
ventilation
opening
with
items, such
as
newspapers,
tablecloths,
curtains, etc.
At
least
10
cm
space
should
be
left
around
the
apparatus
for
sufficient ventilation.
The
product should
be
situated
away
from
heat
sources
such
as
radiators,heat registers,
stoves,
or
other
products
(including
amplifiers)
that
produce
heat.
Place
the
apparatus
in
such
a
position that the
screen
is
not
exposed
to
direct sunlight. It
is
best to
have
soft
indirect
lighting
while
watching
and
avoid
complete
dark
environment
and
reflection
from
the
screen
as
these
may
cause
eye
fatigue.
Keep the
product away
from
high
magnetic
field
(i.e.
power-amplified
power
speaker) to
avoid
affecting
the
tint.
Do
not
pull the
plug
out by the
wire;
Never
touch the
plug
with
wet
hands.
Excessive sound
pressure
from
earphones
and
headphones can
cause
hearing
loss.

Important Safety Instructions and Maintenance
Installation
Do
not
place
this
apparatus
near
water,
for
example,
near
a
bath tub,
wash
bowl, kitchen
sink,
or
laundry
tub; in
a
wet
basement; or
a
swimming
pool; and
the
like;
Cleaning
When
the TV being
moved
in from
cold
place, it needs
some
right time
for
dew
inside
unit evaporating fully
before turn on the
unit;
Unplug this
apparatus
from
the
AC
outlet
before
cleaning.
Do
not use
liquid
cleaners
or
aerosol
cleaners.
Use
a
damp
cloth
for
cleaning;
Do
not
place
the
set
on
an
unstable
cart, stand, table
or
shelf.
The
set
may fall, causing
serious
personal
injury
as
well
as
damage
to
the
product.
Use
only
with
the
cart,
stand, tripod,
bracket,
or
table
specified
by
the
manufacturer,
or
sold
with the
apparatus.
An
appliance
and
cart
combination
should
be
moved
with
care. Quick
stops, excessive force,
and
uneven
surfaces
may
cause the
appliance
and
cart
combination to
overturn.
To
prevent injury,
this
apparatus
must be
securely
attached to the floor/wall
in
accordance
with
the
installation instructions.
Move
For
your
protection, please
read this
instruction
completely,
and
keep
this
manual for
future
reference.
WARNING
3

Contents
4
General description
Specifications and Accessories
Overview
Remote control
External connection
Trouble shooting
Picture defects and countermeasures

u
General
Description
5
Zero X radiation complies to green environment protection
requirement
Auto tuning and fine tuning
One YPbPr input socket
HDMI inp t socket(HDMI 1.4)
One composite video input socket
audio input sockets
Support USB
Multi-language OSD
Wide range voltage input
Feature:
Note:
1. In case of any design change, a notice will not be released.
Three
One
One PC VGA input socket

.'*-7$
6
5W
Specifications and Accessories
Accessories
User’s manual Remote control
Note: Due to TV may be used with different display screen,weight marked in this
user’s manual or in packaging box are subject to change without notice.
Specifications:
~110-240V
50/60Hz
Description
Dimensions
(LXWXH)
TV
with
stand
TV
without
stand
TV
with
stand
TV
without
stand
75
Color active matrix LED display
Weight
(Net weight)
Power supply for
remote controller DC 3V (Two AAA size batteries)
0 C-40 C
PAL/NTSC
2X
/S ECAM
50" Diagonal(max.)
1920X1080
!
NTSC:M;PAL:M/N
$LU&+a&+&DEOH&+a&+
îîPP
îîPP
.*
.*
:

Overview
7
The buttons on the lower-right panel control your Tv’s basic features, including the
on-screen menu. To use the more advanced features,you must use the remote control.
Pr
Pb
Y/AV LR
VGAAUDIO
PCIN
HDMI 1 HDMI 2
RF IN
USB 2
HDMI 3
USB 1
SPDIF
CVBS OUT
Headphone
USB 2
USB 1
Camcorder
DVD player
PC (HDMI-output)
Blu-ray disc player
PC
DVD player
Press to see an on menu
of your Tv’s features.
MENU
INPUT Toggles between all the
available input sources.
Press to change programs.
In the on-screen menu, use
the PROG U/Vbuttons as
up/down arrow buttons.
PROG U/V
VOL Y/ZPress to increase or
decrease the volume. In
the on-screen
menu, use the VOL Y/Z
buttons as left/right arrow
buttons.
Aim the remote control
towards this spot on the TV.
REMOTE CONTROL
SENSOR
Press button to toggle
between normal and
standby mode.
Standby button
POWER INDICATOR
POWER SWITCH
OFFON
6
7
531
24
8
INPUTMENU
CHVOL

8
Page aspect rato seecton,
1. POWER button
Turns the television on from the stand-by mode.
2. INPUT button
Press to select the desired input.
3. NICAM button
NICAM/A2 input or output.
4. ASPECT button
5. PMODE button
Repeatedly press to select a picture mode.
6. SMODE button
Repeatedly press to select a sound mode.
7. Numerical buttons 0-9
Press 0-9 to directly select a TV channel while watching
the TV. In teletext mode enter the page number, etc.
8. --/- button
It is used to enter channel numbers with various digit
counts, e.g. for 1 – 11 – 111.
9. RECALL button
Button for switching to the previously watched
channel.
10. FAV button
Press in the TV mode to enter/exit the favourites menu.
11. FREEZE button (freeze)
Freeze the picture
12. TV/RADIO button
Switching between the television and radio modes.
13. SLEEP button
Set the automatic shut o time for the television.
14. EPG button
Press to show/hide the electronic program guide.
15. ////ENTER buttons
Used for navigating in a menu on the screen and for
setting up the television according to your preferences.
16. MENU button
In TV mode, it displays the LCD television‘s main menu.
17. EXIT button
Function for exiting a menu or a screen.
18. VOL+/- buttons
Press to increase/decrease the volume.
19. CH +/- buttons
Press to switch between individual channels.
20. DISPLAY button
Button for displaying the source and information about
channels.
RRP RRP$XWR)XOO

9
21. MUTE button
Press to mute the sound. Press it again to renew
the sound or press VOL +.
22. HOLD/button
HOLD button: hold the current display
In the MEDIA mode: Playback/pause or start
atime shift recording
23. REVEAL/button
REVEAL button: Press REVEAL to display or hide
hidden teletext information (depends on the
broadcast).
button: fast rewind
24. SIZE/button
SIZE button: Press SIZE to change the size of the
screen in the MEDIA mode.
button: fast forward
25. INDEX/button
INDEX button: call up ateletext content page.
button: Stop recording / playback.
26. button
In the MEDIA mode: skip to the previous track
27. S.PAGE/button
S.PAGE button: Press S.PAGE to enter ateletext
subpage.
button: skip to the next track
28. TTX button
Turn teletext on or o.
Note: The teletext function is optional and the
availability of buttons depends on the model.
Teletext information fully depends on the
operator of the channel.
29. T.SHIFT button
It is used to start recording with atime shift (i.e.
time shift). Function is only available in the DTV
mode.
30. AUDIO button
DTV/MEDIA mode: select abackground sound,
if available.
ATV mode: select asound mode: Stereo/Dual I/
II/Mono.
Other sources: select the left / right channel
31. SUBTITLE button
Button for showing / hiding subtitles in the
bottom part of the screen, if they are available.
32. AUTO / REC button
AUTO button: Used for automatic conguration in
the PC mode.
REC button: Press to start recording. (only in the
DTV mode.)
33. LIST button
It is used to enter / exit the channel list menu and
other PVR functions.
34. RED, GREEN, YELLOW, BLUE buttons:
corresponds to various function colors in the
menu or teletext. USB MEDIA: BLUE button
- repeat mode set and movie subtitle coding
selection.
Note:
Remove battery during storage or when you are
not using the device for a long time.
• To control the device using the remote
control, point the remote control at the
device and then press the button with the
required function. The maximum range
of the remote control is about 5 meters
with a deviation of up to +/- 30° from the
perpendicular direction to the reception
sensor of the remote control on the front
side of the device. The falling capacity of
the batteries gradually reduces the remote
control range. There must be no solid
obstacles in the area between the remote
control and the device when the remote
control is being used.
• During standard use the lifetime of batteries
in the remote control is about 1 year.
When the eective range of the remote
control is substantially reduced, or when
there are problems with its use, change
both the batteries in the remote control.
If you will not be using the remote control
for a longer period of time, take out both
batteries from it – in this way you will
prevent potential damage caused by their
leakage.
• Avoid strong impact of light (e.g. sunlight or
light from strong uorescent/saving sources)
which can reduce the eectiveness and
reliability of IR remote control.
Important note:
Button description of the remote control can be
provided in two versions, but functions do not
change.
1) OK and ENTER buttons – function is identical.
2) and REC buttons – function is identical.

10

FDQEHRSHQRUFORVHGE\EXWWRQ
6HOHFW/&16RUWLQJZLWKEXWWRQDQGWKHQSUHVV2.EXWWRQ1H[WWKH/&1VRUWLQJ
3UHVVEXWWRQWRVHOHFW0DQXDO7XQLQJDQGSUHVV2.EXWWRQWRVKRZPDQXDO
3UHVV0HQXEXWWRQWRVKRZ&KDQQHO3LFWXUH
11
6RXQG7LPH2SWLRQ/RFN
3UHVVEXWWRQWRVZLWFKPHQX
3UHVVEXWWRQWRVHOHFW0HQXLWHP
▼ / ▲
$XWR7XQLQJ
3UHVVEXWWRQWRVHOHFW$XWR7XQLQJ$IWHUSUHVVLQJ2.EXWWRQ\RXFDQVHHD
LQWHUIDFHRIDXWRWXQLQJ
▼ / ▲
▼ / ▲▼ / ▲
'9%70DQXDO7XQLQJ
WXQLQJOLVW7KURXJKEXWWRQ\RXDUHDEOHWRVHOHFWFKDQQHOQXPEHU\RXFDQ
▼ / ▲▼ / ▲
▼ / ▲▼ / ▲
DOVRGLUHFWO\SUHVVQXPEHUNH\VWRVHOHFWFKDQQHOQXPEHUDQGWKHQSUHVV2.
EXWWRQWRVWDUWVHDUFKLQJFKDQQHO
/&16RUWLQJ
▼ / ▲▼ / ▲

3HUVLD&ORFN2II7LPH2Q7LPH6OHHS
$VSHFW5DWLR
12
Program Edit
Press ▼ / ▲ button to select Program Edit, then press Enter button to enter sub-menu.
First press ▼ / ▲ to highlight the channel you want to select, then:
Press the button to add or remote the channel to your favorite list.
Press the button to skip the select channel.
(Your TV set will skip the channel automatically when using
CH+/- to view the channels.)
Red
Blue
Then,press button to adjust
Press button to select the above menu
Cock,
Auto Sleep,Time Zone.
Noise-Track Sound Stereo
Noise-Tr
r
ack Soun
ack Soun
ack Soun
ack Sou
ck S
d
Stereo
e
e
/ /
items and go into next interface with OK
/ /
button.
Clock
Press button to select Clock and go into
▼ / ▲
next interface with OK button. Then there
appear clock list and four menu item.The
customer can set date,month,year,hour,

13
26'
Language,
Parental Guidance and Clear Lock.
LOCK Menu
lock
Lock
System,Set Password,Block Program,
Menu
setup
Language,Audio Language,Subtitle
minute at freedom.
Off Time
Select Off Time with button and press OK button to go into sub_menu.Customer
▼ / ▲
can firstly set the date of off time.then select the hour and minute.
On Time
Select On Time with button and press OK button to go into sub_menu.Customer
▼ / ▲
can firstly set the date of on time.Then the hour,minute,channel,volume can be altered
to set specific on time.
Auto sleep
Select Auto sleep with button and press OK button.Then with button, the
▼ / ▲
function of auto sleep can come true.
Sleep Timer
Select Sleep Timer with button and press OK button.Then with button, the
▼ / ▲
sleep timer can be open and set to specific sleep time.
Lock System
Select System Lock with button and then
press OK button to select on/off to open or
close the lock function.
SET Password
Select Set Password with button. Then press OK button to input old password “ 0000”
▼ / ▲
▼ / ▲
and set new password.
Block Programme
Select Block Programme with button,and press OK button.Then you can add some
▼ / ▲
channel to block programme.
Parental Guidance
Select Parental Guidance with button, and then press OK button.
▼ / ▲
With button,
the parental guidance can be open or closed.
Option
/DQJXDJH395)LOH6\VWHP5HVHW%OXH
6FUHHQ26'7LPH
OSD Language
Press to select OSD Language and
select language with or
▼ / ▲
▼ / ▲
button And then

14
press OK button.
Caption
Select Caption with button and press OK button.Then by button,the caption can appear
GVGG
or vanish.
Reset
Select Reset with button and then press OK button.The system can be changed to
factory default.
GVGG
OSD Timer
Select OSD Timer with button and then press OK button.By button,you can
GVGG
choose specific time.
PVR File System

15
External connection
5.Press Exit button to exit.
all on the TV.
Assemble the stand
If you need to install the pedestal, please special screws inst
Must form a complete set of product pedestal
notice:
Photo Show
4.Select the specific photo, and press button to play, press button to play
1. Insert USB Port to USB entry.
2.Select photo with button, and then press OK button to enter sub_menu
3.Select C:\,press OK button to go into sub_menu.
previous one,
press to play next one.
Music Play
1.Insert USB Port to USB entry.
2.Select music with button and then press OK button to enter sub_menu.
3.Select C:\,press OK button and sub_menu will appear.
4.Select the specific music, and press button to play, press button to play
previous one,press to play next one.
5.Press Exit button to exit.
Film Play
1.Insert USB Port to USB entry.
2.Select film with button , and then Press OK button to enter sub-menu.
3.Select C:\,press OK button and sub_menu will appear.
4.Select the specific film, and press button to play, press button to play
previous one,press to play next one.
Text Show
1. Insert USB Port to USB entry.
2.Select photo with button, and then press OK button to enter sub_menu
3.Select C:\,press OK button and sub_menu will appear.
4.Select the specific text, and press button to play, press button to play
previous one,press to play next one.
5.Press Exit button to exit.
choose specific menu and the adjustable
Press SOURCE button to show Photo,
USB Mode
Music, Movie, Text. Press button to
value. In their sub_menu, choose menu
press with or button.
item
USB Multimedia Playback Format:avi/mpg/dat/mov/mkv

Problem Possible
Solution
Poor
picture
and
sound
quality
Try
another
channel.
Adjust
the
antenna.
Check
all
wire
connections.
No
picture
or
sound
unde r
TV
status
Try
another
channel.
Press
the
TV/AV
button.
Make
sure
the
TV
is
plugged
in.
Check
the
antenna
connections.
No
sound
or
sound
is
too
low
at
maximum
volume
First,
check
the
volume
of
uni t s
connected
to
your
TV.
Adjust
the
TV
volume
accordingly.
Check
sound
adjustment(Volume
and
Mute)
No
color,
wrong
colors
or
tints.
Make
sure
the
program
is
broadcast
in
color.
Select
the
picture
menu,
then
adjust
the
color
or
tint
submenu
to
the
proper
value.
Picture
rolls
verti cally. C heck
all
wire connections.
Blurred
or
snowy
picture,
distorted
sound
Check
the
direction,
location
and
connections
of
your
antenna.
Thi s
interference
is
often
due
to
the
use
of
an
indoor
antenna.
Remote
control
malfuncti ons
Replace
the remote
control
batteries.
Check
the
battery
terminals.
Remote
is
out of range,
move
close
to
TV
Confirm
there is no
obstructions
between
remote
and
TV
Make
sure
power
cord
is
plugged
in
Ima ge
is
not
centered
on
the
screen.
Adjust
the
horizontal
and
vertical
position
Clean
TV
set
When
cleaning the
LCD
screen,
please
pull
out
the
power
plug,
use
dry
and
soft and
clean
cloth
to
clean
the
dust
on
the
screen
and
shell.
In
case
of
further
cleaning
for
the
screen,
please
use
clean
wet
cloth.
Do
not
use
naphtha ,
thinner
or
similar
liquids
for
cleaning.
Colored
point
Thi s
product
adopts
a
high-resolution
LCD
TV,
and
the
colored
point
of
some
pixels
may
occur
due
to
the
special
feature
of
the
product.
For
a
few
of
colored
points,
this
shall
not
be
related
with
terrible
product
performance
or
product
reliability,
and
in
case
of
this
situation,
the
service
of
the
product
will
not
be
i nf lue nc ed .
For
the
criterion
of
colored
points,
our
company
has
similar
products
with
others.
The
colored
point
in
conformity
with
the
product
criterion
is
not
covered
by
the
return
scope
of
the
product
due
to
quality
problems.
We
hope
our
respected
customers
will
forgive
us.
Trouble
shooting
If you
have
any
problem,
check
the
countermeasure for
each
symptom
listed
below.
The
following
symptoms
may
have
caused
by
inappropriate
adjustment rather
than
actual
malfunction
of the
unit.
If
the
trouble
persists,
contact
the
service
center.
16

The
most
common
types
of
television
interference
are
as
following:
SNOWY
PICTURE
Snowy
picture
is
usually
caused
due to
weak
signal.
Adjust
antenna
or install
an
antenna
amplifier.
DOUBLE IMAGES
OR “GHOSTS”
Double
images
are
usually
caused
by
reflections
from
tall
buildings.
Adjust the
direction
of the antenna
or
raise
it.
RADIO
WAVE
INTERFERENCE
W ave
pattern
are
moving
on
the
screen, which
are
usually
caused
by
nearby
radio
transmitter or
shot-
wave
receiving
equipment.
HIGH
TEMPERATURE
ELECTROTHERMAL INTER-
FERENCE
Diagonal,
or
herring-bone,
patterns
appear
on
the
screen
or
part
of
picture
is
missing.
This
is
probably
caused
by
high
temperature
electrothermal
equipment
in
the
nearby
hospital.
NOTE:
If
one
of
these
symptoms
appears
on
the
screen
when
the
cable
from a
company
is
connected,
this
may
be
due
to the
local
cable
company
broadcast.
Picture
defects and
countermeasures
17

0DGH,Q&KLQD
Table of contents
Other Konka LED TV manuals

Konka
Konka KDL55XS782UN User manual

Konka
Konka KUD43WT808AN User manual

Konka
Konka KUD50GT775AN User manual

Konka
Konka KDG49JT542A User manual

Konka
Konka KDG32MX665AN2-B User manual

Konka
Konka KDG43XE559AN2 User manual

Konka
Konka KDG32MX665AN2 User manual

Konka
Konka KDG40MX665AN2 User manual

Konka
Konka KUD49MK794ANTS User manual

Konka
Konka KDG40MX558AN2 User manual