KoolMore KM-OKS-BQ30 User manual

USER MANUAL
BBQ GRILL
For any service-related Issues, please contact
us: Phone Number: 718-576-6342
30" Built In BBQ Grill
Model:
KM-OKS-BQ30
I. SAFETY AND WARNING INFORMATION ...............................................
II. INSTALLATION REQUIREMENTS ...........................................................
III. SPECIFICATIONS ....................................................................................
IV. GAS CONNECTIONS ...............................................................................
V. ELECTRICAL SAFETY .............................................................................
VI. GRILL INSTRUCTIONS ............................................................................
VII. CARE & MAINTENANCE ........................................................................
VIII.TROUBLESHOOTING GUIDE ..................................................................
IX. WARRANTY .............................................................................................
1.
3.
4.
6.
8.
9.
12.
14.
15.
CONTENT

Please read this Installation and User Care Guide thoroughly before using your built-in grill.
Proper understanding and application of these instructions will reduce the risk of fire, burn
hazards, and other potential injuries.
OUTDOOR GRILL SAFETY
Your safety and the safety of others is crucial. We have included many important safety messages in this
manual and on your appliance. Make sure to read and follow all safety messages.
This is the safety alert symbol.
This symbol signals potential hazards that could harm you or others.
All safety messages will follow the safety alert symbol and either the word
"DANGER" or "WARNING".
These words indicate:
• Failing to adhere to these instructions could lead to a fire or explosion resulting in serious bodily injury,
death, or property damage.
• Not following instructions could lead to severe injury or death. All safety messages will specify the
potential hazard, suggest how to reduce the risk of injury, and explain what could happen if the instructions
are not followed.
DANGER
If you smell gas:
• Shut off gas supply to the appliance immediately.
• Carfully, put out any open fire of flames in the area.
• Open all windows and doors to ventilate the area.
• If you still smell gas, leave the area and immediately call your gas supplier or the fire department.
DANGER
1. Do not store or use gasoline or other flammable liquids or vapors near this or any other appliance.
2. Appliances not in use should not be stored near gas or other flammable substances.
Installation must comply with local codes. In the absence of local codes, follow the National Fuel Gas
Code, ANSI Z223.1/NFPA 54, the Natural Gas and Propane Installation Code, CSA B149.1, or the
Propane Storage and Handling Code, CSA B149.2.
When installed, the outdoor cooking gas appliance must be electrically grounded in accordance with
local codes, or, in the absence of local codes, with the National Electrical Code, ANSI/NFPA 70, or the
Canadian Electrical Code, Part I, CSA C22.1.
WARNING
• Only use outdoors.
• Read the instructions before using the appliance.
• Be careful: parts of the appliance may become very hot. Keep young children away. Make sure to
keep this appliance away from flammable materials while it's in use.
• Do not move the appliance while in use.
• After use, turn off the gas supply at the gas container.
• Do not modify the appliance.
Explosion Hazard
Ensure all gas connections are securely tightened. A qualified technician must confirm that the gas
pressure does not exceed the rated gas pressure. A qualified technician could be licensed heating
personnel, authorized gas company personnel, or authorized service personnel. Not following these
instructions could lead to an explosion, fire hazard, or death.
The maximum temperature of the outdoor BBQ Grill Cavity is 600°F.
I. SAFETY AND WARNING INFORMATION
1

2
I. SAFETY AND WARNING INFORMATION
IMPORTANT SAFETY INSTRUCTIONS
WARNING: To reduce the risk of fire, electric shock, injury to persons, or damage when using the outdoor
cooking gas appliance, adhere to basic precautions, including the following:
• Do not install built-in outdoor cooking gas appliances in a moving installation such as a recreational
vehicle, portable trailer, boat, etc.
•Always maintain a safe distance from combustible construction. Refer to the "Location Requirements" section.
•Do not place the outdoor cooking gas appliance under any overhead unprotected combustible construction.
• This appliance is for outdoor use only and should not be used inside a building, garage, or any other
enclosed area.
• Keep the electrical supply cord and fuel supply hose away from any heated surfaces.
• The area around the outdoor cooking gas appliance should be free from combustible materials, gasoline,
and other flammable vapors and liquids.
• Do not block the flow of combustion and ventilation air.
• Keep the ventilation openings of the gas cylinder enclosure free and clear of debris.
Before each use of the outdoor cooking gas appliance, inspect the gas cylinder supply hose.
If it shows excessive wear and tear, or if it's cut, replace it before using the appliance.
Contact your dealer and use only replacement hoses specified for use with this appliance.
• Check the burner flames visually. They should appear blue or slightly yellow.
• Regularly check and clean the burner/venturi tube for insects and insect nests.
A clogged tube could lead to a fire under the appliance.
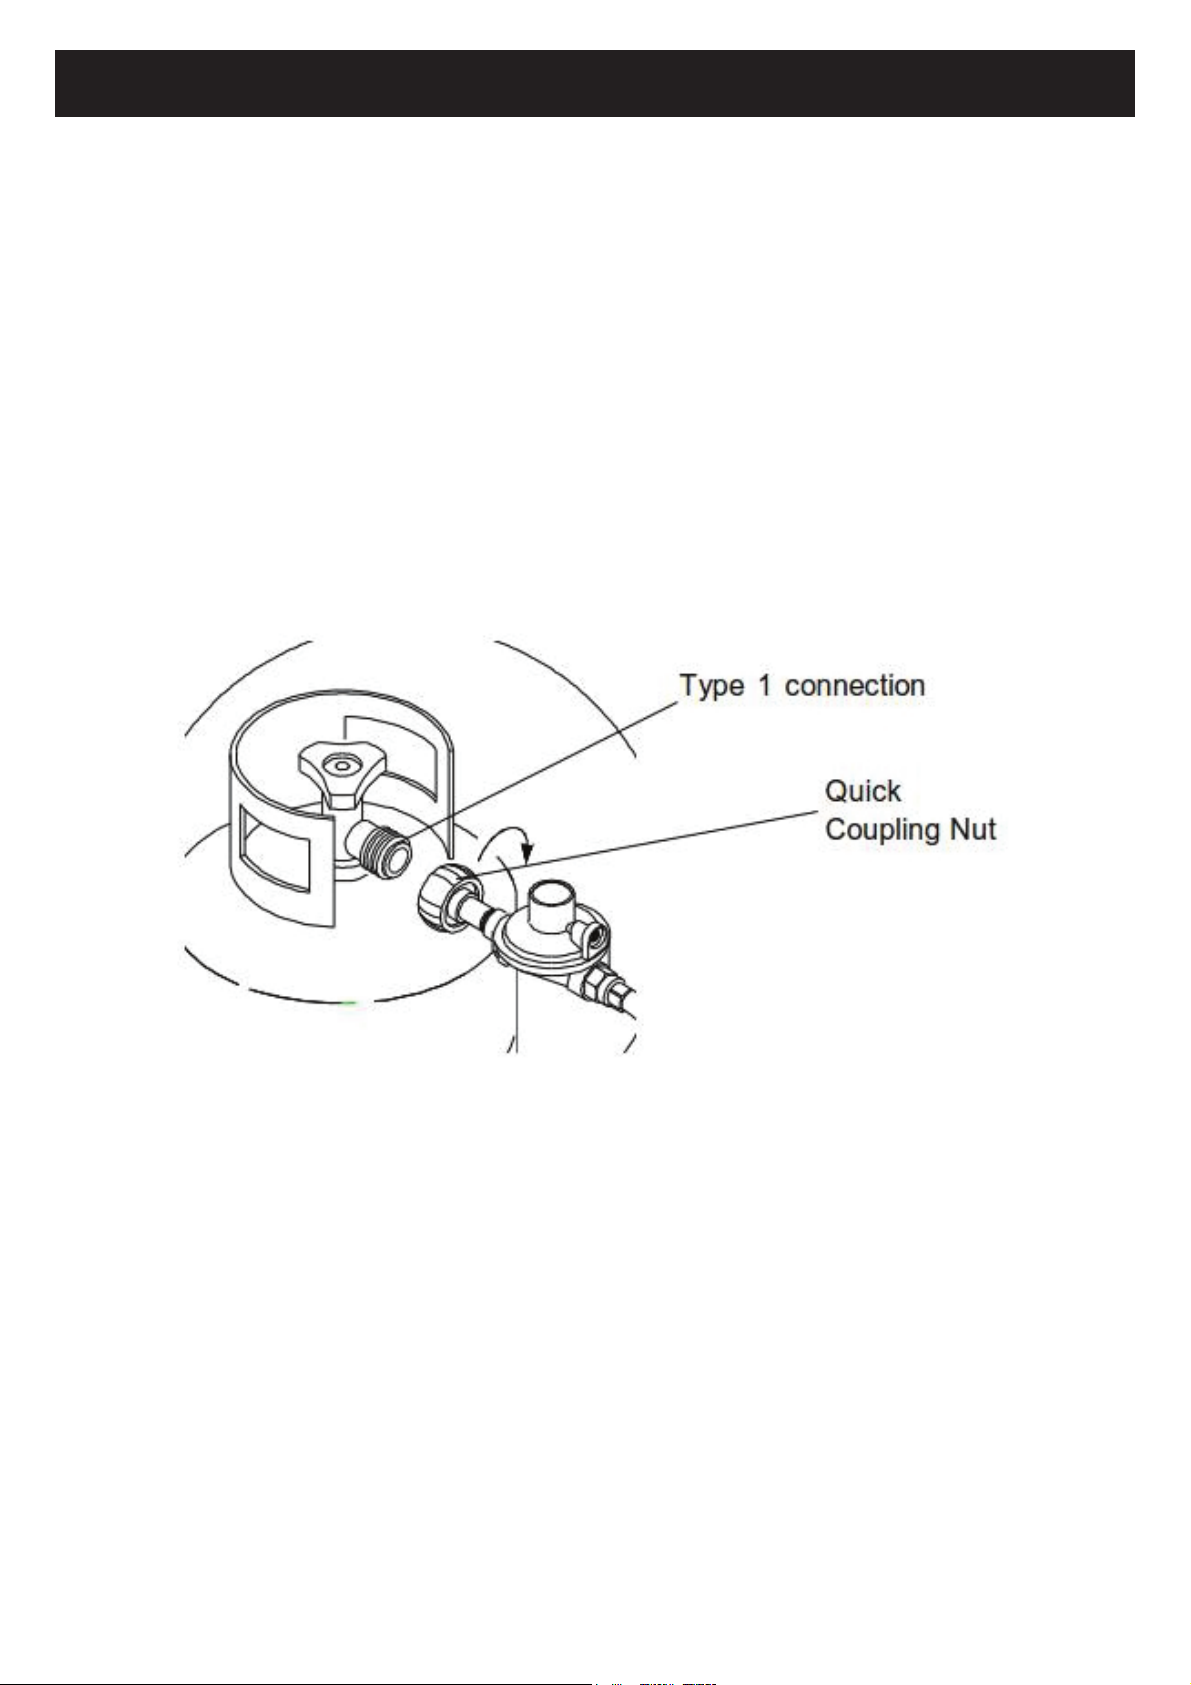
This model is designed for use with a standard 10KG Liquid Petroleum Gas tank, which should be:
• Approximately 305mm in diameter by 393mm high.
• Equipped with a listed overfilling prevention device.
• Compatible with the cylinder connection device for outdoor cooking gas appliances.
Always check connections for leaks each time you connect the gas supply cylinder.
Refer to the "Installation Instructions" section.
When not in use, turn off the gas at the supply cylinder.
If stored indoors, disconnect and remove the cylinder from the appliance.
Cylinders must be stored outside, out of children's reach. Do not store cylinders in a building, garage, or any
other enclosed area. The pressure regulator and hose assembly supplied with the outdoor cooking gas
appliance must be used. Any replacement gas regulator & hose assembly must comply with the
manufacturer's specifications.
When not in use, place a dust cap on the cylinder valve outlet. Only install the type of dust cap provided with
the cylinder valve. Other types of caps or plugs may result in gas leakage.
If you don't follow this information exactly, a fire causing death or serious injury may occur.
Do not store a spare gas cylinder under or near the outdoor cooking gas appliance. Never fill the cylinder
beyond 80 percent full.
The LP gas cylinder to be used must be constructed and marked in accordance with the Specifications for LP
gas Cylinders of the U.S. Department of Transportation (D.O.T.) or the Standard for Cylinders, Spheres, and
Tubes for the Transportation of Dangerous Goods and Commission CAN/CSA-B339.
The cylinder used must include a collar to protect the cylinder valve. If you don't follow this information exactly,
a fire causing death or serious injury may occur.

3
II. INSTALLATION REQUIREMENTS
TOOLS AND MATERIALS
Before you start the installation process, make sure to gather all necessary tools and materials.
Please adhere to the instructions that come with any tools listed here.
TOOLS REQUIRED
• Tape measure
• Pipe wrench
• Small, flat-blade screwdriver
• Scissors or cutting pliers
• #2 and #3 Phillips screwdriver
• Non-corrosive leak-detection solution
•Level
• Wrench or pliers
MATERIALS INCLUDED
• Gas pressure regulator/hose assembly
• 1 - "AA" size alkaline battery
• Hardware packet with screws (W 3/32-32*2/5", 4 pieces) for door installation
INSTALLATION LOCATION
Choose a location with minimal exposure to wind and traffic. Avoid areas with strong drafts. Ensure that the
flow of combustion and ventilation air is not obstructed.
CLEARANCE FOR COMBUSTIBLE STRUCTURES
For outdoor grills, maintain a minimum clearance of 24 inches (61.0 cm) between the grill's front, sides, back, and
any combustible construction. Also, maintain a minimum clearance of 24 inches (61.0 cm) below the cooking
surface and any combustible construction. For additional assistance, see the "Assistance or Service" section.
WANRNING
Fire Hazard
Do not use grill near combustible materials. Do not store
combustible materials near grill Doing so can result in
death or fire.
WANRNING
Explosion Hazard
Do not store fuel tank in a garage or indoors
Do not store grill with fuel tank in a garage or indoors Failure to follow
these instructions can result in death, explosion, or tire.

III. SPECIFICATIONS
This built-in outdoor grill is designed for installation only within a built-in enclosure made entirely of non-com-
bustible materials. Suitable non-combustible materials include brick, firewall, or steel. Do not use wood or
other combustible materials for the built-in enclosure.
PRODUCT DIMENSIONS
4

5
III. SPECIFICATIONS
INTERNAL DIMENSIONS
Prior to placing the propane tank into the tank tray, secure the tray with four locking screws (size 5/32*8).
Please note, this appliance is designed exclusively for installation within a built-in enclosure made entirely of
non-combustible materials.

6
IV. GAS CONNECTION
GAS PRESSURE REGULATOR
The gas pressure regulator that comes with this grill is essential for its proper operation and must be used. The
input pressure to the regulator should be in accordance with the specifications provided for optimal functionality.
CONNECTING THE REGULATOR AND HOSE TO YOUR LP GAS TANK
1. Ensure all control knobs are in the OFF position.
2. Inspect the valve connection port and regulator assembly for any damage or debris. If you find any debris,
remove it immediately. Equipment with any damage should not be used under any circumstances.
3. Attach the regulator assembly to the tank valve. Tighten the nut by hand in a clockwise direction until it's
fully secure. Please avoid using a wrench to tighten the nut as it could damage the Quick Coupling Nut,
which might lead to a gas leak or even a fire hazard.
4. Open the tank valve slowly, turning it counterclockwise for about 1/4 to 1/2 of a full rotation.
5. Use a soapy water solution to check for gas leaks while lighting your grill. See the "Check All Connections
for LP Gas Leaks" section for detailed instructions. If a leak is detected, immediately turn off the tank valve
and refrain from using your grill until the issue is addressed and resolved.

7
IV. GAS CONNECTION
(LP Tank Installation Layout)
CONNECTING THE REGULATOR AND HOSE TO YOUR LP GAS TANK
1. Please note that while this grill is designed to work with a propane tank, the tank itself is not included. The
grill, however, comes with a gas pressure regulator and hose assembly.
2. The grill's tank tray is designed to accommodate most propane tanks available in the market. For safety,
the propane tank must be properly installed and securely fastened.
3. To begin, open the cabinet doors.
4. Next, loosen the tank tray locking screw.
5. Place the propane tank into the tank tray located underneath the grill.
6. Once the tank is in position, tighten the locking screw clockwise against the bottom collar of the propane
tank to ensure it is secured in place. For more detailed information, please refer to the above image - LP
Tank Installation Layout.
7. For ease of installation, it is recommended that the liquid withdrawal valve on the tank is oriented to face
the right side.
Cylinder must be arranged to provided vapor withdraw.
A.LOCKING SCREW
B.TANK TRAY
20 IN LP gas fual tank tray

8
V. ELECTRICAL SAFETY
Take note of the following safety guidelines when dealing with the electrical components of your outdoor gas
appliance:
A. To prevent electric shock, never submerge the cord or plugs in water or any other liquid.
B. Always unplug the appliance when it's not in use or before cleaning.
Wait for it to cool down before attaching or detaching parts.
C. Do not use the appliance if the cord or plug is damaged, or if the appliance has malfunctioned or been
damaged in any way. Instead, contact the manufacturer for repair assistance.
D. Avoid letting the cord hang over the edge of a table or come into contact with hot surfaces.
E. Only use the outdoor cooking gas appliance for its intended purposes.
F. When connecting, plug the cord into the appliance first, then plug the appliance into the outlet.
G. This outdoor cooking gas appliance should only be used with a Ground Fault Interrupter (GFI) protected
circuit.
H. The grounding plug should never be removed, nor should the appliance be used with a 2-prong adapter.
I. If an extension cord is required, use only those with a 3-prong grounding plug. The extension cord should
be rated for the power of the equipment and approved for outdoor use with a W-A marking.

9
VI. GRILL INSTRUCTIONS
Your newly purchased grill may contain some or all of the following features. Note that the locations and appear-
ances of the features listed may not exactly match your specific model.
A. Electric Ignition Control Knob
B. Left Grill Burner Control Knob
C. Left Center Grill Burner Control Knob
D. Right Center Grill Burner Control Knob
E. Rotisserie Burner Control Knob
F. Right Grill Burner Control Knob
HOW TO USE YOUR OUTDOOR GRILL
INSPECT THE GAS FUEL TANK SUPPLY HOSE
Before each use, be sure to check the gas pressure regulator and hose
assembly. If you observe excessive wear, abrasion, or find that the hose
has been cut, it must be replaced before you use the outdoor cooking
gas appliance. Use only the replacement hose assembly specified by
the manufacturer.
WARNING
Food Poisoning Hazard
Do not let food sit for more than one hour before or after cooking.
Doing so can result in food poisoning or sickness.

10
VI. GRILL INSTRUCTIONS
PREPARING THE GAS SUPPLY
Ensure that all control knobs are turned to OFF and the drip tray is properly placed
and pushed all the way to the back.
TURNING ON THE GAS SUPPLY
For outdoor grills using a propane tank, open the tank valve slowly.
NOTE: If the flow limiting device triggers, your grill may not light. Even if your grill does light, the flames will be
low and will not heat properly. If this occurs, turn off the tank valve and all control knobs, wait for 30 seconds,
then slowly open the tank valve again. Wait for an additional 5 seconds before lighting the grill.
LIGHTING THE GRILL
IMPORTANT: If a burner doesn't light immediately, turn the burner knob to OFF and wait 5 minutes before
attempting to relight it.
1. Do not lean over the grill.
2. Choose the burner you wish to light. Press the pulse ignitor module and simultaneously push in and turn
the grill burner control knob to IGNITE/HI. Hold it in this position.
3. You will hear the "snapping" sound of the spark. Once the burner is lit, release the knob and adjust it to your
desired setting.
4. Repeat this process for each of the other burners as needed.
5. Repeat steps 2 through 5 for each main burner.
6. Remove the match and place the manual lighting extension back on the right side panel
MANUALLY LIGHTING THE GRILL
1. Avoid leaning over the grill.
2. Take out the manual lighting extension (refer to the following illustration)
and attach a match to the split ring.
3. Ignite the match.
4. Push the pulse ignitor module, push in and turn the burner knob to
IGNITE/HI for the burner closest to the lit match. The burner should light
immediately. Once lit, adjust the knob to your desired setting.
IMPORTANT: If a burner doesn't light immediately, turn the knob to OFF and
wait 5 minutes before attempting to relight it. If any burners fail to light after
manual attempts, contact the Customer Service Center.
WARNING (AFTER USE)
Storing an outdoor cooking gas appliance indoors is only permissible if the gas cylinder has been
disconnected and removed from the appliance.

11
VI. GRILL INSTRUCTIONS
USING THE ROTISSERIE BURNER
To avoid damaging the warming rack, remove it from the grill when using the rotisserie burner. Do not use the
main burners while the rotisserie burner is in operation.
LIGHTING THE ROTISSERIE BURNER
1. Do not lean over the grill.
2. Press the pulse ignitor module. Push and turn the Rear Burner knob slowly to IGNITE/HI. You will hear the
"snapping" sound of the spark.
3. Once the rotisserie burner is lit, continue to hold the knob in for another 15 seconds, then release it. The
snapping sound will continue until the knob is released.
IMPORTANT: If the rotisserie burner doesn't light immediately, turn the burner knob to OFF and wait 5 minutes
before attempting to relight it.
NOTE: The rotisserie burner only has a high setting.
MANUALLY LIGHTING THE ROTISSERIE BURNER
1. Do not lean over the grill.
2. Remove the manual lighting extension (see following illustration)
and attach a match to the split ring.
3. Strike the match to light it.
4. Hold the lit match gently close to the rotisserie burner.
5. Press the pulse ignitor module and push in and turn the control
knob to IGNITE/ON. Continue to hold this knob in for 15 seconds
after the burner is lit. You will hear the "snapping" sound of the
spark until the knob is released.
IMPORTANT: If the rotisserie burner doesn't light immediately,
turn the rotisserie burner control knob to OFF and wait 5 minutes
before attempting to relight it.
6. Remove the match and place the manual lighting extension back
inside the cabinet door.
A. Lighting extension
Rotisserie burner

12
VII. CARE & MAINTENANCE
REPLACEMENT OF IGNITER BATTERY
In instances where the igniters cease to spark, a battery replacement may be necessary.
1. Remove the igniter button cap by rotating it counterclockwise.
A. The Igniter button
B. "AA" size battery
2. Extract the battery from its compartment.
3. Replace the used battery with a fresh alkaline "AA" size battery, making sure the negative end is inserted first.
4. Secure the igniter button cap by rotating it clockwise.
ROUTINE GRILL CLEANING
IMPORTANT: Prior to any cleaning, ascertain that all controls are in the off position and that the grill has
sufficiently cooled. Always adhere to the instructions on cleaning products.
Regularly clean your grill with mild soap and water using a soft cloth or sponge. Rinse with clean water and
promptly dry using a soft, lint-free cloth to prevent spots and streaks. Avoid using steel wool as it may scratch
the grill surface.
To protect the finish of your grill from weather damage, consider using a vinyl grill cover.
STAINLESS STEEL CARE
IMPORTANT: To prevent damage to stainless steel surfaces, abstain from using soap-filled scouring pads,
abrasive cleaners, cooktop polishing creams, steel wool, gritty washcloths, or paper towels.
Your cleaners should be chlorine-free to avoid any possible harm.
Immediately clean food spills once the entire grill has cooled down to prevent permanent discoloration.
Cleaning Method:
• Wipe in the direction of the grain to avoid potential surface damage.
• Utilize stainless steel cleaner.
• Employ liquid detergent or all-purpose cleaner.
• Rinse with clean water and dry with a soft, lint-free cloth.
• Use vinegar to treat hard water spots.
• Apply glass cleaner to remove fingerprints.
BURNER MAINTENANCE
Cleaning Method:
1. Start by scrubbing the exterior of the burner using a wire brush to remove any loose debris.
2. Check for any blockages in the burner ports. If you find any, use a straightened paper clip to clear them out.
It's important to use a metal object like a paper clip instead of a toothpick, as a toothpick could potentially
break and cause further blockage.
3. Inspect and clean the burner/venturi tubes to ensure they are free from obstructions and grime.
4. Once the initial cleaning is completed, proceed with the disassembly of the burner:
i. Unscrew the two screws holding the burner in place and remove the gas burner from the grill.
ii. Remove the grill grates and flame tamers to expose the burner.
5. With the burner removed, use a flashlight to conduct an internal inspection through the burner inlet. Look
for any blockages and if found, clear them using a straightened metal coat hanger.
6. After ensuring the burner is free from blockages, it's time for reassembly:
i. Align the middle tube of the gas burner over the gas orifice, which is the connection point for the burner.
ii. Finally, secure the gas burner back in its place using the two screws.

13
VII. CARE & MAINTENANCE
ROTISSERIE BURNER MAINTENANCE
Cleaning Method:
1. Ignite the rotisserie burner (refer to the "Using Your Rotisserie Burner" section).
2. Close the grill hood.
3. Allow the burner to run on high for about 30 minutes.
4. Turn the knob to OFF and let the grill cool completely.
5. Brush any ash particles off the rotisserie burner.
DRIP TRAY CLEANING
IMPORTANT: The drip tray should only be extracted once the grill has completely cooled.
The full-width drip tray accumulates grease and food particles that drop through the grill. Regular cleaning is
necessary to prevent grease buildup.
Cleaning Method:
• Detach tray and place it on a flat surface.
• Wipe away excess grease using paper towels.
• Clean with a mild detergent and warm water. Rinse and dry thoroughly.
• Reinstall the tray.
CLEANING KNOBS AND FLANGE AREA
IMPORTANT: To prevent damage, avoid using steel wool, abrasive cleaners, or oven cleaner on the knobs or
the flange area surrounding them. Never immerse the knobs in water.
Cleaning Method:
• Use a mild detergent, a soft cloth, and warm water.
• Rinse and dry.
CARE FOR CONTROL PANEL GRAPHICS
IMPORTANT: To avoid causing damage to control panel graphics, refrain from using steel wool, abrasive
cleaners, or oven cleaner. Do not spray cleaner directly onto the panel.
Cleaning Method:
• Gently clean around the burner labels to avoid removing the print.
• Use a mild detergent, a soft cloth, and warm water.
• Rinse and dry thoroughly.

14
VIII. TROUBLESHOOTING GUIDE
Problem: Grill will not light
Possible causes and solutions:
- Propane tank valve is turned off. Please turn it on.
-Grill is not properly connected to the gas supply.
Review the installation instructions and ensure proper setup.
- The propane tank is empty. Verify the gas level before using the grill.
- The igniter is not functioning. Confirm that the igniter battery is properly installed or if the battery needs
replacement. Try lighting the grill with a match. Check for debris that may be blocking the electrode. If the
igniter is not sparking at the tip of the electrode, replacement may be necessary.
Problem: Burner Flame will not stay lit
Possible causes and solutions:
- Gas supply valve is not in the correct position. Adjust the position of the gas valve according to the flame performance.
- The fuel gas tank is running low. Check the gas level.
- The burner is not properly installed or is damaged. Ensure that the burner is correctly installed and inspect
for any signs of damage.
Problem: Flame is noisy, low, or erratic
Possible causes and solutions:
- Gas supply is not fully turned on. Confirm that the propane tank valve is fully open.
- The propane tank has a low gas supply. Check the gas level.
- Only one burner appears low. Inspect and clean the burner if it's clogged or dirty.
- The gas supply hose is bent or kinked. Straighten the hose.
- Flame is noisy or lifting away from the burner. This may indicate that the burner is getting too much air.
Check the air shutter adjustment.
Problem: Burner flame is mostly yellow or orange
Possible causes and solutions:
- Grill may be in a windy area, or not receiving enough air. Check the burner air inlets for obstructions.
Also, adjust the air shutter.
Problem: Excessive flare-ups
Possible causes and solutions:
- There's excessive fat in the food being grilled. Keep the flame on low or turn one burner off. Keep the hood
up when grilling to avoid excessive flare-ups. Move food to the warming rack until flames subside. Avoid
spraying water on gas flames as it may damage the grill.
Problem: Low heat in LP Gas
Possible causes and solutions:
- If your outdoor grill uses a propane tank, open the tank valve slowly. If a flow limiting device activates, your
grill may not light or the flames will be low and will not heat properly. To rectify this, turn the tank valve and
all control knobs off and wait 30 seconds. Then, slowly open the tank valve and wait another 5 seconds
before lighting. Light one burner at a time.

15
LIMITED WARRANTY
Koolmore Supply, Inc. extends a limited warranty to the original purchaser, guaranteeing that this Koolmore
product is free from manufacturing defects in material or workmanship for one year from the date of
purchase.
Should you discover any such defect within the warranty period, Koolmore Supply, Inc., reserves the right to
repair or replace the product without charge, or to cover the cost of replacement parts and repair labor needed
to correct defects present at the time of purchase or resulting from regular usage, when the appliance has been
installed, operated, and maintained as per the instructions provided.
At its sole discretion, Koolmore Supply Inc. may decide to replace the product. In such an event, your replace-
ment appliance will carry the warranty for the remaining term of the original unit's warranty period.
This warranty is valid exclusively to the original purchaser of the product and only applicable within the United
States. The warranty commences from the date of original consumer purchase. Proof of the original purchase
date will be required to obtain service under this warranty.
Under this limited warranty, your sole and exclusive remedy will be product repair, as outlined above. All
services must be provided by a Koolmore-designated service company.
To claim warranty or request repair service:
Email suppor[email protected]. Please include your name, address, phone number, warranty repair request,
and a copy of your proof of purchase receipt. Alternatively, visit koolmore.com and use the contact us page. A
Koolmore customer service representative will promptly arrange service for your appliance.
We thank you for choosing Koolmore.
WARRANTY EXCLUSIONS
This limited warranty will not cover:
1. Failure of the product to perform during power failures or interruptions,
or due to inadequate electrical service.
2. Damage incurred during transportation or handling.
3. Damage caused by accidents, vermin, lightning, winds, fire, floods, or acts of God.
4. Damage resulting from accidents, alterations, misuse, abuse, improper installation, repair, or mainte-
nance. This includes using any external device that alters or converts the voltage or frequency of
electricity.
5. Unauthorized product modifications, repairs by unauthorized centers, or use of non-approved
replacement parts.
6. Abnormal cleaning and maintenance not aligned with the user's manual.
7. Use of incompatible accessories or components.
8. Any costs associated with repairs or replacements under these excluded circumstances shall be the
responsibility of the consumer.
WARRANTY

Table of contents
Other KoolMore Grill manuals
Popular Grill manuals by other brands

Aroma
Aroma AHG-1435 Instruction manual & recipes

FireMagic
FireMagic Echelon quick start guide

George Foreman
George Foreman GGR201RCDSQ Use and care book

Electrolux
Electrolux FN38LP/NG use and care manual

Alice's Garden
Alice's Garden ARAMIS manual

BAR-BE-QUICK
BAR-BE-QUICK Trolley Grill&Bake Build instructions

Jenn-Air
Jenn-Air 730-0337 instructions

Blooma
Blooma Longley instructions

Broil King
Broil King 9986-44 Assembly manual & parts list

Furrion
Furrion FGL200A-SS instruction manual

Tucker Barbecues
Tucker Barbecues CHARCOAL DELUXE Assembly, installation and operating instructions

Nesco
Nesco GRG-1000 instruction manual