Kosei Kogyo KA-G User manual

p.1
KOSEI CHARCOAL GRILLER(KA-G model)
English
instruction
manual
Table of Contents
2….. Names of Parts
3….. How to Set Up Main Unit
4….. How to Install Burner
5….. How to Install Kosei Charcoal (ceramic charcoal)
6….. How to Ignite
7….. Caution Regarding Use
8….. About Cleaning
To Grill for Good Flavor
9….. Before Maintenance
How to recognize malfunctions/ abnormalities
10….. About After-sales Service

p.2
Names of Parts
KA Series (Universal-use model)
(1) Grill surface
(2) Gas connection port
(3) Automatic ignition cock
(4) Drip catch tray
(5) Tong hanger
(6) Adjuster
(7) Gas calorie display table
Heat induction plate
Please note that the shapes of the rear-side and
front-side.
(5) (4) (3) (6) (7)
(2)
(1)
For
use
side
(toward
user)

p.3
How to Set Up Main Unit
1. Please check gas type. It is affixed on the gas connection area.
2. Please handle carefully, avoiding shock while carrying and setting up.
3. Please adjust with the adjustor at the base so that the main unit sits level.
(6) of Page 1
4. Please insert the rubber tube into the rubber tube port up all the way to the red line and fasten it
securely with the rubber tube stop.
Please be careful to use the rubber tube to within 1 m and to not twist or bend the rubber Tube
back and forth. (Please give it some extra leeway.)
Please also take care so that the rubber tube does not touch the appliance.
Please make requests for iron pipe-connected equipment, which is made due to gas type and
size, to an expert gas contractor.
(2) of Page 1
5. Please install the main unit in accordance with the “Fire Protection Performance Rating
Committee” indication, separated by at least 15 cm of space at the back and at least 20 cm at the
sides, and with the hood exhaust at the top and separated by at least 1m of space.
6. Please be sure that the area surrounding the griller is furnished with noncombustible materials.
Please try to surround it with stainless steel or brick, etc.
p.4
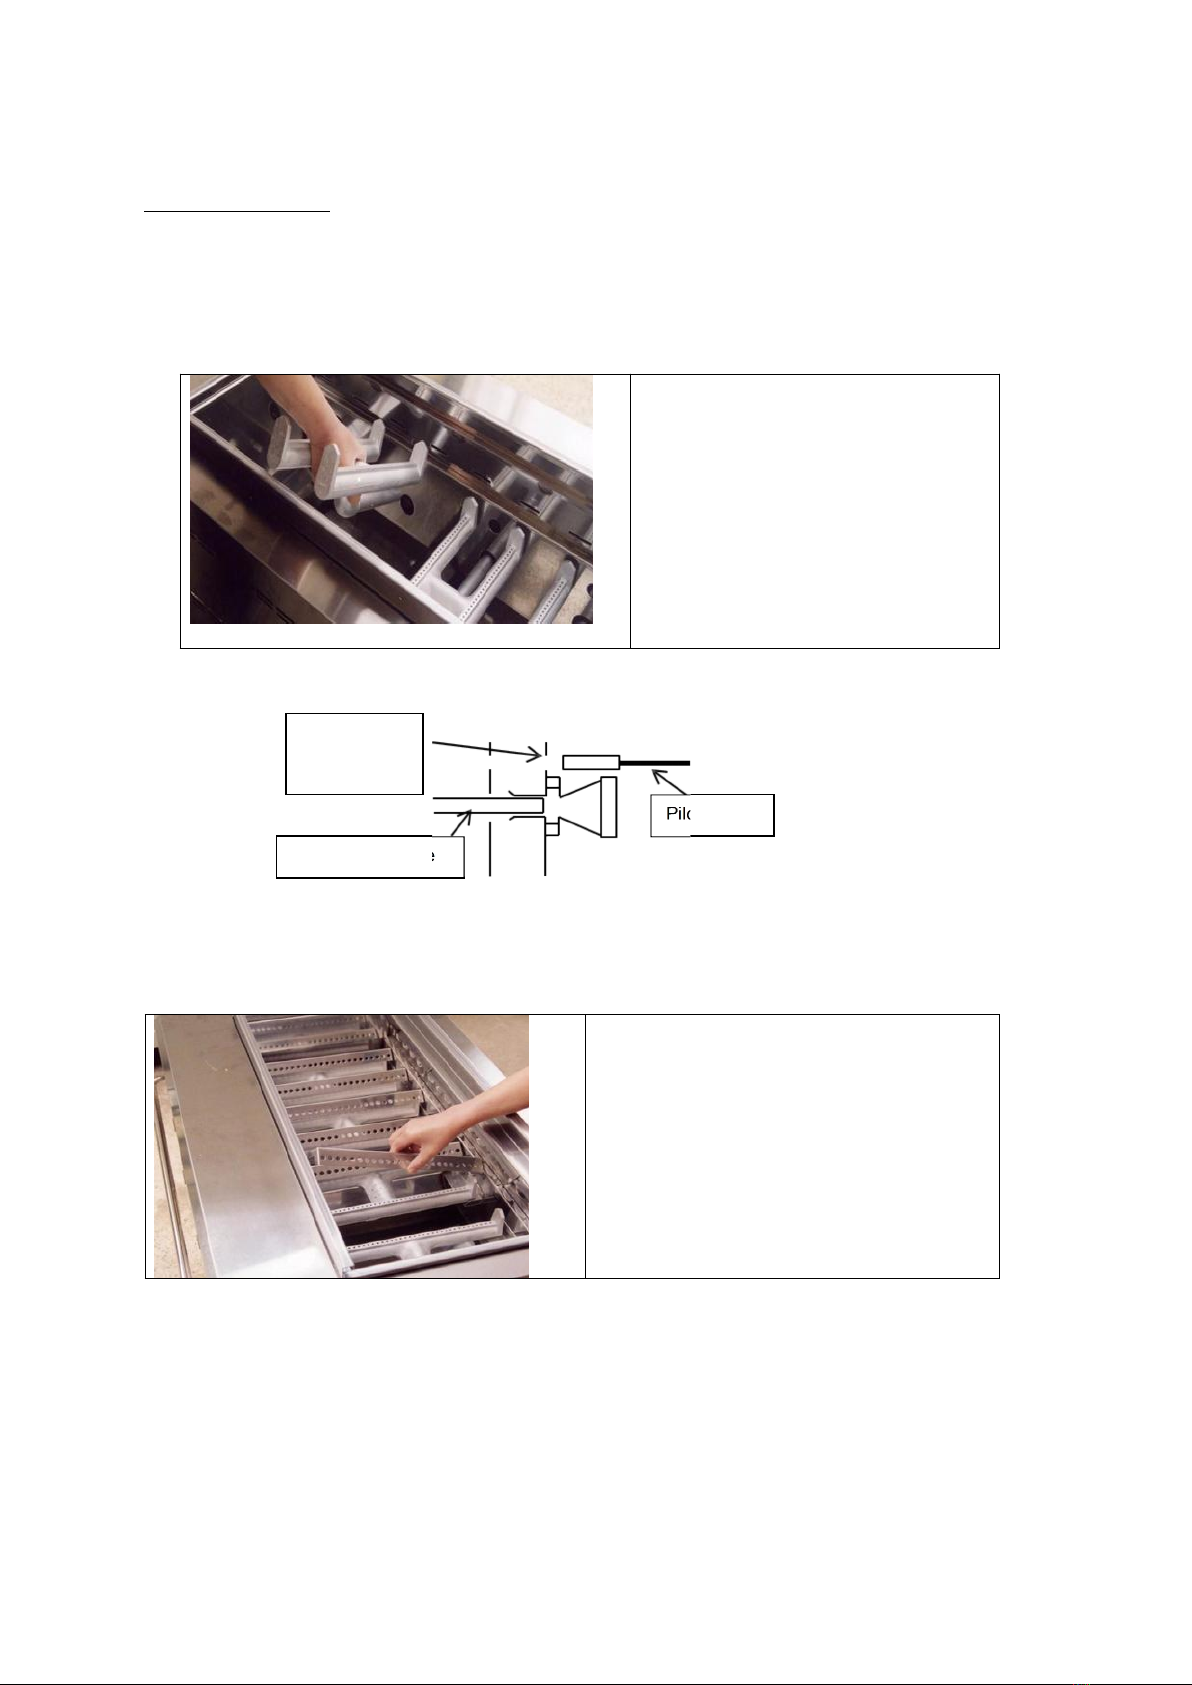
How to Install Burner
1. The opening at the top is the pilot emission opening.
Please insert the mixer tube of the burner main unit into the lower-level hole and deposit it onto
the burner holder.
Please insert into the lower hole of the
front of the burner set and secure to
the burner holder.
Burner insertion cross section
2. Please place the burner cover onto the cover rest of the installed burner.
Please place the burner cover on top of the
set burner.
3. When removing it to clean it etc., please follow the opposite process or 1.2. This is also the case
when replacing the burner.
Pilot
burner
Burner mixer
tube
Pilot flame
emission
opening
p.5
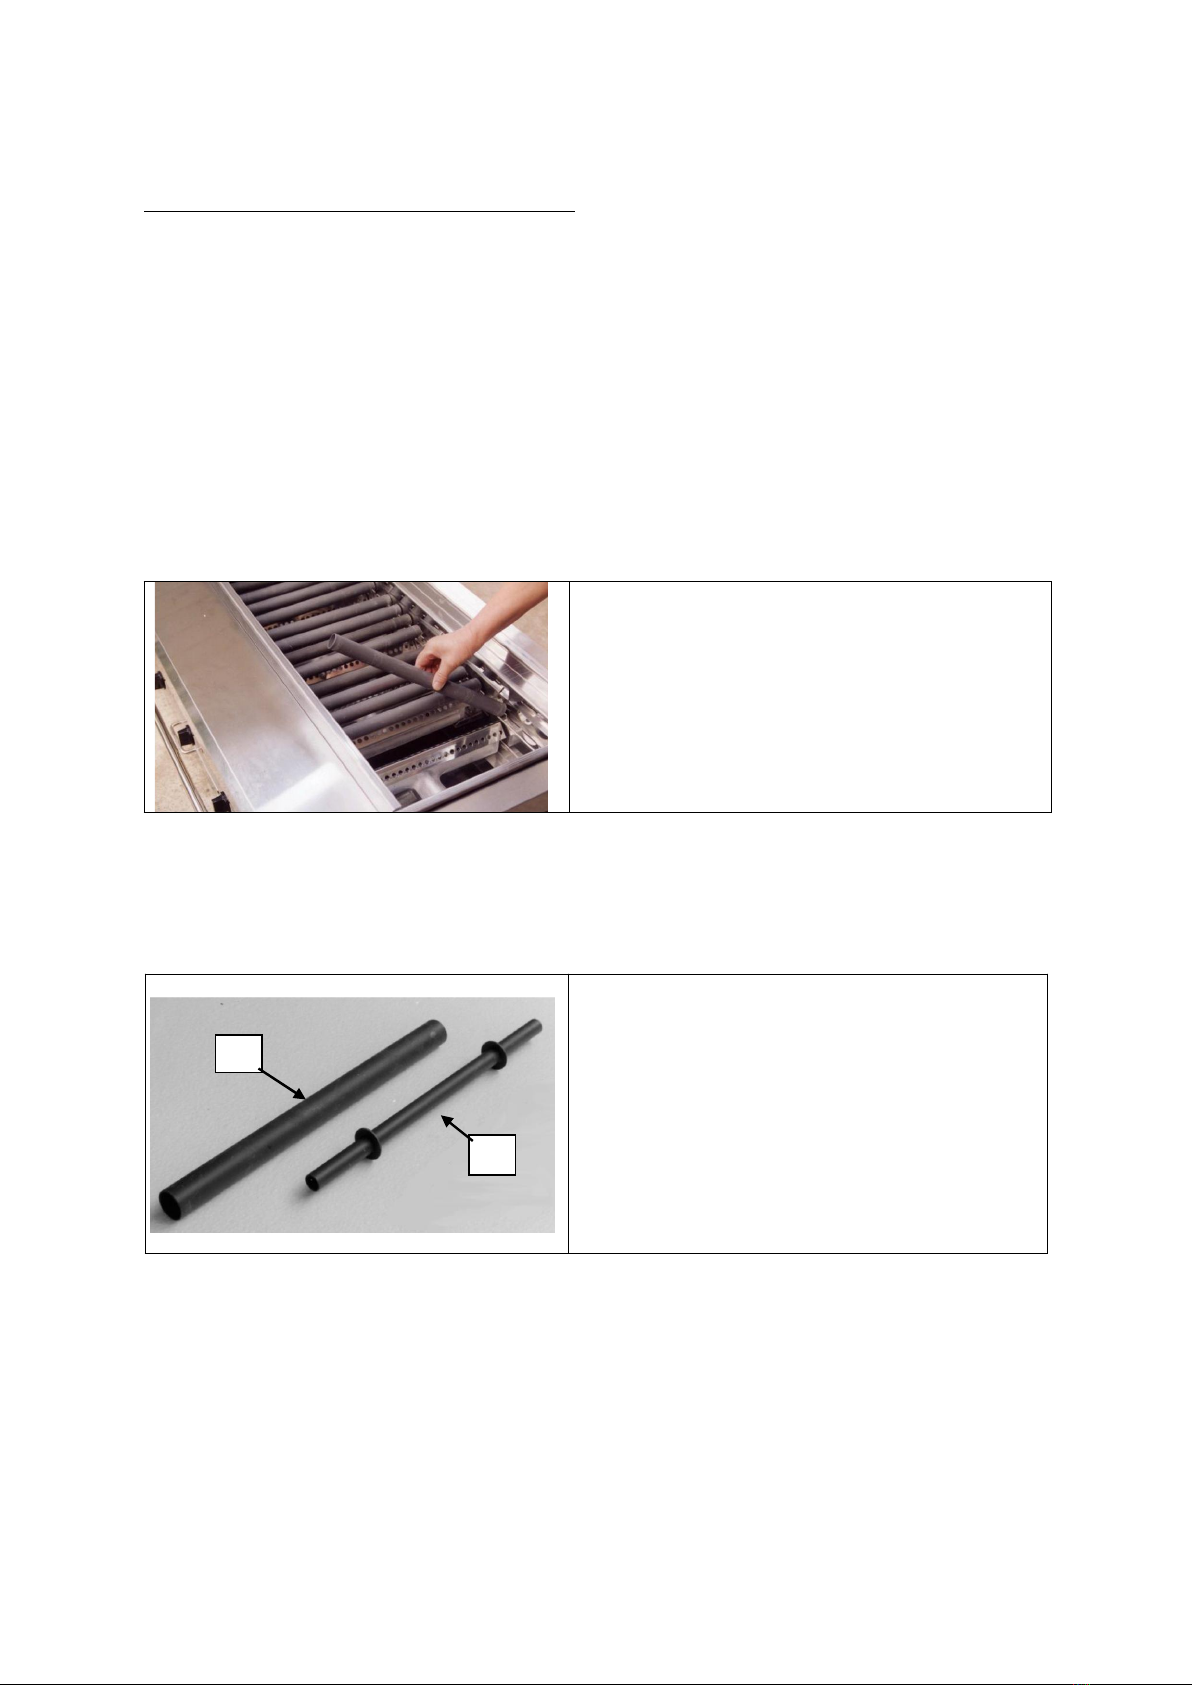
How to Install Kosei Charcoal (ceramic charcoal)
The ceramic charcoal consists of 3 types.
A: 27ΦPipe-type
B: 16ΦWith ring
C: Branch-type (imitating charcoal)
A, B and C are referred to as ‘Kosei charcoal’ as a general term.
1. First, please set the 27Φcharcoal in the concave area of the semicircular charcoal receiver in the
fire bed.
Please set Kosei charcoal 27Φin the front and back
of the charcoal tray.
2. When setting Kosei charcoal, please set the rear heat induction plate first, and then set the 27Φ
charcoal so that it is pressing against the rear heat induction plate.
You will be able to set it efficiently if you set the front heat induction plate after setting the 27Φ
charcoal, 16Φcharcoal. (Refer to Page 1 Heat Induction Plate)
Kosei Charcoal
(1) For KA 27Φcharcoal
(2) “ 16Φcharcoal
(1)
(2)

p.6
3. After setting the 27Φcharcoal, please place the 16Φcharcoal (With ring) between 27Φand
27Φ. Basic set-up is now complete.
You will be able to do standard grilling when you ignite it in this state.
Please place the branch-type casually as though putting down natural charcoal. The dramatic
impact will be increased.
KA Series Kosei Charcoal
Example of setting 16Φcharcoal
Please set between 27Φ
and 27Φ.
How to Ignite
1. Before setting the gas stopcock to ‘Open’, please make sure that the appliance cock is on ‘Shut’.
2. While pushing the ignition knob, please turn it in the ignition direction (counter-clockwise).
The pilot flame will ignite with a clicking sound. When you let go of it at this point, the main
burner will ignite. (If it does not ignite the first time, please repeat the same action again slowly.)
It will take some time when the appliance is first installed, as there will be air inside the appliance.
When setting to medium flame, please use at the middle position. In this instance as well, please
set to full-open first and then turn it back to medium flame.
3. To put out the flame, please turn the knob back. (In a clockwise direction)
4. When you are finished using it, please be sure to shut off the gas stopcock.
p.7
Caution Regarding Use
1. The Kosei Charcoal Griller is a professional grilling device for business use and has high heating
power, and as such it is recommended for use by persons who are familiar with,
or for use under the guidance of persons who are familiar with, the handling of professional
appliances.
2. After making sure that the griller cock is shut off, please perform the actions for ignition with the
stopcock fully open.
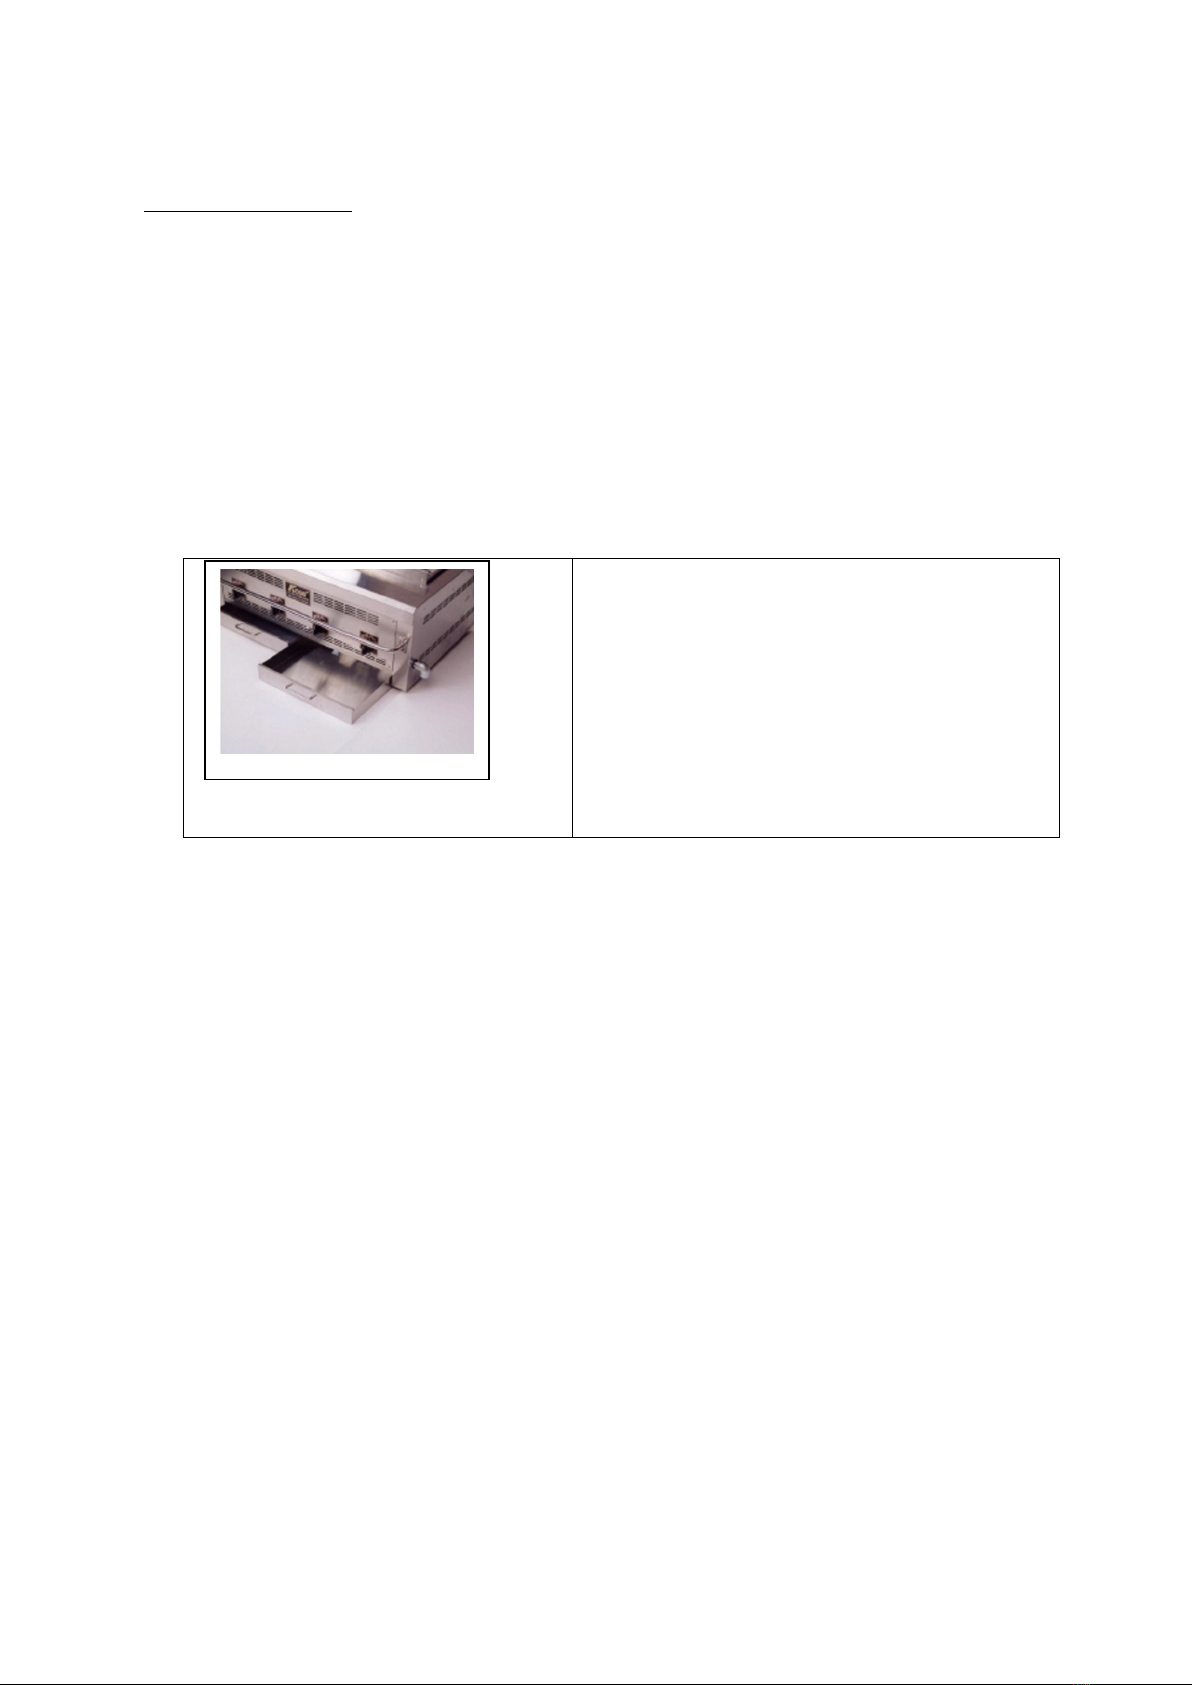
3. Please be absolutely sure to put water into the drip catch tray drawer below.
Cleaning later is also made easy if you lay out aluminum foil underneath.
20A
Drip catch tray
KA Series
20A Gas connection port
Elbow facing down
Drip catch tray
4. This griller is a grilling and broiling cooking machine. Please do not ever use it or modify it etc.
(teppan-yaki) for any other purpose. There is risk of death or serious injury.
Please be in absolutely
strict compliance in order to prevent injury or asset loss before such occurs.
5. If residual grilling matter or sauce etc. should fall in large quantities even during use, please use a
rod-shaped object to remove the residual matter etc.
so that the flame below can be seen between the Kosei charcoal pieces while using the griller.

p.8
About Cleaning
1. It is not necessary to wash Kosei charcoal every day, but if there is sauce etc. that is stuck to it,
please turn the ceramic charcoal halfway over with the stuck sauce etc.
facing downward the next
day to the extent possible prior to use, so that it will then become ash when ignited.
Please make left-over ash at the top fall into the drip catch tray.
2. Please clean the drip catch tray every day or as needed. Please be careful, as residual grilling
matter etc. will catch fire if it accumulates and will become a cause of accidents.
3. After tending to grime in the main unit, please sufficiently eliminate moisture with a dry cloth.
If grime is left on the way it is, it burns on and becomes hard to remove.
4. Please remove grime stuck to the walls of the fire bed with a spatula, etc.
5. Never pour water on it.
The outside, fire bed area and entire main unit must never, ever be washed with water. (The life
span of the main unit will be shortened considerably.)
To Grill for Good Flavor
1. Always heat for 6~8 minutes after ignition and let the Kosei charcoal warm up sufficiently
and use the griller in such a way that far infrared radiation is emitted in a highly efficient state.
If you use the
grilling grate during this time, the grilling grate will also heat up at the same time
and it will become harder for food to become burned and stuck on.
2. This griller is regularly used as the next closest thing to grilling with charcoal, but it unfortunately
does not give the aroma of natural charcoal. If you desire the aroma of natural charcoal, please
place 2~3 pieces of unlit natural charcoal in the fire bed. They will gradually catch fire and your
grilled food will have the greatest grilled flavor through the aroma of natural charcoal
and a smoked
effect. However, please be sufficiently careful to put in no more than 2~3 pieces of
natural charcoal at maximum, and after you are finished with operations,
please be sure to make ashes fall into the
drip catch tray and to be diligent in sufficiently disposing of remaining lit ashes and charcoal.
3. A rough guideline for the amount of natural charcoal to put in is one approximately 10 cm piece of
charcoal per burner.

p.9
Before Maintenance
Immediately after using the griller, the appliance and especially the fire bed will reach high
temperatures and, as such, there is the risk of burns etc., so please wait to do maintenance
until it has sufficiently cooled.
How to recognize malfunctions/ abnormalities
Phenomenon Cause How to treat
Does not ignite
-No gas comes out
-There is no more gas
-Burner nozzle is clogged
Please fully open the gas stopcock
Please contact an LP gas contractor
Please contact the store
Gas odor
-Appliance stopcock abnormality
-The gas being used and the gas type
do not match
Please contact the store
“
Sooty red flame
appears during burning
-Gas pressure is not suitable
-Air conditioning is not adequate
-Damper (air intake port)
is clogged
Contact gas company
Contact the store
“
Appliance stopcock
(cock) is stiff and does
not turn
Is abnormally loose
-Malfunction of appliance stopcock
-Scorched appliance stopcock
Contact the store
Flame becomes large or
becomes red
-Burner ports are clogged
-Has not been placed in a level
location.
-Burner is damaged
Please clean burner pots with a drill,
etc.
Please place in a level place
Please replace burners with new ones

p.10
About After-sales Service
When requesting inspections and repairs, please look at Page 9 “How to recognize malfunctions/
abnormalities” and check things once more, and if there is still no improvement then please contact
the store. When ordering repairs, please give the following information.
A. Please give your address, name, telephone number, nearby landmarks, etc.
B. The trouble phenomenon (in as much detail as possible)
C. Model name or size and shape D. Date of purchase,
gas type
Please store this instruction manual carefully, use it if you have any questions,
and take care to use the griller in its best condition for many years to come.
When having repairs done during the warranty period, please show
this written warranty.
Repairs will be made according to the stipulations of the written warranty. (Store)
When the warranty period has expired, if repairs are to be done we will do them
to the extent possible. (Store)
Technical fee : This is the charge for repairing malfunctioning appliances.
(There are instances in which complete repair may not be possible.
The customer will be consulted in such instances.)
Parts charges : These are the charges for parts used in repairs.
Out-call charges : These are the expenses for dispatching technicians to the place that the appliance
was installed at. Separate parking charges, transportation costs, trains, airfare,
etc.
We give you our deep and sincere thanks for your purchase, and we offer our heartfelt wish that this
griller will be able to contribute to even greater development of your establishment.
Table of contents
Popular Grill manuals by other brands


Kenmore
Kenmore 415.16123800 Use and care guide

Tucker Barbecues
Tucker Barbecues GTR Series Assembly, installation and operating instructions

Monogram
Monogram ZGG540NCP1SS owner's manual

Equipex
Equipex Sodir Savoy Operation manual

Gaggenau
Gaggenau VR 414 610 use and care manual

Miele
Miele KM 408-1 operating instructions


