PL
Instrukcja obsługi
PL
Instrukcja obsługi
18 19
4. Potwierdzić godzinę przy pomocy przycisku
Alarmu 1 lub 2, lub odczekać 5 sekund, aby
godzina została potwierdzona samoczynnie.
5. Nacisnąć ponownie przycisk Alarmu 1 lub 2,
aby wybrać rodzaj budzika: radio lub
brzęczyk, lub wyłączyć alarm.
Po aktywacji alarmu o ustawionej godzinie:
• Nacisnąć przycisk Radia, aby wyłączyć alarm.
• Nacisnąć przycisk Drzemki, aby włączyć 9
minutową drzemkę.
• Aby wyłączyć drzemkę należy nacisnąć
przycisk Radia.
• Jeżeli alarm nie zostanie wyłączony przyciskiem,
wyłączy się on automatycznie po godzinie.
• Alarm włączy się ponownie po 24 godzinach.
Aby całkowicie wyłączyć alarm należy
nacisnąć przycisk Alarmu 1 lub 2, aż
wskaźniki alarmu wyłączą się.
Ustawianie timera
Radio posiada funkcję automatycznego
wyłączania po określonym czasie. Aby ją ustawić:
1. Podczas słuchania radia należy nacisnąć
przycisk wyłącznika czasowego. Na
wyświetlaczu pojawi się migająca liczba 90,
wskazująca minuty do wyłączenia.
2. Naciskać przycisk wyłącznika czasowego, aż
do uzyskania żądanego czasu.
3. Po 2 sekundach od wybranego czasu
wyłączenia, na wyświetlaczu ponownie
pojawi się aktualny czas, a radio wyłączy się
po ustawionym czasie.
4. Nacisnąć przycisk wyłącznika czasowego,
aby wyświetlić aktualny czas do wyłączenia
radia.
5. Aby wyłączyć funkcję timera, należy
naciskać przycisk wyłącznika czasowego, aż
• Podczas zasilania z baterii, wyświetlacz
wyłączy się po 15 sekundach bezczynności.
Aby wybudzić wyświetlacz należy nacisnąć
dowolny przycisk.
• Jeżeli baterie są włożone podczas zasilania z
sieci, będą one działały do podtrzymywania
zegara i pamięci stacji radiowych podczas
zaniku zasilania.
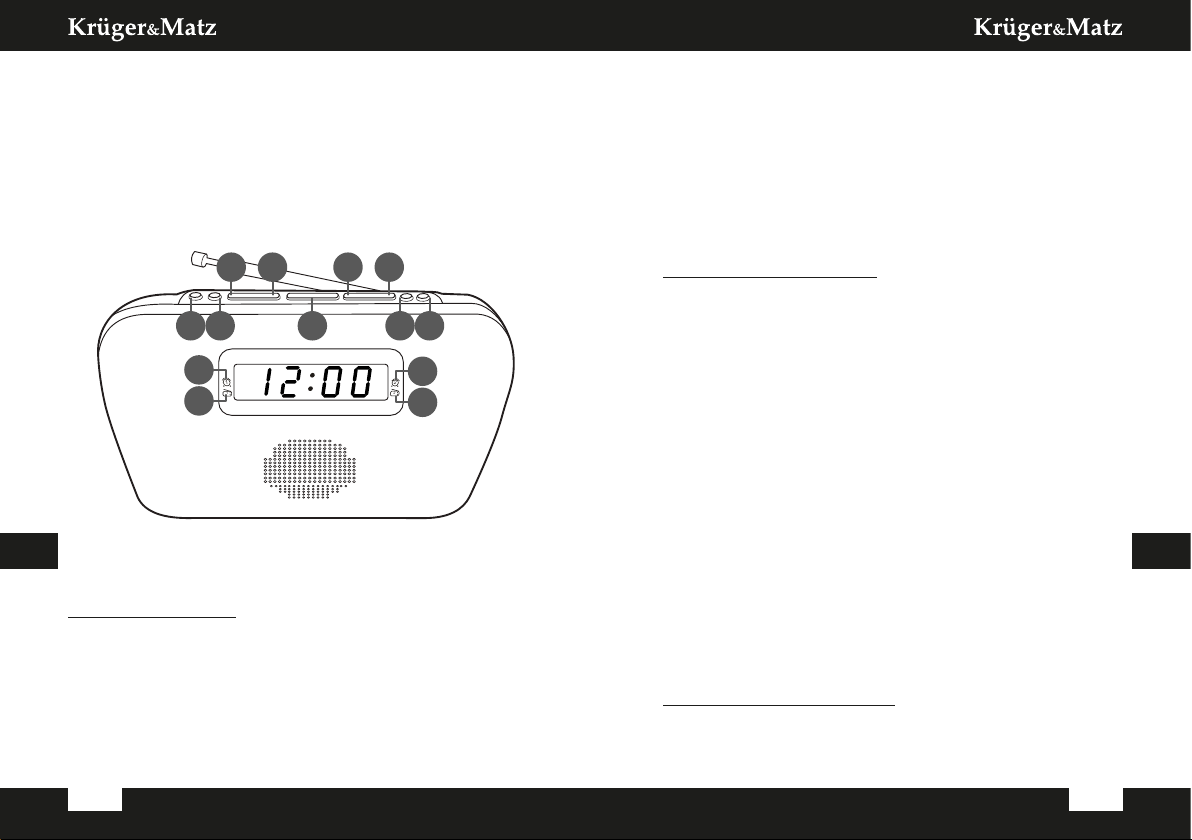
Ustawianie zegara
1. Przy pierwszym włączeniu urządzenia, na
wyświetlaczu pojawi się migająca godzina
0:00, wskazując, że zegar nie jest ustawiony.
2. Nacisnąć przycisk HR, aby ustawić godzinę.
Nacisnąć przycisk MIN, aby ustawić minuty.
Nacisnąć i przytrzymać przycisk HR lub MIN,
aby szybko zmieniać godziny lub minuty.
3. Po ustawieniu poprawnej godziny, należy
nacisnąć przycisk ustawiania czasu, lub
zaczekać 5 sekund. Po tym czasie zegar
potwierdzi godzinę samoczynnie.
Aby zmienić ustawiony czas:
1. Należy upewnić się, że radio jest wyłączone.
2. Nacisnąć i przytrzymać przycisk ustawiania
czasu, aż godzina na wyświetlaczu zacznie
migać.
3. Powtórzyć kroki 2-3 z poprzedniego akapitu.
Ustawianie alarmu
Uwaga: jeżeli dźwiękiem alarmu ma być radio,
przed ustawieniem alarmu należy ustawić
radio na wybraną stację i głośność.
1. Upewnić się, że radio jest wyłączone.
2. Nacisnąć i przytrzymać przycisk Alarmu 1
lub Alarmu 2. Godzina zacznie migać.
3. Użyć przycisków HR i MIN, aby ustawić
godzinę alarmu.