LED
MOON
ANLEITUNG
MANUAL
SICHERHEITSHINWEISE
SAFETY INSTRUCTIONS
• Diese Produkte können bei unsachgemäßer Installaon oder Anbringung eine mögliche Stromschlag- oder Brandgefahr darstellen. Die Produkte sollten in Übereinsmmung mit dieser Anleitung, den
geltenden Elektrovorschrien und/oder dem aktuellen Naonal Electric Code (NEC) installiert werden.
Um das Risiko eines Brandes, eines elektrischen Schlages oder einer Verletzung von Personen zu vermeiden, stellen Sie sicher, dass die Stromzufuhr zum Gerät vor der Installaon oder einer Wartung
an der Quelle unterbrochen wird.
• These products may represent a possible shock or re hazard if improperly installed or aached in any way. Products should be installed in accordance with these instrucons, current electrical codes,
and/or the current Naonal Electric Code (NEC).
To reduce the risk of re, electric shock or injury to persons, make sure that the electrical power to the xture is disconnected at the source prior to installaon or any servicing.
WARNUNG
WARNING
• Auf dieses Produkt wird eine Garane von 2 Jahren gewährt. Die Garanezeit beginnt mit dem Rechnungsdatum. Die Garane bezieht sich auf Materialfehler
oder Fehlfunkonen, die nicht durch unsachgemäßen Gebrauch verursacht wurden. Im Garanefall den Strahler bie mit einer Kopie der Kaufrechnung an den
Händler zurückgeben. Die Strahler werden entweder repariert oder ausgetauscht.
Die Leuchte nicht mehr benutzen, wenn Teile defekt sind oder fehlen. Für Folgeschäden, die durch defekte Teile verursacht werden, kann keine Garaneleis-
tung in Anspruch genommen werden. Bei Zuwiderhandlung erlöschen die Garane und die Betriebssicherheit. Unter den folgenden Umständen werden die
Reparaturkosten berechnet:
1. Nach Ablauf der Garanezeit.
2. Die Leuchte durch unsachgemäßen Gebrauch beschädigt wurde.
3. Die Leuchte durch Fall bzw. Anstoß beschädigt wurde.
4. Bei Folgeschäden die entstehen, weil der Strahler mit defekten Teilen weiterbenutzt wurde.
• The warranty of this product is valid for two years aer purchasing. The me of warranty starts with the date on purchase
invoice. The warranty extends over material defects or dysfuncons that are not caused by improper use. In case of
guarantee please ll out the customer service form full and return this together with lamp and a copy of the purchase
invoice to the local distributor. The lamp will be repaired, or a replacement will be issued.
Secondary damage caused using the lamp with broken parts are not covered by the warranty.
In case of misuse, the warranty will be invalidated.
For the following condions we will repair the product at appropriate charge:
1. Beyond the warranty me.
2. If lamp has been damaged by improper operaon.
3. If lamp has been cracked or damaged by impact.
4. Secondary damages caused by the use with broken parts (such as broken housing or switch rubber)
KUNDENSERVICE
AFTER SALES SERVICE
• Lesen Sie vor der ersten Verwendung des LED-Moons sorgfälg die Bedienungsanleitung und bewahren Sie diese für zukünige Referenzzwecke auf.
• Überprüfen Sie vor jedem Gebrauch die Leuchte und das Zubehör auf eventuelle Schäden oder Mängel. Verwenden Sie die Leuchte nicht, wenn sie beschädigt ist
oder nicht ordnungsgemäß funkoniert.
• Achten Sie darauf, dass das Stromkabel und der Anschluss in gutem Zustand sind und keine Beschädigungen aufweisen. Verwenden Sie ausschließlich zugelassene
Verlängerungskabel und stellen Sie sicher, dass diese für den Außenbereich geeignet sind.
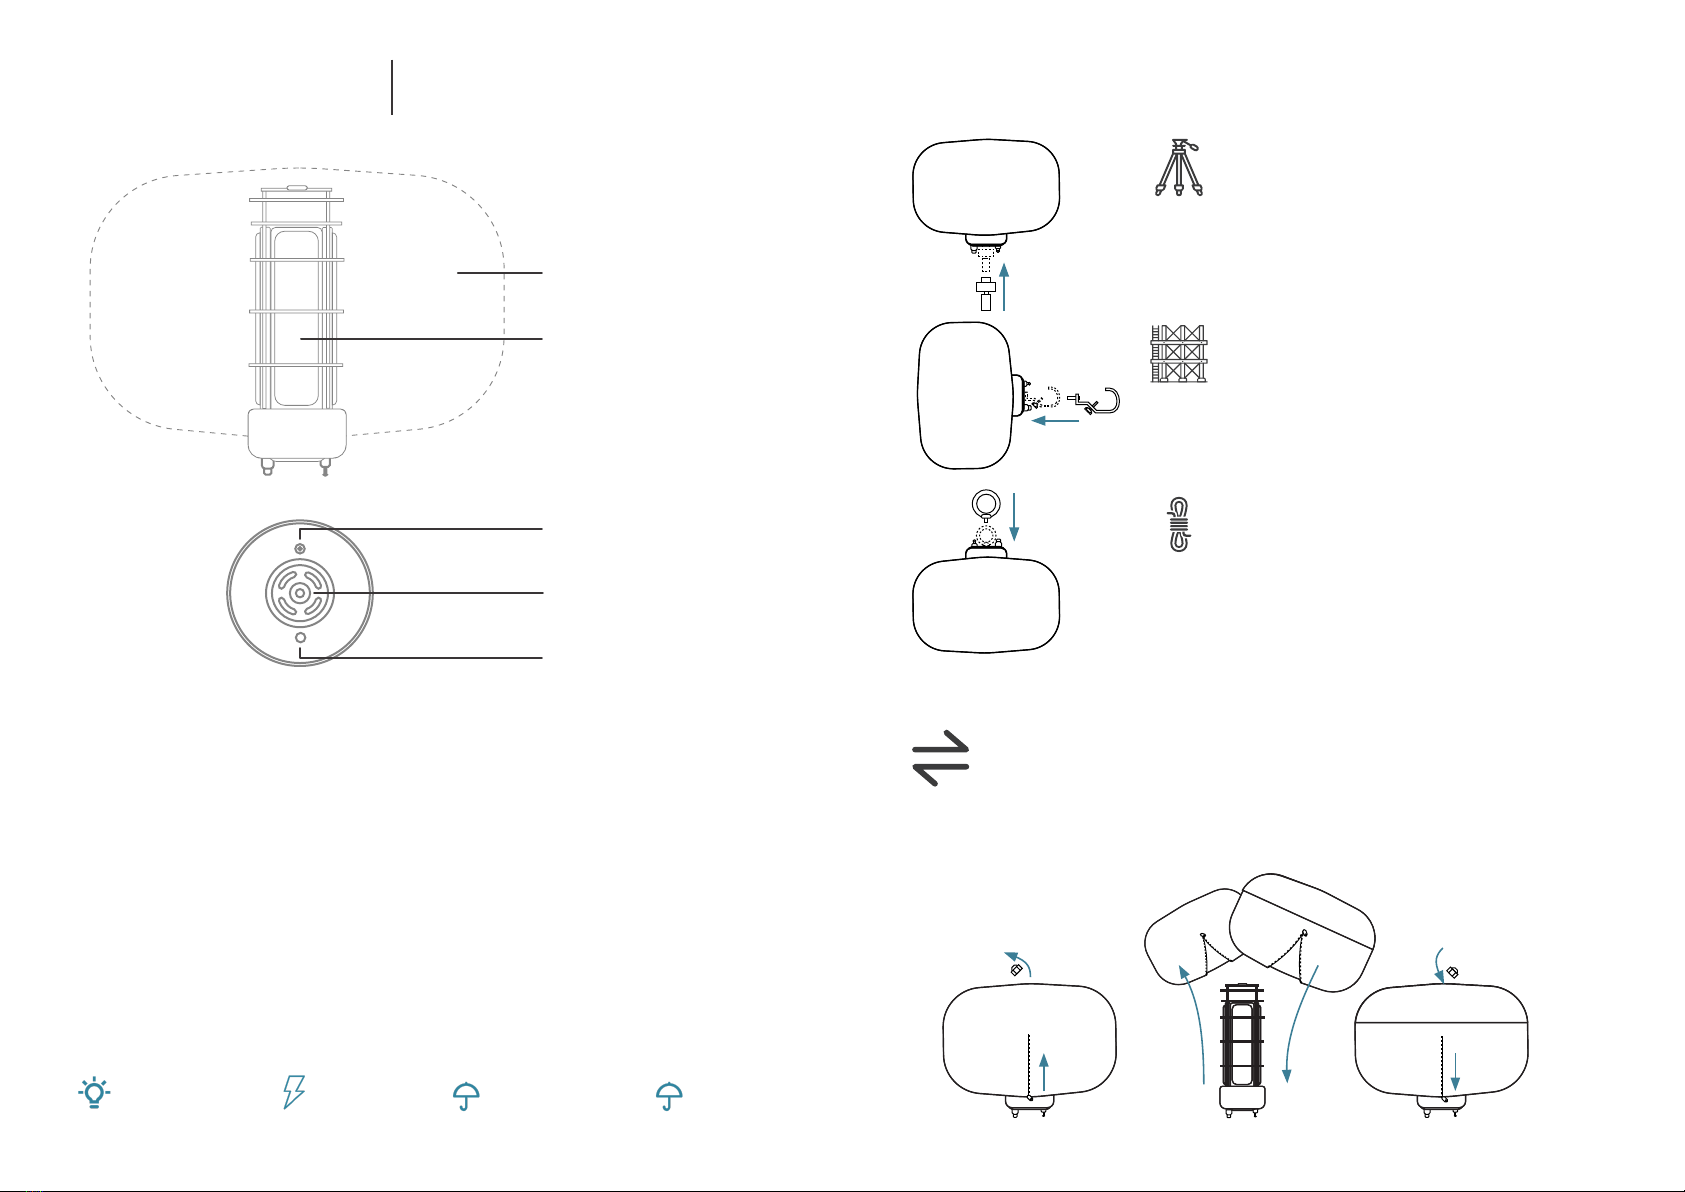
• Posionieren Sie den LED-Moon auf einer ebenen, stabilen und rutschfesten Oberäche, um ein Umkippen oder Verrutschen während des Betriebs zu verhindern.
• Halten Sie den LED-Moon von Wasser, Feuchgkeit und entzündlichen Materialien fern. Die Leuchte ist zwar für den Außenbereich konzipiert, sollte jedoch vor
extremen Wierungsbedingungen wie starkem Regen oder Schnee geschützt werden.
• Lassen Sie die Leuchte während des Betriebs nicht unbeaufsichgt und achten Sie darauf, dass Kinder und Hausere sich nicht in unmielbarer Nähe aualten.
• Berühren Sie die Leuchte und den Diusor nicht während des Betriebs, da sie sich erhitzen können. Warten Sie, bis die Leuchte vollständig abgekühlt ist, bevor Sie
sie anfassen oder transporeren.
• Schalten Sie die Leuchte aus und trennen Sie sie vom Stromnetz, bevor Sie den Diusor wechseln, Wartungsarbeiten durchführen oder das Gerät reinigen.
• Verwenden Sie ausschließlich vom Hersteller empfohlene Ersatzteile und Zubehör, um die opmale Funkon und Sicherheit des LED-Moons zu gewährleisten.
• Im Falle einer Fehlfunkon oder eines elektrischen Problems ziehen Sie sofort den Netzstecker und kontakeren Sie einen Fachmann oder den Hersteller für weitere
Anweisungen.
• Before using the LED Moons for the rst me, carefully read the operang instrucons and keep them for future reference.
• Before each use, inspect the xture and accessories for any damage or defects. Do not use the xture if it is damaged or not funconing properly.
Ensure that the power cord and connector are in good condion and free of damage. Use only approved extension cords and make sure they are suitable for outdoor
use.
• Posion the LED-Moon on a at, stable and non-slip surface to prevent it from pping over or slipping during operaon.
• Keep the LED-Moon away from water, moisture and ammable materials. Although the xture is designed for outdoor use, it should be protected from extreme
weather condions such as heavy rain or snow.
• Do not leave the xture unaended during operaon and ensure that children and pets are not in the immediate vicinity.
• Do not touch the xture or diuser during operaon as they may become hot. Wait unl the xture has cooled down completely before handling or transporng it.
• Switch o the light and disconnect it from the power supply before changing the diuser, performing maintenance or cleaning the unit.
• Use only spare parts and accessories recommended by the manufacturer to ensure opmal funcon and safety of the LED Moons.
• In the event of a malfuncon or electrical problem, unplug the unit immediately and contact a professional or the manufacturer for further instrucons.