KTS-Electronic GPA 1000 User manual

Ground
Penetrating
Analyzer
GPA 1000
User’s Manual KTS – 3 D
KTS-Electronic
Germany

Table of content
1General guidelines...........................................................................4
1.1 Preface.......................................................................................................4
1.2 Important details.......................................................................................4
1.3 Scope of delivery......................................................................................4
2Hardware operation .........................................................................6
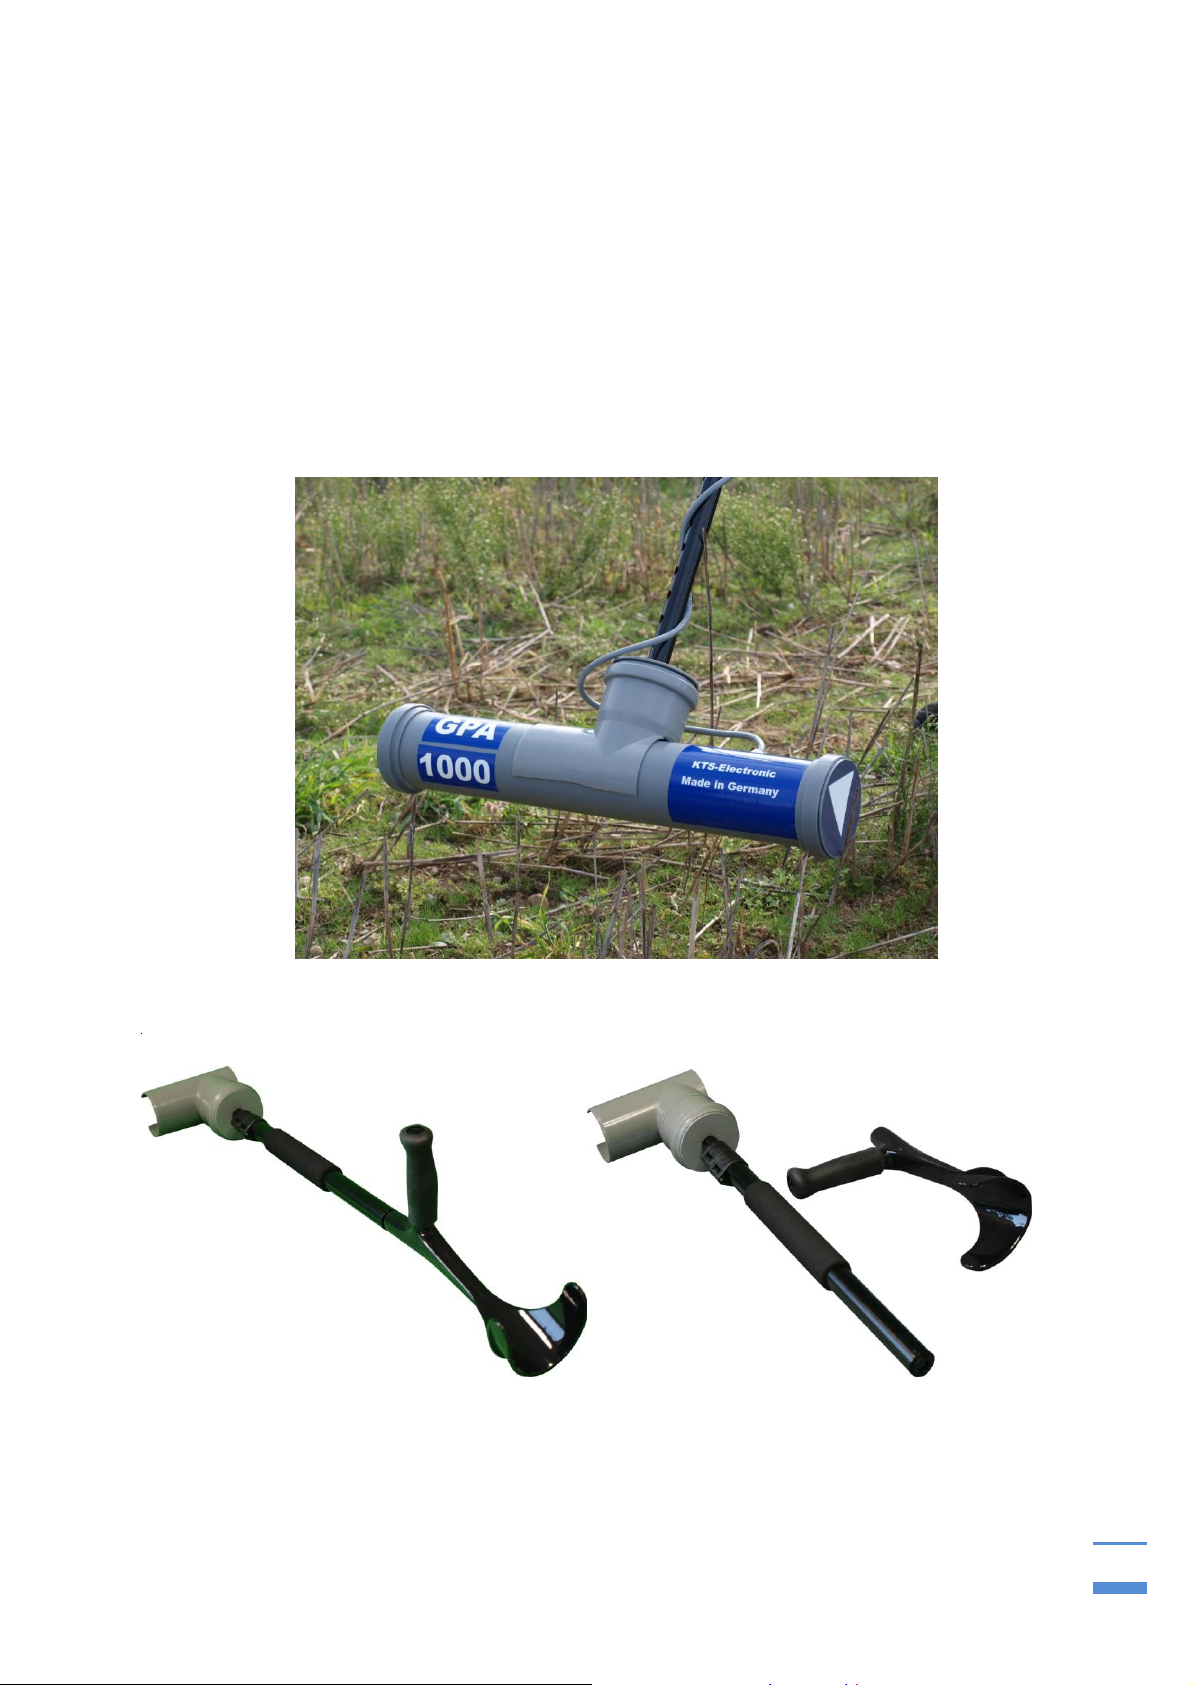
2.1 Assembly...................................................................................................6
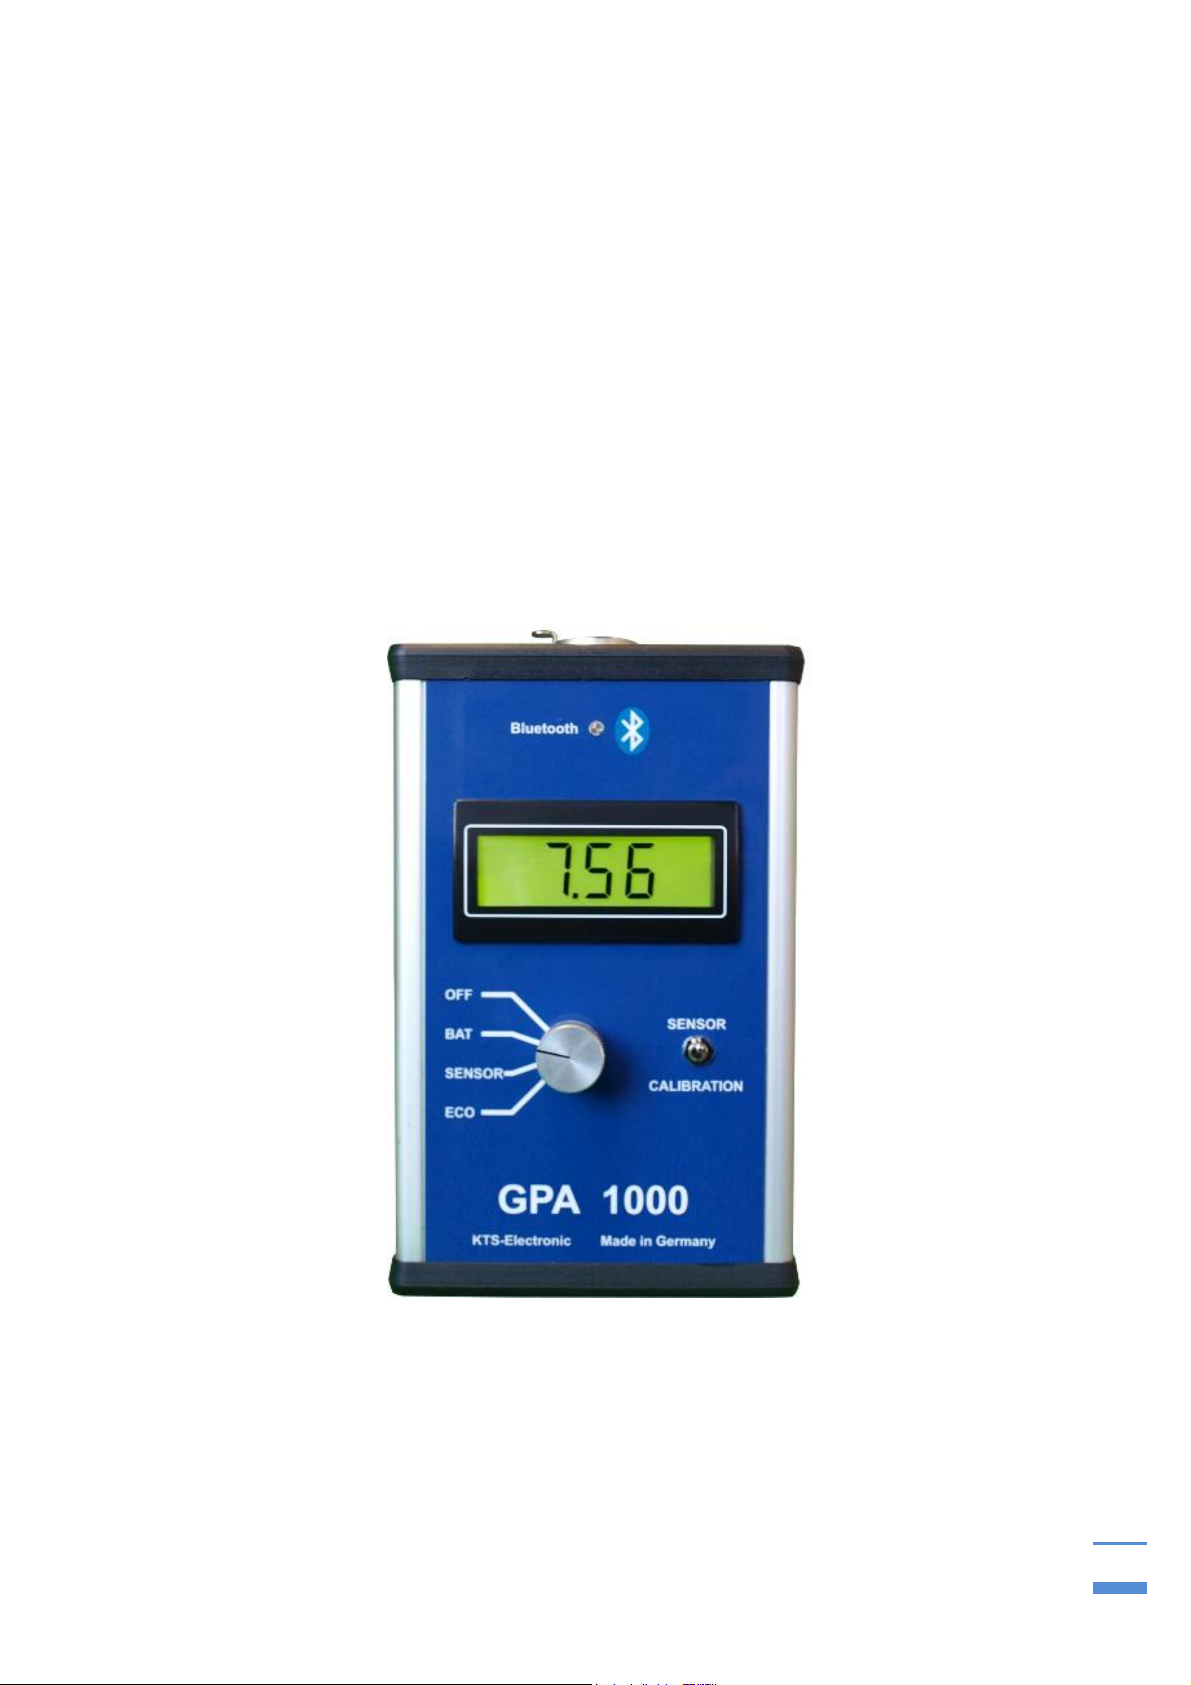
2.2 Front ..........................................................................................................7
2.3 Starting the electronic..............................................................................8
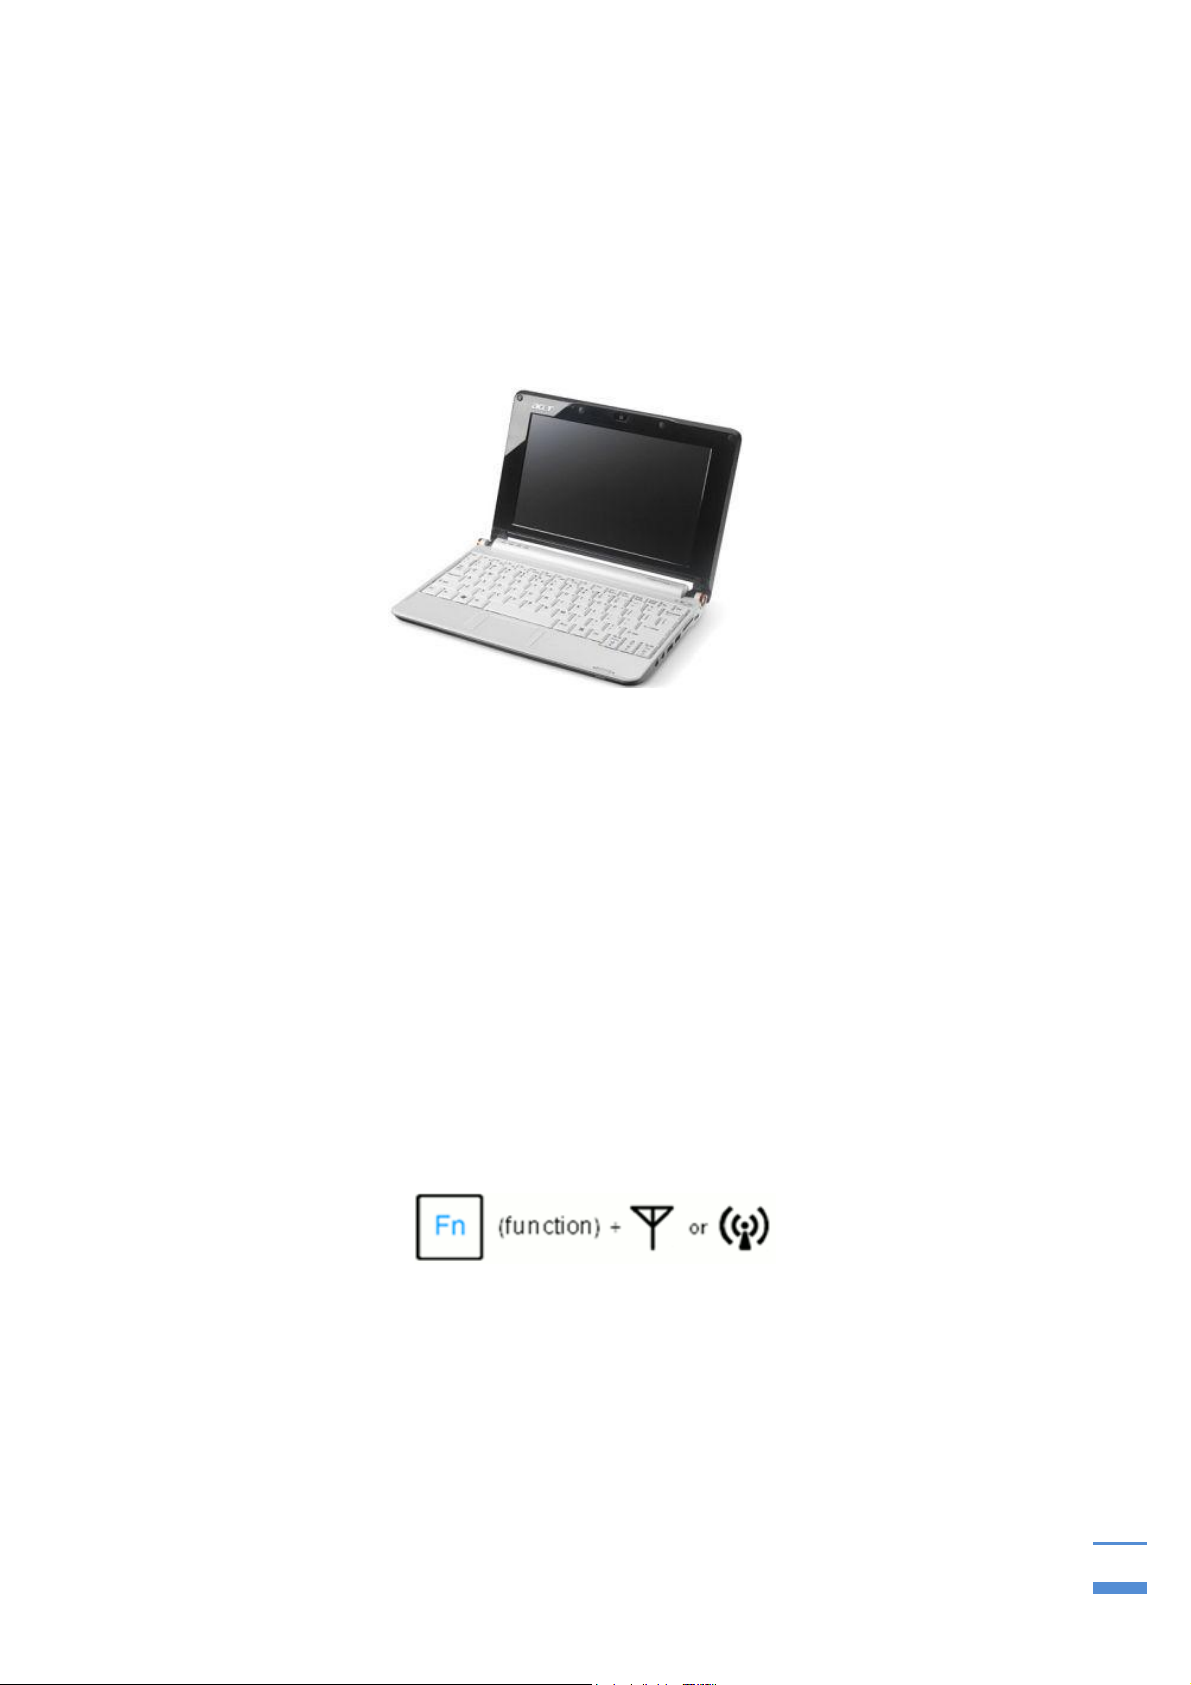
3Program start ...................................................................................9
3.1 Software-reinstalling (with reinstalling of Windows).............................9
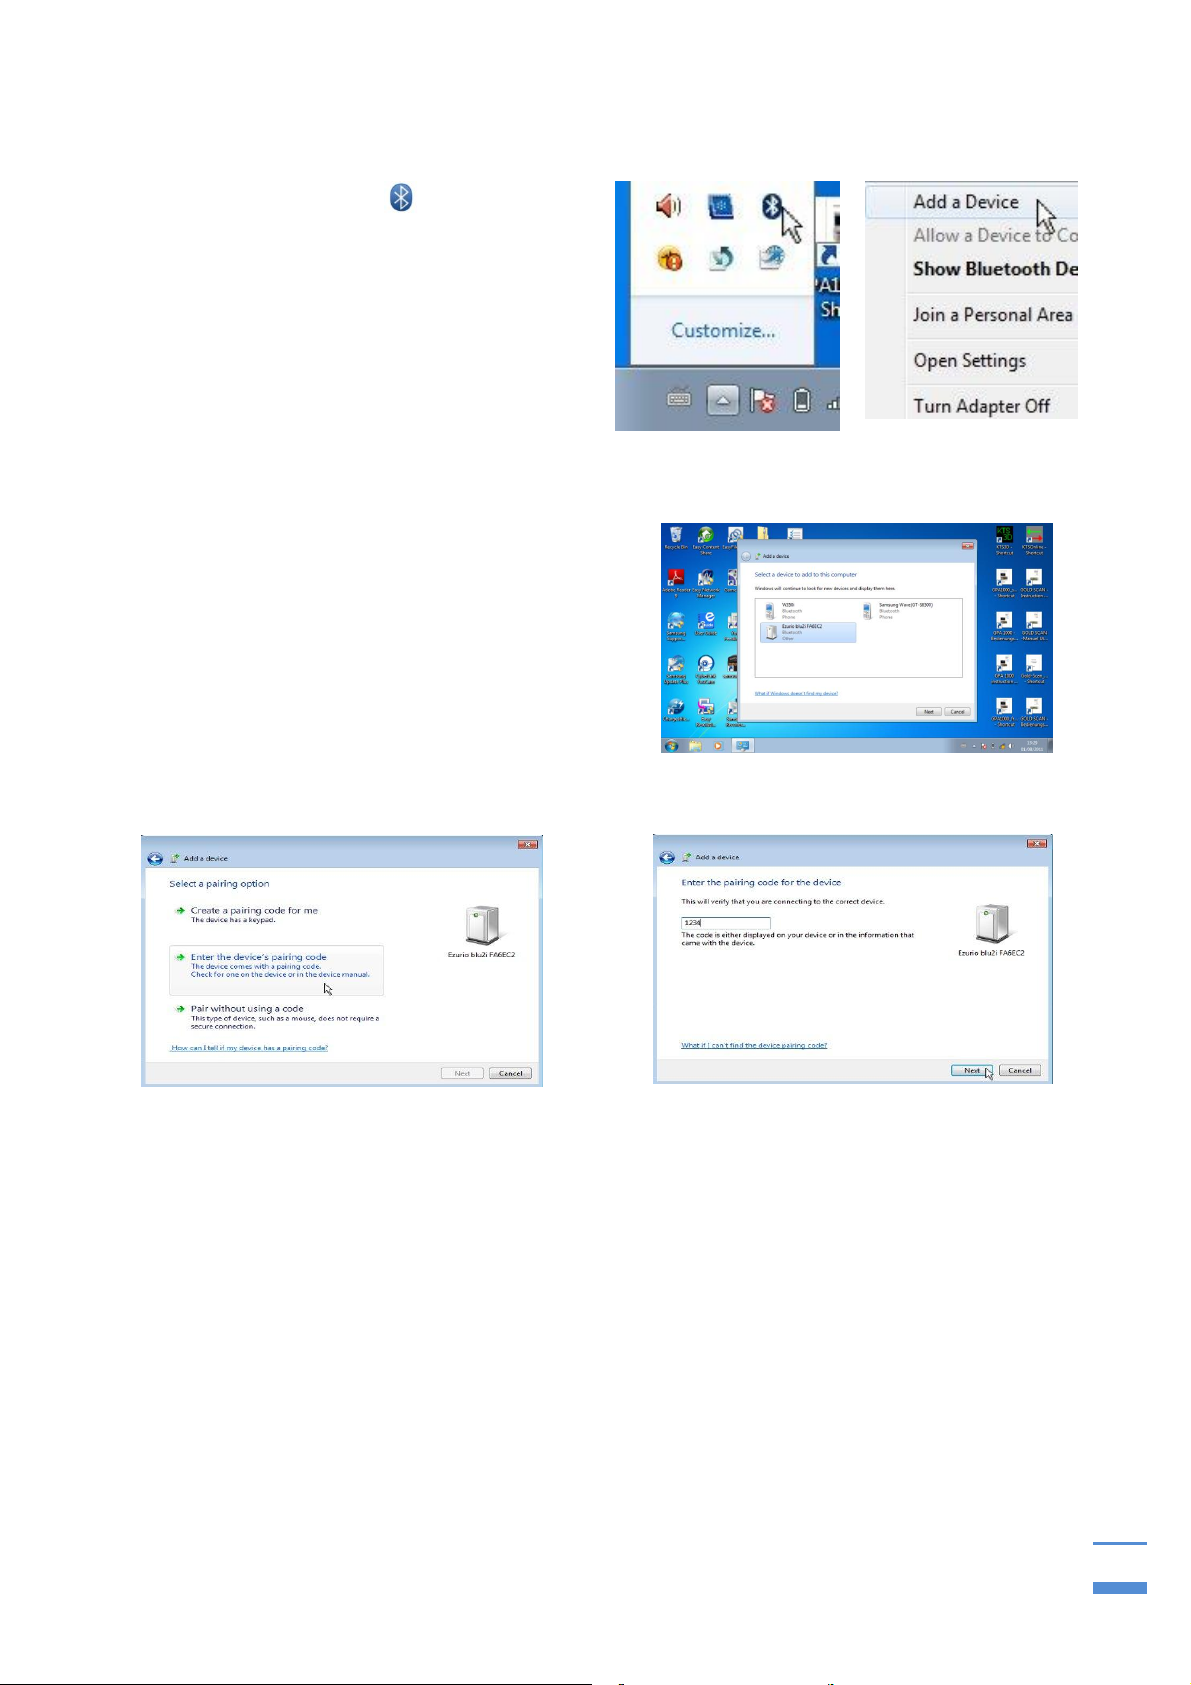
3.2 Bluetooth pairing......................................................................................9
4The search process .......................................................................11
4.1 Search with the universal probe............................................................11
4.2 Search with the super probe..................................................................11
4.3 Live mode................................................................................................12
4.4 3D-search mode......................................................................................12
4.4.1 Preadjustment...........................................................................................13
4.4.2 Start-button...............................................................................................13
4.4.3 End of measurement ................................................................................13
4.4.4 Transfer of measurement data..................................................................14
4.4.5 3-D figures................................................................................................14
4.5 Search process (measurements) ..........................................................14
4.5.1 Searches in counter direction ...................................................................16
5Program operations.......................................................................17
5.1 Main window ...........................................................................................17
5.1.1 Toolbar .....................................................................................................17
5.1.2 Display range............................................................................................18
5.2 Menu bar..................................................................................................18
5.2.1 Data menu................................................................................................18
5.2.2 Display menu............................................................................................18
5.2.3 Options menu ...........................................................................................18
5.2.4 Info menu..................................................................................................18
5.3 Options window......................................................................................19
5.3.1 Paths ........................................................................................................19
5.3.2 Colors and coordinates.............................................................................19
5.3.3 Languages................................................................................................20
6Data recordings..............................................................................20
6.1 Adjustment before data recording ........................................................20
6.1.1 Display during data recording...................................................................21
6.1.2 Display after completion of data recording................................................21

6.2 Display alternatives................................................................................22
6.2.1 Figures proportional or quadratic..............................................................22
6.2.2 Figures data absolutely or relatively .........................................................22
6.3 Accumulator and charger ......................................................................22
7System requirements and license agreements ...........................23
7.1 System requirements .............................................................................23
7.2 License agreements ...............................................................................23
7.3 Utilization regulations ............................................................................23
7.4 Liability exclusions.................................................................................23
8Warranty.........................................................................................24
8.1 After expiration date...............................................................................24
8.2 Legal note................................................................................................24
9Contact ...........................................................................................25

KTS-Electronic GPA 1000
4
1 General guidelines
1.1 Preface
We congratulate you on your purchase of one of the most advanced geophysical
ground control equipments –GPA 1000.
The assembly is very simple since the programs are already pre-installed. The
instruction manual is written in plain style and is easy to understand primarily
because of numerous illustrations. This instruction has been developed by the KTS-
Electronic company. Any alterations or duplications are only allowed with the written
permission of KTS-Electronic. KTS-Electronic reserves the right to modify the
instruction with new knowledge at anytime. The new instructions can always be
downloaded gratuitously from our website.
1.2 Important details
Please note:
Do not store appliance in wetness or high moistures.
Avoid current-carrying overhead lines
Do not use mobile phones during the operation
Do not process any measurement during thunderstorms
Accurate operation is not guaranteed with empty accumulator
For the operation or loading please only use the components enclosed or
released by KTS.
1.3 Scope of delivery
Hardware:
GPA 1000 electronic unit with Bluetooth® incl. installed lithium-ion accu
universal probe 45 cm (17.72")
super probe 60 cm (23.62")
2 part carbon telescopic pole with grab handle
Ultra mobile netbook (10,1") with KTS software and operation system incl.
lithium-ion accu
Powerful quick-charger with power inverter, car-loading cable and additional
110V adapter
Solid hard-top case

KTS-Electronic GPA 1000
5
Software:
Newly developed KTS-3D software with 5 basic colors (pre-installed on PC)
USB stick with software for processing data on other computers
GOLD SCAN accessory metal discrimination:
GOLD SCAN electronic unit with Bluetooth, incl. installed lithium-ion accu with
bag and carrying strap
Powerful quick-charger (2800 mAh), with additional 110V adapter
45 cm (17.72") Ø search coil (waterproof) with carbon telescope pole, grab
handle
Service:
English, German, French or Spanish user's manual
2 years manufacturer's warranty for the entire scope of delivery (incl. hardware
and software)

KTS-Electronic GPA 1000
6
2 Hardware operation
2.1 Assembly
Contrary to other appliances the assembly is very simple.
The assembly of universal and super probe:
Plug the bar into the mount of the probe. Then insert the remaining parts in the
correct order. The universal or super probe can be attached to the holder now.
Afterwards the sensor cable must be connected. Your device is now ready for use.
Fig.: 4-part demountable universal probe
Fig.: Telescope bar Fig.: Telescope bar - disassembled

KTS-Electronic GPA 1000
7
2.2 Front
Turn-switch: The turn-switch has 4 positions:
OFF The device is switched off.
BAT Current battery voltage (should lie between 7 and max. 8.2 Volt).
SENSOR Display shows sensor values.
ECO Power save mode, display lighting is off.
Toggle-switch: SENSOR/CALIBRATION
SENSOR Shows battery voltage (BAT) or current value sensor (SENSOR or ECO).
CALIBRATION Shows calibration value.
Bluetooth-connection is ready, if green LED flashes and bound if LED lights up constantly
Fig.: front of electronic unit (GPA 1000)

KTS-Electronic GPA 1000
8
2.3 Starting the electronic
Through the Bluetooth-connection the transfer of measured data to the PC is saver,
quicker and easier –contrary to other devices, which comprehend such data via
parallel interface.
To control the current charge of battery switch on the electronic part with the turning
knob to BAT. This value must always lie over 7.5 Volt (otherwise please charge the
battery). Then turn to the position SENSOR or ECO to read the sensor or calibration
data on the screen. The sensor data should always lie between 1-4, the calibration
approx. 2.5 (before the calibration automatically is set it could temporarily show other
values).
Fig.: Complete electronics unit with PC

KTS-Electronic GPA 1000
9
3 Program start
After booting the PC and double-click on the KTS-3D icon start the KTS software.
GPA 1000 will be automatically connected to the computer (be sure that GPA 1000 is
turned on before you start KTS 3D-Software). Should this not be the case, please
see 3.2.
3.1 Software-reinstalling (with reinstalling of Windows)
In case you want to connect another laptop (with Bluetooth-connection) to the main
unit or if you have to reinstal Windows please copy the entire data content from the
provided USB stick to the hard disc. Additional software is not necessary. Therefore
your tool is operational and ready for use.
3.2 Bluetooth pairing
This menu item is completely preinstalled and only has relevance, if software is not
connected automatically with the GPA 1000 unit or you want to link GPA 1000 with
another computer with Bluetooth-ability. Start the computer and make sure that
Bluetooth is engaged. Should this not be the case, activate Bluetooth by pressing
simultaneously.

KTS-Electronic GPA 1000
10
The Bluetooth symbol will appear
in the menu bar. Via right-click on this
symbol the add a device–window will
show all available Bluetooth devices
(it is necessary that GPA 1000 is
active and the green LED flashes).
Select Ezurio Blu 2I and click “Next”.
In the next window pick “Enter the
device’s pairing code”, insert the
password “1234” and go to “Next”
(the device will automatically instal the
suitable drivers). Finally click the
Close-button to conclude the
procedure.
Click “Start” “Computer” “System Properties” “Device Manager” double-
click on “Ports (COM & LPT)”. Two subitems (Standard Serial over Bluetooth link) will
appear –you should memorize the lower COMPORT number. After that open KTS
3D-Software, click on “Options” “Serial Interface” and choose the memorized
COMPORT and click “OK”. Restart the Software and the device will automactically
connect to the computer. You will recognize this if the LED lights up permanently.
GPA 1000 is now operational.
For further usage you only should notice that Bluetooth is active and the GPA 1000
device is turned on (above proceedings must not be repeated).

KTS-Electronic GPA 1000
11
4 The search process
During soil analysis one can choose between several search modes.
4.1 Search with the universal probe
The computer will be connected through Bluetooth to the electronic unit which
will be performed wireless.
Turn the probe that the arrow (see side part of probe) shows to the ground
during inspection (so you can reach the highest search performance).
After engaging the electronic and check-up of battery condition turn the turn-
switch to sensor position.
Check the calibration over the toggle-switch before searching (approx. 2.5).
Now use this toggle-switch when turning back to sensor position. Assure
yourself that the indicated value lies between 1-4. Should this not be the case,
change the search direction slightly so that the value stands between 1-4.
The further search procedure is decribed under 4.3.
4.2 Search with the super probe
The super probe is similar to the universal probe, but has approx. 30% more depth
performance. Search with the super probe is complex because the magnetic direction of
the probe needs to be adjusted. Beforehand it is absolutely necessary to choose the
search direction in such a way that values between 1-4 are displayed.

KTS-Electronic GPA 1000
12
4.3 Live mode
To mark relevant sectors it is reasonable to scan large areas in the live mode at first
so that afterwards the control in the 3-D-system is more exact. If the live mode stops
unexpected, press the “start” button again and continue with the search.
4.4 3D-search mode
For the exact examination of the ground, the area should be divided into tracks.
These tracks can be scanned in the same direction or in counter-direction. The
running direction is selectable in the settings window.
The track length can be selected variably (during the search after large objects or
excavations longer track lengths can be chosen). For the search after small items
shorter track lengths are recommended.

KTS-Electronic GPA 1000
13
4.4.1 Preadjustment
With the "new" button on the screen the search begins,
the computer requires the sensor number, track length, track number, track and
measurement speed, etc.
4.4.2 Start-button
By pressing the start button the search begins. The results are shown on the screen
2-dimensionally, while the measurements are completed automatically. The start
button must be pressed again at the next track.
4.4.3 End of measurement
After the last track has ended, you are going to be questioned if you want to store the
measurements. With the O.K.-button the measurement is stored internally on a place
intended for it.

KTS-Electronic GPA 1000
14
4.4.4 Transfer of measurement data
The provided USB-stick can also be used for the transfer of measuring data; you can
transmit to other PCs and call up all informations for further processings.
4.4.5 3-D figures
The measurement data can be shown as 3-D figures.
The 3D presentation shows every modification and its dimension.
4.5 Search process (measurements)
The GPA is a gauge, which can measure alterations of ground anomalies caused by
metal objects, soil structure or excavations; it also is able to discriminate from normal
ground magnetism. Correct results strongly depend on ground type and measuring
method. Areas to be measured should not have electric fields (like high voltage
cables or ground wires), strong mineralising or wet grounds because they influence
the measuring. The dryer the soil, the more precise are the results.

KTS-Electronic GPA 1000
15
You should divide the area to be measured into even tracks. You may choose
between 2 methods:
4.5.1 Searches with rectification
If you have chosen the search in rectification, you should come back to the starting
point after completion of each track and press the start button (for the measurements
of the second track).

KTS-Electronic GPA 1000
16
4.5.2 Searches in counter direction
If you have chosen the search in counter direction, you should turn around after
completion of each track, step approx. 1 Meter to the right and directly start the next
track by pressing the start button.
For a precise measurement you should hold the search speed in a stable manner
while you are walking the tracks. This way objects can be detected at the same spot
during counter direction. For exact measurements track lengths between 5 to 10
Meters are advantageous.

KTS-Electronic GPA 1000
17
5 Program operations
The program serves the visualisation of measurement data in colored, three
dimensional representation, in particular the ad of magnet field data.
5.1 Main window
After start of program the main window appears with the menu bar, the tool bar the
adjustment and the ad-area (right),
When the program starts the display range is empty at first.
5.1.1 Toolbar
Some buttons are summarized for fast operation. These are from left to right:
New shows a data reception with external hardware
Start starts a data reception with a track
Stop stops the data reception
Live starts a data reception in live mode
Open reads a stored file
Save saves the current file
Peak switches between absolute and relative ad
Norm resets main-ad into basic setting
Prop switches between proportional and quadratic representation
Zoom the two buttons [+] and [-] steer the enlargement

KTS-Electronic GPA 1000
18
5.1.2 Display range
The colored, three-dimensional measured data will appear on the display range.
While moving the mouse with pressed left mouse button the presentation can be
rotated at the same time.
5.2 Menu bar
5.2.1 Data menu
The data menu shows entries to enable the opening and storing of measurement
data. The stored measurement data is marked through the ending GRD.
New starts a data acquisition with connected external measurement hardware.
A selection window appears for the adjustment of the measurement
conditions.
Copy into clipboard copies the current view in the cache so that it can be
inserted into every image editing application.
End ends program.
5.2.2 Display menu
In this menu you can switch between graphic and numeric views of measurements.
5.2.3 Options menu
The options menu entry opens a new window for the adjustment of program options.
The description of the various possibilities takes place there.
5.2.4 Info menu
Only one single point appears in the info menu. It delivers information about the
present version.

KTS-Electronic GPA 1000
19
5.3 Options window
The options window is divided into three categories.
5.3.1 Paths
With the path adjustment the index is defined for the data storage. A selection
dialogue appears after the [search] button is activated.
5.3.2 Colors and coordinates
Here you can choose colors for the coordinate-ad, graphic cursor and the
background. A color-selection dialogue appears after activity of the corresponding
buttons.

KTS-Electronic GPA 1000
20
5.3.3 Languages
For the service in several languages the program can be switched completely.
6 Data recordings
6.1 Adjustment before data recording
Before data acquisition there are various adjustments which must be planned. The
track length determines –together with the values per track –the distance (step
width) between every individual measurement. The number of values per track is
limited to approx. 100. The measurement begins after activating the [Start] button.
With the [Cancel] button program termination is possible anytime. Furthermore, one
can switch between consensual and contrasensual movement.
The measurement can be released either manual or time-controlled. An appropriate
hint occurs.
Other manuals for GPA 1000
1
Table of contents
Other KTS-Electronic Measuring Instrument manuals
Popular Measuring Instrument manuals by other brands

Phoenix
Phoenix Humiport 05 Installation, operation & service instructions

wtw
wtw LF 320/SET Instruction manuals

Ripley
Ripley MILLER VIS300 user guide

Renkforce
Renkforce GLP-08 operating instructions

LOVATO ELECTRIC
LOVATO ELECTRIC DMED300T2UL instruction manual

Curtis
Curtis 700 series Instructions for use