KTS-Electronic GPA 3000 DR User manual

Ground
Penetrating
Analyzer
GPA 3000 DR
User’s Manual KTS –3D
KTS-Electronic GmbH & Co. KG
Germany

Table of content
1General guidelines.............................................................................................. 3
1.1 Preface.............................................................................................................. 3
1.2 Important details.............................................................................................. 3
1.3 Scope of delivery............................................................................................. 4
2Hardware operation............................................................................................ 5
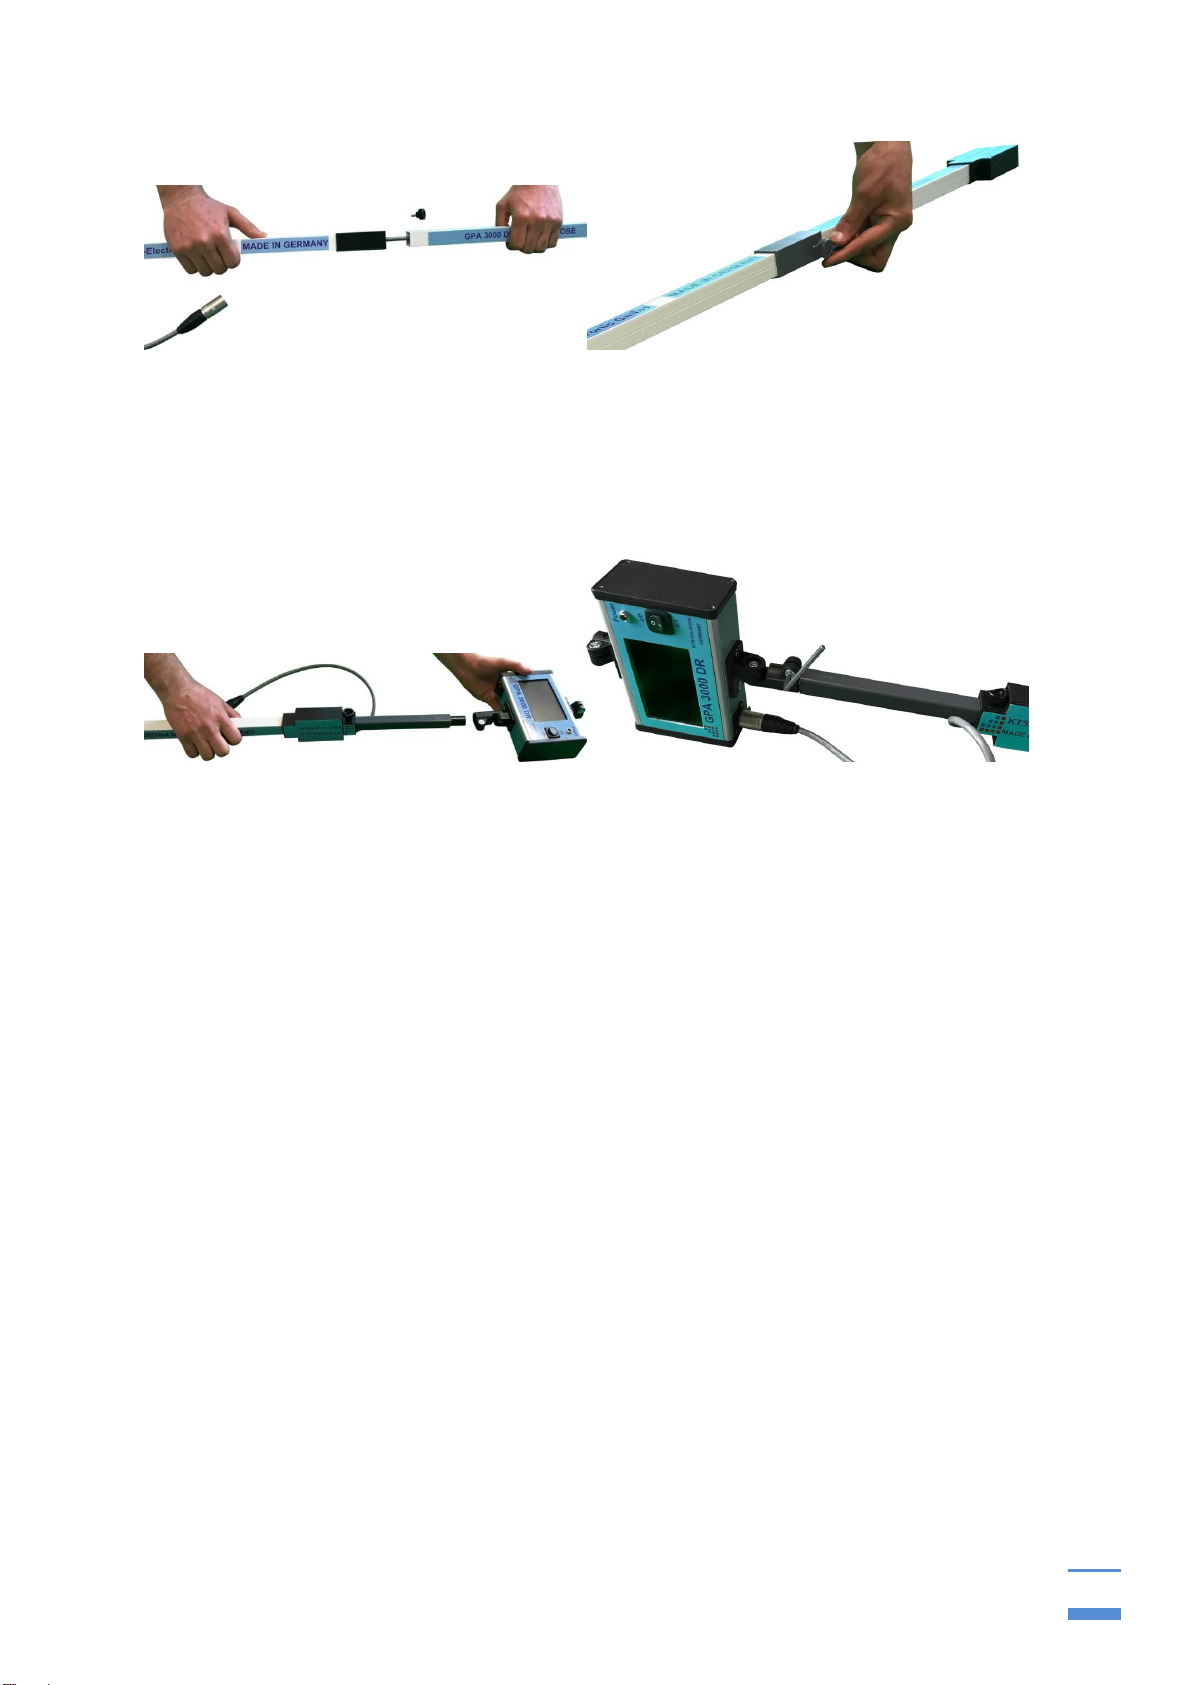
2.1 Assembly of GPA probes: .............................................................................. 5
2.1.1 Universal probe 60cm......................................................................................... 5
2.1.2 Super probe 1m................................................................................................... 6
3Electronic unit..................................................................................................... 8
3.1 Connection to the drone ................................................................................. 9
3.2 Commissioning of the electronics unit.......................................................... 9
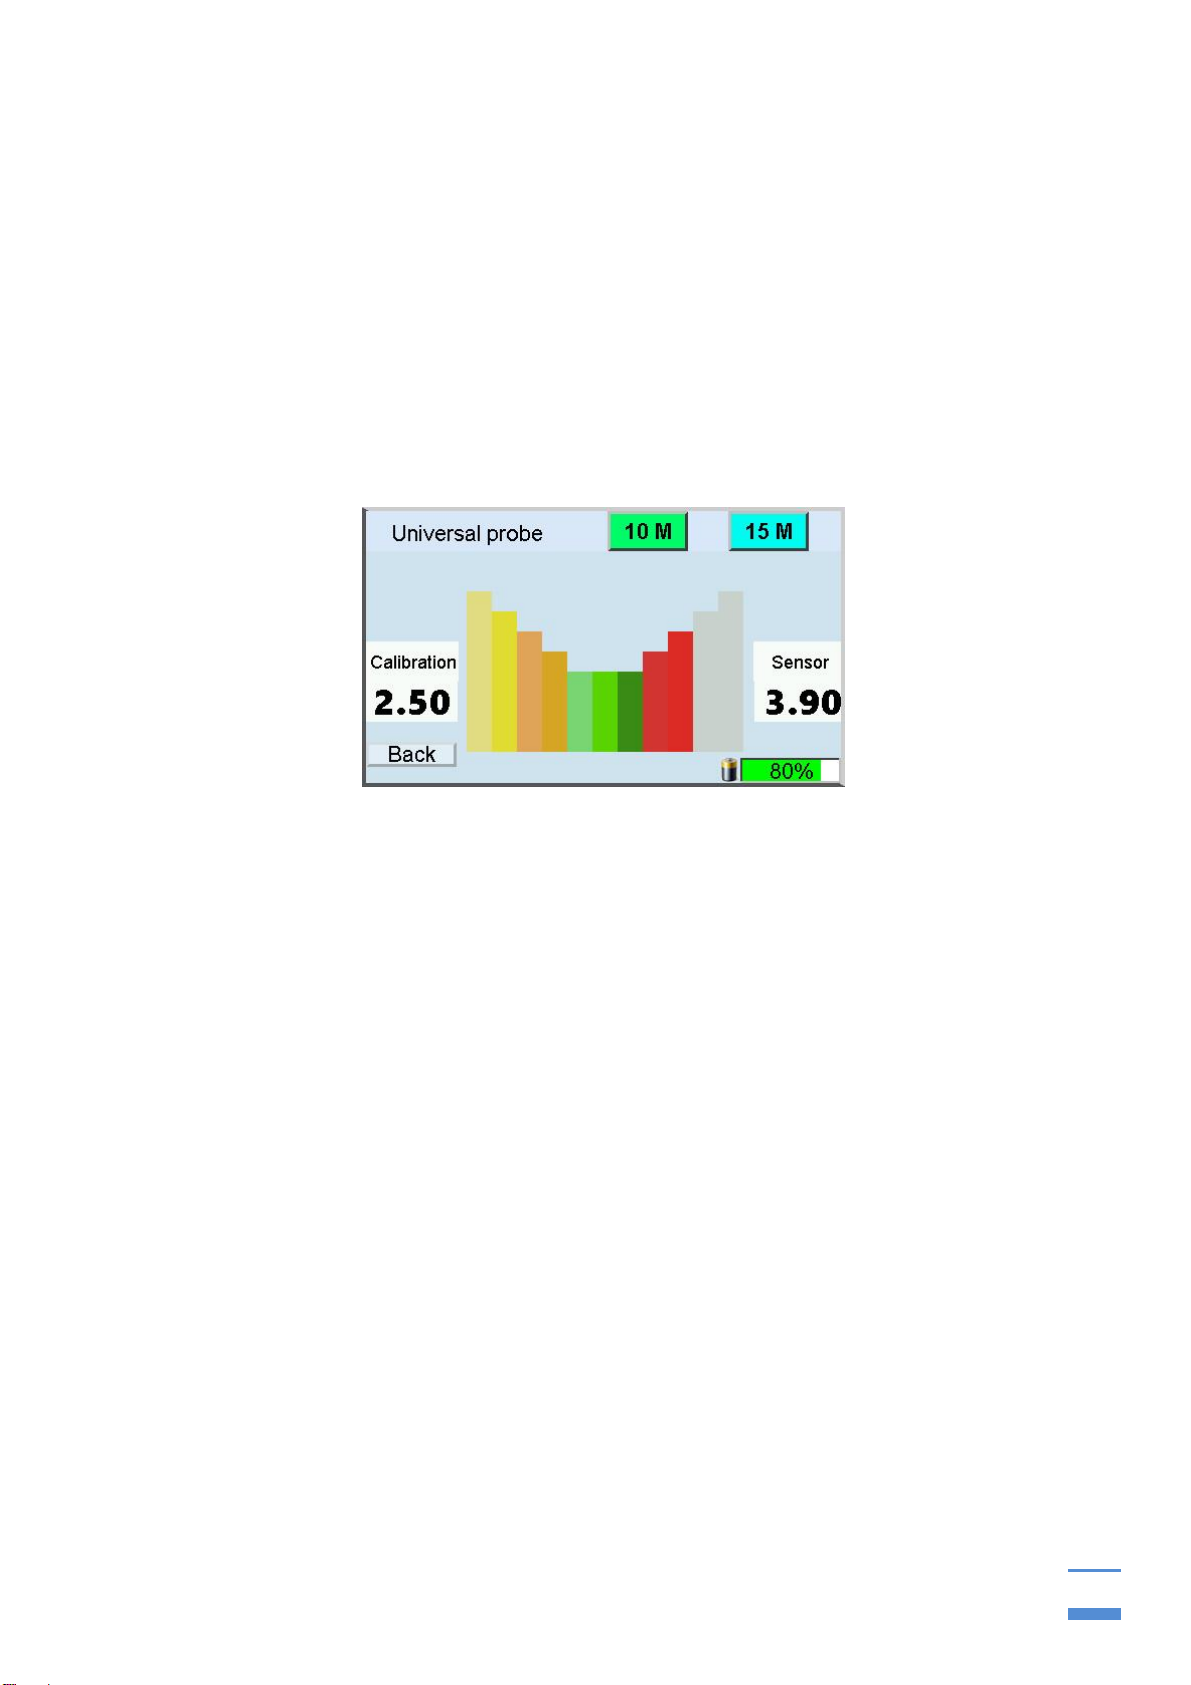
3.3GPA display ................................................................................................... 10
4Search methods................................................................................................ 10
4.1 GPA search methods .................................................................................... 10
4.1.1 Search with the universal probe ...................................................................... 10
4.1.2 Search with super probe................................................................................... 11
4.2 Battery and charger....................................................................................... 12
5Android software.............................................................................................. 13
5.1 Commissioning of tablet computer.............................................................. 13
5.2 Bluetooth-Connection................................................................................... 14
5.3 KTS GPA 3D- Software.................................................................................. 15
5.3.1 Search with KTS GPA 3D.................................................................................. 15
5.3.2 Evaluation with KTS GPA 3D............................................................................ 16
5.3.3 Settings for KTS GPA 3D.................................................................................. 18
5.4 KTS GPA Visualizer -software...................................................................... 19
5.4.1 Search with KTS GPA Visualizer...................................................................... 19
5.4.2 Evaluation with KTS GPA Visualizer................................................................ 19
5.4.3 Settings for KTS GPA Visualizer...................................................................... 21
5.5 Reinstallation................................................................................................. 21
6System requirements and license agreements.............................................. 21
6.1 System requirements.................................................................................... 21
6.2 License agreements...................................................................................... 22
6.3 Terms of use .................................................................................................. 22
6.4 Exclusion of liability...................................................................................... 22
7Warranty............................................................................................................ 22
7.1 After expiration date...................................................................................... 23
7.2 Care................................................................................................................. 23
7.3 Legal note....................................................................................................... 23
8Contact.............................................................................................................. 24

KTS-Electronic GmbH & Co. KG –GPA 3000 DR
3
1 General guidelines
1.1 Preface
Congratulations on your purchase of one of the most advanced high performance
detectors: the GPA 3000 DR.
The GPA 3000 DR is the new development of KTS-Electronic GmbH & Co. KG.
Already pre-installed programs and an instruction manual which is furnished with
numerous illustrations and easy to understand will facilitate the assembly, so that
nothing will stand in the way for a practical application. Furthermore there is an
assembly instruction-video available on the tablet and an enclosed flash drive.
Besides the KTS 3D software the new "GPA Visualizer" software is pre-installed on
the tablet computer; this enables an easy operation without the need for previous
knowledge.
This instruction has been developed by KTS-Electronic GmbH & Co. KG. Any
alterations or duplications are only allowed with written permission of KTS-Electronic
GmbH & Co. KG. KTS-Electronic GmbH & Co. KG reserves the right to modify the
instruction with new knowledge at anytime. The new instructions can always be
downloaded gratuitously from our website.
1.2 Important details
Please note:
Stay away from conducting overhead lines
Do not use cell phone during operation
Do not process measurements during thunderstorms
Keep dry
Accurate operation is only guaranteed with a fully charged battery
For operation or charging only use the components enclosed or authorized by KTS GmbH
& Co. KG.

KTS-Electronic GmbH & Co. KG –GPA 3000 DR
4
1.3 Scope of delivery
Hardware:
GPA 3000 DR electronic unit with integrated radio transmitter*
GPA 3000 DR super probe 100 cm (39”) two-fold demountable*
External Li-Ion battery pack with connection cable*
External radio unit* * for drone usage
GPA 3000 XS universal probe 60 cm (24”) with telescope bar and bag
Tablet computer (Android) with preinstalled KTS software incl. charger
Quick charger 220 Volt and additional 110 Volt adapter
Power inverter with car charging cable
Solid hard top case
Software:
KTS-3D Software and KTS 3D GPA Visualizer software (both pre-installed on
tablet computer)
USB stick with software for processing data on other computers as well as an
assembly instruction-video
Service:
English, German, or French user's manual.
2 years manufacturer's warranty for the entire scope of delivery (incl. hardware
and software.
Fig. 1.1 Complete GPA 3000 DR-Set

KTS-Electronic GmbH & Co. KG –GPA 3000 DR
5
2 Hardware operation
2.1 Assembly of GPA probes:
GPA search method requires a probe.
2.1.1 Universal probe 60cm
Connect the telescope rod to the probe as shown and fasten the screw with
the included Allen key.
Join the electronic unit to the other side of the telescope rod as shown
Plug the probe in to the “GPA”-socket of the electronic unit.
Fig. 2.1 GPA 3000 DR Universal probe with carbon telescope rod and tablet holder
Fig. 2.2 Assembly probe
Fig. 2.3 Assembly electronic unit

KTS-Electronic GmbH & Co. KG –GPA 3000 DR
6
Fig. 2.4 Assembled GPA 3000 DR Universal probe with tablet holder
When searching with the universal probe, the telescopic rod should be vertical to the
ground and the universal probe should be held as shown in the picture.
2.1.2 Super probe 1m
Plug the two pieces together and fasten it with the adjusting screw as shown.
Note when re-packaging, you should remove the knurled screw and carefully
pull the super-probe apart to avoid damaging the inner cable.
A 20 cm supplied square tube serves as a spacer between electronics unit and
super probe. The square tube is attached to the top end of the super probe with
a thumbscrew, and the top of the square tube is secured to the electronics unit
with an Allen key.
Plug the probe in to the “GPA”-socket of the electronic unit.
It is recommended not to disassemble the probe after every use.

KTS-Electronic GmbH & Co. KG –GPA 3000 DR
7
Fig. 2.5 Assembly super-probe Fig. 2.6 Assembly super-probe
Fig. 2.7 Assembly electronic unit Fig. 2.8 Assembly electronic unit

KTS-Electronic GmbH & Co. KG –GPA 3000 DR
8
3 Electronic unit
The GPA 3000 DR has a lightweight and robust housing with easy handling and
operation. The GPA 3000 DR is a measuring device, which can measure alterations
of ground anomalies caused by metal objects, soil structure or excavations and can
discriminate from normal ground magnetism. Correct results strongly depend on
ground type and measuring method. Areas to be measured should not have electric
fields (like high voltage cables or earth wires) or strong mineralised or wet grounds
because they influence the measurement. The dryer the soil, the more precise the
results.
Fig. 3.1 Electronic unit
Connection to the drone
Connection to the probe
Transmitter antenna

KTS-Electronic GmbH & Co. KG –GPA 3000 DR
9
3.1 Connection to the drone
If you want to connect the GPA 3000 DR to the drone, you should connect it to the
upper part of the electronics unit (connection to the drone).
The electronics unit has a transmitter antenna which sends search data to the
receiver. Attached to the tablet is the receiver, which receives the transmitted data and
transmits it to the tablet. This tablet with the radio station should be located next to the
remote control of the drone, so you can control the search data.
When searching with the drone, the supersonic probe should be fixed so that the
probe is perpendicular to the ground.
Abb.3.2 Tablet with radio receiver
Abb.3.3 Radio receiver attached with
Velcro on the backside of the tablet
Note: When connecting the tablet with the radio station, you should first put the
cables in the radio station and then connect with tablet
3.2 Commissioning of the electronics unit
After switching on the electronics unit via the on / off switch, select one of the
four display languages.
Fig. 3.4 Language selection

KTS-Electronic GmbH & Co. KG –GPA 3000 DR
10
3.3 GPA display
After selecting the “GPA” search method you have the option to select a probe.
The sensor value will be shown as a bar graph. The corresponding digits will
appear on the right hand side of the screen.
The calibration value will be shown on the left hand side of the screen.
The search depth will be selectable on the upper part of the display via the
options „10M“, „15M“, „20M“ and „25M“(M for meter).
The “back”-button leads you back to the search method selecting screen.
The battery status will be shown in the lower right corner of the display.
Fig. 3.5 GPA display
4 Search methods
4.1 GPA search methods
There must be a probe connected to the electronic unit to use the GPA search
method.
4.1.1 Search with the universal probe
Switching the electronic unit on via On-/Off-button.
Select your language.
Select “Universal probe” at the probe selection.
The electronic unit should face up while using the probe
Optionally the tablet computer can be connected to the electronic unit via
Bluetooth. (See 5.2)
Place the universal probe so that one of the square ends shows in the direction
you want to search and check both, calibration value and sensor value.
Turn the probe 180° so that the opposite square now face forward and check
the two values again.
Choose the side with values closer to 2.5 as forward direction (as shown in the
following figures).
The distance between the probe and ground should not vary a lot.
Avoid hectic movements and try to walk in straight lines.

KTS-Electronic GmbH & Co. KG –GPA 3000 DR
11
Fig. 4.1 Universal probe
Fig. 4.2 Complete universal
probe
4.1.2 Search with super probe
We recommend, you gather some experience with the universal probe before using
the super probe.
The search with the super probe is similar to the search with the universal probe.
Switching on the electronic unit via On-/Off-button.
Select your language.
Select “Super probe” at the probe selection.
The electronic unit should face up while using the probe
Check the calibration- and sensor-value. The values should be between 2 - 3. If
not, turn the probe around its own axis until the desired value is reached.
The distance between the probe and ground should not vary a lot.
Avoid hectic movements and try to walk in straight lines.
Fig:. 4.3 Super-probe

KTS-Electronic GmbH & Co. KG –GPA 3000 DR
12
4.2 Battery and charger
The electronic unit is powered by an external
2900mAh Li-Ion battery, which gets fully charged
within 90 minutes. (Please note: Do not exceed the
charging time of 90 minutes). The operating time
of the unit depends on the type and size of the
search coil and type of headphones. It varies
between 4 to 6 hours. The charging process is
indicated by a red glowing LED on the power
adapter. The LED changes to green when the
battery is fully charged. Disconnect the adapter
after charging is finished.
An included inverter allows for charging in the car.
Fig. 4.4 Power adapter for
electronic unit
Fig. 4.5 Inverter
Fig. 4.6 External Battery pack incl. wire
The external battery pack is connected to the electronic unit via included
cable. The battery pack can be attached to your belt loop or somewhere
similar. It is best to attach the battery pack to the back of the electronics unit
through the Velcro fastener.

KTS-Electronic GmbH & Co. KG –GPA 3000 DR
13
5 Android software
There is a tablet computer included in the GPA 3000 DR set for two-dimensional and
three-dimensional evaluation of your measurements, which connects wirelessly via
Bluetooth with the electronic unit.
Fig. 5.1 Tablet computer incl. mount
5.1 Commissioning of tablet computer
Turn on the tablet computer by pressing and holding the left button on the upper
edge.
Unlock the display by swiping across the screen.
Both preinstalled programs are located right on the desktop. Simply start them
by tapping.
The menu of each program is on the right hand side of the screen.
Each program-window has an “info”-button on the lower right hand corner of the
screen which provides you with some information about the current window.
You can leave the program by tapping on the “QUIT”-button which is located
next to the “info”-button.
There is a “share”-button in the upper right hand corner of the screen. Tap it to
take a screenshot which can be shared on several platforms.
The tablet computer can be connected to the telescope rod of the universal
probe. To this end there is a mount on the telescope rod, to which the tablet
computer connects and is secured with a half turn. (see following figure)

KTS-Electronic GmbH & Co. KG –GPA 3000 DR
14
Fig. 5.2 Assembly tablet with telescope rod and mount
5.2 Bluetooth-Connection
To evaluate the measurements of the GPA universal probe on the tablet you need to
connect the electronic unit to the tablet via Bluetooth.
To pair the electronic unit with the tablet computer you need to switch on the
unit and select the universal probe of the “GPA”- search method.
Turn on the tablet and run the program of your choice.
Select “CONNECT” from the menu on the right hand side of the screen.
Select the shown device.
Note: If there is no device shown tap on the button “SCAN FOR BLUETOOTH
DEVICES” (several times if necessary) and select it.
A confirmation pop up with:”CONNECTED” will appear on the tablet computer.
A blue dot will appear on the screen of the electronic unit.
Fig.5.3 Successful Bluetooth connection

KTS-Electronic GmbH & Co. KG –GPA 3000 DR
15
5.3 KTS GPA 3D- Software
5.3.1 Search with KTS GPA 3D
Fig. 5.4 Walking direction for 3D evaluation
Before starting the measurement the area should be divided in equal lanes
Select “MEASURE” in the menu on the right hand side of the screen.
Tap on the “START”-button which will appear on the lower part of the screen
and immediately start walking with the universal probe like shown in the figure
above.
During the measuring process the values will appear in different colors on the
screen.
After each lane the measurement will stop automatically. Tap on “START” to
continue. (The number of lanes is selectable. See 5.3.3).
The frequency of the measurements is adjustable. The options “SLOW”,
“NORMAL” and “FAST” appear on the lower hand of the screen.(Selecting
“SLOW” results in a bigger area but lower resolution and vice versa).
For higher accuracy you should walk in a steady pace.
Lane lengths of 5 to 10m are advantageous.
You can pause a measurement anytime with the “STOP”-button. (Continue with
the “START”- button.).
After the measurement is completed the image gets rendered.
The measurement can be saved with the “SAVE”-button. Time and date will be
added automatically after you named the image.
The measurement can be deleted with the “RESET”- button.
Hint: The Bluetooth pairing has failed if there is no “START”- button on the lower part
of the screen . (see 5.2)

KTS-Electronic GmbH & Co. KG –GPA 3000 DR
16
Fig. 5.5 Active measurement with KTS GPA 3D
5.3.2 Evaluation with KTS GPA 3D
You can switch to the three dimensional view any time by tapping “3D” in the
menu (even while still measuring).
Here you see the current measurement in 3D.
Tap “LOAD” for loading a previously saved measurement.
The 3D- image can be moved with one finger and rotated/zoomed with two
finger (see following figures).
Fig. 5.6 3D evaluation of measurements

KTS-Electronic GmbH & Co. KG –GPA 3000 DR
17
Fig 5.7 Two-finger touchscreen gesture
Tap “VIEW” to see measurements in 2D.
Tapping “CURRENT MEASUREMENT” on the lower part of the screen will
show the current measurement in 2D.
Tapping “LOAD” gives you the option to see a previously saved measurement
in 2D.
Fig. 5.8 2D evaluation of measurements
You can manage your saved measurements by tapping on “FILES”
Tap on a file to display the options : “open file”, “rename file”, “delete file” and
“show file in 3D”.
To delete all files tap the button “DELETE ALL FILES” on the lower left part of
the screen.

KTS-Electronic GmbH & Co. KG –GPA 3000 DR
18
Fig. 5.9 File management
5.3.3 Settings for KTS GPA 3D
The following settings can be adjusted by tapping on “SETTINGS”:
o“Number of lanes”: Changes the number of lanes.
o“Number of measurements”: Number of measurements in one lane.
o“Language”: Selection between German, English and French. (Note: App
will restart after selecting a language).
o“Reset Settings”: Resets the device to factory settings.
o“Developer Settings”: Please do not change the developer settings
except for “Measure-delay”. Here you can change the time between two
measurements. Please note that this option will effect the speed options
“SLOW”, “NORMAL” and “FAST” under “MEASURE”.
Fig. 5.10 Settings

KTS-Electronic GmbH & Co. KG –GPA 3000 DR
19
5.4 KTS GPA Visualizer -software
5.4.1 Search with KTS GPA Visualizer
The search with the GPA Visualizer allows for searching on one straight line.
Tap “START” and immediately start walking with the universal probe.
During the measuring process the values will appear in different colors on the
screen.
If you want to take a turn: stop walking, tap on the “STOP”- button and wait for
the “START” button to change its color from red to grey (or until one lane hits
the end of the display). Tap the “START”-button as soon as you are ready to
continue.
The frequency of the measurements is adjustable. The options “SLOW”,
“NORMAL” and “FAST” appear on the lower hand of the screen. (Selecting
“SLOW” results in a bigger area but lower resolution and vice versa).
For higher accuracy you should walk in a steady pace.
Hint: The Bluetooth pairing has failed if there is no “START”- button visible on the
lower part of the screen (see 5.2).
Fig. 5.11 Active measurement with KTS GPA Visualizer
5.4.2 Evaluation with KTS GPA Visualizer
Tap “VIEW” to see measurements in 2D.
Tapping “CURRENT MEASUREMENT” on the lower part of the screen will
show the current measurement in 2D.
Tapping “LOAD” gives you the option to see a previously saved measurement
in 2D.

KTS-Electronic GmbH & Co. KG –GPA 3000 DR
20
Fig. 5.12 Evaluation of measurements
You can manage your saved measurements by tapping on “FILES”
Tap on a file to display the options : “open file”, “rename file” and “delete file”.
To delete all files tap the button “DELETE ALL FILES” on the lower left part of
the screen..
Fig. 5.13 File management
Table of contents
Other KTS-Electronic Measuring Instrument manuals