Kubota RTV-X900 User manual

INSTALLATION MANUAL
PLASTIC CANOPY
(77700-VC5011, VC5011) (color: black)
KUBOTA RTV-X900, RTV-X1120D, RTV-XG850
Estimated assembly time: 30 minutes
PRINTED IN THE USA © KUBOTA TRACTOR CORPORATION 2019 Code: 77700-05183 (Rev. D)
IMPORTANT!
CAB COMPONENT ORDER OF INSTALLATION:
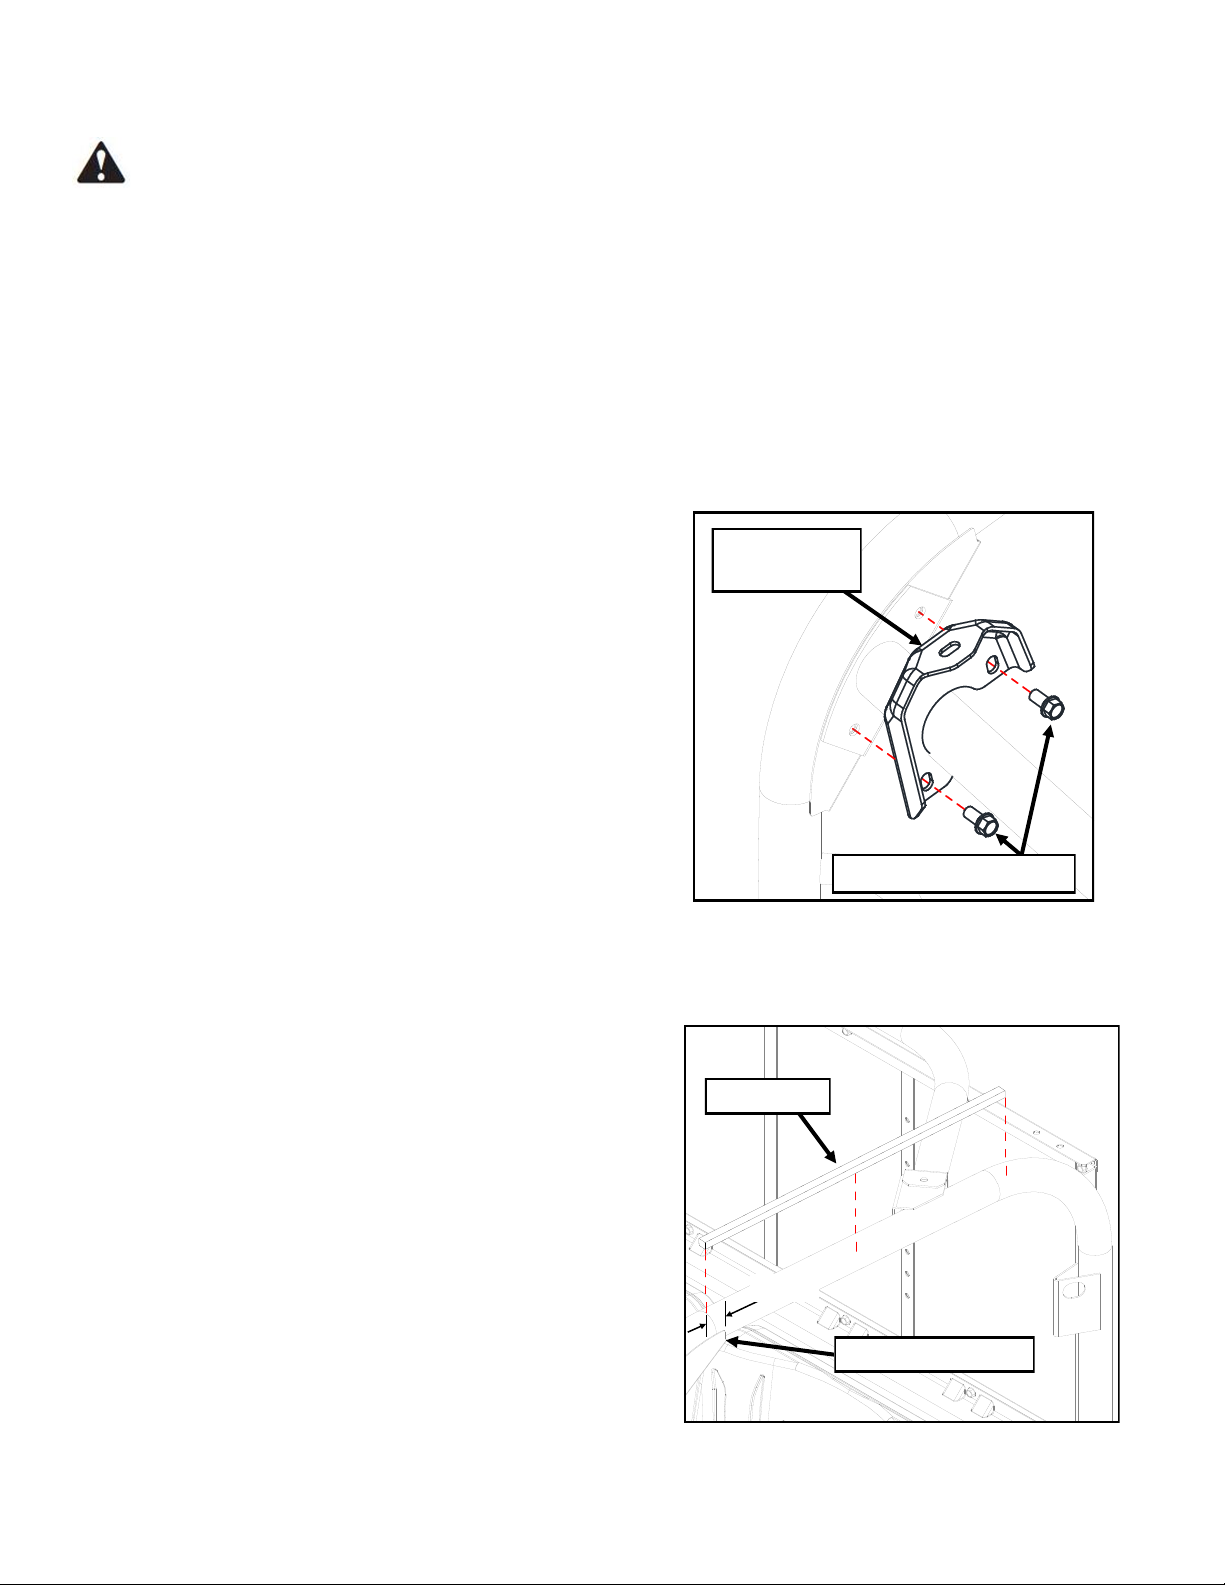
1. Canopy Mounts (Canopy Kit)
2. Windshield Assembly
3. Door Strikers & Hinge Mounts (Door Kit)
4. Rear Panel Assembly
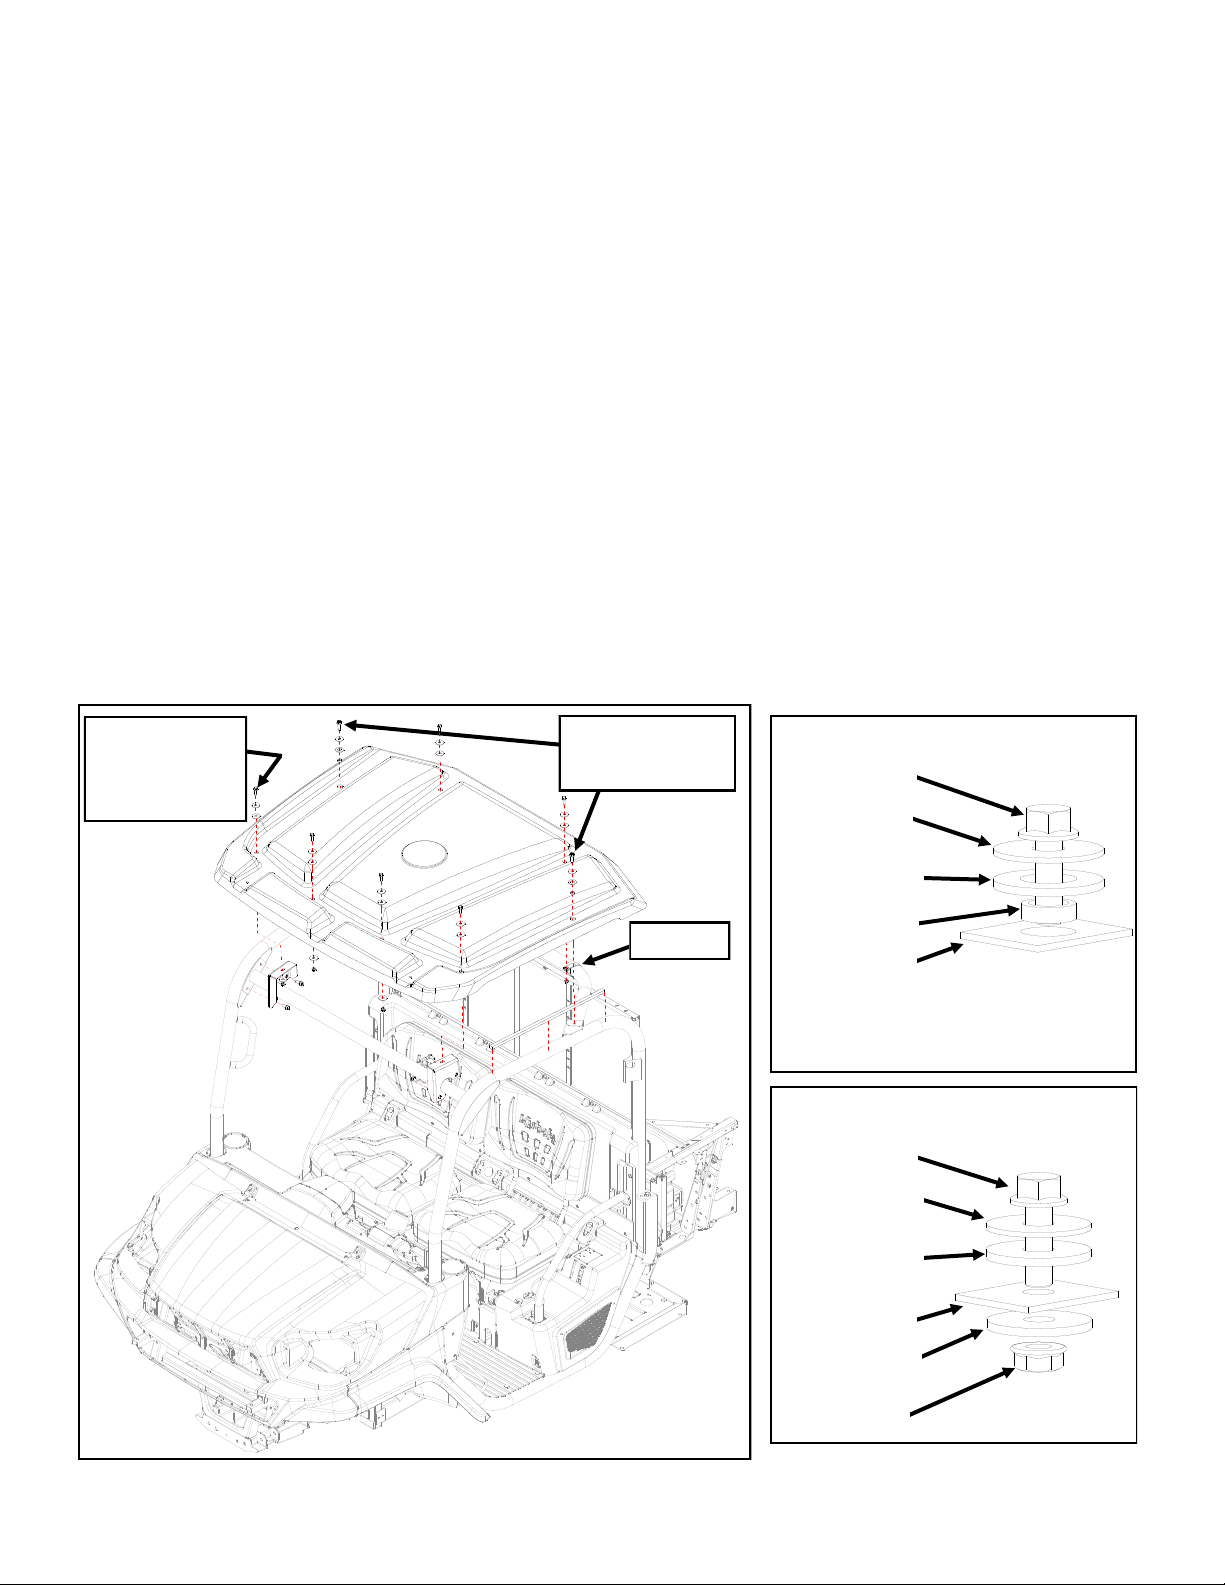
5. Canopy Assembly
6. Door Assemblies
NOTE: Front Heavy Duty Springs (V5218) or Heavy Duty Spring Damper Assembly (V5219) is
required if complete cab is installed (RTV-X900, RTV-X1120D, RTV-XG850).
BEFORE INSTALLING CANOPY
Read all instructions and safety instructions in this manual.
Refer to your machine’s operator’s manual and safety instructions on your
machine’s safety decals.
Wear appropriate personal protective equipment (PPE) when performing work.
Hang a "DO NOT OPERATE" tag in operator station.
If installing windshield and/or rear panel, install those components before installing
canopy.
If installing work lights, it will ease assembly if they are installed prior to installing
canopy onto vehicle.
WARNING
To avoid personal injury or death:
Cabs, blades, and general accessories add additional weight to the base vehicle. Deduct the accessory’s total weight
from the vehicle’s rated capacity including passenger and driver. Never operate the vehicle outside of its rated weight
capacity.
Exposure to carbon Monoxide can cause illness, serious injury, or death. Never operate vehicle if suspicious of
Carbon Monoxide. Inspect exhaust system for leaks monthly. Leaks can result from loose connections, corrosion,
cracks, or other damage to the exhaust manifold. If leaks are found, repair or replace exhaust system. Do not use
vehicle until repair or replacement is complete.
This canopy does not provide protection from: a rollover (or other accidents), from flying objects (including golf balls),
or from lightning. When lightning threatens, take cover and do not operate vehicle.

NOTE: Items in hardware kit not sold separately.
Ref. No. Part No. Part Name QTY REMARKS
177700-05136 Canopy, Plastic, Black 1Code No.: KX9-01B (contains one canopy)
277700-06749 Roof Mount, Stamped and Drawn (left) 1Code No.: SM-00083-L (contains one mount)
377700-06932 Roof Mount, Stamped and Drawn (right) 1Code No.: SM-00083-R (contains one mount)
477700-05137 Hardware Kit, Plastic Roof 1Code No.: KX9HWK-01 (contains all items listed below)
577700-05134 1/2” w x 9/16” Rubber Foam Weatherseal (92” long) 1Code No.: 9PR43-92 (contains one strip)
■ AVAILABLE REPLACEMENT PARTS
PRINTED IN THE USA © KUBOTA TRACTOR CORPORATION 2019 Code: 77700-05183 (Rev. D)
HARDWARE KIT
6X — SCREW, HEX FLANGE, 5/16-18 X 1” LG
10X — STEEL FENDER WASHER, 5/16” ID X 1.25” OD
6X — RUBBER FENDER WASHER, 5/16” ID X 1.25” OD
6X — NUT, HEX FLANGE, NYLOC, 5/16-18
2X — SCREW, HEX FLANGE, M10 x 1.25 X 30mm LG

CAUTION
To avoid personal injury:
Park the machine on a firm and level surface.
Apply the parking brake if applicable.
Stop the engine and remove the key from the
machine is applicable.
■ ASSEMBLY PROCEDURE
NOTE:
All assembly procedures listed within this
manual are generally representative of the
machine model for which the manual is
written. Your machine may be configured
differently, but the outline for the procedure
should still be followed. For further support for
any issues not covered within the pages of this
manual, please contact your local Kubota
representative.
1. Remove 2 front right ROPS bolts (M10), and save for
re-use.
2. Install right canopy mount, using ROPS bolts removed
in step 1. Torque to 38 ft.-lbs. (See fig. 2)
3. Repeat on left side.
4. Cut the provided foam tape in half.
5. Install foam tape to the top of the front-to-rear ROPS
tubes on both sides of the vehicle. Foam tape to start
approximately 1-1/2” in front of front ROPS bracket
edge. (See fig. 5) Note: For best adhesion, apply to a
clean, dry surface at room temperature.
M10 Vehicle ROPS Bolts
Canopy Mount
(Right)
Foam Tape
1-1/2”
Front ROPS Bracket
Fig. 2
Fig. 5
PRINTED IN THE USA © KUBOTA TRACTOR CORPORATION 2019 Code: 77700-05183 (Rev. D)

IMPORTANT! If installing a windshield and/
or rear panel, proceed to installing those
components prior to completing canopy
installation.
6. Remove (2) top rear ROPS bolts (M10). Discard.
7. Loosely install (2) P-Clamps onto ROPS rear cross
member at both bends in approximate location shown.
Orient flat section up. Fasteners to be installed later.
8. Align mounting holes in canopy to rear ROPS mounting
holes, P-Clamps, and slots in canopy mounts.
9. Install M10 x 30mm long screws, with 3/8” ID fender
washers, 5/8” ID rubber washers, and steel spacers
provided. See Fastener Installation Diagram 1 for
fastener installation order. Torque to 38 ft.-lbs.
10. Install (4) 5/16-18 screws, washers, etc. through front
canopy mounting holes. (see fig. 10) See Fastener
Installation Diagram 2 for fastener installation order.
Note: (2) inner front fasteners will be used solely to plug
the mounting holes if no windshield is installed.
11. Install (2) 5/16-18 screws and washers through canopy
and P-Clamps in rear. Secure with 5/16-18 flange nut.
See Fastener Installation Diagram 2 for fastener
installation order.
Fig. 10
M10 Screws
(See Diagram 1)
P-Clamp
Rubber Fender
Washer
Steel Spacer
M10 Screw
Steel Fender
Washer
Note: M10 screws thread into
factory weld-nuts on vehicle ROPS.
Fastener Installation Diagram 1
Canopy Surface
Rubber Fender
Washer
Canopy Surface
*Steel Fender
Washer
5/16-18 Screw
Steel Fender
Washer
Lock Nut *Front locations, only
Fastener Installation Diagram 2
5/16-18 Screws
6 Places
(See Diagram 2)
PRINTED IN THE USA © KUBOTA TRACTOR CORPORATION 2019 Code: 77700-05183 (Rev. D)

CARE AND
MAINTENANCE
Check and tighten hardware after 20 hours of operation.
Periodically inspect and tighten hardware for the remainder
of the unit’s service life.
Keep the enclosure components clean in order to prevent
dust and dirt from forming an unattractive film. The life of
your canopy depends upon following these care procedures:
12. NEVER USE AN ABRASIVE DETERGENT / VEHICLE
CLEANER OR A WIRE BRISTLED BRUSH. Do not use
any CITRUS BASED CLEANERS such as orange or
lemon. Use of these products will cause the plastic to
become permanently damaged.
13. Clean the plastic enclosure surfaces thoroughly with
warm soapy water and a COTTON cloth or chamois. Be
sure to use mild soap, specifically a dish liquid or
equivalent. Clean in a light circular motion for best
results.
14. Use EXTRA CAUTION when cleaning the interior of the
enclosure. The interior is more sensitive than the
exterior because the exterior has an extra coating for
U.V. stability.
15. Remove grease and oil with mineral spirits and a
COTTON cloth or chamois.
IMPORTANT CLEANING INFORMATION
PRINTED IN THE USA © KUBOTA TRACTOR CORPORATION 2019 Code: 77700-05183 (Rev. D)
Other manuals for RTV-X900
2
This manual suits for next models
4
Table of contents