Kuhn Rikon KR47X User manual

Assembly and Operating Instructions for
BG1430G1 as Barbecues
FOR YOUR SAFETY
If you smell gas:
3. Open barbecue lid or hood.
4. If odour continues, discontinue use and
contact your local dealer.
• For outdoor use only. Not for commercial use.
• Read instructions before using the appliance. Failure to follow instructions
could result in death, serious bodily injury, and/or property loss.
•Warning: accessible parts may be very hot. Keep young children and pets
away.
• Do not move the appliance during use.
tions may be dangerous and will invalidate your warranty. This does not
• Retain these instructions for future reference.
• Leak test annually, and whenever the gas bottle is removed or replaced.
Check that the hose connections are tight and leak test each time you re
connect the gas bottle.
• For Flare-up control please refer to the ‘OPERATION’ section of this manual.
FOR YOUR SAFETY
vapours or liquids in the vicinity of this or any
other appliance.
2. A gas bottle not connected for use must not be
stored in the vicinity of this or any other
appliance.
MONTAGE- UND BEDIENUNGSANLEITUNG FÜR
KUHN RIKON TISCH-GASGRILL KR47X
ASSEMBLY AND OPERATING INSTRUCTIONS
TABLE GAS BARBECUE KUHN RIKON KR47X
MONTAGE ET MODE D‘EMPLOI DU BARBECUE
KUHN RIKON KR47X
ISTRUZIONI OPERATIVE E DI MONTAGGIO PER I
BARBECUE KUHN RIKON KR47X
WWW.KUHNRIKON.COM
DE Deutsch 2
EN English 12
FR Français 22
IT Italiano 32

2
FÜR IHRE SICHERHEIT
Bei Gasgeruch:
1. Verriegeln Sie die Gaszufuhr.
2. Löschen Sie alle oenen Flammen.
3. Önen Sie die Abdeckung oder Haube des Grills.
4. Wenn der Geruch andauert, den Betrieb einstellen und
Ihren Händler vor Ort kontaktieren.
FÜR IHRE SICHERHEIT
1. In der Nähe dieses oder eines anderen Geräts dürfen
keine benzinhaltigen oder anderen entzündlichen
Dämpfe bzw. Flüssigkeiten gelagert oder verwendet
werden.
2. Eine nicht angeschlossene Gasflasche darf nicht
in der Nähe dieses oder eines anderen Gerätes
aufbewahrt werden.
»Nur für den Gebrauch im Freien geeignet. Nicht für die kommerzielle Verwendung gedacht.
»Alle Anweisungen vor Gebrauch durchlesen. Die Nichtbeachtung von Anweisungen kann zu Tod, ernsten
Verletzungen und/oder Sachschäden führen.
»Warnung: Zugängliche Komponenten können sehr heiß sein. Von Kindern und Haustieren fernhalten.
»Während des Betriebs darf das Gerät nicht bewegt werden.
»Nach Gebrauch die Gaszufuhr aus der Gasflasche einstellen.
»Jede Änderung des Gerätes sowie Missbrauch oder Nichtbeachtung der Anweisungen können gefährlich
sein und die Garantie aufheben.
»Bitte bewahren Sie die Bedienungsanleitung sorgfältig auf.
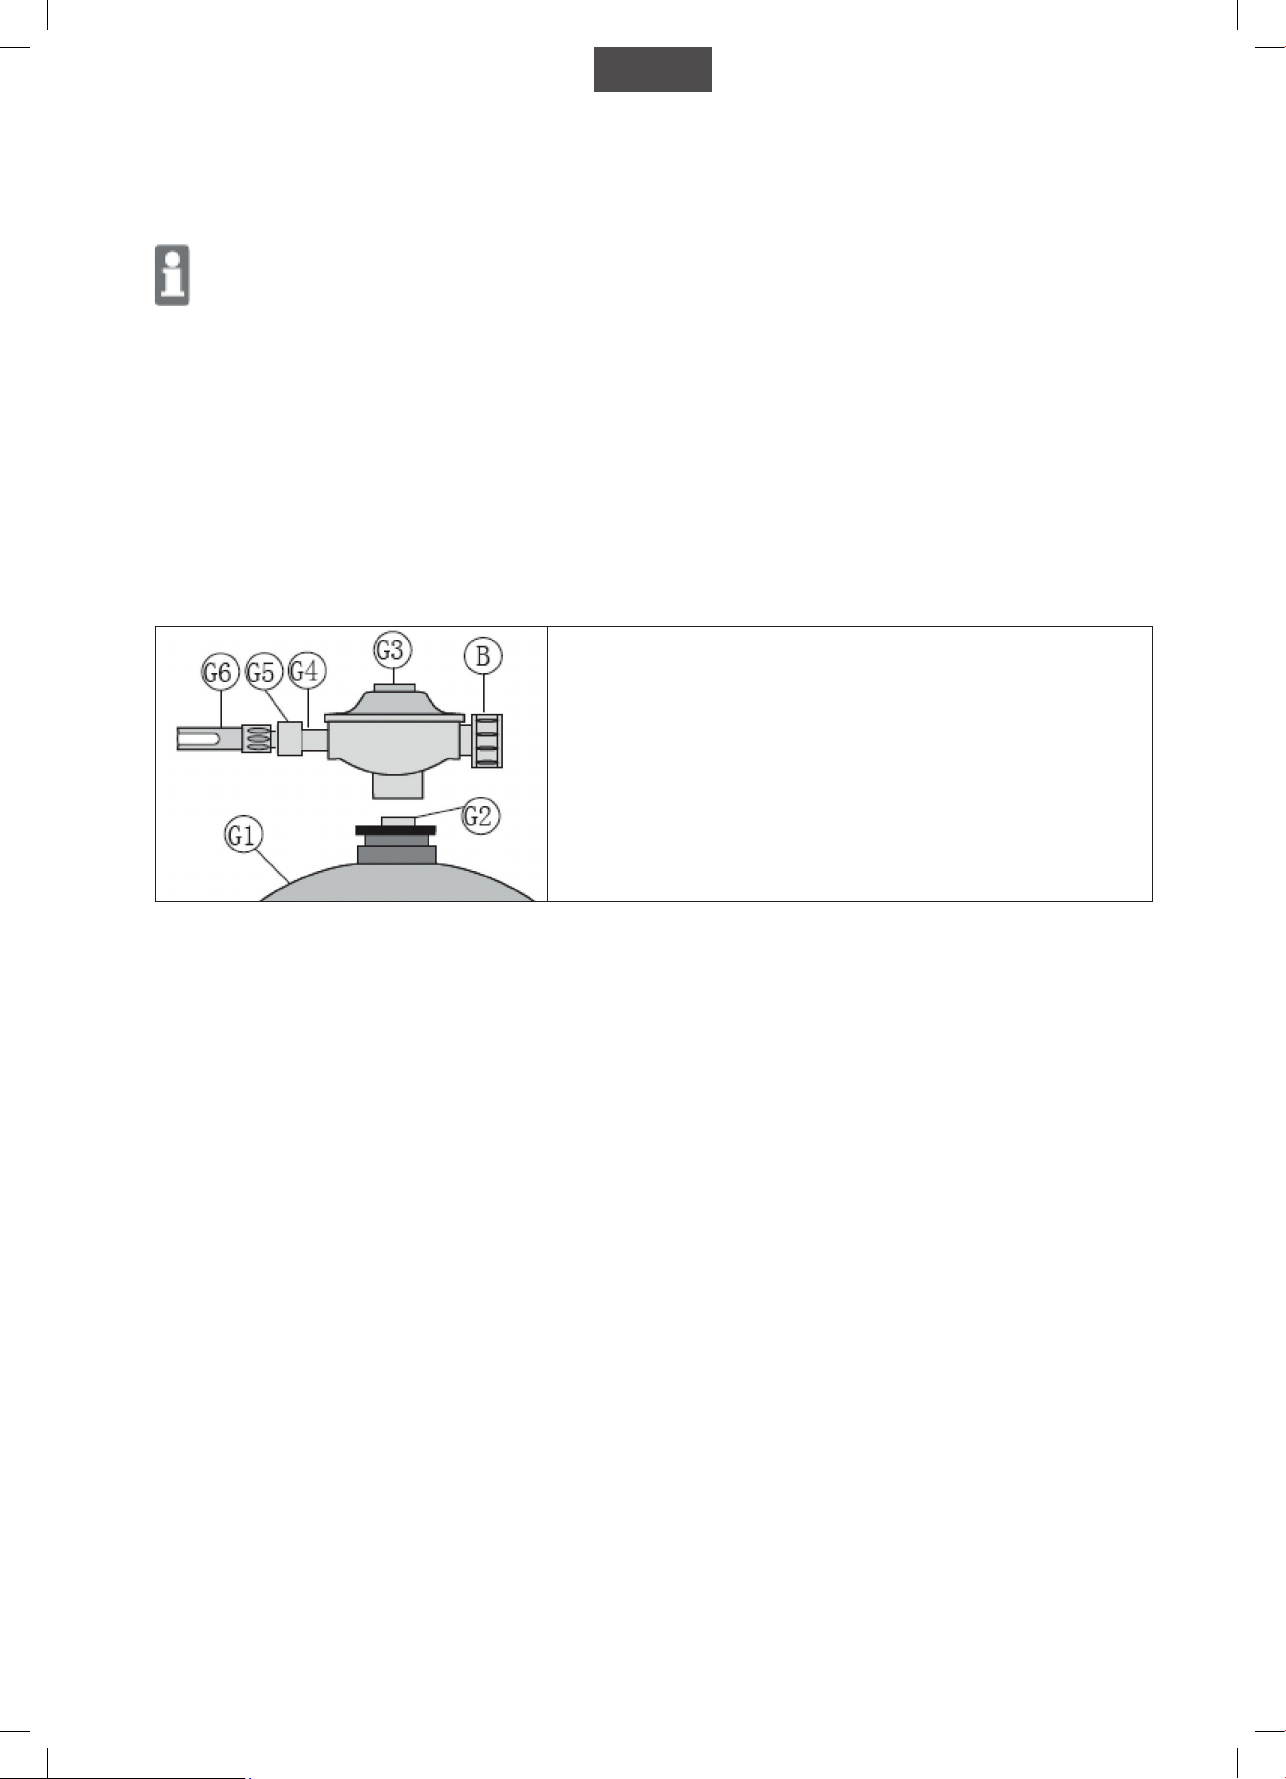
»Führen Sie jedes Jahr bzw. bei jedem Austausch der Gasflasche eine Dichtheitsprüfung durch. Überprüfen
Sie, ob die Schlauchverbindungen dicht sind und führen Sie die Dichtheitsprüfung jedes Mal durch,
wenn Sie die Gasflasche erneut anschließen.
»Näheres zur Anzündsteuerung entnehmen Sie bitte dem Abschnitt „BETRIEB“ dieses Handbuchs.
WARNUNG
Assembly and Operating Instructions for
BG1430G1 as Barbecues
FOR YOUR SAFETY
If you smell gas:
3. Open barbecue lid or hood.
4. If odour continues, discontinue use and
contact your local dealer.
• For outdoor use only. Not for commercial use.
• Read instructions before using the appliance. Failure to follow instructions
could result in death, serious bodily injury, and/or property loss.
•Warning: accessible parts may be very hot. Keep young children and pets
away.
• Do not move the appliance during use.
tions may be dangerous and will invalidate your warranty. This does not
• Retain these instructions for future reference.
• Leak test annually, and whenever the gas bottle is removed or replaced.
Check that the hose connections are tight and leak test each time you re
connect the gas bottle.
• For Flare-up control please refer to the ‘OPERATION’ section of this manual.
FOR YOUR SAFETY
vapours or liquids in the vicinity of this or any
other appliance.
2. A gas bottle not connected for use must not be
stored in the vicinity of this or any other
appliance.
MONTAGE- UND BEDIENUNGSANLEITUNG FÜR
KUHN RIKON TISCH-GASGRILL KR47X
DE

3
TEILE LISTE
Part Beschreibung Anz.
1Deckelgri 1
2Wärmedämmplatte 1
3Deckel 1
4Rost 2
5Seitenplatten 2
6 Korpus 1
7Fettfang 1
A: 2 Stk. B: 2 Stk.
Federscheibe Flache Unterlegscheibe
C: 2 Stk. D: 2 Stk.
Scheibenmutter Flache Unterlegscheibe
DE

4
SPEZIFIKATIONEN
Gassystem
Gerätekategorie Der Dampfdruck für das Butan-/Propan-Gemisch entspricht DIN EN 521:2006
Gastyp Butan-/Propan-Gemisch
Gaskartusche
Dieses Gerät darf nur mit einer Gaskartusche von COLEMAN C500, SunnGas SG0450/C450,
Cadac CA445N oder PRIMUS DOT-E 10677 (Butan-/Propan-Gemisch (450 g/800 ml))
mit Schraubanschluss verwendet werden. Der Versuch, eine andere Gasflasche anzuschließen,
kann gefährlich sein.
Wärmeleistung 3,5 kW
Durchflussrate (Massendurch-
satz) 250 g/h
Gasdruck 50 mbar
Zündung Piezozündung
Flammenregulierung Stufenlos einstellbar 0 - max.
Düsendurchmesser 0,80 mm
Grill
Gesamtgewicht ca. 9,9 kg (netto) /ca. 14 kg (brutto)
Abmessungen (L x H x B) ca. 97 x 39 x 44 cm
Kochbereich (L x B) ca. 47 x 35,5 cm
Gewährleistung und Haftungsausschluss
Der Grill wurde nach den allgemeinen Regeln der Technik hergestellt, die zum Zeitpunkt der Inbetriebnahme gültig waren, und entspricht den
Anforderungen der europäischen Richtlinie 2009/142/EG. Er ist vom IMQ zertifziert und zugelassen. Der Grill verließ das Werk in technisch
einwandfreiem Zustand.
Dieser Grill unterliegt unserer Gewährleistung für einen Zeitraum von zwei Jahren ab Kaufdatum. Diese Gewährleistung umfasst Herstel-
lungsfehler und fehlerhafte Teile (Brenner, Brennerabdeckungen, Grillrost, Warmhaltegestell) sowie den Austausch dieser Teile. Kosten für
Versand, Montage, Austausch von Verschleißteilen und anderen Teilen werden nicht durch diese Gewährleistung abgedeckt.
Die Gewährleistung erlischt und die Verantwortung trägt der Anwender:
»Wenn der Grill nicht gemäß dieser Montage- und Bedienungsanleitung benutzt wird.
»Wenn der Grill trotz sichtbarer Beschädigungen verwendet wird oder nicht vollständig montiert ist.
»Wenn technische Änderungen am Grill vorgenommen wurden.
»Wenn Zubehörteile verwendet werden, die nicht ausdrücklich für diesen Grill zugelassen sind
(wenden Sie sich im Zweifelsfall bitte an unseren Kundendienst).
DE

5
STEUERELEMENTE
Artikel Bezeichnung Funktion
BFlammenregulierung
Füllen Sie den Brenner zum Anzünden mit Gas (zur großen
Flamme [+] drehen). Nach der Zündung Heizstufe einstellen
(Richtung + oder - drehen).
A Piezozündung Drücken, um das Gas, das bei geönetem Flammenregler
(B) in den Brenner strömt, zu entzünden.
G1 Gaskartusche Brennstobehälter
G2 Schraubanschluss für Gaskartusche Gaskartusche - Druckregleranschluss
G3 Druckregler Gasdruck reduzieren.
G4 Anschluss des Gewindedruckreglers Druckregler - Gasgrillanschluss
G5 Überwurfmutter Druckregler - Gasleitungsanschluss
G6 Gasleitung Leitet das Gas zum Brenner.
FUNKTION
Beim Önen des Flammenreglers (B) strömt Gas in den Brenner des Grills.
Die Heizleistung für den Brenner kann mit dem Flammenregler (B) geregelt werden.
VERWENDUNG
Vorgesehener Gebrauch
Dieser Gasgrill ist für die Verwendung in Außenbereichen bestimmt. Die beabsichtigte Verwendung umfasst die ausschließliche Verwendung
zum Grillen von Grillgut unter Beachtung aller Anweisungen in diesem Handbuch.
Nur für den privaten Gebrauch!
Unsachgemäße Verwendung
Jede andere Verwendung oder Anwendung außerhalb des vorgesehenen Verwendungszwecks ist nicht zulässig. Dies gilt insbesondere für
folgende Arten von Missbrauch:
»Betreiben Sie den Grill nicht mit Kohle oder anderem Brennsto als Flüssiggas (Propan/Butan).
»Verwenden Sie den Grill nicht als Herd zum Kochen mit Töpfen und Pfannen.
»Benutzen Sie den Grill nicht als Heizgerät.
Benutzen Sie den Grill ausschließlich zum Erhitzen von Lebensmitteln, die gegrillt werden können.
DE

6
Gefahr „Heiße Flächen und Teile“
Während des Betriebs können einige Teile des Grills sehr heiß werden, insbesondere jene, die
nahe an der Feuerschale sind.
Mögliche Konsequenzen:
»Schwere Verbrennungen durch das Berühren von Teilen, die sich nahe an der Feuerschale
befinden.
»Feuer oder Schwelbrand, wenn sich brennbare Stoe oder Substanzen in der Nähe des Grills
befinden.
Vorsichtsmaßnahmen vor dem Grillen:
»Beim Aufstellen des Grills darauf achten, dass sich in der Nähe keine brennbaren Stoe oder
Materialien befinden. Mindestabstand zu brennbaren Stoen oder Substanzen: 2 m nach
oben und 1 m seitlich. Abstand zu flammwidrigen Materialien oder Substanzen, z. B. Wänden:
mindestens 0,25 m.
»Der Grill muss auf einer stabilen, ebenen und nicht brennbaren Oberfläche stehen.
Vorsichtsmaßnahmen beim Grillen:
»Grillhandschuhe tragen.
»Lassen Sie den Grill nie unbeaufsichtigt. Achten Sie besonders darauf, dass Kinder und Haus-
tiere vom Grill ferngehalten werden.
SICHERHEITSHINWEISE
Gefahr „Zündung des austretenden Gases“
Flüssiggas ist leicht entflammbar und explosiv. Verwenden Sie kein Gerät, das
undicht oder beschädigt ist oder nicht ordnungsgemäß funktioniert.
Mögliche Konsequenzen:
»Ernsthafte Verletzungen oder Sachschäden, wenn entweichendes Gas in einer Umgebung
entzündet, in der es nicht kontrolliert wird.
Vorsichtsmaßnahmen:
»Beim Anschluss der Gaskartusche darauf achten, dass innerhalb eines Radius von 5 m keine
Zündquellen vorhanden sind.
»Achten Sie besonders darauf, keine oenen Flammen anzuzünden, nicht zu rauchen und keine
Elektrogeräte (Geräte, Lampen, Türglocken usw.) einzuschalten (Funkenbildung möglich).
»Wenn Gas aus Ihrem Gerät austritt, die Dichtheit des Gerätes nur im Freien prüfen. Suchen Sie
ein Leck niemals mit einer Flamme. Verwenden Sie nur ein handelsübliches Leckspray.
GASKARTUSCHE ANSCHLIESSEN
DE

7
1. Wählen Sie einen geeigneten Platz für den Grill. Stellen Sie sicher, dass…
»sich in der Nähe keine brennbaren Stoe oder Materialien befinden. Mindestabstand zu brennbaren Stoen oder Substanzen: 2 m
nach oben und 1 m seitlich; Abstand zu schwer entflammbaren Materialien oder Stoen: mindestens 0,25 m.
2. Die Gaskartusche (G1) mit dem Druckregler (G3) verschrauben.
»Niemals die Gaskartusche auf die Seite legen.
3. Überprüfen Sie, ob die Dichtung der Schraubverbindung (G2) vorhanden
und intakt ist. Benutzen Sie keine zusätzlichen Dichtungen.
Dichtung der Schraubverbindung
4. Beim Anschrauben keine Werkzeuge verwenden, da dadurch die Ventildichtung beschädigt werden und ein Leck entstehen kann.
5. Önen Sie den Flammenregler (Drehen Sie B auf [+]) und verwenden Sie handelsübliches Leckspray, um sicherzustellen, dass alle
Anschlüsse fest sitzen.
»Bitte folgen Sie den Anweisungen für die Leckanzeige!
»Auf keinen Fall mit oener Flamme auf Lecks untersuchen. Das Aufsuchen von Lecks durch Hören ist keine zuverlässige
Erkennungsmethode.
»Wenn ein Leck festgestellt wird, sofort den Flammenregler (B) schließen (auf [-] drehen) und den losen Anschluss festziehen bzw.
das defekte Teil ersetzen. Die Dichtheitsprüfung wiederholen.
6. Wenn Sie nicht sofort grillen möchten, den Flammenregler schließen (B auf [-] drehen).
GASKARTUSCHE ABNEHMEN
1. Den Flammenregler schließen (B auf [-] drehen).
2. Die Gaskartusche (G1) von der Schraubverbindung (G2) des Druckreglers
im Uhrzeigersinn von Hand abschrauben und die Gaskartusche (G1) vom
Druckregler (G3) abnehmen.
DE

8
DEN GRILL AUFBAUEN
Den Grill vor dem Grillen gründlich mit etwas warmem Seifenwasser waschen und vollständig trocknen lassen. Anschließend etwas
Speiseöl auf die Oberseite der beiden Grillroste auftragen. Die Speisen haften so nicht am Grillrost.
1. Überprüfen Sie, ob ...
sich in der Nähe keine brennbaren Stoe oder Materialien befinden. Mindestabstand zu brennbaren Stoen oder Substanzen: 2 m nach
oben und 1 m seitlich. Mindestabstand zu weniger brennbaren Stoen oder Substanzen: 0,25 m.
2. Überprüfen Sie, ob...
»der Flammenregler (B) auf [-] (aus) eingestellt ist.
»Der Grill komplett montiert ist und keine oensichtlichen Mängel aufweist.
»der Grillrost richtig positioniert ist.
»der Fettfang mit etwa 10 mm sauberem, absorbierendem, nicht brennbarem Material gefüllt ist, um triefendes Fett zu aufzufangen
(z.B. trockener, lockerer und sauberer Sand). Andernfalls kann das träufelnde Fett Feuer fangen. Niemals brennbare Materialien wie
Sägemehl, Wasser oder ähnliches verwenden.
3. Überprüfen Sie, ob der Schraubverschluss (G2) des Druckreglers (G3) fest
sitzt. Dazu von Hand nach links drehen.
4. Den Flammenregler önen (B auf [+] drehen).
5. Überprüfen Sie, ob das Gassystem dicht ist. Wenn nicht, den Flammenregler
(B) sofort schließen (auf [-] drehen).
Während der folgenden Schritte nicht über den Grill lehnen - Abstand halten.
6. Stellen Sie den Flammenregler (B) auf hohe Flamme [+].
7. Falls erforderlich, die Piezozündung (B) wiederholt drücken, bis der Brenner sich entzündet.
8. Wenn die Flamme erlischt, den Flammenregler (B) auf [-] (aus) drehen, 3 Minuten warten und die Schritte 6 und 7 wiederholen.
9. Stellen Sie den Flammenregler (B) auf hohe Flamme [+], bis sich der Brenner entzündet.
10. Lassen Sie den Grill bei voller Leistung aufheizen. Bei erstmaliger Verwendung den Grill ungefähr 20 Minuten aufheizen, bevor Sie
irgendwelche Speisen auflegen. Dadurch kann die lebensmittelechte Beschichtung aushärten (wie bei jedem Ofen).
11. Wenn der Grill aufgeheizt ist, den Flammenregler (B) auf die gewählte Einstellung (Flammengröße) drehen.
12. Sie können nun Ihre Speisen auf den Grillrost (9) legen. Wir empfehlen, dass Sie zum Schutz gegen die Hitze Grillhandschuhe oder
andere ähnliche Handschuhe tragen.
BETRIEB
DE

9
DEN GRILL AUSSCHALTEN
1. Drehen Sie den Flammenregler (B) auf [-] (aus).
2. Warten Sie, bis alle Teile abgekühlt sind und reinigen Sie alle verschmutzten Komponenten.
3. Wenn der Grill über einen längeren Zeitraum nicht verwendet wird.
»Die Gaskartusche (siehe Kapitel „Gaskartusche abnehmen“) abnehmen.
»Lagern Sie den Grill an einem trockenen Ort. Wenn sich dennoch Feuchtigkeit auf dem Gerät gebildet hat,
vor dem Einschalten abwischen.
REINIGUNG/LAGERUNG/REPARATUR/WARTUNG
Grill
Um sicherzustellen, dass Ihr Grill für viele Jahre gut funktioniert, sollte er nach jedem Gebrauch mit Spülmittel, Pinsel und Tuch gereinigt
werden - darauf achten, dass alle Teile zuerst abgekühlt sind. Sind die Verschmutzungen angetrocknet, ist dies deutlich schwieriger.
Achtung "Zündkerze am Brenner kann sich verformen"
Die Zündkerze am Brenner kann sich beim Reinigen verformen oder abbrechen.
Mögliche Konsequenzen:
»Der Brenner lässt sich nicht mehr entzünden.
Vorsichtsmaßnahmen:
»Besondere Vorsicht bei der Reinigung des Bereichs um die Zündkerze üben.
Gassystem
Bei Bedarf kann die Gasaustrittsdüse am Regler (unterhalb der Frontplatte) mit einer Nadel gereinigt werden. Alle anderen Teile, durch die
Gas strömt, dürfen nur von einem Fachmann gereinigt werden.
Das Stellelement niemals demontieren und keine Veränderungen am Gerät vornehmen!
Wartung
Der Grill ist wartungsfrei. Dennoch sollte er in regelmäßigen Abständen überprüft werden. Die Abstände hängen davon ab, wie oft der Grill
unter welchen Umgebungsbedingungen verwendet wird.
Grill
»Stellen Sie sicher, dass alle Teile des Grills vorhanden und montiert sind (Sichtkontrolle).
»Überprüfen Sie, dass alle Anschlüsse vorhanden und sicher befestigt sind. Bei Bedarf anziehen.
Lagerung
Den Gasgrill ohne Gaskartusche trocken lagern.
Gassystem
Das Gassystem muss bei jedem Anschluss einer Gaskartusche überprüft werden (siehe Kapitel „Gaspatrone anschließen und abnehmen“).
Reparaturen
Senden Sie das defekte Gerät an die Adresse, die auf der Rückseite angegeben ist.
Umweltinformationen und Entsorgungsmaßnahmen
Um den Grill richtig zu entsorgen, in seine Einzelteile zerlegen. Die Metall- und Kunststo-Komponenten recyceln.
DE

10
SCHRITT 1
a) Befestigen Sie den Deckelgri (1) mit zwei Unterlegscheiben (B), zwei Unterlegscheiben (D), zwei Federscheiben (A) und zwei Scheiben-
muttern (C) am Grilldeckel (3) und der Wärmedämmplatte (2), wie unten angegeben.
SCHRITT 2
a) Setzen Sie die beiden Grillroste wie dargestellt in den Feuerraum ein.
MONTAGEANLEITUNG
DE

11
SCHRITT 3
a) Befestigen Sie die Seitenplatten wie dargestellt an jeder Seite des Grills.
SCHRITT 4
a) Setzen Sie den Fettfang von der Rückseite des Grills ein.
MONTAGEANLEITUNG
DE

12
FOR YOUR SAFETY
If you smell gas:
1. Shut o gas to the appliance.
2. Extinguish any open flame.
3. Open barbecue lid or hood.
4. If odour continues, discontinue use and contact your
local dealer.
FOR YOUR SAFETY
1. Do not store or use petrol or other flammable vapours
or liquids in the vicinity of this or any other appliance.
2. A gas bottle not connected for use must not be stored
in the vicinity of this or any other appliance.
»For outdoor use only. Not for commercial use.
»Read instructions before using the appliance. Failure to follow instructions could result in death, serious
bodily injury, and/or property loss.
»Warning: accessible parts may be very hot. Keep young children and pets away.
»Do not move the appliance during use.
»Turn o the gas supply at the gas bottle after use.
»Any modification of the appliance, misuse, or failure to follow the instructions may be dangerous and will
invalidate your warranty. This does not aect your statutory rights.
»Retain these instructions for future reference.
»Leak test annually, and whenever the gas bottle is removed or replaced. Check that the hose connections
are tight and leak test each time you re connect the gas bottle.
»For Flare-up control please refer to the ‚OPERATION‘ section of this manual.
WARNING
Assembly and Operating Instructions for
BG1430G1 as Barbecues
FOR YOUR SAFETY
If you smell gas:
3. Open barbecue lid or hood.
4. If odour continues, discontinue use and
contact your local dealer.
• For outdoor use only. Not for commercial use.
• Read instructions before using the appliance. Failure to follow instructions
could result in death, serious bodily injury, and/or property loss.
•Warning: accessible parts may be very hot. Keep young children and pets
away.
• Do not move the appliance during use.
tions may be dangerous and will invalidate your warranty. This does not
• Retain these instructions for future reference.
• Leak test annually, and whenever the gas bottle is removed or replaced.
Check that the hose connections are tight and leak test each time you re
connect the gas bottle.
• For Flare-up control please refer to the ‘OPERATION’ section of this manual.
FOR YOUR SAFETY
vapours or liquids in the vicinity of this or any
other appliance.
2. A gas bottle not connected for use must not be
stored in the vicinity of this or any other
appliance.
ASSEMBLY AND OPERATING INSTRUCTIONS TABLE
GAS BARBECUE KUHN RIKON KR47X
EN

13
PARTS LIST
Part Description QTY.
1Lid handle 1
2Heat insulation panel 1
3Lid 1
4Cooking grid 2
5Side shelf 2
6Body assem 1
7Oil cup 1
A:2PCS B: 2PCS
Spring Washer Flat Washer
C : 2PCS D: 2PCS
Disc nut Flat Washer
EN

14
SPECIFICATIONS
Gas system
Appliance category Steam pressure for butane/propane mixture corresponds to DIN EN 521:2006
Gas type Butane/propane mixture
Gas cartridge
This appliance shall only be used with the Coleman C500, SunnGas SG0450/C450, Cadac CA445N
or PRIMUS DOT-E 10677 gas cartridge butane-propane mixture (450 g/800 ml) with screw thread
connection. It can be dangerous if you try to connect another type of gas cylinder.
Heat output 3.5 kW
Flow rate (mass flow rate) 250 g/h
Gas pressure 50 mbar
Ignition Piezo ignition
Flame regulation Infinitely adjustable 0 - max.
Nozzle diameter 0,80 mm
Barbecue
Overall weight approx. 9,9 kg (net) / approx. 14 kg (gross)
Dimensions (L x H x W) approx. 97 x 39 x 44 cm
Cooking area (L x W) approx. 47 x 35.5 cm
Warranty and disclaimer
The barbeque has been manufactured according to the general engineering rules - valid at the time manufacturing was started - and the
requirements of European Directive 2009/142/EC. It is certifed and approved by IMQ. The barbecue left the factory in a technically sound
and safe condition.
This barbecue is subject to our warranty for a period of two years from the date of purchase. This warranty covers manufacturing defects
and faulty parts (burners, burner covers, cooking grill, warming rack) as well as the replacement of these parts. Costs for shipping, assem-
bly, replacement of worn parts and others are not covered by this warranty.
The warranty shall expire and any responsibility shall pass over to the user:
»if the barbecue is not used properly.
»if the barbecue is used despite visible damage or if it is not completely assembled.
»if any technical alterations have been made to the barbecue.
»if accessories are used that are not expressly authorised for this barbecue (if in doubt please contact our customer service department).
EN

15
CONTROLS
Item Item Designation Function
BFlame regulator Fill burner with gas to ignite (turn to large flame [+]).
After ignition, set heat level (turn + or -).
APiezo ignition Press to ignite the gas that flows into the burner when the
flame regulator (B) is open.
G1 Gas cartridge Fuel container
G2 Screw connection for gas cartridge Gas cartridge - pressure regulator connection
G3 Pressure regulator Reduce gas pressure.
G4 Connecting thread pressure regulator Pressure regulator - gas barbecue connection
G5 Coupling nut Pressure regulator - gas line connection
G6 Gas line Direct gas to burner.
FUNCTION
Gas flows into the barbeque‘s burner when the flame regulator (B) is open.
The heat output for the burner can be regulated with the flame regulator (B).
UTILISATION
Intended use
This is a gas barbecue that is intended for outdoor use. The intended use comprises the exclusive use for cooking barbecue food in compli-
ance with all instructions in this manual.
For private use only!
Improper use
Any other use or application beyond the intended purpose is not permitted. This applies to the following types of misuse in particular:
»Do not operate the barbecue with charcoal or fuel other than liquid gas (propane/butane).
»Do not use the barbecue as a stove with pots and pans.
»Do not use the barbecue as a heating appliance.
Do not use barbecue to heat materials and substances other than foods that can be barbecued.
EN

16
Danger „Hot surfaces and parts“
During operation some parts of the barbecue may become very hot, particularly those that are
close to the fire bowl.
Possible consequences:
»Severe burns from touching parts near the fire bowl.
»Fire or smoldering fire if flammable materials or substances are near the barbecue
Precautions prior to barbecuing:
»When setting up the barbecue, make sure that there are not, and will not be, any flammable
materials or substances nearby. Minimum distance to flammable materials or substances: 2 m
overhead and 1 m to the side. Distance to flame-resistant materials or substances, e.g. walls:
at least 0.25 m.
»The barbeque must be located on a stable, horizontally flat and nonflammable surface.
Precautions while barbecuing:
»Wear barbecue mittens.
»Never leave the barbecue unattended. Take particular care to ensure that children and pets are
kept away from the barbecue.
SAFETY INSTRUCTIONS
Danger „Ignition of escaping gas“
Liquid gas is highly flammable and explosive. Do not use any appliance that is
leaking or damaged or which is not working properly.
Possible consequences:
»Serious personal injury or damage to property if escaping gas ignites in an environment in
which it is not controlled.
Precautions:
»When connecting the gas cartridge ensure that there are no sources of ignition within
a 5 m radius.
»Take special care not to light any naked flames, do not smoke or switch on electric appliances
(devices, lights, door bells), etc. (spark-over possible).
»If gas escapes from your appliance, only check the leak-tightness of the appliance in the open
air. Never search for a leak with a flame, instead only use a commercially available leak spray.
CONNECTING THE GAS CARTRIDGE
EN

17
1. Select a suitable place to set up the barbecue. Make sure that ...
»there are not, and will not be, any flammable materials or substances nearby. Minimum distance to flammable materials or
substances: 2 m overhead and 1 m to the side; distance to flame-resistant materials or substances: at least 0.25 m.
2. Screw the gas cartridge (G1) to the pressure regulator (G3).
»Never lay the gas cartridge on its side.
3. Check to make sure the seal of the screw connection (G2) is present and
intact. Do not use any additional seals.
Seal of the screw connection
4. Do not use any tools when screwing, as the valve seal could be damaged in the process, resulting in leaks.
5. Open the flame regulator (turn B to [+]) and use a standard leak indicator to make sure that all of the connections are tight.
»Please follow the instructions for the leak indicator!
»Never check for leaks using a naked flame. Listening for leaks is not a reliable method of detection.
»If a leak is detected, close the flame regulator (B) immediately (turn to [-]) and tighten the loose connection or replace the leaking
part. Repeat the leak test.
6. If you do not wish to barbecue immediately, close the flame regulator (turn B to [-]).
DISCONNECTING THE GAS CARTRIDGE
1. Close the flame regulator (turn B to [-]).
2. Unscrew the gas cartridge (G1) from the screw connection (G2) of the
pressure regulator clockwise by hand and remove the gas cartridge (G1)
from the pressure regulator (G3).
EN

18
STARTING UP THE BARBECUE
Wash the cooking grill thoroughly before barbecuing using some warm soapy water and allow to dry completely. Then apply edible
oil to the top side of both parts. Doing this helps to prevent food from sticking to the cooking grill.
1. Check to ensure that ...
there are not, and will not be, any flammable materials or substances nearby. Minimum distance to flammable materials or substances:
2 m overhead and 1 m to the side. Distance to less flammable materials or substances: 0.25 m.
2. Check to ensure that ...
»the flame regulator (B) is set to [-] (o).
»the barbecue is fully assembled and has no apparent faults.
»the cooking grill is properly positioned.
»the fat collection drawer is filled with approximately 10 mm of clean, absorbent, non-flammable material, which can absorb dripping fat
(e.g., dry, loose, and clean sand). Otherwise the dripping fat may catch fire. Never use any flammable materials such as sawdust or similar.
3. Check to make sure the screw closure (G2) of the pressure regulator (G3) is
securely seated. Turn it to the left by hand for this.
4. Open the flame regulator (turn B to [+]).
5. Check to ensure that the gas system is sealed. If not, close the flame regula-
tor (B) immediately (turn to [-]).
During the following steps, do not lean over the barbecue - keep your distance.
6. If necessary, press the Piezo ignition (B) repeatedly until the burner ignites.
7. If the flame goes out, turn the flame regulator (B) to [-] (o)), wait 3 minutes and repeat steps 6 and 7.
8. Turn the flame regulator (B) to high flame [+] until the burner ignites.
9. Allow the barbeque to heat up at full power. The first time you use the barbecue allow it to heat up for approximately 20 minutes before
adding any food; this will enable the food-safe coating to harden (as is the case with any oven).
10. When the barbecue is heated up, turn the flame regulator (B) to the selected setting (size of flame).
11. You can now place your food on the cooking grill (9). We recommend that you wear barbecue mittens or other similar gloves for protec-
tion against the heat.
OPERATION
EN

19
SWITCHING OFF THE BARBECUE
1. Turn the flame regulator (B) to [-] (o).
2. Wait until all of the parts have cooled down and then clean any soiled components.
3. If the barbecue is not going to be used for a prolonged period:
»Disconnect the gas cartridge (see chapter „Disconnecting the gas cartridge“).
»Store the barbecue in a dry place. If moisture has formed on the appliance despite this, wipe the cooker before switching on.
CLEANING / STORAGE / REPAIR / SERVICE
Barbecue
To ensure your barbecue serves you well for many years to come, it should be cleaned after each use with washing-up liquid, a brush and a
cloth - ensure that all parts have cooled down first. It will be much harder to do this later, once the dirt has dried.
Caution „Spark plug on burner may deform“
The spark plug on the burner may deform or snap o during cleaning. Possible consequences:
»Burner no longer ignites.
Precautions:
»Take special care when cleaning the area around the sparkplug.
Gas system
If necessary, the gas outlet jet on the adjuster (beneath the front panel) can be cleaned with a needle. All other parts through which gas
flows may only be cleaned by an expert.
Never dismantle the adjusting element and do not make any modifications to the appliance!
Maintenance
The barbecue is maintenance-free. Nevertheless, you should check it at regular intervals. The intervals depend on how often it is used and
the environmental conditions to which it is exposed.
Barbecue
»Make sure that all parts of the barbecue are available and assembled (visual check).
»Check to ensure that all connections are present and securely fastened. Tighten if necessary.
Storage
Store the gas barbecue without gas cartridge in a dry place.
Gas system
The gas system needs to be checked every time a gas cartridge is connected (see chapter „Connecting and disconnecting the gas cartridge“).
Repair
Send the defective appliance to the address indicated on the rear for your country.
Umweltinformationen und Entsorgungsmaßnahmen
To dispose of the barbecue properly, disassemble it into its individual parts. Recycle the metal and plastic components.
EN

20
STEP 1
a) Attach the Lid handle (1) to the BBQ Lid (3) and Heat insulation panel (2) with two Flat washers (B), two Flat washers (D), two Spring
washers (A) and two Disc nuts (C) in the orientation as shown below.
STEP 2
a) Insert both Cooking grid into the firebox as shown.
ASSEMBLY INSTRUCTIONS
EN
Table of contents
Languages:
Other Kuhn Rikon Grill manuals
Popular Grill manuals by other brands

Nexgrill
Nexgrill 720-0830HM instruction manual

Outback
Outback Charcoal Roaster 2000 Assembly and operating instructions

MUURIKKA
MUURIKKA Nokkela TO6841 Assembly instructions

Fagor
Fagor BBC-850 Instructions for use

Cuisinart
Cuisinart CPO-600 Assembly and operating instructions

Philips
Philips HD4467 user manual