manuals.online logo
Brands
  1. Home
  2. •
  3. Brands
  4. •
  5. Kunpeng Sports Goods
  6. •
  7. Other
  8. •
  9. Kunpeng Sports Goods M User manual

Kunpeng Sports Goods M User manual

Electric Skateboard
Model: M
Jiangsu Kunpeng Sports Goods Co., Ltd
Table of Contents
1、Index
2、Introduction
3、Apparatus
4、Methods of Use
5、The Controller and Remote Control
6、Features
7、Specifications
8、Safety Warnings and Tips
9、Troubleshooting
10、Warranty
11、Safe Use of Battery
12、Installation Guide
Introduction
Apparatus
1. Deck
We use 8-layer of 12mm thick composite wooden boards with Kunpeng
features, which make the decks flexible, durable and powerful. And in all
riders’ view, U-type decks will be more stable for them to use a variety of
action skills.
2. Battery Box
Kunpeng battery box, the low-profile multi-unit battery pack is located
under the deck. For batteries, we use the latest plug-in technology. The
flexible and compact battery case allows the deck to bend without
affecting the sliding.
. Charging port
. Power switch
. Power status indicator
. Motor outlet
3. The Motor
By integrating the plug-in technology for the aerospace industry, the
400-watt brushless hub motor provides reliable and efficient power for
electric skateboard.
4. Wheels
We use high rebound polyurethane wheels which provides power and
stability of the surface for Kunpeng skateboard and make the riders’ feet
feel comfortable, and we made the skateboards became a reliable urban
transportation tools.
5. The Bridge
Kunpeng skateboard choose 5.5-inch and 7-inch trucks according to the
deck’s style and size, which make the skateboard slide stably and turn
freely, and excellent stability makes higher level of stability during
playing. The screw in the middle connects bridge and the base made of
the highest grade material, the steering performance and flexibility of the
skateboard can be changed by adjusting the top nut.
6. The Remote Control
A sleek and compact wireless controller is one of the key features of
Kunpeng Skateboard, and you can intuitively control the skateboard’s
movement by controlling the buttons of accelerator / brake / forward /
backward / fast / slow speed.
As the picture shows :
Remote control has one putter, three switches, one contact, and one
charging port. The putter is used to control the acceleration, push forward
is speed-up, backward push is the brake. The two switches on the both
sides of the transmitter are the remote control power switch and reversing
switch; reversing switch means that skateboard can move forward or
backward by toggling the switch. There is also a contact by the remote
control power switch, which is the frequency switch, if your skateboard
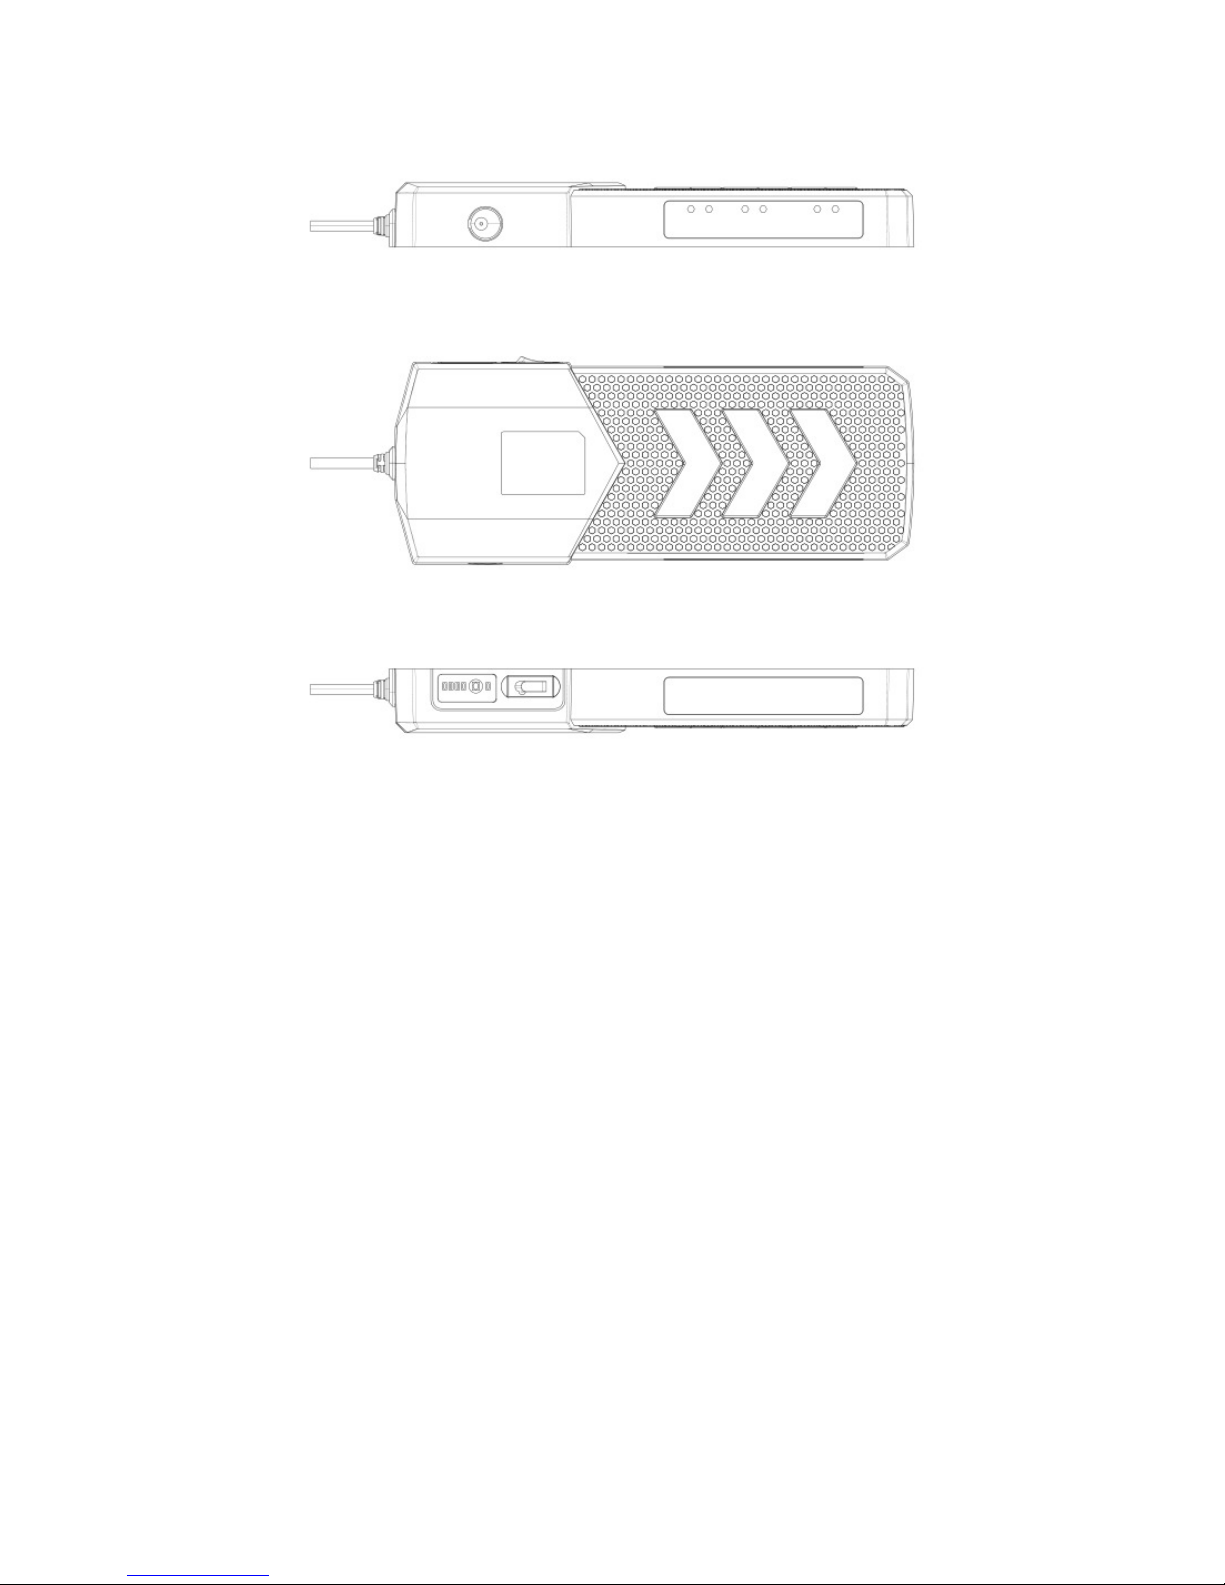
equipped with flashing lights, then it can also use as flashing lights switch.
The switch on the back of the controller is the gear switch, which
includes fast and slow gear, slow gear only has 50% of speed compare
with fast gear, we recommend the beginners use slow gear, and riders
may consider using the fast gear after their adaptation. The last is the
charging port, our remote control charging port matches Micro-USB
cable, so don’t worry that you can’t find the place to charge.
7. Skateboarding Tools
To ensure the integrity of the performance of the skateboard, you must
regularly clean the dust on skateboard and check the tightness of the
screws. Each skateboard equipped with a set of professional tools; you
can easily disassemble each part of the skateboard. It gives riders a better
control of skateboard’s performance, which deployed to the highest
performance for riders.
8. Charger
Each of our skateboard equipped with a USB remote charging cable and a
skateboard charger. The USB cable can be connected to any ordinary
mobile phone charger, you can start charging once connected with
transmitter while keep the remote control switch open during charging,
the transmitter lights will flash, and stops when charging is done. It is a
smart charger, the skateboard will display a red light when charging, and
the green light for full power to stop charging, so as to prevent over
charge phenomenon for the battery, and skateboard takes 1-2 hours to
fully charge.
Methods of Use
Controller and remote control
1. You can clearly see the remote control has a putter, three switches, a
contact and a charging port. We can also see a switch, a charge port and a
row of power indicators on the battery box.
2. First we have to make sure the remote control switch and battery box
switches are turned off.
3. Push the steering gear to forward position, and push the speed gear to
slow position.
4. Open the remote control switch, you will see the remote control light
on, then it shows the transmitter has been turned on.
5. Open the battery box switch, and battery indicator light will be on, so
will the signal light.
6. Make the remote control get near the battery, and take a long press on
the transmitter contacts, until you see the transmitter light and the battery
box signal light flash at the same time, then you can disconnect.
7. You will see the battery box lights flashing fast, which indicates the
frequency is completed.
Features
1. Two Speed Modes
Slow mode: suitable for beginners, the rate is controlled at 65% of full
speed, and makes the riding-learning more relaxed and safe.
Fast mode: suitable for skilled and experienced skateboarding players, it’s
quick with strong climbing power.
2. KP skateboard suitable for different user levels
Children: slow 5 ~ 6km/h, fast 8km/h, Single drive
Adolescent models: slow 10km/h, fast 16km/h, single drive
Young professional models: slow 18km/h, fast 25km/h, dual drive
Adult section: slow 18km/h, fast 25km/h, single drive
Adult professional section: slow 20km/h, fast 28km/h, dual drive
3. KP skateboard batteries are from Samsung original lithium batteries,
which can complete the fast charge, and the charging time is 1 - 2 hours,
so it’s necessary to use standard 1A current. The charging time for the
remote control is 30 minutes and it can charge by any Micro-USB cable.
4. KP skateboard are using the most advanced power recovery system,
which means when you are sliding in the non-power glide situation; the
generated electricity will be recycled into the battery, thereby enhancing
the driving life of the skateboard.
5. One KP skateboard is only 4.8KG, this weight allows more
professional riders fall in love with this product. Riders can easily do
their actions with it.
Specifications
1. Performance
The rider's maximum weight: 125 kg
Maximum mileage: 15km
Highest speed mode: 18.6 miles / 30 km / h
Minimum low speed mode: 3.1 miles / 5 km / h
2. Skateboard
Deck Material: Canadian maple
Deck size: 915 * 240 mm
Wheels material : Polyurethane
Wheels size: 75 mm diameter / 55 mm wide
Battery Type: Lithium Ion
Battery capacity: 2.2AH
Number of batteries: 7
Battery charging time: 1-2 hours
Engine Type: External rotor brushless DC motor
Motor power: 400W
Transmission mode: wheel direct drive
Board weight: 10.6 lb / 4.8 kg
3. Charger
Maximum input: AC100-240V / 50-60HZ / 1.5A
Rated output: DC 29.4V / 1A
Charging indicator: Charge red / full green
4. Remote Control
Material: ABS plastic
Size: 123 * 44 * 33 mm
Weight: 60 grams
Battery type: lithium battery
Battery capacity: 200mah
Battery charging time: 30 minutes
Wireless connection: 2.4GHZ
With Vibration: affirmative
Security warnings and prompts
Before riding the KP skateboard, it is highly recommended to read and
follow all the hints, tips and warnings listed as below. It can help to
reduce the inherent risk. When riding an own skateboard, if it exceeds
your ability or KP skateboard get through obstacles or other unsuitable
surfaces, this can cause a collision and scratch the chassis which will
result in serious or fatal injury or damage to your skateboard.
For New Skateboard Riders
First time user of KP skateboard. The rider shall use low-speed mode. An
experienced rider shall practice in a spacious, non-traffic area during the
1st use. Experienced rider should assist with more experienced riders. Do
not let new rider use KP Skateboard control without read this guide. First
time rider shall ask help from experienced riders or other people's till KP
skateboard is learned.
Summary for riders
KP skateboard designed for users at aged 10 and above. They intended
for riders weighing 125 kg / 276 lb or less. KP skateboard can not use for
carrying goods. KP skateboard designed for rider with good health. You
must not ride if you feel uncomfortable. You must be vigilant to travel
safely as the same as use other personal electric transportation tools. KP
skateboard can not carry any non - rider, and do not play by getting
several boards together. You shall not hold the child to ride and do not
ride after drinking or taking drugs. Do not ride if you can not follow the
instructions and warnings in this guide.
Troubleshooting
What should I do if my skateboard doesn’t work
1.1 Check if the electric skateboard is switched on : When the switch
turned on you should see the battery indicator and the signal indicator.
1.2 Check whether the remote control is activated: When the transmitter
turned on, the indicator lights.
1.3 If both of the skateboard and the transmitter are on, if the signal
indicator on the battery box is not flashing rapidly, which means that the
skateboard and the remote controller are not connected, just activate the
frequency mode.
1.4 If the transmitter and skateboard are linked, and the battery box is
also in the fast flashing lights state, then check if the battery indicator is
in one grid of electricity state, if so it means your battery power is
running out, you need to charge.
1.5 During the riding, if it is clear that the speed has slowed down, and
the intensity is insufficient, it shows the skateboard power is low, and it
needs to charge, now the remote control needs to charge with battery box.
Warranty
.Skateboard parts
1. Regular use (non-human or by external damage)
1. Deck: free to replace a new one within eight months
3. Truck fracture: free replacement within one year
4. Bearings and wheels are consumable and are not covered under
warranty, depending on how they used and the road condition.
.Control system and motor
1. Regular use (non-human disassembly, visible impact, high-altitude fall,
water and other external factors damage) results in failure.
2. Remote control and monitoring system: damage within eight months,
maintenance will be provided, the control system and remote control will
replace with new ones in critical condition.
3. Motor: failure within eight months support will be provided; there will
be the replacement of the new engine in a critical condition.
. Customers need to know: for bulk production, we will distribute 0.3%
of the main control board and remote control board, and provide fault
repair training; there are maintenance seals in the central control part and
the motor part. Maintenance will be refused if customers tore the repair
sealing paste privately or remove the parts themselves. The main control
board and the motor will be used as connectors to facilitate replacement
and maintenance.

Popular Other manuals by other brands

Feig Electronic OBID ID RW02 Series Mounting instructions

Feig Electronic

Feig Electronic OBID ID RW02 Series Mounting instructions

Siemens Simatic RF600 System manual

Siemens

Siemens Simatic RF600 System manual

Havis KK-K9-C22-K installation instructions

Havis

Havis KK-K9-C22-K installation instructions

curt 11376 installation instructions

curt

curt 11376 installation instructions

Hendrickson OPTIMAAX Service instructions

Hendrickson

Hendrickson OPTIMAAX Service instructions

Oldham OLC 20 user manual

Oldham

Oldham OLC 20 user manual

eSSL TS1000 series user manual

eSSL

eSSL TS1000 series user manual

EHEIM Professionel 4e+ 350 operating instructions

EHEIM

EHEIM Professionel 4e+ 350 operating instructions

Roland DM-800 manual

Roland

Roland DM-800 manual

TAAM Rio Nano Skimmer user manual

TAAM

TAAM Rio Nano Skimmer user manual

Freecom DUAL DRIVE NETWORK CENTER datasheet

Freecom

Freecom DUAL DRIVE NETWORK CENTER datasheet

Scotsman WATER FILTER datasheet

Scotsman

Scotsman WATER FILTER datasheet

Aim MXm user guide

Aim

Aim MXm user guide

Danfoss Link PR installation guide

Danfoss

Danfoss Link PR installation guide

DITEC OBBI3BH Installation and maintenance manual

DITEC

DITEC OBBI3BH Installation and maintenance manual

Cisco 4215 - Intrusion Detection Sys Sensor Configuration guide

Cisco

Cisco 4215 - Intrusion Detection Sys Sensor Configuration guide

MSD 6ALN installation instructions

MSD

MSD 6ALN installation instructions

Curt Manufacturing 13146 Installation instructions manual

Curt Manufacturing

Curt Manufacturing 13146 Installation instructions manual

manuals.online logo
manuals.online logoBrands
  • About & Mission
  • Contact us
  • Privacy Policy
  • Terms and Conditions

Copyright 2025 Manuals.Online. All Rights Reserved.