Kuppersbusch ITW 632 Operation manual

BEDIENUNGSANWEISUNG
mit Montageanweisungen
Instructions for use and installation instructions
Instructions d’utilisation et avis de montage
Gebruiksaanwijzing en montagehandleiding
Istruzioni di uso e di montaggio
Instrucciones de uso y de montaje
Instruções de uso e de montagem
Ðtv³wuÒxvÒvÒÊËwÒ´ÎËxÑÐÌгv&&vÒ
ITW 632
537637 I61

For your information
Please read the instructions in this ma-
nual carefully. They contain important in-
formation concerning the safety, the in-
stallation and the use of your appliance.
The appliance must only be used for pre-
heating or keeping hot of plates and
cups in your household.
Store these instructions in a safe place.
Table of contents
Your appliance at a glance. . . . . . . . . . . 9
Safety instructions . . . . . . . . . . . . . . . . 9
Connection and functioning
The operation of your appliance
Before first use . . . . . . . . . . . . . . . . . 10
Cleaning for the first time
Connection
Using the appliance . . . . . . . . . . . . . . 10
Cleaning and care . . . . . . . . . . . . . . . 10
Installation . . . . . . . . . . . . . . . . . . . . 11
Fitting of the appliance
Technical data. . . . . . . . . . . . . . . . . . 12
Service
8

Your appliance at aglance
Safety instructions
Please read and follow these in-
structions!
1 Heating up indicator
2 Operating indicator
3Timer
4 Entriegelung of overheating
protection
5 Temperature regulator
Connection and functioning
Küppersbusch appliances are built in accordance with the valid
safety requirements.
Maintenance and repair of your appliance should only be made
by an authorized electrician in accordance with the valid safety re-
quirements. Improper repairs may place the user at serious risk.
The appliance becomes hot during operation. Always keep child-
ren well away.
The connection leads of electrical appliances must not get jam-
med in the door of the appliance.
Functioning of the appliance
If repairs or maintenance is being carried out, the appliance must
be de-energized. Unplug it or disconnect it from the mains supply.
Never use your appliance to store objects which, if the oven is
unintentionally switched on, could endanger the environment.
Be careful when working in the hot appliance. If necessary, use
an oven cloth, gloves or something similar.
Only use the appliance with the door closed.
9

Before first use
Using the appliance
Cleaning and care
Cleaning for the first time
Dispose of packaging. Before using your appliance for the first time
you must clean it. Clean the appliance with a damp cloth and a little
washing up liquid. Wipe dry with a soft cloth.
Connection
Connect the appliance to the electric circuit with an earthing contact-
type plug.
Please note the safety instructions on page 4!
Switch timer and thermostat into the desired position.
Einstellung of
timer
Dauer Einstellung
des
Thermostaten
Temperature
10 Minutes 40 °C
20 Minutes 45 °C
30 Minutes 50 °C
40 Minutes 55 °C
50 Minutes 60 °C
60 Minutes 65 °C
70 Minutes 70 °C
80 Minutes 75 °C
90 Minutes 80 °C
100 Minutes 80 °C
110 Minutes 80 °C
120 Minutes 80 °C
The heating-up time of the full warming cupboard is about 30 - 40
minutes, with a temperature at 80 °C.
After 2 hours the appliance switches off automatically. If overheating
occurs, the appliance is switched off by a built-in overheating pro-
tection.
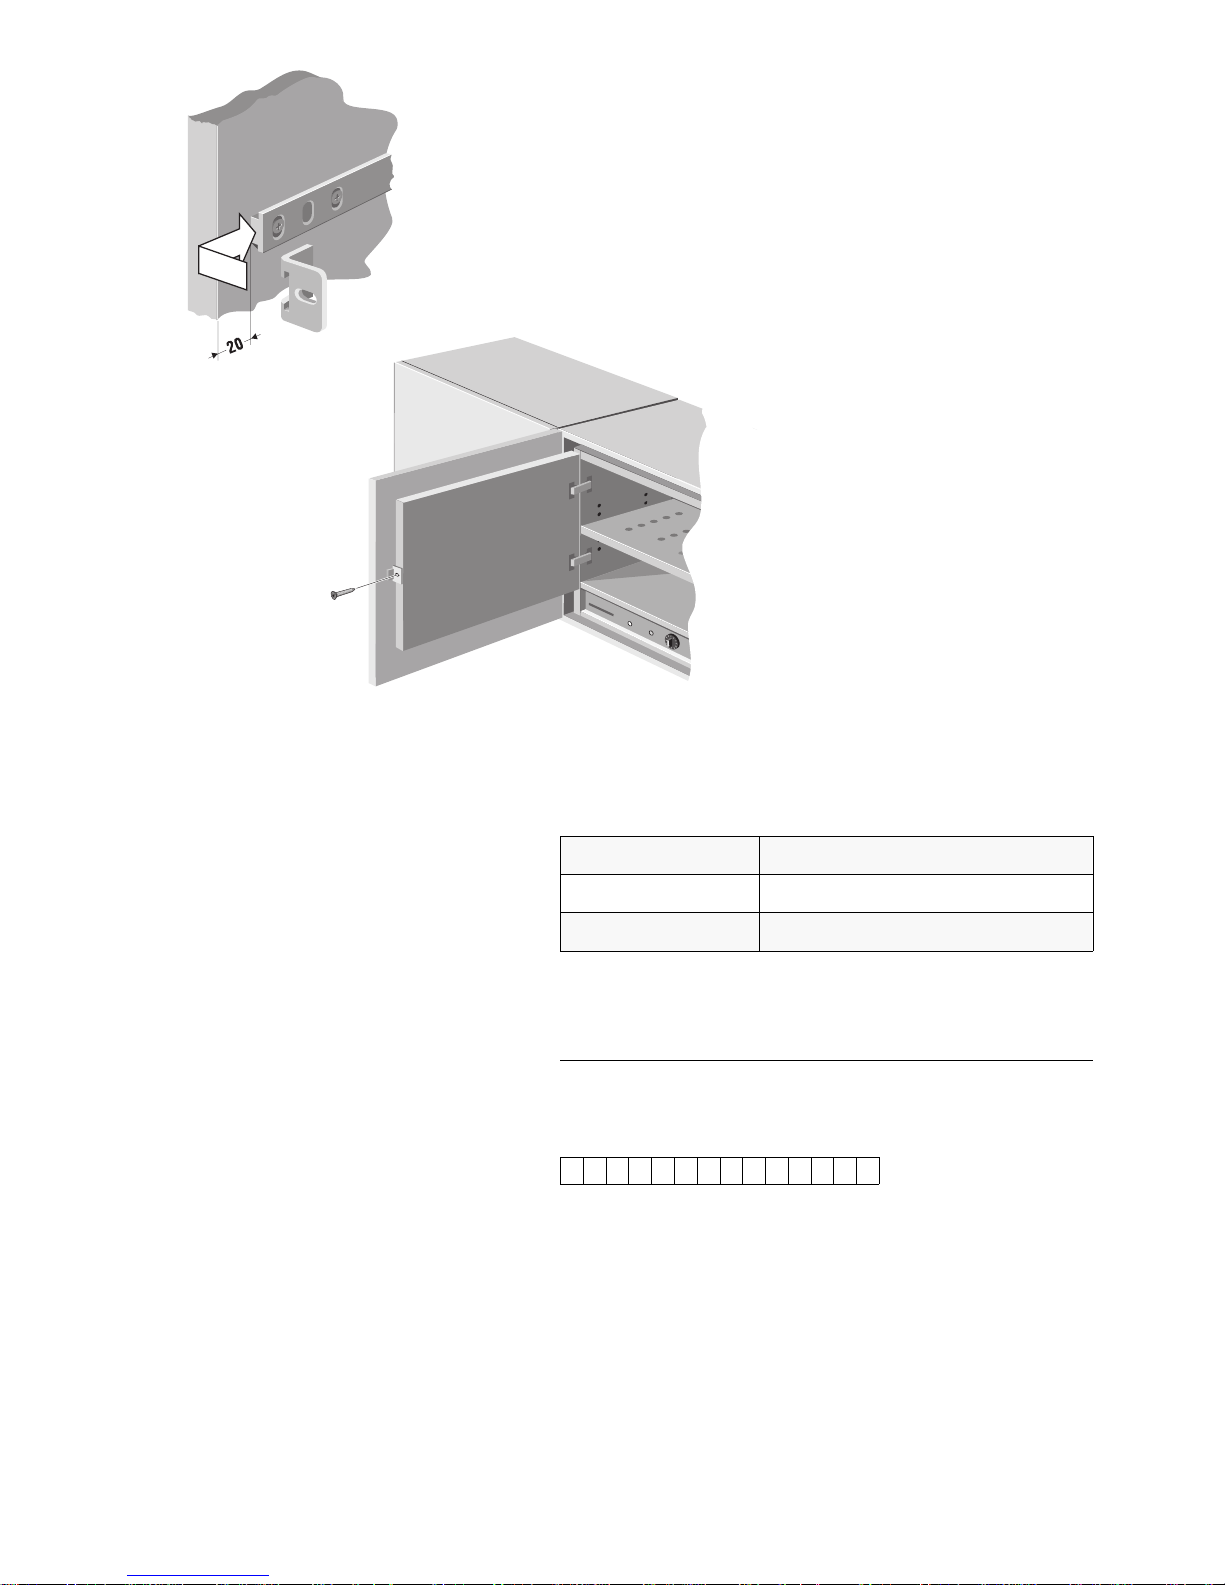
After the appliance has cooled down, you can release this protecti-
on. In order to do that, press the release mechanism F inside the
warming cupboard.
Before cleaning the appliance, de-energize – remove the fuse.
Lassen Sie das Gerät vor dem Reinigen grundsätzlich vollständig
abkühlen! Clean with a damp cloth and a little washing up liquid
and then wipe dry. That is usually sufficient.
Verwenden Sie zur Reinigung keinesfalls kratzende oder aggressi-
ve Reinigungsmittel wie Scheuermittel, Stahlwolle, verseifte Stahl-
wolle, Metallschwämme, Plastikschwämme oder Schwämme mit
kratzender Oberfläche.
Keine bleichenden und chlorhaltigen Reinigungsmittel verwenden.
Entfernen Sie Kalk-, Fett-, Stärke- und Eiweißflecken sobald wie
möglich. Andernfalls kann sich unter diesen Schichten durch feh-
lenden Luftzutritt Korrosion bilden.
Verwenden Sie zur Pflege handelsübliche Edelstahl-Pflegemittel.
Beachten Sie dabei grundsätzlich die Angaben des jeweiligen Her-
stellers und probieren Sie zunächst eine kleine Stelle aus, bevor
Sie das Mittel ganzflächig einsetzen.
10

Installation
In case of repairs or maintenance the
appliance must be de-energized!
Reparatur nur durch autorisierten Fachmann!
Fitting the appliance into the cupboard.
Vor dem Einbau des Gerätes gemäß nebenstehender Maßzeichnung
eine Öffnung zur Durchführung des Netzkabels in die Schrankrück-
wand sägen.
Dann die beiliegenden Sicherungsschrauben vollständig in den Bo-
den des Einbauschrankes einschrauben.
Den Tellerwärmer in die Schranknische heben und mit dem Schuko-
Stecker an das Stromnetz anschließen.
Insert the built-in warming cupboard
into the appropriate cupboard niche.
Be careful not to jam the connection
lead!
The space between the closed door
of the warming cupboard and the top
edge of the cupboard must be 7mm.
Zum Einbau des Zwischenbordes die Bodenträger in die vorhande-
nen Bohrungen im Innenbereich des Schrankes in der gewünschten
Höhe einsetzen.
Danach das Zwischenbord auf die Bordträger schieben.
Ø 3,5
40
210
230
230
Ø 55
35
11

Technical data
To fasten the hinge of the towing door fasten the slide rail D onto
the inside of the built-in cupboard door. The distance of the outer
edge of the door must be 20 mm. The installation height depends
on the size of your cupboard door.
Please use the supplied screws for fastening.
Dimensions 540 x 320 x 500 mm (W x D x H)
Weight approx. 22 kg
P.- consumption 0,5 kW / 230 V
Service
Note down the model number (on the rating plate) in case of enqui-
ries at your service centre.
Die Führung in die Gleitschiene einhängen
und anschließend an der Türe des Tellerwär-
mers befestigen.
12
Table of contents
Other Kuppersbusch Warming Drawer manuals