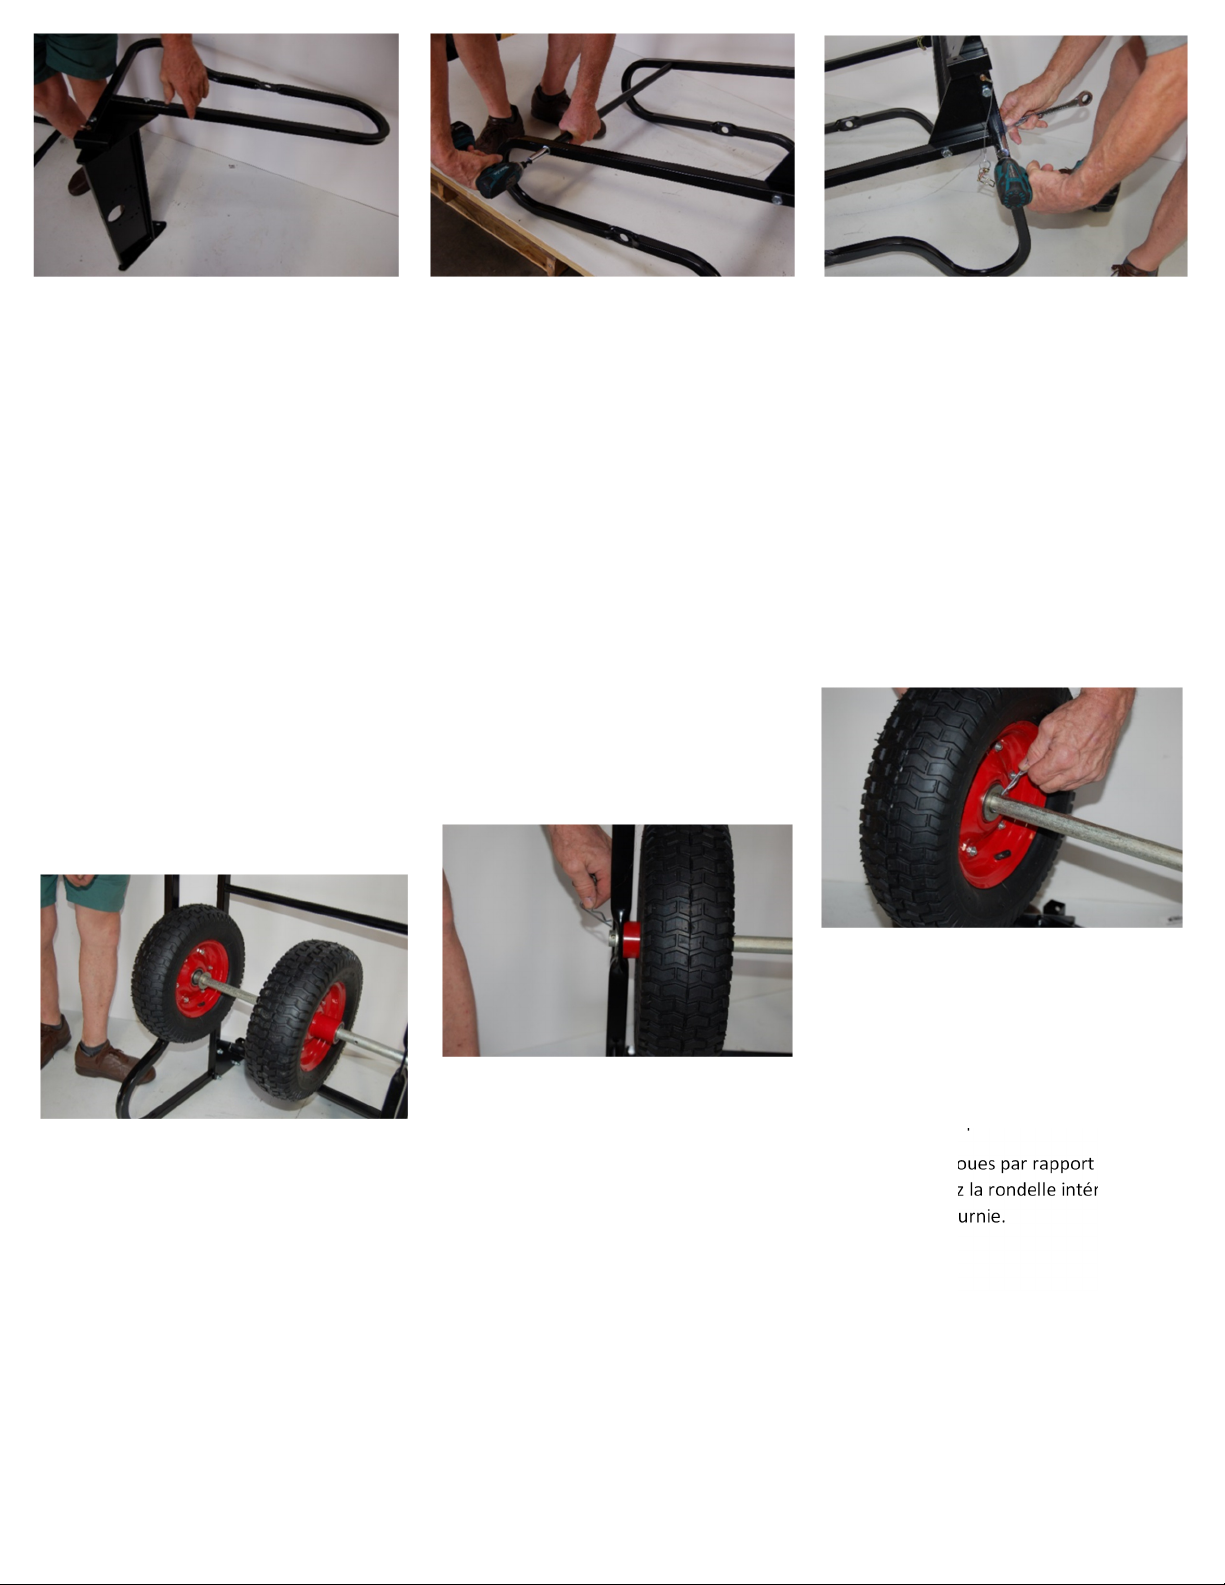
manuals.online logo
Brands
  1. Home
  2. •
  3. Brands
  4. •
  5. Kushlan Products
  6. •
  7. Mixer
  8. •
  9. Kushlan Products 1000DD-WB User manual

Kushlan Products 1000DD-WB User manual

Other Kushlan Products Mixer manuals

Kushlan Products 350DD Service manual

Kushlan Products

Kushlan Products 350DD Service manual

Kushlan Products KPRO350MP User manual

Kushlan Products

Kushlan Products KPRO350MP User manual

Popular Mixer manuals by other brands

Oster FPSTSM2710 instruction manual

Oster

Oster FPSTSM2710 instruction manual

Aviom A-16II user guide

Aviom

Aviom A-16II user guide

Varimixer V30K Spare part and operation manual

Varimixer

Varimixer V30K Spare part and operation manual

Kohler Stillness K-T954 installation guide

Kohler

Kohler Stillness K-T954 installation guide

Wolf Gourmet WGSM300 Use & care guide

Wolf Gourmet

Wolf Gourmet WGSM300 Use & care guide

Team International TEAM MS 17 operating instructions

Team International

Team International TEAM MS 17 operating instructions

MULTIQUIP Whiteman WM45E Operation and parts manual

MULTIQUIP

MULTIQUIP Whiteman WM45E Operation and parts manual

KitchenAid KSM7581BZ0 Instructions and recipes

KitchenAid

KitchenAid KSM7581BZ0 Instructions and recipes

Jay-Lor 5050 owner's manual

Jay-Lor

Jay-Lor 5050 owner's manual

privileg MJ-BL1051W user manual

privileg

privileg MJ-BL1051W user manual

Fakir CULINA CHEF user manual

Fakir

Fakir CULINA CHEF user manual

Termozeta Bellacucina Instruction booklet

Termozeta

Termozeta Bellacucina Instruction booklet

Thinky ARE-250 instruction manual

Thinky

Thinky ARE-250 instruction manual

Midas XL4 manual

Midas

Midas XL4 manual

bianco PURO 4 manual

bianco

bianco PURO 4 manual

better chef IM-815WC Use and care book

better chef

better chef IM-815WC Use and care book

ALLEN & HEATH GR1 user guide

ALLEN & HEATH

ALLEN & HEATH GR1 user guide

Buffalo CP921 instruction manual

Buffalo

Buffalo CP921 instruction manual

manuals.online logo
manuals.online logoBrands
  • About & Mission
  • Contact us
  • Privacy Policy
  • Terms and Conditions

Copyright 2025 Manuals.Online. All Rights Reserved.

Kushlan Products, LLC 281-313-2506 OR 800-469-4178
10601 S Sam Houston Parkway W STE 140 Fax 281-313-2509
Houston, TX 77071
FEATURES INCLUDE:



  











SHOULD YOU REQUIRE ANY
SET-UP OR OPERATING ASSISTANCE WITH YOUR PRODUCT,
DO NOT RETURN TO ORIGINAL PLACE OF PURCHASE
2
•Aer referring t the perati n manual, if assistance is still needed, please c nsult ur web Site at
www kushlanproducts com
• From our web site you may e-mail us directly, If assistance is still required, please call our customer service de-
partment at 1-800-469-4178
Safety Alert Symbol: is safety alert symbol is sed to attract yo r attention!
• Pers nal Safety is inv lved when y u see this symb l, Pay extra attenti n, bec me alert-be sure t heed it’s
message. Failure t d s may lead t seri us pers nal injury r damage may ccur.
• Warnings and safety instructi n: If these warnings and safety instructi ns are n t read and carefully f ll wed,
seri us pers nal injury c uld ccur.
WARNINGS
1. D n t use, start, r attempt t perate this machine until all f the instructi ns have been read and fully under-
st d.
2. Never all w any ne t perate this machine unless the pers n is well acquainted with these rules f safe pera-
ti n.
3. Never perate this machine with ut all guards in place and rmly attached t the machine.
4. Make certain that the mixing drum is clear f bstructi ns and stand clear f the machine with ut all guards in
place and rmly attached t the machine.
5. When cleaning, lubricating, r adjusting the mixer, disc nnect the p wer plug.
6. Keep all pe ple (except perat r) a minimum f ve (5) feet away fr m the machine during perati n.
7. Always make certain that the mixer is c nnected t a pr perly gr unded electric circuit t pr tect the perat r
fr m p ssible electric sh ck.
8. D n t plug r unplug the m t r while standing in r ar und damp r wet gr und.
9. D n t start the m t r if the drum is Fully l aded
10. D n t verl ad the mixer
11. Never attempt t m ve the mixer while the m t r is n.
EN CASO DE QUE REQUIRIERA AYUDA
CON LA INSTALACIÓN O EL MANEJO DE SU PRODUCTO,
• Después de c nsultar el manual de peración, si sigue necesitand ayuda c nsulte nuestr siti Web en
www kushlanproducts com
• Desde nuestr siti Web puede enviarn s un mensaje directamente. Si siguiera necesitand ayuda, llame a nuestr
departament de atención al cliente al 1-800-469-4178
Símbolo de alerta: Este símbolo de alerta se sa para llamar s atención!
• Cuand vea este símb l sabrá que está implicada su seguridad pers nal; p nga atención especial, esté alerta y n
lvide seguir su mensaje. N hacerl puede pr v car graves lesi nes físicas dañ s.

ADVERTENCIAS
1. N use esta máquina, ni la arranque ni trate de manejarla antes de haber leíd y entendid plenamente t das las
instrucci nes.
2. Nunca permita que nadie maneje esta máquina si la pers na n está bien familiarizada c n estas reglas peración
segura.
3. Nunca maneje esta máquina sin las guardas en su lugar y bien jadas en la máquina.
4. Cerciórese de que el tamb r de mezclad n tenga bstrucci nes, que libre bien la máquina y que t das las guar-
das están en su lugar, bien jadas en la máquina.
5. Cuand limpie, lubrique ajuste la mezclad ra, desc necte la clavija de c rriente.
6. T da la gente (salv el perad r) debe estar p r l men s a 1.5 metr s de distancia de la máquina durante su
peración.
7. Cerciórese siempre de que la mezclad ra esté c nectada a un circuit eléctric debidamente aterrizad , para
pr teger al
perad r de un p sible ch que eléctric .
8. N enchufe ni desenchufe el m t r al estar parad en tierra húmeda m jada.
9. N arranque el m t r si el tamb r está t talmente cargad .
10. N s brecargue la mezclad ra.
11. Nunca trate de m ver la mezclad ra mientras esté encendid el m t r.
SAFETY INSTRUCTIONS For the safety of yourself and others around you, it is extremely important that you observe the follow-
ing notes.
1. Keep hands and cl thing away fr m m ving parts at all times.
2. D n t perate this machine under the inuence f alc h l r while taking medicati n that impairs the senses r
reacti ns.
3. Make certain that the w rk area ar und the machine is clear f debris and bstructi ns.
4. Keep all unauth rized and untrained pe ple away fr m the machine at all times.
5. Never let the mixer run unattended even f r a brief m ment.
6. Turn  the m t r when y u leave the machine.
7. Only use r perate the mixer n level gr und t prevent the mixer fr m tipping ver.
8. D n t abuse the p wer c rd; i.e. Never yank n the c rd t disc nnect it. Keep the c rd away fr m heat, il, and
sharp edges.
9. D n t verreach while w rking with the mixer. Keep pr per F ting and balance at all times when l ading r
unl ading the mixer.
10. Never all w children r inexperienced perat rs t perate r repair the mixer.
11. Use nly fact ry auth rized parts f r replacement
12. Keep these perati n instructi ns with the machine at all times
13. Always wear safety glasses and safety sh es when perating and m ving equipment
14. Safety decals – replace missing damaged safety decals.
Mixer Instructions
A. LUBRICATION: ere are grease ttings n all m dels. Apply any type f EP grease until grease begins t c me
ut f the bearings. LUBRICATE ALL FITTINGS BEFORE EACH USE.
B. GEARBOX MOTOR: Mixer already shipped with gear oil in gearbox. Change l bricate/oil every 200 ho rs
of se. Fill 8 oz of 75w-90 gear oil.
C. GENERAL: Check all screws f r tightness bef re each use.
D. CONCRETE MIXING: D n t insert sharp bjects int the plastic mixing drum. D ing s will damage the
drum.
E. CLEANING: D n t spray water n r int the m t r.  r ugh cleaning f the mixer aer each use is rec m-
mended and will add t the service life.
Instructions pour le mélangeur
A. LUBRIFICATION: T us les m dèles s nt munis de graisseurs. Appliquer n'imp rte quel type de graisse EP.
Appliquer la graisse jusqu'à ce que la graisse ress rte R ulement de r ue. LUBRIFIER LES RACCORDS AVANT
CHAQUE UTILISATION
B. MOTEUR BOÎTE DE VITESSES: Mixer livré avec briser la graisse dans le carter. Changer l brier / h ile
to tes les 200 he res. Utilisez 75W-90 h ile.
C. GÉNÉRALITÉS: Vérier que les vis s nt bien serrés avant t ute utilisati n.
D. MÉLANGE DE BÉTON: Ne pas intr duire d' bjets tranchants dans le tamb ur de mélange en plastique. Ne pas
suivre cette c nsigne risque d’end mmager le tamb ur.
E. NETTOYAGE:  

Item# Part# Description Qty
1 1000DDWB-01 MachineBoltm12x70 1
2 1000DDWB-02 Outsi eDrumPlatewithStraightBushing 1
3 1000DDWB-03 PolyethyleneDrum10.0cu.ft.17in.DiameterOpening 1
4 1000DDWB-04 Insi e rumplate 1
5 1000DDWB-05 Boltsfor rumplate3/8”-16x2 12
6 1000DDWB-06 Steelmixingbla es 3
7 1000DDWB-07 Boltsforbla es3/8”-16x2 6
8 1000DDWB-08 Nutsforbla es3/8-16 6
9 1000DDWB-09 Boltsforframem12x50 8
10 1000DDWB-10 Boltsformotorcover5/16x34 2
11 1000DDWB-11 Motorcover 1
12 1000DDWB-12 Rearchannel 1
13 1000DDWB-13 Wheelbarrowhan les 2
14 1000DDWB-14 Han legrips 2
15 1000DDWB-15 Lockingpinan lanyar forhan les 2
16 1000DDWB-16 1.5HPGearmotor10Amp110volt 1
17 1000DDWB-17 Wheelbarrowframe(RIGHTSIDE) 1
18 1000DDWB-18 15in.Polyurethanewheelan hub 2
19 1000DDWB-19 2.5in.CotterPinforWheels/Axle(setof4) 1set
20 1000DDWB-20 1in.x29in.WheelAxle 1
21 1000DDWB-21 1in.SteelWheelWashers(setof4) 1set
22 1000DDWB-22 Frontsupporttube 1
23 1000DDWB-23 CompleteDrumWheelGui eAssembly 1
23A 1000DDWB-A 2.5in.DrumGui eWheel(setof2) 1set
23B 1000DDWB-B Mountingplate 1
23C 1000DDWB-C .5in.x4.5inDrumGui eWheelShaft(setof2) 1set
23D 1000DDWB-D 3/8in.x2in.Gra e2mountingbolt 1set
23E 1000DDWB-E 3/8in.Nuts(setof4) 1set
17A 1000DDWB-17A Wheelbarrowframe(LEFTSIDE)*NOTSHOWNINDIAGRAM 1

2
4
1
5
8
9
10
7
12
14
13
6
3
17
16
11
15
18
19
23D
23
21
9
20
23A 23E
23E
23B
23C
22
5
Item# Part# Description Qty
1 DD-1000 Gearboxan motorassembly(110V-60Hz) 1
2 DDMA-02 Screw(6x25mm) 1
3 DDMA-03 Seal(40mm) 1
4 DDMA-04 Screw(6x50mm) 4
5 DDMA-05 Gearboxcase-fronthalf 1
6 DDMA-06 Gearboxgasket 1
7 DDMA-07 Pin(8x20mm) 1
8 DDMA-08 Lockingkeyforgearan axle(8x7x15mm) 1
9 DDMA-09 Gearboxballbearing 1
10 DDMA-10 Gear(Z79) 1
11 DDMA-11 Lockingkeyforgearaxle(5x5x12mm) 1
12 DDMA-12 Pinion(Z9) 1
13 DDMA-13 Gearboxcase-backhalf 1
14 DDMA-14 Motorseal(20mm) 1
15 DDMA-15 SpacewasherA(30mm) 1
16 DDMA-16 MotorBearing(6004z) 1
17 DDMA-17 MotorCasing Several
18 DDMA-18 Motorrotor 1
19 DDMA-19 Motorbearing(6003z) 1
20 DDMA-20 BellHousing 1
21 DDMA-21 Fan 1
22 DDMA-22 Screw(4x10mm) 4
23 DDMA-23 Fancover 1
24 DDMA-24 Bolt(5x135mm) 4
26 DDMA-26 On/offswitch 1
27 DDMA-27 Powercor withplug 1
28 DDMA-28 Screw(4x22mm) 1
29 DDMA-29 ElectricalPanelGasket 1
30 DDMA-30 Support 1
31 DDMA-31 Screw(4x15mm) 1
32 DDMA-32 Con enser/capacitor 1
33 DDMA-33 Manualresetthermalprotector 1
34 DDMA-34 Electricalboxassembly 1
35 DDMA-35 Motorgasket 1
36 DDMA-36 Gearboxnut(6mm) 10
37 DDMA-37 Gearboxwasher(6mm) 10
38 DDMA-38 Gearboxbearing(36205) 1
39 DDMA-39 SpacewasherB(30mm) 1
40 DDMA-40 Gear(Z68) 1
41 DDMA-41 Gearboxbearing(36108) 1
42 DDMA-42 Lockingpin(6x10mm) 2
43 DDMA-43 Bolt(6x40mm) 1
45 DDMA-45 Gearboxwasher(4mm) 1
46 DDMA-46 Screw(4x6mm) 8
47 DDMA-47 Gearbox rive(straight)shaft 1
48 DDMA-48 Stopring(30mm) 1
51 DDMA-51 Sealed worm gearbox 1
6
7
Step 1-

 




 
 
 
 
 








Step 2-

 

Paso 2 


Étape 2-



Step 3-



Paso 3-



Etape 3




Step 4-







Paso 4 




 

 
Step -

 



Step 6-



 




Step 7-




 



 






Step 8-

 




 







Steps 9 & 10-



 


 







Step 11- 






Step 12-This is a very important
step

 










Step 13-




