manuals.online logo
Brands
  1. Home
  2. •
  3. Brands
  4. •
  5. Kustom
  6. •
  7. Musical Instrument Amplifier
  8. •
  9. Kustom KBA65 User manual

Kustom KBA65 User manual

Thank you for purchasing the Kustom KBA65 model bass guitar amplifier. Kustom has
listened to musicians throughout the world and stands proudly behind each and every
one we make. It was designed with your needs in mind. lexible, feature laden, great
sounding, able to adapt to all kinds of music, this amplifier really delivers what you have
been looking and waiting for. Whatever style you choose, its ready!
Kustom, with a 30 year tradition of excellence in design, proudly delivers to you this
amp and rewards you with a rugged and dependable amp designed and engineered
in the USA. Again, thank you for your purchase. Please take a few minutes to learn
about all the professional features that are built in.
OWNERS MANUAL
KBA65/100
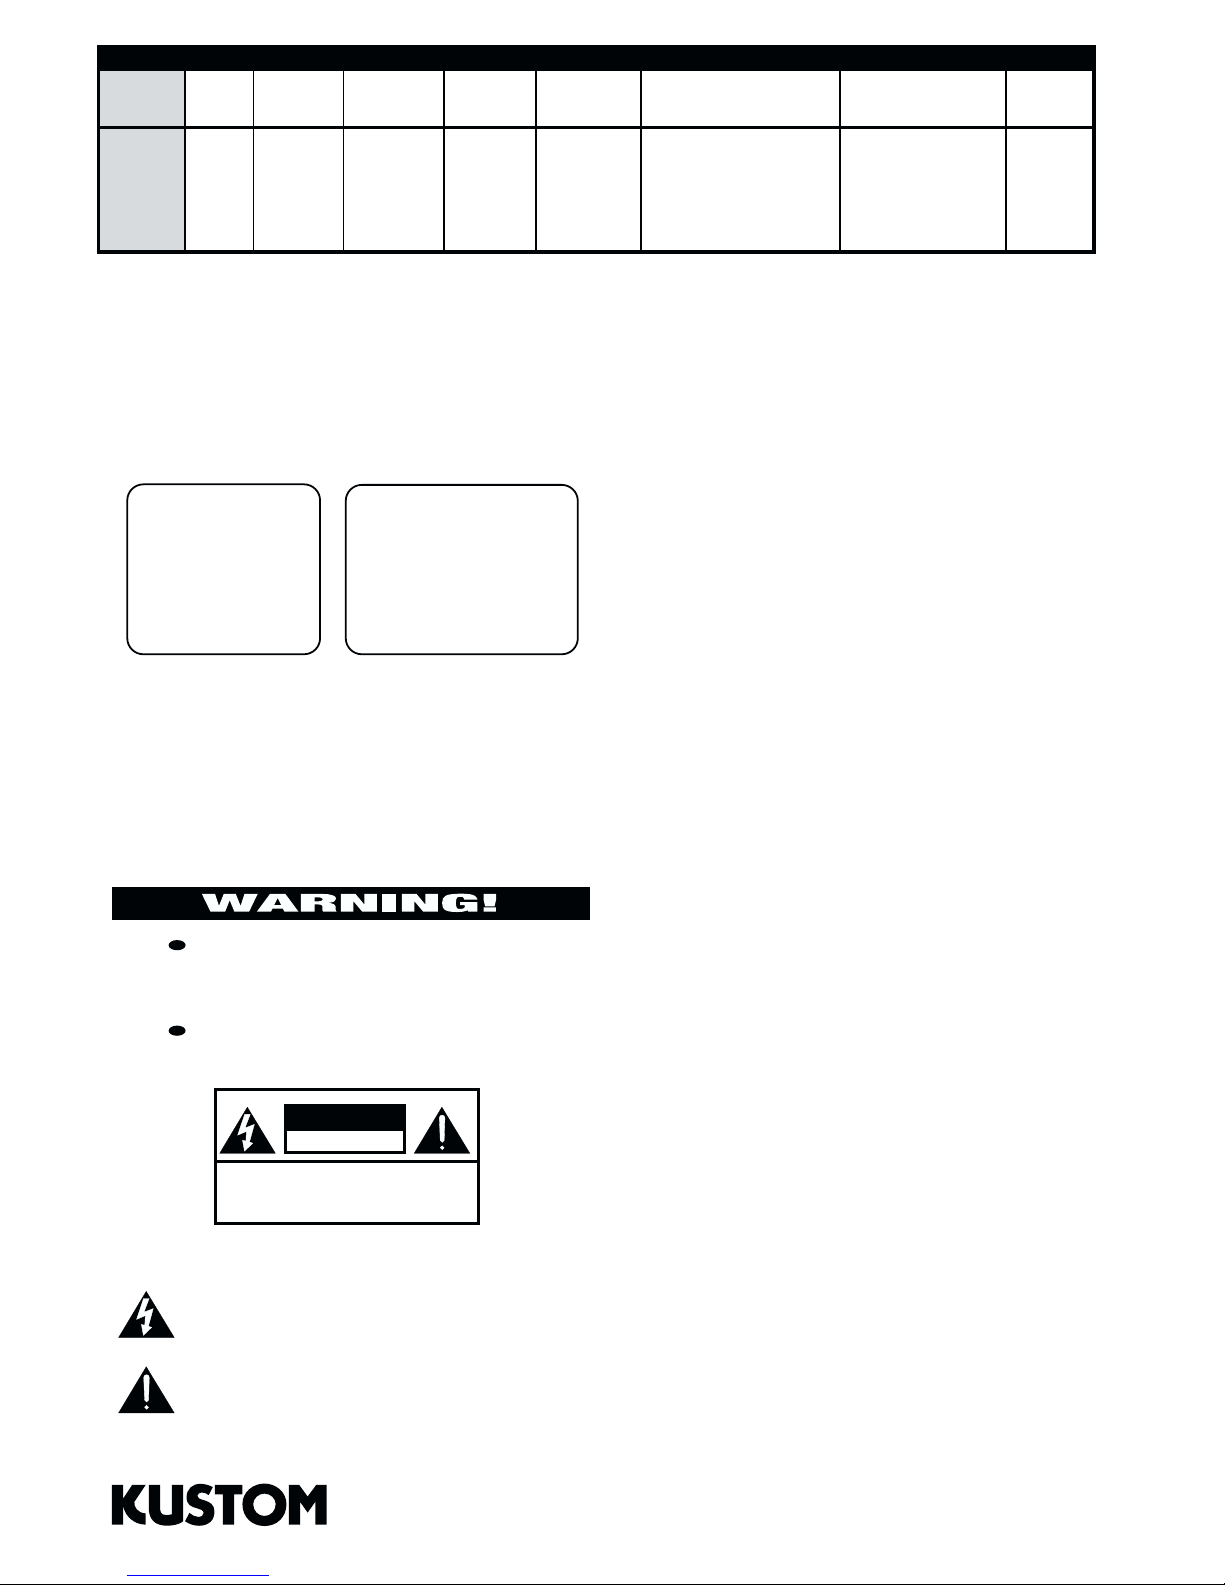
Model Power Equalizer Channels Impedance Effects Amplifier Type Dimensions Weight
KBA65 65 W 6 Band One 8 Ohms 8 Preset MOS- ET Transistor 21x14.6x17.5 56 lbs.
Digital E X 53.4x37x44.5cm. 21.1 kg.
KBA100 100W 24x14.6x17.5 68 lbs.
61.1x37x44.5cm. 30.1 kg.
SPECIFICATIONS
THIS APPARATUS SHALL NOT BE EXPOSED TO
DRIPPING OR SPLASHING. NO OBJECTS FILLED
WITH LIQUIDS SUCH AS VASES SHALL BE PLACED
ON THE APPARATUS.
TO AVOID ELECTRICAL SHOCK, DO NOT
DISASSEMBLE. REFER SERVICING TO QUALIFIED
PERSONAL ONLY!
Kustom Inc., 4940 Delhi Pike, Cincinnati, OH  USA
( 00) 999-555 Fax: (513) 347-2192 / www.kustom.com
SOUND LEVEL db FLOW RESPONSE
0
3
5
7
100
103
110
CAUTION
THIS AMPLIFIER HAS BEEN DESIGNED AND CONSTRUCTED TO PROVIDE
ADEQUATE POWER RESERVE FOR PLAYING MODERN MUSIC WHICH MAY
REQUIRE OCCASIONAL PEAK POWER. EXTENDED OPERATION AT
ABSOLUTE MAXIMUM POWER IS NOT RECOMMENDED SINCE THIS
COULD DAMAGE THE ASSOCIATED LOUDSPEAKER SYSTEM. PLEASE BE
AWARE THAT MAXIMUM POWER CAN BE OBTAINED WITH VERY LOW
SETTINGS OF THE MASTER VOLUME CONTROLS IF THE INPUT SIGNAL
IS VERY STRONG.
IMPORTANT
1. Read all safety and operating instructions before using this product.
2. All safety and operating instructions should be kept for future reference.
3. Obey all cautions in the operating instructions and on the back of the unit.
4. All operating instructions should be followed.
5. This product should not be used near water i.e. bathtub, sink, swimming
pool, wet basement, etc.
6. This product should be located so that its position does not interfere
with proper ventilation. It should not be placed flat against a wall or
placed in a built-in enclosure that will impede the flow of cooling air.
7. This product should not be placed near a source of heat, such as a
stove, radiator, or another heat producing amplifier.
8. Connect only to a power supply of the type indicated on the back of the
amplifier near the power supply cord.
. Do not break off the ground pin of the power supply cord.
10. Power supply cords should always handled carefully. Never walk or place
equipment on power supply cords. Periodically check cords for cuts or
signs of stress, especially at the point where the cord exits the unit.
11. The power supply cord should be unplugged when the unit is unused
for long periods of time.
12. If this product is to be mounted in an equipment rack, rear support
should be provided.
13. Metal parts and vinyl covering may be cleaned with a damp rag.
14. Care should be taken so that objects do not fall and liquids are not spilled
into the unit through the ventilation ports or any other openings.
15.This unit should be checked by a qualified service technician if:
A. The power supply cord or plug has been damaged.
B. Anything has fallen or been spilled into the unit.
C. The unit does not operate correctly.
D. The unit has been dropped or the enclosure damaged.
16. The user should not attempt to service this equipment. All service work
must be done by a qualified service technician for warranty repairs.
DANGER
EXPOSURE TO EXTREMELY HIGH NOISE LEVELS MAY CAUSE A PERMANENT
HEARING LOSS. INDIVIDUALS VARY CONSIDERABLY TO NOISE INDUCED HEARING
LOSS BUT NEARLY EVERYONE WILL LOSE SOME HEARING IF EXPOSED TO
SUFFICIENTLY INTENSE NOISE FOR A SUFFICIENT TIME.
THE U.S. GOVERNMENT'S OCCUPATIONAL SAFETY AND HEALTH ADMINISTRATION
(OSHA) HAS SPECIFIED THE FOLLOWING PERMISSIBLE NOISE LEVEL EXPOSURES:
ACCORDING TO OSHA, ANY EXPOSURE IN THE ABOVE PERMISSIBLE LIMITS COULD
RESULT IN SOME HEARING LOSS. EAR PLUGS OR PROTECTORS IN THE EAR CANAL
OR OVER THE EARS MUST BE WORN WHEN OPERATING THIS AMPLIFICATION
SYSTEM IN ORDER TO PREVENT A PERMANENT HEARING LOSS. IF EXPOSURE IN
EXCESS OF THE LIMITS AS PUT FORTH ABOVE, TO INSURE AGAINST POTENTIALLY
HARMFUL EXPOSURE TO HIGH SOUND PRESSURE LEVELS. IT IS RECOMMENDED
THAT ALL PERSONS EXPOSED TO EQUIPMENT CAPABLE OF INDUCING HIGH SOUND
PRESSURE LEVELS, SUCH AS THIS AMPLIFICATION SYSTEM, BE PROTECTED BY
HEARING PROTECTORS WHILE THIS UNIT IS IN OPERATION.
DURATION PER DAY IN HOURS
8
6
4
3
2
1
1/2 HR. or LESS
THIS SYMBOL IS INTENDED TO ALERT THE USER TO THE PRESENCE OF IMPORTANT
OPERATING AND MAINTENANCE (SERVICING) INSTRUCTIONS IN THE LITERATURE
ACCOMPANYING THE UNIT.
THIS SYMBOL IS INTENDED TO ALERT THE USER TO THE PRESENCE OF
UNINSULATED DANGEROUS VOLTAGE WITHIN THE PRODUCTS ENCLOSURE THAT
MAY BE OF SUFFICIENT MAGNITUDE TO CONSITUTE A RISK OF ELECTRIC SHOCK
TO PERSONS.
CAUTION
RISK OF ELECTRIC SHOCK
DO NOT OPEN
CAUTION:
TO REDUCE THE RISK OF ELECTRIC SHOCK, DO NOT
REMOVE CHASSIS. NO USER-SERVICEABLE PARTS
INSIDE. REFER SERVICING TO QUALIFIED SERVICE
PERSONNEL.
AVIS: RISQUE DE CHOC ELECTRIQUE-NE PAS OUVRIR.
1.) Line Output - this is a 3 cond. XLR output jack for plugging into Lo-Z microphone inputs as found on PA or recording
mixers. It is intended in place of external mics or used as a built in direct box.
2.)
CD/Tape Input - this 1/4 3 conductor jack will allow you to plug in a CD player, tape or any other source to practice along
with. It sums the left and right signals into a mono signal. To control the volume of the source, adjust the output volume of the
device.
3.)
Guitar Input Jack - this is a 1/4 2 conductor input jack for plugging in your instrument. It is intended for bass but will accept
other instruments as well.
4.) Gain - adjust this clockwise to match the output level of your bass to the preamp input. If you get an over load LED that lights
up you should lower the gain and increase the volume level for the cleanest possible sound.
5.) Overloa LED - this LED will indicate an overload on the preamp..
6.) Volume - this is the volume control of the amplifier. It works in conjunction with the gain control.
7.) Notch - this control is a wide band sweep from 40 to 800 Hz. It is set at -12db to help you fine tune your sound. It is
effective for clearing up unwanted overtones.
Equalizer Section - All controls are active with a center etent which is equivilant of bypass for that ban . Turning
it counterclockwise, will cut the response at the given frequency up to -12 b. Clockwise, it will boost up to +12 b.
8.) 63 - frequency center of 63 Hz. Boost or cut +/- 12db.
9.) 150 - frequency center of 150 Hz. Boost or cut +/- 12db.
10.) 350 - frequency center of 350 Hz. Boost or cut +/- 12db.
11.) 800 - frequency center of 800 Hz. Boost or cut +/- 12db.
12.) 2K - frequency center of 2Kz. Boost or cut +/- 12db.
13.) 5K - frequency center of 5KHz. Boost or cut +/- 12db.
14.) Effects On/Off - this switch engages the digital effects section.
15.) Effects Level - this control adds the digital effects section and mixes it into the main signal buss. Several different
effects are available. 4-Chorus, 2- lange and 2 Echos.
16.) Program Select -this switch will select any of eight different effects. 6-Chorus and 2- lange.
17.) Jewel Light - this jewel light lets you know that the amplifier is on.
18.) Power - this switch turns on and off the AC power to the amp.
Back Panel - (not picture )
Speaker Out - this is a 2 conductor 1/4 speaker output jack. This will disconnect the internal speaker and allow an external
speaker cabinet to be employed. Rating is 8 ohms.
Line Output - this is a 2 conductor 1/4 line output jack. This will allow an external amplifier or mixing board to be supplied with
the signal from this amp.
Effects Loop I/O - these are 2-2 conductor 1/4 jacks. This will allow an external effects device or equalizer to be patched back in before
the power amp section in this amp. One is send and the other is return.
Footswitch Jack - this is a 2 conductor 1/4 jack. This is for hooking up a footswitch to turn on/off the effects section
11 13
42 910
13 5 6 714
12
815 181716
PROGRAM
LEVEL
5
6
7
8
2
3
4
1
DIGITAL EFFECTS
POWER
OVERLOAD
350 800 2K 5K
ON
63 150FREQUENCYVOLUMEGAIN
65 WATT
MOSFET BASS AMPLIFIER
GUITAR
INPUT
CD/TAPE
INPUT
LINE OUT
1. LITE C ORUS 1
2. LITE C ORUS 2
3. MEDIUM C ORUS
4. EAVY C ORUS
5. FLANGE 1
6. FLANGE 2
7. SLAPBACK
8. EC O
KBA65
EQUALIZERPREAMP
NOTC
Suggeste Settings
(These settings are general starting points. They
are esigne to get you close to the soun you are
looking for. If the control is not shown, then it oesnt
apply to this particular soun . )
Alternative Style - this setting is designed for a upper end punch and edge that will cut
through most any sound. This style will work well with pick or fingers and will add a touch
of distortion to the sound as well. Make sure your instruments volume control is up all the
way. Since you are adding volume, you need to be careful with the actual amount of e.q..
you use as it also can add distortion to the sound. The digital effects, designed especially
for bass, can be used with any setting to enhance your tone. Also, you may want to use a
compressor pedal in the signal chain before the amp to give it a smoother sound but still
edgy. As in all the settings above, it is strictly a matter of personal taste in a achieving the
sound you are looking for.....experiment.
Tra itional Electric Bass Setting - in this setting the amplifier will deliver a standard electric
bass sound. Whether you are playing rock, country, blues or gospel, this setting will get you
close. Because of the Active E.Q., you will be able to dial in your personal preferences from
here. If you play with a pick and want less top end attack on the notes, roll off a bit of the
High control. If its deeper bottom your looking for, add more low and low mid. The key is
to experiment to achieve your own personal sound. The digital effects, designed especially
for bass, can be used with any setting to enhance your tone.
Funk Slap Soun s - this style of music needs a good strong attack sound with lots of top
end. Usually a hollowed out middle will produce the extra top end necessary for the punch
needed for this style of music. If you are using a more thumb style, a bit more low end and
volume might be needed for your particular style of playing. Or less if you really hit it hard.
Even though this is a practice or rehearsal level amplifier, it will deliver the punch and clarity
that you require. The digital effects, designed especially for bass, can be used with any
setting to enhance your tone. Chorus and lange are wonderful in filling out your sound.
Remember to try this amp with an additional speaker plugged in. Youll be nicely surprised.
PROGRAM
LEVEL
5
DIGITAL EFFECTS
POWER
OVERLOAD
350 800 2K 5K
ON
63 150FREQUENCYVOLUMEGAIN
65 WATT
MOSFET BASS AMPLIFIER
GUITAR
INPUT
CD/TAPE
INPUT
LINE OUT
KBA65
EQUALIZERPREAMP
NOTC
6
7
8
2
3
4
1
1. LITE C ORUS 1
2. LITE C ORUS 2
3. MEDIUM C ORUS
4. EAVY C ORUS
5. FLANGE 1
6. FLANGE 2
7. SLAPBACK
8. EC O

This manual suits for next models

1

Other Kustom Musical Instrument Amplifier manuals

Kustom GROOVE 115C User manual

Kustom

Kustom GROOVE 115C User manual

Kustom GROOVE 1200 User manual

Kustom

Kustom GROOVE 1200 User manual

Kustom Sienna 35PRO User manual

Kustom

Kustom Sienna 35PRO User manual

Kustom GROOVE 600TM User manual

Kustom

Kustom GROOVE 600TM User manual

Kustom 36 coupe User manual

Kustom

Kustom 36 coupe User manual

Kustom KG1 User manual

Kustom

Kustom KG1 User manual

Kustom 72 Coupe Hardtop Quick start guide

Kustom

Kustom 72 Coupe Hardtop Quick start guide

Kustom IV Lead User manual

Kustom

Kustom IV Lead User manual

Kustom Defender 5H User manual

Kustom

Kustom Defender 5H User manual

Kustom KGA10 User manual

Kustom

Kustom KGA10 User manual

Kustom KG212FX User manual

Kustom

Kustom KG212FX User manual

Kustom JCLEPA4200 User manual

Kustom

Kustom JCLEPA4200 User manual

Kustom HV 100TM User manual

Kustom

Kustom HV 100TM User manual

Kustom KAA65 User manual

Kustom

Kustom KAA65 User manual

Kustom Defender V30 User manual

Kustom

Kustom Defender V30 User manual

Kustom KGA30 User manual

Kustom

Kustom KGA30 User manual

Kustom KGA65 User manual

Kustom

Kustom KGA65 User manual

Kustom KB10 User manual

Kustom

Kustom KB10 User manual

Kustom KG210FX User manual

Kustom

Kustom KG210FX User manual

Kustom Sienna 30PRO User manual

Kustom

Kustom Sienna 30PRO User manual

Kustom DE50 User manual

Kustom

Kustom DE50 User manual

Kustom KAA16 User manual

Kustom

Kustom KAA16 User manual

Kustom DE300 HD User manual

Kustom

Kustom DE300 HD User manual

Kustom The Defender 15H User manual

Kustom

Kustom The Defender 15H User manual

Popular Musical Instrument Amplifier manuals by other brands

Gibson G20A Schematic diagram

Gibson

Gibson G20A Schematic diagram

Hughes & Kettner DSM manual

Hughes & Kettner

Hughes & Kettner DSM manual

Roland AC-40 user manual

Roland

Roland AC-40 user manual

Texas Tone 50 owner's manual

Texas

Texas Tone 50 owner's manual

GLX LG-IO owner's manual

GLX

GLX LG-IO owner's manual

Roland CUBE 40XL owner's manual

Roland

Roland CUBE 40XL owner's manual

Fender Frontman 65R operating instructions

Fender

Fender Frontman 65R operating instructions

ZT Lunchbox Junior LBJ1 owner's manual

ZT

ZT Lunchbox Junior LBJ1 owner's manual

YORKVILLE Keymaster K2 parts list

YORKVILLE

YORKVILLE Keymaster K2 parts list

DR. Z Amplification JETTA manual

DR. Z Amplification

DR. Z Amplification JETTA manual

CARVIN V3 operating manual

CARVIN

CARVIN V3 operating manual

Roland CUBE Lite owner's manual

Roland

Roland CUBE Lite owner's manual

Roland Jazz Chorus JC-55 Operation manual

Roland

Roland Jazz Chorus JC-55 Operation manual

Pyle PGTAMPL128B user guide

Pyle

Pyle PGTAMPL128B user guide

IK Multimedia Z-TONE Buffer Boost user manual

IK Multimedia

IK Multimedia Z-TONE Buffer Boost user manual

SUSTAINIAC SUSTAIN-MAN manual

SUSTAINIAC

SUSTAINIAC SUSTAIN-MAN manual

KINSMAN KAA25 owner's manual

KINSMAN

KINSMAN KAA25 owner's manual

Hughes & Kettner TUBEMEISTER Series manual

Hughes & Kettner

Hughes & Kettner TUBEMEISTER Series manual

manuals.online logo
manuals.online logoBrands
  • About & Mission
  • Contact us
  • Privacy Policy
  • Terms and Conditions

Copyright 2025 Manuals.Online. All Rights Reserved.