• RS 180 usable up to NW 200 or cross-section 200x200
(needs to be certified according to EN 13384)
• RS 225 usable up to NW 250 or cross-section 250x250
(needs to be certified according to EN 1338
• If the cross-section is larger, use an conversion
adapter.
• Place the chimney fan centrically on the opening of the
chimney's inner pipe and mark dowel drills.
• Drill holes for approved dowels 8 mm Ø and place
dowels.
• Attach an elastic ground (e.g. temperature-resistant [at
least 200 °C] silicone) to the base plate of the chimney
fan.
• The chimney fan has to be connected tightly with inner
flue gas pipe (in case of a multi-shell flue gas system).
• The linear extension of the flue gas system has to be
considered. Please see the documentation of the
manufacturer. If necessary, extra measures need to be
taken based on its requirements and the conditions
on-site. Due of the great variety of flue gas systems it
is not possible to give universal solutions here.
• If the flue gas system has a rear ventilation, its outlet
has to remain unblocked. Measures need to be taken
depending on the conditions on-site. Because of the
great variety of flue gas systems, it is not possible to
give universal solutions here.
• Place the chimney fan on top and fasten it with
stainless screws.
• The chimney fan does not need to be removed, except
for repairing or burning out the chimney.
• Therefore, if there is sheet metal at the chimney outlet
please use screws and not rivets.
• Please make sure that during operation the chimney
fan does not aspirate leak air from outside through its
bearing or untight spots at the base plate = power loss.
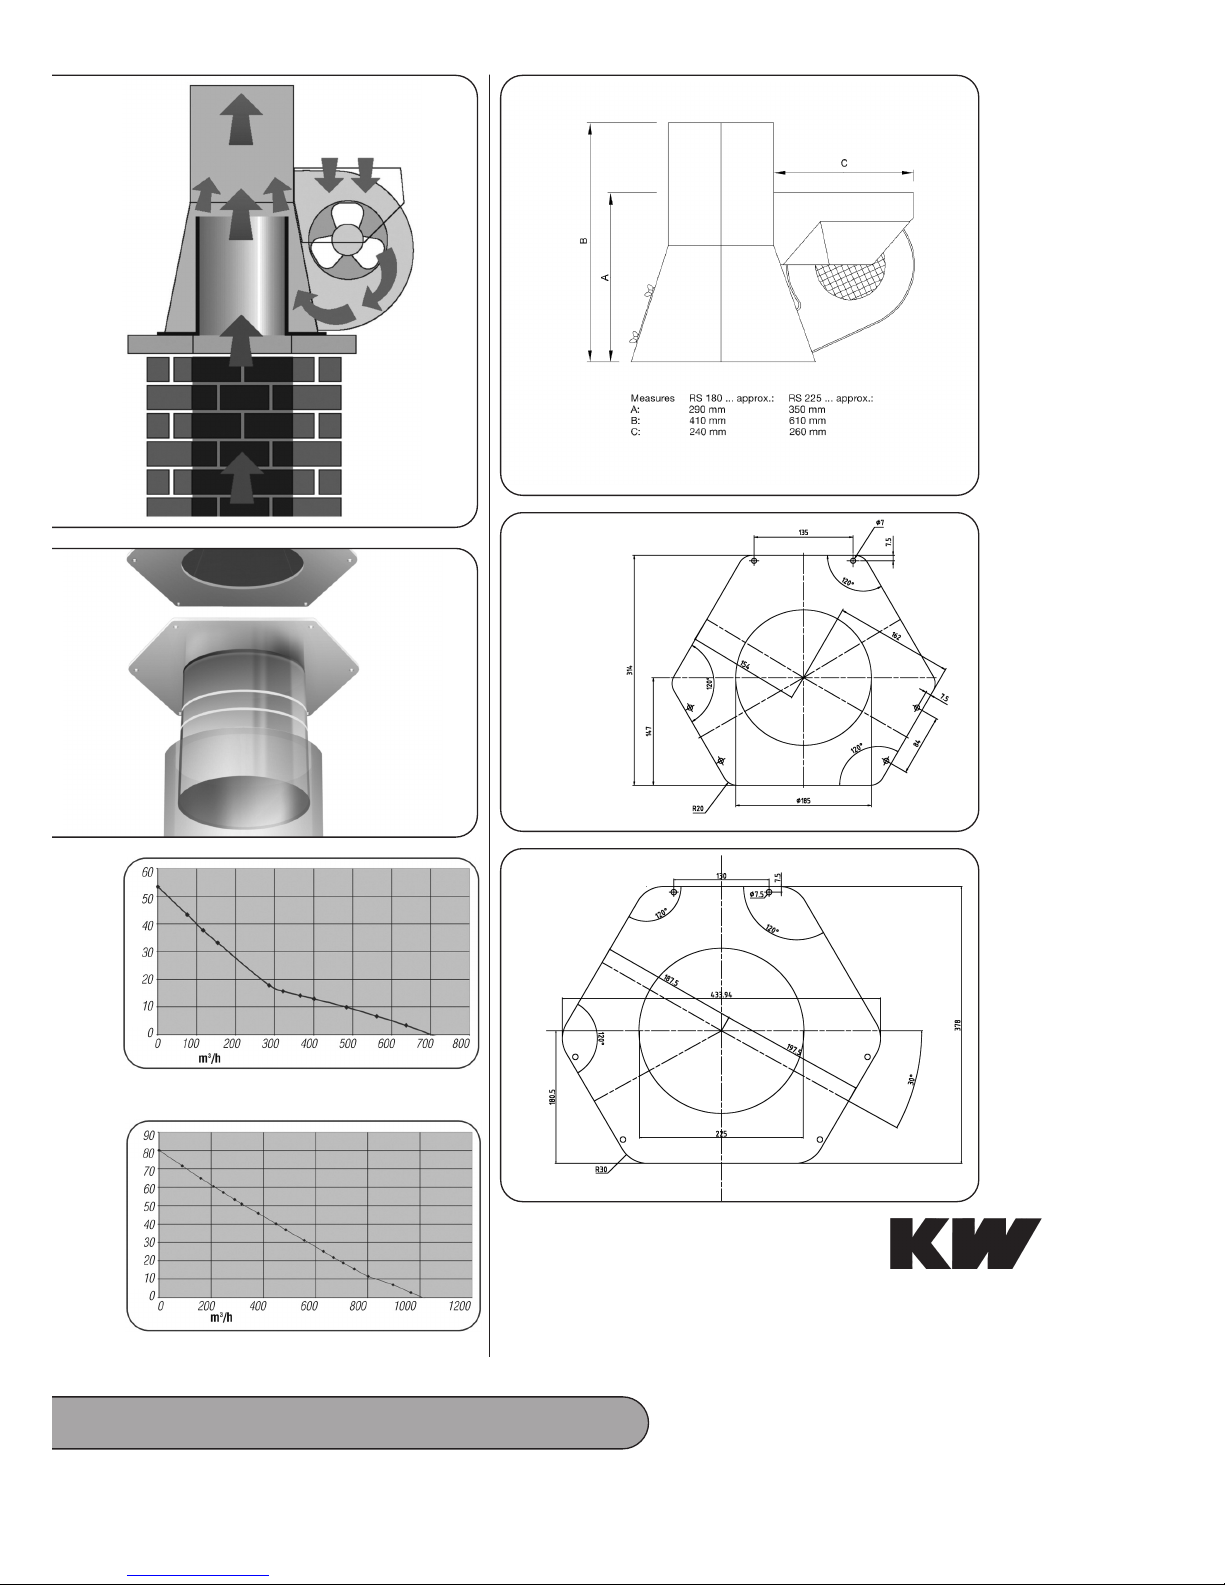
b. Fastening on a Stainless Steel Flue System
The chimney fan can also be mounted on a double-walled
stainless steel chimney with an adapter. For this you may
order (optional) the adapter RSG.../... (Ø insertion pipe of
adapter = nominal diameter - 2 mm). Fitting adapters
especially for Raab flue gas systems or separate chimney
fan base plates for attachment on-site on request. The
fastening depends on the installation criteria of the flue gas
system's manufacturer. The structural analysis has to be
done on-site.
Start Up
Check chimney fan compressor.
Check speed actuator (minimum and maximum rotation
speed).
Check negative pressure at fireplace.
Check circuit breaker (on-site).
Check grounding.
Start up fireplace and check overall operation.
Switch on chimney fan before lighting the fire.
Cleaning / Maintenance
The chimney fan "Injekt" is mostly maintenance free.
The pressure chamber can be made accessible if it should
become dirty. For this, remove the wing nuts from the side
of the casing facing away from the fan and remove the
inspection cover. After cleaning the pressure chamber, the
base of the inspection cover and casing should also be
cleaned. Put the inspection cover back and tighten the
wing nuts.
Warning!
Interrupt power supply before starting maintenance!
Safety Advice
After installation, chimney fans are an integral part of the
flue gas system of the fireplace (such as boilers, tiled
stoves, wood-burning stoves and individual stoves) and
affect these directly. Therefore, you should inform your
responsible building control before installing them.
The chimney fan supports the operation of the flue gas
system and the design of the flue gas system has to
comply with EN 13384 T 1 / T 2.
A smooth operation is only guaranteed if the following
instructions are followed.
EN DIN 18 160 T 1
(construction standards for flue gas systems)
EN 13384 T 1 (formerly DIN 4705 T 1)
Calculation of flue gas systems
EN 13384 T 2 (formerly DIN 4705 T 3)
Calculation of flue gas systems with multi-configuration
(only for oil and gas fireplaces with certified control
systems)
Current laws, guidelines and standards have to be
followed for installation.
The chimney fan “Injekt” is exclusively made for
installation on top of the outlet of the flue gas system
above the roof or on the outlet of a stainless steel
chimney. Structural requirements have to be considered
and a safe fastening ensured.
When burning out the chimney (Warning: In some
countries - for example the UK – it is not allowed to burn
out the chimney, please contact your authorities to find
out if you allowed to do so).
The chimney fan has to be removed before burning out
the chimney.
Range of Use
Mainly for solid fuels (heaters, tiled stoves, open
fireplaces etc.) single and multi-configuration.
Single, multi and mixed configuration for oil and gas
stoves only with control system.
Technical Data RS 180 RS 225
Max. delivery pressure* approx. 50 Pa approx. 80 Pa
Max. output* approx. 750 m3/h approx. 1000 m3/h
Fan capacity 170 W 270 W
Current drain 0,75 A 1,3 A
Bearings dimensions
(hexagonal) see Page 4
Height see Page 4
Weight (total) ca. 8,0 kg ca. 12,0 kg
Material stainless steel 1.4404 or 1.4571
* Please note characteristic line on page 4
Installation
a. Fastening to the Chimney Cowl
The chimney fan is fastened to the chimney cover with
the base plate.
A soft, tight layer has to be put between the base plate
and the chimney cover (e.g. temperature-resistant
silicone, ceramic fibre, etc.) to
• ensure an even positioning
• keep out precipitation
• prevent vacuum exhaust of leak air.
The fastening has to be stable enough to withstand wind.
The chimney cover has to be attached firmly to the
chimney or have enough net weight to hold the chimney
fan safely (if necessary, attach the cover to the chimney
separately).
Mounting the Chimney Fan on the Cowl
• Make sure that the foundation (e.g. base plate) is intact
and statically stable to ensure a safe installation of the
chimney fan. It has to withstand wind.