21
M11A1-93 Breech Buffer (Small)
M11A1-94 Breech Buffer (Large)
M11A1-95 Breech Base Screw (Small)
M11A1-96 Breech Base Screw (Small)
M11A1-97 Breech Base Screw (Large)
M11A1-98 Front Sight Base Screw
M11A1-99 Main Seal Base Screw
M11A1-100 Grip Screw
M11A1-102 Impact Block Housing
Retainer
M11A1-103 Hop Up Cylinder Retaining
Ring E-Clip
M11A1-104 Recoil Spring Guide E-Clip
M11A1-105 Folding Stock Pin E-Clip
M11A1-107 Safety Pin
M11A1-111 Hop Up Ball Bearing
M11A1-112 Safety Switch Ball Bearing
M11A1-121 BB Feed Ramp
M11A1-122 BB Feed Ramp Pin
M11A1-123 Main Seal Base
M11A1-125 Alum Jet Nozzle
M11A1-126 Jet Nozzle Spring
M11A1-128 Main Seal Cap
M11A1-129 Jet Nozzle Pin
M11A1-130 Main Seal
M11A1-132 Main Seal Cap Screw
M11A1-152 Inner Barrel Clip
M11A1-153 Inner Barrel Spring Washer
M11A1-154 Inner Barrel Spring
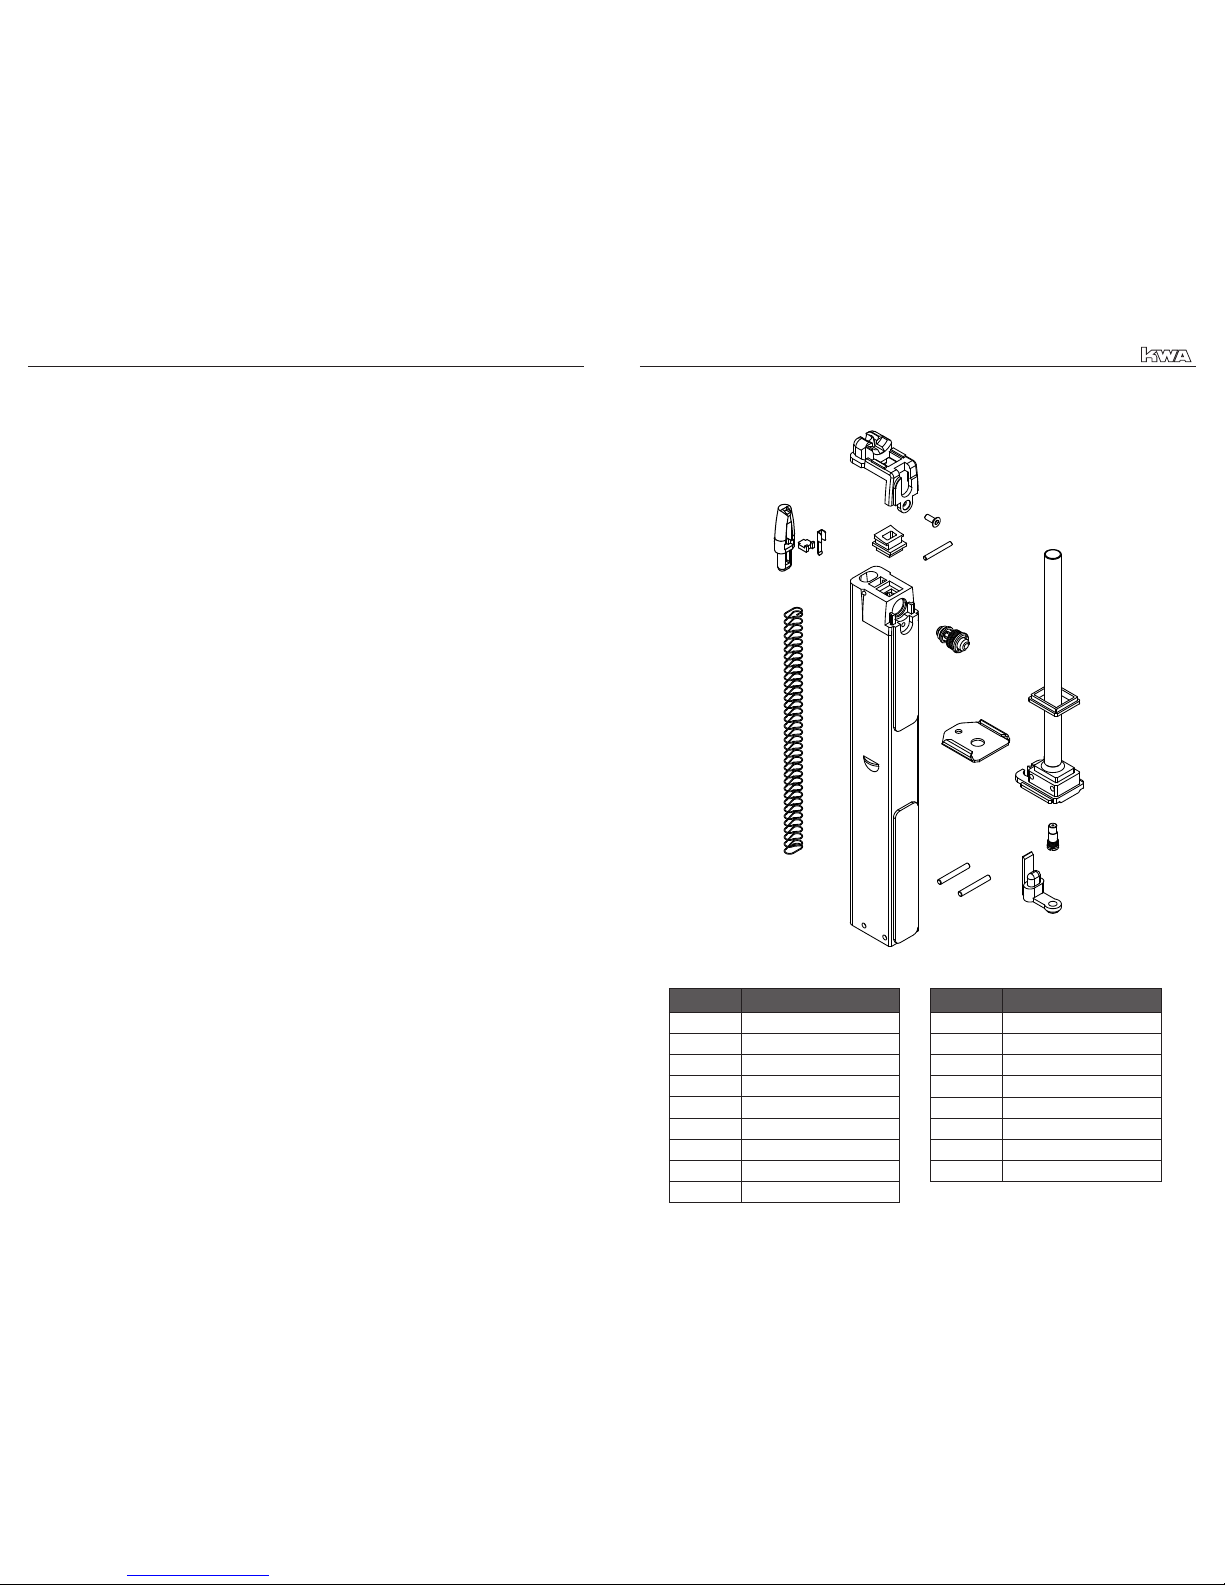
Parts # Description
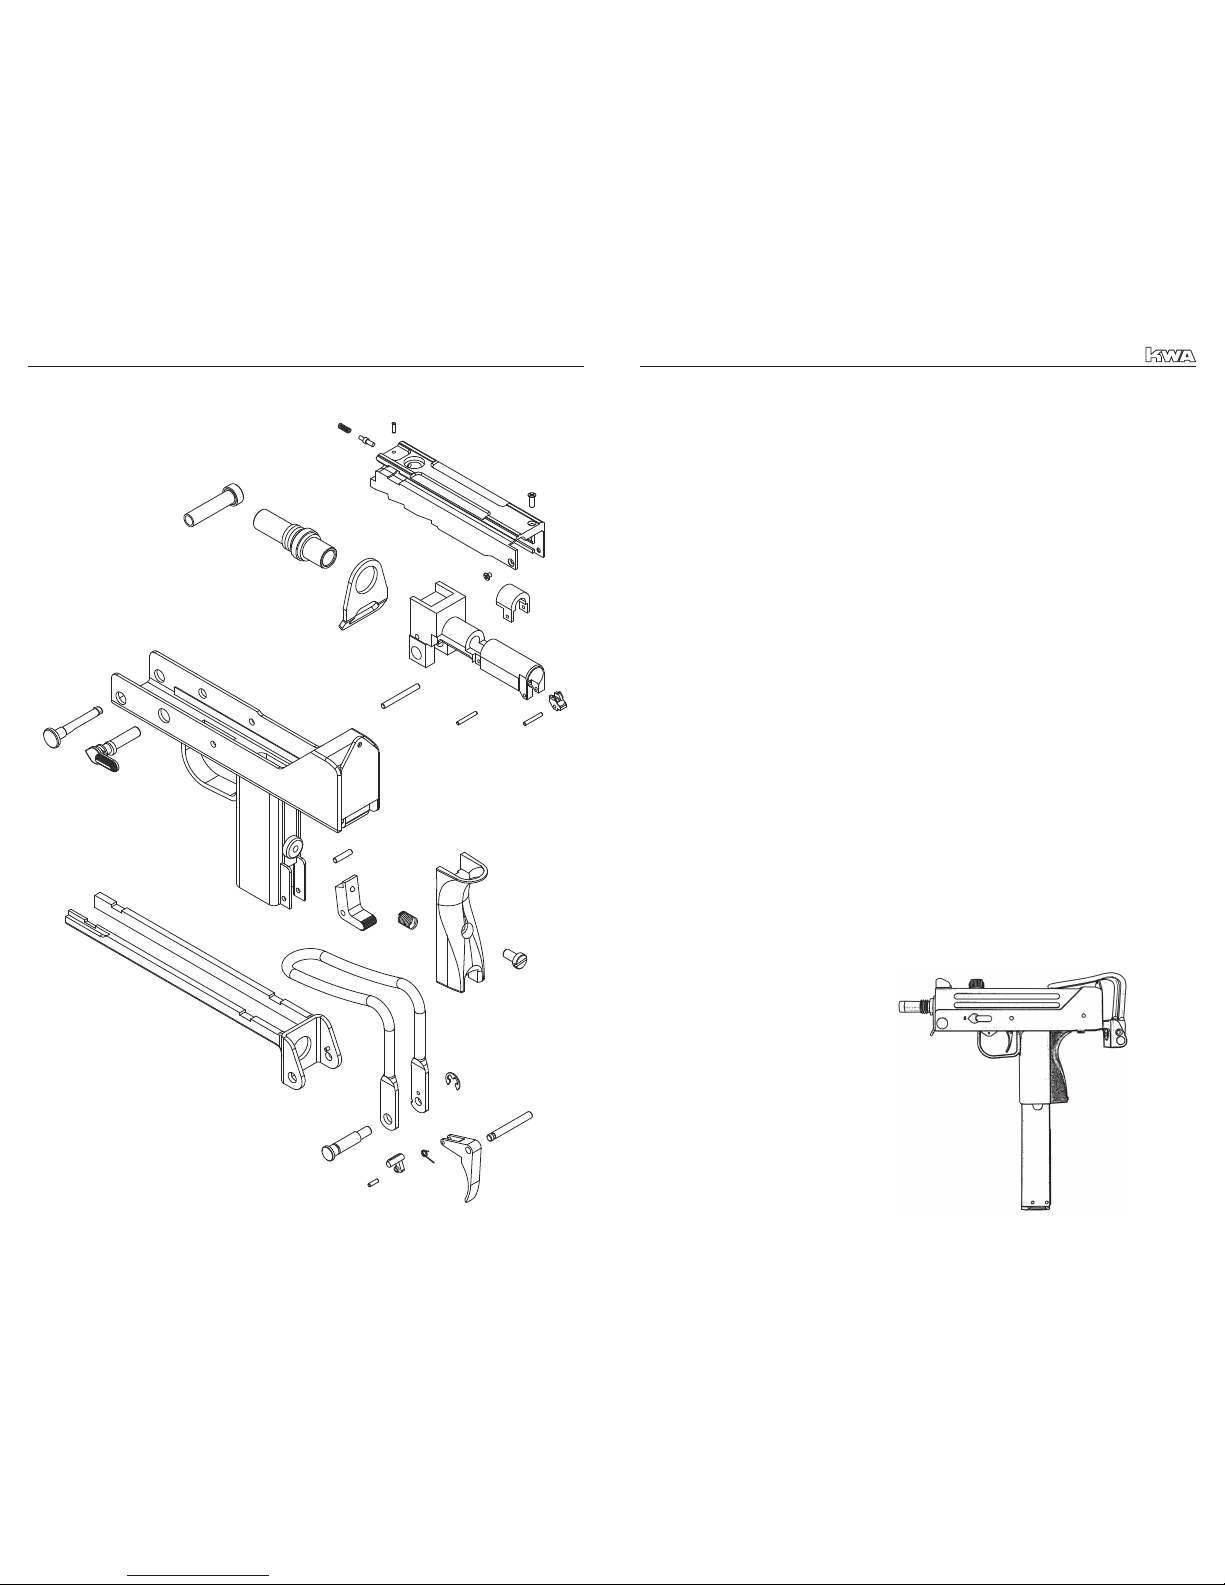
M11A1-1 Lower Frame
M11A1-2 Upper Frame
M11A1-3 Bolt
M11A1-4 Cylinder
M11A1-5 Front Sight
M11A1-6 Front Sight Base
M11A1-8 Grip
M11A1-9 Hop Up Cylinder Retaining
Ring
M11A1-10 Inner Frame Base
M11A1-11 Wire Stock
M11A1-12 Trigger
M11A1-13 Inner Barrel Base
M11A1-14 Bolt Stop
M11A1-15 Sear
M11A1-16 Impact Block
M11A1-17 Sear Disconnector
M11A1-18 Safety Base
M11A1-19 Breech Base
M11A1-20 Bolt Handle
M11A1-21 Outer Barrel
M11A1-22 Inner Barrel Clip
M11A1-24 Impact Block Reset Button
M11A1-28 Safety
M11A1-29 Magazine Release Lever
M11A1-30 Selector Lever
M11A1-31 Stock Release Button
M11A1-32 Hop Up Cylinder
M11A1-38 Hop Up Bucking
M11A1-40 Inner Barrel
M11A1-44 Recoil Spring Guide
Follower
M11A1-46 Impact Block Pin
M11A1-48 Bolt Handle Plunger
M11A1-49 Recoil Spring Guide Rod
M11A1-50 Take Down Pin
M11A1-51 Take Down Pin Lock
M11A1-52 Trigger Pin
M11A1-53 Stock Pin
M11A1-57 Inner Barrel Clip Pin
M11A1-58 Outer Barrel Retaining Pin
M11A1-60 Sear Pin
M11A1-63 Magazine Release Lever Pin
M11A1-64 Cylinder Return Spring
Retaining Pin
M11A1-65 Impact Block Housing (Left)
M11A1-66 Impact Block Housing
(Right)
M11A1-67 Inner Slide Housing
M11A1-69 Folding Stock
M11A1-70 Swivel
M11A1-71 Main Seal Base Screw
Washer
M11A1-73 Trigger Spring
M11A1-74 Impact Block Housing
Spring
M11A1-75 Impact Block Spring
M11A1-
76-1 Recoil Spring
M11A1-77 Sear Spring
M11A1-80 Bolt Handle Plunger Spring
M11A1-81 Bolt Stop Spring
M11A1-82 Sear Disconnector Spring
M11A1-83 Cylinder Return Springs
M11A1-87 Stock Release Button
Springs
M11A1-88 Magazine Release Lever
Spring
M11A1-89 Safety Spring
M11A1-90 Trigger Pin Retaining Spring
M11A1-92 Impact Block Reset Button
Spring
Parts # Description Parts # Description
2
USE OF THIS MANUAL
Before operating the Airsoft gun, read this manual in its entirety. Important safety topics
and tips are discussed throughout all of the chapters. It’s important that the operator know
the principles of gun handling safety and operation prior to ring the Airsoft gun.
SAFETY GUIDELINES
WARNING! Failure to follow safety guidelines may result
in serious injury.
Safety Distance
The effective shooting range is approximately 75 feet. BBs red from this Airsoft gun may
travel further than intended. Make certain that you have an adequate backstop.
Eye Protection
Eye protection should be worn at all times when both shooting and maintaining your Airsoft
gun. Protect your eyes from BBs under pressure while performing maintenance on your
Airsoft gun.
Assume Every Gun is Always Loaded
Until you are certain the chamber is empty, treat every gun as if it were loaded. Do not
assume the chamber is empty based on your memory or someone else’s words. Always
remove the magazine and visually check to conrm the chamber is empty.
Beware of Barrel Obstructions
Ensure the Airsoft gun barrel is free of obstructions before you re the gun. Even the
smallest obstruction such as lubrication or a stuck cleaning patch can cause a misre or
malfunction.
Muzzle Control
Always keep the muzzle of the gun pointed in a safe direction. Never point the muzzle at a
person or object that you do not intend to shoot.
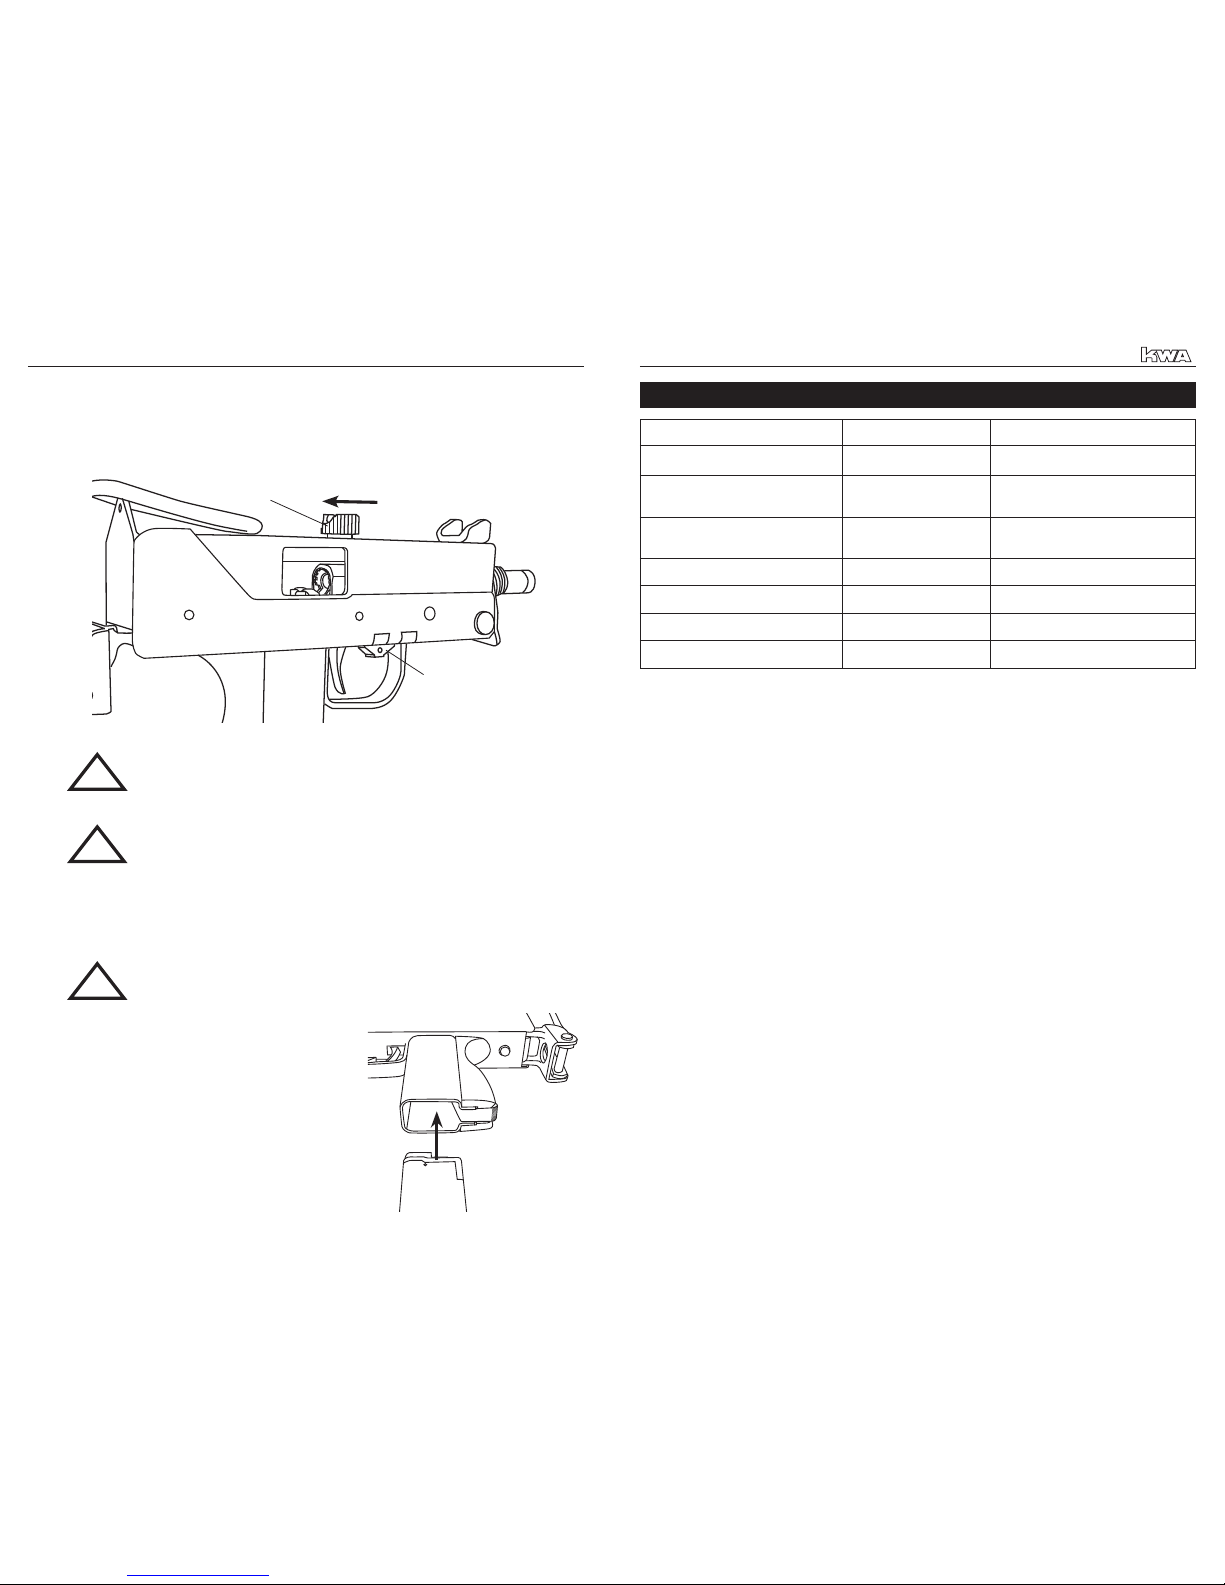
Keep Your Safety On
Keep the gun’s safety on until your sights are aligned on your target and you are ready to
re.
Keep Your Finger Off The Trigger
Keep your nger off the trigger and out of the trigger guard until your sights are aligned on
your target and you are ready to re.
WARNING! Airsoft BBs can be a choking hazard. Keep
them away from children.
!
!
PARTS LIST
M11A1 NS2