LA Audio DLX200 User manual


2 www.laaudio.com
Contents.
Welcome. ................................................................................................................... 3
Support 3
Conventions 3
Help 3
Ways to connect......................................................................................................... 4
RS232 4
BVNet 4
Installation Guide. ..................................................................................................... 5
System Requirements 5
[Install Your Adapter] 5
Insert the PodWare CD 6
Connect Your Processor 6
First Use..................................................................................................................... 7
Authorisation Code 7
COM Port 7
Go Online 7
Firmware Check 7
Wink 7
In Use. ........................................................................................................................ 8
Gain Tab 9
Mono/Stereo Mode 9
Crossover 10
EQ 12
Presets. .................................................................................................................... 13
Storing a Preset 13
Recalling a Preset 13
Deleting a Preset 13
Device Settings. ....................................................................................................... 14
Storing Device Settings 14
Recalling Device Settings 14
Device Firmware...................................................................................................... 15
Firmware for BVNet Enabled Devices 15
Updating Device Firmware 15

3 www.laaudio.com
Welcome.
This guide will get you up to speed with 's remote control and networking capabilities and
introduce PodWare, the PC software used to control processors. Please read the installation
section of this manual thoroughly before trying to install software or connect devices.
SUPPORT
If, after consulting this manual, you're still thwarted, stuck or otherwise bamboozled by a problem,
them to your rescue.
CONVENTIONS
This is a warning. Dire consequences will befall those who do not heed them.
Menu selections are denoted using a different font, separated by the | character. The following
example would be written as: Preferences|Show Bandwidth As...|Q
HELP
To get help on anything to do with PodWare, go to Help|Help topics. This opens an HTML file
containing help information.

4 www.laaudio.com
Ways to connect.
There are two ways of connecting a PC to units:
RS232
Connection to a single unit is made over RS232. If your computer has a serial port, you can connect
directly to the device. If your computer does not have an RS232 port, you will need to use the USB-
RS232 adapter supplied with your processor. Ensure that this is installed, using the supplied
disc, before beginning your PodWare installation.
BVNET
BVNET is a way of networking multiple devices using the RS485 standard, carried over a CAT5-
type cable. While the physical appearance of BVNet components may be familiar, it is important
to use approved BVNet devices when assembling your network. This will ensure the easy set up of
your system and afford you the security of LA Audio support should you need it.
units equipped with BVNet cards can be connected in networks of up to 100 devices. Use an
approved BVNet adapter to connect your computer to the network. A device with a BVNet card
can still be controlled via its RS232 port, although not simultaneously.

5 www.laaudio.com
Installation Guide.
SYSTEM REQUIREMENTS
PodWare requires a PC running Windows 2000, or XP. PodWare also requires the Microsoft .NET
framework. In the event that you do not have the .NET Framework installed on your computer, you
will be prompted to do so by PodWare’s installer. Version 2.0 is included on the installation package,
entitled dotnetfx.exe. It is recommended that you check for and install any available updates using
Microsoft Update.
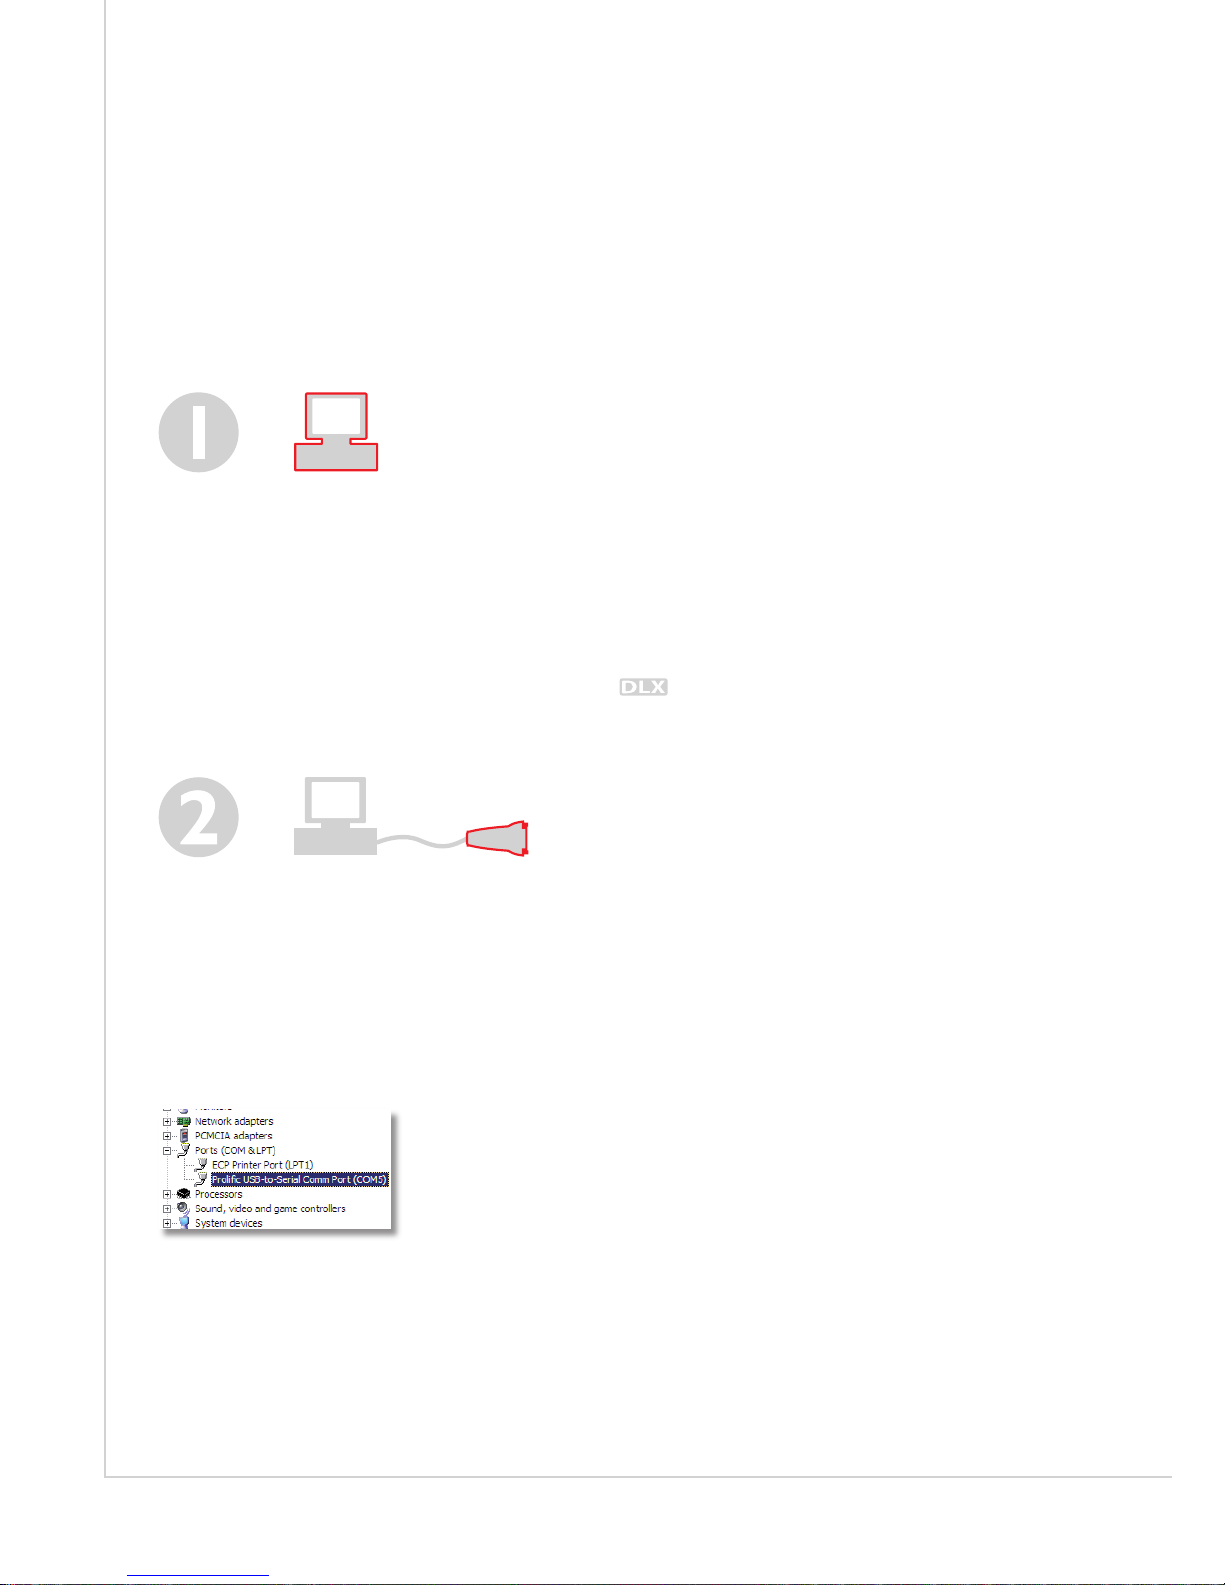
Your PC will also need a serial port to connect to your processor. If your computer does not
have a serial port, you can use the supplied USB-RS232 adapter in a free USB socket. The adapter
will have its own software, which must be installed first, as shown below.
[INSTALL YOUR ADAPTER]
If you require a USB-RS232 adapter, you will first need to install it onto your computer using the
disc supplied with the ATen adapter (not the PodWare disc!). Follow the on-screen instructions
to install the adapter. When doing so, make a note of the COM port assigned to your device; you
will need this shortly. To discover the COM port used for your device, you will need to check the
device manager. From the Windows Control Panel, select System, then on the Hardware tab, click
to open the Device Manager. Under the ‘Ports (COM & LPT)’ heading, you should find your device
with its COM Port in brackets.

6 www.laaudio.com
INSERT THE PODWARE CD
Upon insertion, the PodWare installer should start automatically. If it does not, navigate to your
computer’s CD ROM drive and run Setup.exe. Select a suitable installation directory and click
‘Next’. Then view and agree to the software license and click ‘Next’. You should then see the
‘Installation Complete’ screen. PodWare is now ready for you to use.
CONNECT YOUR PROCESSOR
Connect your processor to your PC. The method of connection will vary depending on
whether or not you are using BVNet networking.
For non-networked systems, your cables will look like this:
PC Serial (RS232) Cable Processor
USB to RS232
Adapter
(If Necessary)
For systems using BVNet, your cables will connect like this:
RS232 to RS485
Converter
9-pin to EtherCon
Adapter
USB to RS232
Adapter
(If Necessary)
PC
CAT5E Cable
You're now ready to run PodWare for the first time...

7 www.laaudio.com
First Use.
AUTHORISATION CODE
When PodWare starts, it will ask you to enter an Authorisation code. This code can be found on
your installation CD.
COM PORT
If you require a USB-RS232 adapter, by this point you will have installed its software and noted the
COM port used. To enable communications between PodWare and the adapter, you will have to
tell PodWare which COM Port to use. To do this go to Network|COM Port and select the correct
port.
GO ONLINE
Press the Go Online button. The software then searches the network for any connected
processors. During this time, the loading bar in the bottom-right corner of the
screen will display progress. Once online, the triangle in the button turns green and all connected
devices are displayed in the left-hand pane.
FIRMWARE CHECK
The first time a processor is connected to the network, it will be scanned to see if it has the latest
version of the device firmware. If not, you will be prompted to update your processor's firmware.
For more information on this, see the 'Device Firmware' section on page 15.
WINK
The wink button can help you test communications and find your way through a large network of
devices. Select a device in the sidebar by clicking on its name once. Clicking the Wink button
will cause the selected device to show “RECEIVING” for a few seconds.

8 www.laaudio.com
In Use.
To begin controlling a device, double click its icon in the left-hand pane. To create settings offline,
go to Device | Add Device Panel. This will open a MonIcon, a quick display showing monitor
levels and mute status. MonIcons are ideal for keeping an eye on systems with multiple devices, as
the critical elements of a system can be viewed on a single screen. The MonIcon is purely a display
window and does not allow you to control parameters.
A MonIcon
To alter the parameters of a device, press the Expand button. The panel will now expand
showing a number of tabs for each of the available control pages. To shrink a full panel back to a
MonIcon, press the Contract button.

9 www.laaudio.com
DEVICE NAME
The text box in the bottom-left corner of the full panel allows you to enter a name for a device. This
allows easy identification of devices within a networked system. The name will also be stored in the
device's memory and stay with it for future set-ups.
GAIN TAB
The gain page allows the adjustment of input and output gains, mutes and the Mono/Stereo mode.
MONO/STEREO MODE
To toggle between Mono and Stereo mode, press the Mono / Stereo button. In Stereo
Mode, channels are paired as shown in the tables below. When switching to Stereo Mode, settings
from the left side of the unit are copied to the corresponding channel on the right. The controls will
then be paired, so that any adjustments will be reflected in the opposite channel.
Switching to Stereo Mode will overwrite settings on the Right side of the unit.
Left Input A Output 1 Output 2
Right Input B Output 3 Output 4
Left Input A Output 1 Output 2 Output 3
Right Input B Output 4 Output 5 Output 6

10 www.laaudio.com
CROSSOVER
The crossover page allows you to adjust routing, crossover points and filter shapes for each of the
unit’s outputs. It also displays EQ information for all channels, to give you an excellent overview of
the system’s frequency response.
Each of the output channels can define a source input. This can be either Input A or B, or the Sum of
A+B. In Stereo Mode routing is fixed and the routing controls will be shown in dark grey. For more
information on Stereo Mode, see above.

11 www.laaudio.com
The display area of the crossover page shows all of the frequency response information; EQ,
crossover settings and filters for all of the inputs and outputs. These are colour-coded to correspond
with the key above the graph. Coloured areas correspond to the frequency response of the output,
displaying a combination of crossover settings and output EQ. In the example above, the dip and
peak in the blue area are caused by EQ filters, but their effect is shown in the crossover display.
Input EQs are shown as lines laid over the crossover settings as the thin yellow and orange lines.
Crossover points and filter shapes can be set using the text input boxes and drop-down menus at
the bottom of the panel. Alternatively, you can adjust the settings using curve-dragging.
To activate curve-dragging, click on the black display area. You will now see a selection of handles
with which to drag crossover points. Dragging horizontally will control the frequency. Holding shift
and dragging vertically will step through available filter types and slopes.

12 www.laaudio.com
EQ
Input and output channels have an 8-band EQ section. This can be set using the text input boxes
and drop-down menus at the bottom of the panel. Alternatively, you can adjust the settings using
curve-dragging.
To activate curve-dragging, click on the black display area. You will now see a selection of handles
with which to drag EQ filters. Dragging horizontally will control the frequency, while dragging
vertically will adjust the gain. Holding shift and dragging vertically will vary the bandwidth or, in the
case of a shelving filter, the slope.

13 www.laaudio.com
Presets.
Every processor has 45 presets. The first two of these are reserved as the base Mono and
Stereo presets. The remaining 43 are all yours to use.
STORING A PRESET
To store a preset, press the Store button. The Store dialogue box will appear, asking you to
choose the memory location and type a name.
Pressing Store will then write the current settings to that memory location. To exit without
storing, click Cancel .
RECALLING A PRESET
To recall a preset, click the arrow on the drop-down menu. Click on the desired preset to recall.
This will overwrite any current settings. To exit without recalling, click Cancel .
DELETING A PRESET
To delete a preset, click the Arrange button.
In the Arrange dialogue, select the preset to delete and press the Delete button. When you’re
done, click Done .

14 www.laaudio.com
Device Settings.
All current settings and stored presets for a device (or an offline device panel) can be saved as a
device settings (.dse) file onto your computer. This is a useful way of retaining device settings, both
as a backup and as a means of transferring settings from one unit to another.
STORING DEVICE SETTINGS
To store settings from a processor to your computer, first click the desired processor on
the left-hand panel. Then click the Save button, or go to File | Save. Choose a memorable
location for your settings file, and give it a name. PodWare will ask you if you would like to store all of
the used presets into the file. Saying yes will store all of the presets containing settings information,
even if they are not currently in use. This will consequently increase the file size and load times of
the file. Saying no will only transfer the current settings of the device.
RECALLING DEVICE SETTINGS
To recall settings from your computer into a processor, first select the desired processor on
the left-hand panel. Then click the Open button, or go to File | Open, and navigate to your
settings file.
When recalling a file containing just current settings, only the device's current settings will be
altered. To retain your device's current settings before recalling a file, store them into a spare preset
location.
Recalling a file containing presets will cause any existing presets in the same locations to be
overwritten, as shown below.
Settings File Current Presets Result
1DS911 Tops 1□ Mono 1 □ Mono
2DS943 Tops 2□ Stereo =2□ Stereo
3DS945 Subs 3 XG666 Wedges 3 DS945 Subs
4 4 XG111 Wedges 4 XG111 Wedges
5DS949 Wedges 5 5 DS949 Wedges
Recalling a settings file with presets will overwrite any presets stored in the same locations.
When creating settings in an offline device panel, be sure not to use presets 1 and 2, as these
are reserved for the base Mono and Stereo presets, which cannot be overwritten.

15 www.laaudio.com
Device Firmware.
Firmware is a set of instructions designed to inform your processor of its purpose and
functions. As part of our programme of continuing improvement, firmware updates may be released
from time to time. You can use PodWare to update the firmware in an attached processor.
Firmware files can be identified by the .dfw extension. The file name will contain the device model
number (before the V) and firmware version (after the V) number as shown below.
So, in the above example, the firmware is for Model 1169 ( ) and its version number is
1.234.
FIRMWARE FOR BVNET ENABLED DEVICES
processors with BVNet cards installed have different model numbers, and will therefore
require different firmware to those without network capabilities. PodWare will prevent you from
installing an inappropriate firmware file, as this would render the unit unusable.
To add networking features to your processor, please consult your LA Audio dealer.
DO NOT attempt to install network firmware onto a device without a BVNet card.
Without Networking With BVNet Card
1169 1311
1102 1308
UPDATING DEVICE FIRMWARE
To update an attached device’s firmware, go to Device|Update Firmware, then locate the
required firmware file (.dfw). At the time of writing, the most recent versions of firmware are
included on your Podware installation disc. Check www.laaudiocom for more recent versions.
During the firmware updating process, the progress bar in the bottom-right corner of the
screen will turn red. DO NOT disturb the update process during this time. Doing so will render the
device useless and involve returning your processor to LA Audio for repair.
Other manuals for DLX200
1
Table of contents
Popular Software manuals by other brands

Cisco
Cisco TELEPRESENCE MANAGEMENT SUITE SECURE SERVER - CONFIGURATION GUIDE... Configuration guide

Bosch
Bosch DINION IP 5000 MP Software manual

ADS Technologies
ADS Technologies Instant Music RDX-150 quick start

Juniper
Juniper JUNOS SPACE 2.0 - RELEASE NOTES release note

Casio
Casio Mail Setup Manager user guide

F-SECURE
F-SECURE MOBILE SECURITY FOR BUSINESS - Administrator's guide