LA VAGUE LV-HD120 User manual

LV-HD120
LED Projector
Benutzerhandbuch
Instruction Manual
Mode d‘emploi
Manuale di istruzioni
Manual de uso

2
DEUTSCH
BEDIENUNGSANLEITUNG
BITTE BEACHTEN
• Bitte lesen Sie das gesamte Benutzerhandbuch sorgfältig durch, bevor Sie den Projek-
tor verwenden.
• Um die Stabilität der Stromversorgung zu gewährleisten, verwenden Sie bitte eine
Standard-Stromversorgung und geerdete Steckdosen.
• Verwenden Sie nur die auf dem Projektor angegebene Stromquelle.
• Bitte önen Sie den Projektor nicht. Es benden sich keine vom Benutzer zu warten-
den Teile im Projektor. Das Önen des Projektors führt zum Erlöschen der Garantie.
Wenn Sie ein Problem mit Ihrem Projektor haben, wenden Sie sich an Ihren Lieferan-
ten.
• Bitte schauen Sie nicht in die Linse des Projektors. Das helle Licht könnte Ihren Augen
schaden.
• Stellen Sie den Projektor nicht auf eine Fläche, die den Luftstrom aus den Lüftungs-
schlitzen blockieren könnte. Weiches Gewebe könnte den Luftstrom behindern. Auf
stabilem, hartem Untergrund aufstellen.
• Halten Sie den Projektor von Flüssigkeiten und Feuchtigkeit fern. Der Projektor ist nicht
wasserdicht und darf nicht im Freien verwendet werden.
• Um einen elektrischen Schlag zu vermeiden, halten Sie den Projektor von Feuchtigkeit
fern.
• Bitte schalten Sie den Projektor aus und trennen Sie ihn vom Stromnetz, wenn er nicht
benutzt wird.
• Bitte verwenden Sie für die Aufbewahrung Ihres Projektors Originalverpackungen.
3
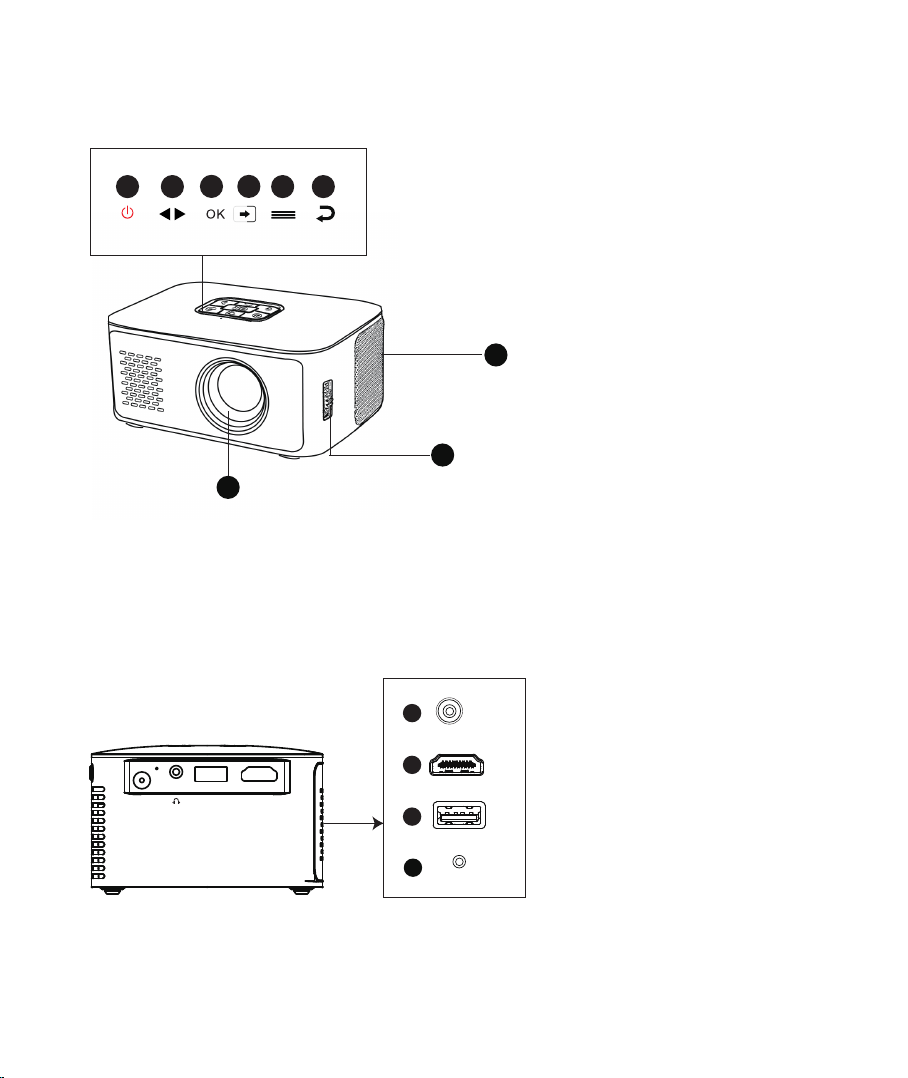
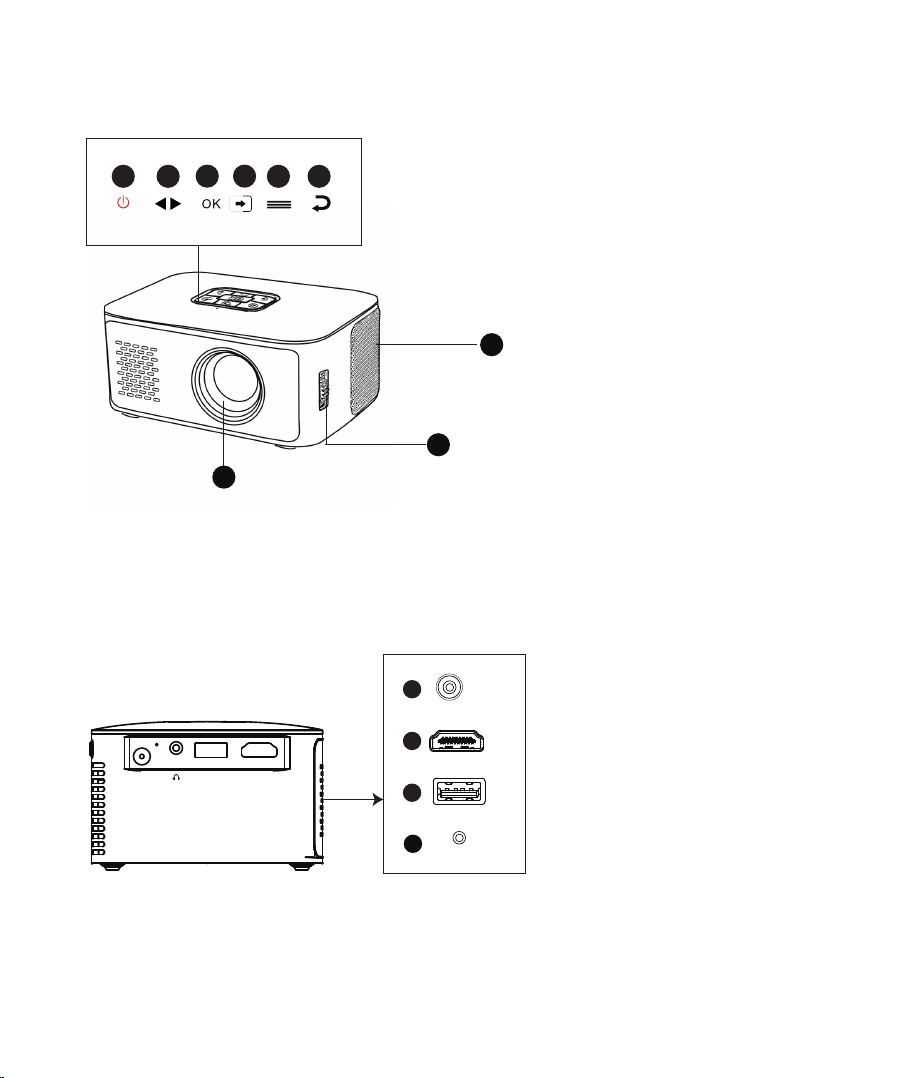
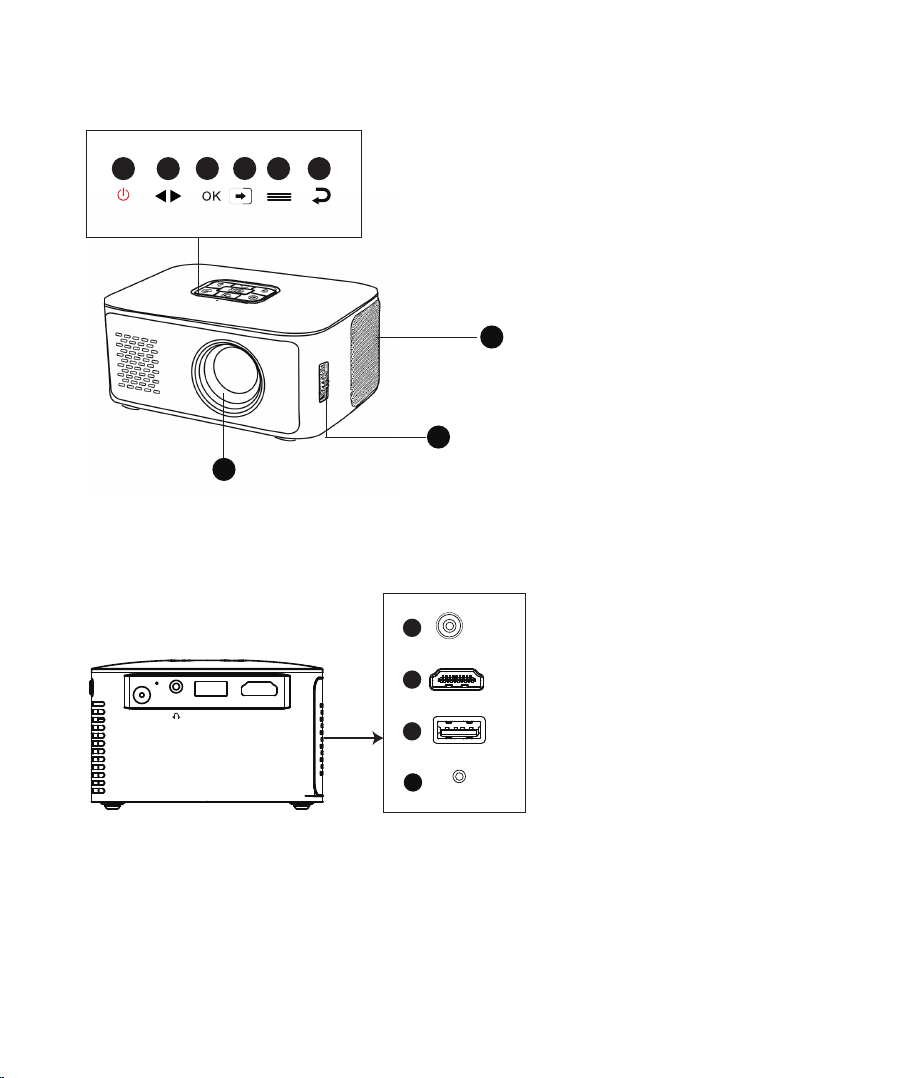
PRODUKTÜBERSICHT
1An-/Aus-Taste
2Pfeil-Tasten
3Auswahl bestätigen
4Eingang auswählen
5Menü
6Zurück
7Linse
8Fokus anpassen
9Lautsprecher
ANSCHLÜSSE
10
11
12
13
HDMI
DC-IN
USB
DC-IN USB HDMI
AUDIO OUT
10 Stromanschluss 12V / 2A
11 HDMI-Eingang
12 USB-Eingang
13 3,5mm Audio-Ausgang
7
8
9
23 4 561

4
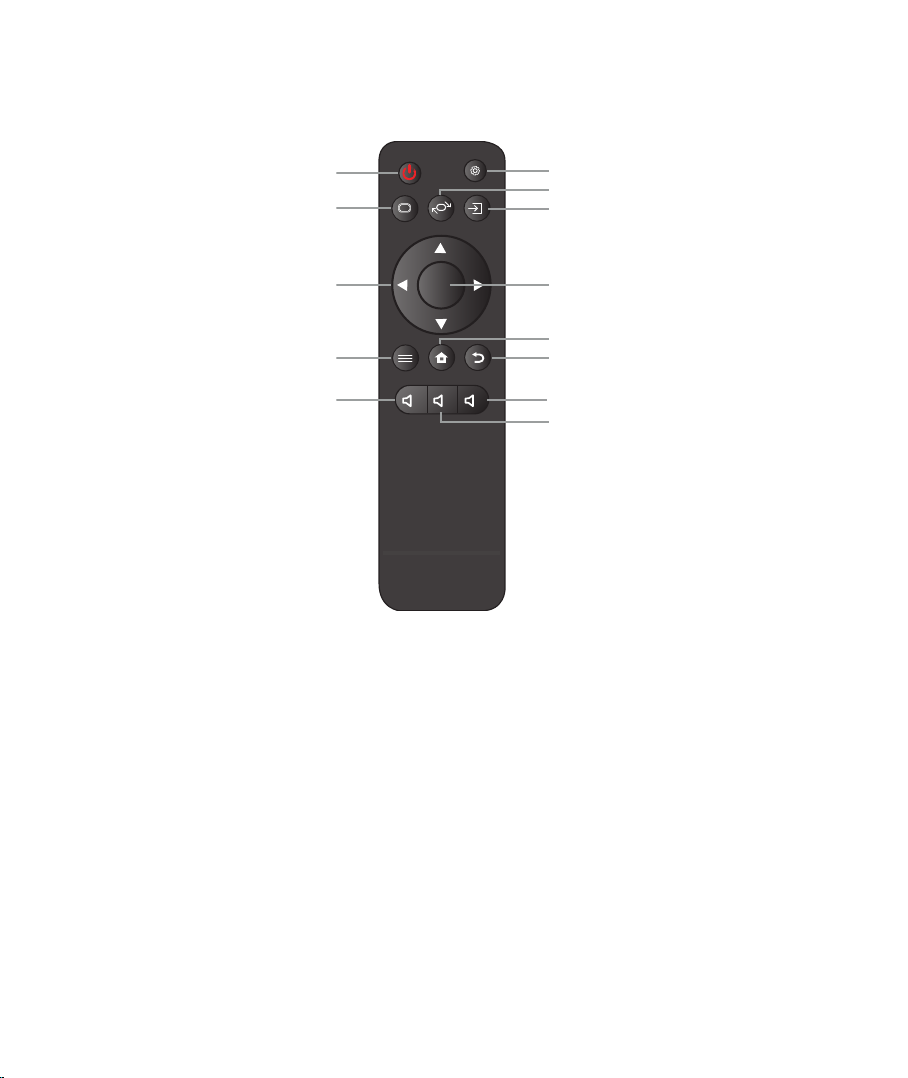
FERNBEDIENUNG
INBETRIEBNAHME
Netzkabel anschließen
Schließen Sie das Netzkabel an der Seite des Projektors und einer Steckdose an.
Einschalten
Drücken Sie die „An-/Aus“-Taste auf der Oberseite des Projektors oder auf der Fernbedie-
nung. Nach dem Einschalten erscheint der Start-Bildschirm.
Auf der Rückseite des Projektors bendet sich ein zusätzlicher „On/O“ Schalter. Hiermit
können Sie den Projektor aufgrund des integrierten Akkus (mit Position des Schalters auf
„On“) auch mobil verwenden.
Bitte beachten: Zum Laden des Akkus muss der Schalter auf „On“ stehen. Der Akku wird in
An-/Aus-Taste
Seitenverhältnis 16:9 / 4:3
Menü-Navigation
Menü
Lautstärke verringern
OK
-
x+
Einstellungen
Bildausrichtung ändern
Eingang auswählen
Auswahl bestätigen
Start-Bildschirm
Zurück
Lautstärke erhöhen
Stumm

5
der Schalterposition „O“ nicht geladen.
Sollten Sie den Projektor nicht verwenden, empfehlen wir Ihnen den Schalter auf „O“ zu
stellen, um eine Entladung des Akkus zu vermeiden.
Bildfokussierung
Verwenden Sie das seitliche Einstellrad (8) um den Bildfokus einzustellen.
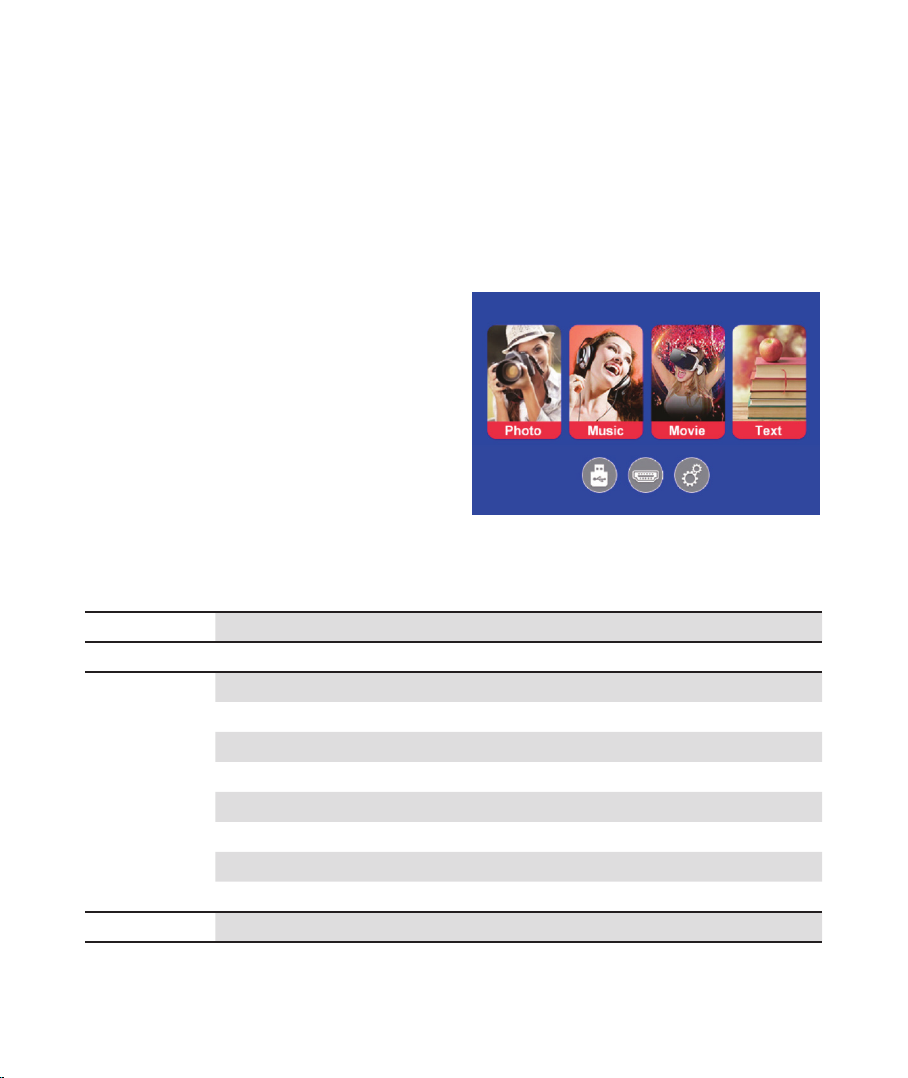
WIEDERGABE
USB
Schließen Sie ein USB-Gerät an dem ent-
sprechenden Eingang an, der sich an der
Seite des Projektors bendet.
Wählen Sie die Medienquelle „USB“ (Sym-
bol unten links) und wählen Sie dann das
gewünschte Medium aus (Foto/Musik/Film/
Text).
Wählen Sie anschließend die Datei(en) aus,
die Sie ansehen möchten, und drücken Sie
dann die Taste „OK“ auf der Fernbedienung.
Es werden folgende Formate unterstützt:
Foto JPG BMP PNG
Musik MP3 AAC
Film
MKV(H264/MPEG4/DIVX4/MPEG2)
AVI(H264/MPEG4/DIVX4/H263/MGPEG)
MOV/MP4(H264/MPEG4/DIVX4/MPEG2/MPEG1/H263/MJPEG)
TS(H264/MPEG2)
ASF(H264/MPEG4/DIVX4/MPEG2/MPEG1/H263/MJPEG)
FLV(H264/H263)
PMP(H264/MPEG4G)
MPG/VOB(MPEG2/MPEG1)
Text TXT

6
HDMI-Geräteanschluss
Schließen Sie einen Computer oder andere HDMI-Geräte an den entsprechenden Eingang
an der Seite des Projektors an und wählen Sie die Medienquelle „HDMI“.
3,5mm Ausgang für Audiogeräte
Schließen Sie Kopfhörer und andere unterstützte Audiogeräte mit einem 3,5mm Klinken-
stecker an den entsprechenden Ausgang an der Seite des Projektors an.
MENÜ
Drücken Sie die „Menü“ Taste um weitere Einstellungen an Ihrem Projektor vorzunehmen.
EINGANG AUSWÄHLEN
Durch Drücken der Taste „Eingang auswählen“ können Sie als Bildquelle „HDMI“ oder „Mul-
timedia“ (über USB) auswählen.
TECHNISCHE DATEN
Lichtquelle LED
Anzeigeverfahren LCD
Kontrast 1000:1
Physikalische Auösung 480 x 320 (unterstützt 1920 x 1080)
Projektionsentfernung 0,9 - 4m
Bildformat 16:9 / 4:3
Helligkeit 600 Lumen
Akku 7,4V / 2000mAh
Netzanschluss 110 - 240V / 50 - 60Hz
Leistung 25W
Eingangsschnittstellen USB / HDMI
Ausgangsschnittstelle 3,5mm Klinke
Abmessungen 140 x 102 x 66 mm
Gewicht 0.36kg

7
ENTSORGUNG
Diese Kennzeichnung besagt, dass für dieses Produkt die Europäische
Richtlinie gilt und es nicht zusammen mit anderen Haushaltsabfällen ent-
sorgt werden darf. Informieren Sie sich über die örtlichen Bestimmungen
zur getrennten Sammlung elektrischer und elektronischer Geräte und befol-
gen Sie diese. Eine ordnungsgemäße Entsorgung von alten Produkten hilft,
negative Auswirkungen auf Umwelt und Gesundheit zu vermeiden.
HERSTELLER
VEHNS GROUP GmbH
Theatinerstraße 40-42
80333 München
Deutschland
www.vehnsgroup.com
www.lavague.de
MADE IN CHINA
Änderungen und Irrtümer vorbehalten
Der Hersteller übernimmt keine Haftung für Schäden, die durch fehlerhafte, unsachgemä-
ße oder unvereinbare Verwendung des Produkts entstehen.
© VEHNS GROUP GmbH
Version 1.0 – 05/2021

8
ENGLISH
INSTRUCTION MANUAL
PLEASE NOTE
• Please read the entire user manual carefully before using the projector.
• To ensure the stability of the power supply, use standard grounded power sockets.
• Only use a power source as indicated on the projector.
• Please do not open projector. There are no user-serviceable parts in the projector.
Opening the projector will void warranty. If there is a problem with your projector
contact your supplier.
• Please do not directly look into the projector lens. The bright light could damage your
eyes.
• Please do not place projector on a surface that may block air ow from the vents. A
soft fabric could prevent air ow. Place the projector on stable hard surface.
• Please keep projector away from any liquids. The projector is not water proof or water
resistant and is not for use outside.
• To prevent electrical shock please keep projector away from moisture.
• Please turn o and unplug projector when not in use.
• Please use original packaging material when storing your projector.
9
PRODUCT OVERVIEW
1On/O button
2 Arrow keys
3 Conrm selection
4 Select input
5Menu
6 Back
7 Lens
8 Adjust focus
9Speaker
CONNECTIONS
10
11
12
13
HDMI
DC-IN
USB
DC-IN USB HDMI
AUDIO OUT
10 Power connection 12V / 2A
11 HDMI input
12 USB input
13 3.5mm audio output
7
8
9
23 4 561
10
REMOTE CONTROL
OPERATING INSTRUCTIONS
Connecting the power cable
Connect the power cord to the side of the projector and a power outlet.
Powering On
Press the „On/O“ button on the top of the projector or on the remote control. When the
power is turned on, the main screen appears.
There is an additional „On/O“ switch on the back of the projector. This allows you to use
the projector on the move due to the built-in battery (with the switch in the „On“ position).
Please note: To charge the battery, the switch must be in the „On“ position. The battery will
not be charged when the switch is in the „O“ position.
If you are not going to use the projector, we recommend that you set the switch to „O“ to
On / O button
Aspect ratio 16:9 / 4:3
Menu navigation
Menu
Decrease volume
OK
-
x+
Settings
Change image orientation
Select input
Conrm selection
Main screen
Back
Increase volume
Mute

11
avoid discharging the battery.
Image focusing
Use the side dial (8) to adjust the image focus.
PLAYBACK
USB
Connect a USB device to the appropriate input
located on the side of the projector.
Select the media source „USB“ (icon at the
bottom left) and then select the desired media
(photo/music/movie/text).
Then select the le(s) you want to view and
press the „OK“ button on the remote control.
The following formats are supported:
Foto JPG BMP PNG
Music MP3 AAC
Movie
MKV(H264/MPEG4/DIVX4/MPEG2)
AVI(H264/MPEG4/DIVX4/H263/MGPEG)
MOV/MP4(H264/MPEG4/DIVX4/MPEG2/MPEG1/H263/MJPEG)
TS(H264/MPEG2)
ASF(H264/MPEG4/DIVX4/MPEG2/MPEG1/H263/MJPEG)
FLV(H264/H263)
PMP(H264/MPEG4G)
MPG/VOB(MPEG2/MPEG1)
Text TXT

12
HDMI device connection
Connect a computer or other HDMI device to the corresponding input on the side of the
projector and select the media source „HDMI“.
3.5mm output for audio devices
Connect headphones and other supported audio devices with a 3.5mm jack plug to the
corresponding output on the side of the projector.
MENU
Press the „Menu“ button to make further adjustments to your projector.
SELECT INPUT
Press the „Select Input“ button to select „HDMI“ or „Multimedia“ (via USB) as the picture
source.
TECHNICAL DATA
Light source LED
Display method LCD
Contrast 1000:1
Physical resolution 480 x 320 (unterstützt 1920 x 1080)
Projection distance 0,9 - 4m
Image format 16:9 / 4:3
Brightness 600 Lumen
Battery 7,4V / 2000mAh
Mains connection 110 - 240V / 50 - 60Hz
Power 25W
Input interfaces USB / HDMI
Output interface 3,5mm Klinke
Dimensions 140 x 102 x 66 mm
Weight 0.36kg
13
DISPOSAL
This symbol indicates that this product is subject to the European Directive
and must not be disposed of together with other household waste. Refer to
and follow local regulations for separate collection of electrical and electronic
equipment. Proper disposal of old products helps to avoid negative eects
on the environment and health.
MANUFACTURER
VEHNS GROUP GmbH
Theatinerstraße 40-42
80333 Munich
Germany
www.vehnsgroup.com
www.lavague.de
MADE IN CHINA
Changes and errors excepted.
The manufacturer accepts no liability for damage resulting from incorrect, impro-
per or incompatible use of the product.
© VEHNS GROUP GmbH
Version 1.0 – 05/2021

14
FRANÇAIS
MANUEL D‘UTILISATION
ATTENTION
• Veuillez lire attentivement l‘intégralité du manuel d‘utilisation avant d‘utiliser le vidéo-
projecteur.
• Pour assurer la stabilité de l‘alimentation électrique, utilisez une alimentation électri-
que standard et des prises de terre.
• Utilisez uniquement la source d‘alimentation indiquée sur le vidéoprojecteur.
• N‘ouvrez pas le vidéoprojecteur. Le vidéoprojecteur ne contient aucune pièce répara-
ble par l‘utilisateur. L‘ouverture du vidéoprojecteur annule la garantie. Si vous avez un
problème avec votre vidéoprojecteur, contactez votre fournisseur.
• Ne regardez pas dans l‘objectif du vidéoprojecteur. La lumière vive pourrait endomma-
ger vos yeux.
• Ne placez pas le vidéoprojecteur sur une surface qui pourrait bloquer le ux d‘air des
fentes de ventilation. Les tissus mous peuvent obstruer le ux d‘air. Placez votre vidéo-
projecteur sur une surface stable et dure.
• Tenez le vidéoprojecteur à l‘écart des liquides et de l‘humidité. Le projecteur n‘est pas
étanche et ne doit pas être utilisé à l‘extérieur.
• Pour éviter tout choc électrique, tenez le vidéoprojecteur à l‘écart de l‘humidité.
• Veuillez éteindre le vidéoprojecteur et le débrancher du secteur lorsqu‘il n‘est pas
utilisé.
• Veuillez utiliser l‘emballage d‘origine pour ranger votre vidéoprojecteur.
15
APERÇU DU PRODUIT
1Bouton marche/arrêt
2 Touches échées
3 Conrmer la sélection
4Sélectionner une entrée
5Menu
6 Retour
7 Lentille
8 Ajuster le focus
9Haut-parleur
CONNEXION
10
11
12
13
HDMI
DC-IN
USB
DC-IN USB HDMI
AUDIO OUT
10 Connexion électrique
12V / 2A
11 Entrée HDMI
12 Entrée USB
13 Sortie audio 3,5 mm
7
8
9
23 4 561

16
TÉLÉCOMMANDE
PREMIÈRES ÉTAPES
Branchement du cordon d‘alimentation
Branchez le cordon d‘alimentation sur le côté du projecteur et sur une prise de courant.
Fonctionnement - marche/arrêt
Appuyez sur le bouton marche/arrêt situé sur le dessus du projecteur ou sur la télécom-
mande. Lorsque l‘appareil est allumé, l‘écran principal apparaît.
Un interrupteur supplémentaire „On/O“ se trouve à l‘arrière du projecteur. Cela vous per-
met d‘utiliser le projecteur en déplacement grâce à la batterie intégrée (avec l‘interrupteur
en position „On“).
Veuillez noter : Pour charger la batterie, l‘interrupteur doit être en position „On“. La batterie
ne se charge pas lorsque l‘interrupteur est en position „O“.
Si vous n‘utilisez pas le projecteur, nous vous recommandons de mettre l‘interrupteur sur
Bouton marche/arrêt
Format d‘image 16:9 / 4:3
Navigation dans le menu
Menu
Diminuer le volume
OK
-
x+
Paramètres
Changer l'orientation de l'image
Sélectionner une entrée
Conrmer la sélection
Écran principal
Retour
Augmenter le volume
Couper le son
17
„O“ pour éviter de décharger la batterie.
Mise au point de l‘image
Utilisez la molette latérale pour régler (8) la mise au point de l‘image.
LECTURE
USB
Connectez un périphérique USB à l‘entrée
correspondante située sur le côté du pro-
jecteur.
Sélectionnez la source de média „USB“
(icône en bas à gauche) puis sélectionnez le
média souhaité (Photo/Musique/Film/Texte).
Sélectionnez ensuite le(s) chier(s) que vous
souhaitez visualiser, puis appuyez sur la
touche „OK“ de la télécommande.
Les formats suivants sont pris en charge :
Photo JPG BMP PNG
Musique MP3 AAC
Film
MKV(H264/MPEG4/DIVX4/MPEG2)
AVI(H264/MPEG4/DIVX4/H263/MGPEG)
MOV/MP4(H264/MPEG4/DIVX4/MPEG2/MPEG1/H263/MJPEG)
TS(H264/MPEG2)
ASF(H264/MPEG4/DIVX4/MPEG2/MPEG1/H263/MJPEG)
FLV(H264/H263)
PMP(H264/MPEG4G)
MPG/VOB(MPEG2/MPEG1)
Texte TXT

18
Connexion d‘un appareil HDMI
Connectez un ordinateur ou un autre appareil HDMI à l‘entrée correspondante sur le côté
du projecteur et sélectionnez la source de média „HDMI“.
Sortie audio 3,5 mm
Connectez les écouteurs et autres appareils audio pris en charge avec une prise téléphoni-
que de 3,5 mm à la sortie correspondante sur le côté du projecteur.
MENU
Appuyez sur le bouton „Menu“ pour eectuer d‘autres réglages sur votre projecteur.
SÉLECTIONNER LA SOURCE
En appuyant sur le bouton „Sélectionner une entrée“, vous pouvez sélectionner „HDMI“ ou
„Multimedia“ (via USB) comme source d‘image.
SPECIFICATIONS
Source de lumière LED
Méthode d'achage LCD
Contraste 1000:1
Résolution physique 480 x 320 (supporte 1920 x 1080)
Distance de projection 0,9 - 4m
Format de l'image 16:9 / 4:3
Luminosité 600 lumens
Batterie 7.4V / 2000mAh
Connexion au réseau 110 - 240V / 50 - 60Hz
Power 25W
Interfaces d'entrée USB / HDMI
Interface de sortie jack 3,5mm
Dimensions 140 x 102 x 66 mm
Poids 0,36 kg
19
TRAITEMENT DES APPAREILS USAGÉS
Ce pictogramme indique que ce produit est soumis à la directive européen-
ne et ne doit pas être jeté avec les autres déchets ménagers. Respectez
les réglementations locales pour la collecte séparée des équipements
électriques et électroniques. Le traitement approprié des appareils usagés
permet d‘éviter les eets négatifs sur l‘environnement et la santé.
Fabricant
VEHNS GROUP GmbH
Theatinerstraße 40-42
80333 Munich
Allemagne
www.vehnsgroup.com
www.lavague.de
MADE IN CHINA
Sous réserve de modications et d‘erreurs.
Le fabricant décline toute responsabilité pour les dommages résultant d‘une utilisation
incorrecte, inappropriée ou incompatible de l‘appareil.
© VEHNS GROUP GmbH
Version 1.0 – 05/2021

20
ITALIANO
ISTRUZIONI PER L‘USO
SI PREGA DI NOTARE
• Si prega di leggere attentamente l‘intero manuale utente prima di utilizzare il proietto-
re.
• Per garantire la stabilità dell‘alimentazione elettrica, utilizzare un alimentatore standard
e prese con messa a terra.
• Utilizzare solo la fonte di alimentazione indicata sul proiettore.
• Si prega di non aprire il proiettore. Non ci sono parti riparabili dall‘utente nel proietto-
re. L‘apertura del proiettore annulla la garanzia. Se avete un problema con il proietto-
re, contattate il vostro fornitore.
• Non guardare nell‘obiettivo del proiettore. La luce intensa potrebbe danneggiare gli
occhi.
• Non posizionare il proiettore su una supercie che potrebbe bloccare il usso d‘aria
dalle fessure di ventilazione. I tessuti molli possono ostruire il usso d‘aria. Collocare su
una supercie dura e stabile.
• Tenere il proiettore lontano da liquidi e umidità. Il proiettore non è impermeabile e
non deve essere utilizzato all‘esterno.
• Per evitare scosse elettriche, tenete il proiettore lontano dall‘umidità.
• Spegnere il proiettore e scollegare l‘alimentazione CA quando non è in uso.
• Si prega di utilizzare l‘imballaggio originale per la conservazione del proiettore.
Table of contents
Languages:
Other LA VAGUE Projector manuals


