Lamona LAM8304 User manual

Generic instructions, (To be used in conjunction with User Instructions).
lPlease read this Installation Manual to ensure safe fitting and use of the appliance.
lThe appliance should be fitted by a suitably competent and qualified person.
lPlease keep these instructions in a safe place for future reference.
lDanger of suffocation keep packaging material away from children.
Installation Instructions
LAM8304
LAM8376
www.howdens.com/appliance-registration
Built-In Dishwasher
ISSUE v1.4


3
Exclusive to Howdens
Risk of damage to
appliance:
Do not attempt to
move the appliance
by the door.
NOTE: Do not leave the
dishwasher door open.
Be careful not to trip over
open door.
Warning:
Beawareoftheinstability
of the appliance prior to
being fitted into position.
Risk of damage to
property:
Take care of surrounding
area when moving the
appliance to prevent
damage to flooring, wall
coverings, pipes etc..
Two person lift. Risk of injury:
Beware of sharp metal
edges. Use gloves when
handling.
NOTE: If the electricity
cable isdamaged itmust
be replaced by a
competent person.
Dishwasher must
be fixed securely and
level.
Ensure that all packing
and transit protectors
havebeenremovedfrom
the appliance before
positioning.
DoNotinstalla damaged
machine.
70
°C
60
°C
eco
50
°C
40-65
°C
AUTO
mix 40
°C
Cancel 3 sec.
3 sec.
30
°C
70
°
C
60
°
C
eco
50
°
C
40-65
°
C
AUTO
mix 40
°
C
Cancel 3 sec.
3 sec.
30
°
C
Safety Information
Warningforinjuryorproperty
damage risk.
Warning for electric shock. Warning for risk of
fire / flammable materials.
Throughout this manual the following symbols are used.
DO NOT KINK HOSES
BEHIND MACHINE!
Machine will not work properly.
or machine does not fill / empty -
CHECK HOSES for kinks.
If after installation upon 1st use an
error code is displayed,

4
www.howdens.com
Installation overview guide
Safety Information (continued)
1. Dimensions .........................................................................p.6
2. Dishwasher connections. ...........................................p.6
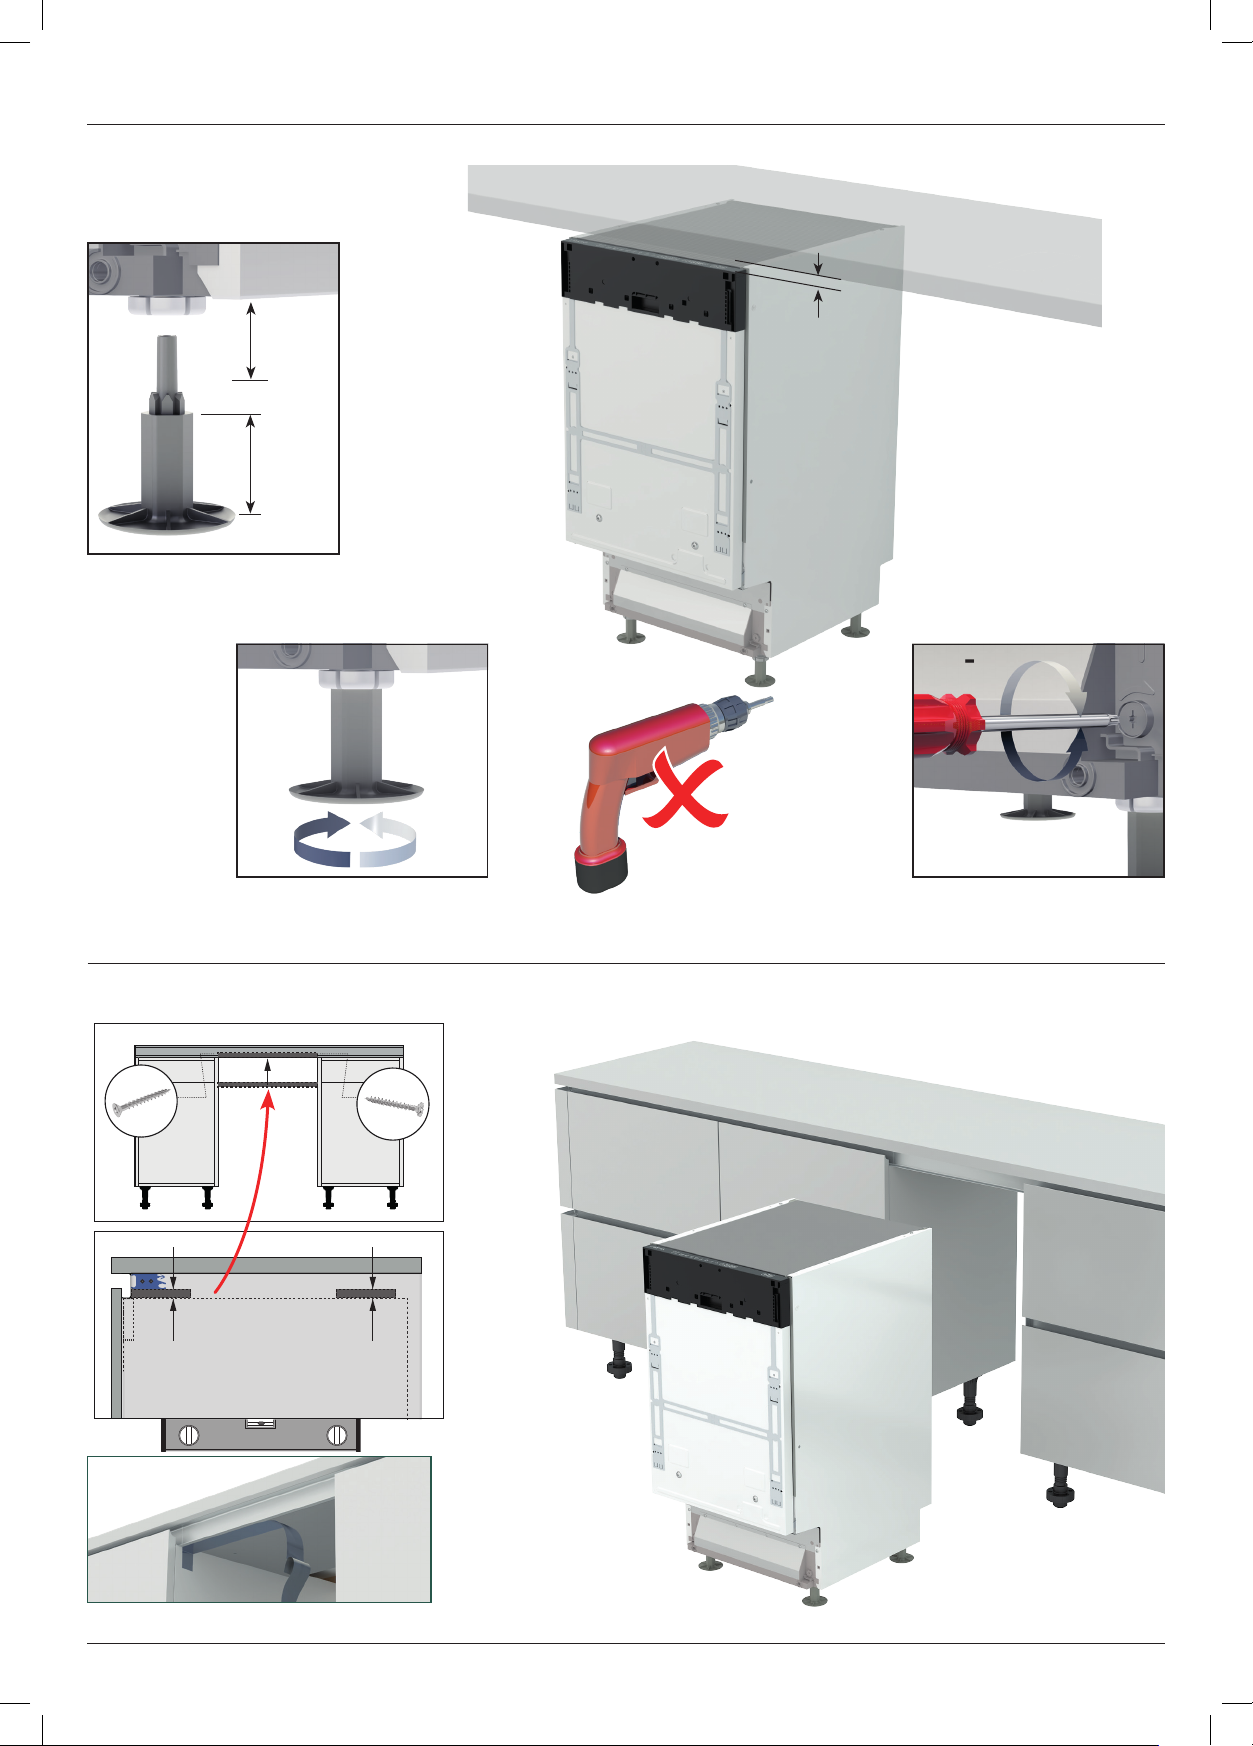
3. Fit feet and raise 10-15mm below
worktop height..................................................................p.8
4. Profile kitchen....................................................................p.8
5. Protection strip for timber worktops.....................p.9
6. Positioning the dishwasher .......................................p.9
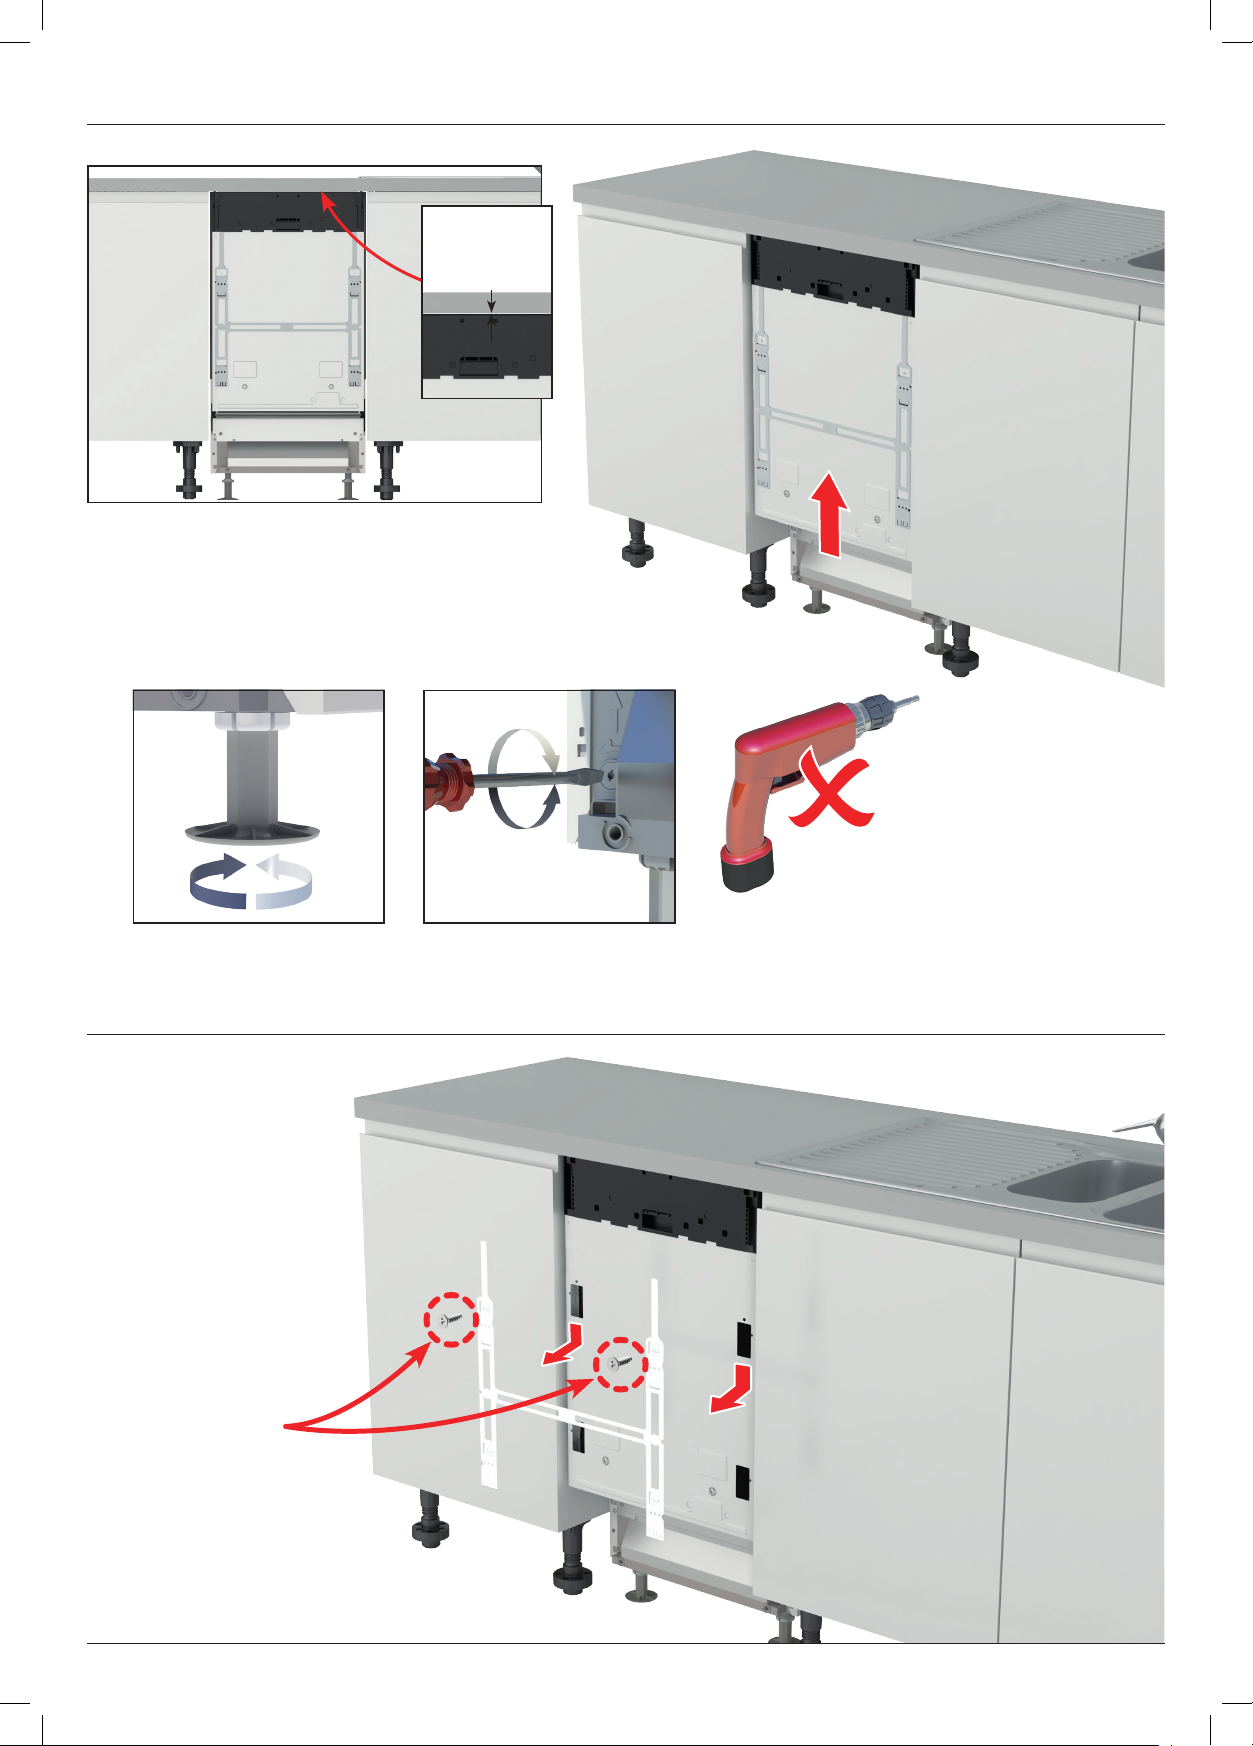
7. Adjust feet and raise dishwasher to
underside of worktop (level) .....................................p.10
8. Remove ‘H’ frame.............................................................p.10
9. Standard decor door preparation.........................p.11
10. Decor drawer frontals preparation .......................p.11
11. Fit decor door / decor drawer frontals ................p.12
12. Final adjustment and secure dishwasher .........p.13
13. Fit plinth ................................................................................p.14
14. Connect water/plumbing/electric...........................p.14
15. Profile Kitchen ...................................................................p.15
Electrical connection
WARNING! Risk of fire and electric shock.
•The appliance must be earthed.
•Makesurethat theelectrical information onthe rating
plate agrees with the power supply. If not, contact an
electrician.
•Do not use multi-plug adapters and extension cables.
•Avoid damage to the mains plug and mains cable.
Should the mains cable need to be replaced, contact
a LAMONA Authorised Service Agent or a suitably
qualified person.
•Connect the mains plug only at the end of the
installation. Ensure access to the mains plug after the
installation.
•This appliance complies with all relevant
E.U. Directives.
•The appliance has a 13amp plug.
Use fuse: 13amp ASTA (BS 1362).
Water connection (cold water supply)
•Do not kink or damage the hoses during installation.
•Before you connect the fill hose to the appliance; let
somewaterflowthroughtoensurealldebrisisremoved.
•We suggest you connect the fill hose and open the
watervalvebeforepushingtheapplianceintoposition.
•Check for leaks during and after installation and after
first use.
•Ifthewaterinlethoseisdamaged,immediatelyclosethe
watersupplyvalveanddisconnectthemainsplugfrom
the mains socket.
•The appliance is to be connected to the water mains
usingthenewhose-setsuppliedwiththeappliance.Do
not re-use old hose-sets.

5
Exclusive to Howdens
Phillips head
Flat head
Torx head
10mm open
ended spanner
DO NOT use high
speedimpactpower
tools.
x1x1 x4
+50mm
(4x36mm)
Phillips head Side Spacer
(4x42mm)
Phillips head
(4x13mm)
x6 x6 x4
Phillips head
x4
ABC
Installation
Parts supplied
Tools required

6
www.howdens.com
min
15mm
818mm
(+100)
550mm
(+5mm)
450mm
(+2mm)
820-920mm
min
570mm
*450mm (+1)
min
500mm
min
300mm
max
1000mm
*max.
100mm
*
min
500mm
min
300mm
max
1000mm
1- Dimensions
2- Dishwasher connections
Position the dishwasher
relative to service connections.
For Profile Kitchens,
see page 8, section 4.
All dimensions are to the floor. *DO NOT insert the hose too deep into the waste pipe,
(Maximum hose length, 3.2 metres).
Fit and adjust the spacers to the niche width.
(both sides - see page 9)
Cabinet
Dishwasher
Adjust the spacer to fill
the gap between the
dishwasher and the cabinet
Dishwasher

7
Exclusive to Howdens
Cold water supply
10-80 lpm.
REMOVE
CAP/END
WARNING! This appliance
must be earthed.
(Socket must be accessible
after fitting).
WARNING! Do not use extension
cables / adapters.
Ensure water is turned on and the
isolator valve is accessible after
fitting.
Hose connection - 3/4”.
Cold water pressure -
0.1 – 1Mpa (0.3 - 1.0 Bar)
Incorrect waste pipe configuration. Correct waste pipe configuration to avoid water flow
from sink to dishwasher.
Ensure cap/end is removed
from waste pipe spigot.
NOTE: Ensure hoses are not
kinked or trapped behind the
dishwasher.
NOTE: If necessary loosen and
rotate the water hose towards the
watersupplyandre-tighten.(Always
use the new hose supplied with the
dishwasher).
NOTE: Issues with hoses or drain will cause machine to malfunction.

8
www.howdens.com
DO NOT use high speed
impact power tools.
DO NOT damage the
plastic screw heads.
+_
+
_
10-15mm
Plus foot
addition
+50mm
Foot,
max
50mm
x2 x2
For standard installation extension
feet need to be fitted.
Donotpositionin
cabinetrunatthis
stage.
3- Fit feet and raise to 10-15mm below worktop height
Front feet Rear feet
4- Profile Kitchen
Pre-install an infill when fitting a dishwasher into a Profile Kitchen.
It is critical that
the dishwasher is
installed level.
RKC0071 x2
Apply moisture barrier tape.

9
Exclusive to Howdens
&
NOTE: Ensure hoses
are not kinked or
trapped behind the
dishwasher.
5- Protection strip for timber worktops to avoid condensation damage
6- Positioning the dishwasher
NOTE: If necessary loosen and
rotatethewaterhosetowardsthe
water supply and re-tighten.
Alwaysusethenewhosesupplied
with the dishwasher.
Ensure a clean and
dust free surface. Cut to fit.
NOTE:Thisstripmustbefittedtotimberworktopstoavoid
damage. Ensure protection strip is set to edge of square
edged worktops.
Push machine
back and pull
hoses through.
Set the desired width
Adjust side
spacer fixings

10
www.howdens.com
DO NOT use high speed
impact power tools.
DO NOT damage the
plastic screw heads.
+_+
Flat head
screw driver
_
Plumb & level
(touch at
front)
7- Adjust feet and raise dishwasher to underside of worktop (level)
8- Remove ‘H’ frame for frontal fitting
Retainscrews
for
stage 9/10.
Front feet Rear feet
It is critical that
the dishwasher is
installed level.

11
Exclusive to Howdens
(4x13) x2
(4x13) x2
Stage 8 screws x2
Stage 8 screws x2
A
A
=
=
TOP
Centre line
267mm 517mm
192mm
192mm
60mm
130mm
130mm
=
267mm
517mm
2 x 356mm drawer fronts = 712mm
Normal door height = 716mm
Therefore space between
drawer fronts = 3-4mm
TOP
Centre
=
192mm
192mm
9- Standard decor door preparation
10 - Decor drawer frontals preparation
Remove centre rail.

12
www.howdens.com
2mm
2mm
(4x42mm)
Phillips head 42mm
numbers 3 and 6.
(4x42mm)
Phillips head 42mm
numbers 3, 4 and 6.
B
B
11 - Fit decor door / decor drawer frontals
2
1
34
5
6
12
3
4
5
6
Fixing for standard decor door
DO NOT use hole 1, especially
when fitting an integrated
handle decor door.
If necessary make final alignment
and fully tighten the screws. Make
sure screws are fastened flush. DO
NOT over-tighten.
Fixing for decor drawer frontals
12
345
6
2
1
3
4
5
6

13
Exclusive to Howdens
3mm3mm
450mm (+1) 451mm (+>1)
2mm
C
12 - Final adjustment and secure dishwasher
Maximum 450mm (+1)
It is critical that the dishwasher is installed level.
Side fixing method for dishwashers
(4x36mm) x4
Do not overtighten
Do not bow dishwasher sides.
Make sure the spacer is bridging
any gap between the appliance and
the cabinet.
Securing screws x4 positions

14
www.howdens.com
Cold water supply
10-80 L/pm.
70
°C
60
°C
eco
50
°C
40-65
°C
AUTO
mix 40
°C
Cancel 3 sec.
3 sec.
30
°C
70
°
C
60
°
C
eco
50
°
C
40-65
°
C
AUTO
mix 40
°
C
Cancel 3 sec.
3 sec.
30
°
C
13 - Fit plinth
14 - Switch on water and electric
Once decor door / decor drawer
frontals are fitted correctly, fit the
plinth.
Final checks:
! -Decor dooropens andcloses
without clash?
! -Dishwasher installed level -
Front Rear,
Side Side?
! -Hoses not kinked?
Runaprogrammecycletoconfirmsuccessfulinstallationand
that there are no leaks.
Ifduringinitialusethemachinedoes
not fill / empty.
Check hoses,
see ‘Dishwasher connections’.

15
Exclusive to Howdens

Product serial number
(Place sticker here)
Product information correct at the time of publication in October 2023
The company has a policy of continuous product development and reserves the
right to change any products and specifications given in this manual. Subject to
the Terms and Conditions of Trading, a copy of the Howdens Terms and Conditions
is available upon request.
Copyright © 2023 Howden Joinery Ltd. All rights reserved. HD320130
This manual suits for next models
1
Table of contents
Other Lamona Dishwasher manuals

Lamona
Lamona LAM8301 Owner's manual

Lamona
Lamona LAM8603 User manual

Lamona
Lamona FLM8600 User manual

Lamona
Lamona LAM8302 User manual

Lamona
Lamona LAM8607 User manual

Lamona
Lamona LAM8606 User manual

Lamona
Lamona LAM8676 User manual

Lamona
Lamona LAM8675 User manual

Lamona
Lamona LAM8602 Troubleshooting guide

Lamona
Lamona Lam8303 User manual