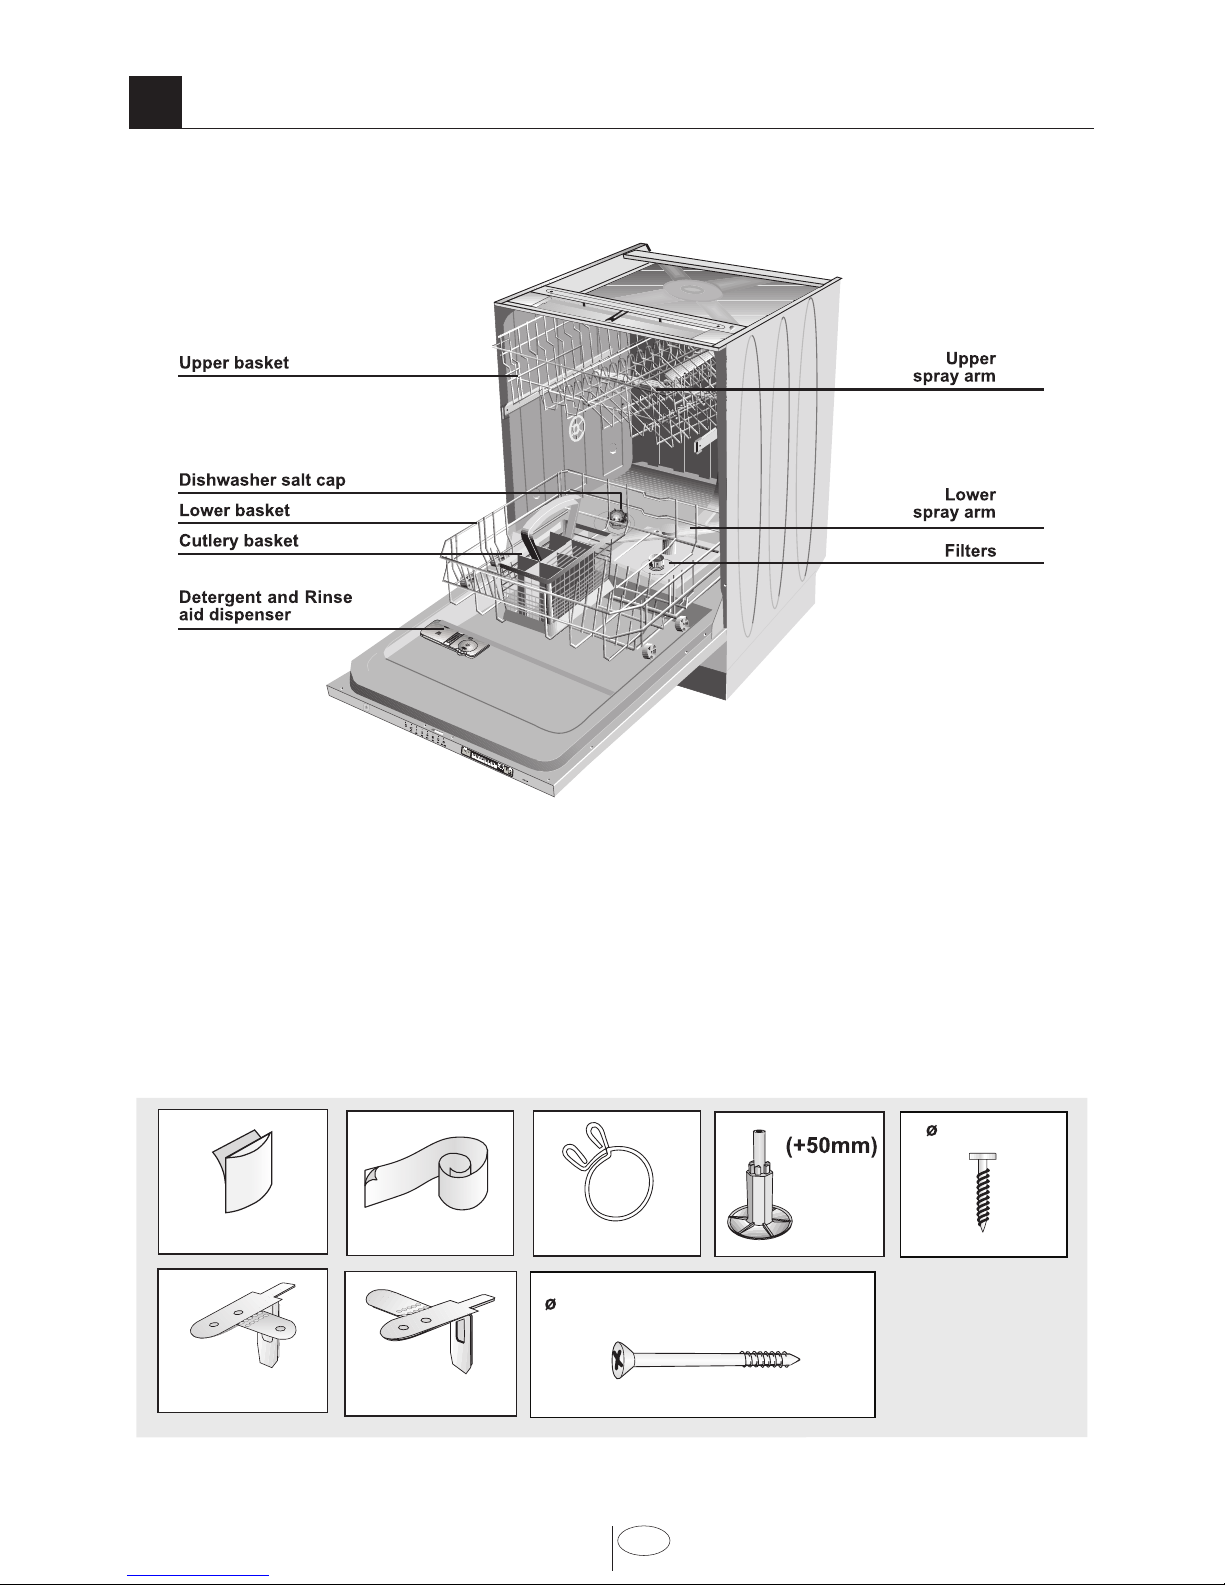
Lamona LAM8602 Troubleshooting guide

User & Installation Guide
LAM8602
Dishwasher

Welcome
Dear Customer
Congratulations on your choice of a quality dishwasher which has been designed
to give you excellent service.
Please read these instructions before installing the dishwasher and using it for the
in the home. Failure to observe these instructions may invalidate your right to free
Note
Due to the quality control processes during production, there may be some
water left in your machine. This does not cause any damage.
Preparation before use
It is recommended that the dishwasher is operated on the Economy
programme with prewash before loading with dishes.

TABLE OF CONTENTS
Know your dishwasher 3
Programme Chart 5
Warning and safety information 6
Electrical Safety 6
Children’s Safety 6
General 6
Recycling 7
Energy and water saving 7
What should not be washed in your
dishwasher 7
Before first use 8
Installation 8
Electrical requirements 9
Warning 9
Water inlet hose connection 10
Drain Hose Connection 10
Installation of dishwasher 11
How to use 12
Water hardness & regeneration
settings 12
Water Hardness Level Adjustment
Rinse aid 17
Loading the dishwasher 18
Operating the dishwasher 20
Hot Air Drying 20
How to clean your machine 21
Before calling service / Trouble
shooting 23
Guarantee 25

GB
Unpacking
regulations.
1
(P18)
(P14)
(P18)
(P18)
(P21)
(P21)
(P20)
*Please Clean Regularly
Failure to clean will result
in poor performance
Know your dishwasher
!"
!"#$%&''
!#
&$&!''
!$
!% !$
!$
!$ !#

4GB
Specification
Load Capacity : 12 Place settings
Height : 820 mm
Width : 598 mm
Depth : 550 mm
Net weight : 33 kg
Supply voltage : 220-240 V ~ 50 Hz
Fuse currrent : 13 A
Total power : 1900-2200 W
Heater power : 2000 W
Pump powers : 125/30 W
Diameter of plates for
Upper basket : 20 cm max.
Lower basket : 31 cm max.
Because we continually strive to improve our products, we may change our
Note for Testing Institutes
The necessary information for performance testing will be provided upon request.
The request can be done by e-mail through:
Please do not forget to write the model code, stock code and serial number
information of the appliance besides your contact information in the e-mail.
The model code, stock code and serial number information can be found on the
rating label, which is placed on the side of the door.

GB
2Programme Chart
On/Off Button
Tablet Detergent Indicator
Salt Level Indicator Light
Time Delay Indicator
Programme Indicator Light
Start / Stop Indicator Light
Programme Selection Button
Half Load / Tablet Detergent Button
Start / Stop Button
Time Delay Button
Half Load Indicator Light Rinse Aid Indicator Light
Programmes and
temperatures
Cycle Selection
Information
Water
Consumption
(Litres)
Energy
Consumption
(Kwh)
Running Time
(min)
P1 ECO* 50°C
Most economic
normally soiled dishes
P2 PRE-WASH No Heat
and loosen food
residue awaiting full
P3 RAPID 35°C
Lightly soiled dishes
P4 NORMAL 60°C
Normally soiled
P5 INTENSIVE 70°C
Heavily soiled dishes
requiring
Plate Size ( cm )
Upper Basket Lower Basket
20

6GB
3Warning and safety information
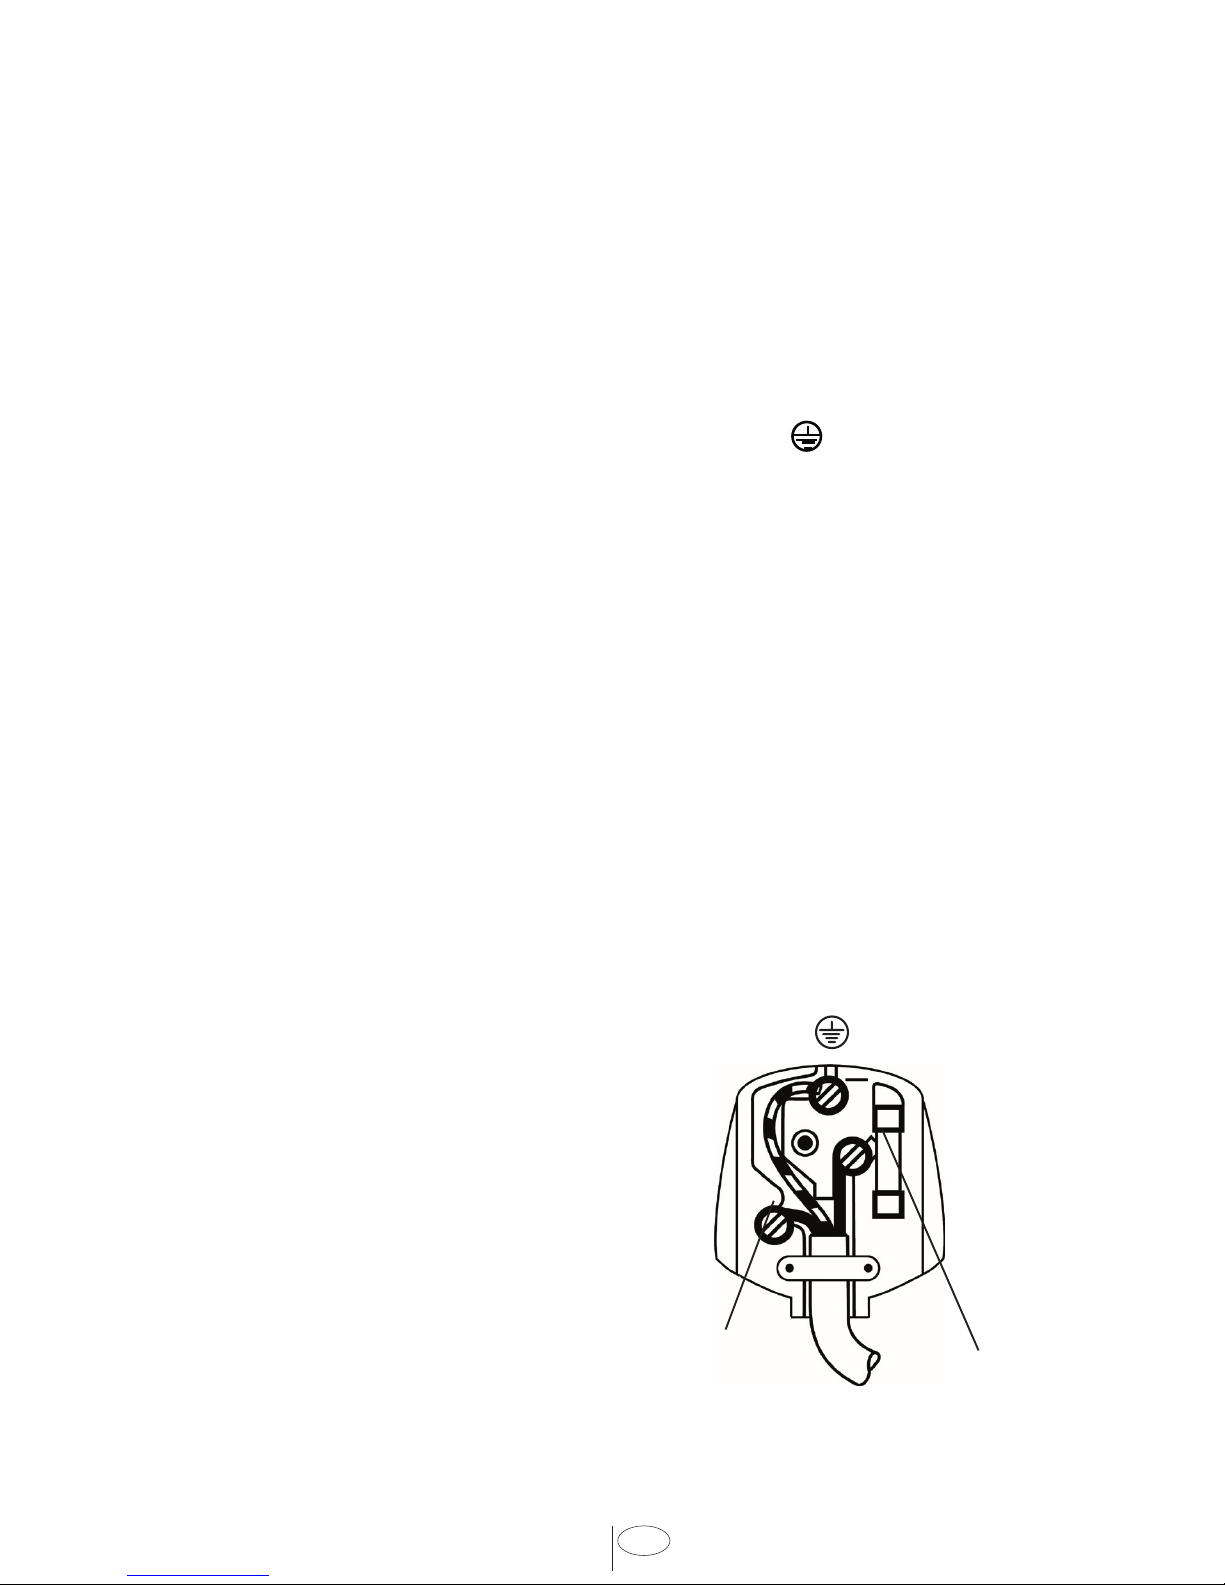
Electrical Safety
for meeting these basic safety
standards.
Do not use an extension cable.
When disconnecting your machine
Children’s Safety
your dishwasher.
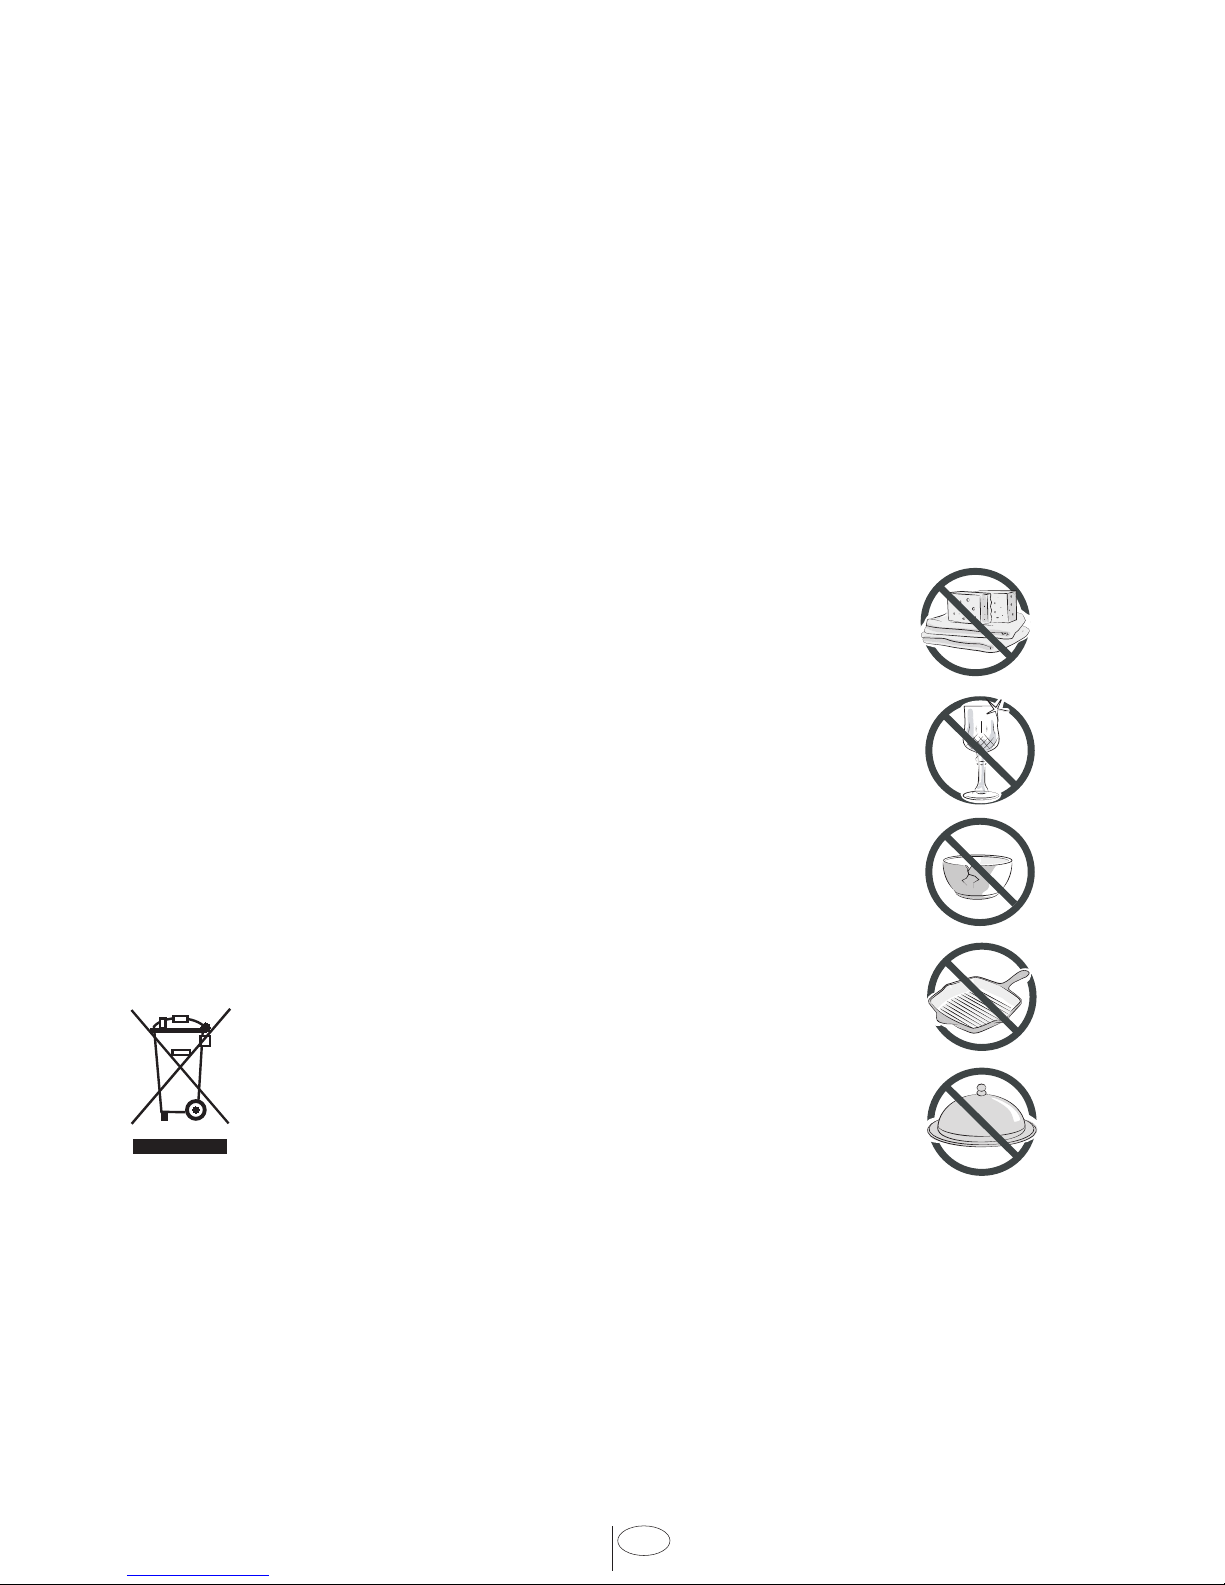
Dishwasher detergents contain irritants
and throat.
the wash cycle.
machine until right before you start the
do not allow your children near your
or sit on the front door when the front
reach.
Warning !
Long cutlery, such as ladles and
long knives, etc must be placed
horizontally on top of the full cutlery
basket or on the racks to prevent
accidental injury.
General
clean your dirty dishes at home.
Never use chemical solvents in your
Never use materials other than
Please ensure old machines do not
become a threat to child safety. It is

7GB
may be damaged.
After using the dishwasher always
Recycling
mixed with general refuse and should
be given to recycling centres.
We suggest you contact your local
facilities available.
selective sorting symbol
for waste electrical and
Directive 2002/96/EC in order to be
or regional authorities.
dangerous for the environment and
Energy and water saving
before loading. Start your dishwasher
after fully loading the machine. Do not
What should not be washed in
your dishwasher
Do not wash
items soiled with
etc. since these
may damage your
machine
Do not wash
wooden or bone
resistant to high
and aluminium
ware in your
dishwasher.
silver have a tendency to discolour or
and crystals may lose their shine and

8GB
4
5
When deciding on where to install
dishes in the dishwasher and also to
wall coverings etc. Do not move the
handle
Installation
A chemical reaction can occur between
silver cutlery and stainless steel
together.
Iron and cast iron objects can rust and
stain other items.
the item you wash in the dishwasher is
the item.
Do not overload your dishwasher or
do not load items other than those
mentioned in this manual.
Before first use
and use damaged machines. If your
machine is damaged contact your
on this dishwasher should be carried
out by authorised service staff only.
Unauthorised repairs are not only
cancellation of your guarantee.
connections of your dishwasher are
installation as stated in the relevant
It is recommended that the
dishwasher is operated on the
Economy programme with prewash
before loading with dishes.
add 1 Litre of
water to the salt container of your
machine.

9GB
Electrical requirements
the frequency shown in the rating label
Important
Fitting a different plug
As the colours of the wires in the
1.
symbol or coloured green
and yellow or green.
2.
or coloured red.
!
!"#$%&#"&"'(
"
!)*'&#"
+),-.
/"''%&,%(&0'))#$
#"&1"''%
Warning
This appliance must be
earthed
elsewhere in the house.
rating must be used. Do not forget

10 GB
Water inlet hose connection
install your new dishwasher. If in doubt
The appliance must be connected
to the water mains using the new
hose set supplied with your new
dishwasher. Old hose sets must not
be re-used.
bars.
Connect the straight end to your water
1
when the machine is not being used.
If you only have one cold water
Y
cold water feed you need for your
dishwasher. Y
most DIY stores.
Drain Hose Connection
Fit the drainage hose of your machine
connected into the waste drains and
not surface water drainage system.
and must not be extended otherwise
water.
!"#$%%&$'!
!"! #! $! %! !" &! '! (! )! "!! ""!
%('!
!)*$+'!
!"#$%%&$'!
!)*$,&$'!
%-
(%
!

11 GB
!"#$%&&
'(%&&)
'(%&&)
*+&,-+&
'(%&&)
*+&,-+&
Installation of dishwasher
An additional sheet containing
assembly and installation instructions
in the mentioned sheet in order to
assemble and install your dishwasher
easily and correctly.
See the diagram above and also the
additional sheet. Ensure there is a
clearance each side of the machine to
allow slight side ways movement for
servicing.
Note:
Position the machine next to a water
that the water inlet and drain hoses are
Good levelling is essential for correct

12 GB
level using the adjustable feet.
inner liner on either side of the cabinet.
not catch any other surface to ensure
the door is closed smoothly.
6
Water hardness & regeneration settings
effectiveness.
If you move to a different location, the level of water hardness will possibly
be different. It is essential to reset the water hardness in order to obtain
optimum washing efficiency.
!"#$%&$'()
*"$%$+"%,-$"'
./0,%.'01%203'
$-)%.0'%4%1(53$"6
7"108"%$+"
$"#$%#$'()%.'01
($#%)-9:(5;6
%<(//%-%;/-##%,($+
$-)%,-$"'%-5=
=()%$+"%$"#$%#$'()
(5$0%,-$"'%.0'%4
#"905=6
!-:"%$+"%$"#$%#$'()
03$%0.%$+"%,-$"'%-5=
#+-:"%($6
>0/=%.0'
4%1(53$"6
&"$%$+"%,-$"'%+-'=5"##%/"8"/%0.%203'%=(#+,-#+"'
-990'=(5;%$0%$+"%'"#3/$%#+0,5%?2%$+"%$"#$%#$'()6
!
"
#
$%&'()*#
$%+#,-(.
,. /
!"#$%&'
(')*#+",#+%&'#-"./'./
$",#+%&'#-"./'./
0'1%2&#+%&'#-"./'./
3%45#+%&'#-"./'./
(')*#3%45#+%&'#-"./'./
$'6'+#7
$'6'+#8
$'6'+#9
$'6'+#:
$'6'+#;
$'6'+#<
How to use

GB
! For level 5 and level 6 there is no
difference between hardness level
settings.
If the hardness of the water you
use is more than 80°dF (French
Hardness) or if you are using well
water, we recommend that you use
light will be on continuously.
hardness level stored on your machine
once the stored water hardness setting
adjust water hardness level according
suitable to your machine from the
Water Hardness Level Adjustment
Key.
for once to store the level you have
selected.
when the new water hardness level is
stored.
your machine.
Hardness
Level
English Water
Hardness °dE
German Water
Hardness °dH
French Water
Hardness °dF* Water Hardness Level Indicator
1st Level
Press the Programme Selection button to set the water hardness level
2nd Level
rd Level Press the Programme Selection button to set the water hardness level
th Level Press the Programme Selection button to set the water hardness level
6th Level Press the Programme Selection button to set the water hardness level
Water Hardness Level Adjustment Table

GB
Detergent use
detergents that have been designed for
Detergent must be added to the
container before each use.
Detergent overdose may cause
scratches on your dishes and there
may be traces of detergent left in your
machine.
chlorine.
chlorine
you add salt to the salt container even
if the hardness of your water is as low
dishes and glasses may be observed.
amount of detergent.
Detergents without chlorine have less
bleaching effect. Coloured stains may
detergent with chlorine.
Adding Dishwasher Salt
salt in your machine to soften the hard
salt do not dissolve in water easily and
Water softener will be full of water.
Therefore, adding softening salt
should always be done immediately
before you start the dishwasher.
Caution :
salt causing corrosion. Ensure 1 Litre
Water softener.
!
"
#
$
%
&
$
!
"
#
%
!
'
#
!"##$%

GB
Warning!
Two-in-one and three-in-one
detergents
You will obtain the best results from
softening salt.
softening salt.
softening salt.
results from combined detergents only
amounts of rinse aid and/or softening
and rinse aid required to suit the water
hardness level in your home.
or not.
Follow the instructions on the
ensure economical use of salt and/
or rinse aid.
of the detergent holder.
Using three-in-one detergent,
softening salt and rinse aid.
add more rinse aid to the rinse aid
If you use combined detergents
with a rinse aid setting higher
the washed items and inside the
machine.
If you use combined detergents
more salt to the water softener.
Using two-in-one detergent:
detergent and softening salt
rinse aid so you need to use the
rinse aid setting as described
there is rinse aid in the rinse

16 GB
Using two-in-one detergent and
rinse aid
add more rinse aid to the rinse aid
If you use combined detergents
with a rinse aid setting higher
the washed items and inside the
machine.
softening salt so you need to use
the softening setting as described
there is salt in the water softener
the water softener with salt every
Important warning
the detergent manufacturer directly.
If you stop using this kind of
detergent:
Ensure that the salt and rinse aid
Put the water hardness setting at
the highest level and run a wash
the water hardness setting to the
correct level for your mains water
hardness shown in the manual.
Put the rinse aid setting at the
correct level.
Filling detergent dispenser
If the dishwasher is considerably full
level. If the dishwasher is not quite full
on the degree of soiling and the
water hardness in your area it may be
necessary to add more detergent.
If you are using tablet detergent read
the manufacturer’s recommendations

17 GB
inside the dishwasher (detergent
Do not use detergent when using the
Detergent residues
washes and/or short duration
recommend to carry out a service wash
is not recommended to carry it out with
Rinse aid
Use only rinse aid intended for
household dishwashers.
to be used in the dishwashers for the
there is adequate amount of rinse
machine.
You can adjust the amount of rinse
between levels 1 and 6 (6 being the
Filling the rinse aid dispenser
diagram.

18 GB
Loading the dishwasher
Loading the dishwasher correctly will
Examine the information given in this
section and the information stated
reference card given with the manual.
Place large or heavily soiled items in
height adjustable to accommodate tall
items.
ensure tall glasses (and/or wine
to rest against each other since they
may be damaged during washing if not
larger items.
7
8
10
9
11
12
13
15
14
16
1
2
3
4
5
6
Loading the Upper Basket
1. Glasses
2. Saucers
Dessert Bowl
6. Long Utencils
Loading the Lower Basket
7. Pan Lids
8. Side Plates
9. Serving Dish
10. Serving Bowl
11. Cutlery
12. Dessert Bowl
Side Plates
Pans
Dinner Plates
16. Side Plates
7
8
10
9
11
12
13
15
14
16
1
2
3
4
5
6

19 GB
!
"
Movable Cutlery Basket
side.
Table of contents
Other Lamona Dishwasher manuals

Lamona
Lamona Lam8303 User manual

Lamona
Lamona LAM8302 User manual

Lamona
Lamona LAM8605 Installation instructions

Lamona
Lamona LAM8304 User manual

Lamona
Lamona LAM8605 User manual

Lamona
Lamona LAM8301 Owner's manual

Lamona
Lamona LAM8603 User manual

Lamona
Lamona FLM8600 User manual

Lamona
Lamona LAM8607 User manual

Lamona
Lamona LAM8675 User manual