Laney Audiohub Venue Series User manual

AH110-G2
AH115-G2
AH112-G2

WELCOME
Dear Player,
Thank you very much for purchasing your new Laney product and becoming part of the worldwide Laney family. Each and
every Laney unit is designed and built with the utmost attention to care and detail, so I trust yours will give you many years
of enjoyment.
Laney products have a heritage which stretches back to 1967 when I first began building valve amplifiers in my parents’
garage.
Warm Regards,
At the same time we believe we have not lost sight of the reason Laney was founded in the first place - a dedication to
building great sounding amplification for working musicians.
Since then we have moved on from strength to strength developing an extensive range of guitar, bass, public address, multi
instrument and keyboard amplification products along with a list of Laney endorsees that includes some of the world’s
most famous and respected musicians.
Lyndon Laney
Chairman and Founder.
2

3
INTRODUCTION
AH110-G2
AH112-G2
AH115-G2
These lightweight, portable, full range moulded enclosures,
can be either floor standing, mounted on a pole or tripod
stand (via the 35mm pole socket), or used on stage as a
wedge monitor.
The Laney Audiohub Venue range of enclosures is designed
to deliver a high performance in a wide variety of demanding
audio applications.
The Audiohub Venue range is ideally suited for use in
classrooms, business seminars, presentations, worship meets,
parties, bars, BBQ's and a variety of different styles of
musical performances.
This manual contains important information regarding
correct and safe operation of your active system. Please
read it thoroughly in order to get the best performance and
reliability from your new Laney product.
Housing a flexible on-board mixer which includes a
Bluetooth® equipped media player, each Audiohub Venue
gives you a compact yet flexible solution to your audio
sound reinforcement requirements.

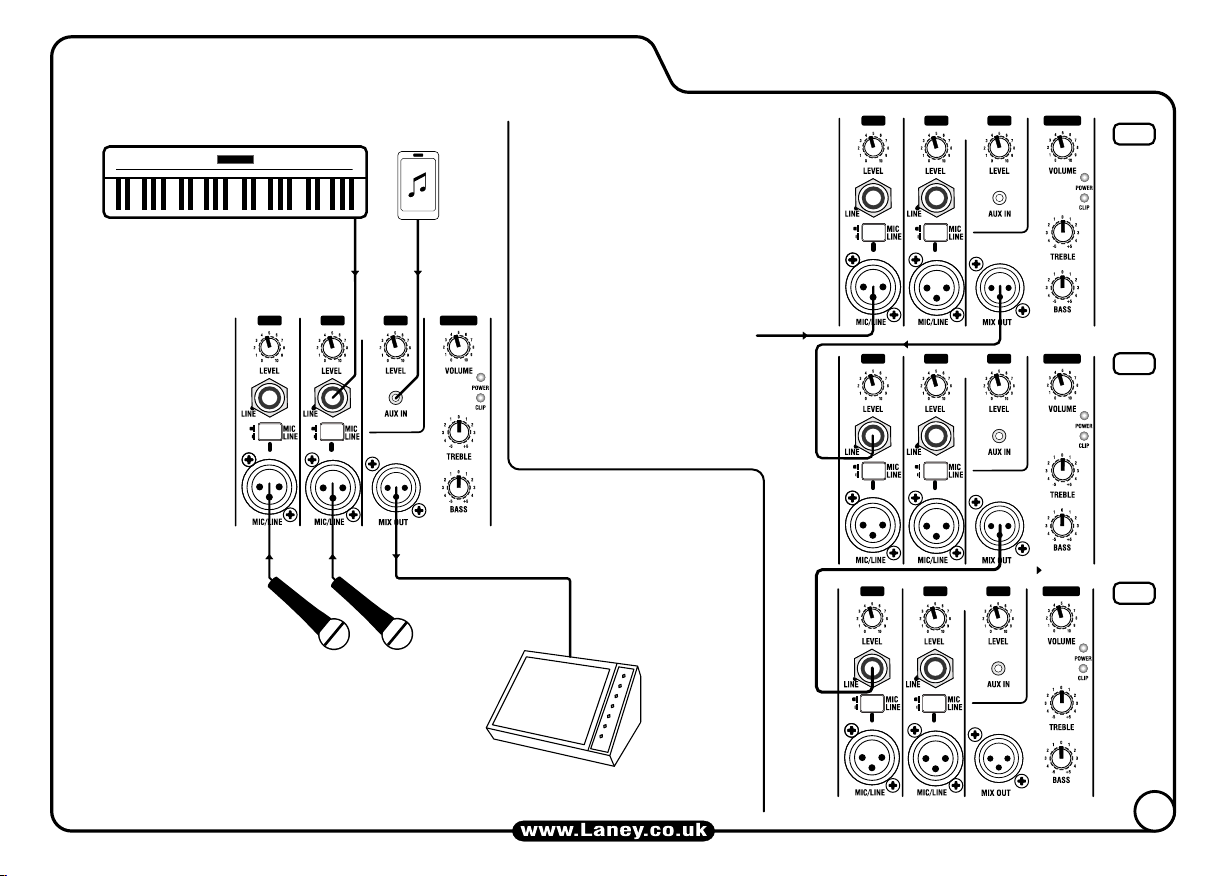
MIC: a balanced input for low level, low impedance devices eg. -mic (200-600 Ohms) or electro-acoustic
guitar.
LINE (via XLR Input): A balanced input for higher output line level devices eg. - keyboard/drum
machine.
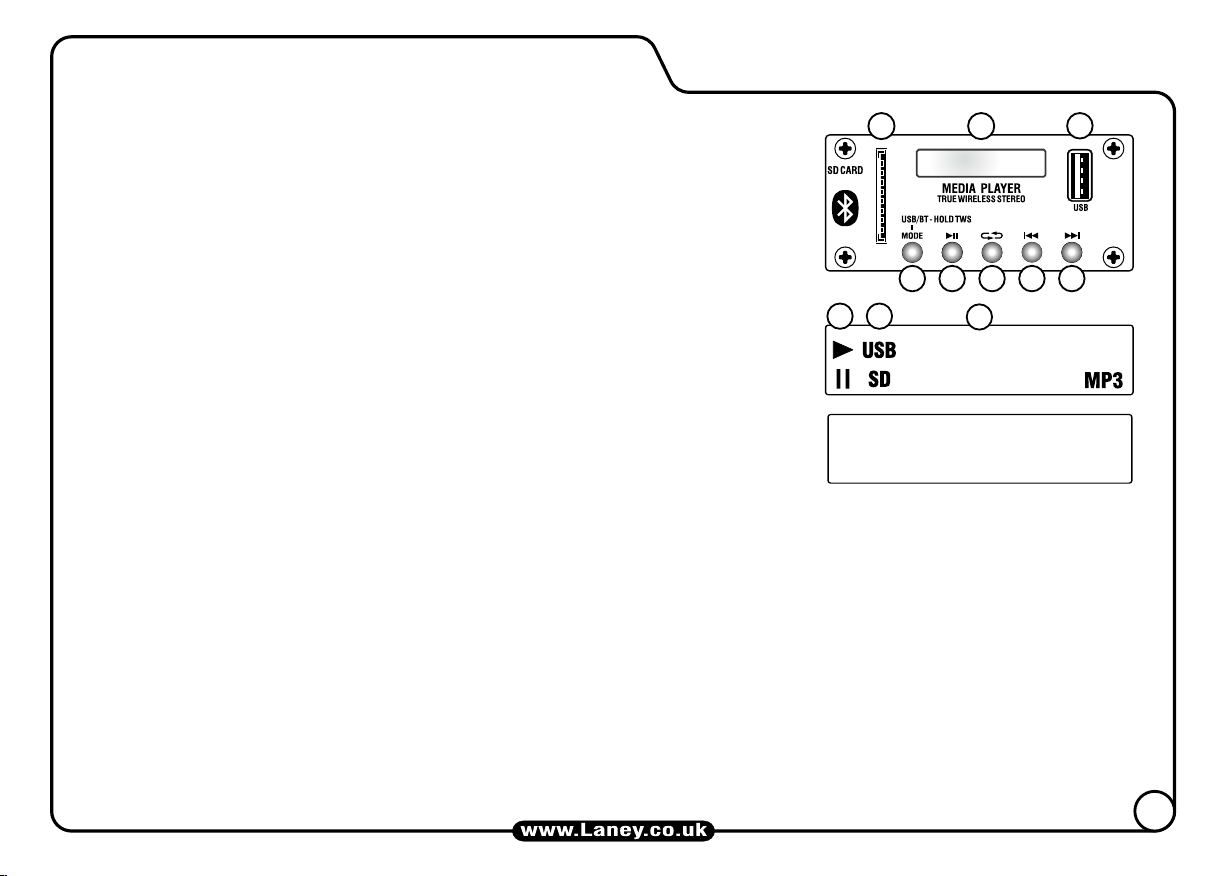
6. CH3 LEVEL: Use this control to adjust the level of the onboard USB/SD player or an external (line level)
signal feed connected to the AUX IN.
5/5a. MIC/LINE INPUT: Use the push button (5a) to switch the XLR Skt between:
4. LINE INPUT: An unbalanced input - for higher output line level devices eg. - keyboard, processor, drum
machine.
1/2. CH1 and CH2: Mono Input channels.
3. LEVEL: Use the Level control to set the channel volume.
7. AUX IN: This gives you the option to connect an additional line level device. Control the Level with CH3
Level control. Please use a stereo cable.
8. MIX OUT: A BALANCED signal feed that can be used to connect to a second Audiohub cab (daisy
chained - see page 8), active wedge monitor, house PA or mixing console for example.
9. POWER LED: This will illuminate when the unit is powered up. There is also a second power LED on the
front of the cab.
10. CLIP LED: Illuminates just before the amplifier begins to clip. Adjust the level controls and signal level
from your source so this illuminates only briefly on peaks in the music.
12. ACTIVE BASS and TREBLE: These controls allow you to boost or cut the low/high frequency
response of the Audiohub amplifier.
15. VOLTAGE SELECT SWITCH: Although every effort has been made to select the correct voltage for the region of use, please check before powering
up for the first time. Damage could occur if the voltage is incorrectly set. See page 9 for more information.
14. INFORMATION: Area relating to the amplifier: Serial Number, operational information, power
rating, etc.
17. MAINS INLET SOCKET AND FUSE: IEC input for connection of an appropriate mains lead. Only replace the fuse with the type indicated for your mains
voltage. See page 9 for more information.
13. HEAT SINK: Cooling fins for the amplifier. Do not obstruct.
16. MAINS SWITCH: Turns the system on and off. Ensure the Level/Volume controls are at minimum when switching on and off.
11. MASTER VOLUME: Controls the overall level of your Audiohub.
REAR PANEL CONTROLS
126
14
VOLTAGE SELECT
110-120V~ 220-240V~
DESIGNED AND ENGINEERED IN THE UK BY LANEY
CAUTION - RISK OF ELECTRIC SHOCK DO NOT OPEN
ATTENTION - LE RISQUE DE DÉCHARGE ÉLECTRIQUE NE S'OUAUDIOHUBNT PAS
CH 1 CH 2 CH 3 MASTER
11
12
99
10
13
8
5a
4
3
7
5
15 16 17
(AH115-G2 Panel shown)
4

5
MEDIA PLAYER CONTROLS
678
123
5
4
00:02
abc
BT
b. What device is being used: USB or SD Card.
d. Switching between a USB device and a Bluetooth device is possible, but the Bluetooth device will need to be re-selected by pressing the MODE button once.
1. SD CARD SLOT: Insert your standard SD card here.
ONE - Plays one track repeatedly (cycle to the required track to play using NEXT button (8).
FOD - Plays all track in the current active folder.
a. Play or Pause indicator.
d. “bt” is displayed when connecting to a Bluetooth Device.
5. PLAY/PAUSE: Use this control to play or pause your MP3 music/backing track.
NOTE. T he USB socket is for the playback of recorded tracks only, not for charging a USB device.
4. MODE: Select the input source - SD card USB, Bluetooth/TWS with two cabinets. See page 6 for more information.
Use the onboard player for playing MP3 encoded audio tracks from SD card/USB or Bluetooth® device.
(Automatically detected on insertion, or if removed and reinserted uses smart technology to resume play from the
previous point).
ALL - Plays all the tracks on the root of the device in date order, then the sub folders
7. PREVIOUS: Press to skip to the preceding track. A prolonged press will reduce the volume of the MP3 player.
3. MEMORY STICK SLOT: Connect your USB thumb drive here. If removed and reinserted, the system uses smart
technology to resume play from the previous point.
2. DISPLAY SCREEN: Display track information.
6. LOOP: Use this to enable/disable the looped playback modes. When using this button with an SD card or USB
thumb drive, there are 3 options:
8. NEXT: Press to skip to the next track. A prolonged press will increase the volume of the MP3 player.
c. Time into track.
CONNECT T O BLUETOOTH DEVICE:
a. Toggle through the system modes and select Bluetooth (using MODE switch (4)).
b. On your Bluetooth capable device, make sure Bluetooth is enabled. Scan down the list of available devices - search for: ‘Laney Audiohub’ and select.
c. Y our Audiohub enclosure is now connected to your Bluetooth device and controlled using the PLAY/PAUSE, PREVIOUS and NEXT BUTTONS.

TWS
1. Connect the Primary Audiohub cabinet to a Bluetooth capable device as explained on the previous page.
3. Once the connection has been established, the image (to the left) will appear on the display of both Primary
and Secondary cabinet.
SETTING UP THE CONNECTION
True Wireless Stereo is a feature that allows for the connection of two Audiohub cabinets to a Bluetooth capable device. The result is a true
stereo system via Bluetooth with the first AudioHub providing the left and the second providing the right portion of the stereo image.
2. Using the Mode switch, select the Bluetooth mode on the secondary cabinet, then hold the MODE switch
for a further 5 - 10 seconds, then release. BT will appear on the display of both cabinets (flashing on and off)
and indicates the TWS connection is in progress.
Bluetooth source PRIMARY AH cabinet SECONDARY AH cabinet
-BT-
BT
6

7
Music from the Media player.
Connection and control of a
Bluetooth device using the
Media player.
SOLO PERFORMANCE
DANCE CLASS
APPLICATIONS
CH 1 CH 2 CH 3 MASTER

8
DAISY CHAINING
Please note: If an additional audio feed is
connected to AH2, it will only be heard
from AH2 and AH3, NOT AH1.
Initially set CH1 LEVEL control for AH1to
zero.
Set the CH1 LEVEL for AH2 and AH3 to 5.
Slowly turn up the CH1 LEVEL control on
the AH1 to achieve the desired level.
A number of Audiohubs can be connected
in this way.
STAGE PERFORMANCE
AH1
AH2
AH3
CH 1 CH 2 CH 3 MASTER

Switch off and disconnect the power cord before proceeding.
FUSE REPLACEMENT AND VOLTAGE SELECTION
1.) Slide out the fuse holder tray.
2.) Only replace fuse with the same
type and power rating as specified
on the rear panel.
Using a suitable tool, slide the voltage selector switch to the required
operating voltage.
110-120V setting
VOLTAGE SELECT
110-120V~ 220-240V~
220-240V setting
VOLTAGE SELECT
110-120V~ 220-240V~
MIX OUT
GND
3.5MM STEREO JACK
GND
6.35MM UNBALANCED JACK
+(HOT) LEFT
RIGHT
BLOCK DIAGRAM
MIC
LINE
MIC
LINE
GND
6.35MM UNBALANCED JACK
+(HOT)
GND
3.5MM STEREO JACK
LEFT
RIGHT
1/O CONNECTOR
WIRING:
1 GROUND
2 HOT
3 COLD
1 GROUND
2 HOT
3 COLD
12
3
1
2
3
MALE
(FRONT VIEW) (REAR VIEW)
MALE
1
2
3
12
3
(FRONT VIEW) (REAR VIEW)
FEMALE FEMALE
9
MIC/LINE
INPUT
MIC/LINE
INPUT
CH1
Bluetooth

(Stand not included) 35mm pole cup
Thumb screw
POLE MOUNTING
Keep lights away from speakers; heat can cause fires / speaker damage.
Keep lighting cables away from ALL sound cables including mains, use separate circuit for lights if possible.
Don't over-extend poles/tripods; ensure at least 4 x the pole diameter is still inside the outer pole.
Make sure the legs have a good splay on tripods, but do not obstruct doorways or other access-ways.
Be aware of total power usage. Overloading a mains socket is potentially dangerous, and likely to cause a
power out during use.
All cabinets should be balanced and steady.
If a pole mount is used, make sure that the thumb screw on the cabinet is tight.
Don't run cables across access-ways; if you have to, run them above doors or use approved cable covers.
Keep power and signal cables apart.
10

11
SPECIFICATION: AH110-G2
Power Rating : 400W
Amplifier Type : Class A/B
Power Supply : Linear Toroidal PSU - Switchable Voltage
Features
Inputs :
2x balanced XLR with mic/line switch, 2x 6.3mm single ended jack inputs, 1x 3.5mm stereo jack in,
Media player with BT 4.1, USB and SD card
Outputs : Balanced XLR mix out.
Controls : CH1,2,3 Gain controls, Master 2 and EQ, Master Volume
Speaker
HF Driver : 1" Compression Driver
LF Driver : 10" Woofer
Coverage : 90°H X 40°V
Enclosure
Cabinet : Robust polypropylene cabinet with top handle and monitor angle
Finish : Black
Grille : Powdercoated steel
Other : 35mm Distance Pole
Unit dimensions (HWD) : 49 x 31.5 x 26.5 CM
19.3" x 12.4" x 10.4"
Unit weight : 6.75Kg, 14.9 lbs
Carton dimensions (HWD) : 55.5 x 37 x 30.5 CM
21.9" x 14.6" x 12" , 0.063 M3
Packed weight : 8.75Kg, 19.3 lbs
In the interest of continued development, Laney reserves the right to amend product specification without prior notification.

SPECIFICATION: AH112-G2
12
Power Rating : 800W
Amplifier Type : Class A/B
Power Supply : Linear Toroidal PSU - Switchable Voltage
Features
Inputs :
2x balanced XLR with mic/line switch, 2x 6.3mm single ended jack inputs, 1x 3.5mm stereo jack in,
Media player with BT 4.1, USB and SD card
Outputs : Balanced XLR mix out.
Controls : CH1,2,3 Gain controls, Master 2 and EQ, Master Volume
Speaker
HF Driver : 1" Compression Driver
LF Driver : 12" Woofer
Coverage : 90°H X 40°V
Enclosure
Cabinet : Robust polypropylene cabinet with three handles and monitor angle
Finish : Black
Grille : Powdercoated steel
Other : 35mm Distance Pole
Unit dimensions (HWD) : 58.5 x 37.5 x 31 CM
23" x 14.8" x 12.2"
Unit weight : 11.7Kg, 25.8 lbs
Carton dimensions (HWD) : 66 x 43.5 x 36 CM
26" x 17.1" x 14.2" , 0.103 M3
Packed weight : 12.7Kg, 28 lbs
In the interest of continued development, Laney reserves the right to amend product specification without prior notification.

13
SPECIFICATION: AH115-G2
Power Rating : 800W
Amplifier Type : Class A/B
Power Supply : Linear Toroidal PSU - Switchable Voltage
Features
Inputs :
2x balanced XLR with mic/line switch, 2x 6.3mm single ended jack inputs, 1x 3.5mm stereo jack in,
Media player with BT 4.1, USB and SD card
Outputs : Balanced XLR mix out.
Controls : CH1,2,3 Gain controls, Master 2 and EQ, Master Volume
Speaker
HF Driver : 1" Compression Driver
LF Driver : 12" Woofer
Coverage : 90°H X 40°V
Enclosure
Cabinet : Robust polypropylene cabinet with three handles and monitor angle
Finish : Black
Grille : Powdercoated steel
Other : 35mm Distance Pole
Unit dimensions (HWD) : 71.5 x 46.5 x 38 CM
28.1" x 18.3" x 15"
Unit weight : 13.5Kg, 29.8 lbs
Carton dimensions (HWD) : 74 x 48.5 x 40 CM
29.1" x 19.1" x 15.7" , 0.144 M3
Packed weight : 16.9Kg, 37.3 lbs
In the interest of continued development, Laney reserves the right to amend product specification without prior notification.

TRANSLATION
DOCUMENTS

126
14
VOLTAGE SELECT
110-120V~ 220-240V~
DESIGNED AND ENGINEERED IN THE UK BY LANEY
CAUTION - RISK OF ELECTRIC SHOCK DO NOT OPEN
ATTENTION - LE RISQUE DE DÉCHARGE ÉLECTRIQUE NE S'OUAUDIOHUBNT PAS
CH 1 CH 2 CH 3 MASTER
11
12
99
10
13
8
5a
4
3
7
5
15 16 17
(AH115-G2 Panel shown)
15
17. PRISE D'ALIMENTATION ET FUSIBLE: Prise IEC pour brancher le câble d'alimentation. Ne remplacez le fusible que par un fusible identique.
1/2. CH1 et CH2: Entrées mono.
5/5a. ENTRÉE MIC/LINE: Utilisez le bouton (5a) pour changer le mode d'entrée de la prise XLR :
MIC: Entrée symétrique pour instrument de bas niveau et basse impédance tel que micro (200-600 ohms)
ou guitare électro-acoustique.
LINE: (par entrée XLR) : Entrée symétrique pour instrument de niveau ligne élevé tel que clavier, boîte à
rythme.
6. CH3 LEVEL: Contrôle le niveau du lecteur SD/USB intégré ou de la source externe (niveau ligne)
branchée dans la prise AUX IN.
4. ENTRÉE LINE: Entrée asymétrique pour instruments de niveau ligne élevé tel que clavier,
synthétiseur, batterie électronique.
9. VOYANT POWER: Ce voyant s'allume lorsque l'appareil est en marche. Il y a un deuxième voyant à
l'avant de l'enceinte.
7. AUX IN: Entrée pour brancher une source externe supplémentaire de niveau ligne dont le niveau est
contrôlé par le bouton CH3 level. Veuillez utiliser un câble stéréo.
3. BOUTON LEVEL: Contrôle le niveau du canal correspondant.
8. MIX OUT: Sortie symétrique pour brancher une deuxième enceinte AH (liaison en série – voir page
8), un retour amplifié, une table de mixage ou un enregistreur par exemple.
10. VOYANT CLIP: Ce voyant s'allume juste avant que l'ampli commence à écrêter. Ajustez les
contrôles de niveau et le niveau de vos sources pour que ce voyant ne s'allume que brièvement lors des
pics de volume.
12. RÉGLAGES BASS ET TREBLE: Ces contrôles actifs permettent d'accentuer ou de diminuer les
fréquences graves/élevées de l'ampli.
13. REFROIDISSEUR: Ailettes du refroidisseur de l'amplificateur. Veuillez ne pas les obstruer.
14. INFORMATION: Endroit réservé aux données de l'ampli : numéro de série, information d'alimentation et de puissance, etc.
11. VOLUME MASTER: Contrôle le volume général de votre enceinte AH.
15. SÉLECTEUR DE TENSION: Bien que tous les efforts aient été faits pour que la tension soit réglée sur celle de votre région, veuillez la vérifier
avant la première mise en marche. Des dégâts peuvent être occasionnés si la tension n'est pas réglée correctement. Consultez la page 17 pour avoir plus
d'information.
16. INTERRUPTEUR PRINCIPAL: Permet de mettre le système en marche et de l'arrêter. Assurez-vous que les contrôles de niveau sont au minimum
lors de la mise sous/hors tension.
FR
PANNEAU DE COMMANDE FR

678
123
5
4
00:02
abc
BT
b. Cual dispositivo de encuentra en uso: USB o SD.
1. TARJETAS SD: Inserir una tarjeta SD normal en este receptáculo.
Use el reproductor de medios incluido para reproducir contenido con codificación MP3 desde una tarjeta SD,
pendrive o disco USB o dispositivo Bluetooth®.
(La reproducción de la tarjeta viene con tecnología inteligente que de forma automática detecta la tarjeta al ser
inserida, o si removida y re inserida, cuando vuelve a reproducir desde el punto anterior).
2. TELA DEL MOSTRADOR: Muestra la información de pistas tocando.
a. Indicador Play o Pause.
c. Tiempo de la pista.
d. Se muestra “bt” cuando conectado a un dispositivo Bluetooth.
3. RECEPTACULO PARA MEMORY STICK: Conecte su pendrive USB aquí. Lo mismo que la tarjeta SD,
reproduce desde el último punto caso removido y re inserido.
NOTA: El conector USB es apenas para la reproducción de músicas gravadas y no para carga de dispositivos
USB.
4. MODO: Selecciona la Fuente de entrada – Tarjeta SD, USB, Bluetooth y la función TWS cuando en dos
gabinetes.
5. PLAY/PAUSE: Use este control para reproducir o pausar su música MP3 o de fondo.
6. LOOP: Use esta función para habilitar/deshabilitar los modos de reproducción en Loop. Al usar este control con tarjetas SD o medios USB, existen 3
opciones:
ALL – Toca todas las músicas en el archivo raíz del dispositivo y en orden cronológica, después toca los sub-archivos.
ONE – Toca una música de manera repetida (elija la música usando el botón NEXT (8).
FOD – Toca todas las músicas en el fichero activo.
7. PREVIOUS: Presione para volver a la música anterior. Apretando y atajando de forma prolongada reduce el volumen del reproductor Mp3.
CONEXIÓN AL DISPOSITIVO BLUETOOTH:
a. Navegue por los modos del Sistema y seleccione Bluetooth (usando el botón MODE (4)).
b. En su dispositivo Bluetooth, observe que la capacidad Bluetooth se encuentre habilitada. Vea en la lista de dispositivos disponibles – o busque por: ‘Laney
Audiohub’ y la seleccione.
c. El Sistema Laney Audiohub se encuentra ahora conectado a su dispositivo Bluetooth y puede ser controlado usando los comandos de PLAY/PAUSE,
PREVIOUS y NEXT.
d. Elegir entre un reproductor USB o Bluetooth es posible, pero el dispositivo Bluetooth deberá ser re seleccionado con un toque en el botón MODE.
8. NEXT: Presione para saltar a la música siguiente. Apretando y atajando de forma prolongada aumenta el volumen del reproductor MP3.
FR
16

2. Sur l'enceinte secondaire, à l'aide du bouton MODE, sélectionnez le mode BlueTooth, puis maintenez enfoncé le bouton MODE pendant 5 à 10
secondes et relâchez-le. Le sigle BT clignote sur l'afficheur des deux enceintes, indiquant que la connexion TWS est en cours.
1. Connectez l'enceinte AH primaire à un appareil BlueTooth comme décrit dans la page précédente.
True Wireless Stereo (véritable stéréo sans fil) est une fonction qui permet la connexion de deux enceintes AH à un appareil BlueTooth. Le résultat est
un système en véritable stéréo par BlueTooth, la première enceinte AH émettant le canal gauche et la deuxième enceinte AH émettant le canal droit
de l'image stéréo.
RÉGLAGE DE LA CONNEXION
3. Lorsque la liaison est établie, l'image (à gauche) apparaît sur les afficheurs des deux enceintes primaire et secondaire.
FUENTE BLUETOOT GABINETE AH PRIMARIO
-BT-
BT
Arrêter l'appareil et débrancher le câble d'alimentation
avant d'effectuer la manipulation. 110-120V setting
VOLTAGE SELECT
110-120V~ 220-240V~
220-240V setting
VOLTAGE SELECT
110-120V~ 220-240V~
REMPLACEMENT DU FUSIBLE
SÉLECTEUR DE TENSION
A l'aide d'un outil adéquat, glissez le sélecteur
de tension dans la position appropriée.
1. Tirez le tiroir du porte-fusible.
2. Ne remplacez le fusible que par le même type
et le même calibre indiqué sur le panneau
arrière.
GABINETE AH SECUNDARIO
FR
TWS
17

1/2. ENTRADA DE CANALES CH1 y CH2: Canales de entrada tipo Monofónicas.
4. ENTRADA LINE: Una entrada No balanceada – para dispositivos con niveles más altos –
teclados, batería electrónicas, procesadores, etc.
9. INDICADOR LED de POWER: Este indicador en LED se ilumina para mostrar que la unidad se
encuentra encendida. Un segundo indicador LED se encuentra al frente del gabinete.
11. MASTER VOLUME: Controla el volume general de su gabinete AH.
12. Controles Activos BASS y TREBLE: Estos controles permiten ajustar la ecualización y
respuesta de frecuencias bajas y altas del sistema.
14. INFORMACIÓN: Área relativa al amplificador: Numero Serial, información operacional, info de potencia, etc.
LINE (por la entrada XLR): Una entrada balanceada para niveles e impedancias más altas. – teclados,
Bat. Elect. etc.
7. AUX IN: Esta entrada permite conectar un dispositivo de línea opcional. Controle el nivel con el
control CH3 Level. Por favor, use un cable estéreo.
MIC: Entrada balanceada de micrófono de nivel bajo y baja impedancia. -micrófonos (200-600 Ohms) o
guitarras electroacústicas.
8. MIX OUT: Una salida BALANCEADA que se puede usar para conectar otros gabinetes AH
(conexión en cadena – vea la página 8), un monitor activo de suelo, conectar al PA o consola de
grabación, entre otros.
10. INDICADOR LED de CLIP: Se ilumina un poco antes de que el amplificador se sobrecargue.
Ajuste el nivel con los controles y en la fuente del sonido para que este indicador se prenda muy
ocasionalmente durante la operación. Lo ideal es que se ajusten los niveles de manera que esto no se
prenda.
6. CH3 LEVEL: Use este control para ajustar el nivel del reproductor de medios interno o la señal
(línea) proveniente del conector de entrada AUX IN.
13. REJAS de ENFRIAMIENTO: Aletas de refrigeración para el amplificador. Nunca las cubra.
15. SELECTOR DE VOLTAJE: AA pesar de todo el esfuerzo para que cada región ya tenga su voltaje correcto, siempre observe este selector antes
de prender por la primera vez. Daños pueden ocurrir si este ajuste se encuentra incorrecto. Vea la página 20 para mayores informaciones.
5/5a. ENTRADA MIC/LINE: Use el botón de empuje (5a) para seleccionar este conector XLR
entre:
3. LEVEL: Use este control para ajustar el volumen del canal.
16. BOTÓN MAINS: Prende y apaga el sistema. Siempre observe que los controles de nivel se encuentren al mínimo antes de prender el equipo.
17. COMPARTIMIENTO DEL FUSIBLE Y CONECTOR DEL CABLE: Entrada tipo IEC para la conexión de cable compatible.
REAR PANEL CONTROLS
126
14
VOLTAGE SELECT
110-120V~ 220-240V~
DESIGNED AND ENGINEERED IN THE UK BY LANEY
CAUTION - RISK OF ELECTRIC SHOCK DO NOT OPEN
ATTENTION - LE RISQUE DE DÉCHARGE ÉLECTRIQUE NE S'OUAUDIOHUBNT PAS
CH 1 CH 2 CH 3 MASTER
11
12
99
10
13
8
5a
4
3
7
5
15 16 17
(AH115-G2 Panel shown)
ES
18

1. TARJETAS SD: Inserir una tarjeta SD normal en este receptáculo.
NOTA: El conector USB es apenas para la reproducción de músicas gravadas y no para carga de dispositivos
USB.
4. MODO: Selecciona la Fuente de entrada – Tarjeta SD, USB, Bluetooth y la función TWS cuando en dos
gabinetes.
Use el reproductor de medios incluido para reproducir contenido con codificación MP3 desde una tarjeta SD,
pendrive o disco USB o dispositivo Bluetooth®.
(La reproducción de la tarjeta viene con tecnología inteligente que de forma automática detecta la tarjeta al
ser inserida, o si removida y re inserida, cuando vuelve a reproducir desde el punto anterior).
2. TELA DEL MOSTRADOR: Muestra la información de pistas tocando.
b. Cual dispositivo de encuentra en uso: USB o SD.
a. Indicador Play o Pause.
d. Se muestra “bt” cuando conectado a un dispositivo Bluetooth.
c. Tiempo de la pista.
3. RECEPTACULO PARA MEMORY STICK: Conecte su pendrive USB aquí. Lo mismo que la tarjeta
SD, reproduce desde el último punto caso removido y re inserido.
5. PLAY/PAUSE: Use este control para reproducir o pausar su música MP3 o de fondo.
6. LOOP: Use esta función para habilitar/deshabilitar los modos de reproducción en Loop. Al usar este control con tarjetas SD o medios USB, existen 3 opciones:
ALL – Toca todas las músicas en el archivo raíz del dispositivo y en orden cronológica, después toca los sub-archivos.
ONE – Toca una música de manera repetida (elija la música usando el botón NEXT (8).
FOD – Toca todas las músicas en el fichero activo.
7. PREVIOUS: Presione para volver a la música anterior. Apretando y atajando de forma prolongada reduce el volumen del reproductor Mp3.
8. NEXT: Presione para saltar a la música siguiente. Apretando y atajando de forma prolongada aumenta el volumen del reproductor MP3.
CONEXIÓN AL DISPOSITIVO BLUETOOTH:
a. Navegue por los modos del Sistema y seleccione Bluetooth (usando el botón MODE (4)).
c. El Sistema Laney Audiohub se encuentra ahora conectado a su dispositivo Bluetooth y puede ser controlado usando los comandos de PLAY/PAUSE, PREVIOUS y
NEXT.
b. En su dispositivo Bluetooth, observe que la capacidad Bluetooth se encuentre habilitada. Vea en la lista de dispositivos disponibles – o busque por: ‘Laney
Audiohub’ y la seleccione.
d. Elegir entre un reproductor USB o Bluetooth es posible, pero el dispositivo Bluetooth deberá ser re seleccionado con un toque en el botón MODE.
678
123
5
4
00:02
abc
BT
ES
REPRODUCTOR DE MEDIOS
19

El sistema de Estéreo Inalámbrico Real (True Wireless Stereo) es un recurso que permite conectar dos gabinetes AH a un único dispositivo Bluetooth.
El resultado es que se crea un sistema estéreo real vía Bluetooth, con la primera AH tocando el contenido del canal izquierdo y la segunda AH
tocando el contenido del canal derecho de la música en imagen estéreo.
AJUSTANDO LAS CONEXIONES
1. Conecte el gabinete AH Primario a un reproductor Bluetooth como mostrado en la página anterior.
2. Usando el botón MODE, elija Bluetooth en el gabinete SECUNDARIO, y entonces apriete y ataje el botón MODE por 5 a 10 segundos más, y
suelte. BT debe aparecer en el mostrador de los dos gabinetes
(parpadeando entre On y Off) indicando que la función TWS se encuentra en progreso.
3. Una vez que la conexión sea obtenida, la imagen (a la izquierda) será mostrada en el mostrador de los dos gabinetes.
FUENTE BLUETOOT GABINETE AH PRIMARIO
-BT-
BT
Antes de prosseguir, desligue o aparelho e retire o cabo de força.
110-120V setting
VOLTAGE SELECT
110-120V~ 220-240V~
220-240V setting
VOLTAGE SELECT
110-120V~ 220-240V~
SUBSTITUIÇÃO DO FUSÍVEL
SELECIONANDO A VOLTAGEM
Usando uma ferramenta apropriada, deslize a chave seletora
de voltagem para a voltagem de operação requerida.
1. Deslize a bandeja que segura o fusível.
2. Somente substitua o fusível por outro
do mesmo tipo e especificação, conforme
indicado no painel traseiro.
GABINETE AH SECUNDARIO
2020
ES
This manual suits for next models
3
Table of contents
Languages:
Other Laney Speakers manuals

Laney
Laney LionHeart LT112 User manual

Laney
Laney CT10 User manual

Laney
Laney Lionheart L412 User manual

Laney
Laney Concept CP10-II User manual

Laney
Laney NX115 User manual

Laney
Laney Audiohub Venue AH2500D User manual

Laney
Laney CX10 User manual

Laney
Laney AH4X4 User manual

Laney
Laney CXP-110 User manual

Laney
Laney CXP-110 User manual